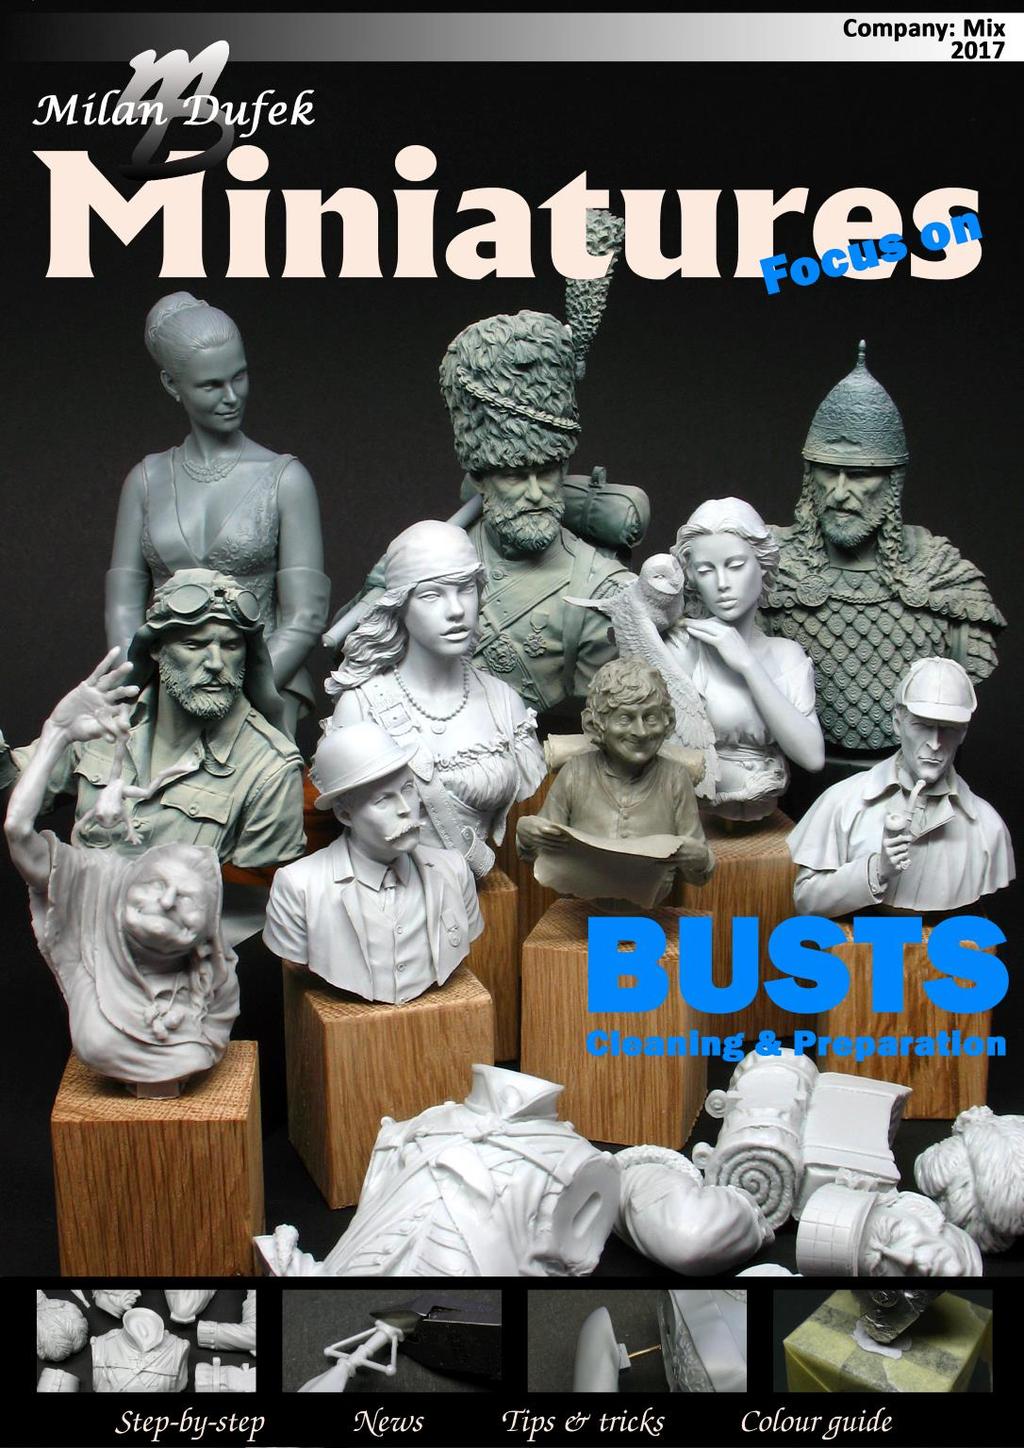
Focus on 1 COPYRIGHT Milan TAIKO Dufek
|
|
|
- Jasper Gregory
- 5 years ago
- Views:
Transcription
1


2 So what Wiki tells us about Bust Bust is a sculpted or cast representation of the upper part of the human figure, depicting a person's head and neck, and a variable portion of the chest and shoulders, usually located on the base. Bust is usually made from marble, bronze or other durable material. Even in our figure s world, we meet the designation Bust. Here, however, this designation is not so strictly limited, and we can see different busts. Often, however, it is not a bust, but rather a half-figure. Here we can find the standard look of the bust. As one hand bust as two hands bust will still fall into the "bust" category. No matter what bust will, preparation will always be the same. Focus on 1 COPYRIGHT Milan TAIKO Dufek


3 I unpack the model box and check the content. I will also check the number of parts and their quality, or damage. It may happen that some parts are missing or very damaged, broken, unkempt, etc. It has only happened to me once. Do not be afraid to contact the manufacture of the bust. Damaged parts will usually replaced from the manufacturer. Nowadays, bust are casted from resin or metal. Metal models are more and more extruded by resin to reduce costs. Resin beautifully copies the details, but unfortunately it is very fragile. Metal is harder, but durable. Personally, I would imagine a bust, where large parts such as a torso, hands or head were cast from resin, and small parts like feathers, parts of weapons or ornaments were cast from metal. Focus on 2 COPYRIGHT Milan TAIKO Dufek


4 As I mentioned earlier, the busts are casted. Therefore, we can find a dividing plane, larger bends or surface inequalities on all parts. All this must be removed. My usual working tools are: scalpel with interchangeable tips, various shapes of rasper, model pliers and a razor blade. Focus on 3 COPYRIGHT Milan TAIKO Dufek


5 I remove larger casting extensions with a razor blade. It could be tedious and lengthy, but all the time I have the model and the saw under control. When using modeling pliers, it may happen, I split a piece of the model and that would be a shame. That's the reason why I use the pliers at least. However, may suit somebody. I remove the rough parts by scalpel then and dividing plane on the model by file. I do not use any electric tools. I do not have complete manage my work and any errors are very hard to fix. Focus on 4 COPYRIGHT Milan TAIKO Dufek


6 I have all parts cleaned and now I have to stuck together. Before it, I have to consolidate it. The consolidating of the model is called "pinning". This means, all the parts which to be glued, I will drill a hole and insert a piece of metal wire. This wire, together with the glue, will guarantee a strong connection. I use a hand drill and various sizes of drills for drilling. Again, I do not use an electric drill. I do not have complete manage my work and any errors are very hard to fix. I usually drill 1-2 holes. It depends on the size of the part and size of the area where it will be drilled. The paper clips are me favorite wire. I must also remember that the model will attached to the wooden base. In this case, I use a stronger wire. I glued all the parts together by canoacrylate glue and then glued by two-component glue to the wooden base. I need a really strong connection that will keep a trips to the exhibitions. Focus on 5 COPYRIGHT Milan TAIKO Dufek
. I put a piece of Tack-It (2).")
.")
. I drill a hole (8).")
7 There is a little trick how to drill opposed hole in the exact location. I take parts where I need to drill a opposed hole (1). I put a piece of Tack-It (2). Thepush it till does not fall out (3). Attach the part with the already drilled hole and push slightly together (4.). A fingerprint from the enclosed part (5.) appears in the Tack-It mass. Use a needle to mark the location where it will be drilled (6 and 7). I drill a hole (8). Insert a metal wire and adjust its length (9). I fit parts together and just gluing (10). Focus on 6 COPYRIGHT Milan TAIKO Dufek


8 Occasionally, some parts do not fit exactly at each other. There is a gap between them and the adhesive surface is too small, insufficient. In this case I use the twocomponent Magic Sculpt to fill the cavities. I ruddle the second part by water or linseed oil to keep the sealant on the part, and push both parts together. I remove extruded sealant and divide the parts. I keep out of the bust to next day to dry. Thanks to the sealant, the adhesive surface is increased. Focus on 7 COPYRIGHT Milan TAIKO Dufek


9 Another way how to mark opposite hole is by oil paint. First, we will drill the holes into first part. By toothpick and oil paint, we mark both drilled holes. We push two parts together. The oil paint will transferred to the second piece and marks the place, where we will drill. Then just drill the holes, insert the wires, and gluing two parts together. Focus on 8 COPYRIGHT Milan TAIKO Dufek


10 In some cases, the bust is glued straight to the wooden pedestal. More often, a resin piece to be attached to the bust and then blued to the wooden pedestal. I personally cut off these block and use only a small piece of them. I like it more. Before I start to complete the bust together, I check if I get a paintbrush to all places. In some cases, I paint parts separately. Therefore, have to be everything prepared perfectly efore, so that there is no error when gluing. Focus on 9 COPYRIGHT Milan TAIKO Dufek


11 After completing the bust, I will check the connectioins and repair the gaps. I use double-component Magic Sculpt for repairing. The mixing ratio is 50:50 (Magic Sculpt:Water). Works very well. The corrected passing is smoothed with a wet brush or by a file after hardening. What base to choose? That s a question. Personally, I choose several pieces of pedestals from my stock which could be used and putting them in one row. Then I will attach the bust to each pedestal and evaluate. Gradually I take off one by one and finally I have the one, I like the most. I choose by feeling and overall appearance. Focus on 10 COPYRIGHT Milan TAIKO Dufek


12 When I have the bust ready-made and glued to the wooden base, it's time to take a spray gun or spray in my hand. Even as, the last step before painting, it is to protect the base from dirt or damage during painting. For this purpose, I'm using a glue tape that I will cover the base. The remaining parts cover Tack-It. It's time to start the compressor and shake the spray. I used a white spray at first, but I switched to a spray gun and white color. Not only did, my favorite base Citadel s spray sneak so was unbearable, but I also had to go to the balcony. Now I can handle everything at my desk. Base color will unify the surface of the model and show any errors that we have overlooked before. I remove errors and repaint them again by basic white color, if I find such mistakes. The color property is, that it highlights any surface roughness on the model. I have seen some beautifully painted models where was a small dividing plane or a poorly repaired surface. This reduce the overall impression of the model at all. Focus on 11 COPYRIGHT Milan TAIKO Dufek


13 As the last step before the painting of the model, is pre-shading. For this purpose I use dark blue and beige colors from Tamiya. I spray the model from the bottom with a dark blue color and then a beige color from the top by a spray gun. It's better to do it this way, because I'm getting access into poorly accessible places. I also tried black-and-white pre-shading, but there was too much contrast. This combination suits me and do my work easier on the next steps. In this article I described How to prepare the bust before painting. I believe, this article will help beginners to prepare the model well and advanced ones found some new tricks. Personally, I consider, that preparing the bust is very important step before painting. Do not underestimate it. Focus on 12 COPYRIGHT Milan TAIKO Dufek
First steps. I divided the bust into three parts for better painting; the head, the cap and the body of the model, which I glued on the wood base.
 First steps I bought this model in 2011 when I was at a foreign competition. I hadn t painted busts by that time. I had always a respect to it. There is much skin colour on the face, everything is large
3Position the hull of the ship as
 Yamato: Step-by-step 25 The hull and stern deck c b d a b d c e e f a Rear frame b Stern deck x 2 c Stern deck x 2 d Side wall x 2 Wood glue Sandpaper (no. 400 grain) Craft knife Pliers d Side wall x 2
Lots of paints Several brushes from 000 to? Exacto knife. 200 grit sandpaper Bel-Decal Sheets Spray Primer
 Tools Lots of paints Several brushes from 000 to? Exacto knife 200 grit sandpaper Bel-Decal Sheets Spray Primer Brass Rod and a Drill bit that matches Super Glue Sculpy Putty the same size 3/16 suggested
4Wrap piece 7 around a rod. 5Remove piece 7 from the. 6Close up the join in both
 Yamato: Step-by-step 193 Parts of the command bridge and sides a b c d g e a Bow fairlead b Anchor x 2 c Machine-gun firing control mechanism x 2 d Base of machine-gun fire control mechanism x 2 e Launch
1Take the keel (3) and
 and") 1 The hull and the bridge 1Take the keel (3) and apply PVA wood glue in the second slot from the left: a toothpick may make it easier. Take care: the left end is the one that has a projection. THE HULL
1 The hull and the bridge 1Take the keel (3) and apply PVA wood glue in the second slot from the left: a toothpick may make it easier. Take care: the left end is the one that has a projection. THE HULL
3Insert the second rod no. 4
 Yamato: Step-by-step 37 The stern block and searchlight control towers a b c d e f Recommended tools and materials Wood glue Sandpaper (no. 800 grain) Metal file Putty Craft knife For metal: Super Glue
1Use the metal file to smooth
 Yamato: Step-by-step 85 Parts of the bridge and the hull a b c d e f a Part of the bridge b Part of the bridge c Part of the bridge d Radar x 2 e Part of the bridge x 2 f Wire Recommended tools and materials
Rosalina Accessories Tutorial Version March 2011 Martyn
 Rosalina Accessories Tutorial Version 1.0 - March 2011 Martyn Star Brooch Feel free to experiment with these dimensions, you should make a template you are happy with, the method still works. 1) Creating
Tips & Tricks using Part 12
 Tips & Tricks using Part 12 How to Use Mold #164...1 Painting Small Parts...3 Floor Tile Patterns...5 Tips & Tricks using Bruce Hirst Part 12 Page i How to Use Mold #164 1. The round connector block mold
4-H Model Building. Monroe County. Grades 3-12
 4-H Model Building Monroe County Grades 3-12 PURPOSE Positive development of our young people through the stimulation of their personal interest and natural skills through the assembly, techniques of construction,
Building the Circular Tower
 Building the Circular Tower You will need to fill this mold 18 times to have enough blocks to build the circular tower. Be sure the blocks are completely dry before gluing them together. For detailed instructions
Block Sanding Primer Dos and Don ts Transcript
 Block Sanding Primer Dos and Don ts Transcript Hey, this is Donnie Smith. And welcome to this lesson on block sanding primer. In this lesson, we're going to give you some of the do's and some of the don
Pump Assembly. Lloyd Matthews September 2013
 Pump Assembly Lloyd Matthews September 2013 Before proceeding with this part of the build, the author recommends that Pt. No 227 1 mm diameter Brass Wire Figure H1, is replaced with 0.8 mm straight brass
LAPORTE COUNTY 4-H MODEL PROJECT
 LAPORTE COUNTY 4-H MODEL PROJECT I. PURPOSE This project is designed to provide members with an opportunity to be creative and to familiarize them with the techniques of assembly, construction and painting.
Nanton Grain Mill Assembly
 ( 1 ) Nanton Grain Mill Assembly Locate package for assembling storage building. These are cut from 1/8 masonite. Inspect and lightly sand edges where it will be bonded. Use white glue or CA glue to bond.
Working with Resin Models
 Working with Resin Models This article will run through the basic techniques and methods required to get the most out of preparing, cleaning up and assembling Forge World s resin kits. If you need extra
1Smooth pieces 4, 5 and 6, using
 Yamato: Step-by-step 109 Machine-guns, anti-aircraft guns and decking h e f a b c g d e f a Anti-aircraft gun base x 2 b Anti-aircraft gun (bottom) x 2 c Anti-aircraft gun (top) x 2 d Machine-gun base
Copyright 1998 KDE Technologies
 Modular Computer Corner Desk Unit Copyright 1998 KDE Technologies http://members.tripod.com/~kdetech/ 1. Introduction 2. Plans Sheet one - Isometric Sheet two - Top Detail / Corner Unit Sheet three - Leg
Ask your DIY store or carpenter to cut the required boards to size. Instructions. 1. Cut out the opening for the bottles
 KITCHEN TROLLEY Next time you're whipping up some magic in the kitchen, take advantage of our willing assistant. Fixed on rollers to provide easy mobility, our kitchen trolley can be stationed wherever
Adhesives - Worksheet
 Adhesives - Worksheet By: Louise Lopes based on the Workshop Investigation of Ian Bentley Introduction: This is one sticky situation! Glues and adhesives are a common part of everyday life. We use them
Transfer an Image to Drawing Paper
 Level: Beginner to Advanced Flesch-Kincaid Grade Level: 8.4 Flesch-Kincaid Reading Ease: 64.6 Drawspace Curriculum 1.2.A5 6 Pages and 4 Illustrations Transfer an Image to Drawing Paper A three-step process
Plastic Welding Experiences
 Plastic Welding Experiences In the past I have advocated plastic solvent welding with ABS solvent to rejoin ABS plastic parts without repainting. Solvent is inexpensive but it does takes considerable time
Hardware Cabinet. Part 3
 Hardware Cabinet Part 3 The vertical dividers are the next task on the cabinet and a bit of a trick to get right. The horizontal dividers are only ½ thick pine spanning the 31 width of the cabinet and
Grade 11 Woods Lift Lid Coffee Table. Based on Under the big Top from Popular Mechanics Website
 Grade 11 Woods Lift Lid Coffee Table Based on Under the big Top from Popular Mechanics Website TABLE TOP 1. Select enough lumber to construct a top that is between 22 ½ and 24 wide after jointing. Ensure
Building Tips This model can be built using the following types of adhesives:
 Page 1 Building Tips This model can be built using the following types of adhesives: Epoxy (with or without microballons) Odorless cyanoacrylate (CA) with accelerator UHU Creativ for Styrofoam (or UHU
Beyond Rubber: Unique Techniques Your Own Stamps
 Beyond Rubber: Unique Techniques for or Making M Your Own Stamps There are many materials you can carve in order to make your own rubber stamps to use in décor projects. Popular materials include erasers,
Tools and Tips: ( 1 )
") Tools and Tips: As you build instructions will show in my many picture manual how to assemble. You can use your own methods as you desire, my results are very good. A smooth, flat work surface is very
Tools and Tips: As you build instructions will show in my many picture manual how to assemble. You can use your own methods as you desire, my results are very good. A smooth, flat work surface is very
Al & Gary's Illusionist Heart
 Al & Gary's Illusionist Heart Plans and Instructions by: Albert Herwig and Gary A. Emerich Al & Gary's Illusionist Heart As Al Would Say: It's a pendant Now it's a heart Our pictures are in there My children'
Shoulder Plane. dovetailed. fine tools. Make an heirloom tool and learn the secret to creating double dovetails in metal it s easier than you think.
 fine tools dovetailed Shoulder Plane Make an heirloom tool and learn the secret to creating double dovetails in metal it s easier than you think. I ve always been fascinated by old, metal hand planes.
Robert Bosch GmbH. Wall organiser
 Wall organiser The organisational talent Wall organiser Say goodbye to messiness! The wall organiser is the ideal place to store everything that tends to lie around. 1 Introduction Wardrobes, drawers and
Building the Cathedral
 Building the Cathedral Please note that the cathedral is a fairly difficult and time consuming project. I strongly suggest building one or two easier models before tackling this one! Four molds are needed
T-Top Headliner Repair Guide With detailed instructions
 T-Top Headliner Repair Guide With detailed instructions Supplies: Fabric: 1 ¼ yards will do -You can use any kind of fabric you want. Some fabrics will be harder to install than others. I d highly recommend
PRIVACY FENCE WITH SCALLOPED PICKET INSTALL INSTRUCTIONS
 PRIVACY FENCE WITH SCALLOPED PICKET INSTALL INSTRUCTIONS These instructions are to be used as general guidelines for the installation of your vinyl fence under normal installation conditions. Local conditions
Sky-in-a-Box Instructions
 Strand 1 Activity 7 The Shifting Stars Sky-in-a-Box Instructions Large or Small? The Sky-in-a-Box designs are provided ready to print on A4 or US Letter size paper. Used at this size they will require
San Felipe: Step by Step Pack 3
 Pack 3 Your parts Bulwarks Gun port covers x 2 Tools and equipment Wood glue Sandpaper Brushes Wood stain Hammer Pin pusher/nails Razor saw a Remove the longer bulwark and test-fit it in place at the bow
PRIVACY FENCE WITH LATTICE INSTALLATION INSTRUCTIONS
 PRIVACY FENCE WITH LATTICE INSTALLATION INSTRUCTIONS These instructions are to be used as general guidelines for the installation of your vinyl fence under normal installation conditions. Local conditions
January Instructions Willem van Aelst Study 2008 David Jansen. For the Video Link, Please see Page 3
 January Instructions Willem van Aelst Study 2008 David Jansen For the Video Link, Please see Page 3 Historical Information To start the painting we first need to establish the Ground. The ground is the
ParkJet Builder s Manual
 ParkJet Builder s Manual Thank you for purchasing the ParkJet. The ParkJet is a profile ducted fan airplane that can be flown in a larger park. The ParkJet was initially designed by Scott Stoops and modified
Tips & Tricks using Part 24
 Tips & Tricks using Part 24 Finishing the River Sections... 2 Making Tentacles... 4 Making Fish... 6 Adding the Water... 8 Making the Plank Bridge... 13 Making Crystal Piles... 15 Finishing Various Accessories...
Building the Bell Tower
 Building the Bell Tower Mold #55 does not contain all of the blocks to build this tower. You will need extra regular blocks (1/2" x 1/2" x 1") and square blocks (1/2" x 1/2" x 1/2"). These blocks can be
Hotel Belvedere Instructions for Assembly of the HO scale kit. v1.1
 Hotel Belvedere Instructions for Assembly of the HO scale kit. v1.1 Kit Contents: 319 ea. laser cut.090" acrylic parts. 132 ea. laser cut.060" acrylic parts. 8 ea. window glass templates 8 ea. window glazing
Cockpit Kit. Full Depth - Builds Quickly - Light Weight READ THROUGH THIS INSTRUCTION MANUAL FIRST. IT CONTAINS IM- laser cut wood kit
 The Savage Light Sukhoi Su- 27 Cockpit Kit contains everything you need to build a full depth semi scale Su-27 cockpit, yet adds less than an ounce to your finished model s weight (not including pilot).
WESTERN PISTOL.22 CALIBER SINGLE SHOT. Entire pamphlet Copyrighted by JACO Designs 1972
 WESTERN PISTOL.22 CALIBER SINGLE SHOT Entire pamphlet Copyrighted by JACO Designs 1972 This pamphlet contains the plans and instructions necessary to construct the Western pistol. This pistol breaks open
The Gothic Chess Set
 The Gothic Chess Set Please note that this chess set is a fairly difficult and time consuming project. I strongly suggest building one or two easier models before tackling this one! The miniatures used
Focus on 1 COPYRIGHT Milan TAIKO Dufek
 The eye is probably the most catching thing about the human face. It is where we are looking when we are talking to people. It is where tears emerge from. It is where we indicate what we are looking at
Knitt.
 G g n i Knitt l a i r to u T e aug ll e B a d n by Bre http://www.brendaabell.com The Basics Recommended Tools & Supplies Metal ruler Calculator (or pencil & paper) Main yarn Contrasting waste yarn Blocking
Tools and Tips: ( 1 )
") Tools and Tips: As you build instructions will show in my many picture manual how to assemble. You can use your own methods as you desire, my results are very good. A smooth, flat work surface is very
Tools and Tips: As you build instructions will show in my many picture manual how to assemble. You can use your own methods as you desire, my results are very good. A smooth, flat work surface is very
DRAWING KEY FOLD TYPES A B C EDGE BEVEL REFERENCE/ OPTIONAL
 RR Finch B DRAWING KEY FOLD TYPES A B C A - FOLD (ABOVE) B - FOLD (BESIDE) C - FOLD (COVER) LINE TYPE/COLOR SYMBOLS PART NUMBER CUT 50% SCORE CREASE NAME MATERIAL MODEL - VERSION QUANTITY 45 DOUBLE BEVEL
5If the protruding part is. 6Place 1 as is shown in the. 7Place what was assembled
 Yamato: Step-by-step 49 The base of the bridge and strakes a c b d a Base of the bridge b Base of the bridge c Base of the bridge d Strakes x 10 THE BASE OF THE BRIDGE 1Smooth 1 to 3, first using the metal
Wanderlust Suitcase Vanity
 Wanderlust Suitcase Vanity If you re like me, you re always up for an adventure. When I saw some examples of DIY reclaimed suitcases, paired with the exciting new Wanderlust embroidery design collection,
BUILDING INSTRUCTIONS
 BUILDING INSTRUCTIONS Building a model out of paper is really not new. It is, in fact, a lost art that used to be extremely popular before the First World War! If you take your time, you can make a Museum
L e i s u r e A r t s L i b r a r y. c o m. Knit Pullovers
 Knit L e i s u r e A r t s L i b r a r y. c o m # 800091 Knit Pullovers Women's Sizes: 32, 34, 36, 38, 40 (bust measurement) Men's Sizes: 36, 38, 40, 42, 42, 44 (chest measurement) Click Here to sign up
EASY BREAD/ CUTTING BOARDS
 PLANS BY DEEPLY SOUTHERN HOME EASY BREAD/ CUTTING BOARDS DIFFICULTY LEVEL: EASY TOOLS REQUIRED 18V ONE+ RANDOM ORBIT SANDER 18V ONE+ CORNER CAT FINISH SANDER 18V ONE+ LITHIUM-ION DRILL KIT 18V ONE+ ORBITAL
Clocking a TD-04 Turbo Compressor Housing. Appendix A : AWIC Silicone and Tubing Fitting
 Clocking a TD-04 Turbo Compressor Housing Appendix A : AWIC Silicone and Tubing Fitting Revision A: 7-13-2015 Tools: Metric Sockets (10, 12, 14, 17mm) 5mm Hex Key Large Internal Snap Ring Pliers 3/8 Socket
Ranch Rail Vinyl Fence
 Ranch Rail Vinyl Fence INSTALLATION INSTRUCTIONS These instructions are to be used as general guidelines for the installation of your vinyl fence under normal installation conditions. Local conditions
Durabrac Gable Bracket Installation Guide
 Durabrac Gable Bracket Installation Guide Durabrac vinyl gable brackets are manufactured from high quality natural white vinyl with UV inhibitors. There are currently six styles and three sizes to choose
cabinet & commitment some helpful tips on how to look after your Gillies cabinet Living in style
 www.gillies.co.uk cabinet & commitment some helpful tips on how to look after your Gillies cabinet Living in style Caring for your furniture You are probably buying your new cabinet furniture with a view
Project Skill Level: INTERMEDIATE Plywood Used: CANPLY EXTERIOR Good Two Sides (G2S) or precision sanded Aspen
 or precision sanded Aspen") Project Skill Level: INTERMEDIATE Plywood Used: CANPLY EXTERIOR Good Two Sides (G2S) or precision sanded Aspen MATERIALS LIST: (1) ¾" x 4 ft x 8 ft plywood panel (20) #8 x 2" Robertson or Phillips wood
Project Skill Level: INTERMEDIATE Plywood Used: CANPLY EXTERIOR Good Two Sides (G2S) or precision sanded Aspen MATERIALS LIST: (1) ¾" x 4 ft x 8 ft plywood panel (20) #8 x 2" Robertson or Phillips wood
4" Round Fieldstone Tower
 4" Round Fieldstone Tower This page contains instructions on how to use mold #72 to build the round fieldstone tower. You will have to cast the mold 18 times to build the tower. This round tower is slightly
The Simple Birdhouse Ornament
 The Simple Birdhouse Ornament There are a number of techniques for constructing birdhouse Christmas ornaments and the resulting ornaments vary from simple to very ornate and complicated. It has been my
PITTS S2S CONSTRUCTION
 PITTS S2S CONSTRUCTION FUSELAGE CONSTRUCTION 1) Place the right fuselage side over the plan and mark the former positions. Place the left side over the right side and mark the former positions. Glue F1
Copper Copper windows showcase beautifully woven bands in a simple but stylish pendant
 beginner metal Woven in Copper Copper windows showcase beautifully woven bands in a simple but stylish pendant by Mary Hettmansperger C opper is one of the most colorful and economical metals on the market,
The model boasts of twin fuselages and three fins
 An Experimental Twin Tractor One of the Most Unique and Finest Fliers Ever Presented. If You Want Something Different, Build and Fly This One By FELIX GUTMANN The model boasts of twin fuselages and three
Hubble Space Telescope Paper Model Directions Downloads, patterns, and other information at:
 Hubble Space Telescope Paper Model Directions Downloads, patterns, and other information at: www.hubblesite.org/go/model Materials: model pattern printed onto cardstock/coverstock instructions printed
FRANKLIN COUNTY 4-H MODEL BUILDING
 FRANKLIN COUNTY 4-H MODEL BUILDING Save this book, use it each year you are in the project. 4 H Model Building Model building can be fun and exciting. You can express your creative abilities, learn to
Plastic Trainer-19. I have tried to only use materials available from the big box building centers like Home Depot, Rona (Canada) and Lowe s.
 and Lowe s.") Plastic Trainer-19 I have tried to only use materials available from the big box building centers like Home Depot, Rona (Canada) and Lowe s. The picture above shows the prototypes with an original Cox
Plastic Trainer-19 I have tried to only use materials available from the big box building centers like Home Depot, Rona (Canada) and Lowe s. The picture above shows the prototypes with an original Cox
Blakes 7 DSV-1 Liberator
 Blakes 7 DSV-1 Liberator Model kit by Masterpiece Models: www.masterpiecemodels.com Pattern Maker: Alfred Wong Casting: J&S Technologies LLC Parts List Main body 3 Main body nose vanes 4 Main body detail
BY SEAN MIDDLETON V 4. Instructions courtesy of TopNotch Page 1
 BY SEAN MIDDLETON V 4 Instructions courtesy of TopNotch Page 1 INSTRUCTIONS INTRODUCTION Using masks take a little bit of practice and some patience when you first begin. Like most things though, once
LAND AND CONDUCTOR REPAIR (DVD-97ABC)
") This test consists of twenty multiple-choice questions. All questions are from the video: Land and Conductor Repair (DVD-97ABC). Each question has only one most correct answer. Circle the letter corresponding
This test consists of twenty multiple-choice questions. All questions are from the video: Land and Conductor Repair (DVD-97ABC). Each question has only one most correct answer. Circle the letter corresponding
Building the Toothpick Audio CW Filter
 Building the Toothpick Audio CW Filter Introduction The toothpick is a simple variable bandpass audio filter designed to compliment the Splinter QRPp Trans-Receiver. The filter also contains an audio amplifier
Jasper County 4-H 2016
 ARTS & CRAFTS Jasper County 4-H 2016 In the Arts and Crafts project the 4-H'er will have a chance to express his/her talents in an array of mediums from fine arts which include drawings and paintings in
CA to each one. You may have to hold the end down while to glue sets or use an accelerator like I did.
 The following information and photographs are what I did to build the kit. Your methods and needs may differ from this which is fine. There is no right or wrong way if you are used to scratch building.
Additional Parts List:
 THE TIME MACHINE Additional Parts List: In addition to the cast resin parts enclosed in this kit, there should also be a plastic bag containing the following items needed to complete your time machine
HOW TO MAKE A HARLEY QUINN HAMMER
 4D MODELSHOP MODEL MAKING GUIDE HOW TO MAKE A HARLEY QUINN HAMMER This guide shows you how to cut, shape and stick Styrofoam and Plastazote. A video of this build is available on our website. If you make
Tongue & Groove Cabinet Doors Copyright 2014 JaysCustomCreations.com
 Tongue & Groove Cabinet Doors Copyright 2014 JaysCustomCreations.com A tongue and groove cabinet door is made up of at least 5 pieces. Two horizontal rails (blue), two vertical styles (green), and one
WRIGHT FLYER 1 INSTRUCTIONS FOR THE D10LC KIT
 WRIGHT FLYER 1 INSTRUCTIONS FOR THE D10LC KIT Manufactured in the USA by Easy Built Models PO Box 681744, Prattville, AL 36068-1744 Visit us at www.easybuiltmodels.com Easy Built Models GLUE METHODS Always
COFFEE TABLE WITH RECESSED TRAY
 COFFEE TABLE WITH RECESSED TRAY Why not treat your guests to a tray laid with delicacies and then remove it from sight in your new coffee table. There's no easier way to show that you are a thoughtful
Installation Guidelines
 Page 1 Two inch () Porch Screening System Extruded Screen Walls Only Kit Installation Guidelines Tools You ll Need 4 ft. Carpenter s level Chalk line (to mark U channel locations) Chop saw with a metal
Parts List. Description. Installation Instructions
 Page 1 of 7 Parts List Aluminum Coping Hardware Kit 1 pkg Tek screws 1 tek screw nut driver 1 Snap strip removal tool 1 can Touch up spray paint 1 11/64 drill bit 8 pieces 1/8 Gray PVC 4 long 2 boxes Aluminum
Exterra Installation Guide
 Exterra Installation Guide Installing the foam padding Please review this installation guide before you begin installing the floor. If you have any questions, please call us at 800-428-5306 any time Monday
The Park Hotel Instructions for Assembly of N Scale Kit
 The Park Hotel Instructions for Assembly of N Scale Kit Kit Contents: 198 ea. Laser Cut Acrylic Parts, 2 ea. Chimney Parts Sheets, 1 ea.2".040 styrene rod, 5 ea. Sidewalk Parts, 14 ea. Cast Resin Dormers,
Irish Ornament or Pendant Sample. An Original Pattern With Complete Instructions
 Sheila Landry Designs Sheila Bergner-Landry, Designer RR 1, Box 47, Meteghan, Nova Scotia, Canada B0W 2J0 Phone Number: 902-482-7174 Email: sheilalandrydesigns@gmail.com Website Address: www.sheilalandrydesigns.com
Piper Cherokee /3 scale. Construction Manual
 Piper Cherokee 140 1/3 scale Construction Manual STAB CONSTRUCTION 1. Remove foam cores from cradle and place on flat surface. Inspect pieces before you epoxy halves together making sure leading and trailing
Adjustable Box Joint Jig. Richard Hicks on 8/24/2015. Box or Finger Joints
 Adjustable Box Joint Jig Richard Hicks on 8/24/2015 Box or Finger Joints Adjustable Box Joint Jig Richard Hicks on 8/24/2015 Box Joints are also called Finger Joints Because they have interlocking fingers
Tools and Tips: ( 1 )
") Tools and Tips: As you build the book will show in my many picture manual how to assemble. You can use your own methods as you desire, but these worked best for me. A smooth, flat work surface is very
Tools and Tips: As you build the book will show in my many picture manual how to assemble. You can use your own methods as you desire, but these worked best for me. A smooth, flat work surface is very
installation manual m y w a l l a r t. c o m
 installation manual Step 1 Step 2 Acclimate panels for 48 hours in the environment and temperature they will be installed in. Step 3 Install over relatively smooth flat surfaces, all major holes or major
Designed by Melissa DiRenzo thesweetescape.ca
 instructions Designed by Melissa DiRenzo thesweetescape.ca YOU WILL NEED 3 -diameter foam ball Christmas sweater Hot glue gun and glue sticks 3/8 -wide satin ribbon Elastic thread: metallic Note: A child
Sawn Baluster Sizing and Installation Guide
 Sawn Baluster Sizing and Installation Guide Welcome to the Durabrac sizing and installation guide for Sawn Balusters. This guide has been prepared to answer any questions you may have about our Sawn Balusters
The Park Hotel Instructions for Assembly
 The Park Hotel Instructions for Assembly Kit Contents: 280 ea. Laser Cut Acrylic Parts. 1 ea. 6" Plastic Coated Wire. 5 ea. Sidewalk Parts. 14 ea. Cast Resin Dormers. 12 ea. Window Glass Templates, 12
Installation Instructions Recommended Tools
 Recommended Tools Tape Measure Sharp Knife Duct Tape Mineral Spirits Clean Cloth Isopropyl Alcohol Blunt Putty Knife Caulking Gun Caulking Trowel Material Sizing 1. Joints must be sized every 5-7 feet
FMR-010 1/32 Scale Vietnam-era AH-1G Rocket Pods (M-158, M-200)
") P.O. Box 126 Tanner, AL 35671-0126 USA www.fireballmodels.info FMR-010 1/32 Scale Vietnam-era AH-1G Rocket Pods (M-158, M-200) Contents: A) 2x M-200 Rocket Pod B) 1x M-200 Decal C) 14x Brass Tube D) 4x
P.O. Box 126 Tanner, AL 35671-0126 USA www.fireballmodels.info FMR-010 1/32 Scale Vietnam-era AH-1G Rocket Pods (M-158, M-200) Contents: A) 2x M-200 Rocket Pod B) 1x M-200 Decal C) 14x Brass Tube D) 4x
How to assemble the Reims Gueux Pit Centre Module #005
 How to assemble the Reims Gueux Pit Centre Module #005 We recommend quick drying super glue for our models. Just a few drops on the joining edges, press and hold them for a few seconds and the connection
135 ROLLTOP DESK 515
 135 ROLLTOP DESK 515 For the person who hates to clear off a desk, who wants to leave everything where it is overnight yet still have the clutter hidden, a rolltop desk is a godsend. The tambour hides
the wire, less is better. And make sure the bends on each truss wire are in line with the other. See the next photo.
 The following information and photographs are what I did to build the kit. Your methods and needs may differ from this which is fine. There is no right or wrong way if you are used to scratch building.
Building the 1, 2, or 3 Car
 Building the 1, 2, or 3 Car Garage kit by Railroad Kits. Thanks to Bob Butts for doing the building construction and writing / taking pictures. If this is your first craftsman kit or Railroad Kits purchase
Pilot Cutters. John B. Shadle, CMC
 Pilot Cutters John B. Shadle, CMC One thing horologists share is a love of timepieces. Another thing we share is a love of the tools we use. In this article, I will introduce you to a group of useful tools
Introduction: The instructions to complete the vases begin on page 47.
 Introduction: Hello, my name is Steve Good. I am the author of the Scrollsaw Workshop Blog. Seven years ago I started the blog and today it is read by thousands of scroll saw enthusiasts all over the world.
O nament. Birdhouse. Birdhouse Christmas ornaments have become very
 Birdhouse O nament Photo by Al Parrish Dale Nish, one of the principal architects of the turning revival, shares some turning techniques. Birdhouse Christmas ornaments have become very popular the last
WOOD TOY NEWS. July 23, 2013 Tuesday
 WOOD TOY NEWS Make your own perfect turntable for spray painting toys with these useful tips. And it s fast, fun and easy to build! by Imants Udris Watch the video on our website at : http://www.toymakingplans.com/website/how-to/
Building Instructions
 Building Instructions Tools Required Tape measure Straight edge Pencil/pen Jigsaw Table Saw Circular Saw Electric drill 1 Hole saw bit Saw horses/table Protractor Staple gun Caulk gun Paint brush Wrenches