LED Cup Holder Lights Installation Guide
|
|
|
- Elijah Gallagher
- 5 years ago
- Views:
Transcription


 Soldering Iron or another wire attachment technique ( military splice demonstrated) Disassembly: Begin")

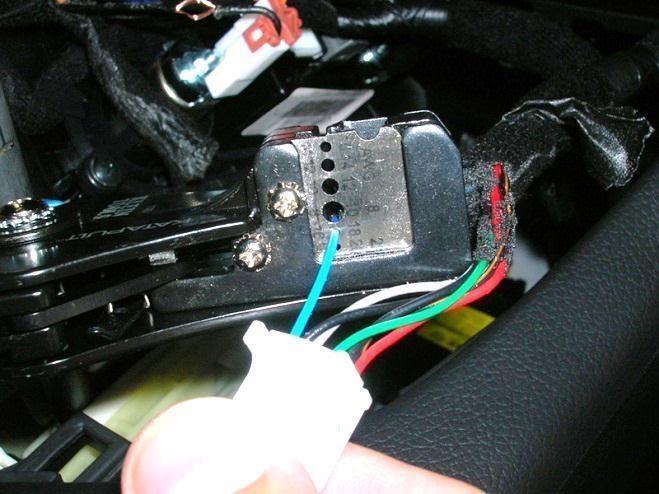
1 LED Cup Holder Lights Installation Guide ( Kia Optima) Thanks for purchasing this LED Cup Holder Light Kit! If you have any questions or feedback please us direct at Read these instructions completely before beginning installation: K5 Optima Store does not assume responsibility or accept liability for damage, loss, or expense arising from improper use, operation, or installation of this product. You may need the following tools: Plastic panel popper tool (Harbor Freight #67021) Small Flathead Screwdriver 3/16 Drill Bit (or larger) Electrical Tape Razor Blade or Scissors Wire Strippers (product similar to Irwin is used) Soldering Iron or another wire attachment technique ( military splice demonstrated) Disassembly: Begin by engaging the emergency brake and then using a small flathead screwdriver to pop up the shift lock cover (A). Use the screwdriver to press the button inside that space and shift the car into neutral. We need to pop off the leather surrounding the shifter (Highlighted in B), on automatic models reach your fingers in the leather boot and carefully pop all of it upwards around the edge (C). Next with the vehicle in neutral pull up with both hands on the shifter, it may take an upwards force of 50 lbs to pop off (D). (On manual models just unscrew the shift knob and leave the boot intact) A B


 (G).")
.")
2 C You will be left with (E). Using your fingers or a plastic panel tool pop up the back end of the console trim (Console highlighted in E, arrows show back end). Next carefully maneuver the trim and pull the rest of the console upwards and towards the rear of the vehicle (F). Flip over the trim and you can unplug all of the plugs or carefully lay the trim over the edge of the center console (if you do this, lay a shirt or cover over the center console to protect it or it may scratch) (G). D F E G Installation: First, we need to lift out the rubber inserts in the cup holders, grab the small tabs on the side of each and lift away (H). Thoroughly clean inside each cup holder with an alcohol pad or similar degreaser. Carefully drill a 3/16 hole from the top of the center console slightly off center in each cup holder (I). There is room underneath the cup holders so that you will not hit anything but still use caution.


.")
 (doesn t matter which power outlet).")
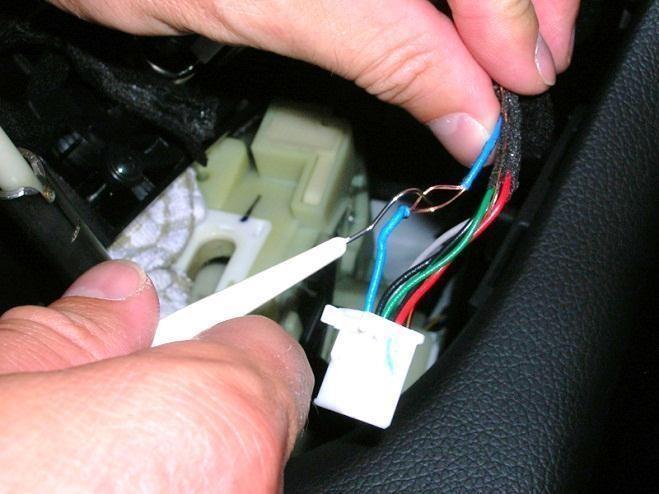
3 H I Run the LED wire through each hole (J). You should be able to reach your hand under and grab each wire and pull it forwards towards the shifter trim. Now remove the covering from the doublesided tape on the back of each cup holder disc. Route the wire through each hole and place the disc down into the cup holder but do not press down yet (this step is important, you only get one shot at pressing down and securing the adhesive), carefully center each disc and then press down firmly to secure (K). J K The wires we need are on the 12pin white connector plugged into the rear of the AUX and the 2pin white connector plugged into the power outlet (L) (doesn t matter which power outlet). (**2012 Optima SX with UVO system pictured, NonNavigation/UVO systems will have a different plug, please see end of instructions) Unplug the white 12pin AUX connector (M) and take a razor blade or scissors and carefully strip back the black fuzzy covering from the wires (N). The wire we need is the BLUE (+) wire on the end of the 12pin plug (O).
 and then poke a hole through the wire (Q).")
.")
 (DISCLAIMER: A")
.")
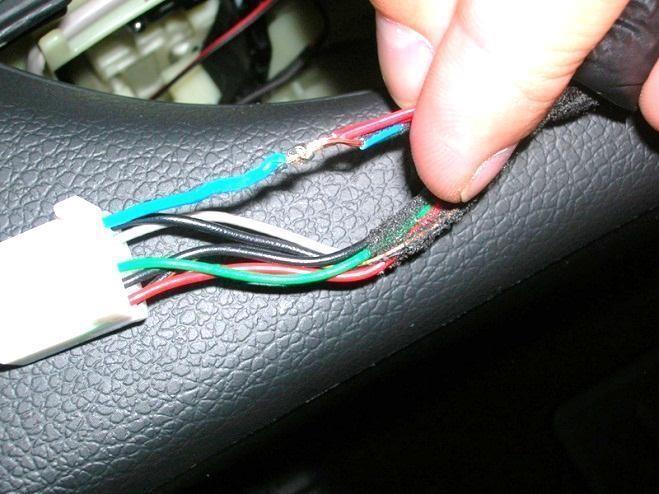
4 L M N O Use wire strippers to strip back the blue wire (P) and then poke a hole through the wire (Q). Take your LED wires and twist both black wires together and both of the red wires together (R). Take the RED LED wire and thread it through the blue car wire and twist it around (S) (DISCLAIMER: A 13amp fuse is suggested in line with the red LED wires). Electrical tape that connection and use zip ties to secure (T).
5 Q P S R
.")


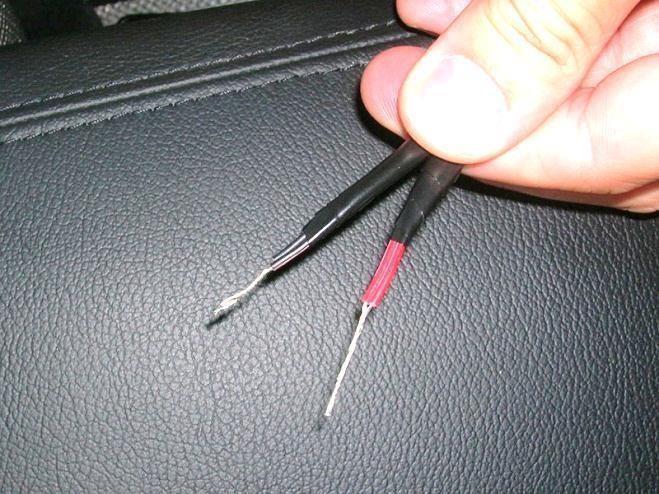
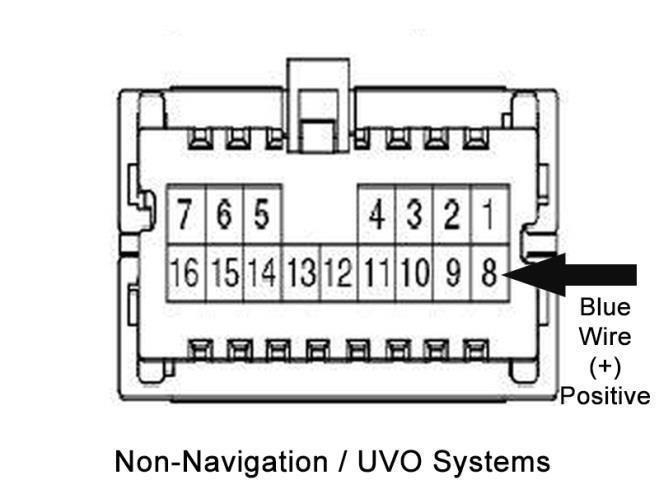
6 T Now we need the BLACK () wire on the white 2pin power outlet plug (U). Do the same process, stripping the wire, poking a hole, and then wrapping the BLACK LED wires around the BLACK car wire, then tape up and zip tie (V). U V Make sure all of your wiring is secure and all exposed connections are covered and secured. Plug back in all plugs and turn on your headlights and test the discs! All done! Reinstall is the opposite of uninstall. NonNavigation/UVO Systems Wiring: Instead of a white 12pin plug at the back of the AUX connector you will have a white 16pin plug attached to the USB/AUX. We need the BLUE (+) wire on the END of the connector (arrow below, plug may be reversed from picture, but it is the blue wire on the end, not the blue wire in pin #3 spot). Connecting the wire will be the same as the rest of the steps above and wiring the black LED wires will be the same as the instructions above.
7
8 If you have any questions or need support, please do not hesitate to reach out to us directly, via or by phone (213)
Toyota Tacoma Interior Light Upgrade
 Toyota Tacoma 2011- Interior Light Upgrade Part Number 00016-00095 Accesory Code: IL2 Conflicts Kit Contents Item # Quantity Reqd. Description 1 1 Y Adapter 2 1 Wire harness 3 1 Hardware Kit 4 2 White
Installation Instructions Precision Sport Shifter
 Installation Instructions Precision Sport Shifter 2004 and up Pontiac GTO Part Number 45043 2010, 2005, 2004 by B&M Racing and Performance Products This B&M Precision Sport Shifter has been designed to
Installation instructions, accessories. TV receiver, digital
 Installation instructions, accessories Instruction No 30756561 Version 1.1 5 Part. No. 30756181, 30756569 TV receiver, digital Volvo Car Corporation TV receiver, digital- 30756561 - V1.1 Page 1 / 36 Equipment
Finish Line Emergency Brake Boot INSTRUCTION SHEET. Part Number. Application: Corvette. Part Includes.
 Application: 1997-2004 Corvette Part Includes 1 - Emergency Brake Boot Finish Line Emergency Brake Boot Tools Needed T15 10mm PRE-INSTALLATION NOTES Read completely through instructions to familiarize
Suggested Instructions for: , , , C5 Emergency Brake Boot
 Suggested Instructions for: 608-348, 608-349, 614-653, 619-200 C5 Emergency Brake Boot Tools Ratchet, 10mm socket, extension #15 Torx screwdriver Needle nose pliers Masking Tape Very small flat head screwdriver
GENUINE PARTS INSTALLATION INSTRUCTIONS
 GENUINE PARTS INSTALLATION INSTRUCTIONS 1. 2. 3. 4. DESCRIPTION: APPLICATION: PART NUMBER: KIT CONTENTS: Kit G Coupe 999J2 JxxxxB4 (xxxx Designates model year and color) Item Qty. Description Part Number
Written By: Walter Galan
 iphone 4S Logic Board Replacement Replace a dead logic board in your iphone 4S. Written By: Walter Galan ifixit CC BY-NC-SA www.ifixit.com Page 1 of 22 INTRODUCTION Use this guide to replace your iphone's
iphone 4S Dismantling Instructions
 iphone 4S Dismantling Instructions These instructions will show you how to open the iphone to replace the digitizer, LCD screen and other internal parts. Opening your iphone will void your warrantee, and
Toyota Tundra Interior Light Upgrade
 Toyota Tundra 2012- Interior Light Upgrade Part Number: 00016-00095 Accessory Code: IL2 General Applicability All models of Tundra Kit Contents Item # Quantity Reqd. Description 1 1 Y Adapter 2 1 Wire
Signal Mirror Installation Instructions
 Signal Mirror Installation Instructions Honda CRV 1997-2003 THE safety accessory of the 21 st Century. P/N 210-0032-0 Rev B2 (6-26-04), GG 2003 Muth Mirror Systems, LLC. Note: Professional Installation
GENUINE PARTS INSTALLATION INSTRUCTIONS
 GENUINE PARTS INSTALLATION INSTRUCTIONS DESCRIPTION: APPLICATION: PART NUMBER: REAR SPOILER KIT - CARBON FIBER INFINITI Q60 T99J1 5CH0B KIT CONTENTS: Item Qty. Part Description A 1 Spoiler Assembly B 4
Explorer Wiring Kit (assembled)
") Explorer Wiring Kit (assembled) For Vintage, Firestorm & Standard Series Please Read All Instructions Before Beginning. Tools you will need: Soldering Iron (35 watt preferably) Solder Wet Sponge Wire Clippers
Explorer Wiring Kit (assembled) For Vintage, Firestorm & Standard Series Please Read All Instructions Before Beginning. Tools you will need: Soldering Iron (35 watt preferably) Solder Wet Sponge Wire Clippers
IPad mini REPAIR GUIDE. Version Edition
 IPad mini REPAIR GUIDE Version 1 2016 Edition IPad Mini REPAIR GUIDE LCD AND DIGITIZER REPLACEMENT RiAna Soto Repair Training Specialist rsoto@cellairis.com FOR EVERY REPAIR MAKE SURE TO COMPLETE, INITIAL,
5X Racing Mazda Miata Shifter Rebuild Kit Installation Instructions
 5X Racing 1999-2005 Mazda Miata Shifter Rebuild Kit Installation Instructions Thank you for purchasing our Miata shifter rebuild kit for the 1999-2005 Mazda Miata! These instructions will guide you on
Bionaire BAP 600 Control Board Replacement
 Bionaire BAP 600 Control Board Replacement Replace control board or its components such as capacitors or a fuse to bring power back to fan, ionizer, and LED's. Written By: Alexander Tarancon ifixit CC
Mini Cooper Lock Actuator
 2001-2006 Mini Cooper Lock Actuator Replacement This guide is on how to remove the lock actuator from the cars door. Written By: Jem ifixit CC BY-NC-SA www.ifixit.com Page 1 of 13 INTRODUCTION In order
Subwoofer. - F required in S40 with low cargo compartment floor - G always required in V50 - H required in V50 with low cargo compartment floor
 1 of 26 Subwoofer 2 of 26 INTRODUCTION - NOTE! Read through the whole installation instruction before starting the work. - The front page gives the date of this edition and the edition it replaces - The
2011 KIA Optima SX / EX Turbo Mesh Grille
 IMPORTANT: PLEASE KEEP THIS INSTRUCTION MANUAL FOR FUTURE REFERENCE! TOOLS REQUIRED 2011 KIA Optima SX / EX Turbo Mesh Grille Upper and Lower Overlay Part #: Complete 1310-0102-11SX / Black Ice Part #1310-B102-11SX
X5 License Plate PDC Retrofit (Part # ) dkl
 dkl") X5 License Plate PDC Retrofit (Part # 66 21 0 416 597) dkl Disclaimer: This article is only intended to be use as a guideline in addition to those instructions provided by BMW. As with all modifications,
X5 License Plate PDC Retrofit (Part # 66 21 0 416 597) dkl Disclaimer: This article is only intended to be use as a guideline in addition to those instructions provided by BMW. As with all modifications,
Cover Page. Factory Radio Other Documents Available For This Vehicle:
 Factory Radio Other Documents Available For This Vehicle: No documents available at this time Adobe Acrobat Reader Printing Tips: 1) Select FLE then PRNT and select your printer. 2) n the print options
PS4. Ragnarok Flex Modchip Installation Instructions.
 PS4 Ragnarok Flex Modchip Installation Instructions Revised 11/25/2013 Tools needed PS4 Controller Viking PS4 Ragnarok Flex modchip DIY Kit (includes mod chip, LED board, and LED lense) Two diodes (included
JEEP JK ( 5 DOOR ) SLIMLINE II - FULL TRAY EXTREME RACK KIT
 SLIMLINE II - FULL TRAY EXTREME RACK KIT") JEEP JK ( 5 DOOR ) SLIMLINE II - FULL TRAY EXTREME RACK KIT FAJK001 / KRJW014T INSTALL TIME: 2.5 Hours NOTE: Your Jeep JK (5 Door) Extreme Roof Rack Kit consists of four boxes. (1) the Tray, (2) the Roll
JEEP JK ( 5 DOOR ) SLIMLINE II - FULL TRAY EXTREME RACK KIT FAJK001 / KRJW014T INSTALL TIME: 2.5 Hours NOTE: Your Jeep JK (5 Door) Extreme Roof Rack Kit consists of four boxes. (1) the Tray, (2) the Roll
Wizard of Oz (WOZ) Pinball Cliffy Protector Installation Instructions
 Pinball Cliffy Protector Installation Instructions") Wizard of Oz (WOZ) Pinball Cliffy Protector Installation Instructions These instructions are provided for the installation of the 10 piece WOZ Cliffy protector set. Before starting, remove the lockdown
Wizard of Oz (WOZ) Pinball Cliffy Protector Installation Instructions These instructions are provided for the installation of the 10 piece WOZ Cliffy protector set. Before starting, remove the lockdown
Daytime Running Lights - Splice-in (10-12 All):
:") Time Necessary: Approximately 1 hour Tools Required: Heat Gun Installation Procedure: Daytime Running Lights - Splice-in (10-12 All): 1. It is recommended that the positive terminal be removed from the
Time Necessary: Approximately 1 hour Tools Required: Heat Gun Installation Procedure: Daytime Running Lights - Splice-in (10-12 All): 1. It is recommended that the positive terminal be removed from the
Bushwacker Jeep Flat Style Fender Flares Front Pair
 Bushwacker Jeep Flat Style Fender Flares Front Pair Note: These instructions involve cutting parts of your vehicle. Please read all instructions prior to starting. Installation Time: 3-4 Hours Tools Required:
DIY S2000 Door Card Removal
 DIY S2000 Door Card Removal This Do-It-Yourself guide is intended to guide you through removing the door cards from your S2000. Tools Required: Phillips Head Screwdriver Trim tools (pry tool and a trim
OpenROV. Guide 3 - Electronics. We will now move to the assembly of the electronics that will control the ROV. Written By: OpenROV
 OpenROV Guide 3 - Electronics We will now move to the assembly of the electronics that will control the ROV. Written By: OpenROV 2017 openrov.dozuki.com Page 1 of 33 INTRODUCTION We will introduce soldering
Written By: Walter Galan
 Xbox 360 CPU Heat Sink Replacement CPU heat sink replacement. Written By: Walter Galan ifixit CC BY-NC-SA www.ifixit.com Page 1 of 27 INTRODUCTION Use this guide to remove the CPU heat sink from your Xbox
Written By: Walter Galan
 Replace the small antenna attached to the headphone jack of your iphone 4S. Written By: Walter Galan ifixit CC BY-NC-SA www.ifixit.com Page 1 of 23 INTRODUCTION Use this guide to replace your iphone's
iphone 6 Chargeport REPAIR GUIDE Version Edition
 iphone 6 Chargeport REPAIR GUIDE Version 1 2016 Edition IPHONE 6 CHARGEPORT REPAIR GUIDE LCD AND DIGITIZER REPLACEMENT RiAna Soto Repair Training Specialist rsoto@cellairis.com FOR EVERY REPAIR MAKE SURE
JPM COACHWORKS INSTALLATION GUIDE
 JPM COACHWORKS INSTALLATION GUIDE 2015+ FORD MUSTANG MANUAL SHIFT BOOT Pre-Installation Warning: The installation of this product requires adhesives for proper assembly. Please read and follow all safety
Ford Police Interceptor Utility Vehicle
 Ford Police Interceptor Utility Vehicle 1 TOOLS NEEDED 13 MM Twelve Point Deep Socket Socket Wrench Extension Socket Wrench Hand Drill or Cordless Drill Phillips Head Screwdriver Measuring Tape or Ruler
INSTALLATION MANUAL REAR PARKING ASSIST SENSORS
 MITSUBISHI MOTORS GENUINE ACCESSORIES PART NUMBER MZ380456EX APPLICABLE MODEL LANCER SEDAN INSTALLATION MANUAL REAR PARKING ASSIST SENSORS Thank you for purchasing MITSUBISHI genuine * REAR PARKING ASSIST
Installation tutorial for Console Customs Xbox 360 Dual Rapid fire Microchip for wired and wireless controllers (all versions)
") Installation tutorial for Console Customs Xbox 360 Dual Rapid fire Microchip for wired and wireless controllers (all versions) This tutorial is designed to aid you in installation of a console customs
Installation tutorial for Console Customs Xbox 360 Dual Rapid fire Microchip for wired and wireless controllers (all versions) This tutorial is designed to aid you in installation of a console customs
JEEP JK ( 5 DOOR ) SLIMLINE II - FULL TRAY EXTREME RACK KIT
 SLIMLINE II - FULL TRAY EXTREME RACK KIT") JEEP JK ( 5 DOOR ) SLIMLINE II - FULL TRAY EXTREME RACK KIT FAJK002 / KRJW014T INSTALL TIME: 5 Hours NOTE: Your Jeep JK (5 Door) Extreme Roof Rack Kit consists of four boxes. (1) the Tray, (2) the Roll
JEEP JK ( 5 DOOR ) SLIMLINE II - FULL TRAY EXTREME RACK KIT FAJK002 / KRJW014T INSTALL TIME: 5 Hours NOTE: Your Jeep JK (5 Door) Extreme Roof Rack Kit consists of four boxes. (1) the Tray, (2) the Roll
Porsche 997 Carbon Fiber Shift Boot Surround Install Instructions
 Porsche 997 Carbon Fiber Shift Boot Surround Install Instructions Tools Required T-25 Torx bit T-20 Torx bit T-15 Torx bit T-10 Torx bit MAcarbon Interior Install Tools Flat Screwdriver Blue Painter s
 Page 1 of 8 Search Audizine Audizine Forums > Tech Forums > DIY How-To's B6 A4/S4: Interior Trim Removal User Name Password User Name Remember Me? Log in Register FAQ Calendar DIY How-To's Share and discover
Instructions to Convert a 4-foot Florescent Fixture to LEDs Using 60W Power Supply Using 2 or 3 strips 30Dec15
 Instructions to Convert a 4-foot Florescent Fixture to LEDs Using 60W Power Supply Using 2 or 3 strips 30Dec15 Thank you for purchasing the Shoplight Solutions 4-ft conversion kit. This is a companion
irobot Roomba 980 Motherboard Replacement
 You will be able to remove the device's motherboard and replace it in case it is damaged. Written By: Ernesto Rodriguez Romero ifixit CC BY-NC-SA www.ifixit.com Page 1 of 13 INTRODUCTION Replacing the
Tools needed: Phillips screwdriver, flat blade screwdriver, rubber cement, clean hands.
 Installing the New Face for the Volvo 740 Turbo Vacuum/Boost Gauge INTRODUCTION: These instructions will guide you through the installation of this new face for your existing vacuum/boost gauge. It is
Bi-Color Signal Mirror Installation Instructions
 Bi-Color Signal Mirror Installation Instructions 2005-2009 Toyota Tacoma THE safety accessory of the 21 st Century. P/N 210-0141-0 Rev. A2 (3/30/09), BTV 2007 Muth Mirror Systems, LLC Page 3 of 13PplPage
ABM International, Inc.
 ABM International, Inc. Lightning Stitch required 1 1.0: Parts List head and motor assembly (Qty. 1) Reel stand (Qty. 1) Needle bar frame clamp (Qty. 1) Motor drive (Qty. 1) 2 Cable harness with bracket
Sea Doo Spark Engine Access Kit
 Sea Doo Spark Engine Access Kit PART# - RS4-130-EAK APPLICATION(S): Sea Doo Spark. 2up & 3up Models. We strongly recommend the use of a service manual to familiarize yourself with the various components
05-17 Mustang Fuel System Wire Upgrade Installation
 PARTS LIST: -10AWG INLINE FUSE HOLDER WITH 30AMP BLADE FUSE -16FT 10AWG HIGH CURRENT PRIMARY WIRE -40AMP AUTOMOTIVE RELAY -1FT 10AWG GROUND WIRE -1FT 10AWG HIGH CURRENT PRIMARY WIRE OUTPUT TO FPDM -1FT
E-FLIGHT BLADE CX COMPLETE DISASSEMBLY JANUARY 2006
 E-FLIGHT BLADE CX COMPLETE DISASSEMBLY JANUARY 2006 AERONUTS THIS IS NOT AN OFFICIAL E-FLIGHT MANUAL OR INSTRUCTION. IT IS BEING PROVIDED FOR INFORMATIONAL PURPOSES ONLY. AUTHOR ASSUMES NO LIABILITY FOR
Harmony Remote Repair
 Harmony Remote Repair harmonyremoterepair.com How to install your new Harmony One Front Cover/Touch Screen Important! Before you begin working on your Harmony One, you must discharge any static electricity
For the window switch piece, using a trim stick, pop the piece out below the wood trim:
 Facelift S8/A8 Removing Wood Trim Tools Needed: 1. Nylon Trim Stick 2. Philips Head Screwdriver 3. 5 and 6 mm allen heads 4. Small Torx screwdriver if removing emergency flasher switch Front and Rear Doors:
INSTALLATION. Preparation:
 INSTALLATION Preparation: Average Time Required: 2 to 3 hours Place a blanket down in the area which you will be working in. This will prevent scratches on the rear fascia / valance. Remove your License
Signal Mirror Installation Instructions Honda Odyssey
 Signal Mirror Installation Instructions 2005-2009 Honda Odyssey THE safety accessory of the 21st Century. P/N 210-0122-0 Rev. A4 (6/9/09), BTV 2006 Muth Company, LLC PROFESSIONAL INSTALLATION RECOMMENDED
Signal Mirror Installation Instructions Toyota Tacoma
 Signal Mirror Installation Instructions 2005-2015 Toyota Tacoma THE safety accessory of the 21 st Century. P/N 210-0115-0 Rev. A4 (3/11/15), BTV 2005 Muth Mirror Systems, LLC Page 3 of 12PplPage 3 of 12
0. Disassembly. Disassembly of the MK2 printer and upgrading to the MK2S using the upgrade kit. Written By: Jakub Dolezal
 0. Disassembly Disassembly of the MK2 printer and upgrading to the MK2S using the upgrade kit. Written By: Jakub Dolezal 2018 manual.prusa3d.com/ Page 1 of 12 Step 1 Preparing the printer Ensure the printer
Iphone 5 Glass/Lcd REPAIR GUIDE. Version Edition
 Iphone 5 Glass/Lcd REPAIR GUIDE Version 1 2016 Edition IPhone 5 Glass/LCd REPAIR GUIDE RiAna Soto Repair Training Specialist rsoto@cellairis.com FOR EVERY REPAIR MAKE SURE TO COMPLETE, INITIAL, AND HAVE
INSTALLATION INSTRUCTIONS
 3b Fig. A Fig. C Fig. B Fig. D KIT FEATURES ISO and DIN unit provisions Pocket (holds jewel cases) KIT COMPONENTS Radio Housing 99-7898 INSTALLATION INSTRUCTIONS APPLICATIONS ACCORD 990-97, CIVIC 999-00,
Ford Mustang, SVT, Cobra
 1996 2004 Ford Mustang, SVT, Cobra N2MB WOT Box Installation Instructions NOTE: If you have a CDI (capacitive discharge ignition system) please contact us at support@n2mb.com for additional instructions.
DO NOT PULL ON THE SHEATH.
 Removing and Replacing the Head Cover To remove and replace the head cover you will need the following tools: #2 Phillips screwdriver (magnetic tip preferred) Removing the Head Cover 1. Ready the machine
NAVIGATION SYSTEM INSTALLATION INSTRUCTIONS
 NAVIGATION SYSTEM INSTALLATION INSTRUCTIONS These instructions along with the pictures were performed in a 2008 Yukon. Please use them only as a reference since they might not exactly match your vehicle
Instructions to Convert a 4-foot Florescent Fixture to LEDs Using 100W Power Supply Using 1-4 strips 30Dec15
 Instructions to Convert a 4-foot Florescent Fixture to LEDs Using 100W Power Supply Using 1-4 strips 30Dec15 Thank you for purchasing the Shoplight Solutions 100W conversion kit. This is a companion document
V Ford Mustang
 V8 2011 Ford Mustang N2MB WOT Box Installation Instructions NOTE: If you have a CDI (capacitive discharge ignition system) please contact us at support@n2mb.com for additional instructions. Damage to your
MM Strut Tower Brace, Cobra (MMSTB-7)
") The MM strut Tower Brace attaches to each strut tower and to the firewall. 3430 Sacramento Dr., Unit D San Luis Obispo, CA 93401 Telephone: 805/544-8748 Fax: 805/544-8645 www.maximummotorsports.com MM
The MM strut Tower Brace attaches to each strut tower and to the firewall. 3430 Sacramento Dr., Unit D San Luis Obispo, CA 93401 Telephone: 805/544-8748 Fax: 805/544-8645 www.maximummotorsports.com MM
Conflicts Note: Drop-in Bed liner
 Toyota Tundra 2015 LED Bed Lights Preparation Part Number: 00016-34089 Accessory Code: BU1000 Conflicts Note: Drop-in Bed liner Kit Contents Item # Quantity Reqd. Description 1 1 Hardware Kit 2 1 Driver
UPLIFT Height Adjustable Standing Desk 3-Leg (T-Frame) DIRECTIONS FOR ASSEMBLY AND USE
 DIRECTIONS FOR ASSEMBLY AND USE") UPLIFT Height Adjustable Standing Desk 3-Leg (T-Frame) DIRECTIONS FOR ASSEMBLY AND USE CAUTION MAKE SURE NO OBSTACLES ARE IN THE DESK S PATH AND ALL CORDS ARE OF APPROPRIATE LENGTH FOR DESK TRAVEL. FAILURE
UPLIFT Height Adjustable Standing Desk 3-Leg (T-Frame) DIRECTIONS FOR ASSEMBLY AND USE CAUTION MAKE SURE NO OBSTACLES ARE IN THE DESK S PATH AND ALL CORDS ARE OF APPROPRIATE LENGTH FOR DESK TRAVEL. FAILURE
Installation tutorial for Console Customs PS3 TrueFire Standard Rapid fire Microchip for Sixaxis and Dualshock 3 controllers
 Installation tutorial for Console Customs PS3 TrueFire Standard Rapid fire Microchip for Sixaxis and Dualshock 3 controllers This tutorial is designed to aid you in installation of a console customs rapid
I Click on a link tab to jump to that page. Cover Page
 Factory Radio Other Documents Available For This Vehicle: No documents available at this time Adobe Acrobat Reader Printing Tips: 1) Select FLE then PRNT and select your printer. 2) n the print options
Razr Adapter Retrofit Project by Craig Hoy, Edmonton, AB, Canada
 Razr Adapter Retrofit Project by Craig Hoy, Edmonton, AB, Canada The following is a description of the process that I have used to modify the console eject box for e38, e39, e46 and x5 s, part number 84-21-6-933-415.
Instructions to Convert a 4-foot Florescent Fixture to LEDs Using a SS 25W Power Supply and a 4 LED strip 30Dec15
 Instructions to Convert a 4-foot Florescent Fixture to LEDs Using a SS 25W Power Supply and a 4 LED strip 30Dec15 Thank you for purchasing the Shoplight Solutions 4-ft conversion kit. This is a companion
Frameless Inline Door With Return QCI5263
 INSTALLATION INSTRUCTIONS Frameless Inline Door With Return QCI5263 WALL MOUNT HINGES FRAMELESS DOOR / PANEL / RETURN PANEL QCI5263 REV. 0 Page 1 Certified 06/17/2016 Parts List with wall mount hinges
Paco Motorsports Strong Arms X
 Paco Motorsports Strong Arms 13-101X Thanks for purchasing our Strong Arms. These braces reinforce the frame horns that support the engine and transfer all of the cornering and road impact loads into the
SUT-1000CLC ASSEMBLY REQUIREMENTS
 SUT-1000CLC Torque wrench, carpenters square, wire cutters, Phillips screwdriver, 7/16, 9/16, and 3/4 combination wrenches, ratchet, 9/16, 3/4, 13/16, and 7/8 sockets. ASSEMBLY REQUIREMENTS *Torque all
Dynavin Solutions: Dash Disassembly
 Dynavin Solutions: Dash Disassembly The installation of the Dynavin in my E46 was covered by my Dynavin Info thread on www.e46fanantics.com but It didn't really address many details of the dash disassembly,
INSTALL/REMOVAL INSTRUCTIONS: WINDOW REGULATOR
 REMOVAL/INSTALL OF WINDOW REGULATOR (741-584) Ford Focus 2000-2007 General Tech Tips: Use painter s tape rather than duct tape to secure window. It will not damage paint or leave sticky residue. A plastic
Hatchback Wing Riser Kit
 Hatchback Wing Riser Kit 2015-06-11 Thank you for purchasing this PERRIN product for your car! Installation of this product should only be performed by persons experienced with installation of aftermarket
SALEEN BODY KIT INSTALLATION MUSTANG
 SALEEN BODY KIT INSTALLATION 1994-1998 MUSTANG PART# 10-8002-C14234A Saleen Performance, Inc. 1225 East Maple Rd. Troy, MI 48083 248-743-4800 www.saleen.com 2 IF YOU ARE NOT EXPERIENCED IN THE AREA OF
SAFETY THIS PRODUCT IS FOR OFFROAD USE ONLY. ALL LIABILITY FOR INSTALLATION AND USE RESTS WITH THE OWNER.
 SAFETY Your safety and the safety of others is very important. In order to help you make informed decisions about safety, we have provided installation instructions and other information. These instructions
Removing and Replacing the Y-truck
 Service Documentation Removing and Replacing the Y-truck To remove and replace the Y-truck you will need the following tools: 4mm Allen wrench 12mm stamped flat wrench #2 Phillips screwdriver (magnetic
The Useless Machine. DIY Soldering Edition. Instruction Guide v0004
 The Useless Machine DIY Soldering Edition Instruction Guide v0004 TM For the best outcome, follow each step in order. We recommend reading this guide entirely before you get started. Tools required: Soldering
JEEP JK ( 3 DOOR ) SLIMLINE II - FULL TRAY EXTREME RACK KIT
 SLIMLINE II - FULL TRAY EXTREME RACK KIT") JEEP JK ( 3 DOOR ) SLIMLINE II - FULL TRAY EXTREME RACK KIT FAJK004 / KRJW016T INSTALL TIME: 2 Hours NOTE: Your Jeep JK (3 Door) Extreme Roof Rack Kit consists of four boxes. (1) the Tray, (2) the Roll
JEEP JK ( 3 DOOR ) SLIMLINE II - FULL TRAY EXTREME RACK KIT FAJK004 / KRJW016T INSTALL TIME: 2 Hours NOTE: Your Jeep JK (3 Door) Extreme Roof Rack Kit consists of four boxes. (1) the Tray, (2) the Roll
STYLE BAR & TONNEAU COVER INSTALLATION
 STYLE BAR & TONNEAU COVER INSTALLATION INSTALLATION MANUAL: 2005 to '09 Mustang P/N: 10-8002-C12071B Saleen Performance, Inc. 1225 East Maple Rd., MI 48083 800-888-8945 www.saleen.com 1 IF YOU ARE NOT
Bushwacker Jeep Flat Style Fender Flares Rear Pair (JK Wrangler 2dr)
") Bushwacker Jeep Flat Style Fender Flares Rear Pair (JK Wrangler 2dr) Note: These instructions involve cutting parts of your vehicle. Please read all instructions prior to starting. Installation Time: 3-4
Bushwacker Jeep Flat Style Fender Flares Rear Pair (JK Wrangler 2dr) Note: These instructions involve cutting parts of your vehicle. Please read all instructions prior to starting. Installation Time: 3-4
Installation Instructions
 MUSTANG RTR SIDE ROCKER SPLITTER KIT Part # 1011-7000-01 Application: 2010-2014 Mustang Installation Instructions Before installing your RTR components, rear through the entire installation process and
BOOM! AUDIO AM/FM/WB HIDDEN ANTENNA
 REV. 0-- BOOM! AUDIO AM/FM/WB HIDDEN ANTENNA GENERAL Kit Number 000 Models For model fitment information, see the P&A retail catalog or the Parts and Accessories section of www.harley-davidson.com (English
Frameless Inline Door QCI5254
 INSTALLATION INSTRUCTIONS Frameless Inline Door QCI5254 FRAMELESS DOOR / PANEL QCI5254 REV. 0 Page 1 Cer fied 06/16/2016 Parts List with wall mount hinges *Quanes may vary QCI5254 REV. 0 Page 2 Cer fied
Riverside. Windward Bay EntertaInment Wall System Assembly Instructions. Made In Viet Nam. Right Pier. Bridge & Back Panel.
 EntertaInment Wall System Page 1 of 12 Product No. 42840 42848 42849 42843 Product Description Console Left Pier Right Pier Bridge & Back Panel Right Pier Bridge & Back Panel Left Pier 63" Inch Ent. Console
Allegro Home Office Assembly Instructions. Tipping Restraint. Bun Foot W/ Leveler. 4 pcs.
 email: info@riverside-furniture.com Allegro Home Office Assembly Instructions Components and Hardware List Page 1 of 5 Made in China Shelf Pin Wood Shelf File Rod & Clips 1/2"Wood Screw A 16 pcs. B 4 pcs.
INSTALLATION INSTRUCTIONS
 PACKAGE CONTENTS and PARTS LIST: INSTALLATION INSTRUCTIONS Additional copies of these instructions can also be found on our website at www.xtremegate.com in the section titled How to Install X-Treme Gate.
Signal Mirror Installation Instructions
 Signal Mirror Installation Instructions 2005-2010 Chevy Corvette C6 THE safety accessory of the 21 st Century. P/N 210-0144-0 Rev. A3 (9/29/2011), BTV 2007 Muth Mirror Systems, LLC Page 3 of 10PplPage
Disassembling HP Envy TouchSmart 15 Heat
 Disassembling HP Envy TouchSmart 15 Heat Sink Removal of the Heat Sink Written By: Ramon Villadonga ifixit CC BY-NC-SA www.ifixit.com Page 1 of 14 INTRODUCTION You may need to replace or re-seat your heatsink
Signal Mirror Installation Instructions
 Signal Mirror Installation Instructions Ford Explorer 1996-2001, Ford Explorer SportTrac 2001, Ford Ranger 1996-2001, Mazda B-2500\B-3000\B-4000 1998-2001, Mercury Mountaineer 1997-2001 THE safety accessory
LAND ROVER DEFENDER UNDER CONSOLE SAFE
 LAND ROVER DEFENDER UNDER CONSOLE SAFE SAFE008 INSTALL TIME: 30 mins IMPORTANT WARNING! IT IS CRITICAL THAT ALL FRONT RUNNER PRODUCTS BE PROPERLY AND SECURELY ASSEMBLED AND ATTACHED TO YOUR VEHICLE. IMPROPER
Repairing Microsoft Wedge Touch Mouse Battery Cover Retaining Clip
 Repairing Microsoft Wedge Touch Mouse Battery Cover Retaining Clip Disassembly, repair and reassembly of Wedge Touch mouse when the battery cover will not stay closed. Also is a good guide to repair other
* * APPLICABLE MODELS: 2014 > MAZDA 3
 PART NUMBER: 0000 8C L46 GENUINE ACCESSORIES INSTALLATION INSTRUCTIONS Rev. AAA *550-0604-000* APPLICABLE MODELS: 204 > MAZDA 3 REQUIRED COMPONENTS: ITEM QTY DESCRIPTION Usage Chart MIRROR ASSEMBLY: Mirror
GEN II Toyota Prius Back Door Opener Switch Replacement & License Plate Lights
 GEN II Toyota Prius Back Door Opener Switch Replacement & License Plate Lights Rubber Surface of Switch had Degraded to Tar-like Substance Vehicle Manufacture Date 10/06 OLD SWITCH IN GARNISH SWITCH REMOVED
SCION FR-S REAR SPOILER Preparation
 Preparation Part Number: PT938-18130-XX Kit Contents Item # Quantity Reqd. Description 1 1 Spoiler 2 2 Strut 3 1 Hardware Bag Hardware Bag Contents Item # Quantity Reqd. Description 1 2 M6 x 1 Nut with
I Click on a link tab to jump to that page. Cover Page
 Publication, Duplication, or Retransmission Of This Document Not Expressly Authorized n Writing By The nstall Doctor s Prohibited. Protected By U.S. Copyright Laws. 1997,1998,1999,2000. Factory Radio Other
OPERATOR S MANUAL Model 58B Prefeed / Dereeler
 110 Fairgrounds Drive P.O. Box 188 Manlius, NY 13104-0188 USA 315.682.9176 FAX: 315.682.9160 OPERATOR S MANUAL Model 58B Prefeed / Dereeler PRODUCTION WIRE PROCESSING EQUIPMENT Website: www.carpentermfg.com
Fender Protectors. To ensure a successful installation, please read all of these instructions prior to starting.
 Fender Protectors To ensure a successful installation, please read all of these instructions prior to starting. General Instructions All Tough Stuff Protective Products use a waterproof contact adhesive.
Simply lift up on the flexible cover to remove it from the radiator support panel and factory grille, exposing the upper mounting hardware.
 2 Simply lift up on the flexible cover to remove it from the radiator support panel and factory grille, exposing the upper mounting hardware. Apply masking tape to the top of the bumper cover underneath
INSTALLATION INSTRUCTIONS
 INSTALLATION INSTRUCTIONS Roush Mustang Rear Valances This kit is intended for professional installation. Roush Performance 28400 Plymouth Road Livonia, MI 48150 1-800-59-ROUSH Application: Mustang 1999
Specimen Products Single Ended Stereo Amp Instruction Book
 Specimen Products Single Ended Stereo Amp Instruction Book Specimen tube amplifier designs are informed by decades of servicing and building musical instrument amps. As a result of being subjected to the
Chrome Mustang Billet Interior Door Handles (05-09) - Installation Instructions
 - Installation Instructions") Chrome Mustang Billet Interior Door Handles (05-09) - Installation Instructions The below installation instructions work for the following products: Chrome Mustang Billet Interior Door Handles (05-09)
Chrome Mustang Billet Interior Door Handles (05-09) - Installation Instructions The below installation instructions work for the following products: Chrome Mustang Billet Interior Door Handles (05-09)
Part # 4463 & Ford Mustang C-Series Upper & Lower Grilles
 Rev. 3/18 Page 1 Part # 4463 & 4464 2018 Ford Mustang C-Series Upper & Lower Grilles Notice: Install new, parts according to these instructions! Altered Parts are Non-Refundable! Part #4464 Notice: Part