DIY S2000 Door Card Removal
|
|
|
- Sharon O’Connor’
- 6 years ago
- Views:
Transcription
 Razor blade Step 1: Disconnect battery any time you will be working with electrical connections (in this case")
1 DIY S2000 Door Card Removal This Do-It-Yourself guide is intended to guide you through removing the door cards from your S2000. Tools Required: Phillips Head Screwdriver Trim tools (pry tool and a trim tab remover) Razor blade Step 1: Disconnect battery any time you will be working with electrical connections (in this case you will be disconnecting the window switch panels and tweeters) it s a good idea to disconnect the battery and wait minutes before beginning work to reduce the chance of damaging electrical components. Step 2: Remove the door handle to remove the door handle, begin by using a plastic trim pry tool to pop off the two screw covers located at the top and bottom of the handle as pictured below in Figure 1: Figure 1 Once removed, use a Phillips screwdriver to remove the two screws located behind the covers, seen below in Figure 2:

2 Figure 2 Remove the handle. Take care not to lose the two silver trim rings.

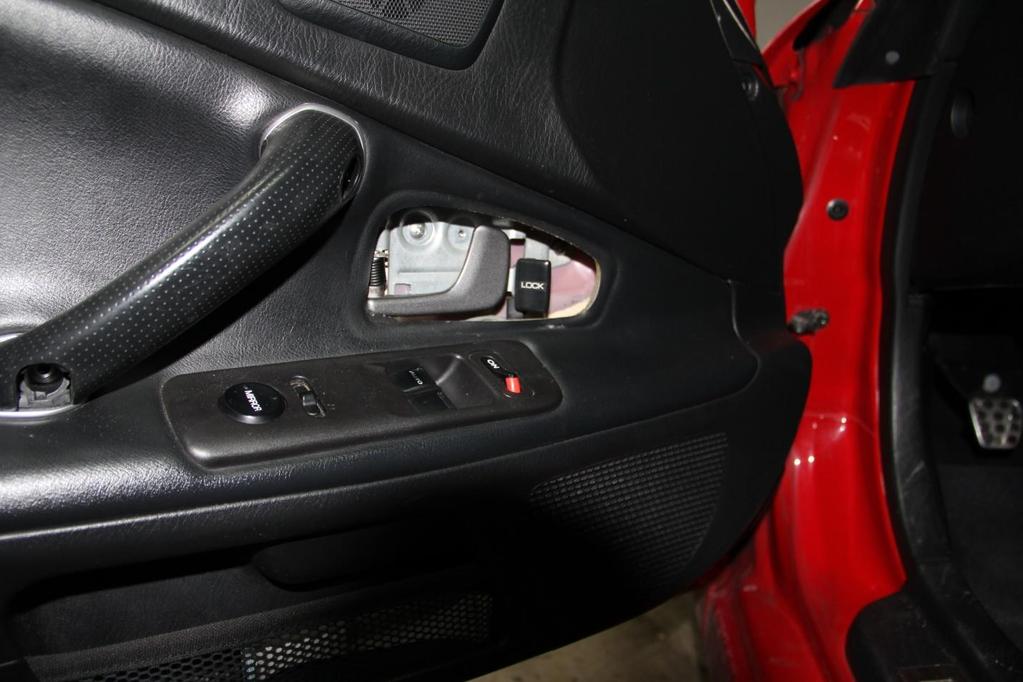
3 Step 3: Remove the door latch screw and trim Next we need to remove the door latch trim screw located behind the door latch pictured in Figure 3 below: Figure 3 Use your Phillips head driver to remove the screw. Then, carefully pull the plastic trim away from the door panel and rotate it such that you can remove it from the door latch. It helps to keep the latch pulled back in the open position while you remove the trim.
4 Figure 4
 to pry the tab off, using caution not to damage the trim.")
5 Step 4: Remove the door trim tab Next you need to remove the single trim tab at the front of the door panel, pictured in Figure 5 below: Figure 5 Use your trim tab remover (or a flathead screwdriver) to pry the tab off, using caution not to damage the trim.

6 Step 5: Remove the door panel With the trim tab and the door handle and latch screws removed, you can now remove the door panel. It hooks over the metal door frame at the top and is secured with five clips on the bottom, front, and rear of the door panel as shown below in Figure 6: Figure 6 Carefully pry the door panel away from the door frame at these points. You ll hear a pop as each clip is removed.

7 Figure 7 ATTENTION: Take extreme care as you separate the trim panel from the door frame. The panel is still attached to the door via the tweeter and window and mirror control wiring. As you lift the panel trim away you must carefully reach in and disconnect the two wiring connections for the window and mirror controls and disconnect the tweeter as seen in Figure 8. Please note that I have aftermarket tweeters and speakers installed, so your tweeter wiring will look different. It will likely be easier just to remove the tweeter itself from the trim panel.

8 Figure 8 Once you have disconnected the wires you can remove the panel from the door completely.
.")
9 Step 6: Remove the door card from the door panel - Lay your newly removed door panel face down on a clean work surface. Remove the 17 screws holding the white plastic door card to the panel (Figure 9). Note: You must also remove the 6-sided black plastic support (Figure 10) to access one of the door card screws, and you also must cut the speaker insulation (Figure 11) to separate the door card from the door panel. Figure 9 Not all screws are highlighted.

10 Figure 10 The 6-sided plastic support must be removed to access one of the door card screws

11 Figure 11 cut the speaker foam to separate the door card from the panel

12 Step 7: Remove window controls from the door card The final step is a simple one you must remove the door controls from the door card. On the driver side there is one screw clip holding the controls in place. The passenger side just uses tension clips and should pop out easily. Figure 12 Driver side retaining clip Conclusion: You have now successfully uninstalled your S2000 door cards. They can now be cleaned and your new door card fabric can be glued in place. To reinstall, just follow the inverse of the uninstall procedure.
Chrome Mustang Billet Interior Door Handles (05-09) - Installation Instructions
 - Installation Instructions") Chrome Mustang Billet Interior Door Handles (05-09) - Installation Instructions The below installation instructions work for the following products: Chrome Mustang Billet Interior Door Handles (05-09)
Chrome Mustang Billet Interior Door Handles (05-09) - Installation Instructions The below installation instructions work for the following products: Chrome Mustang Billet Interior Door Handles (05-09)
Repairing Microsoft Wedge Touch Mouse Battery Cover Retaining Clip
 Repairing Microsoft Wedge Touch Mouse Battery Cover Retaining Clip Disassembly, repair and reassembly of Wedge Touch mouse when the battery cover will not stay closed. Also is a good guide to repair other
STEPS FOR REMOVING REAR DOOR PANELS, DOOR UNLOCK HANDLE ASSEMBLY AND TRIANGULAR INSERT ON QUARTER WINDOW DIVIDER
 Please give credit where credit is due! This DIY was completed ENTIRELY by the hardest working VW Vortex moderator on the site!! Gary Thompson, Ph.D. - vortex ID VGRT6, email address vgrt6@yahoo.com. Please
WATCH VIDEO INSTALL! HOW-TO INSTALL CV-TL-80S-EB. Page: Instructions for Installation on: Toyota Land Cruiser 80 Series
 Clearview Towing Mirrors (Electric Power Adjustable) CV-TL-80S-EB Instructions for Installation on: Toyota Land Cruiser 80 Series 1990-1997 Page: 1 OF 13 Clearview s premiere line of replacement towing
Install. instructions. B8 A4/S4 RS4 Blackout Mesh Style Grille. By: 7716 Wiles Rd.Coral Springs, FL
 Install instructions B8 A4/S4 RS4 Blackout Mesh Style Grille By: Preface: The best fitting grille on the market! Completely change the look of your Audi A4 or S4. This mesh style grille features a black
Exterior Door Handle - LH - Unpainted (05-14 All)
") Tools Required: Exterior Door Handle - LH - Unpainted (05-14 All) 1) 10mm and 7mm sockets 2) Socket wrench (small size recommended) 3) T30 Torx bit 4) Plastic pry/molding tool (below, A) 5) Thin plastic
Tools Required: Exterior Door Handle - LH - Unpainted (05-14 All) 1) 10mm and 7mm sockets 2) Socket wrench (small size recommended) 3) T30 Torx bit 4) Plastic pry/molding tool (below, A) 5) Thin plastic
AUDI A8 D3 REPLACING THE OUTSIDE DRIVER DOOR HANDLE
 AUDI A8 D3 REPLACING THE OUTSIDE DRIVER DOOR HANDLE The keyless entry system in the D3 is a great feature. If you have the car key fob in your pocket, putting your hand under the door handle will unlock
Porsche 997 Carbon Fiber Shift Boot Surround Install Instructions
 Porsche 997 Carbon Fiber Shift Boot Surround Install Instructions Tools Required T-25 Torx bit T-20 Torx bit T-15 Torx bit T-10 Torx bit MAcarbon Interior Install Tools Flat Screwdriver Blue Painter s
INSTALL/REMOVAL INSTRUCTIONS: WINDOW REGULATOR
 REMOVAL/INSTALL OF WINDOW REGULATOR (741-526) Jeep Liberty 2002 2006 General Tech Tips: Use painter s tape rather than duct tape to secure window. It will not damage paint or leave sticky residue. A plastic
PLEASE READ THE ENTIRE BULLETIN BEFORE BEGINNING THE PROCEDURE
 Bulletin # 205 System 4 Board Replacement Page 1 of 5 Summary Products Affected Key Word Tags Tools/Equipment (If Required) Parts/Materials (If Required) Related Media Replacing the System 4 control board
INSTALL/REMOVAL INSTRUCTIONS: WINDOW REGULATOR
 REMOVAL/INSTALL OF WINDOW REGULATOR (748-569) Jeep Liberty 2002 2006 General Tech Tips: Use painter s tape rather than duct tape to secure window. It will not damage paint or leave sticky residue. A plastic
HTC One Mini 2 Battery Replacement
 HTC One Mini 2 Battery Replacement Replace the battery in your HTC One Mini 2 Geschreven door: Jeron Hogan ifixit CC BY-NC-SA nl.ifixit.com Pagina 1 van 10 GEREEDSCHAPPEN: 64 Bit Driver Kit (1) ifixit
Custom Grille Insert
 1 of 8 Thank you for your purchase of DBCustomz 2016+ Toyota Tacoma! This product was carefully crafted to ensure a perfect fit with your vehicle. The instructions below are provided to allow for an easier
Asus ZenFone 2 Display Replacement
 Asus ZenFone 2 Display Replacement Replace your display if it isn't functioning correctly or if it is cracked or broken. Written By: Jessica Nguyen ifixit CC BY-NC-SA www.ifixit.com Page 1 of 14 INTRODUCTION
GEN II Toyota Prius Back Door Opener Switch Replacement & License Plate Lights
 GEN II Toyota Prius Back Door Opener Switch Replacement & License Plate Lights Rubber Surface of Switch had Degraded to Tar-like Substance Vehicle Manufacture Date 10/06 OLD SWITCH IN GARNISH SWITCH REMOVED
Mazda Miata window guide replacement for NBs with electric windows Other model years would be similar, I imagine.
 Mazda Miata window guide replacement for NBs with electric windows Other model years would be similar, I imagine. This procedure was written to supplement the window guide supplier s procedure, not replace
2009 Subaru Impreza WRX Front Speaker
 2009 Subaru Impreza WRX Front Speaker Replacement Replaces front speaker of 2009 Subaru Impreza WRX. Rédigé par: Jared Spadaro ifixit CC BY-NC-SA fr.ifixit.com Page 1 de 13 INTRODUCTION This guide shows
Fig. 1 Fig. 2. Fig. 3 Fig. 4 TOOLS REQUIRED: *Phillips Screwdriver *Three Inch Putty Knife*Panel Removal Tool *10mm Nut Driver CONTENTS:
 *Phillips Screwdriver *Three Inch Putty Knife*Panel Removal Tool *10mm Nut Driver CONTENTS: 2EA. 6X9 TWO WAY SPEAKERS P/N 05030281AA 1EA. INSTRUCTIONS P/N RBI05LXREAR 300c and Charger 1. Remove the lower
Mini Cooper Lock Actuator
 2001-2006 Mini Cooper Lock Actuator Replacement This guide is on how to remove the lock actuator from the cars door. Written By: Jem ifixit CC BY-NC-SA www.ifixit.com Page 1 of 13 INTRODUCTION In order
irobot Roomba 980 Motherboard Replacement
 You will be able to remove the device's motherboard and replace it in case it is damaged. Written By: Ernesto Rodriguez Romero ifixit CC BY-NC-SA www.ifixit.com Page 1 of 13 INTRODUCTION Replacing the
Installation Instructions for Converting Hinging on Roll-In Refrigerators
 Installation Instructions for Converting Hinging on Roll-In Refrigerators Part number 161651 hinge conversion kit RH is for converting a right side hinged door and part number 161652 hinge conversion kit
Lexus ES350 Window Clip Replacement
 Page 1 of 10 1.0 Purpose The following instruction details the tools and supplies required, and the steps for removing and replacing the broken window clip in your 2007-2012 Lexus ES350. 2.0 Tools and
2007 Honda CR-V EX. KTC trim tool set SOJATP2014 * Trim pad remover, Snap-on A177A or equivalent, commercially available
 Special Tools Required KTC trim tool set SOJATP2014 * Trim pad remover, Snap-on A177A or equivalent, commercially available * Available through the American Honda Tool and Equipment Program; call 888-424-6857
INSTALL/REMOVAL INSTRUCTIONS: WINDOW REGULATOR
 REMOVAL/INSTALL OF WINDOW REGULATOR (741-584) Ford Focus 2000-2007 General Tech Tips: Use painter s tape rather than duct tape to secure window. It will not damage paint or leave sticky residue. A plastic
iphone 4S Dismantling Instructions
 iphone 4S Dismantling Instructions These instructions will show you how to open the iphone to replace the digitizer, LCD screen and other internal parts. Opening your iphone will void your warrantee, and
gently pry up all your door switches.. disconnect them.. same with the mirror control on the drivers side..
 How To Recover Door Panels By: Crispy SUPPLY/TOOL LIST NEEDED Dremel with drill cutter attachment (or drill with drill bit) contact cement 1/2 inch self tapping screws Carpet/Headliner spray on glue Phillips
Installation Instructions
 86-95 Samurai (SJ413) SJ410 Aluminum Replacement Door Handles (SKU# SEB- ADH) Installation Instructions Suggested Tools: CAUTION: Safety glasses should be worn at all times when working with vehicles and
Mac mini Model A1283 RAM Replacement
 Mac mini Model A1283 RAM Replacement Written By: Walter Galan ifixit CC BY-NC-SA www.ifixit.com Page 1 of 10 INTRODUCTION Accessing the RAM requires the removal of the internal frame. TOOLS: Jimmy (1)
INSTALL/REMOVAL INSTRUCTIONS: WINDOW REGULATOR
 REMOVAL/INSTALL OF WINDOW REGULATOR (741-870) Ford Windstar 1995 2003, Ford Freestar 2004 2006 & Ford Monterey 2004 2006 General Tech Tips: Use painter s tape rather than duct tape to secure window. It
LEFT-SIDE CARTR. LATCH REPLACEMENT
 Service Edge Page 5 long screw A. TOP COVER: 3 short screws, 1 long screw B. LEFT COVER: 4 tabs, 2 screws SCREW SCREW LEFT-SIDE CARTR. LATCH REPLACEMENT CLJ 3000, 3600, 3800, CP3505 This printer series
Written By: Chad Facciolo
 HTC One Mini 2 Charging Port Replacement These instructions will show you how to replace your charging port. Written By: Chad Facciolo ifixit CC BY-NC-SA www.ifixit.com Page 1 of 11 INTRODUCTION The charging
Written By: Walter Galan
 iphone 4S Logic Board Replacement Replace a dead logic board in your iphone 4S. Written By: Walter Galan ifixit CC BY-NC-SA www.ifixit.com Page 1 of 22 INTRODUCTION Use this guide to replace your iphone's
INSTALL/REMOVAL INSTRUCTIONS: WINDOW REGULATOR
 REMOVAL/INSTALL OF WINDOW REGULATOR (741-845) Chevrolet S10 Blazer/Pickup, GMC S15 Jimmy/Pickup 1995 2004, Oldsmobile Bravada 1996 2001, GMC Envoy 1998 2000, Isuzu Hombre 1998 2000 General Tech Tips: Use
Signal Mirror Installation Instructions
 Signal Mirror Installation Instructions 2006 2007 Honda Ridgeline THE safety accessory of the 21 st Century. P/N 210 0142 0 Rev. A (9/5/07), BTV 2007 Muth Company, LLC Professional Installation Recommended:
For the window switch piece, using a trim stick, pop the piece out below the wood trim:
 Facelift S8/A8 Removing Wood Trim Tools Needed: 1. Nylon Trim Stick 2. Philips Head Screwdriver 3. 5 and 6 mm allen heads 4. Small Torx screwdriver if removing emergency flasher switch Front and Rear Doors:
INSTALL/REMOVAL INSTRUCTIONS: WINDOW REGULATOR
 REMOVAL/INSTALL OF WINDOW REGULATOR (740-666) Lincoln Town Car 1990 94 General Tech Tips: Use painter s tape rather than duct tape to secure window. It will not damage paint or leave sticky residue. A
Written By: Walter Galan
 Replace the small antenna attached to the headphone jack of your iphone 4S. Written By: Walter Galan ifixit CC BY-NC-SA www.ifixit.com Page 1 of 23 INTRODUCTION Use this guide to replace your iphone's
INSTALL/REMOVAL INSTRUCTIONS: WINDOW LIFT MOTOR
 REMOVAL/INSTALL OF WINDOW LIFT MOTOR (655-1503) Chevrolet S10 Blazer/Pickup, GMC S15 Jimmy/Pickup 1995 2004, Oldsmobile Bravada 1996 2001, GMC Envoy 1998 2000, Isuzu Hombre 1998 2000 General Tech Tips:
Mac mini Model A1283 PRAM Battery Replacement
 Mac mini Model A1283 PRAM Battery Replacement Written By: Walter Galan ifixit CC BY-NC-SA www.ifixit.com Page 1 of 10 INTRODUCTION The time and date, as well as other settings, are kept by the PRAM battery
INSTALL/REMOVAL INSTRUCTIONS: WINDOW REGULATOR
 REMOVAL/INSTALL OF WINDOW REGULATOR (741-665) Ford Crown Victoria, Mercury Grand Marquis 1992-2010 General Tech Tips: Use painter s tape rather than duct tape to secure window. It will not damage paint
X5 License Plate PDC Retrofit (Part # ) dkl
 dkl") X5 License Plate PDC Retrofit (Part # 66 21 0 416 597) dkl Disclaimer: This article is only intended to be use as a guideline in addition to those instructions provided by BMW. As with all modifications,
X5 License Plate PDC Retrofit (Part # 66 21 0 416 597) dkl Disclaimer: This article is only intended to be use as a guideline in addition to those instructions provided by BMW. As with all modifications,
Nikon D70 Eyepiece Replacement
 Replace the Eyepiece in your Nikon D70. Rédigé par: Andrew Bookholt ifixit CC BY-NC-SA fr.ifixit.com Page 1 de 21 INTRODUCTION Use this guide to replace the eyepiece cover that allows for focus compensation.
INSTALL/REMOVAL INSTRUCTIONS: WINDOW REGULATOR
 REMOVAL/INSTALL OF WINDOW REGULATOR (741-768) Jeep Cherokee 1997 2001 General Tech Tips: Use painter s tape rather than duct tape to secure window. It will not damage paint or leave sticky residue. A plastic
MacBook Unibody Model A1278 Hard Drive
 MacBook Unibody Model A1278 Hard Drive Cable Replacement Written By: Walter Galan ifixit CC BY-NC-SA www.ifixit.com Page 1 of 13 INTRODUCTION This guide will show you how to remove the hard drive cable
05-17 Mustang Fuel System Wire Upgrade Installation
 PARTS LIST: -10AWG INLINE FUSE HOLDER WITH 30AMP BLADE FUSE -16FT 10AWG HIGH CURRENT PRIMARY WIRE -40AMP AUTOMOTIVE RELAY -1FT 10AWG GROUND WIRE -1FT 10AWG HIGH CURRENT PRIMARY WIRE OUTPUT TO FPDM -1FT
INSTALL INSTRUCTIONS
 Jeep JK Rear Corner Skins Product : JK200,JK201,JK202,JK203 Applica on : 2007+ Jeep Wrangler JK ( 2 Door and 4 Door ) Page ( 1 of 6 ) I WARNING Read the instruc ons completely before beginning installa
Tensioning Instructions
 Tensioning Instructions S I G N E X T R U S I O N S A N D S Y S T E M S S I G N E X T R U S I O N S A N D S Y S T E M S Before beginning, thoroughly read all tensioning instructions. Tools Required: 1.
Enjoy the instructions for changing the window motor. These instructions merged content from VO7848 and kwadell. Use at your own risk.
 Enjoy the instructions for changing the window motor. These instructions merged content from VO7848 and kwadell. Use at your own risk. These are draft instructions since I am still working on improvements.
INSTALLATION INSTRUCTIONS DODGE RAM 2 & 4WD 1500 PART # P5058
 INSTALLATION INSTRUCTIONS 2009-13 DODGE RAM 2 & 4WD 1500 PART # P5058 PARTS LIST: Qty Description Qty Description 1 Grille Guard 12 12-1.75mm Hex Nuts 2 Upper Frame Mounting s (for trucks without tow hooks
Signal Mirror Installation Instructions
 Signal Mirror Installation Instructions 2004 2008 Ford F-150 XLT, FX4, & Lariat Pre-wired without side signals Pre-wired with side signals Without side directional lights, see page 2 With side directional
Pontiac Grand Am SC/T Installation Instruction Sheet Aftermarket Front Fascia
 Aftermarket Front Fascia be used correctly to install the secondary fascia to the existing fascia. 1 Fascia Front 5 Bolt M6-1.0x60 5 Washer 1/4x9/16 2 Bolt/Washer Assembly 1 Nut/Washer Assembly 1. Six
TOYOTA COROLLA EC REARVIEW MIRROR Section I Installation Preparation
 Section I Installation Preparation Part Number: PT374-02030 Section I Installation Preparation Kit Contents Item # Quantity Reqd. Description 1 1 AD Mirror Assembly w/compass & Maplights 2 1 Hardware Bag
Pioneer Elite Smart Speaker F4 Button Panel Circuit Board Replacement
 Pioneer Elite Smart Speaker F4 Button Panel Circuit Board Replacement Use this guide if the buttons or microphone on your speaker do not work. Please note that replacing this part requires the speaker's
Table of Content. Sayl Disassembly for Recycling
 Y Sayl Disassembly for Recycling Table of Content 1. Work Chair Disassembly... 2 2. Side Chair Disassembly...17 3. Work Stool Footring Disassembly... 22 1 Y Sayl Disassembly for Recycling Work Chair Disassembly
Signal Mirror Installation Instructions
 Signal Mirror Installation Instructions Toyota RAV4 1996-2000 THE safety accessory of the 21 st Century. P/N 210-0034-0 Rev B1 (11-19-02), GG 2002 Muth Co. LLC. Note: Professional Installation Recommended
JK JEEP MIDWIDTH FRONT BUMPER
 SIGNATURE SERIES JK JEEP MIDWIDTH FRONT BUMPER INSTALLATION INSTRUCTIONS **PLEASE READ THROUGH THE INSTRUCTIONS BEFORE BEGINNING ANY PART OF THE INSTALLATION PROCESS** 1. Begin the installation of your
INSTALLATION INSTRUCTIONS GRILLE GUARD 09-ON DODGE RAM PART #
 INSTALLATION INSTRUCTIONS GRILLE GUARD 09-ON DODGE RAM PART # PARTS LIST: Qty Description Qty Description 1 Grille Guard 8 12-1.75mm x 35mm Hex Bolts 2 Brackets (for trucks without 22 12mm x 30.1mm OD
IMPORTANT: PLEASE RETAIN THIS INSTRUCTION MANUAL FOR FUTURE REFERENCE
 IMPORTANT: PLEASE RETAIN THIS INSTRUCTION MANUAL FOR FUTURE REFERENCE 005-07 Cadillac STS Classic 3D Z, Classic Dual Weave, Classic Mesh & Classic Black Mesh Grilles B 7 HR 3 STS Classic 3D Z Grille Part
Elite Series Fender Flares
 Page 1 of 8 Installation Instructions I - Sheet Number I606RPG Rev.B Important Safety Information Tools Required Contents Elite Series Fender Flares Preparation Before Painting / Installation NOTE Actual
Gear Assembly Removal
 Gear Assembly Removal 1 Remove the Top Cover, the Right Side Cover, the Fuser Assembly, and the Formatter Assembly. 2 Remove the Main Motor Assembly (see Figure 6-30). 3 Remove the (2) screws that hold
TI-84 Plus Silver Edition Individual Key Replacement
 TI-84 Plus Silver Edition Individual Key Replacement This guide will show you how to replace an individual key on your TI-84 Plus Silver Edition. Written By: Kale McKinney ifixit CC BY-NC-SA www.ifixit.com
Written By: Walter Galan
 Xbox 360 CPU Heat Sink Replacement CPU heat sink replacement. Written By: Walter Galan ifixit CC BY-NC-SA www.ifixit.com Page 1 of 27 INTRODUCTION Use this guide to remove the CPU heat sink from your Xbox
Finish Line Emergency Brake Boot INSTRUCTION SHEET. Part Number. Application: Corvette. Part Includes.
 Application: 1997-2004 Corvette Part Includes 1 - Emergency Brake Boot Finish Line Emergency Brake Boot Tools Needed T15 10mm PRE-INSTALLATION NOTES Read completely through instructions to familiarize
Signal Mirror Installation Instructions Honda Odyssey
 Signal Mirror Installation Instructions 2005-2009 Honda Odyssey THE safety accessory of the 21st Century. P/N 210-0122-0 Rev. A4 (6/9/09), BTV 2006 Muth Company, LLC PROFESSIONAL INSTALLATION RECOMMENDED
Signal Mirror Installation Instructions
 Signal Mirror Installation Instructions Honda CRV 1997-2003 THE safety accessory of the 21 st Century. P/N 210-0032-0 Rev B2 (6-26-04), GG 2003 Muth Mirror Systems, LLC. Note: Professional Installation
Mac mini Model A1283 Internal Frame
 Mac mini Model A1283 Internal Frame Replacement Written By: Walter Galan ifixit CC BY-NC-SA www.ifixit.com Page 1 of 9 INTRODUCTION Remove your internal frame to access most of your mini's internals. TOOLS:
Written By: Walter Galan
 iphone 4 Vibrate Ring Switch Replacement Replace the metal portion of the vibrate/ring switch on your iphone 4. Written By: Walter Galan ifixit CC BY-NC-SA www.ifixit.com Page 1 of 21 INTRODUCTION Use
FIELD REPLACEABLE UNIT DOCUMENTATION
 GENERAL INFORMATION Tools Required for Proper Disassembly and Reassembly: 1. Phillips Screwdriver (Size0&1) 2. 4mm Flat head Screwdriver 3. Case Separator 4. ESD Wrist Strap 5. ESD mats 6. Tweezers Before
Signal Mirror Installation Instructions
 Signal Mirror Installation Instructions 2005-2010 Chevy Corvette C6 THE safety accessory of the 21 st Century. P/N 210-0144-0 Rev. A3 (9/29/2011), BTV 2007 Muth Mirror Systems, LLC Page 3 of 10PplPage
BMW X5 OEM RUNNING BOARD PART#SBBW
 INSTALLATION INSTRUCTIONS 2014-2016 BMW X5 OEM RUNNING BOARD PART#SBBW-146-74 QTY HARDWARE 1 Driver Side OEM Running Board 1 Passenger Side OEM Running Board 8 Rivet Pin 1 Page Step 1: Verify all parts
Written By: Andrew Optimus Goldberg
 Replace the screen your GSM/AT&T iphone 4. Written By: Andrew Optimus Goldberg ifixit CC BY-NC-SA www.ifixit.com Page 1 of 25 INTRODUCTION [video: http://www.youtube.com/watch?v=obpfpfx5abw] Use this guide
Sony Cyber-shot DSC-T1 Motherboard
 Sony Cyber-shot DSC-T1 Motherboard Replacement This guide explains how to remove the motherboard from the Sony Cyber-shot DSC-T1. Escrito por: ideleted ifixit CC BY-NC-SA es.ifixit.com Página 1 de 11 INTRODUCCIÓN
Mac mini Model A1176 Speaker Replacement
 Mac mini Model A1176 Speaker Replacement Written By: Walter Galan ifixit CC BY-NC-SA www.ifixit.com Page 1 of 16 INTRODUCTION Restore sound to your mini by replacing the speaker. TOOLS: Jimmy (1) Phillips
Signal Mirror Installation Instructions Dodge Charger, Dodge Magnum, Chrysler 300
 Signal Mirror Installation Instructions 2006-2009 Dodge Charger, 2005-2008 Dodge Magnum, 2005-2009 Chrysler 300 THE safety accessory of the 21st Century. P/N 210-0123-0 Rev. A4 (10/7/09), BTV 2007 Muth
Mac mini Model A1176 SSD Installation
 Mac mini Model A1176 SSD Installation Installing an SSD in the Mac Mini A1176 Written By: Dozuki System 2017 guides.crucial.com Page 1 of 13 INTRODUCTION Upgrade your hard drive for more storage capacity.
Mustang Door Sill Plates Installation Guide
 Mustang Door Sill Plates Installation Guide The below installation instructions work for the following products: 1994-2004 Ford Mustang Steeda Polished Door Sill Plates Congratulations on purchasing a
INSTALLATION INSTRUCTIONS GRILLE GUARD RAM 1500 PART # 5058/5058-2
 INSTALLATION INSTRUCTIONS GRILLE GUARD PART # 5058/5058-2 PARTS LIST: Qty Description Qty Description 1 Grille Guard 8 12-1.75mm x 35mm Hex Bolts 2 Upper Frame Mounting s (for trucks without tow hooks
Suggested Instructions for: , , , C5 Emergency Brake Boot
 Suggested Instructions for: 608-348, 608-349, 614-653, 619-200 C5 Emergency Brake Boot Tools Ratchet, 10mm socket, extension #15 Torx screwdriver Needle nose pliers Masking Tape Very small flat head screwdriver
IMPORTANT INSTALLATION INSTRUCTIONS ATTACHED
 IMPORTANT INSTALLATION INSTRUCTIONS ATTACHED For Full-Color Installation Instructions, Please Visit: VOLANT.COM and Search by Part Number Please be sure to review the enclosed instructions prior to beginning
Mac mini (PowerPC) Hard Drive Replacement
 Hard Drive Replacement") Mac mini (PowerPC) Hard Drive Replacement Written By: irobot INTRODUCTION Upgrade your storage with a new hard drive. TOOLS: 1.5" Thin Putty Knife (1) Phillips #00 Screwdriver (1) Phillips #1 Screwdriver
Mac mini (PowerPC) Hard Drive Replacement Written By: irobot INTRODUCTION Upgrade your storage with a new hard drive. TOOLS: 1.5" Thin Putty Knife (1) Phillips #00 Screwdriver (1) Phillips #1 Screwdriver
Mac mini Model A1283 Speaker Replacement
 Mac mini Model A1283 Speaker Replacement Written By: Walter Galan ifixit CC BY-NC-SA www.ifixit.com Page 1 of 14 INTRODUCTION Restore sound to your mini by replacing the speaker. TOOLS: Jimmy (1) Phillips
Rockwell Automation PowerFlex 755 Disassembly
 Rockwell Automation PowerFlex 755 Disassembly Disassembling a 1HP Rockwell Automation PowerFlex 755 VFD. Written By: Alex Nolan ifixit CC BY-NC-SA www.ifixit.com Page 1 of 12 INTRODUCTION This guide outlines
Mac mini (PowerPC) Lower Case Replacement. Written By: irobot. ifixit CC BY-NC-SA Page 1 of 10
 Lower Case Replacement. Written By: irobot. ifixit CC BY-NC-SA Page 1 of 10") Mac mini (PowerPC) Lower Case Replacement Written By: irobot ifixit CC BY-NC-SA www.ifixit.com Page 1 of 10 INTRODUCTION The bottom case of the Mac mini. TOOLS: Jimmy (1) Anti-Static Wrist Strap (1) Phillips
Mac mini (PowerPC) Lower Case Replacement Written By: irobot ifixit CC BY-NC-SA www.ifixit.com Page 1 of 10 INTRODUCTION The bottom case of the Mac mini. TOOLS: Jimmy (1) Anti-Static Wrist Strap (1) Phillips
How to Remove a Car Stereo in a Chevy
 How to Remove a Car Stereo in a Chevy Tracker This guide is to teach you how to remove the car stereo from a 2000 Chevy Tracker. Written By: Nick Eaton ifixit CC BY-NC-SA www.ifixit.com Page 1 of 9 INTRODUCTION
Rugged Ridge Front Bumper Winch Plate JK
 Rugged Ridge Front Bumper Winch Plate 13-17 JK Note: These instructions involve cutting parts of your vehicle. Please read all instructions prior to starting. Installation Time: 2-3 Hours Tools Required:
Signal Mirror Installation Instructions Toyota Tacoma
 Signal Mirror Installation Instructions 2005-2015 Toyota Tacoma THE safety accessory of the 21 st Century. P/N 210-0115-0 Rev. A4 (3/11/15), BTV 2005 Muth Mirror Systems, LLC Page 3 of 12PplPage 3 of 12
LED Cup Holder Lights Installation Guide
 LED Cup Holder Lights Installation Guide (20112015 Kia Optima) Thanks for purchasing this LED Cup Holder Light Kit! If you have any questions or feedback please email us direct at Sales@K5OptimaStore.com
Bi-Color Signal Mirror Installation Instructions
 Bi-Color Signal Mirror Installation Instructions 2005-2009 Toyota Tacoma THE safety accessory of the 21 st Century. P/N 210-0141-0 Rev. A2 (3/30/09), BTV 2007 Muth Mirror Systems, LLC Page 3 of 13PplPage
MM Strut Tower Brace, Cobra (MMSTB-7)
") The MM strut Tower Brace attaches to each strut tower and to the firewall. 3430 Sacramento Dr., Unit D San Luis Obispo, CA 93401 Telephone: 805/544-8748 Fax: 805/544-8645 www.maximummotorsports.com MM
The MM strut Tower Brace attaches to each strut tower and to the firewall. 3430 Sacramento Dr., Unit D San Luis Obispo, CA 93401 Telephone: 805/544-8748 Fax: 805/544-8645 www.maximummotorsports.com MM
Ref Qty Part Description Part Number 1 1 Headlight-LED Nylon Tie Strap Instructions
 LED LIGHTS KIT P/N 2880289; 2880621 APPLICATION MY15-16 INDIAN MOTORCYCLES WITH THUNDERSTROKE 111 BEFORE YOU BEGIN Read these instructions and check to be sure all parts and tools are accounted for. Please
Headlight Removal & Installation: VW Jetta / Golf / GTi 5
 Headlight Removal & Installation: 2005-2010 VW Jetta / Golf / GTi 5 DISCLAIMER Buyer assumes any and all risk and liability from the installation and use of this product. Seller, author, or any of their
Mac mini Model A1176 PRAM Battery Replacement
 Mac mini Model A1176 PRAM Battery Replacement Written By: Walter Galan ifixit CC BY-NC-SA www.ifixit.com Page 1 of 12 INTRODUCTION The time and date, as well as other settings, are kept by the PRAM battery
SAFETY THIS PRODUCT IS FOR OFFROAD USE ONLY. ALL LIABILITY FOR INSTALLATION AND USE RESTS WITH THE OWNER.
 SAFETY Your safety and the safety of others is very important. In order to help you make informed decisions about safety, we have provided installation instructions and other information. These instructions
Written By: Angela Mossgrove
 SodaStream Source Loader Tab Replacement In this guide, you will be replacing the SodaStream Source Loader Tab. Written By: Angela Mossgrove ifixit CC BY-NC-SA www.ifixit.com Page 1 of 13 INTRODUCTION
Hop-Stopper Wrangler JK Hood Retainer installation
 Hop-Stopper Wrangler JK Hood Retainer installation Off Road Only ph 651.644.2323 www.offroadonly.com oro-info@offroadonly.com The ORO Hop-Stopper is a secondary latch mechanism, designed to retain the
The top did not ship with a printed instruction. Here is one available online:
 http://www.s2ki.com/s2000/topic/540666-how-to-install-a-hardtop-with-pics/ Posted 06 November 2007-12:41 AM When I ordered my hardtop, I began looking for a DIY to get my mind wrapped around doing the
MacBook Pro 15" Unibody 2.53 GHz Mid 2009 Front Display Glass Replacement
 MacBook Pro 15" Unibody 2.53 GHz Mid 2009 Front Display Glass Replacement Replacing the front display glass. Written By: Andrew Bookholt ifixit CC BY-NC-SA www.ifixit.com Page 1 of 25 INTRODUCTION Use
Media Low Sensor Maintenance Kit
 Media Low Sensor Maintenance Kit Installation Instructions This kit includes the parts and documentation necessary to install the Media Low Sensor maintenance kit in the Xi4 printers. Read these instructions
MM Strut Tower Brace, GT (MMSTB-5.1)
") 3430 Sacramento Dr., Unit D San Luis Obispo, CA 93401 Telephone: 805/544-8748 Fax: 805/544-8645 www.maximummotorsports.com MM Strut Tower Brace, 1996-97 GT (MMSTB-5.1) MMSTB-5.1 is for 1996-97 GT s with
3430 Sacramento Dr., Unit D San Luis Obispo, CA 93401 Telephone: 805/544-8748 Fax: 805/544-8645 www.maximummotorsports.com MM Strut Tower Brace, 1996-97 GT (MMSTB-5.1) MMSTB-5.1 is for 1996-97 GT s with
Applications: Section 1: Getting Started Tools Needed: BEFORE
 Installation of KBD Body Kits Porsche GT 3 Look/Style 2 Piece Polyurethane Front Bumper & Lip Applications: Porsche 996: 1999-2001 Porsche Boxster 986: 1997-2004 Page 1 Tools Needed: Philips Head Screwdriver