For the window switch piece, using a trim stick, pop the piece out below the wood trim:
|
|
|
- Nicholas Turner
- 5 years ago
- Views:
Transcription

 Phillips")
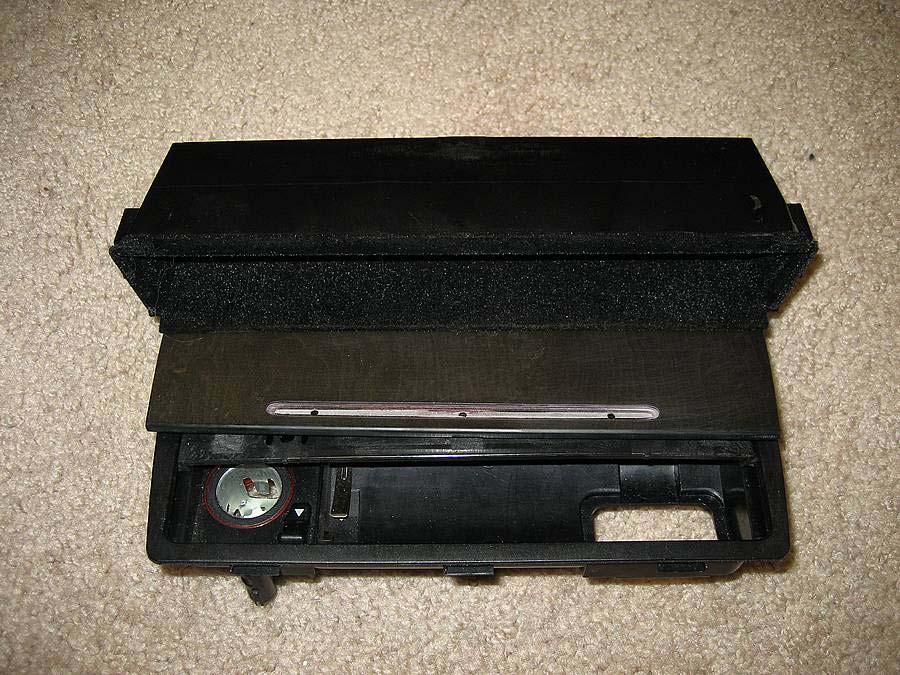
1 Facelift S8/A8 Removing Wood Trim Tools Needed: 1. Nylon Trim Stick 2. Philips Head Screwdriver 3. 5 and 6 mm allen heads 4. Small Torx screwdriver if removing emergency flasher switch Front and Rear Doors: For the top piece, it just clicks in place. Use a plastic trim stick to pry it out from one end, has 4 or 5 nipples on the back of the trim. Here is a picture of the back of the trim: For the window switch piece, using a trim stick, pop the piece out below the wood trim: This will expose (2) Phillips head screws (number 12 below), once they are removed, unscrew two Phillips head screws and the wood piece will come out. Disconnect wiring.

2

3 Stereo Surround: This piece has four nipples on the back of it, it just pulls out from the bottom. Move the shifter to neutral or drive and pull from the bottom of the piece of wood back. You ll have to pull very, very hard if it s never been removed before. Once the bottom two nipples release, the tops will release. You can see two of the nipples on the right hand side in the picture below. Remove the wiring from the switches. Once it pops out, unclicp the switches from behind, if you need to remove the hazard switch, you need to remove it with a small torx screwdriver.

4 Dash Trim Pieces (2) Right hand side: open glove box and on right hand side you will see two vertical screws that hold the air vent in. Remove the outboard most screw and remove the air vent. NOTE: it s not the two screws that are easily visible, it s a screw that is between those and recessed a little bit further up. Once it s removed, it should come out pretty easy. In the picture above, it IS NOT the two screws with the gold backers, it s a screw that sets into the black plastic piece just behind and above it. The trim is held in with a stud assembly that has a C style clip that must be removed (item 5 below). This clip tensions the trim piece with the stud/nut. NO NEED to remove or loosen the nut, just remove the C clip and the piece of trim will come out. Pull it out and pivot it, then the inboard side will come out. See image below.

5
 and remove the allen head screws (3) plus I believe there are (2) more at each side")

6 Left hand side: The kick panel below the steering wheel must be removed. Remove the trim cover pieces (2) and remove the allen head screws (3) plus I believe there are (2) more at each side bottom of the piece. Once the tan colored trim piece above is removed, remove the air vent with the screw as in the right hand side. Remove the C clips for the piece of trim. There are TWO on the left hand side. Remove wood trim. First picture below is driver s side trim, second is passenger side.


7
8 Center Console Trim Rear piece by seat heater switches (16): Just gently pry off. Parking Brake Cover: Turn locking screw (10) approximately 2 turns then remove trim from front. I found that it just normally pulls right off.

9 Ashtray: The wood is attached to the pivoting cover by four posts attached to the wood that SLIDE into the plastic cover. It should push FORWARD towards the front of the car then detach. When you get the right direction it will SLIDE off the the cover. After doing it on my car, do the following: push the ashtray slightly open, then rock the front of it to disengage the two tabs (left and right) on the sliders so the side closest to the driver (most aft in the car) disengages. Point it to an approximate degree angle up, then slide the wood piece back (from front of car towards back of car), the back of tabs will keep the back side attached to the sliders, the wood will then slide out of the tabs seen below. Put the replacement wood back in and reengage the two tabs. It should literally take 60 seconds.
10
 will now be exposed. Put everything back together again.")
11 Center Conolse Pieces: You need to have the center console pieces all ready before you start. 1. Remove side panels on the center console. 2. Remove gear shift surround piece. 3. Remove armrest. 4. Remove piece under armrest. 5. Now remove entire cup holder as the three screws (forward and aft) will now be exposed. Put everything back together again. Gear Shit Trim Piece: This piece is the only one on the center console that has two attachment screws. The center console side panels (item 1 in picture below) MUST be removed to get to these screws. Each side panel has one Phillips head screw holding it in, they are behind the carpet which is cut at the factory. See image below for driver s side, passenger side is in a similar location (Item 3 in picture below). Once that screw is removed, you have to turn the stop for the gas pedal 90 degrees to free the carpet on the driver s side. If the floor carpet and other carpet is not removed, pull them out also. Pull the side panels down and forward to remove, they just have extension fingers that latch them in place.
 on each side for the wood trim and (2) on each side for the shifter gate aluminum assembly. To make it easy just take them all out.")
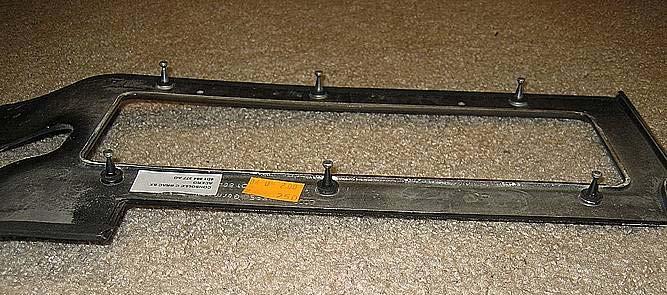
12 Once the side panels are out of the way, look on each side, behind where the side panels were installed, for the 6mm hex screws and remove them. There are (2) on each side for the wood trim and (2) on each side for the shifter gate aluminum assembly. To make it easy just take them all out. They are in the approximate location of screws (20) and (21) in the image above. Once the screws are removed, you can pry up on the wood trim and remove it. There will be some friction from the rubber gasket but it will come straight up and out. The following picture is the wood trim after it was removed, you are looking at it from the side/bottom where the 5mm hex heads screw into it. Gear shifter trim piece shown upside down.

13 Piece under armrest: The armrest must be removed first. Remove cover on back (item 6 below) exposing mounting hole, remove long bolt (7 below), then remove armrest. It is a TAPER FIT, so if it doesn t come off easily, hit it side to side with a mallet to loosen the taper. Once it is removed, pry the wood trim up with a trim stick. It has multiple posts holding it in that just pop up.
14


15 Cupholder Piece: Once you have the armrest piece and the shifter removed, you will see three phillips head screws holding the cupholder in. Remove them and change out the cup holder.
INSTALLATION INSTRUCTIONS
 3b Fig. A Fig. C Fig. B Fig. D KIT FEATURES ISO and DIN unit provisions Pocket (holds jewel cases) KIT COMPONENTS Radio Housing 99-7898 INSTALLATION INSTRUCTIONS APPLICATIONS ACCORD 990-97, CIVIC 999-00,
INSTALLATION INSTRUCTIONS
 KIT FEATURES ISO Stack and Double-DIN head unit provisions KIT COMPONENTS 99-780 INSTALLATION INSTRUCTIONS ACURA CL 997-99 Radio Housing Rear Support Tray Mounting Bracket (ACURA Legend) ISO Brackets ()
Mini Cooper Lock Actuator
 2001-2006 Mini Cooper Lock Actuator Replacement This guide is on how to remove the lock actuator from the cars door. Written By: Jem ifixit CC BY-NC-SA www.ifixit.com Page 1 of 13 INTRODUCTION In order
Signal Mirror Installation Instructions
 Signal Mirror Installation Instructions 2005-2010 Chevy Corvette C6 THE safety accessory of the 21 st Century. P/N 210-0144-0 Rev. A3 (9/29/2011), BTV 2007 Muth Mirror Systems, LLC Page 3 of 10PplPage
ES# ECS MKV R32 Dead Pedal Kit Installation Instructions
 ECS MKV R32 Dead Pedal Kit ES#261054 Proper service and repair procedures are vital to the safe, reliable operation of all motor vehicles as well as the personal safety of those performing the repairs.
RH-412 STEEL DOORS INSTALLATION INSTRUCTIONS
 RH-412 STEEL DOORS INSTALLATION INSTRUCTIONS By following the steps outlined below, the assembly, installation and adjustment of the steel doors, will be a simple process. Let s start with the Driver Side.
INSTALLATION INSTRUCTIONS RH 412 STEEL DOORS
 By following the steps outlined below, the assembly, installation and adjustment of the steel doors, will be a simple process. Let s start with the Driver Side. Note: Having the hood open makes the job
AUDI A8 D3 REPLACING THE OUTSIDE DRIVER DOOR HANDLE
 AUDI A8 D3 REPLACING THE OUTSIDE DRIVER DOOR HANDLE The keyless entry system in the D3 is a great feature. If you have the car key fob in your pocket, putting your hand under the door handle will unlock
BY ALIEN TECHNOLOGIES CORP
 BY ALIEN TECHNOLOGIES CORP Assembly Instructions TopLift Pros YOU MAY ALSO REVIEW OUR ASSEMBLY VIDEO, PLAY AND PAUSE AT YOUR CONVENIENCE. JUST VISIT US AT WWW.TOPLIFTPROS.COM AND GO TO Customer Support
Installation Guide for Rough Country 1.25 inch Body Lift Kit w/o Shocks (07-15 Wrangler JK 4 Door) Item # J10048 Option B; Manual
 Item # J10048 Option B; Manual") Installation Guide for Rough Country 1.25 inch Body Lift Kit w/o Shocks (07-15 Wrangler JK 4 Door) Item # J10048 Option B; Manual Installation Time: 3 Hours Tools Required: Jack (Tall enough to reach body
Installation Guide for Rough Country 1.25 inch Body Lift Kit w/o Shocks (07-15 Wrangler JK 4 Door) Item # J10048 Option B; Manual Installation Time: 3 Hours Tools Required: Jack (Tall enough to reach body
Signal Mirror Installation Instructions
 Signal Mirror Installation Instructions 2006 2007 Honda Ridgeline THE safety accessory of the 21 st Century. P/N 210 0142 0 Rev. A (9/5/07), BTV 2007 Muth Company, LLC Professional Installation Recommended:
AW-200GM APPLICATIONS GM MULTI KIT KIT FEATURES KIT COMPONENTS A B C TOOLS REQUIRED:
 APPLICATIONS GM MULTI KIT 99-2001 AW-200GM KIT FEATURES DIN Head Unit w/ Equalizer Provision KIT COMPONENTS A) Radio Housing B) Spacer C) Equalizer Dummy Plate D) Shaft Masks A B C D TOOLS REQUIRED: Phillips
05-17 Mustang Fuel System Wire Upgrade Installation
 PARTS LIST: -10AWG INLINE FUSE HOLDER WITH 30AMP BLADE FUSE -16FT 10AWG HIGH CURRENT PRIMARY WIRE -40AMP AUTOMOTIVE RELAY -1FT 10AWG GROUND WIRE -1FT 10AWG HIGH CURRENT PRIMARY WIRE OUTPUT TO FPDM -1FT
5X Racing Miata Radio Delete Plate Installation Instructions
 5X Racing 99-05 Miata Radio Delete Plate Installation Instructions Thank you for purchasing our unique, aluminum race inspired radio delete plate for your 1999-2005 Mazda Miata! These instructions will
HURST COMP STICK KIT DODGE CHARGER, MAGNUM, AND CHRYSLER 300 (with AUTO-STICK) Catalog # & by Hurst Performance
 Catalog # & by Hurst Performance") HURST COMP STICK KIT 2005-2007 DODGE CHARGER, MAGNUM, AND CHRYSLER 300 (with AUTO-STICK) Catalog #538 0410 & 538 0411 2009 by Hurst Performance FORM 159 0410 03/09 Thank you for purchasing the Hurst Comp
HURST COMP STICK KIT 2005-2007 DODGE CHARGER, MAGNUM, AND CHRYSLER 300 (with AUTO-STICK) Catalog #538 0410 & 538 0411 2009 by Hurst Performance FORM 159 0410 03/09 Thank you for purchasing the Hurst Comp
Porsche 997 Carbon Fiber Shift Boot Surround Install Instructions
 Porsche 997 Carbon Fiber Shift Boot Surround Install Instructions Tools Required T-25 Torx bit T-20 Torx bit T-15 Torx bit T-10 Torx bit MAcarbon Interior Install Tools Flat Screwdriver Blue Painter s
Suggested Instructions for: , , , C5 Emergency Brake Boot
 Suggested Instructions for: 608-348, 608-349, 614-653, 619-200 C5 Emergency Brake Boot Tools Ratchet, 10mm socket, extension #15 Torx screwdriver Needle nose pliers Masking Tape Very small flat head screwdriver
DIY S2000 Door Card Removal
 DIY S2000 Door Card Removal This Do-It-Yourself guide is intended to guide you through removing the door cards from your S2000. Tools Required: Phillips Head Screwdriver Trim tools (pry tool and a trim
Acura/Honda/Isuzu
 INSTALLATION INSTRUCTIONS FOR PART 95-7801 KIT FEATURES Double DIN radio provision Stacked ISO radio provision APPLICATIONS See application list inside Acura/Honda/Isuzu 1990-2006 95-7801 WIRING & ANTENNA
Finish Line Emergency Brake Boot INSTRUCTION SHEET. Part Number. Application: Corvette. Part Includes.
 Application: 1997-2004 Corvette Part Includes 1 - Emergency Brake Boot Finish Line Emergency Brake Boot Tools Needed T15 10mm PRE-INSTALLATION NOTES Read completely through instructions to familiarize
Reupholstering Seats in 1974 Mercedes 450SL (R107) rao
 rao") Reupholstering Seats in 1974 Mercedes 450SL (R107) rao 7-4-2017 Before starting: You have more space to work if the roof is removed from the car. The job took me about 1 full day s work for each of the
Reupholstering Seats in 1974 Mercedes 450SL (R107) rao 7-4-2017 Before starting: You have more space to work if the roof is removed from the car. The job took me about 1 full day s work for each of the
Table of Content. Sayl Disassembly for Recycling
 Y Sayl Disassembly for Recycling Table of Content 1. Work Chair Disassembly... 2 2. Side Chair Disassembly...17 3. Work Stool Footring Disassembly... 22 1 Y Sayl Disassembly for Recycling Work Chair Disassembly
Bi-Color Signal Mirror Installation Instructions
 Bi-Color Signal Mirror Installation Instructions 2005-2009 Toyota Tacoma THE safety accessory of the 21 st Century. P/N 210-0141-0 Rev. A2 (3/30/09), BTV 2007 Muth Mirror Systems, LLC Page 3 of 13PplPage
VIEWPOINT ALUMINUM RUNNING BOARD TOYOTA RAV4
 PARTS LIST: VIEWPOINT ALUMINUM RUNNING BOARD 1 Driver/Left Running Board 4 10-1.5mm x 50mm T-Bolt 1 Passenger/Right Running Board 12 10mm Plastic Retainers 1 Driver/Left Bracket 2 10-1.50mm x 40mm Hex
INSTALLATION. Preparation:
 INSTALLATION Preparation: Average Time Required: 2 to 3 hours Place a blanket down in the area which you will be working in. This will prevent scratches on the rear fascia / valance. Remove your License
Hawko Zhaga Systems Installation Instructions
 Hawko Zhaga Systems Installation Instructions Contents Wire Suspension Installation 4 Recessed Brackets 6 Fixed Suspension Rods 8 Swivel Suspension Rods 10 Surface Mount Ceiling 12 Surface Mount Wall
INSTALLATION INSTRUCTIONS K9-C20-32 & K9-C CHEVROLET 4 DOOR TAHOE, GMC YUKON, SUBURBAN and YULON XL
 INSTALLATION INSTRUCTIONS K9-C20-32 & K9-C21-32 2007-2014 CHEVROLET 4 DOOR TAHOE, GMC YUKON, SUBURBAN and YULON XL TOOLS REQUIRED: Power drill Drill bit set Standard & metric socket sets Phillips screwdriver
Nissan Titan 2017-up, Titan XD 2016-up B
 INSTALLATION INSTRUCTIONS FOR PART 95-7631B Nissan Titan 2017-up, Titan XD 2016-up 95-7631B Table of Contents Dash Disassembly...2-5 Kit Assembly. ISO DDIN radio provision... 6 KIT FEATURES ISO DDIN radio
Please read BOTH these Installation Instructions and the General Instructions before attempting to install or operate this equipment.
 Please read BOTH these and the General Instructions before attempting to install or operate this equipment. 1. Blue Ox towing products and accessories are intended to be installed by Blue Ox Dealers who
A3 Jetta TDI Chip Upgrade
 A3 Jetta TDI Chip Upgrade View the online version at http://vw.ogdenlabs.com/kerma.htm I'm writing this article to show how to go about upgrading an A3 Jetta TDI. Please be aware that this is for information
WPS crew Doors Installation instructions
 WPS-132-133 crew Doors Installation instructions ORDER OF INSTALLATION FOR A COMPLETE ENCLOSURE OF A CREW WPS (Weather Protection System) IS AS FOLLOWS: 1. Heater 2. Rear Thresholds - Right Hand & Left
Installation Instructions Precision Sport Shifter
 Installation Instructions Precision Sport Shifter 2004 and up Pontiac GTO Part Number 45043 2010, 2005, 2004 by B&M Racing and Performance Products This B&M Precision Sport Shifter has been designed to
Exterior Door Handle - LH - Unpainted (05-14 All)
") Tools Required: Exterior Door Handle - LH - Unpainted (05-14 All) 1) 10mm and 7mm sockets 2) Socket wrench (small size recommended) 3) T30 Torx bit 4) Plastic pry/molding tool (below, A) 5) Thin plastic
Tools Required: Exterior Door Handle - LH - Unpainted (05-14 All) 1) 10mm and 7mm sockets 2) Socket wrench (small size recommended) 3) T30 Torx bit 4) Plastic pry/molding tool (below, A) 5) Thin plastic
Fig. 1 Fig. 2. Fig. 3 Fig. 4 TOOLS REQUIRED: *Phillips Screwdriver *Three Inch Putty Knife*Panel Removal Tool *10mm Nut Driver CONTENTS:
 *Phillips Screwdriver *Three Inch Putty Knife*Panel Removal Tool *10mm Nut Driver CONTENTS: 2EA. 6X9 TWO WAY SPEAKERS P/N 05030281AA 1EA. INSTRUCTIONS P/N RBI05LXREAR 300c and Charger 1. Remove the lower
Volvo 240/260 New Face Overlay Installation Models By Dave Barton
 Volvo 240/260 New Face Overlay Installation 1975-80 Models By Dave Barton These custom faces are the product of years of research and experimentation. They are printed with a special printer using waterproof
 Page 1 of 8 Search Audizine Audizine Forums > Tech Forums > DIY How-To's B6 A4/S4: Interior Trim Removal User Name Password User Name Remember Me? Log in Register FAQ Calendar DIY How-To's Share and discover
Transit Connect Full/Half Installation Instructions
 GATHER THESE TOOLS FOR ASSEMBLY & INSTALLATION 7/16 wrench, T45 Torx socket, 7/16 socket, 3/8 drive ratchet - 3/8 socket One 1/8 square end driver bit provided - Electric drill/driver/18v cordless One
Signal Mirror Installation Instructions
 Signal Mirror Installation Instructions 2004 2008 Ford F-150 XLT, FX4, & Lariat Pre-wired without side signals Pre-wired with side signals Without side directional lights, see page 2 With side directional
TRAILMATE METEOR ASSEMBLY MANUAL
 TRAILMATE METEOR ASSEMBLY MANUAL The Trailmate Meteor recumbent has been designed for easy assembly. This means more time to enjoy the smooth ride with single speed, 3 speed coaster brake and 21 speed
EmagiKit. Privacy Pod Plus. Quiet. Easy. Affordable. INSTRUCTIONS ASSEMBLY
 EmagiKit Privacy Pod Plus Quiet. Easy. Affordable. INSTRUCTIONS ASSEMBLY DIMENSIONS AND COMPONENTS 47 47 Ceiling Unit 2-B 2-L 2-R Glass Door Corner Trim Door Handle 90 Adjustable Height Work Surface 1-B
Signal Mirror Installation Instructions Dodge Charger, Dodge Magnum, Chrysler 300
 Signal Mirror Installation Instructions 2006-2009 Dodge Charger, 2005-2008 Dodge Magnum, 2005-2009 Chrysler 300 THE safety accessory of the 21st Century. P/N 210-0123-0 Rev. A4 (10/7/09), BTV 2007 Muth
MMD Convertible Styling Bar Customer Installation Guide
 MMD Convertible Styling Bar Customer Installation Guide TOOLS REQUIRED/RECOMMENDED: Electric Drill 1 Forstner Bit (Hole Saw) 1 3/8 Hole Saw (manual calls for 1 ¾ ) 1/8, 3/8 & ¾ Drill Bits Rivet Gun Trim
Rugged Ridge Front Bumper Winch Plate JK
 Rugged Ridge Front Bumper Winch Plate 13-17 JK Note: These instructions involve cutting parts of your vehicle. Please read all instructions prior to starting. Installation Time: 2-3 Hours Tools Required:
WATCH VIDEO INSTALL! HOW-TO INSTALL CV-TL-80S-EB. Page: Instructions for Installation on: Toyota Land Cruiser 80 Series
 Clearview Towing Mirrors (Electric Power Adjustable) CV-TL-80S-EB Instructions for Installation on: Toyota Land Cruiser 80 Series 1990-1997 Page: 1 OF 13 Clearview s premiere line of replacement towing
FACTORY CAT TOMCAT CORPORATION
 FACTORY CAT RPS TOMCAT CORPORATION Artificial Turf and Carpet Sweeping Install Kit #349-641 & #349-642 1. Detach batteries so that there is no power running through the machine before starting. 2. Start
Basic steps to time the Gammill quilting machine s rotary sewing hook
 Basic steps to time the Gammill quilting machine s rotary sewing hook 1.) Turn the machine off and unplug it. 2.) With the needle bar in the raised position, remove the bobbin and bobbin case. 3.) Remove
Lexus ES350 Window Clip Replacement
 Page 1 of 10 1.0 Purpose The following instruction details the tools and supplies required, and the steps for removing and replacing the broken window clip in your 2007-2012 Lexus ES350. 2.0 Tools and
Installation for Full Size Polaris Ranger Crew Doors
 Installation for Full Size Polaris Ranger Crew Doors Order of Installation: Heater Doors Wiper on to Windshield Windshield Top & Back Panel Note: Most of the steps in these instructions need to be repeated
INSTRUCTIONS TO INSTALL THE ORA XL MIRROR TO THE NISSAN PATROL GU SERIES
 Tools Long flat screw driver and a small flat screw driver Phillips head screw driver 10mm Socket Container to hold bolts, screws and loose items. Installation INSTRUCTIONS TO INSTALL THE ORA XL MIRROR
STEP 1 : DESTROYER FRONT BUMPER INSTALL GATHER YOUR TOOLS AND LAY OUT YOUR PARTS... *shorty bumper to show hardware* Tools Required:
 DESTROYER FRONT BUMPER INSTALL JL STEP 1 : GATHER YOUR TOOLS AND LAY OUT YOUR PARTS... Tools Required: - Utility knife - 11/16 Deep socket - Ratchet - 11/16 Crescent wrench - Ratchet Extension - 1/4 socket
Signal Mirror Installation Instructions
 Signal Mirror Installation Instructions Honda CRV 1997-2003 THE safety accessory of the 21 st Century. P/N 210-0032-0 Rev B2 (6-26-04), GG 2003 Muth Mirror Systems, LLC. Note: Professional Installation
WARNING!! DO NOT LIFT DOORS UP WHEN THE HOOD IS OPEN. THE DOORS WILL HIT THE HOOD!
 WARNING!! DO NOT LIFT DOORS UP WHEN THE HOOD IS OPEN. THE DOORS WILL HIT THE HOOD! THIS KIT INCLUDES: 4 M8-1.25X30MM BOLTS WITH WASHERS 12 M8-1.25X40MM BOLTS WITH WASHERS 2 SHOULDER BOLTS WITH RIGHT AND
Signal Mirror Installation Instructions Toyota Tacoma
 Signal Mirror Installation Instructions 2005-2015 Toyota Tacoma THE safety accessory of the 21 st Century. P/N 210-0115-0 Rev. A4 (3/11/15), BTV 2005 Muth Mirror Systems, LLC Page 3 of 12PplPage 3 of 12
Introduction. Rocky Mountain Westy Swing Away Carrier Kit Installation Instructions
 Rocky Mountain Westy Swing Away Carrier Kit Installation Instructions Introduction Thank you for purchasing the Rocky Mountain Westy Swing Away Carrier Kit. We pride ourselves in the products we develop
Barricade Trail Force HD Rear Bumper w/ Tire Carrier installation (07-16 Wrangler JK)
") Barricade Trail Force HD Rear Bumper w/ Tire Carrier installation (07-16 Wrangler JK) Installation Time: 2-3 Hours Tools Required: Tire iron Ratcheting socket set (ratchet plus 13, 16, 19mm sockets) Open
Barricade Trail Force HD Rear Bumper w/ Tire Carrier installation (07-16 Wrangler JK) Installation Time: 2-3 Hours Tools Required: Tire iron Ratcheting socket set (ratchet plus 13, 16, 19mm sockets) Open
Installation Instructions for FC2 & FC15 Forward Controls for the Super Magna
 Installation Instructions for FC2 & FC15 Forward Controls for the Super Magna It is highly recommended that you use a thread lock compound such as Loctite brand on all threads to keep them from vibrating
BX2173 Installation Instructions Ford Focus (including the 2.3L engine) 2003 Ford Focus SVT
 2003 Ford Focus SVT") BX2173 Installation Instructions 2000-04 Ford Focus (including the 2.3L engine) 2003 Ford Focus SVT Serial No. The front fascia, coolant line bracket and anti-pollution devices are removed for baseplate
BX2173 Installation Instructions 2000-04 Ford Focus (including the 2.3L engine) 2003 Ford Focus SVT Serial No. The front fascia, coolant line bracket and anti-pollution devices are removed for baseplate
Mazda Miata window guide replacement for NBs with electric windows Other model years would be similar, I imagine.
 Mazda Miata window guide replacement for NBs with electric windows Other model years would be similar, I imagine. This procedure was written to supplement the window guide supplier s procedure, not replace
Installation instructions, accessories. TV receiver, digital
 Installation instructions, accessories Instruction No 30756561 Version 1.1 5 Part. No. 30756181, 30756569 TV receiver, digital Volvo Car Corporation TV receiver, digital- 30756561 - V1.1 Page 1 / 36 Equipment
FENDER FLARE INSTALLATION
 : 2009 - UP Ram 1500 Fleetside. (Exclude R/T Models) Tools Required 1. #2 Phillips Driver 2. Socket Wrench 3. 8mm Socket 4. 1/2 Wrench 5. Utility Knife PRIOR TO INSTALLATION Hardware Kit Included 5/16
FRONT BUMPER INSTALLATION INSTRUCTIONS Toyota 4Runner
 Aluminess Products Inc 9402 Wheatlands Ct. #A Santee, CA 92071 619-449-9930 FRONT BUMPER INSTALLATION INSTRUCTIONS 2003-2009 Toyota 4Runner Please read before beginning Stainless steel hardware may bind
Classic SportBar Camaro V6 or V8
 Classic SportBar 2011-2015 Camaro V6 or V8 The Classic SportBar is intended for restyling purposes only and does NOT provide roll over protection. Read entire installation guide before starting. Component
SIGNATURE FRONT BUMPER INSTALL
 SIGNATURE FRONT BUMPER INSTALL JL **PLEASE READ THROUGH THE INSTRUCTIONS BEFORE BEGINNING ANY PART OF THE INSTALLATION PROCESS** 1. You can now remove the trim strip (2 vertical clips, 4 horizontal, 2
Paco Motorsports Strong Arms X
 Paco Motorsports Strong Arms 13-101X Thanks for purchasing our Strong Arms. These braces reinforce the frame horns that support the engine and transfer all of the cornering and road impact loads into the
Xbox 360 S Hard Drive Bracket Replacement
 Replace your HDD's plastic bracket. Rédigé par: David Hodson ifixit CC BY-NC-SA fr.ifixit.com Page 1 de 33 INTRODUCTION Give your Xbox's wiggly hard drive a new bracket to sit in. OUTILS: Metal Spudger
Tuff Tread. 502 W. Montgomery STE 120 Willis, TX PH: (800) FAX: (888)
 FAX: (888)") Motor Brush Holder Assembly Installation Instructions Never use a sanding stone or comm stone on the commutator of a Noramco Fitness Treadmill motor. The commutator of a motor that has been properly broken
Motor Brush Holder Assembly Installation Instructions Never use a sanding stone or comm stone on the commutator of a Noramco Fitness Treadmill motor. The commutator of a motor that has been properly broken
Toyota FJ Cruiser 2006-Up Set Part # Revision A
 Toyota FJ Cruiser 2006-Up Set Part # 31924 Revision A 03-31-08 Step 1: Prior to Installation: A) Fit: Verify the fit of the flares to vehicle. (Some filing, sanding, or cutting may be necessary to ensure
2015 GMC Yukon. Upper Class Grille Insert
 Upper Class Grille Insert TOOLS REQUIRED: Flat Head Screwdriver Long Flat Head Screwdriver Phillips Screwdriver 7mm Socket 10mm Socket Ratchet & Extensions 3/16 Drill Bit Power Drill Cutting Wheel or Saw
1 Removing The Screen Track, Screen and Screen Rollers Note: The screen remains in the track while the track is removed and/or installed.
 Sliding Door Screen and Screen Track Replacement Service Instruction These instructions apply to: Architect Series 12/2004-Current Designer Series 3/2005-Current Tools Required: #2 Phillips head screwdriver
OTHER TOOLS MAY BE NEEDED DEPENDING ON YOUR VEHICLE.
 THIS KIT INCLUDES: 16 M8-1.25X40MM BOLTS WITH WASHERS 2 SHOCKS 720 PSI RIGHT AND LEFT HINGE ASSEMBLY 2 SHOULDER BOLTS 2 PINS TOOLS REQUIRED FOR INSTALLATION: AIR RACHET, GRINDER AND CUTTER. 10MM, 11MM,
AUTOMATIC ADVANCE MANUAL
 AUTOMATIC ADVANCE MANUAL AVL Looms, Inc. 3851 Morrow Lane, Suite #9 Chico, CA 95928-8305 530 893-4915 530 893-1372 fax # info@avlusa.com www.avlusa.com Copyright 2009 TABLE OF CONTENTS Page # I. Parts.........................
INSTALL INSTRUCTIONS
 Jeep JK Rear Stealth Bumper Product : 508R0B, 508R0B TC Applica on : 2007+ Jeep Wrangler JK ( 2 Door and 4 Door ) Page ( 1 of 5 ) I WARNING Read the instruc ons completely before beginning installa on.
Applications: Section 1: Getting Started Tools Needed: BEFORE
 Installation of KBD Body Kits Porsche GT 3 Look/Style 2 Piece Polyurethane Front Bumper & Lip Applications: Porsche 996: 1999-2001 Porsche Boxster 986: 1997-2004 Page 1 Tools Needed: Philips Head Screwdriver
Signal Mirror Installation Instructions Honda Odyssey
 Signal Mirror Installation Instructions 2005-2009 Honda Odyssey THE safety accessory of the 21st Century. P/N 210-0122-0 Rev. A4 (6/9/09), BTV 2006 Muth Company, LLC PROFESSIONAL INSTALLATION RECOMMENDED
Rugged Ridge Body Armor Guard Kit, 5 Pieces, Black (07-Current JK 4-door)
") Rugged Ridge Body Armor Guard Kit, 5 Pieces, Black (07-Current JK 4-door) Installation Time: 60 Minutes Tools Required: Notes: Phillips head screwdriver 3/8 socket or Flat head screwdriver 1/2 socket 7
Rugged Ridge Body Armor Guard Kit, 5 Pieces, Black (07-Current JK 4-door) Installation Time: 60 Minutes Tools Required: Notes: Phillips head screwdriver 3/8 socket or Flat head screwdriver 1/2 socket 7
4832A Installation Sheet Part List
 4832A Installation Sheet Part List (1) 4016A-43-003 Qty 1- (2) 4016A-43-002 Qty 1- (3) 4016A-43-001 Qty 2- (4) 4016A-10-005 Qty 1- (5) 4016A-43-004L Qty 1- Mounting Bolt Kit (A) (K) Qty 2 - Qty 6 - M10
IMPORTANT: PLEASE RETAIN THIS INSTRUCTION MANUAL FOR FUTURE REFERENCE
 IMPORTANT: PLEASE RETAIN THIS INSTRUCTION MANUAL FOR FUTURE REFERENCE 005-07 Cadillac STS Classic 3D Z, Classic Dual Weave, Classic Mesh & Classic Black Mesh Grilles B 7 HR 3 STS Classic 3D Z Grille Part
RAMPAGE P R O D U C T S. INSTALLATION INSTRUCTIONS BRONCO ZIPPER FASTRACK TOP PART #984xx BRONCO TOOLS REQUIRED
 RAMPAGE P R O D U C T S 84 (+/- 1/4 ) INSTALLATION INSTRUCTIONS BRONCO ZIPPER FASTRACK TOP PART #984xx BRONCO 1966-1977 TOOLS REQUIRED 3/8 WRENCH 7/16 WRENCH ½ WRENCH #2 PHILLIPS SCREWDRIVER 1/8 DRILL
INSTALLATION INSTRUCTIONS KK-K9-C12-K CHEVY IMPALA
 INSTALLATION INSTRUCTIONS KK-K9-C12-K 2000-2005 CHEVY IMPALA READ ALL INSTRUCTIONS PRIOR TO INSTALLATION TOOLS REQUIRED: Power Drill Drill bits1/4 and 5/32 7/l6 wrench and socket 15,18 and\or 19mm socket
THIS KIT INCLUDES: 8 M8-1.25X40MM BOLTS WITH WASHERS 8 M8-1.25X30MM BOLTS WITH WASHERS RIGHT AND LEFT HINGE
 Sal es@lambodoorscanada. com 2407A Kal adarave,ottawa,on K1V 8B9 THIS KIT INCLUDES: 8 M8-1.25X40MM BOLTS WITH WASHERS 8 M8-1.25X30MM BOLTS WITH WASHERS RIGHT AND LEFT HINGE 2 SHOCKS 565 PSI 2 SHOULDER
BMW X5 OEM RUNNING BOARD PART#SBBW
 INSTALLATION INSTRUCTIONS 2014-2016 BMW X5 OEM RUNNING BOARD PART#SBBW-146-74 QTY HARDWARE 1 Driver Side OEM Running Board 1 Passenger Side OEM Running Board 8 Rivet Pin 1 Page Step 1: Verify all parts
RTI TECHNOLOGIES, INC.
 RTI TECHNOLOGIES, INC. BRC500 & BRC550 Arbor/Spindle Mechanism Adjustment & Service Technical Instructions The arbor/spindle mechanism of the BRC500/550 is designed to be robust for long life. Occasionally
Signal Mirror Installation Instructions
 Signal Mirror Installation Instructions Ford Explorer 1996-2001, Ford Explorer SportTrac 2001, Ford Ranger 1996-2001, Mazda B-2500\B-3000\B-4000 1998-2001, Mercury Mountaineer 1997-2001 THE safety accessory
Chrome Mustang Billet Interior Door Handles (05-09) - Installation Instructions
 - Installation Instructions") Chrome Mustang Billet Interior Door Handles (05-09) - Installation Instructions The below installation instructions work for the following products: Chrome Mustang Billet Interior Door Handles (05-09)
Chrome Mustang Billet Interior Door Handles (05-09) - Installation Instructions The below installation instructions work for the following products: Chrome Mustang Billet Interior Door Handles (05-09)
CORVETTE CORVETTE REV: Made in USA U.S. PATENT #6,808,223; #6,845,547; #7,140,075; #7,059,655 and other patents pending.
 CORVETTE 2005-2006 CORVETTE 2005-2007 REV: 7-2-07 Made in USA U.S. PATENT #6,808,223; #6,845,547; #7,140,075; #7,059,655 and other patents pending. Page 1 of 12 CORVETTE C6 2005-2007 THIS KIT INCLUDES:
Written By: Walter Galan
 Xbox 360 CPU Heat Sink Replacement CPU heat sink replacement. Written By: Walter Galan ifixit CC BY-NC-SA www.ifixit.com Page 1 of 27 INTRODUCTION Use this guide to remove the CPU heat sink from your Xbox
Under Seat Storage Drawer Installation Instructions
 Under Seat Storage Drawer Installation Instructions Parts List: 1) Drawer Assembly 8) Self Tapping Screws 1) Instructions 1) Template Tools Needed: Drill and/or Bit Driver Tape Measure Jigsaw or metal
INSTALLATION INSTRUCTIONS SIDE BAR FORD ESCAPE & MAZDA TRIBUTE PART #
 INSTALLATION INSTRUCTIONS SIDE BAR 2008-2010 FORD ESCAPE & MAZDA TRIBUTE PART # 50136 50137 PARTS LIST: 1 Driver/Left Sidebar 2 10-1.50mm x 35mm Bolt Plate 1 Passenger/Right Sidebar 2 10-1.50mm x 30mm
Bushwacker Jeep Flat Style Fender Flares Front Pair
 Bushwacker Jeep Flat Style Fender Flares Front Pair Note: These instructions involve cutting parts of your vehicle. Please read all instructions prior to starting. Installation Time: 3-4 Hours Tools Required:
Adjusting, Changing and Maintaining The Latches and Catches on Your Airstream
 Adjusting, Changing and Maintaining The Latches and Catches on Your Airstream Hinges,Latches and Catches in your Airstream Bumps, pulling, gravity and time can have an affect on hinges and latches. Adjustments
MAG-CONV Basic, 48, 48R & Midline Front Mount
 Parts Required: Tools Used: Mag Wheels Brakes Brake Rods Mounting Bracket Anti Tippers 7/16" Wrench Screw Driver Rubber Mallet 5/8 Wrench 5mm Allen Wrench Step Execution Figures 1 Remove front 5" total
INSTALLATION INSTRUCTIONS GRILLE GUARD RAM 1500 PART # 5058/5058-2
 INSTALLATION INSTRUCTIONS GRILLE GUARD PART # 5058/5058-2 PARTS LIST: Qty Description Qty Description 1 Grille Guard 8 12-1.75mm x 35mm Hex Bolts 2 Upper Frame Mounting s (for trucks without tow hooks
Install. instructions. B8 A4/S4 RS4 Blackout Mesh Style Grille. By: 7716 Wiles Rd.Coral Springs, FL
 Install instructions B8 A4/S4 RS4 Blackout Mesh Style Grille By: Preface: The best fitting grille on the market! Completely change the look of your Audi A4 or S4. This mesh style grille features a black
Bushwacker Jeep Flat Style Fender Flares Rear Pair (JK Wrangler 2dr)
") Bushwacker Jeep Flat Style Fender Flares Rear Pair (JK Wrangler 2dr) Note: These instructions involve cutting parts of your vehicle. Please read all instructions prior to starting. Installation Time: 3-4
Bushwacker Jeep Flat Style Fender Flares Rear Pair (JK Wrangler 2dr) Note: These instructions involve cutting parts of your vehicle. Please read all instructions prior to starting. Installation Time: 3-4
SAFETY THIS PRODUCT IS FOR OFFROAD USE ONLY. ALL LIABILITY FOR INSTALLATION AND USE RESTS WITH THE OWNER.
 SAFETY Your safety and the safety of others is very important. In order to help you make informed decisions about safety, we have provided installation instructions and other information. These instructions
Service Bulletin
 Service Bulletin 18-026 April 24, 2018 Version 5 Safety Recall: Left (Driver Side) Second Row Seat Recliner Does Not Lock Supersedes 18-026, dated April 7, 2018 to revise the information highlighted in
STEPS FOR REMOVING REAR DOOR PANELS, DOOR UNLOCK HANDLE ASSEMBLY AND TRIANGULAR INSERT ON QUARTER WINDOW DIVIDER
 Please give credit where credit is due! This DIY was completed ENTIRELY by the hardest working VW Vortex moderator on the site!! Gary Thompson, Ph.D. - vortex ID VGRT6, email address vgrt6@yahoo.com. Please
WOLF PUP LOOM TM & WOLF PUP LT LOOM TM
 WOLF PUP LOOM TM & WOLF PUP LT LOOM TM Assembly Instructions FL3000 FL3006 FL3009 WOLF PUP WOLF PUP LT Find out more at schachtspindle.com Schacht Spindle Company 6101 Ben Place Boulder, CO 80301 p. 303.442.3212
Page 1 of 5 Instructions for Fitting Lower Grille to S Type Jaguar. Part Code 9048
 Page 1 of 5 Instructions for Fitting Lower Grille to S Type Jaguar. Part Code 9048 To fit this grille you will need: Torch, 10mm spanner, 10mm socket with extension, T30 torx bits, Screwdrivers, Pliers,
TI-84 Plus Silver Edition Individual Key Replacement
 TI-84 Plus Silver Edition Individual Key Replacement This guide will show you how to replace an individual key on your TI-84 Plus Silver Edition. Written By: Kale McKinney ifixit CC BY-NC-SA www.ifixit.com