PASTELS DEMONSTRATION
|
|
|
- Adelia Eaton
- 5 years ago
- Views:
Transcription


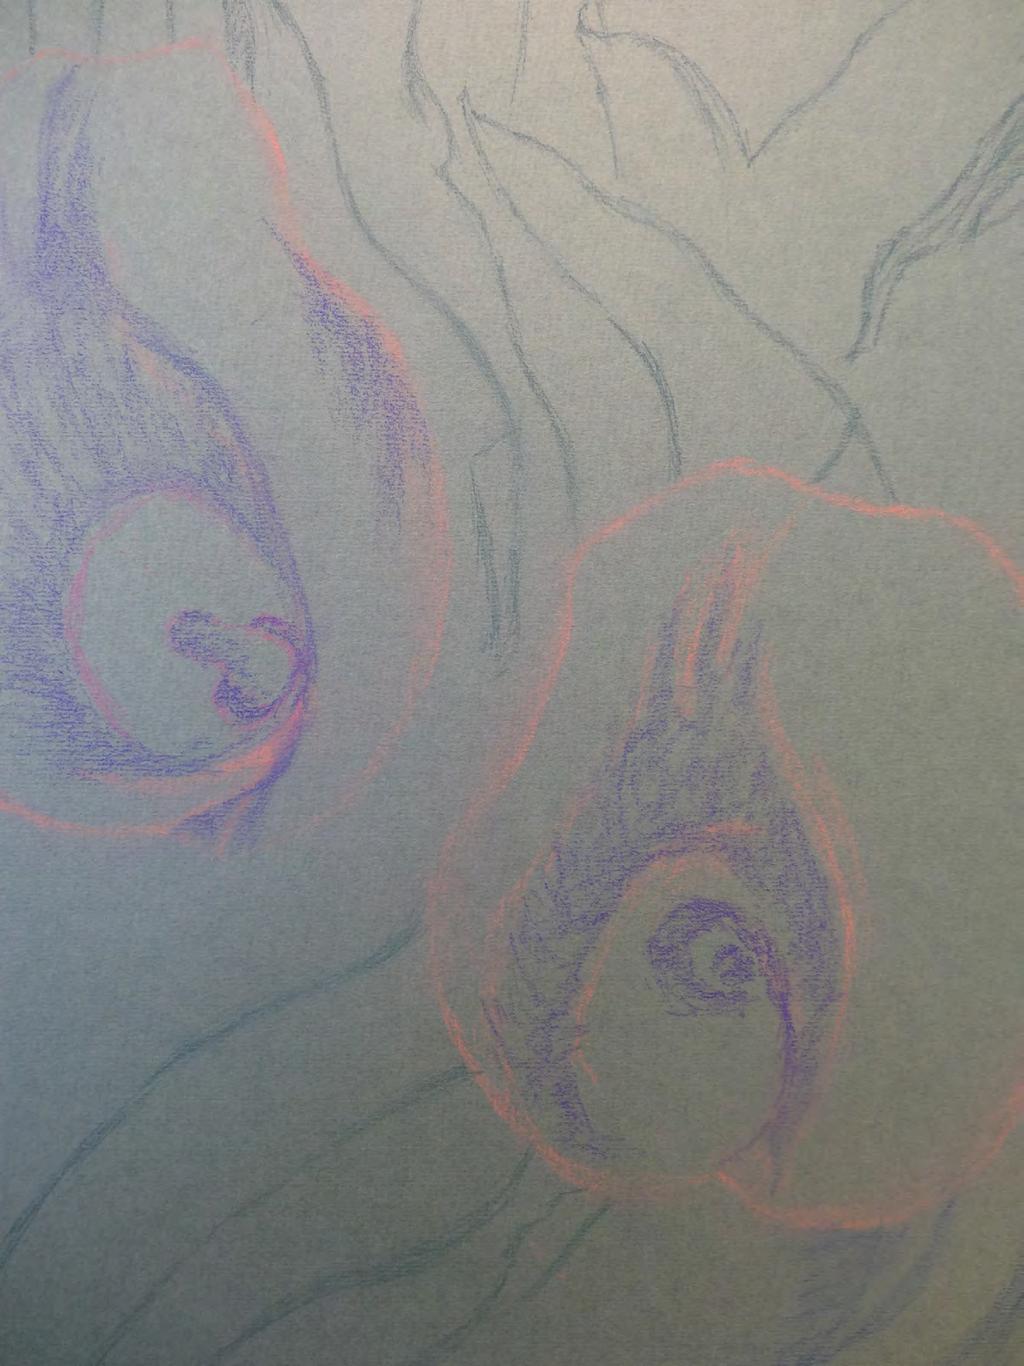
1 PASTELS DEMONSTRATION FLORAL STILL LIFE By Michael Howley In this guide I will be demonstrating how to develop a floral still life using blending and layering techniques. As you can see from the photograph, I have selected an unusual composition taken from above a potted Calla Lilly plant. This is because I like the flowing forms of the lilies and leaves and I was drawn to the play of light and shade across them. I felt that zooming in would allow me to make the most of these aspects. I worked from an image on my computer screen, so if you work from a printed out version, you may want to modify and deepen the tones a little. 1
.")
2 Materials Paper: I have chosen to work on a soft green paper from Windsor and Newton (Similar to one available in the Fabriano Tiziano range and a Fern Green available in the Daler-Rowney range). It is slightly cool and a little lighter than a mid tone (though it looks a bit grey in the photographs). I felt it would help me with my greens generally, as I could allow it to show through to varying degrees. If you use a green paper that is lighter, darker or stronger in colour, you will probably have to select slightly different colours and tones of pastel than me as my choices were based on working on (and incorporating) this particular green. Pastels Daler-Rowney Soft Pastels 1. Cream White 2. Pansy Violet Tint 1 3. Pansy Violet Tint 2 4. Crimson Lake Tint 2 5. Crimson Lake Tint 3 6. Purple Tint 3 7. Pansy Violet Tint 8 8. Mauve Tint 6 9. Purple Grey Tint Yellow Green Tint Yellow Green (Light Tint) from the Conte Range 12. Brilliant Green Tint Hookers Green Tint Olive Green Tint Terre Verte Tint French Ultramarine Tint French Ultramarine Tint Indigo Tint 8 I also used the following Derwent Pastel Pencils for my initial sketch: 1. Geranium Lake 2. Forest Green 3. Dark Violet 2
3 A note about pastels and colour selection: You don t have to rush out and buy the same pastels as I have used here or have exactly the same colours. Use the above range as a guide to the sorts of colours I used and then match them as closely as you can from whatever range you have (or buy). I like to work with Daler-Rowney ranges because of their softness and quality but you could get very good results from less expensive ranges of pastels like Inscribe or Mung-Yo for example. My online tutorials go through this in more detail and there I suggest a range of 48 Inscribe (half size) which will give you a decent palette of colours with quite a few subtle tints that you will often use. I also look at colour mixing using pastels a tutorial that gives you an idea of just how many colours you can mix from a few warm and cool primaries (plus white). Colour is personal and subjective and you might make different colour selections than me depending on your own perception and instinct. 3


4 The Initial Sketch Sometimes pencil will not show up well on a certain tone of paper so in this case, I chose 3 pastel pencils to sketch out my main shapes with: Geranium Lake for the outline of the Flowers; Forest green for the Leaves; and Dark Violet for the central details and shadow areas in the flower forms. Each of these will disappear into the pastel layers as the painting progresses. You could use harder ranges of soft pastels like Conte instead or even your soft pastels to sketch out. On the following page you will find an A4 picture of my sketch. If you choose to work to A4 size, you can copy the picture directly, if you want to work a bit bigger, try to grid method to enlarge my sketch onto your paper. If you re unsure how this works, take a look at Bob Davies Drawing Foundation Course on ArtTutor.com 4
5 5
.")


6 Step 1: Blocking in Using the side of the pastel mainly, I began by blocking in the main areas of the leaves using Hookers Green (Tint 8). Remember to vary the pressure here to allow the green of the paper to break through in certain areas. Some areas I left uncovered ready for some highlights later on. Take your time to observe the subtle shifts from one shape to another and don t be tempted to switch off and just fill in the whole area. 6


,")
7 Next we can move onto some blending. Concentrating on the areas that we ve just filled in, let s gently blend the pastel into the surface of the paper. Be careful to blend around the other shapes, and again, we don t want something that s too uniform so you might want to vary the pressure or amount of blending so that you keep the shapes that you ve drawn and allow varying amounts of the paper surface to break through. Moving on to the flowers now, I applied a first layer of Pansy Violet (Tint 1), floating this over the shadow tones of my pencil sketch. I then gently blended this into the paper surface, allowing it to merge with the sketch. 7

8 Next, I applied a further layer of Pansy Violet (Tint 1) to lighten areas of the flowers, which I then blended in. Effectively, these two layers of Pansy Violet change the working surface from the green of the paper to a soft foundation layer for further pinks and mauves. 8

, we can build the")


9 Step 2: Building Initial Colour Layers (Flowers) We ve got a really good base for our painting now, so we can start to build up some of the layers of colour that will make this picture luscious and vibrant. So using strokes that followed the contours (and observing the shapes), we can build the suggestion of detail in the flowers using Pansy Violet (Tint 2). Again, I followed this by blending the layer gently in, pinching my little finger together with another for control of edges. There is an art to blending involving carefully following the shapes that you have applied and varying the pressure so that the effect is not too even or mechanical. A light touch is the most important thing to remember! 9
 and alternated this with more of the Pansy")


 to certain areas, which I then")

10 Next, I warmed the pinks by adding Crimson Lake (Tint 3) and alternated this with more of the Pansy Violet (Tint 2) to create the subtle ridges in the flower surface. Again, I gently ran my finger over these to soften them in. I then added some depth by applying a layer of Crimson Lake (Tint 3) to certain areas, which I then blended in. Notice in the centre, I used smaller stippled strokes to suggest the stamen and allowed the Dark Violet Pencil and green paper layers to show through a little for depth. 10


11 Step 3: Developing Shadows and Depth (Flowers) I then began to develop the shadow areas and textural contrasts on the flowers using Purple (Tint 3). Again being careful to observe the shapes, I used the side of the pastel for larger areas and the end for detail. As usual, I followed this with some light blending. 11
.")


 to certain areas and")
12 To give greater depth to these areas, I then added and blended in some Mauve (Tint 6). Then with Pansy Violet (Tint 8), I added another layer, developing the texture a little more in the ridges and the central detail. I followed this by adding a little more Crimson Lake (Tint 3) to certain areas and blending layers lightly together. 12
, I drew")


13 Step 4: Adding Detail (Flowers) Using Purple Grey (Tint 6), I drew in the dark tones at the base of the stamen. Then I added Yellow Green (Tint 1), Cream White and Brilliant Green (Tint 6) to the central area of the right hand flower, blending them together slightly. 13


14 Step 5: Developing the Leaves and Background I began then to develop the shape, detail and contrast in the leaves using a combination of Olive Green (Tint 8) and Indigo (Tint 8). Again, I allowed varying amounts of the Hookers Green and the paper colour to show through these layers. I was also careful when working along edges and used the side of the pastel to create crisp contrasts where needed. 14

, and")
, Mauve")
. I also emphasized the")

15 Then I developed the small flower form in the background beginning with Pansy Violet (Tint 2), and overlaying with Pansy Violet (Tint 8), Mauve (Tint 6) and Indigo (Tint 8). I also emphasized the highlight on the edge of the form using Yellow Green (Tint 1). 15
; Purple Grey (Tint 6); French")

16 Next, I worked on the pot in the bottom right of the picture, using in order, Purple (Tint 3); Purple Grey (Tint 6); French Ultramarine (Tint 4) and French Ultramarine Tint 3). With each I followed the contour of the form and then blended in. 16
, I then brought out")


. I noticed at this point another small flower in the")
17 Step 6: Refining Detail & Contrast Using Terre Verte (Tint 1) and a Conte Yellow Green (Light Tint), I then brought out some of the lighter tones and highlights across the leaves. I worked fairly lightly and blended areas with previous layers to soften them in. Occasionally, I would use a firmer stroke and blend very little in order to pick out a highlight. I followed this by sharpening up the darker details using hookers green (Tint 8); Olive Green (Tint 8) and Indigo (Tint 8). I noticed at this point another small flower in the background which I brought out using Pansy Violet (Tints 1 & 2). 17


18 Then I continued to work on the lighter tones and highlights using Terre Verte (Tint 1) and the Conte Yellow Green (Light Tint). I varied the strokes here to pick out crisp details, flowing highlights and stippled or broken detail. If you want more help with some of these tricker markmaking techniques, you can refer to my Soft Pastels Foundation Course on ArtTutor.com. 18


19 Returning to the flowers, I added depth and detail to the central areas using Crimson Lake (Tint 3) and Pansy Violet (Tint 8). 19

20 Step 7: Stepping Back and Assessing At this stage, I paused and had a good long stare at the image. Then I went away and had a brew and came back to it. This allowed me to see it with fresh eyes and to work out what final refinements I could make. I felt that the highlights on the flowers could do with bringing out a little more and so I decided to heighten the contrasts a little. 20


21 Step 8: Final Refinements Firstly, I began to brighten the highlight areas using Pansy Violet (Tint 1). Then I increased the contrast in the shadow areas and ridges using Mauve (Tint 6). And Finally, I further emphasized key highlights in these areas. 21

22 The Finished Outcome So here is the final piece. I am pleased with the sense of flow about the shapes and the play of light and dark across the image. As you will have experienced, the process involved sketching it out using pastel pencils, blocking initial areas in, building colour layers, adding tonal depth, developing contrasts of light and dark followed by assessing, refining and finally tweaking until you are satisfied that the piece is finished. I hope you ve enjoyed having a go and that you have found this guide helpful. 22


23 About Michael Howley Born in Burnley in 1964, I have taught and painted around the North and Pendle area for over 25 years. Soft Pastels is my favourite medium and I particularly enjoy applying it to the subtleties of Landscape painting. I try to capture a sense of the moment and emphasise mood and atmosphere. See Michael s full profile at: Find more guides like this one at Coloured Pencil Nude by Jane Lazenby Strawberries by Karl Fletcher Making Charcoal by James Wood Midnight Sky in Pastel by Michael Howley 23
PASTELS DEMONSTRATION
 PASTELS DEMONSTRATION Sky Painting By Michael Howley In this lesson I will be demonstrating how to develop a skyscape using blending, layering and scumbling techniques. Soft Pastels are a perfect choice
COLOURED PENCIL DEMONSTRATION
 COLOURED PENCIL DEMONSTRATION Hare Today By Jane Lazenby In this step-by-step guide we re going to paint a hare in coloured pencil. As per usual with my coloured pencil demonstrations we re going to create
ACRYLICS DEMONSTRATION
 ACRYLICS DEMONSTRATION PALETTE KNIFE STILL LIFE By Will Kemp In this lesson we re going to look at a still life floral arrangement, but we re going to practice loosening up with our acrylic painting, so
ACRYLICS DEMONSTRATION
 ACRYLICS DEMONSTRATION TABBY CAT LOOSE AND FAST By Jane Lazenby I shall be working quickly and loosely with Atelier Interactive acrylics. These paints give me the ability to change the dry surface of the
Apple. Drawing an Apple in Coloured Pencil -- Michael Spillane
 Drawing an Apple in Coloured Pencil -- Michael Spillane Apple Botanical Illustration -- Lesson Plan Apple in coloured pencil -- 9 x 9 inches Arches 240 lb hot-pressed watercolour paper taped to a masonite
Pastel Pencil Skintones
 Pastel pencils and portraiture go hand in hand; enabling the artist to achieve both detail and subtle blended effects. As a forgiving medium they allow you to take away or add colour and texture without
Video 2: Landscape Structure and Atmospheric Perspective
 Video 2: Landscape Structure and Atmospheric Perspective When working with pastels, landscape drawing can be approached using a specific order. Because pastels can be layered on the surface, it makes sense
Example: Leaf. Cut out the shape using scissors, and carefully use the template to place your sampling outlines evenly around the drawing paper.
 Colored Pencil Samplings Because of the technical skills required to successfully manipulate colored pencils, you must first practice some of the basic techniques involved with drawing colored pencil compositions.
Impressionistic Gardens using Acrylics
 Impressionistic Gardens using Acrylics There are some fabulous gardens in this country, many are open to the public and you can spend an enjoyable day taking photos or sketching, gathering reference for
LESSON 8 VEGETABLES AND FRUITS STRUCTURE 8.0 OBJECTIVES 8.1 INTRODUCTION 8.2 VEGETABLES AND FRUITS 8.3 FORMS OF FRUITS AND VEGETABLES 8.
 LESSON 8 VEGETABLES AND FRUITS STRUCTURE 8.0 OBJECTIVES 8.1 INTRODUCTION 8.2 VEGETABLES AND FRUITS 8.3 FORMS OF FRUITS AND VEGETABLES 8.3.1 DRAWING WITH CRAYONS 8.3.2 DRAWING WITH PENCIL 8.3.3 USE OF DESCRIPTIVE
REALISTIC DRAWING WITH CHARCOAL with Kirsty Partridge
 REALISTIC DRAWING WITH CHARCOAL with Kirsty Partridge SUPPLY LIST Part 3- Drawing Animals with Charcoal Strathmore 300 Series Bristol Vellum Paper Lyra Rembrandt Charcoal Pencils 2B & H Lyra Rembrandt
Complete Drawing and Painting Certificate Course
 Complete Drawing and Painting Certificate Course Title: Unit Three Shading and Form Medium: Drawing in graphite pencil Level: Beginners Week: Two Course Code: Page 1 of 15 Week Two: General overview Last
Fiona Peart Detailed Hedgerow studies using watercolour.
 Detailed Hedgerow studies using watercolour. Introduction As the summer moves towards autumn, but before the colours all change, is a wonderful time to find painting subjects in our hedgerows. There is
COLORED PENCIL WITH MIXED MEDIA with Sarah Becktel
 COLORED PENCIL WITH MIXED MEDIA with Sarah Becktel SUPPLY LIST Lesson 4: Using Pen and Ink with Colored Pencil Strathmore 400 Series Toned Mixed Media Paper This paper comes in 3 colors: gray, tan, and
COLORED PENCIL WITH MIXED MEDIA with Sarah Becktel
 SUPPLY LIST COLORED PENCIL WITH MIXED MEDIA with Sarah Becktel Lesson 1: Introduction to Materials and Techniques Strathmore 500 Series Mixed Media Board or Strathmore 400 Series Mixed Media Paper Artist-grade
DEFINING THE FOCAL POINT
 Sunrise 124 10 DEFINING THE FOCAL POINT These projects demonstrate the thought process behind the composition design of two paintings that have strong focal points. You ll begin each painting using your
Sample. A = the working one or the one to draw on B = the good one which you will use as a guide for your painting, or the one you will draw from.
 Beginning Sample Sample Method Two: Measuring and the grid. This is such an important part of any painting. Before you pick up a pastel we are going to make sure the sketch is as accurate as possible.
4 th Grade: March Lesson 5: Landscape Chalk Pastel
 4 th Grade: March Lesson 5: Landscape Chalk Pastel Objective: To create a landscape drawing, pulling colors and light out of a dark background Technique: Sketching and drawing with chalk pastels Set-up:
Poppies. Principles of design: repetition, variety, movement, contrast, unity, balance.
 Poppies Symbolism of poppies has long history of life, death and renewal. The seeds remain dormant under Ground for years until disturbed and then they flower. Vincent Van Gogh (Post-Impressionist) Claude
WaterColors that. al vesselli.com. Painting Glass. Lesson 1. Contemporary Realism Techniques Using Watercolors
 WaterColors that POP! Contemporary Realism Techniques Using Watercolors Lesson 1 Painting Glass al vesselli.com WaterColors that BIntroduction. efore we even begin to talk about watercolors and how I use
EMPHASIS STILL LIFE. Milito Art II
 EMPHASIS STILL LIFE Milito Art II OBJECTIVES SWBAT / I CAN: Understand the ways in which artists create emphasis, & contrast in artwork Draw a realistic still life from reference & observation creating
Notes on colour mixing
 INFORMATION SHEET These notes, with the diagrams in colour, can be found on the internet at: http://www.andrewnewland.com/homepage/teaching Notes on colour mixing Andrew Newland T E A C H I N G A R T &
Art 2D Mid-Term Review 2018
 Art 2D Mid-Term Review 2018 Definition: What is a Line? Definition: Line is the most basic design tool. A line has length, width, tone, and texture. It may divide space, define a form, describe contour,
In today s tutorial you will learn the basics of using fine art textures in your photography work.
 Applying Fine Art Textures to Your Photography Work WHAT WE RE CREATING: In today s tutorial you will learn the basics of using fine art textures in your photography work. If you re wondering exactly what
FACTFILE: GCSE ART AND DESIGN
 FACTFILE: GCSE ART AND DESIGN Drawing Techniques Aims This range of drawing exercises breaks drawing down into very simple approaches or steps. Each exercise is accessible to all students, regardless of
COPYRIGHT NATIONAL DESIGN ACADEMY
 National Design Academy How 2 Guide Choosing markers COPYRIGHT NATIONAL DESIGN ACADEMY mark Contents Choosing markers 3 Basic Greyscale 3 Coloured markers 5 Toolbox: basic marker cube 6 2 Choosing markers
An Easy Method for Mixing Acrylic Paint for Skin Tones
 An Easy Method for Mixing Acrylic Paint for Skin Tones By using the simple method detailed in this tutorial, you'll learn how to mix skin tones using different ratios of the primary colors. This easy method
How to paint a Horse in Traditional Oil Paint
 How to paint a Horse in Traditional Oil Paint www.montmarte.net Copyright of Mont Marte International Pty Ltd ACN 101589897 Materials List... The materials for this lesson can be found at a Gold or above
Gradations. Blend and Burnish. Shade and Burnish a Vertical Gradation
 Level: Beginner Flesch-Kincaid Grade Level: 9.6 Flesch-Kincaid Reading Ease: 58.0 Drawspace Curriculum 1.2.A2-6 Pages and 10 Illustrations Blend and Burnish Gradations Create smoothly-rendered gradations
After Bouguereau: The Nut Gatherers.
 After Bouguereau: www.kingslan.com painting@kingslan.com Surface Portrait grade 24 x 36 portrait grade canvas. Transfer Information Transfer the design to the surface with gray graphite. Palette Set up
Coloured pencils are easy to work with step-by-step to avoid making mistakes. It is easy to correct mistakes once happen using an eraser.
 Coloured pencil technique What makes this medium so special and supersedes pencil in drawing? Human beings eye adores both colour and light. Coloured pencils are portable and a good medium to start with
Project - Harbour based on the Florida Keys (Size - 7 x 10 )
") Project - Harbour based on the Florida Keys (Size - 7 x 10 ) Materials you will need. Cotton Rag Hot Pressed (HP) Watercolour Paper - Hot Pressed paper is a smooth watercolour paper which allows the pencils
Project - Harbour based on the Florida Keys (Size - 7 x 10 ) Materials you will need. Cotton Rag Hot Pressed (HP) Watercolour Paper - Hot Pressed paper is a smooth watercolour paper which allows the pencils
Painting Techniques: Ways of Painting
 Techniques: Ways of There are so many ways of painting that no book can possibly do justice to them all. However there are certin basic techniques that every painter should master. Opaque Technique: The
COLORED PENCIL WITH MIXED MEDIA with Sarah Becktel
 COLORED PENCIL WITH MIXED MEDIA with Sarah Becktel Supply List: Lesson 2: Adding Fluid Acrylics to Colored Pencil Strathmore 500 Series Mixed Media Board or Strathmore 400 Series Mixed Media Paper This
Drawing and Painting Secrets from a Modern Master of Hyperrealism MARK CRILLEY. WATSON-GUPTILL PUBLICATIONS Berkeley
 The Realism Challenge Drawing and Painting Secrets from a Modern Master of Hyperrealism MARK CRILLEY WATSON-GUPTILL PUBLICATIONS Berkeley Shattered Eggshell This lesson requires a bit more preparation
Autumn Leaf. If you have never painted with Colored Pencils before, please review the Basics videos.
 Autumn Leaf an original design in colored pencils by Marian Jackson, MDA 1353 Rose Creek Court, Lebanon, OH 45036 513-217-4653 website: http://marianjackson.com email: contact@marianjackson.com An online
PENCILS TO PAINT USING A LIMITED PALETTE
 A U T O D E S K SketchBook Pro for ipad PENCILS TO PAINT USING A LIMITED PALETTE THE ARRIVAL A Tutorial by Shaun Mullen www.mull-art.com Introduction This tutorial will take you through the steps I use
The Mill by Barb Halvorson
 The Mill by Barb Halvorson The Mill By Barb Halvorson Palette: DecoArt Americana Acrylics Alizarin Crimson #13179 Black Forest Green #13083 Blue Violet #13141 Bright Yellow #13227 Brilliant Red #13145
Painting With Threads
 Painting With Threads Orchids in a Vase By Tina Whiteley One of the most fun and exciting ways you can use your sewing machine is to create thread pictures with free motion stitching. You can use straight
The Art of Recording. Materials Needed. Background WATERCOLOR TECHNIQUES. Enduring understanding: Grade Level: 6-8. Alignment to Utah Core Curriculum
 The Art of Recording Alignment to Utah Core Curriculum Intended Learning Outcomes (ILO s): 1. Use science process and thinking skills. 2. Manifest scientific attitudes and interests. 3. Understand science
Painting A Complete Portrait
 Week 6 So this is it, the final week of the course. We have learnt all the theory we need to know and we have painted all the individual parts of the face. Now it's time we put all our knowledge together
Drawing 101 2/4/2016. Basic Tools & Materials. Drawing Pencils. Drawing Pencils Erasers Blending Mediums Paper Other
 Basic Tools & Materials Drawing 101 Tips and Techniques Drawing Pencils Erasers Blending Mediums Paper Other Drawing Pencils H Pencils lead is firmer therefore your mark is lighter B Pencils Lead is softer
Year 7 Art Homework Booklet 1
 Year 7 Art Homework Booklet 1 Name: Teacher: Group: How is your homework marked? 1 Exceeding target level 2 Achieving target level 3 Working towards target level 4 Working below target level Art analysis
Session Key Objective from skills listed above (What is it that you want the children to learn?)
") Year 1/2 Key Skills to be covered, taken from Lancashire Key Learning Document pitching at the correct year group and differentiation within plan for different groups Be specific in the key skills, and
Year 1/2 Key Skills to be covered, taken from Lancashire Key Learning Document pitching at the correct year group and differentiation within plan for different groups Be specific in the key skills, and
homestead autumn by Barb Halvorson
 homestead autumn by Barb Halvorson Homestead Autumn By Barb Halvorson Palette: DecoArt Americana Acrylics Alizarin Crimson #13179 Baby Blue #13042 Black Forest Green #13083 Bright Orange #13228 Bright
Transfer an Image to Drawing Paper
 Level: Beginner to Advanced Flesch-Kincaid Grade Level: 8.4 Flesch-Kincaid Reading Ease: 64.6 Drawspace Curriculum 1.2.A5 6 Pages and 4 Illustrations Transfer an Image to Drawing Paper A three-step process
Trunk Full of Flowers by Kingslan & Gibilisco Studio
 Trunk Full of Flowers by Kingslan & Gibilisco Studio Conversion Chart Book Code Archival Winsor & Newton Genesis W Soft Titanium White Titanium White White Y Cadmium Yellow Mid Cadmium Yellow Pale Bismuth
Post-Processing/Editing Page 1
 All images need a little something to help re-create or re-imagine what you think a particular image should look like. Whether it is adding a digital gradient to a sky to help saturate and deepen the colours
? What is covered in this module?
 MODULE 6 The Eye - Frontal View? What is covered in this module? It has been said that the eyes are the windows to the soul. Clearly, rendering the eye with accuracy is incredibly important in portrait
What You Need. Pick up all these materials at a Gold or above art centre near you
 Budgicorn Sci Fi Painting. What You Need Pick up all these materials at a Gold or above art centre near you cmmd7510 mont marte double thick canvas 76x101 cm macr0002 mont marte foam roller 50 mm mcg0063
Town and Village Tutorial
 Town and Village Tutorial For Adobe Photoshop by Lerb This tutorial will take you through the basic techniques I use when creating village and town maps in Adobe Photoshop. The techniques can also be used
Complete Drawing and Painting Certificate Course
 Complete Drawing and Painting Certificate Course Title: Unit Three Shading and Form Medium: Drawing in graphite pencil Level: Beginners Week: Three Course Code: Page 1 of 12 Week Three: General overview
Year 8 Art Homework Booklet Term 1
 Year 8 Art Homework Booklet Term 1 Name: Teacher: Group: How is your homework marked? 1 Exceeding target level 2 Achieving target level 3 Working towards target level 4 Working below target level Art analysis
DRAWING FROM LINE TO LIFE Beginners Course
 WEEK 2 Remember last week when I asked you to draw blocks of tone with each pencil, and on the second line to draw as heavily as you could? The object of that exercise was make you produce the darkest
Painting Special Effects on Photographs
 TUTORIAL 7 Painting Special Effects on Photographs In this tutorial you will learn how to transform a photo into a striking color composition with paintbrushes, masks, blending modes, color, and paper
Watercolour. Part 7 Make the Ordinary. Fast and Loose. transform any scene into a spectacular painting
 Watercolour Fast and Loose Part 7 Make the Ordinary transform any scene into a spectacular painting No course covering the great impressionistic watercolourists of the 20 th century would be complete without
White Rose & Calla Lilies. Kingslan & Gibilisco Studio
 White Rose & Calla Lilies Kingslan & Gibilisco Studio Permission is granted to teach this project within a 100 mile radius of teacher s home studio. Written permission is required beyond this point. Page
April Instructions Willem van Aelst Study 2008 David Jansen
 Video Links Full Video- April Lesson Disk 4 Video Lesson in 4 parts Lesson Link Video Part 1 of 4 Lesson Link Video Part 2 of 4 Lesson Link Video Part 3 of 4 Lesson Link Video Part 4 of 4 April Instructions
Research a range of realistic bird images for next lesson. The images need to be appropriate for biro so they will need to be black and white
 Research a range of realistic bird images for next lesson. The images need to be appropriate for biro so they will need to be black and white drawings and not photos. Make sure you choose a range of different
Art Curriculum Overview More than one skill may be covered under one learning objective- Addressed in the success criteria
 Art Curriculum Overview 2016-2017 More than one skill may be covered under one learning objective- Addressed in the success criteria Year 1 General Record and explore ideas from first hand observations
Painting Poppies. how to. Presented by Willow Wolfe LEARN. Level: Beginner. Supply List. No drawing or painting experience necessary!
 LEARN how to PAINT Painting Poppies Presented by Willow Wolfe Level: Beginner with Step-by-Step Instructions Supply List BRUSHES Princeton Artist Brush Co. Select Artiste #3750 #10 flat shader #8 filbert
HK- 2 -Gargoyle Moodboard
 HK-1- Name Plate Fold a piece of plain paper in half so that it stands up. Add your name in big full letters that is easy to read. Decorate and add colour. You may choose to do this on the computer if
Exercise 7: Still life with natural objects
 Exercise 7: Still life with natural objects Assemble a group of natural objects. These could be highly-coloured objects such as fruit or vegetables (peppers make an excellent subject), more subtly coloured
Getting Started WATERCOLOUR PENCIL ART. Paint. Draw. Colour INSTRUCTION BOOKLET
 Getting Started WATERCOLOUR PENCIL ART Draw Paint Colour INSTRUCTION BOOKLET TABLE OF CONTENTS Introduction...1 Basic Techniques...2 Pencil Techniques....3 Experimenting with Colour Mixing...6 Papers....10
Name VALUE. Vocabulary. (also on drawing vocab worksheet)
") Name VALUE Value is the relative lightness and darkness of a color or grey tone. Color as well as black and white, has value. When you turn a color photo into a black and white version you can see the
Name VALUE Value is the relative lightness and darkness of a color or grey tone. Color as well as black and white, has value. When you turn a color photo into a black and white version you can see the
After Bouguereau: The Knitter
 After Bouguereau: The Knitter www.kingslan.com painting@kingslan.com The Knitter Surface Portrait grade 18 x 24 portrait grade canvas. Transfer Information Transfer the design to the surface with gray
Copyright of Mont Marte International Pty Ltd ACN
 Traditional bouquet in Oils pick up these materials from any gold mont marte art centre Cmmd6076 Mont Marte double thick canvas 60 x 72cm bmhs0019 mont marte gallery series brush pack 6pce bmhs0024 mont
Build your character s back story
 80 Adobe Photoshop Build your character s back story Danilo Brandão reveals a simple yet effective way to breathe life into your characters by developing personality and creating their environment It s
How to paint a misty landscape.
 How to paint a misty landscape. There is something about misty landscapes that most people find appealing. Mist has a way of softening the landscape and creating a sense of mystery. What lies behind the
Water-colour painting techniques
 INFORMATION SHEET Water-colour painting techniques Andrew Newland T E A C H I N G A R T & D E S I G N Sheeaun, Kilmaley, Ennis, Co. Clare, Ireland. These notes are copyright Andrew Newland Introduction
Dutch Old Master. with Urn
 Dutch Old Master with Urn First Stage of all objects - paint all objects to this level before adding shines and shadows Dutch Old Master with Urn - Page 2 Dutch Old Master with Urn - Page 3 Dutch Old Master
Essential Skills - 3 Key Blend Modes. Ken Fisher
 Ken Fisher One of the best ways to understand blending modes is to experiment with them. Get two layers together and play around. The results sometimes will leave you cold, the effects wont inspire you.
OILS DEMONSTRATION. CÉZANNE STILL LIFE By Lucy Somers
 OILS DEMONSTRATION CÉZANNE STILL LIFE By Lucy Somers In this lesson we will be painting a still life inspired by Cézanne and other Post-Impressionists, paying close attention to the way colour temperature
Extension material for Level 2 Design and Visual Communication Study Guide (page 33)
") Graphic media Extension material for Level 2 Design and Visual Communication Study Guide (page 33) ISBN 978-1-927194-15-7 For individual student use only. No other use permitted. ESA Publications (NZ)
Graphic media Extension material for Level 2 Design and Visual Communication Study Guide (page 33) ISBN 978-1-927194-15-7 For individual student use only. No other use permitted. ESA Publications (NZ)
1. Draw the scene with a 2B pencil. Mask the flowers and the boat with masking fluid and a masking fluid brush.
 Venetian Doorway To keep this Venetian scene simple, I have chosen a squareon view so I do not have to worry about the perspective. This step-by-step demonstration offers an opportunity to create plenty
Elements Of Art Study Guide
 Elements Of Art Study Guide General Elements of Art- tools artists use to create artwork; Line, shape, color, texture, value, space, form Composition- the arrangement of elements of art to create a balanced
AN INTRODUCTION TO BOTANICAL ART
 AN INTRODUCTION TO BOTANICAL ART MALUS GORGEOUS CRAB APPLE GROUP By Gaynor Dickeson Malus Gorgeous Crab Apple Group Botanical art depicts plants in a fairly tight manner. It is pleasing to the eye and
 http://blog.spoongraphics.co.uk/tutorials/how-to-intensify-your-landscape-photos-in-photoshop This post was originally published in 2011 THE TIPS AND TECHNIQUES EXPLAINED MAY BE OUTDATED. The post-processing
Ceip Isaac Peral Terrassa
 Worksheet 1 DESCRIBING PICTURES 1. Read and label the texts describing pictures as: landscape, cityscape or seascape. Add the type of view it is: desert, garden, iceberg, beach, mountain, buildings or
Raindrops on a Lily - PART 1 From a photograph - By Matthew Palmer
 Raindrops on a Lily - PART 1 From a photograph - By Matthew Palmer 1 Sketch 2 Masking Mask inside main petals as shown Background Using a number 10 brush mix Dark Green with Natural Blue and Aureolin Aureolin
Principles of Architectural Design Lec. 2.
 Principles of Architectural Design Lec. 2. The Complementary Elements of design. The complementary elements characterize the natural elements, creating means of comparison for the primary elements used
Knowledge, Skills and Understanding breakdown for Art. Year 1 Drawing Painting Printing Textiles. 3D Collage Use of IT Knowledge
 Knowledge, Skills and Understanding breakdown for Art Year 1 Drawing Painting Printing Textiles Can they communicate something about themselves in their drawing? Can they create moods in their drawings?
BLACK PEAR TRUST SUBJECT PLAN - ART
 Purpose of Study Art, craft and design embody some of the highest forms of human creativity. A high-quality art and design education should engage, inspire and challenge pupils, equipping them with the
Advanced level or Proficient level to pass the
 Summer Assignments AP Studio Art Mr. Cusworth In order to complete the requirements to create a portfolio of 24 quality artworks to submit for your AP Exam in May of next year you will need to complete
Contents. Teachers Notes 4 Handy Hints 5 Colour 7 Techniques Explained 8 How To Use This Book 9
 Contents Teachers Notes 4 Handy Hints 5 Colour 7 Techniques Explained 8 How To Use This Book 9 Beach Umbrella 10-12 Chameleon 13-15 Banana Sundae 16-18 Life Cycle 19-21 Don t Bully Me 22-23 Balloon Faces
Tutorial Another Rainy Day
 For this tutorial I wanted to take people through the process that I go through when painting buildings. In this tutorial I will be showing you how to paint A Rainy Day in four easy to follow steps...
AP Studio Art: Drawing Portfolio Summer Assignments
 AP Studio Art: Drawing Portfolio Summer Assignments 1. AP Draw 18 x 24 or 24 x 18 Rendering of a Still life using graphite or charcoal Goals: Balanced Asymmetrical Composition; Correctly Drawing Geometric
Colour Theory Explained
 Colour Theory Explained And Why all artists need to understand it. The beginnings of how we now understand colour Sir Isaac Newton discovered the spectrum in the 1660 s The colour (similar to how we see
Review Questions for Design Final Exam Correct answers are highlighted in RED
 Review Questions for Design Final Exam Correct answers are highlighted in RED 1. What type of art is this image? a. Abstract b. Non-Objective c. Realistic 2. What type of art is this image? a. Abstract
Part 2 Highlights and Shadows
 Part 2 Highlights and Shadows 1) Open your completely colored.cpt file from your student folder. You will now add light and shading to create a detailed, finished looking composition. 2) Look at the tabbed
Visual Art Grade 5 Term 1
 1 Visual Art Grade 5 Term 1 Contents Line and Pattern... 2 Drawing... 2 What is a Line?... 2 Uses of Line... 2 What is Pattern?... 3 Activity 2:... 3 Colour is an Element of Art... 4 The Colour Wheel...
Value & Intensity. Contents. Daniel Barndt 1
 Contents Value Scale... 2 Preparation... 2 Painting Value Squares... 3 Case In Point... 6 Case: Value dark to light (and back again)... 6 In Point... 6 Value Painting... 8 Preparation... 8 Painting Value
Welcome Year 10. What do you know about the structure of your faces?! What are the proportion rules?
 Welcome Year 10 What do you know about the structure of your faces?! What are the proportion rules? Draw a labelled diagram of where you think features go 1 Project over year: Drawing & Experimentation
DESIGNING FLOWER BEDS with
 DESIGNING FLOWER BEDS with Good flower bed designs incorporate many different features Relative surface feel or look On plants, texture comes from Leaves Twigs Bark Texture also comes from Rocks Pavement
-Betty Edwards, Drawing on the Right Side of the Brain
 Drawing 101 The magical mystery of drawing ability seems to be, in part at least, an ability to make a shift in brain state to a different mode of seeing/percieving. When you see in the special way in
Recommended Equipment List
 Recommended Equipment List If you have any queries there are a series of videos Anna s made about her recommended materials available to watch for free at www.annamasonart.com/equipment Brushes Paper Pencil
Show a ppt. presentation (Landscapes 1) with different landscapes describing the main elements in each one : city / sea / landscapes.
 with different landscapes describing the main elements in each one : city / sea / landscapes.") LESSON 1 DESCRIBING PICTURES Activity 1 Show a ppt. presentation (Landscapes 1) with different landscapes describing the main elements in each one : city / sea / landscapes. (whole class) Activity 2 Read
LESSON 1 DESCRIBING PICTURES Activity 1 Show a ppt. presentation (Landscapes 1) with different landscapes describing the main elements in each one : city / sea / landscapes. (whole class) Activity 2 Read
Yellow Roses in Clear Vase By Priscilla Hauser
 1 Yellow Roses in Clear Vase By Priscilla Hauser Surface: Canvas or surface of your choice FolkArt Artist Pigments: #918 Yellow Light #629 Red Light #973 Burnt Sienna #628 Pure Orange #649 Warm White #461
How to Paint a Field of Poppies with Studio Acrylic Paint
 How to Paint a Field of Poppies with Studio Acrylic Paint Copyright of Mont Marte International Pty Ltd ACN 101589897 Materials List... The materials for this lesson can be found at a Gold or above Art
Photoshop Elements 3 Filters
 Photoshop Elements 3 Filters Many photographers with SLR cameras (digital or film) attach filters, such as the one shown at the right, to the front of their lenses to protect them from dust and scratches.