Books - Use Game Shelves installed like a calendar shelf: 8 per wall BOOKS. section. See POG for placement of Tower shelves
|
|
|
- Sylvia Small
- 5 years ago
- Views:
Transcription


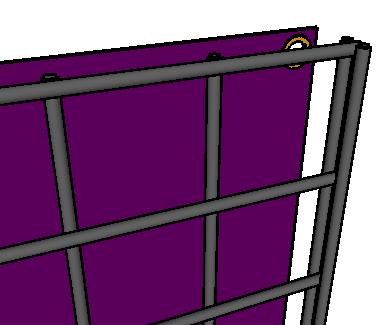


1 Inline store assembly instructions A companion to your custom floor plan and POG Look over the setup guide, study each step carfully and do not rush. Remember to save all your fixture boxes as you well need them to return the fixture. Note: Inlines with 1 x 8 Grid follow the same steps. The 1 x 8 is used on the wall section supports and is faced with 2 x 8's on the towers. EXAMPLE INLINE ONLY!!! These instructions will assist you in assembling your inline store. You must also use the floorplan and Planogram provided to successfully set up. Use the floorplan to determine where to place each section as well as Calendar wall counts by coloured section. Use the POG for Box, game and toy shelf placement, as well as calendar tower shelves. This guide will show you how to assemble each type of section. Wall tower Books - Use Game Shelves installed like a calendar shelf: 8 per wall section. See POG for placement of Tower shelves "H" Section BOOKS POS New 2 x 5 Grid Panel with "T Feet" Games Toys New Pinwheel -2x5& 1x5 Calendars Box section Attaching the liners - Attaching the liners to the panels. First gather the grid panels that require liners. Take the liner and place it on the panel with the horizontal bars facing out. Next take each cable tie and feed it through the gromit in the liner and around the grid panel. Repeat this step as many times as required by the floor plan. Game Demo Wood Top on 2 x 3 Grid Panel Base Wall section Toy Demo Triad - 2x3 & 2x2 Grid Panels Graphic Pick Building a tower - Take 4 panels and cable tie three of the panels together to create 3 walls of the tower, space cable ties an equal distance apart on all of the corners. One side may get a pair of hinges and in that case only two corners are cable tied one side receives two hinges and the remaining side has nothing. Note: Repeat on each corner but do not tighten the cable ties untill all the ties are on. Next tighten each cable tie sequentially until the liner Liner is snug. Horizontal bar 2'x5' Grid panel No hinge or cable ties! Hinge "H" and "T" Section - If an "H" or a "T" section is required, fasten panels to the tower with the liners facing in as shown, it should resemble an "H" pattern. For a "T" section the panel should be in the centre and there will be no liner. Attaching the shelves to the towers - See the shelf placement guide on the back of this sheet. To attach the remaining shelves continue on the same way as in the previous step. Remember to follow the floor plan that is shipped with the store. Bar #4 Center Bar Bar #4 Building box calendar sections - To build the Box calendar sections, see the POG for shelf placement. Note: when building the double box section there are no wall calendar shelves used. Calendar Shelf Attachment shelves - Fasten all the shelves in place using the supplied cable ties as shown in the illustration below. Note: Remember to cut all cable tie ends as flush as possible as the jagged ends can be a hazard to customers. Detail - Top Hooks on 4' Shelf If shelves are being attached to a wall section ther will be only one hook per side. Fasten each shelf to the one behind it as shown below using the supplied cable ties. Each shelf should have 2-3 cable ties spaced an even distance apart. Note: 4' and 5' shelves are cable tied the same way. Detail - Bottom Hooks 5' Floor Sections: Have someone hold a piece of of 2 x 5 grid at the opposite end of the tower. Install the wall calendar shelves. Note: All the other shelves and towers have been removed for illustration purposes. Box Calendar Sections: Install the 2-2'x5' grid panels with the horizontal bars facing out. Next install the 12" x 24" flat shelves using the shelf placement guide on POG for this section. Note: The shelves have been removed for illustration purposes. 2x5 Grid panel is used here when building the double box section. Example Wall calendar shelves this side Repeat the box section steps for any remaining box calendar sections. Remember to cut all cable tie ends as flush as possible as the jagged ends can be a hazard to customers. Box section Double box Section Tower lights - Attach the tower lights to the tower as shown.
2 Shelf Placement Guide This diagram illustrates the proper grid wire to place each shelf hook. The shelves are numbered starting from the floor and the grid wires are numbered as illustrated. Remember to use the supplied grid guides as it will aid in shelf installation. Your inline floor plan should clearly state how many shelves are in each section. Refer to the colour coding on the floor plan or the legend at the bottom of each floorplan. Store size dictates the number of shelves in each section. 6 Wall calendar shelves Colour Refers to the sections on the floor plan 5' Tall free standing sections 8' Tall free standing sections 7 Wall calendar shelves 5' Tall free standing sections 8' Tall free standing sections Box calendar shelves 8 Wall calendar shelves 8' Tall free standing sections


3 Game and Toy Shelves Proceed with the next steps only if you have a game and or toy section!! Game section - Placing the game shelves. The game shelves are placed on the grid in a different way then the calendar shelves as shown. Game Shelf placement is on the POG. Please CHECK - this is different every year! Once the game shelves are placed on the grid cable tie each shelf as shown in fig. 1 and 2. Fig. 1 Fig. 2 Note: When installing the 4'x 8' black liner on a wall toy and game section remember to fasten the liner as close to the rear of the shelves as possible to prevent the product from falling behind.

4 Toy Demo Table - Triad The Toy Demo Table is two levels made from 4 pieces of 2 x 3 grid and 6 pieces of 2 x 2 grid. Please assemble as follows: Build a "tower" from 4 pieces of 2 x 3 grid. Place liners on the grid panels before you cable tie the tower together. Build a three sided 2 x 2 "tower" from 3 pieces of 2 x 2 grid. Place liners on the grid panels before you cable tie the three sides together. REPEAT - Build another three sided 2 x 2 "tower. Place one of the 2 x 2 towers against the side of the 2 x 3 tower. ATTACH with cable ties. Place the other 2 x 2 tower against the adjacent side of the 2 x 3 tower. ATTACH with cable ties. A TOP VIEW of the TRIAD looks like this: 2 x 3' Tower 4 pieces of 2 x 3 Grid with 4-2 x 3 attached 2 x 2' Tower 3 pieces of 2 x 2 Grid with 3-2 x 2 attached. 2 x 2' Tower 3 pieces of 2 x 2 Grid with 3-2 x 2 attached. Place a 2 x 2 Solid Topper on the 2 x 3' Tower Place one of the Corrugate Fold Up Toppers on each of the 2 x 2' Towers Merchandise as per the POG.
5 Anchoring your inline for safety Anchor all inline towers where ever possible!!! Please take some time to review the different ways of securing your inline to the wall shown below. Since each situation is different you must make the decision as to which way is right for you.
IMPORTANT INFORMATION! Attention all Operators, Managers & Store Associates PLANOGRAM (POG)
") What s new for 2011/2012? IMPORTANT INFORMATION! Attention all Operators, Managers & Store Associates PLANOGRAM (POG) Inline Stores 5 high pinwheel fixtures for Engagement, Mini, and Box Calendars constructed
What s new for 2011/2012? IMPORTANT INFORMATION! Attention all Operators, Managers & Store Associates PLANOGRAM (POG) Inline Stores 5 high pinwheel fixtures for Engagement, Mini, and Box Calendars constructed
INLINES ~ Calendar Club and Go! Toys & Games
 INLINES ~ Calendar Club and Go! Toys & Games The Mall Climate Developer/Mall parameters and expectations are constantly evolving, putting more pressure on tenants; even temporary tenants to look and perform
Assembly Instructions
 Selling Station Assembly Instructions View from above without top A B C D Rounded finished corners on A & D Square unfinished 3-sides on B & C Selling Station Components (2) 2' x 6' Side s Have a channel
Therma-Tru Door Gallery Setup Instructions Swing Unit with Hardware Kit - Hardware Part # MADGSWU15 (Swing Unit) Part # MADGHKSU10 (Hardware Kit)
 Part # MADGHKSU10 (Hardware Kit)") Swing Unit with Hardware Kit - Hardware Tools Included: 4mm Allen Wrench, 6mm Allen Wrench, 8mm T-Handle Allen Wrench (1) 3/4" Drill Bit, (1) 7/32" Drill Bit and Hole Template Guide Tools Required: Phillips
Swing Unit with Hardware Kit - Hardware Tools Included: 4mm Allen Wrench, 6mm Allen Wrench, 8mm T-Handle Allen Wrench (1) 3/4" Drill Bit, (1) 7/32" Drill Bit and Hole Template Guide Tools Required: Phillips
Extra Wide Designer Lockers Series Installation Instructions
 Extra Wide Designer Lockers 20000 Series Thank you for selecting the 20000 Series Extra Wide Designer Lockers. We are confident that the quality and construction of the lockers will prove to be a good
Installation Instructions Evolve Cabinets
 Installation Instructions Evolve Cabinets Follow these installation instructions for Evolve upper, base, tall, and scope cabinets with AireCore or wood composite construction. Tools needed: Flat head screwdriver
INSTALLATION OF THE TRACK FOR THE STRAIGHT SIDE STEEL LADDER
 ASSEMBLY OF THE 7180 STRAIGHT SIDE STEEL LADDER TOOLS REQUIRED FOR ASSEMBLY SAFETY GLASSES (2) 1 / 2 WRENCHES OR SOCKETS STEP LADDER OF APPROPRIATE HEIGHT (2) 7 / 16" WRENCHES OR SOCKETS HACKSAW FLAT HEAD
UNIQUE KIOSK SITE INSPECTION FORM
 UNIQUE KIOSK SITE INSPECTION FORM The Store Display and Merchandising Departments use this information to develop a custom layout, product plan and marketing graphics specific to the configuration of your
Linear Hook- on Worksurfaces
 Linear Hook- on Worksurfaces Linear Hook-On Worksurfaces come in three depths and seven lengths. Different worksurfaces have different reqirements for installation that are outlined below. 27 inch deep
compile system INSTALLATION GUIDE Updated January 2019
 INSTALLATION GUIDE Updated January 09 compile system Table of Contents Panels 0 Quick Connect Clips 0 Lock Clips 0 Panel Trims 0 Privacy Glass 0 Post Base Covers 04 Electrical 04 Power Distribution Harness
Add labels to the sides...
 Orthographic Drawings Orthographic Projection A projection on a plane, using lines perpendicular to the plane Graphic communications has many forms. Orthographics is one such form. It was developed as
Setup. The Faraday Cage is available in two types of configurations. Cage for mounting to a full perimeter enclosure on series tables.
 Faraday CageSetup, 2017 Setup The Faraday Cage is available in two types of configurations. Cage for mounting to a full perimeter enclosure on 63-500 series tables. Cage with a base plate for use on a
Installation Instructions
 by Plato Woodwork Installation Instructions Plato Woodwork, Inc. 200 Third Street SW P.O. Box 98 Plato, MN 55370 www.platowoodwork.com 800.328.5924 SECTION GUIDE GETTING STARTED PAGE # Installation Methods...
Storage Cabinets 9000 Series Assembly Instructions
 Storage Cabinets 9000 Series Assembly Instructions Thank you for selecting Salsbury s storage cabinets. We are confident that the quality and construction of the cabinets will prove to be a good investment.
Before Assembling the Storage Wall
 Chapter 1 Assembling the Lista Storage Wall Lista provides two types of standard Storage Walls: B251 and B255. The design, construction, assembly, and quality are identical for both types, however, B251
Making Instructions Version 2.1 for Raspberry Pi
 Making Instructions Version 2.1 for Raspberry Pi Ohbot Ltd. 2017 About Ohbot has seven motors. Each connects to the Ohbrain circuit board and this connects to a computer using a cable. Ohbot software allows
POP PLUS / SPIDER SET-UP INSTRUCTIONS
 POP PLUS / SPIDER SET-UP INSTRUCTIONS 1 Place system frame on floor with screws indicating top. Expand upwards & outwards and secure frame connectors. Pop-Up display systems are made to be set-up and taken
Tradewinds Amplify Display System Instructions
 Table of Contents Packing & Unpacking... Standard Kits... Component Identification... Primary Components Vertical Pole Top... Vertical Pole Bottom... Horizontal... Cross/Hanging Bar... Amplify Shelf Package
4 BAY Low Profile WALL MOUNT CABINET
 D1/347 SSEMLY INSTRUCTIONS 4 Y Low Profile WLL MOUNT CINET TIP HZRD WRNING! Cabinet must be affixed to wall. For use to prevent tipping in compliance with capacity of cabinet specified. Use with heavier
CAB END BEDTRAX (SIDE VIEW)
") Supplied Hardware: (8-14) 1/4-20 Allen head bolts, (12-18) UHMW mount blocks, (4) D-ring tie downs Tools Needed: Allen head wrench GET TO IT. INSTALLATION INSTRUCTIONS STEP 1. INSERT (2) MOUNT BLOCKS INTO
Supplied Hardware: (8-14) 1/4-20 Allen head bolts, (12-18) UHMW mount blocks, (4) D-ring tie downs Tools Needed: Allen head wrench GET TO IT. INSTALLATION INSTRUCTIONS STEP 1. INSERT (2) MOUNT BLOCKS INTO
LCD LIFT Flat Panel Display System Installation Manual. Table of Contents
 LCD LIFT Flat Panel Display System Installation Manual Table of Contents Page Installation Overview... 2 Trim Ring Installation... 3 LCD Lift Installation....4 Actuator Switch Installation.5 Top Plate
System 3000 specifications
 System 3000 specifications Scope: Materials: Type of Bookstack: This specification covers delivery and installation of steel library shelving of the bracket type. Height, depth and accessories shall be
MobileTrak5 Installation Instructions
 MobileTrak5 Installation Instructions PLEASE OPEN ALL BOXES & CHECK TO MAKE SURE YOU HAVE ALL PIECES REQUIRED READ ALL INSTRUCTIONS BEFORE STARTING Tools Required for Assembly 7/16, 1/2 Wrench Phillips
Worktop INDEX eight Capacity Unpacking
 Pro.0 Series Warning: Excessive weight hazard! Use two or more people to move, assemble or install cabinets and locker to avoid back injury. Do not leave children unattended near cabinets. High risk of
Performance 2.0 Series
 Performance. Series Warning: Excessive weight hazard! Warning: Excessive weight hazard! Use two or more people to move, assemble, or install cabinets and locker to avoid back injury. Do not leave children
Installation Manual. A Brighter Future. Technical Support ext 2
 Installation Manual A Brighter Future www.westcoastsaunas.com service@westcoastsaunas.com Technical Support 1-800-975-6180 ext 2 Electrical Requirements Malibu 110/120volt 15amp Dedicated Circuit/Outlet
Yes 20 Charging Wall Cabinet for Tablets
 Built with Anthro-DNA Owner's Manual for Yes 20 Charging Wall Cabinet for Tablets Part # YESCABGMPW Components at a Glance 1 2 4 5 8 7 10 3 6 9 Front of Cabinet (closed) 1. Locking front door to User area.
Flat Panel Stand FPZ-655. for 32" to 55" Flat Panel Screens FEATURES. Reinforced universal adapter plate for a strong hold
 FPZ-655 Flat Panel Stand for 32" to 55" Flat Panel Screens For a viewing experience that really stands out, Peerless FPZ-655 Universal Flat Panel Stand for 32" 55" flat panel TVs provides a brilliant combination
Office Installation Guidelines
 UH Structures Inc. dba Ebtech Industrial 2241 Industrial Drive Connellsville, PA 15425-6181 Telephone: 724-628-6100 Fax: 1-412-774-2429 www.ebtechindustrial.com Office Installation Guidelines INTRODUCTION
Locker Pedestal Installation Instructions
 Locker Pedestal Installation Instructions LK-PED-INST-0314r1 Parts List Single Pedestal Back to Back Pedestal Horizontal Support Tube TS-169 Post Flange TS-190 Post Cap Fasteners Provided: #8 x ¾ round
INLINES ~ Ceiling, Wall & Window Graphics
 INLINES ~ Ceiling, Wall & Window Graphics Ceiling Graphics 48 x 12 Concept Graphics - these are the only graphics that you should have hanging from your ceiling. There is one for each concept, so if your
Germ City Storage Box Inventory
 Germ City Storage Box Inventory 4 Wide connector bars 11 Thin connector bars (4 with Velcro on one side) 12 Channel parts (6 with extensions) 1 Black fabric exhibit cover 2 Black decorated burlap panels
Thanks for shopping with Improvements! Deluxe 10 Closet Organizer (12 deep) Item #461609
 Item #461609") Thanks for shopping with Improvements! Deluxe 10 Closet Organizer (12 deep) Item #461609 To order, call 1-800-642-2112 West Chester, OH 45069 0114 If you have questions regarding this product, call 1-800-642-2112
Thanks for shopping with Improvements! Deluxe 10 Closet Organizer (12 deep) Item #461609 To order, call 1-800-642-2112 West Chester, OH 45069 0114 If you have questions regarding this product, call 1-800-642-2112
INSTALLING INVISIRAIL GLASS PANELS POST INFORMATION... 2 PRE-INSTALLATION... 2
 Contents POST INFORMATION... 2 PRE-INSTALLATION... 2 STEP A1: MEASURING FOR INVISIRAIL CUSTOM GLASS PANELS (skip if using Standard Sized Panels)... 2 STEP A2: GATHER ADDITIONAL TOOLS/SUPPLIES... 2 STEP
NON-ELECTRIC DOG FENCES
 NON-ELECTRIC DOG FENCES Thank you! Thank you for ordering your non-electric dog fence kit from Pet Playgrounds. In less than a day you will have your very own personal dog park installed on your property.
Octagon Greenhouse Manual
 Tools Needed: -Cordless Drill (12V or higher) -#2 Square Drive Bit -Hammer -6 Step Ladder -Tape Measure -Utility knife w/ blade & hook blade -Speed Square -5/16 Wood Drill bit Little Cottage Co. PO Box
FORD TRANSIT VAN PANELS (2015+) 130 /148 WHEEL BASE LOW ROOF INSTALLATION INSTRUCTIONS
 130 /148 WHEEL BASE LOW ROOF INSTALLATION INSTRUCTIONS") FORD TRANSIT VAN PANELS (2015+) 130 /148 WHEEL BASE LOW ROOF INSTALLATION INSTRUCTIONS RECOMMENDED TOOLS -Phillips #4 screwdriver -Phillips #3 screwdriver -Knife or scissors (optional) BEFORE BEGINNING
FORD TRANSIT VAN PANELS (2015+) 130 /148 WHEEL BASE LOW ROOF INSTALLATION INSTRUCTIONS RECOMMENDED TOOLS -Phillips #4 screwdriver -Phillips #3 screwdriver -Knife or scissors (optional) BEFORE BEGINNING
Mama s Slippers. Any color, yardage varies depending on yarn/hook used and size of foot.
 When my sisters and I were growing up, our mother made us knitted slippers every year for Christmas. We always looked forward to getting them, not just because they were warm, but because Mom made them.
Product must be installed as shown using the screws and brackets provided. Use of incorrect hardware could result in damage to the product.
 General Notes These installation instructions are intended to be comprehensive for a typical Keyeira/Presto configuration. Your configuration may differ. If you have questions contact Geiger Customer Service
Insolroll Clutch Operated Shades Installation Instructions Installation Instructions
 All clutch operated shades are shipped fully assembled and ready for installation. Mounting screws are not provided. Screws for chain guide installation to meet the child safety standards are provided.
1. Layout. Step 1. Step 2. Step 3. Fig. 1
 1-3/8 Panel Clamp Tools You Will Need: Tape Measure, Mason s String, Stakes, Hole Digger, Shovel, Level, Wheelbarrow, Wrenches or Adjustable Wrench, Hacksaw, Pliers, Cutting Pliers, Fence Stretcher and
TOOLS REQUIRED: HARDWARE INCLUDED: 13MM FLAT WRENCH FOR LEVELING THE STRUCTURE RATCHET WITH 5MM HEX BIT FOR CORNER SCREWS ON TOP TRAVERSE BEAMS
 1 TOOLS REQUIRED: RATCHET WITH 5MM HEX BIT FOR CORNER SCREWS ON TOP TRAVERSE BEAMS 13MM FLAT WRENCH FOR LEVELING THE STRUCTURE RUBBER MALLET FOR INSERTING PANELS 8MM HEX BIT WITH EXTENSION FOR HEX BOLT
STRUCTURAL HOLDING, F150 TOOL BOARD, AND CART ASSEMBLY
 STRUCTURAL HOLDING, F150 TOOL BOARD, AND CART ASSEMBLY 150006 2014 Chief Automotive Technologies CO9110.1 Rev. A 12/19/14 F150 Structural Holding Tool Board Cart Step 1: Caster Assembly. A.) Assemble 5
SETUP GUIDE FOR THE HANGING MINIBAY and SUPERBAY Golf Simulator Screen Systems.
 SETUP GUIDE FOR THE HANGING MINIBAY and SUPERBAY Golf Simulator Screen Systems www.allsportsystems.com Page 2 of 15 Rev 3/1/2018 Table of Contents INTRODUCTION 4 What s Included: 5 Additional Items Needed:
MONKEY BARS OVERHEAD RACK INSTALLATION
 MONKEY BARS OVERHEAD RACK INSTALLATION Thank you for purchasing the New Monkey Bars Overhead storage rack. The most innovative overhead rack on the market WARNING THE PROPER INSTALLATION OF THIS STORAGE
Select Lab Fixed Height Workstation
 Assembly Instructions Select Lab Fixed Height Workstation Contents Important User Information.............................. 2 Safety Precautions.................................... 3 Required Tools........................................
Opus Cabinets with "H Storage Unit, continued
 66 Health Volume 2 Casegoods Specification Guide Fascia is used to extend cabinets to the ceiling Fascia can only be used on 84"H cabinets Fascia accommodates ceiling heights of 7'6" 9'6" in 1 16" increments
Original Gallery System
 GAllery System Art Displays Original Gallery System a Gallery System product Here s everything you need to know to get started with your Gallery System Art Hanging System GS getting started To install
Tour Worksurfaces and Supports
 R Tour Worksurfaces and Supports Table of Contents Topic Page COLUMN SUPPT SUPPT FRAME TIE BRACKET TO COUNTER Worksurface to Shelf Attachment 2 Worksurface to Counter Attachment Bracket 3 Worksurface Tied
INSTALLATION MANUAL FOR KINESIS STATIONS STEP MH67E EQUIPMENT REQUIRED FOR INSTALLATION
 1 02/02/2012 INSTALLATION MANUAL FOR KINESIS STATIONS STEP MH67E EQUIPMENT REQUIRED FOR INSTALLATION Phillips screwdriver T wrenches size 5-6-8-10 Combination ratcheting wrench 17 and/or open-end wrench
PeeGee s Myna & Starling Trap Plans
 PeeGee s Myna & Starling Trap Plans Canberra Indian Myna Action Group www.indianmynaactiongroup.org.au President Bill Handke Email handke@grapevine.net.au Not for Commercial use. Traps are not to be built
Install Instructions. NewAge Steel Welded Tall Locker
 Kit Contains Full Width Adjustable Steel Shelves (4) Height-Adjustable Steel Leveling Legs (4) Aluminum Door Trim (2) 2.5 x ¼ Cabinet Mounting Lag Bolts (4) Large Zinc Plated Mounting Washers (4) 5/8 x
Firestar f201 laser & Flyer 3D System Quick Start Guide
 Important Note: See the Flyer 3D Marking Head and Firestar f201 Laser Operators Manual for complete installation details and instructions. A PDF version is available Online at: http://www.synrad.com/manuals/manuals_laser.htm.
Yes 20 Charging Wall Cabinet for Tablets
 Built with Anthro-DNA Owner's Manual for Yes 20 Charging Wall Cabinet for Tablets Part # YESCABGMPW Components at a Glance 1 2 4 5 8 7 10 Front of Cabinet (closed) 1. Locking front door to User area. 2.
Assembly Instruction. 9,2 m² Grillkota
 Assembly Instruction 9,2 m² Grillkota Dear customers, Thank you for purchasing our product. We recommend that you read these instructions before installation and make the necessary preparations for building.
LAN Locker Adjustable Shelves
 Adjustable Shelves LAN LOCKER ADJUSTABLE SHELVES * Adjustable Shelves are available for LAN LOCKER widths: 24, 30, 48, 60, and 72. * When installing more than one Adjustable Shelf, it is recommended that
SENC 150 Encoder Installation. SENC 150 Encoder Installation. Vertical Knee Mill X axis... First Steps: Mounting Information: Before proceeding:
 Vertical Knee Mill X axis... Mounting hardware is described within the contents of these instructions. Hard Stop ACU-RITE linear encoder *Center support for encoder Fasteners, and hardware that is provided
General Display Rules
 General Display Rules Inline Exhibit An exhibit with neighboring exhibits on each side and faces only one main aisle. Standard Exhibit Height All display material over 4 high, placed within 10 of a neighboring
Building an Elevated Garden Bed & Hydroponic Table
 Building an Elevated Garden Bed & Hydroponic Table Materials: Lumber (2x4, 2x6, 1x4), Exterior Grade Wood Screws (2 1/2 & 1 5/8 ) and Hardware Cloth (enough to cover a 24 x48 area) Tools: Cordless Drill
Installation Instructions
 Contents Page General Information and Installer Tips.......... 2 Panels & Posts............................. 3 Enclosure Description..................... 4 Hinge Door Hardware................... 4-5 Step-by-Step
1 Intro Folding Panel System 12 Panel Display Backwall Set-up Instructions 1. 2.
 1 Intro Folding Panel System 12 Panel Display Backwall Set-up Instructions Right Stack top panels on bottom panels Unfold display wall Set in desired configuration Wrong Pull from here Remove each folded
Select Lab Adjustable Height Workstation
 Assembly Instructions Select Lab Adjustable Height Workstation Mobile version is shown. Also available without casters. Contents Important User Information.............................. 2 Safety Precautions....................................
IMPORTANT!!! ASSEMBLY ASSEMBLY INSTRUCTIONS. (Internal Dimensions)
") ASSEMBLY ASSEMBLY INSTRUCTIONS (Internal Dimensions) Ent Spec Edition Ltr v-0- Overall dimensions including base: 7. L x 9 W x 0 H cms 97.5" L x 7" W x 8.7" H IMPORTANT!!! Please read these instructions
ASSEMBLY ASSEMBLY INSTRUCTIONS (Internal Dimensions) Ent Spec Edition Ltr v-0- Overall dimensions including base: 7. L x 9 W x 0 H cms 97.5" L x 7" W x 8.7" H IMPORTANT!!! Please read these instructions
INSTALLING YOUR NEW SPRING LIFT ARM KIT
 INSTALLING YOUR NEW SPRING LIFT ARM KIT 1. Measure the distance that the roof is to be raised. [If your lift system is completely non-functional, you will need to calculate or estimate this distance as
COPPER / FIBER MANAGER RACK INSTALLATION INSTRUCTIONS PX Standard Release A March 2008
 COPPER / FIBER MANAGER RACK INSTALLATION INSTRUCTIONS PX101425 Standard Release A March 2008 A UPON RECEIPT OF YOUR Copper / Fiber Manager Rack Great care has been taken to insure that your Copper / Fiber
ASSEMBLY INSTRUCTIONS FOR SL500A AND SL500AL
 ASSEMBLY INSTRUCTIONS FOR SL500A AND SL500AL January 2013 The SL500A is a square upright glass cabinet with a single hinged lockable door. It has five adjustable shelves plus the base. It also has an optional
TITAN INDUSTRIAL RACK 6-FOOT TALL / 4-SHELF
 TITAN INDUSTRIAL RACK 6-FOOT TALL / 4-SHELF DXST10000 IMPORTANT: Please read this manual carefully before assembling this storage rack and save it for reference INSTRUCTION MANUAL 3 TABLE OF CONTENTS
Universal Shelving System Walmart Installation Manual
 Universal Shelving System Walmart Installation Manual Patent Pending FREE STANDING SELF SUPPORTING GRAVITY FLOW Does not attach to cooler walls or door frames Certified Destin Global, Inc. PO Box 50033
Directions for the 25' Jr Batting Cage & Frame
 Directions for the 25' Jr Batting Cage & Frame Parts Qty Part Description 1 6 Upper corners of the arch (with hex bolts) 2 6 Bent pipe for arch feet 3 6 Pipe with no swedge (2 per horizontal arch) 4 12
Track Rack. * Track Racks are not lockable
 The Track Rack s unique staggered, sliding hook design creates the greatest parking efficiency while still providing easy access to any particular bike. When adding or removing a bike to the rack, simply
a.k.a. casegoods instructions
 a.k.a. casegoods instructions a a.k.a. workwall installation IMPORTANT NOTES Failure to install product according to installation instruction will result in loss of warranty. Tools required for assembly
Showpiece Cabinet Integrated Stand For 32" - 52" LCD HDTV
 Showpiece Cabinet Integrated Stand For 32" - 52" LCD HDTV Installation and Assembly Instructions 2009 Incredible Technologies Inc. Version 0109 Showpiece Cabinet Integrated Stand for 32" - 52" LCD HDTV
Installation Instructions
 Installation Instructions 12in. Deep Woodcrest Closet Organizer MODEL: JL-583, JL-584 16in. Deep Woodcrest Closet Organizer MODEL: JL-581, JL-582 www.johnlouishome.com BOOKLET SKU#718 John Louis ome Woodcrest
Sentinel Electronic Safe Installation Guide
 Sentinel Electronic Safe Installation Guide by Rev 07/12/2004 P/N 100020 Table of Contents 1. OVERVIEW...3 2. SAFE INSTALLATION...3 2.1. TOOLS REQUIRED...3 2.2. SELECTING THE MOUNTING LOCATION...3 2.3.
HAPPY CHICKEN TRACTOR
 HAPPY CHICKEN TRACTOR www.thelittlechickenfactory.com Consumer Assembly Instructions 2014 Six-foot unit Picture of six-foot unit shade/rain cover not shown NEW HANDLE INSERT INTO FRAME HOLES WHILE ASSEMBLING
Direct Importers of the Finest Exotic Hardwood Decking, Lumber, & Flooring
 Direct Importers of the Finest Exotic Hardwood Decking, Lumber, & Flooring These Instructions can be found online at: http://www.advantagelumber.com/how-to/buildwoodstoragebox.html Material List 72 FEET
ASSEMBLY INSTRUCTIONS FOR MAR-K BEDSIDES AND GM FLUSH TAILGATE WITH HANDLE
 ASSEMBLY INSTRUCTIONS FOR MAR-K BEDSIDES AND 41-53 GM FLUSH TAILGATE WITH HANDLE Build the box assembly according to the MAR-K assembly instructions. When installing the tailgate and latching mechanisms
Section 11 CABLE & ROD SYSTEMS, SIGN FIXING & SIGN STANDOFFS. Web. acrylicdesign.ie .
 Section 11 CABLE & ROD SYSTEMS, SIGN FIXING & SIGN STANDOFFS Web. acrylicdesign.ie Email. sales@acrylicdesign.ie Acrylic Design 2004-2015 Mobile Cable System Components Single panel clamp Stand Off for
Horizontal Cable Systems
 ALUMINUM RAILING INSTALLATION INSTRUCTIONS Horizontal Cable Systems 1) Check Contents Of Packages: Verify that all parts have arrived and that they match the packing list. 1A) Coastal applications: Confirm
ROS-APT Caucus Plinth Table with Trough Note: Details apply, however the actual configuration of your table may vary from what is depicted here.
 ROS-APT Caucus Plinth Table with Trough Note: Details apply, however the actual configuration of your table may vary from what is depicted here. Parts List - Tables Tops, Top Insert Panels and Base panels
PORTABLE ADJUSTABLE BASKETBALL SYSTEM
 Instruction Manual PORTABLE ADJUSTABLE BASKETBALL SYSTEM P A R T S L I S T 5 1/2 and 8 safe play clearance Item Qty Description Item Qty Description A 1 Portable Base Assembly M 4 1/2 Lock Nut B 2 Front
Vastex Manual Press Registration System Assembly and Operations Manual
 Vastex Manual Press Registration System Assembly and Operations Manual Contents Pg. # Introduction 2 Component Identification 2-3 Pallet Jig Assembly (Manual Rear Clamp) 4 Pallet Jig Assembly (Manual Side
Assembled Ez2 Positioning/Operating Instructions
 Assembled Ez2 Positioning/Operating Instructions Step 1: Remove packaging material from unit. Report any damage to trucking company as soon as possible. Strap Unit Hand Truck Step 2: Remove unit from skid.
ASSEMBLY OF THE KNOCKED-DOWN LADDERS: 8 to 12 STEPS STANDARD TOP AND SAFELOCK REQUIRED TOOLS
 ASSEMBLY OF THE KNOCKED-DOWN LADDERS: 8 to 12 STEPS STANDARD TOP AND SAFELOCK REQUIRED TOOLS SAFETY GLASSES 7/16" WRENCH OR SOCKET STEP LADDER OF APPROPRIATE HEIGHT (2) 9/16" WRENCHES OR SOCKETS RUBBER
Grand Garden Chalet 6X3 Assembly Manual
 Revision #8 November 1, 2009 Grand Garden Chalet 6X3 Assembly Manual Thank you for purchasing a Grand Garden Chalet. Please take the time to identify all the parts prior to assembly. Please use Safety
PH03 Comfort XL Front Assembly Replacement Instructions
 PH03 Comfort XL Front Assembly Replacement Instructions POLYJOHN USA PolyJohn Enterprises Corp 2500 Gaspar Ave. Whiting, IN 46394 Phone: 800-292-1305 Fax: 219-659-0625 www.polyjohn.com info@polyjohn.com
2.9 WINDOW & DOOR BUCKS
 2.9 WINDOW & DOOR BUCKS Bucks provide attachment surfaces for windows and doors while holding back concrete from these openings during concrete placement. Mark the center and edges of openings as you place
Lok Fast Column Clamp General Information
 Lok Fast Column Clamp General Information Gates Lok-Fast Column Clamp Has These Advantages: Can Be Job Built Gang Formed No Loose Pieces Designed For Rapid Placement of Concrete Rapid Locking Action 3
Thanks for shopping with Improvements! Weatherby Corner Storage Cabinet Item #511676
 Thanks for shopping with Improvements! Weatherby Corner Storage Cabinet Item #57 Note: Read these instructions carefully before assembling. Tools required: short Philips screwdriver (not included). Find
ASSEMBLY MANUAL WALL MOUNT RACK SR-WM-10U SR-WM-12U SR-WM-16U
 ASSEMBLY MANUAL WALL MOUNT RACK SR-WM-10U SR-WM-12U SR-WM-16U STRONG WALL MOUNT RACKS Strong equipment wall racks are available in sizes 10U, 12U, and16u, and are constructed with 11 gauge (3mm) thick
INSTALLATION GUIDE N5-DS48-4
 INSTALLATION GUIDE N5-DS48-4 Shelving ( steel ) Transit High Roof & Medium Roof Promaster Standard Roof & High Roof Nissan NV High Roof Sprinter Low Roof & High Roof Box Truck / Trailer QUICK START GUIDE
Paco Motorsports Strong Arms X
 Paco Motorsports Strong Arms 13-101X Thanks for purchasing our Strong Arms. These braces reinforce the frame horns that support the engine and transfer all of the cornering and road impact loads into the
Kentucky 4H Wood Science Plans Notebook. Plans Level 2
 Kentucky 4H Wood Science Plans Notebook Plans Level 2 MATERIALS NEEDED: JEWELRY BOX WS201 1 piece wood 1/4" x 4 x 4 1/2" (bottom) 1 piece wood 1/4" x 4 1/2" x 5 (top) 2 pieces wood 1/4" x 2 x 5 (front
Closet System Installation Manual
 Closet System Manual Thank you For choosing our Custom Closet Collection to fit all your needs Closets come fully assembled to make your project an enjoyable and satisfying experience. With quality Custom
STOP. Performance Plus 2.0 Series. hazard! ATTENTION: Is your cabinet damaged?
 Performance Plus. Series Warning: Excessive Warning: Excessive weight hazard! weight hazard! Use two or more people to move, assemble, or install cabinets and locker to avoid back injury. Do not leave
Stance 6085 Treatment Tables Assembly Instructions
 Stance 6085 Treatment Tables Assembly Instructions Model #ST6085 Treatment Table only Model #ST6085-SH Treatment Table with Shelf Model #ST6085-DW Treatment Table with Shelf and Two Drawer Cabinet Your
Rotary Fixture M/V/X CLASS LASER SYSTEMS. Installation and Operation Instructions
 Rotary Fixture M/V/X CLASS LASER SYSTEMS Installation and Operation Instructions 02/01/2000 Introduction The Rotary Fixture controls in the Printer Driver are used along with the optional Rotary Fixture
PLANS BY TOM BURY MURPHY WORKTABLE TOTAL DIMENSIONS: FOLDED UP 30 X 48 X 0 FOLDED DOWN 30 X 58 X 84
 MURPHY WORKTABLE TOTAL DIMENSIONS: FOLDED UP 30 X 48 X 0 FOLDED DOWN 30 X 58 X 84 MATERIALS LIST: (2) 2 x8 x8 (3) 2 x4 x8 (1) 1 x2 x8 (1) 48 x96 3/4 plywood (2) 1-1/2 x30 continuous hinge (1) Left-side
OFS ED-6C Instruction Sheet LIGHTGUIDE CROSS-CONNECT Comcode: LGX DISTRIBUTING FRAME INSTALLATION
 OFS ED-6C321-50 636-299-104-01 Instruction Sheet LIGHTGUIDE CROSS-CONNECT Comcode: 845 866 367 LGX DISTRIBUTING FRAME INSTALLATION This instruction sheet is intended for use with the installation of an
ASSEMBLY INSTRUCTIONS TALL CABINET - MODEL CS30
 ASSEMLY INSTRUCTIONS TALL CAINET - MOEL CS30 To avoid SERIOUS INJURY or AMAGE to personal belongings: O NOT overload the cabinet or the shelves, maximum weight limit for feet or caster installation is