1 8 Arrows Trigo Cube
|
|
|
- Peter Waters
- 6 years ago
- Views:
Transcription
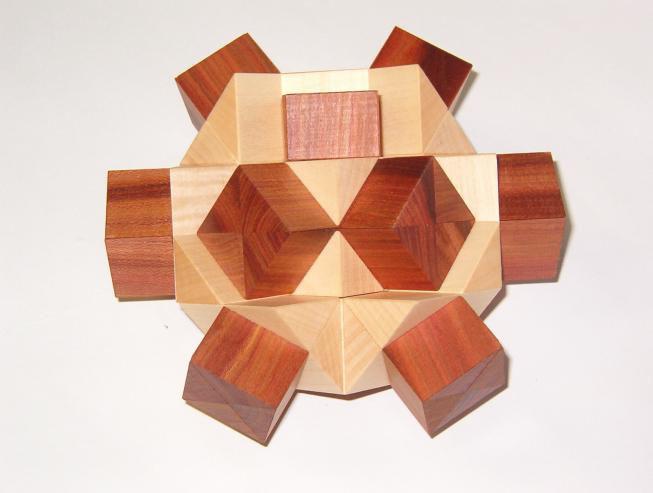
1 1 8 Arrows Trigo Cube Puzzle Goal: Materials: Classification: Put the 8 pieces together to make a cube. Wood: Bubinga, maple, and wenge Serially Interlock

2 1 8 Arrows Trigo Cube Puzzle Solution:
 may need to be moved by the STYLUS during play to enable immediate passage and perhaps passage at some point")
3 2 AMAZE Puzzle Goal: Materials: Classification: Notes: Move the tip of the STYLUS from START to FINISH through the maze without lifting it from the maze path. Plastic Maze/Sequential Movement Certain walls (positioned on four separate SLIDERS) may need to be moved by the STYLUS during play to enable immediate passage and perhaps passage at some point further down the path. The initial positions of the four SLIDERS can be arranged in 16 different ways to change the complexity of the challenge from NOVICE to EXPERT, providing play value for people with different puzzle-solving abilities.

4 2 AMAZE Puzzle Solution:
5 3 Barcode Burr Puzzle Goal: Materials: Classification: Notes: The goal of those who play with this puzzle should be to enjoy the motion and interactions of the pieces. Success (in the sense of a solution) is achieved when the puzzler has figured out the rules that dictate how the pieces move, and can apply that knowledge to disassemble and reassemble the puzzle. Macassar Ebony, Eastern Hard Maple, and 12 steel pins interlocking disassembly Only a light pushing force is required to move pieces. Any attempt to pull or pry with fingernails will not work, and will probably damage the puzzle: all pieces should be "pushed"!
 A piece may be removed if it is extended, if every piece before it is retracted, and if every piece after it has been removed.")
6 3 Barcode Burr Puzzle Solution: 1.) A piece may extend or retract if the piece immediately before it is extended, and every other piece before that one is retracted. 2.) A piece may be removed if it is extended, if every piece before it is retracted, and if every piece after it has been removed. These rules were designed to force the pieces to move in a binary progression. For example, Piece #1 can always extend or retract, no matter what state the puzzle is in. Piece #2 can extend or retract if #1 is extended. Piece #3 can extend or retract if #2 is extended, and #1 is retracted. Thus the pattern to follow in order to extend Piece #4 is: 1, 2, 1, 3, 1, 2, 1, 4 There is a third rule of piece motion, which is that opposite pieces cannot influence each other. Pieces #1 and #5 are opposite, as are Pieces #2 and #4, as well as Pieces #3 and #6. Unlike the first two rules, this one is not determined by the pin mazes cut into the puzzle pieces, but rather is an intrinsic quality of the interlocking concept. Taking this third rule into consideration, there are many opportunities to take shortcuts. For example, it is possible to extend Piece #4 in only five moves: 1, 2, 1, 3, 4 If the binary progression is followed without using any shortcuts, the full pattern to remove one piece from the puzzle is as follows: 1, 2, 1, 3, 1, 2, 1, 4, 1, 2, 1, 3, 1, 2, 1, 5, 1, 2, 1, 3, 1, 2, 1, 4, 1, 2, 1, 3, 1, 2, 1, 6, 1, 2, 1, 3, 1, 2, 1, 4, 1, 2, 1, 3, 1, 2, 1, 5, 1, 2, 1, 3, 1, 2, 1, 4, 1, 2, 1, 3, 1, 2, 1, 6 The 64th move in this sequence is the removal of Piece #6. This is possible because Piece #6 was already extended, and every other piece was retracted. An additional 32 moves are required to remove Piece #5, then 16 more moves to remove #4, 8 more to remove #3, and 4 more to remove #2. The total number of moves required to fully disassemble this puzzle (without using any shortcuts) is 124 from start to finish. If every shortcut is taken advantage of, the full pattern to remove one piece from the puzzle is as follows: 1, 2, 1, 3, 4, 3, 1, 2, 5, 2, 1, 3, 4, 1, 2, 1, 6, 1, 2, 1, 4, 3, 1, 2, 5, 2, 1, 3, 4, 1, 2, 1, 6 The 33rd move in this sequence is the removal of Piece #6. An additional 16 moves are required to remove Piece #5, then 6 more moves to remove #4, 5 more to remove #3, and 4 more to remove #2. Thus the minimum number of moves required to fully disassemble this puzzle is 64 from start to finish. In the diagram, Piece #1 is red, #2 is orange, #3 is yellow, #4 is green, #5 is blue, and #6 is purple. On each face of the cube, the striped pattern makes a sharp U-turn -- this is where the "pusher tips" are located. The best way to find orientation on the cube is to push on each piece until #1 is located (it will always move.) Once #1 has been found, orient the cube so that it looks like this diagram, with the red region representing Piece #1. There are actually three ways to assemble these pieces; the 1-3 and 4-6 sub-assemblies will always have the same construction, however they may be rotated 120 degrees in either direction with respect to each other. If this is done, the pieces will still assemble, however the solution that I have provided is no longer applicable. If you disassemble these pieces, please be careful to re-assemble them in their proper orientation. Use the diagram to be certain that it is done correctly.
7 4 Big Maz-N-Cube Puzzle Goal: Materials: Classification: Separate the 3 cubes (without using excessive force). ABS & TPR plastic (Livecube) Interlocking / Sequential Movement
8 4 Big Maz-N-Cube Puzzle Solution: Big Maz-N-Cube Solution: (move pieces carefully) Starting Point Axes Slide Blue +2 Y Slide Blue +2 Z Slide Blue -2 Y Slide Blue +2 X Slide Blue +2 Y Slide Yellow -1 Y Slide Blue +2 Z Slide Red +2 Y Slide Blue -2 X Slide Red -3 Y Slide Yellow -4 X Slide Red +2 Y Slide Yellow +2 X Slide Red +1 Y Slide Blue +2 X Slide Red -1 Y Slide Yellow -1 X Slide Blue +1 Y Slide Blue -2 Z Slide Blue -1 Y Slide Yellow +1 X Slide Red +1 Y Slide Blue -2 X Slide Red -1 Y Slide Yellow -2 X Slide Red -1 Y Slide Blue -2 Z Slide Red +1 Y Slide Yellow +2 X Slide Red +1 Y Slide Blue +2 X Slide Red -1 Y Slide Yellow -1 X Slide Blue +1 Y Slide Red -1 X Slide Yellow -2 Y Slide Yellow -2 Z Slide Yellow +2 Y Slide Red +1 X Slide Blue -1 Y Slide Yellow +1 X Slide Red +1 Y Slide Blue -2 X Slide Red -1 Y Slide Yellow -2 X Slide Red -1 Y Slide Blue +2 Z Slide Red +1 Y Slide Yellow +2 X Slide Red +1 Y Slide Blue +2 X Slide Red -1 Y Slide Yellow -1 X Slide Blue +1 Y Slide Blue +2 Z Slide Blue -2 Y Slide Blue -2 X Slide Blue +4 Y Slide Blue +Z (out) Blue Piece Removed Slide Red -1 X Slide Red +2 Y Slide Red -2 Z Slide Red -2 Y Slide Red +2 X Slide Red -2 Y Slide Red -4 X Slide Red +4 Y Slide Red +2 Z Slide Red -2 Y Slide Red +2 Z Slide Red -2 Y Slide Red +4 X Slide Red +2 Y Slide Red -2 X Slide Red +2 Y Slide Yellow -Z (out) Yellow Piece Removed All Done
9 5 Box with a Key Puzzle Goal: Materials: Usually you turn the key and you can open the lid. But in this case -----! walnut, red sandalwood, etc.

10 5 Box with a Key Puzzle Solution:

11 6 BurRing Puzzle Goal: Materials: Classification: Notes: Disassemble and re-assemble Bronze put together/take apart One of the most familiar puzzles for people other than Puzzlers is the six piece Burr. My goal was to take this puzzle, distort it, and create a ring out of it. The final step was to exchange the locking piece with the wearer's finger!
12 6 BurRing Puzzle Solution:
13 7 Button Trap Puzzle Goal: Materials: Classification: Free the button Apple-tree, white walnut Take Apart Puzzle


14 7 Button Trap Puzzle Solution:

15 8 Cross in Circle Puzzle Goal: Materials: Classification: Locate the cross inside the circle Maple, plum-tree Put Together Puzzle


16 8 Cross in Circle Puzzle Solution:

17 9 Cube Bi-section Puzzle Goal: Materials: Classification: Form a fractalized cube. hardwood Interlocking Assembly
18 9 Cube Bi-section Puzzle Solution:

19 10 Cubyx Puzzle Goal: Materials: Classification: Make a box by combining 6 unique 3-D tiles Solid wood Put-together
20 10 Cubyx Puzzle Solution:
21 11 Cup Case Puzzle Goal: Materials: Classification: Place four Cup pieces flat in the frames. MDF board 2D put-together
22 11 Cup Case Puzzle Solution:
23 12 Dodecahedron Box Puzzle Goal: Materials: Classification: Match up the mosaic to open the box. Bubinga, Wenge, Maple hardwoods. Sequential Movement
24 12 Dodecahedron Box Puzzle Solution: Rotate the sides of the dodecahedron so that each section of color lies next to the same color on every adjacent panel. A symmetrical mosaic will cover the dodecahedron. When this is done, the lid is unlocked. The lid will open on a hinge. Should you want to give the puzzle to some one else, I invite all to mix the Dodecahedron how they please. However, should you want to set the puzzle at its most difficult setting, rendering your would-be solver all the more entertained (or frustrated), one must align all six of the dodecahedron s edge gaps in the most symmetrical fashion possible. Each gap must be facing directly east, west, north, south, up, and down (see photo). In other words, if you draw lines starting from the center of the dodecahedron out through the midpoints of each edge with a gap, you have the xyz-axis with origin at the center of the dodecahedron. A small wenge accent shows through the gaps to give a clue if you are on the right track to resetting the puzzle. It takes 38 moves to open the box from this point.
25 13 Double Crossed Puzzle Box Puzzle Goal: Materials: Classification: 2.1 (and 6.4) To manipulate the moveable pieces on the top of the puzzle box to open it. Quarter sawn Argentine Walnut, Palo Blanco, and cedar
26 13 Double Crossed Puzzle Box Puzzle Solution: NOT FOR PUBLIC DISCLOSURE

27 14 Double Locked Briefcase Puzzle Puzzle Goal: Materials: Classification: Notes: Secret Opening Briefcase Aluminum, wood, metal Secret Opening Box NO FORCE REQUIRED
28 14 Double Locked Briefcase Puzzle Puzzle Solution: Spin, flip, spin, unlock! 1. Put the briefcase flat on the table, upside down, and spin the puzzle, in either direction. 2. Flip the puzzle's front edge over to theback, laying it flat again. 3. Keeping it flat on the table, spin it again 4. Still keeping it flat on the table, unlock the case using the 2 flip locks Caution: the brass pins will fall out! Just stick them back, putting one into the top-most hole of each wood block when the case is open flat.

29 15 Monad Puzzle Goal: Materials: Classification: Take apart and put back together Die cast metal, dip anodized Take apart
30 15 Monad Puzzle Solution: Rotate the two tails of the two, looser, deeply slotted yin yang pieces in symmetrically opposite directions just far enough to remove them(about ½ inch)and remove them. The other yin yang portion of the puzzle then easily disassembles. To reassemble first assemble the lesser slotted two yin yang pieces. Then drop in the two deeply slotted pieces and rotate back to the solved position. The two colors can assume two possible arrangements.
32 Little Maz-N-Cube. Separate the 3 cubes (without using excessive force). ABS & TPR plastic (Livecube) Interlocking / Sequential Movement
. ABS & TPR plastic (Livecube) Interlocking / Sequential Movement") 32 Little Maz-N-Cube Puzzle Goal: Materials: Classification: Separate the 3 cubes (without using excessive force). ABS & TPR plastic (Livecube) Interlocking / Sequential Movement 32 Little Maz-N-Cube Puzzle
32 Little Maz-N-Cube Puzzle Goal: Materials: Classification: Separate the 3 cubes (without using excessive force). ABS & TPR plastic (Livecube) Interlocking / Sequential Movement 32 Little Maz-N-Cube Puzzle
40 Cat Case. Place four Cat pieces flat in the frames. MDF board 2D put-together. Copyright 2003 IPP Design Competition All rights reserved.
 40 Cat Case Puzzle Goal: Materials: Classification: Place four Cat pieces flat in the frames MDF board 2D put-together 40 Cat Case Puzzle Solution: 41 Keyhole Puzzle Puzzle Goal: Materials: Classification:
01 1 Labyrinth Puzzle
 01 1 Labyrinth Puzzle Puzzle Goal: Materials: Classification: Remove the coin. Trespa, Acrylic, steel balls Routefinding puzzle 01 1 Labyrinth Puzzle Puzzle Solution: 02 13 Triangles Puzzle Goal: Materials:
You will have to discover a range of hidden and disguised tools to reach the final goal. No force is required to open the drawer.
 40 A Plugged Well Puzzle Goal: Materials: Classification: Notes: Work your way through the puzzle to find the barrel of oil. Walnut, steel elements, and magnets 2.1 Trick or Secret Opening You will have
01 10 Cutter Blades. Fit all 10 pieces into the rectangle tray. Acrylic. Put-together. Copyright 2013 IPP Design Competition All rights reserved.
 01 10 Cutter Blades Puzzle Goal: Materials: Classification: Fit all 10 pieces into the rectangle tray. Acrylic Put-together 01 10 Cutter Blades Puzzle Solution: Solution unavailable. 02 4Hex Puzzle Goal:
wood (koa, maple, ebony, cocobolo, new guinea rosewood) and metal (brass, copper, steel) Secret Opening Box
 and metal (brass, copper, steel) Secret Opening Box") 27 Clutch Box Puzzle Goal: Materials: Classification: Open the box wood (koa, maple, ebony, cocobolo, new guinea rosewood) and metal (brass, copper, steel) Secret Opening Box 27 Clutch Box Puzzle Solution:
27 Clutch Box Puzzle Goal: Materials: Classification: Open the box wood (koa, maple, ebony, cocobolo, new guinea rosewood) and metal (brass, copper, steel) Secret Opening Box 27 Clutch Box Puzzle Solution:
01 1 Platypus Egg! Open the egg. Colour pencils, pins, electronics. Copyright 2009 IPP Design Competition All rights reserved. Puzzle Goal: Materials:
 01 1 Platypus Egg! Puzzle Goal: Materials: Open the egg. Colour pencils, pins, electronics Classification: Trick opening (Slocum 2.1) 01 1 Platypus Egg! Puzzle Solution: 02 3 Identical Piece Burr ON Puzzle
20 Memory Drawers. Discover the pattern for opening and closing the drawers. Careful: you need to open and close the drawers perfectly.
 20 Memory Drawers Discover the pattern for opening and closing the drawers. Careful: you need to open and close the drawers perfectly. Walnut, maple, silky oak, birch, rosewood, acryl Sequential movement
25 Helical Burr. Take apart and reassemble. SLS nylon. Take-apart
 25 Helical Burr Puzzle Goal: Materials: Classification: Notes: Take apart and reassemble. SLS nylon Take-apart There are two possible assemblies, one is very simple (a key pieces screws out), and the other
Disassemble, then re-assemble the six pieces to form a cluster arrangement of six rhombic dodecahedrons.
 21 Clustered Anew Puzzle Goal: Materials: Classification: Disassemble, then re-assemble the six pieces to form a cluster arrangement of six rhombic dodecahedrons. Wood: jatoba and ziricote Interlocking
01 Auzzle A2. Collect all the magnets drawn to each other along the equator. Wood, plastic SEQ-GRP
 01 Auzzle A2 Collect all the magnets drawn to each other along the equator. Wood, plastic SEQ-GRP 02 Bermuda Rhombus Pack all 10 elements (including the little rhombus) inside the frame. Acrylic, plastic
20 Memory Drawers. Copyright 2002 IPP Design Competition All rights reserved. Puzzle Solution:
 20 Memory Drawers This work memorizes 120 (The factorial of 5) kinds of turn to open the drawers. The big base is full of 30 device plates. The plates move vertically and horizontally, and change the arrangements
Repairing Microsoft Wedge Touch Mouse Battery Cover Retaining Clip
 Repairing Microsoft Wedge Touch Mouse Battery Cover Retaining Clip Disassembly, repair and reassembly of Wedge Touch mouse when the battery cover will not stay closed. Also is a good guide to repair other
INSTALLATION GUIDE 2009-CURRENT HUMMER H3T PRODUCT CODE:
 INSTALLATION GUIDE 2009-CURRENT HUMMER H3T PRODUCT CODE: 268 June 22, 2010 TOOLS NEEDED COMPONENTS INCLUDED P2 Tip 3/8" Drill Rubber Gasket(s) x 2 Bracket(s) x 2 1/2" Drill Bit Bulkhead Flange #2 Phillips
Series 1500 Aluminum Door Canopy
 Series 500 Aluminum Door Canopy with Sidewings It is our recommendation that you read instructions carefully prior to assembly and installation. Series 500 with Sidewings mounting bar (A) top trim (B)
Harmony Remote Repair
 Harmony Remote Repair harmonyremoterepair.com How to install your new Harmony One Front Cover/Touch Screen Important! Before you begin working on your Harmony One, you must discharge any static electricity
Written By: Walter Galan
 Xbox 360 CPU Heat Sink Replacement CPU heat sink replacement. Written By: Walter Galan ifixit CC BY-NC-SA www.ifixit.com Page 1 of 27 INTRODUCTION Use this guide to remove the CPU heat sink from your Xbox
1 Round Band Puzzle Ring
 1 Round Band Puzzle Ring Disassemble and re-assemble the ring. Brass Take-apart 2 Camera Conundrum Find the hidden drawer. Take the puzzle entirely apart into seven pieces and put it together again. palisander
Series 1100 Aluminum Door Canopy
 Series 00 Aluminum Door Canopy with Support Arms It is our recommendation that you read instructions carefully prior to assembly and installation. Series 00 with Support Arms MOUNTING BAR (A) TOP TRIM
Woodline USA Woodline Spacer Fence System
 Woodline USA Woodline Spacer Fence System MADE IN THE USA Includes: (1) ¼ Spacer Fence (1) 3/8 Spacer Fence (1) ½ Spacer Fence (1) Hardware Package (1) 3 Piece Brass bar set (2) Setup Blocks Visit Us Online
400GTO Lubrication Guide
 400GTO Lubrication Guide Lubrication Guidelines for the following equatorial mounting: 400GTO Servo with GTOCP2 or CP3 Controller For other 400 models please review other postings as they become available.
Xbox 360 Eject Button Replacement
 Xbox 360 Eject Button Replacement Eject button replacement. Written By: Walter Galan ifixit CC BY-NC-SA www.ifixit.com Page 1 of 17 INTRODUCTION This guide will help you replace a damaged or broken eject
Mechanical Frappe Press
 Mechanical Frappe Press Operation Manual CONTENTS OPERATIONAL INSTRUCTIONS PRECAUTIONS PART NAMES INCLUDED ITEMS BASIC OPERATION MAINTENANCE REPLACEMENT PARTS Thank you for using The Frapptastic Five Mechanical
General Four-Way Operation, Maintenance & Service Manual
 General Four-Way Operation, Maintenance & Service Manual SCOPE Included in the following pages you will find assembly drawings, exploded views, parts lists, assembly tips, operational descriptions and
Written By: Walter Galan
 iphone 4 Vibrate Ring Switch Replacement Replace the metal portion of the vibrate/ring switch on your iphone 4. Written By: Walter Galan ifixit CC BY-NC-SA www.ifixit.com Page 1 of 21 INTRODUCTION Use
Written By: Ben Eisenman
 iphone 3GS Front Panel Replacement Replace a cracked front panel on an iphone 3GS. Written By: Ben Eisenman ifixit CC BY-NC-SA www.ifixit.com Page 1 of 18 INTRODUCTION Use this guide to separate and replace
01 Golf Ball Cage. Extract, and return golf ball to inside of cube. Walnut, golf ball Misc. Assembly
 01 Golf Ball Cage Extract, and return golf ball to inside of cube. Walnut, golf ball Misc. Assembly 02 Radix Take the three pieces apart, and then put them back together again. No force is required. Cast
7878 K940. Checkpoint Antenna. Kit Instructions. Issue B
 7878 K940 Checkpoint Antenna Kit Instructions Issue B Revision Record Issue Date Remarks A July 7, 2009 First issue B Nov2013 Revised the Checkpoint installation procedures for 7878 and 7874 scanners Added
Direct Importers of the Finest Exotic Hardwood Decking, Lumber, & Flooring
 Direct Importers of the Finest Exotic Hardwood Decking, Lumber, & Flooring These Instructions can be found online at: http://www.advantagelumber.com/how-to/buildwoodstoragebox.html Material List 72 FEET
For Barrel Tapers. Installation and Operating Instructions for use with table saws and large disk sanders
 Tim s Taper Tool For Barrel Tapers Installation and Operating Instructions for use with table saws and large disk sanders Your taper tool is capable of making barrel tapered shafts. The term barrel is
Replacing the build plate clamps
 Repair manual Replacing the build plate clamps Instructions The build plate clamps hold the glass plate in place on the heated bed. There are two fixed in place at the back of the heated bed and two at
Casting Tool Kit, from Jewelry Television. Introduction. Tools That Come With The Casting Kit
 Tools That Come With The Casting Kit 1. 2. 3. 4. Stone Setting Pliers Pin Vise Prong Lifter 80mm Brass Gauge 5. 6. 7. 8. Tweezer Burnisher Prong Pusher Ring Clamp Casting Tool Kit, from Jewelry Television
HDL(M)6 Nut/Screw Assembly
6 Nut/Screw Assembly") HDL(M)6 Nut/Screw Assembly Remove, repair, and reassemble the nut and screw assembly in your HDL series double lock vise. In these instructions when we refer to the front of the vise or nut/screw assembly,
HDL(M)6 Nut/Screw Assembly Remove, repair, and reassemble the nut and screw assembly in your HDL series double lock vise. In these instructions when we refer to the front of the vise or nut/screw assembly,
AUDI A8 D3 REPLACING THE OUTSIDE DRIVER DOOR HANDLE
 AUDI A8 D3 REPLACING THE OUTSIDE DRIVER DOOR HANDLE The keyless entry system in the D3 is a great feature. If you have the car key fob in your pocket, putting your hand under the door handle will unlock
STOL CH 801 SECTION 2: Nose Rib 8R1-7
 SECTION 2: Nose Rib 8R1-7 Position the lower nose rib on the front of the spar at the predrilled holes just above rear rib #3 (615mm from the bottom of the spar) Check lateral alignment (rib is centered
Mr.Bulletfeeder by Double-Alpha
 Mr.Bulletfeeder by Double-Alpha User Manual US Patent 74975155 and US Patents Pending Thank you for choosing Mr.Bulletfeeder by Double-Alpha! This newly designed product will give you years of reliable
V-MOTION LITE USER GUIDE. Rat Rig All rights reserved.
 V-MOTION LITE USER GUIDE Rat Rig 2017. All rights reserved. PACKAGE CONTENTS 1 1x V-Motion Motor 2 1x Belt 3 1x 3mm Hex Key 4 1x AA Battery Pack (for 8x AA batteries)* 5 1x V-Motion Controller 6 2x Knob
Replacing the build plate clamps
 Repair manual Replacing the build plate clamps Instructions The build plate clamps hold the glass plate in place on the heated bed. There are two fixed in place at the back of the heated bed and two at
RH-412 STEEL DOORS INSTALLATION INSTRUCTIONS
 RH-412 STEEL DOORS INSTALLATION INSTRUCTIONS By following the steps outlined below, the assembly, installation and adjustment of the steel doors, will be a simple process. Let s start with the Driver Side.
INSTALLATION INSTRUCTIONS RH 412 STEEL DOORS
 By following the steps outlined below, the assembly, installation and adjustment of the steel doors, will be a simple process. Let s start with the Driver Side. Note: Having the hood open makes the job
Repairing iphone 4 LCD Backlight Dim spot issue
 Repairing iphone 4 LCD Backlight Dim spot issue found a way to fix a liquid damaged iphone screen back light issue Written By: Pranav Singh ifixit CC BY-NC-SA www.ifixit.com Page 1 of 26 INTRODUCTION found
Xbox360 Slim Dismantling Instructions
 Xbox360 Slim Dismantling Instructions These instructions will show you how to open the console to replace the DVDrom drive, laser and other internal parts. Opening your console will void your warrantee,
HP Envy M6-1205DX Screen Replacement
 HP Envy M6-1205DX Screen Replacement This guide will show you how to replace your computer's screen. Written By: Alex Wasilewski ifixit CC BY-NC-SA www.ifixit.com Page 1 of 16 INTRODUCTION We will be showing
Installing your new Bevella Top. L Shaped Countertop with Joints No Finished Ends (Fits Between Four Walls)
") Installing your new Bevella Top L Shaped Countertop with Joints No Finished Ends (Fits Between Four Walls) Bevella RTI Countertops are engineered and manufactured to the highest quality standards, built
Installing your new Bevella Top L Shaped Countertop with Joints No Finished Ends (Fits Between Four Walls) Bevella RTI Countertops are engineered and manufactured to the highest quality standards, built
Recommended Equipment and Tools
 Recommended Equipment and Tools [1] Philips Screwdriver [2] Flat Blade Screwdriver [3] 1/8 Hex Driver [4] Needle-nosed Pliers [5] X-acto Knife [6] Soft Foam Pad (or equivalent) Equipment and Tools PAGE
Repairing Apple Wireless Keyboard without destroying it.
 Repairing Apple Wireless Keyboard without destroying it. An Apple keyboard with non-functioning keys may be due to damaged traces on the two thin sheets of plastic inside, called the membrane. This is
MAT MASTER TM SYSTEMS
 FrameCo MAT MASTER TM SYSTEMS #14225 BEVEL MOUNT CUTTERS Welcome and thank you for purchasing a FrameCo Mat Master System. Through these instructions we will endeavour to show you the benefits of the system
OPERATOR S MANUAL Euromac Punch Press Applications
 ROLLER SOLUTIONS Use and Maintenance Instructions OPERATOR S MANUAL Euromac Punch Press Applications ROLLING SHEAR ROLLING RIB ROLLING OFFSET ROLLING PINCHER INDEX I. SAFETY WARNING 2 II. BASIC TOOLING
ProLogic Xtreme L22 - Electromechanical Redundant Safe Lock System - Instructions
 ProLogic Xtreme L22 - Electromechanical Redundant Safe Lock System - Instructions Please visit the website below by scanning the QR code with your smartphone or by typing in the address below for video
Written By: Andrew Optimus Goldberg
 Replace the screen your GSM/AT&T iphone 4. Written By: Andrew Optimus Goldberg ifixit CC BY-NC-SA www.ifixit.com Page 1 of 25 INTRODUCTION [video: http://www.youtube.com/watch?v=obpfpfx5abw] Use this guide
Standard Operating Procedure
 RIT MULTIDISCIPLINARY SENIOR DESIGN 2010 Standard Operating Procedure Baja Water Propulsion Test Stand This SOP specifies how to assemble, use, troubleshoot, and disassemble the water propulsion system
tinycylon Assembly Instructions Contents Written by Dale Wheat Version August 2016 Visit dalewheat.com for the latest update!
 tinycylon Assembly Instructions Written by Dale Wheat Version 2.1 10 August 2016 Visit dalewheat.com for the latest update! Contents Assembly Instructions...1 Contents...1 Introduction...2 Quick Start
FIELD REPLACEABLE UNIT DOCUMENTATION
 GENERAL INFORMATION Tools Required for Proper Disassembly and Reassembly: 1. Phillips Screwdriver (Size0&1) 2. 4mm Flat head Screwdriver 3. Case Separator 4. ESD Wrist Strap 5. ESD mats 6. Tweezers Before
For Barrel Tapers. Installation and Operating Instructions For use with small combination belt & disk sanders. Assembled Taper Tool
 Tim s Taper Tool For Barrel Tapers Installation and Operating Instructions For use with small combination belt & disk sanders Assembled Taper Tool Your taper tool is capable of making barrel tapered shafts.
CarvLock HDLM6 Manual Machinable Jaw Vise
 CarvLock HDLM6 Manual Machinable Jaw Vise Instructions KURT MANUFACTURING INDUSTRIAL PRODUCTS DIVISION 1325 QUINCY STREET NE MINNEAPOLIS, MN. 55413 TOLL FREE: (800) 328-2565 TEL: (763) 572-4424 FAX: (612)
Xbox 360 S Hard Drive Bracket Replacement
 Replace your HDD's plastic bracket. Rédigé par: David Hodson ifixit CC BY-NC-SA fr.ifixit.com Page 1 de 33 INTRODUCTION Give your Xbox's wiggly hard drive a new bracket to sit in. OUTILS: Metal Spudger
TABLE OF CONTENTS REQUIRED TOOLS
 TABLE OF CONTENTS SECTION SECTION TITLE PAGE NO. 1 2 3 4 5 Assembling Mounting Structure Installing Bicycle Supports Mounting Rack to Wall Adding Sections Customizing Rack Configuration REQUIRED TOOLS
Assembly Instructions 10 X 10 Aluminum Roof Support
 Assembly Instructions 10 X 10 Aluminum Roof Support Aluminum Roof Support Bolt Package 16-5/16 X 2 ¼ SS Bolt 24-5/16 X 1 SS Bolt 40-5/16 SS Nylon Lock Nuts 16-5/16 SS Flat Washers 28-4 ½ Wood Screws 36-1
15 Dovetail Jig. Instruction Manual. Part # 3452
 15 Dovetail Jig Instruction Manual Part # 3452 CAUTION: Please read, understand, and follow all manufacturers instructions, guidelines and owners manuals that come with your power tools. Peachtree Woodworking
Further Mathematics Support Programme
 Stage 1 making a cross Solving the Rubik s cube The first stage is to make a cross so that all the edges line up over the correct centre pieces in the middle layer. Figure 1 Find a white edge piece (in
Xbox 360 S Faceplate Replacement
 Xbox 360 S Faceplate Replacement Faceplate replacement. Rédigé par: Matthew Newsom ifixit CC BY-NC-SA fr.ifixit.com Page 1 de 26 INTRODUCTION Make your Xbox 360 S look shiny and new by replacing the outer
Retractable Screen Installation Instructions For Vinyl and Aluminum Clad and Wood In-Swing Hinged Doors (See separate instructions for sliding doors)
") Retractable Screen Installation Instructions For Vinyl and Aluminum Clad and Wood In-Swing Hinged Doors (See separate instructions for sliding doors) IMPORTANT: Please read before you begin. Table of Contents
Retractable Screen Installation Instructions For Vinyl and Aluminum Clad and Wood In-Swing Hinged Doors (See separate instructions for sliding doors) IMPORTANT: Please read before you begin. Table of Contents
Perfect Tapers. on the Tablesaw. Make tapered legs of all types, quickly and safely
 Perfect Tapers on the Tablesaw Make tapered legs of all types, quickly and safely B Y S T E V E L A T T A 30 F I N e W o o D W o r K I N G COPYRIGHT 2012 by The Taunton Press, Inc. Copying and distribution
RTI TECHNOLOGIES, INC.
 RTI TECHNOLOGIES, INC. BRC500 & BRC550 Arbor/Spindle Mechanism Adjustment & Service Technical Instructions The arbor/spindle mechanism of the BRC500/550 is designed to be robust for long life. Occasionally
Razr Adapter Retrofit Project by Craig Hoy, Edmonton, AB, Canada
 Razr Adapter Retrofit Project by Craig Hoy, Edmonton, AB, Canada The following is a description of the process that I have used to modify the console eject box for e38, e39, e46 and x5 s, part number 84-21-6-933-415.
Atrium Patio Door Field Service Manual
 Atrium Patio Door Field Service Manual December 2005 Table of contents Service Agreement Pg 2 Release Agreement Pg 5 Inspection form Pg 6 Warranty Pg 8 Replacing swing panel Pg 12 Replacing sliding panel
Replacing the print cartridges
 http://www.hp.com/support/lj9500 1 2 3 Replacing the print cartridges The printer uses four color print cartridges: yellow, magenta, cyan, and black. Follow this procedure to install the print cartridges.
Paramount MYT Tripod User Guide
 Paramount MYT Tripod User Guide Revision 1.1 December, 2014 Software Bisque, Inc. All rights reserved. Table of Contents MYT Tripod Setup and Use... 3 Height Adjustments... 3 Top Plate Adjustment... 7
 The puzzle (also called the "Twisting Tri-Side Puzzle" in the UK) consists of intersecting discs of 6 (rounded) triangular tiles each which can rotate. There are two versions. The "Handy" and the "Challenge".
The Derby Magic Company Track Assembly Instructions, revision E page 1 of 12
 The Derby Magic Company Track Assembly Instructions, revision E page 1 of 12 Thank you for purchasing a Derby Magic Pinewood Derby Track. To assemble your track, start with the stand. The parts of the
Quick Start Guide. Automatic LCD Clock Pet Feeder (PF-05)
") Control Panel Keys Quick Start Guide Automatic LCD Clock Pet Feeder (PF-05) MODE - switches between clock or feeding time display. Also increases clock time during clock I feeding time Set mode SET - enters
Control Panel Keys Quick Start Guide Automatic LCD Clock Pet Feeder (PF-05) MODE - switches between clock or feeding time display. Also increases clock time during clock I feeding time Set mode SET - enters
The wick in your heater needs replacing if, after repeated cleanings, any of the following conditions still exist:
 WICK REPLACEMENT The wick in your heater needs replacing if, after repeated cleanings, any of the following conditions still exist: Slow to light, hard movement of the wick adjuster knob, kerosene odor
c:scape Shared Tables - Freestanding and Tethered
 c:scape Shared Tables - Freestanding and Tethered Furniture should be installed in sequence shown below. 1 2 3 4 5 6 BEAM MID STORAGE DESKING POWER LOW STORAGE PRIVACY THIS INSTALLATION SEQUENCE IS HERE.
DO35 MAINTENANCE INSTRUCTIONS
 CUSTOMER INFORMATION SHEET NO. 038 DO35 MAINTENANCE INSTRUCTIONS (DO35 V3 LAUNCHED PRODUCTION JUNE 2017) Table of Contents 1.0 Replacing Spindle Bushes V3... 22 2.0 Replacing Locking Mechanism V3... 6
Frameless Fixed Panel Slider QCI5279
 Frameless Fixed Panel Slider QCI5279 F AB GLASS AND MIRROR www.fabglassandmirror.com Call: +1 888-474-2221 Fax: (614)-334-4919 Office Timing: 8:30-18:00 EST info@fabglassandmirror.com Frameless Fixed Panel
6MM ALLEN KEY FOR ROOF CLIPS PHILLIPS HEAD BIT FOR SCREWS FOR DOOR FRAME SPIRIT/LASER LEVEL TO LEVEL THE UNIT
 1 TOOLS REQUIRED: MOVING CART/DOLLY FOR TRANSPORTING PANELS, ROOF, AND POSTS TWO 9 FT. STEP LADDERS FOR INSTALLING ROOF & PANELS MINI REVERSIBLE RATCHET 1/4 DRIVE FOR CORNER SCREWS ON TOP TRAVERSE BEAMS
Written By: Walter Galan
 iphone 4 Logic Board Replacement Replace a dead logic board in your iphone 4. Written By: Walter Galan ifixit CC BY-NC-SA www.ifixit.com Page 1 of 16 INTRODUCTION Use this guide to replace your iphone
SIMPLEX ELITE MAT CUTTER
 INSTRUCTION MANUAL MODEL 750-1 / 760-1 SIMPLEX ELITE MAT CUTTER INSTRUCTIONS AND OPERATION MANUAL 40 in (101 cm) mat cutting system with bevel & straight cutters, production stops, 27 in (68 cm) squaring
40 & 50 Foot PS-1 Box Car Assembly Instructions
 40 & 50 Foot PS-1 Box Car Instructions Push the #2100 coupler/stirrup assembly onto the ends of the metal floor. Slide them into the slots and slightly lift the ends (wings), then press firmly on the front
Mac mini Model A1176 Speaker Replacement
 Mac mini Model A1176 Speaker Replacement Written By: Walter Galan ifixit CC BY-NC-SA www.ifixit.com Page 1 of 16 INTRODUCTION Restore sound to your mini by replacing the speaker. TOOLS: Jimmy (1) Phillips
Series 7600 Installation Instructions Aluminum Multi-Slide Door (Pocketing)
") Series 7600 Installation Instructions Aluminum Multi-Slide Door (Pocketing) Things to Know Before You Start Things to Know Before You Start Removal of Old Fenestration Products Ensure any old fenestration
Series 7600 Installation Instructions Aluminum Multi-Slide Door (Pocketing) Things to Know Before You Start Things to Know Before You Start Removal of Old Fenestration Products Ensure any old fenestration
Construct a pyramid with a triangular or a hexagonal base, and then return the parts back into the box.
 01 10 Cubes Construct a pyramid with a triangular or a hexagonal base, and then return the parts back into the box. Padauk, ebony and plywood Put-together 02 14 ASIDE Make a 2x2x2 dice cube in a checkered
Mac mini (PowerPC) Lower Case Replacement. Written By: irobot. ifixit CC BY-NC-SA Page 1 of 10
 Lower Case Replacement. Written By: irobot. ifixit CC BY-NC-SA Page 1 of 10") Mac mini (PowerPC) Lower Case Replacement Written By: irobot ifixit CC BY-NC-SA www.ifixit.com Page 1 of 10 INTRODUCTION The bottom case of the Mac mini. TOOLS: Jimmy (1) Anti-Static Wrist Strap (1) Phillips
Mac mini (PowerPC) Lower Case Replacement Written By: irobot ifixit CC BY-NC-SA www.ifixit.com Page 1 of 10 INTRODUCTION The bottom case of the Mac mini. TOOLS: Jimmy (1) Anti-Static Wrist Strap (1) Phillips
Customer Notice: Congratulations again on your SawStop purchase, and thank you! -SawStop Tualatin, OR
 Customer Notice: Congratulations on the purchase of this Sliding Crosscut Attachment. As the owner of a SawStop saw, you are familiar with our high standards for quality, fit and finish. Different from
GP-SD GENIE PROBE SMALL DIAMETER
 For GENIE PROBE SMALL DIAMETER Installation and Operation Instructions 2 for s Locking Mechanism (if supplied) Set Screws Backed Out To ensure that the is Locking never accidentally loosened or Mechanism
TECHNICAL INFORMATION
 TECHNICAL INFORMATION P 1 / 11 Model No. Description CONCEPT AND MAIN APPLICATIONS Specification Standard equipment TCT saw blade... 1 Rear table set (exclusively Europe, Turkey, South Africa..1 2704 This
MAT MASTER TM SYSTEMS
 FrameCo MAT MASTER TM SYSTEMS #14225 BEVEL MOUNT CUTTERS Welcome and thank you for purchasing a FrameCo Mat Master System. Through these instructions we will endeavour to show you the benefits of the system
Assembly Instructions
 Unite Panel System Hinge Door July 2016 #12 x / slotted hex washer head bolt Figure 1 threshold bracket frame Detail F threshold bracket threshold bracket (installed) #12 x / slotted hex washer head bolt
Series Assembly Instructions
 ComforTrak TM Series Assembly Instructions EP-560, EP-860, EP-960 & EP-970 Models *Inversion Table images may vary slightly from your model. The EP-560 is shown here. BEFORE YOU BEGIN: Review all steps
EXP ASSEMBLY INSPECTION
 EXP ASSEMBLY INSPECTION The Rekluse EXP assembly is built using high quality materials, however, it does experience natural wear and tear like any clutch component. The amount of wear is based on the rider
INSTALLATION INSTRUCTION FOR HIDDEN TAILGATE LATCHES ON GM STEPSIDE TRUCKS
 INSTALLATION INSTRUCTION FOR HIDDEN TAILGATE LATCHES ON 41-87 GM STEPSIDE TRUCKS This instruction covers the installation of the hidden tailgate latches for the 41-87 GM Stepside trucks. Follow along as
Techniques Used: Crocheting in the Round, Simple Increases, Changing Colours
 PINWHEEL PILLOW The pinwheel, or zig-zag pillow is a classic crochet project. This new pattern is modernized with simplified shaping. It is also streamlined by omitting one feature; these cushions, in
Extendable Large Dovetail Jig
 Extendable Large Dovetail Jig Instruction Manual Part # 3458 CAUTION: Please read, understand, and follow all manufacturers instructions, guidelines and owners manuals that come with your power tools.
The Derby Magic Company Track Assembly Instructions, revision F page 1 of 13
 The Derby Magic Company Track Assembly Instructions, revision F page 1 of 13 Thank you for purchasing a Derby Magic Pinewood Derby Track. To assemble your track, start with the stand. The parts of the
(12) Patent Application Publication (10) Pub. No.: US 2003/ A1
 Patent Application Publication (10) Pub. No.: US 2003/ A1") US 20030085640A1 (19) United States (12) Patent Application Publication (10) Pub. No.: US 2003/0085640 A1 Chan (43) Pub. Date: May 8, 2003 (54) FOLDABLE CABINET Publication Classification (76) Inventor:
US 20030085640A1 (19) United States (12) Patent Application Publication (10) Pub. No.: US 2003/0085640 A1 Chan (43) Pub. Date: May 8, 2003 (54) FOLDABLE CABINET Publication Classification (76) Inventor:
CF9030 ASSEMBLY PROCEDURES
 VERMONT PROCEDURES Step 1: Unpack carton. Tools Required: Knife or scissors; hammer; Philips or Robertson screwdriver Castings Box #5 Box #4 Box #1 Box #3 Box #2 Use the knife or scissors to cut the strapping
Sliding Crosscut Table installation guide
 Sliding Crosscut Table installation guide model tsa-sa48 A Note About Color Variations Among Anodized Aluminum Components Congratulations on the purchase of this SawStop Sliding Crosscut Table. We at SawStop
Darin Pitts Phoenix Arcade: How To - Tron Control Panel Overlay October 31, 2011
 Step 1: Flattening the Artwork Tron artwork purchased from Phoenix Arcade will be shipped rolled. At least one week prior to application the artwork should be laid out on a flat surface in order for the
model tsa-sa48 Sliding Crosscut Table installation guide
 model tsa-sa48 Sliding Crosscut Table installation guide A Note About Color Variations Among Anodized Aluminum Components Congratulations on the purchase of this SawStop Sliding Crosscut Table. We at SawStop
12912 Farnham Avenue White Bear Lake, Minnesota WILSON WHEEL OPERATOR S MANUAL. for Amada Thick Turret Punch Presses
 12912 Farnham Avenue White Bear Lake, Minnesota 55110 WILSON WHEEL OPERATOR S MANUAL for Amada Thick Turret Punch Presses Rolling Shear Rolling Rib Rolling Offset Rolling Pincher Revised: September 20,