20 Memory Drawers. Copyright 2002 IPP Design Competition All rights reserved. Puzzle Solution:
|
|
|
- Rosamund Charles
- 5 years ago
- Views:
Transcription
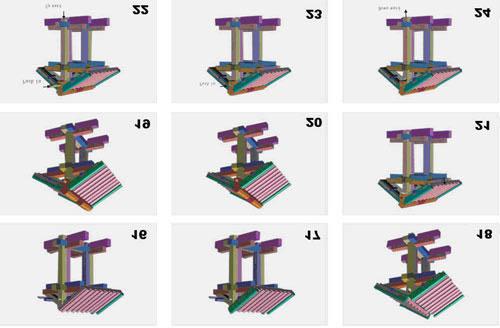
1 20 Memory Drawers This work memorizes 120 (The factorial of 5) kinds of turn to open the drawers. The big base is full of 30 device plates. The plates move vertically and horizontally, and change the arrangements when you open or close the drawers. This work memorizes the turn you closed the drawers just before automatically, and change the turn to open the drawers next. In theory, 6 kinds / 25 plates are needed to realize this system. But actually, instead of that, 3 kinds / 30 plates are used. It s a full-scale work that matches his previous Super-CUBI.


2 21 Chinese Fang
3 22 Egg Fool Young (and Old) Puzzle Inside the egg is a ball which normally prevents the egg from standing on its flat end. To solve the puzzle, hold the egg upside down (flat end facing up) with your thumb and fingers facing down, wait a few seconds for the ball inside the egg to stop moving, then swing the egg upwards in a 180 degree arc - bringing it to a gentle stop when the egg is perfectly vertical. WITHOUT TILTING THE EGG, gently place it down on a flat surface and it will stand on its end!


4 23 FramEst 36

5 24 Comerio We suggest that the sticks be marked using removable labels before starting assembly. Step 1: Hold G front to back with the large notch facing right and the other notch facing up. Step 2: Hold K side to side with the largest notch facing away from you and the smallest notch facing towards you. Place K crosswise in G's notch that faces up, slide it right. Step 3: Hold A upright with the large notch facing towards you and the notch on the flat side facing right. Place A in G's notch, crosswise behind K. Step 4: Hold L side to side with the notch on the flat side facing towards you, the larger end pointing right. Place L directly behind K. Step 5: Hold E front to back with the two notches facing down and the notch on the flat side facing right. Place E directly over G. Step 6: Hold C upright with the two notches facing away from you and the large notch facing left. Place C directly in front of A. Step 7: Slide A one half notch downwards. Step 8: Hold F front to back with the large notch facing left and the other notch facing right with the small notch pointing towards you. Place F directly on the right side of E. Step 9: Slide A downwards. Step 10: Hold I side to side with the large notch facing down, the large end pointing right. Place I directly over K into C's small notch. Step 11: Slide A upwards and align its notch with F. Step 12: Slide F towards you as far as it will go. Step 13: Hold H front to back with the two notches facing up and the other notch facing left. Step 14: Hold B upright with the one notch facing left, the large end pointing up. B and H must be placed into the puzzle as a unit. Place B directly on the right side of A. Place H directly on the right side of G. Slide them together up into the puzzle from underneath. Step 15: Slide F away from you until its back end is flush with L. Step 16: Hold D upright with the large irregular notch facing away from you and the other notch facing left. Place D directly on the right side of C. Step 17: Slide F and D away from you. Step 18: Slide A upwards. Step 19: Hold J side to side with the two notches facing towards you and the other notch down. Place J directly over L. Step 20: Slide A and J downwards and it's done!

6 25 Ying-Yang


7 26 Pattern Box
8 27 Cubes & Ladders The back of each card has the solution to the challenge. They are roughly ordered by increasing difficulty.

9 28 Arc Angles

10 29 Bollixed Briefcase Puzzle Initialize: hold with the handle down and top facing away from you, then jiggle and tap the case vigorously. Rotate the case to the left ¼ turn, so that the hinges are on the left. Tap again. Turn left ¼ turn to start. 1. Hold the briefcase so the handle is up and the top is facing away from you (hinges are down). 2. Turn the case slowly to the left just past ¼ turn (the hinges are now on the right). 3. Turn the case slowly to the right, just past horizontal, and pause (hinges are now on the bottom). 4. Continue to turn the case to the right another ¼ turn, past the vertical (hinges are now on the left). 5. Turn the case slowly ¼ turn to the left (the hinges are back on the bottom). 6. Continue to turn the case to the left another ¼ turn (the hinges are now on the right). 7. Turn the case slowly back to the right ¼ turn, and pause; a tap may be necessary (the hinges are on the bottom). 8. Lay the case down flat, top side up, and open the case in the normal manner by unlocking the two small latches. To close 1. Arrange the pieces as shown 2. Close and latch the case. 3. Tip the case so that the hinges are up, and perform the initialization steps above.

11 30 8 CYLINDER FULL HOUSE
12 31 QUADS AND RODS N/A

13 32 Hide the Animal!


14 33 DoDo Locate and start with pieces A, M, B, and I. They assemble easiest by putting them together as A and M and then B and I as each of two sets of two. This is shown in the photos below. Once together in the correct way, you should be able to read AMBI in a counter-clockwise direction. All letters have the correct orientation to the center point. This first step is difficult to orient due to the odd shapes of the pieces. Study the photos carefully and verify they are correct before proceeding. To reassemble from here, use the disassembly sheet in reverse order, moving the pieces in the opposite directions at each step. Push piece I back up into place. Remove piece D directly by sliding it out from under piece M toward piece A. Push piece X back up. Push piece I back down. This releases pieces E and X. Push piece E over the top of piece I and remove E and X together. Push piece X down all the way. This releases piece T to be removed by sliding it completely out over the top of piece X. A hole is created by the removal of T and pieces D, M, and B. Push piece E back into its original position, then push piece I back to its original position. Completing step 2 opens the lock on pieces O and R. Push piece R to the lower right and piece O will come out with it. Remove both pieces at this time. Holding the puzzle with the hole created from the removal of piece S pointing to your right, push down on piece I until it stops. Still holding the puzzle in this way, slide piece E inward, toward your body, until it stops. Find and remove two key pieces (labeled U and S ). They will slide out when pushed in the right direction. They are located next to each other. The pieces are assembled in the order of the word AMBIDEXTROUS. This is nearly the only word in the English language that I could find that had 12 letters, all of them different. This corresponds to the 12 different pieces of the Dodo Puzzle (and an attribute that could be helpful in assembling the puzzle!).
15 34 Crazy Elephant Dance Solution is recursive. To flip n elephants: - flip n-1 elephants - turn the last elephant 90 degrees - flip only elephant n-1 - turn the last elephant 90 degrees - flip only elephant n-1 n Total moves: 3 2 2n 3
16 35 Edge-Corner-Cube II

17 36 7 Piece Nightmare

18 37 Crossknot
19 38 Olympic Cube No6a The solution of the puzzle is globally well-known because of the famous Rubik s Cube.
20 Memory Drawers. Discover the pattern for opening and closing the drawers. Careful: you need to open and close the drawers perfectly.
 20 Memory Drawers Discover the pattern for opening and closing the drawers. Careful: you need to open and close the drawers perfectly. Walnut, maple, silky oak, birch, rosewood, acryl Sequential movement
2. Connect driver to power source leads. After connections are made, place driver above ceiling. SEE MINIMUM SPACE REQUIREMENTS BELOW.
 INSTALLATION INSTRUCTIONS INSTALLATION: 1. Cut proper opening in ceiling. Round: 140mm Ø, Square: 140mm x 140mm 140mm Ø 140mm x 140mm 2. Connect driver to power source leads. After connections are made,
7878 K940. Checkpoint Antenna. Kit Instructions. Issue B
 7878 K940 Checkpoint Antenna Kit Instructions Issue B Revision Record Issue Date Remarks A July 7, 2009 First issue B Nov2013 Revised the Checkpoint installation procedures for 7878 and 7874 scanners Added
1.1.1 The cube assembly has two filter retainer rings; one is located on the Exciter side and one is on the Emitter side as shown below.
 1.1 Disassemble Cube 1.1.1 The cube assembly has two filter retainer rings; one is located on the Exciter side and one is on the Emitter side as shown below. Emitter Retaining Ring Exciter Retaining Ring
Rubik's Magic Transforms
 Rubik's Magic Transforms Main Page General description of Rubik's Magic Links to other sites How the tiles hinge The number of flat positions Getting back to the starting position Flat shapes Making your
LF Series Assembly Instructions
 LF Series Assembly Instructions 1998760 Revision A-10 Complete Series Master Packet 2010 Kimball International, Inc. T 800.482.1818 F 812.482.8300 Footprint Storage and Metal Filing Systems Assembly Instructions
FOLDING DOOR INSTRUCTIONS
 FOLDING DOOR INSTRUCTIONS Please read these instructions carefully and follow them step by step to insure a smooth installation. Most importantly DO NOT open hardware boxes and mix hardware up. Hardware
Installing Your Electronic Deadbolt
 Ultra Security Plus Electronic Deadbolt Installation Instructions http://www.hberger.com/video-gallery/electronic-deadbolt New Installation Lock Location Preparation (Skip this section if you door has
Repairing Microsoft Wedge Touch Mouse Battery Cover Retaining Clip
 Repairing Microsoft Wedge Touch Mouse Battery Cover Retaining Clip Disassembly, repair and reassembly of Wedge Touch mouse when the battery cover will not stay closed. Also is a good guide to repair other
wood (koa, maple, ebony, cocobolo, new guinea rosewood) and metal (brass, copper, steel) Secret Opening Box
 and metal (brass, copper, steel) Secret Opening Box") 27 Clutch Box Puzzle Goal: Materials: Classification: Open the box wood (koa, maple, ebony, cocobolo, new guinea rosewood) and metal (brass, copper, steel) Secret Opening Box 27 Clutch Box Puzzle Solution:
27 Clutch Box Puzzle Goal: Materials: Classification: Open the box wood (koa, maple, ebony, cocobolo, new guinea rosewood) and metal (brass, copper, steel) Secret Opening Box 27 Clutch Box Puzzle Solution:
ED1300/1300F SERIES CONCEALED VERTICAL ROD DEVICE INSTALLATION INSTRUCTIONS
 ED1300/1300F SERIES CONCEALED VERTICAL ROD DEVICE INSTALLATION INSTRUCTIONS Ver.2 1300 SERIES CONCEALED VERTICAL ROD DEVICE Top Strike Latch Screws Strike Screws Release Plunger Top Latch Plunger Screws
Sentinel Series Cigar Humidor End Tables
 Sentinel Series Cigar Humidor End Tables Assembly Instructions Models: Sentinel 500, 1000 and 1500 Style: Contemporary SENTINEL ASSEMBLY INSTRUCTIONS Congratulations! You have purchased a superior cigar
Written By: Ben Eisenman
 iphone 3GS Front Panel Replacement Replace a cracked front panel on an iphone 3GS. Written By: Ben Eisenman ifixit CC BY-NC-SA www.ifixit.com Page 1 of 18 INTRODUCTION Use this guide to separate and replace
98/9927. Devices covered by these instructions: Surface Vertical Rod Exit Device
 911375-00 Surface Vertical Rod Exit Device 98/9927 Installation Instructions Devices covered by these instructions: 98/9927 Surface Vertical Rod Exit Device 98/9927-F (Fire) Surface Vertical Rod Exit Device
01 10 Cutter Blades. Fit all 10 pieces into the rectangle tray. Acrylic. Put-together. Copyright 2013 IPP Design Competition All rights reserved.
 01 10 Cutter Blades Puzzle Goal: Materials: Classification: Fit all 10 pieces into the rectangle tray. Acrylic Put-together 01 10 Cutter Blades Puzzle Solution: Solution unavailable. 02 4Hex Puzzle Goal:
MM340 Installation Instructions IMPORTANT SAFETY INSTRUCTIONS - SAVE THESE INSTRUCTIONS
 MM30 Installation Instructions IMPORTANT SAFETY INSTRUCTIONS - SAVE THESE INSTRUCTIONS Please read this entire manual before you begin. Do not unpack any contents until you verify all requirements on PAGE.
*D-1030* 1 PARTS CHECK 8 REVERSING INSTRUCTIONS F-XX-C & XX-C D Customer Service. Installation Instructions. Exit Devices
 *D-1030* D-1030 F-XX-C & XX-C Exit Devices Installation Instructions 8 REVERSING INSTRUCTIONS TO REVERSE THE HANDING OF A (F)XX-C DEVICE NOTE: TO REVERSE TRIM, REFER TO SEPARATE INSTALLATION SHEETS. 1
Replacing the build plate clamps
 Repair manual Replacing the build plate clamps Instructions The build plate clamps hold the glass plate in place on the heated bed. There are two fixed in place at the back of the heated bed and two at
MM540 Installation Instructions IMPORTANT SAFETY INSTRUCTIONS - SAVE THESE INSTRUCTIONS
 MM50 Installation Instructions IMPORTANT SAFETY INSTRUCTIONS - SAVE THESE INSTRUCTIONS Please read this entire manual before you begin. Do not unpack any contents until you verify all requirements on PAGE.
How to Operate Hurricane Shutters
 How to Operate Hurricane Shutters NOTES for PORTFOLIO: I created this manual as a booklet for a family who could not operate their hurricane shutters without paying for service. To develop the manual,
MM750 Installation Instructions
 MM750 Installation Instructions IMPORTANT SAFETY INSTRUCTIONS - SAVE THESE INSTRUCTIONS Please read this entire manual before you begin. Do not unpack any contents until you verify all requirements on
Laminate Cabinet Installation Instructions
 Laminate Cabinet Installation Instructions www.easygaragestorage.com/installation How To Use These Instructions Thank you for your purchase! Please read each step of this manual thoroughly to ensure proper
Copyright Black Box Corporation. All rights reserved Park Drive Lawrence, PA Fax
 Copyright 2003. Black Box Corporation. All rights reserved. 1000 Park Drive Lawrence, PA 15055-1018 724-746-5500 Fax 724-746-0746 JULY 2003 RM3010A RM315-R2 RM323-R2 RM329 RM451 RM457 RM3020A RM316 RM324-R2
Installation Instructions
 by Plato Woodwork Installation Instructions Plato Woodwork, Inc. 200 Third Street SW P.O. Box 98 Plato, MN 55370 www.platowoodwork.com 800.328.5924 SECTION GUIDE GETTING STARTED PAGE # Installation Methods...
Modular Drawer & Door Systems Installation Instructions Locking Drawers and Receding Doors
 Modular Drawer & Door Systems Installation Instructions ocking Drawers and Receding Doors Pre-Installation Before you begin installation: 1. Read through the installation procedure before starting the
01 Golf Ball Cage. Extract, and return golf ball to inside of cube. Walnut, golf ball Misc. Assembly
 01 Golf Ball Cage Extract, and return golf ball to inside of cube. Walnut, golf ball Misc. Assembly 02 Radix Take the three pieces apart, and then put them back together again. No force is required. Cast
Atrium Patio Door Field Service Manual
 Atrium Patio Door Field Service Manual December 2005 Table of contents Service Agreement Pg 2 Release Agreement Pg 5 Inspection form Pg 6 Warranty Pg 8 Replacing swing panel Pg 12 Replacing sliding panel
YOUR LIFE. YOUR FIRE. Ortal Curved & Islands Fireplaces User s Manual
 YOUR LIFE. YOUR FIRE. Ortal Curved & Islands Fireplaces User s Manual [USA Fireplace Models [THIS ISTALLATION MANUAL INCLUDES ASSEMBLY INSTRUCTIONS FOR THESE MODELS: STAND ALONE 7565 CURVED TUNNEL DOUBLE
Revised
 Indentify Non-powered panels and separate from Powered panels. Non-powered panel shown at left.. Powered panel shown at left has powerway mounted at factory. Also separate panels by surface type, width
8.0 RE-CALIBRATION OF SPACE
 8.0 RE-CALIBRATION OF SPACE 101 ATTENTION: PLEASE READ BEFORE PROCEEDING. RE-CALIBRATION OF SPACE NO RE-ADJUSTMENT of space is required when changing from one code card to another. The space indicator
EASY POOL STEP (NE113)
") EASY POOL STEP (NE113) FOR USE WITH: EASY POOL STEP (NE113) (1 CARTON) EASY POOL STEP WITH OUTSIDE LADDER (NE126) EASY POOL STEP ENTRY SYSTEM (NE138) (With Gate) (4 CARTONS) Above are the options available
EASY POOL STEP (NE113) FOR USE WITH: EASY POOL STEP (NE113) (1 CARTON) EASY POOL STEP WITH OUTSIDE LADDER (NE126) EASY POOL STEP ENTRY SYSTEM (NE138) (With Gate) (4 CARTONS) Above are the options available
* * 98/9950WDC. Fire-Rated Devices include these. additional components. 1-Point Latch (LBL)
") *24739468* 24739468 98/9950WDC Installation Instructions 1-Point Latch (LBL) Fire-Rated Devices include these additional components Metal Edge Wrap required for 60 and 90-minute applications 2-Point Latch
*24739468* 24739468 98/9950WDC Installation Instructions 1-Point Latch (LBL) Fire-Rated Devices include these additional components Metal Edge Wrap required for 60 and 90-minute applications 2-Point Latch
The build should take around 2 to 3 hours. However, by leaving yourself more time you can go at a relaxed pace and be sure not to miss anything.
 Before We Start Before we jump into building your Picade, make sure you have everything to hand. I know you're eager to jump right into the construction, but we need to get set up properly first! 1. Prepare
Safety glasses Measuring tape Level Pencil Power drill Center punch Phillips screw driver Saw horse
 EX76 Concealed Vertical Rod Exit Device Preparation Guide and Installation Instructions Box Contents EX76 Concealed Vertical Rod Exit Device Back Bar Active Push Bar Filler Plate Door Kit with Templates
1. Turn off or disconnect power to unit (machine). 2. Push IN the release bar on the quick change base plate. Locking latch will pivot downward.
. 2. Push IN the release bar on the quick change base plate. Locking latch will pivot downward.") Figure 1 Miniature Quick Change Applicators, of the end feed type, are designed to crimp end feed strip terminals to prestripped wires. Each applicator is set up to accept the strip form of certain specific
Figure 1 Miniature Quick Change Applicators, of the end feed type, are designed to crimp end feed strip terminals to prestripped wires. Each applicator is set up to accept the strip form of certain specific
Before Assembling the Storage Wall
 Chapter 1 Assembling the Lista Storage Wall Lista provides two types of standard Storage Walls: B251 and B255. The design, construction, assembly, and quality are identical for both types, however, B251
Wine Rack Assembly Instructions. Ten Column Display Rack
 Wine Rack Assembly Instructions Ten Column Display Rack Congratulations! You have purchased the finest wine racking available anywhere. Properly assembled, these Vigilant wine racks will outlast even your
Wooden Frame Type Instruction Manual
 Wooden Frame TypeInstruction Manual Thank you for selecting our product. Before starting installation, please read this manual thoroughly to ensure correct installation. Please keep this manual at hand
YOUR LIFE. YOUR FIRE. Ortal Curved & Islands Fireplaces Installation Manual. Ortal USA - Version: 1.3 November, 2017 SKU: KPMANCIRISLUS17B
 YOUR LIFE. YOUR FIRE. Ortal Curved & Islands Fireplaces Installation Manual Ortal USA - Version: 1.3 November, 2017 SKU: KPMANCIRISLUS17B [THIS ISTALLATION MANUAL INCLUDES ASSEMBLY INSTRUCTIONS FOR THESE
Five Column Half Height Rack Base Rack. (Shown with Tabletop)
") Five Column Half Height Rack Base Rack (Shown with Tabletop) Congratulations! You have purchased the finest wine racking available anywhere. Properly assembled, these Vigilant wine racks will outlast even
Five Column Half Height Rack Base Rack (Shown with Tabletop) Congratulations! You have purchased the finest wine racking available anywhere. Properly assembled, these Vigilant wine racks will outlast even
Kontax Stirling Engines KS90T instructions
 Kontax Stirling Engines KS90T instructions This document covers the following: Tools required Parts list Assembly instructions Operating instructions Maintenance Contact details: www.stirlingengine.co.uk
Exponents Bench Cushion
 Exponents Bench Cushion Power Drill #2 Phillips Bit Bit Holder Page 1 of 2 939500640 Rev A 1. Place cushion on top of the bench, so the black Coalesse tag is in the right rear corner of the bench. 2. From
Sentinel Series Cigar Humidor End Tables
 Sentinel Series Cigar Humidor End Tables Assembly Instructions Models: Sentinel 500, 1000 and 1500 Style: Traditional SENTINEL ASSEMBLY INSTRUCTIONS Congratulations! You have purchased a superior cigar
Kontax Stirling Engines KS90S instructions
 Kontax Stirling Engines KS90S instructions This document covers the following: Tools required Parts list Assembly instructions Operating instructions Maintenance Contact details: www.stirlingengine.co.uk
Pencil Hardness Tester BEVS 1301
 Pencil Hardness Tester BEVS 1301 User Manual PAGE 1 1. Introduction BEVS pencil hardness tester offers an easy to use method for the determination of film hardness for a coating applied to a flat substrate,
Cut-True 16M Manual Paper Cutter
 Cut-True 16M Manual Paper Cutter 2/2013 OPERATOR MANUAL FIRST EDITION TABLE OF CONTENTS TOPIC PAGE Specifications 1 Safety Guidelines 1 Assembly 2 Overview 3 Description of Equipment Parts 3-4 Operation
EASY-IN POOL STEP SYSTEM NE132
 EASY-IN POOL STEP SYSTEM NE132 This instruction manual features multiple guides for the step unit components. 7939 EASY POOL STEP (NE113) FOR USE WITH: EASY-IN POOL STEP (NE126) 6492 PARTS & HARDWARE FOR
Maintenance Information
 16601023 Edition 2 January 2014 Air Impact Wrench 2705P1 Maintenance Information Save These Instructions Product Safety Information WARNING Failure to observe the following warnings, and to avoid these
1 8 Arrows Trigo Cube
 1 8 Arrows Trigo Cube Puzzle Goal: Materials: Classification: Put the 8 pieces together to make a cube. Wood: Bubinga, maple, and wenge Serially Interlock 1 8 Arrows Trigo Cube Puzzle Solution: 2 AMAZE
HP PSC 2410 Photosmart All In One Printer Scanner Lamp Replacement
 HP PSC 2410 Photosmart All In One Printer Scanner Lamp Replacement Replace the scanner lamp on your printer's scanner. Written By: Mackenzie Billings ifixit CC BY-NC-SA www.ifixit.com Page 1 of 9 INTRODUCTION
Extendable Swing Shut Gate
 Extendable Swing Shut Gate WIDTH Adjustable from 72.5 to 95 cm HEIGHT Top of gate to floor 78 cm SPINDLES x 4 WALL CUPS x4 7cm EXTENSIONS x2 GATE NUTS x 4 SPANNER x Note: Each 7cm extension comprises of
Matrix BGA Socket Assembly Instructions
 s 0,80mm, 1,00mm, 1,7mm Pitch MPI-1758-01 Rev. 1 4 5 6 7 1. mm Hex Wrench (Not Supplied.). Spring Plate Assembly. ( Item). Top Support Plate. ( Item) 4. BGA Package (Not Supplied.) 5. Matrix MPI BGA Socket
You will have to discover a range of hidden and disguised tools to reach the final goal. No force is required to open the drawer.
 40 A Plugged Well Puzzle Goal: Materials: Classification: Notes: Work your way through the puzzle to find the barrel of oil. Walnut, steel elements, and magnets 2.1 Trick or Secret Opening You will have
THE ONION IS USED IN ALMOST ALL CULTURES. READILY AVAILABLE THE YEAR
 38 K N I F E S K I L L S I L L U S T R AT E D CUTTING ONIONS THE ONION IS USED IN ALMOST ALL CULTURES. READILY AVAILABLE THE YEAR round, it is inexpensive and versatile. Even though it doesn t cost much,
Lumber Smith. Assembly Manual. If you are having problems assembling the saw and need assistance, please contact us at:
 Lumber Smith Assembly Manual If you are having problems assembling the saw and need assistance, please contact us at: 804-577-7398 info@lumbersmith.com 1 Step 1 Safety Carefully read the Owners Manual.
13MM FLAT WRENCH FOR LEVELING THE GLIDES OF STRUCTURE 6MM ALLEN KEY FOR ROOF CLIPS PHILLIPS HEAD BIT FOR SCREWS FOR DOOR FRAME
 1 TOOLS REQUIRED: MOVING CART/DOLLY FOR TRANSPORTING PANELS, ROOF, AND POSTS TWO 9 FT. STEP LADDERS FOR INSTALLING ROOF & PANELS REVERSIBLE RATCHET 1/4 DRIVE FOR CORNER SCREWS ON TOP TRAVERSE BEAMS ALTERNATIVE
Rubik's Revenge Solution Page
 Rubik's Revenge Solution Page Do you have one of those Rubik's Revenge (RR from now on) cubes? You know, the 4 x 4 x 4 ones. Is it an insurmountable challenge? Could you use some help? I've managed to
Sliding Glass Door Assembly and Installation Guide
 Sliding Glass Door Assembly and Installation Guide Index Door System Components and Hardware The following components are needed to complete the installation of your Sliding Patio Door unit. Check all
Part I: The Swap Puzzle
 Part I: The Swap Puzzle Game Play: Randomly arrange the tiles in the boxes then try to put them in proper order using only legal moves. A variety of legal moves are: Legal Moves (variation 1): Swap the
POP PLUS / SPIDER SET-UP INSTRUCTIONS
 POP PLUS / SPIDER SET-UP INSTRUCTIONS 1 Place system frame on floor with screws indicating top. Expand upwards & outwards and secure frame connectors. Pop-Up display systems are made to be set-up and taken
EllisSaw.com. EllisSaw.com P.O. Box Verona, WI
 P.O. Box 9019 Verona, WI 9-019 GENERAL OPERATING & SAFETY INSTRUCTIONS * READ INSTRUCTIONS BEFORE USE * CAUTION: Disconnect power supply cord from power source when doing repair work or changing belt.
WARNING: Prior to installation, turn the power off to the vending machine and unplug it from its power source. Also, make sure to level the machine.
 Installation of Gum and Mint Tray for National 147, 157, 167 Important Note: Please read all instructions thoroughly before continuing with installation of kit. If you are having problems installing the
PMR ELECTRONIC LOCK USER GUIDE
 封底 封面 148.5 x 210(mm) www.ezset.com.tw PMR ELECTRONIC LOCK USER GUIDE 封面裡 Parts Introduction Do not use an electric screwdriver when installing the product! Installation Procedures 1. Draw horizontal lines
High Rise Sit-Stand Desk Converter
 High Rise Sit-Stand Desk Converter Assembly Instructions for Model DC350 Patent No. 9,332,839 PRE-ASSEMBLY Please read all instructions before beginning assembly. We strongly recommend you watch the video
LARGE PLYWOOD CUTTING GUIDE
 Copyright 2015 Shanty-2-Chic.com Workbench I f you are tight on space but large on ideas this bench is just what you need. Sturdy and mobile this bench has an ingenious fold out wing that gives you over
32 Little Maz-N-Cube. Separate the 3 cubes (without using excessive force). ABS & TPR plastic (Livecube) Interlocking / Sequential Movement
. ABS & TPR plastic (Livecube) Interlocking / Sequential Movement") 32 Little Maz-N-Cube Puzzle Goal: Materials: Classification: Separate the 3 cubes (without using excessive force). ABS & TPR plastic (Livecube) Interlocking / Sequential Movement 32 Little Maz-N-Cube Puzzle
32 Little Maz-N-Cube Puzzle Goal: Materials: Classification: Separate the 3 cubes (without using excessive force). ABS & TPR plastic (Livecube) Interlocking / Sequential Movement 32 Little Maz-N-Cube Puzzle
Portofino Installation Guide
 vjul16 (for 17 or 24 mm Surface Wall Profiles) DO NOT ASSEMBLE WITHOUT FULLY READING THESE INSTRUCTIONS Page 2 Thank you for purchasing this Portofino shower enclosure. Please study these instructions
V-MOTION LITE USER GUIDE. Rat Rig All rights reserved.
 V-MOTION LITE USER GUIDE Rat Rig 2017. All rights reserved. PACKAGE CONTENTS 1 1x V-Motion Motor 2 1x Belt 3 1x 3mm Hex Key 4 1x AA Battery Pack (for 8x AA batteries)* 5 1x V-Motion Controller 6 2x Knob
MantelMount. TM1A Installation Instructions IMPORTANT SAFETY INSTRUCTIONS - SAVE THESE INSTRUCTIONS
 MantelMount TMA Installation Instructions IMPORTANT SAFETY INSTRUCTIONS - SAVE THESE INSTRUCTIONS TM Thank you for choosing the MantelMount television wall mount. Please read this entire manual before
STEINBERGER TRANSTREM (TYPE 2) TECHNICAL DOCUMENT
 TECHNICAL DOCUMENT") STEINBERGER TRANSTREM (TYPE 2) TECHNICAL DOCUMENT These instructions apply to newer style TransTrems only (non-threaded ball type or modified threaded ball type). For purposes of discussion, these TransTrems
STEINBERGER TRANSTREM (TYPE 2) TECHNICAL DOCUMENT These instructions apply to newer style TransTrems only (non-threaded ball type or modified threaded ball type). For purposes of discussion, these TransTrems
Kontax Stirling Engines KS90 instructions
 Kontax Stirling Engines KS90 instructions This document covers the following: Tools required Parts list Assembly instructions Operating instructions Maintenance Contact details: www.stirlingengine.co.uk
6625 WEST WILSHIRE BLVD. OKLAHOMA CITY, OK (405) FAX (405)
 FAX (405)") INSTALLATION INSTRUCTIONS FOR THE TAILGATE WITH LATCH AND LINK ASSEMBLY 76-87 FORD SHORT & 53-87 FORD LONG FLARESIDES 1. Assemble the bed and make sure the box is square. Measure the distance between the
INSTALLATION INSTRUCTIONS FOR THE TAILGATE WITH LATCH AND LINK ASSEMBLY 76-87 FORD SHORT & 53-87 FORD LONG FLARESIDES 1. Assemble the bed and make sure the box is square. Measure the distance between the
Converting a Gutter to GC123
 1. Remove the Gutter Disconnect the downspout from the gutter. Then remove the mounting spikes, screws and or nails that secure the gutter to the fascia board and lay the gutter on the ground. 2. Inspect
INSTALLATION MANUAL FORTRESS SERIES
 Guardian Security Structures TEL 1-406-212-2334 EMAIL rg@gssdoors.com WEB www.gssdoors.com FORTRESS SERIES GENERAL INSTALLATION GUIDELINES 1. The door frame is installed using 16 bolt screws 7,5 mm in
Kontax Stirling Engines KS90R instructions
 Kontax Stirling Engines KS90R instructions This document covers the following: Tools required Parts list Assembly instructions Operating instructions Maintenance Contact details: www.stirlingengine.co.uk
HD-CXENVL-FDR Envelope Feeder Assembly and Operations Guide
 HD-CXENVL-FDR Envelope Feeder Assembly and Operations Guide Rev. 12-12-16 1 Table of Contents DESCRIPTION OF FUNCTION... 3 Time-out (out of paper) Feature... 3 PREPARING THE HD-CX1600/1700 (C9x1) PRINTER...
Grade 7/8 Math Circles. Visual Group Theory
 Faculty of Mathematics Waterloo, Ontario N2L 3G1 Centre for Education in Mathematics and Computing Grade 7/8 Math Circles October 25 th /26 th Visual Group Theory Grouping Concepts Together We will start
Xbox 360 E Motherboard Replacement
 Xbox 360 E Motherboard Replacement Replace the entire motherboard in your Xbox 360 E. Written By: Bryce ifixit CC BY-NC-SA www.ifixit.com Page 1 of 17 INTRODUCTION Use this guide if the connections in
Grade 7/8 Math Circles. Visual Group Theory
 Faculty of Mathematics Waterloo, Ontario N2L 3G1 Centre for Education in Mathematics and Computing Grade 7/8 Math Circles October 25 th /26 th Visual Group Theory Grouping Concepts Together We will start
316R Series Installation Instructions
 316R Series Installation Instructions Multi size 1 thru 6 Non hold open closers CAUTION An incorrectly installed or improperly adjusted closer can cause property damage or personal injury. These instructions
FIELD REPLACEABLE UNIT DOCUMENTATION
 GENERAL INFORMATION Tools Required for Proper Disassembly and Reassembly: 1. Phillips Screwdriver (Size0&1) 2. 4mm Flat head Screwdriver 3. Case Separator 4. ESD Wrist Strap 5. ESD mats 6. Tweezers Before
Series 1500 Aluminum Door Canopy
 Series 500 Aluminum Door Canopy with Sidewings It is our recommendation that you read instructions carefully prior to assembly and installation. Series 500 with Sidewings mounting bar (A) top trim (B)
Portofino Case2 Installation Guide
 Portofino Case2 Installation Guide vjun16 (for 17 or 24 mm Surface Wall Profile) DO NOT ASSEMBLE WITHOUT FULLY READING THESE INSTRUCTIONS Page 2 Thank you for purchasing this Portofino Case 2 shower enclosure.
Installation Instructions. Oakmont Folding Doors
 Before You Start For quick and easy installation of your Oakmont folding door, read these instructions thoroughly. A few minutes of prior planning will make the job easier and ensure years of trouble-free
Step 1: The larger tower box contains the tower machine, a set of Silver 100 Lid Keys, and a set of Black 002 Coin Box Keys
 2 3 Step 1: Each tower is shipped as two boxes the large tower box and the smaller stand box. Open each of the boxes and inventory each of the parts before starting assembly to ensure all parts have arrived.
EURO DELUXE INSTALLATION INSTRUCTIONS
 WALLBEDS! TM EURO DELUXE INSTALLATION INSTRUCTIONS NOTE: Due to the arched top assembly, the assembly of this model is different from the standard wallbed assembly. PLEASE READ THROUGH THESE INSTRUCTIONS
For installation assistance, contact SARGENT at DOORS SHOWN HERE SWING IN FOR ILLUSTRATION PURPOSES ONLY.
 SARGENT Installation Instructions for LP8600 x LR8600 & 12-LP8600 x 12-LR8600 Series Low Profile Panic and Fire Exit Devices on Double Egress & Double Doors or LS8600 & 12-LS8600 Low Profile Exit Device
2&3 SECTION LOFT LADDER Images feature the 3 section loft ladder, but the same instructions apply to both 2& 3 section ladders
 TWIST CATCH ASSEMBLY A4 A2 A1 A3 A7 A6 A5 2&3 SECTION LOFT LADDER Images feature the 3 section loft ladder, but the same instructions apply to both 2& 3 section ladders A Installation and Operating Instructions
TABLE OF CONTENTS REQUIRED TOOLS
 TABLE OF CONTENTS SECTION SECTION TITLE PAGE NO. 1 2 3 4 5 Assembling Mounting Structure Installing Bicycle Supports Mounting Rack to Wall Adding Sections Customizing Rack Configuration REQUIRED TOOLS
PROFESSIONAL LOFT LADDER
 PROFESSIONAL LOFT LADDER TWIST CATCH ASSEMBLY A4 A3 A2 A1 A7 A6 A5 A Installation and Operating Instructions Read Carefully Before Installation Please check you have all components listed (tick Boxes)
Footprint Mobile Assembly Instructions
 Footprint Mobile Assembly Instructions 1998754 Revision -1 Complete Series Master Packet If you have any questions concerning these instructions, please call Kimball Office Customer Service. 20 Kimball
6MM ALLEN KEY FOR ROOF CLIPS PHILLIPS HEAD BIT FOR SCREWS FOR DOOR FRAME SPIRIT/LASER LEVEL TO LEVEL THE UNIT
 1 TOOLS REQUIRED: MOVING CART/DOLLY FOR TRANSPORTING PANELS, ROOF, AND POSTS TWO 9 FT. STEP LADDERS FOR INSTALLING ROOF & PANELS MINI REVERSIBLE RATCHET 1/4 DRIVE FOR CORNER SCREWS ON TOP TRAVERSE BEAMS
Mobile Cart for Flat Panel Display MSP-SPTC42 (PTC-2000 Series)
") INSTALLATION INSTRUCTIONS Mobile Cart for Flat Panel Display (PTC-2000 Series) The Mobile Cart for Flat Panel Display is designed to assist the presenter in showrooms, boardrooms, and trade show exhibits.
INSTALLATION INSTRUCTIONS Mobile Cart for Flat Panel Display (PTC-2000 Series) The Mobile Cart for Flat Panel Display is designed to assist the presenter in showrooms, boardrooms, and trade show exhibits.
Deauville Installation Guide
 vjul16 (for 17 or 24 mm Surface Wall Profiles) DO NOT ASSEMBLE WITHOUT FULLY READING THESE INSTRUCTIONS Page 2 Thank you for purchasing this Deauville shower enclosure. Please study these instructions
Build the Spitfire: Step-By-step. Pack 7 Stages 61-71
 Pack 7 Stages 61-71 1 Stage Contents Page Number 61 212-215 62 216-218 63 219-221 64 222-224 65 225-228 66 229-231 67 232-235 68 236-238 69 239-241 70 242-245 71 246-249 Editorial and design by Continuo
Disassembling Xbox 360 E Top Body
 Disassembling Xbox 360 E Top Body Remove the top body of your Xbox 360 E. Written By: Sarah ifixit CC BY-NC-SA www.ifixit.com Page 1 of 12 INTRODUCTION You will need to remove the top body of your Xbox
Working with Wood & Tools. Marking and Measuring. Tools you will need:
 Marking and Measuring English Measure If you want to make pieces of a certain size, you will have to measure and mark them before you do any cutting. Examine a rule and find an inch mark. The mark (")
a.k.a. casegoods instructions
 a.k.a. casegoods instructions a a.k.a. workwall installation IMPORTANT NOTES Failure to install product according to installation instruction will result in loss of warranty. Tools required for assembly
33/3527A. Devices covered by these instructions: 33/3527A-F (Fire) Surface Vertical Rod Exit Device
 Surface Vertical Rod Exit Device") *911403-00* 911403-00 Surface Vertical Rod Exit Device 33/3527A Installation Instructions Devices covered by these instructions: 33/3527A Surface Vertical Rod Exit Device 33/3527A-F (Fire) Surface Vertical
*911403-00* 911403-00 Surface Vertical Rod Exit Device 33/3527A Installation Instructions Devices covered by these instructions: 33/3527A Surface Vertical Rod Exit Device 33/3527A-F (Fire) Surface Vertical
Replacing the build plate clamps
 Repair manual Replacing the build plate clamps Instructions The build plate clamps hold the glass plate in place on the heated bed. There are two fixed in place at the back of the heated bed and two at