TECHNICAL MANUAL 1. ClicBox. Technical manual PATENTED TECHNOLOGY
|
|
|
- Brenda Phelps
- 5 years ago
- Views:
Transcription


1 TECHNICAL MANUAL 1 ClicBox Technical manual PATENTED TECHNOLOGY


2 2 UNICLIC system white finish (also available in lissa oak and ivory) chipboard STANDARD FEATURES No tools necessary Thanks to the UNICLIC technology it is possible to click the panels easily into each other without using any tools, adhesive or fittings. Faster assembly With the UNICLIC technology the panels can be assembled faster than in the case of a traditional kitchen cabinet. Flexible drilling pattern The panels already feature a drilling template that matches the fittings of major suppliers: This drilling template offers you many options for the layout of your kitchen. Find our dealer list on Watch our movie online, scan the QR-code! ClicBox is quality product of Unilin bvba, division panels Ingelmunstersteenweg Oostrozebeke Belgium T F info.panels@unilin.com with UNICLIC-technology PATENTED TECHNOLOGY
3 3 ClicBox offers a complete range The complete range contains 42 skus in 3 different colours: white, ivory & lissa oak white ivory lissa oak BASE CABINETS WALL CABINETS LARDER CABINETS DOOR/ DRAWER LINE FULL DRAWER CORNER UNDER OVEN WALL CORNER ANGLED BRIDGE TALL SHELVING PACKS* Side L=R L=R L=R L=R L=R L=R L=R L=R L=R / Height / Depth Width 150 Width 300 Width 350 Width 400 Width 450 Width 500 Width Width 700 Width 800 Width 900 Width *includes 2 fixed and 2 adjustable shelves. ClicBox


4 4 Product features that make the difference 18 mm 8 mm 18 mm thick MFC panels, 1 mm ABS on leading edges 8 mm solid back No fittings because of UNICLICtechnology Solid top and bottom are interchangeable 18 mm adjustable shelves; 3 possible heights Adjustable tool-less legs Standard heigth: 150 mm Adjustable: mm Tool-less solid centerpost with a unique Turnfastener technology Tool-less and adjustable hanging bracket system Flexible drilling template means more options and greater efficiency. ClicBox is FSC certified
5 5 Turnfastener technology Unilin s Turnfastener Technology makes sure that centerposts, fixed shelves and backrails for kitchen cabinets are easy and completely tool-less to assemble. On one side the Turnfastener needs to be inserted in the drilling hole of the kitchen panel, the other side of the Turnfastener is placed into the drilling hole in the centerpost, shelf or backrail. With a turn movement of 90, the Turnfastener locks itself into the kitchen panel so that the connection with a centerpost, shelf or backrail becomes very strong. For details on the installation of the Turnfastener, please see picture. The Turnfastener tool is being used in the following cabinets: - All base cabinets with a width from mm (centerpost) - The fixed shelves in the tall larders - Corner cabinets (backrail) ClicBox
 with")
6 6 How to install centerpost with Turnfastener technology? Photo: Turnfastener tool How to install fixed shelves (only for tall larders) with Turnfastener technology?

7 7 Handling of larder unites Units should be handled with extra care + setup similar to pictures. Don t lift the larder unit from his side. Cut outs ClicBox
8 Oven unit + piping: min. 50mm 8 Sink unit + piping: min mm All dimensions for cut outs are also mentionned on the assembly instructions.


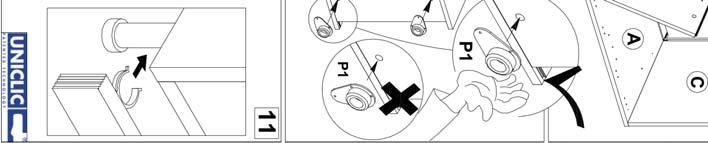
9 9 Door sizes and combinations of the units Smart drilling pattern Height of the legs: mm Height of the legs: mm Larders with doors & drawers Gap of 4mm between the doors/drawers ClicBox


10 10 Height of the legs: mm Doors + oven Height of the legs: mm Doors + drawers + oven Gap of 4mm between the doors/drawers


11 11 Height of the legs: mm Doors + fridge Height of the legs: mm Doors + drawers + fridge Gap of 4mm between the doors/drawers ClicBox
12 12 Around the kitchen door or drawer there is a space of 2 mm When the width of the cabinet is 600 mm, the width of the door should be 596 mm. 4 mm 2 mm Other possible spaces are 3 and 5 mm. Around the kitchen door or drawer, there is a space of 1,5 or 2,5 mm.
13 13 Possible positions of fixed shelves ClicBox

14 14 Technical drawings of door sizes and combinations Doors and doors + drawers Fridge with doors Built-in fridge with doors Fridge with doors and drawers Oven with doors Oven with doors and drawers Base, wall, bridge and extractor - doors and drawers Drawer suppliers:

15 ClicBox DOORS AND DOORS + DRAWERS 15

16 FRIDGE WITH DOORS 16

17 ClicBox FRIDGE WITH DOORS AND DRAWERS 17

18 18 BUILT-IN FRIDGE WITH DOORS

19 ClicBox OVEN WITH DOORS 19

20 OVEN WITH DOORS AND DRAWERS 20

21 ClicBox BASE, WALL, BRIDGE AND EXTRACTOR - DOORS AND DRAWERS 21

22 22 Detail of the hinges

23 23 Corner solutions ClicBox
24 24

25 ClicBox 25

26 26 Combinations corner cabinet

27 ClicBox 27
28 28 Tips & Tricks Wall cabinet mounting» Screw the mounting plates on the wall» Hang the wall cabinets on the mounting plates» Align the wall cabinet and put them level by adjusting the hanging brackets» Screw the wall units together»! Don t screw as long as there s a gap between the cabinets!
29 29 Assembly instructions BASE Corner Cabinet BASE door/drawer line B150 BASE door/drawer line B300/350/400/450/500/600 BASE door/drawer line B700/800/900/1000 BASE full drawer double sided box DSDB D500/600 BASE full drawer double sided box DSDB D800/900/1000 BASE Under Oven UO600 WALL W260/300/350/400/450/500/600 WALL W700/800/900/1000 WALL Angled Cabinet WALL Corner Cabinet LARDER tall larder TEP300/400/500/600 BRIDGE 500/600/800/900 & EXTRACTOR 500/600/900 ClicBox
30
31
32
33
34 v04
35
36 v04
37

38
39
40
41 WALL W260/300/350/400/450/500/600 B Parts A C A D D C optional: the clic joint can be strengthened with glue A C 90!! C A align the front!! A C Click 60!! 90!! A C Click C A C C1 (2x) A B H1 (1x) B 1 2 A A 1 2 H3 H2 H2(1x) align the front!! H3(1x) 9 1 PZ2 NOTE: to avoid damage, adjust lower screw first to fix cabinet to wall inside cabinet D 2x C1 H1 8x T1 T1 (8x) v !! NOTE: attach bracket securely to wall using suitable fasteners D
42
43
44
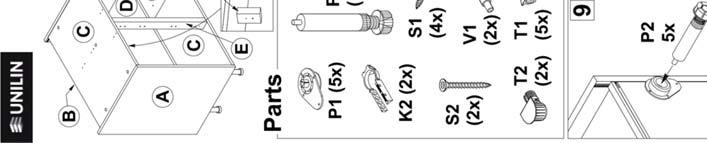
45 LARDER tall larder TEP300/400/500/600 B C optional: the 1 2 C clic joint can be strengthened with glue A align the front!! Click In case of oven unit see step 13b! 6 A B A D E E A A C 90!! 60!! 90!! A C Click A C C A B 1 2 align the front!! A D C A 1 2 P1 optional: 4x 3.5x16 10 Fridge => Oven => 13a 13b Fridge/oven => 12 Parts P1 P1 (4x) P2 (4x) 11 P2 12 K2 (2x) T2 (8x) T1 (8x) S1 (4x) v07
46 13a Fridge Unit!!!!!! 13b Oven Unit Additional to screw when shelves are placed (16). Cut to size Positioning of these fittings depends on type of fridge/oven. Check before placing these fittings. 15a T2 15c 15b 90!! 1 How to use the turnfastener : 2 TURN 90 TO LOCK 16 E D K2 S1 OR 17 3 LOCKED K2 T1
47
48 UNILIN, division panels UNILIN, division panels is part of the UNILIN Group. Since we were established in 1960, we have grown to become an international player offering solutions for the construction, furniture and interiors sectors. UNILIN is synonymous with (r)evolution. Thanks to continuous investments in design, technologies, research and development, our divisions have grown to become top players in their fields. Through a strong vertical integration, from tree to finished product, with creativity as a motor and innovation as a driving force, we develop solutions tailored to your needs. Ingelmunstersteenweg 229, 8780 Oostrozebeke - Belgium T F info.panels@unilin.com /2015
Section 9: Finishing Touches - Other Decor Units
 Section 9: Finishing Touches - Other Decor Units Butler Sink Units Important: This unit is designed to be used with either This unit is always used between other units. Level the units. Fix together and
Section 7. Microwave/compact oven... page 185 Microwave/compact oven with warming drawer... page 187. Fridge or freezer option...
 Section 7 Midi tower shelf configurations Cabinet information How the cabinet is supplied... page 176 Additional shelf pack... page 177 Cabinet modifications... page 177 Hints and tips for installation..........................................
Handleless Uni t Specification
 Handleless Uni t Specification QUALITY BRITISH CRAFTSMANSHIP 160 Handless Fitting Guide - Parts Index & Base Cabinet Section 1 150 325 DRAWER 870 870 870 73 73 720 720 DOOR 685 325 2 x
Section 8. Curved units. Curved units
 Section 8 Curved units Curved units Curved corner post... page 94 Curved base cabinet... page 95 Curved wall cabinet... page 96 Curved deep wall cabinet... page 97 Curved plinth - Joining... page 99 www.howdens.com
Kitchen Fittings Hanging Cabinets and Accessories
 Cabinet hanger Knock-in version, load bearing capacity 130 kg/pair Depth adjustment Finish: Galvanized Concealed mounting of cabinet hanger behind the rear panel (Min. 16 mm free space required) Mounting
Mounting Instructions Item No.: /521/522/420/421/422
 Mounting Instructions Item No.: 541.35.520/521/522/420/421/422 Revolving Corner Unit In addition to these general mounting instructions, please refer to the fitting instructions, where the individual drilling
Kitchen Installation Manual
 Kitchen Installation Manual June 2018 www.howdens.com 2 www.howdens.com Section pages Introduction... page 4 Supplied products... page 4 Guide - Hints and tips... page 5 Cabinet installation fittings...
Closet System Installation Manual
 Closet System Manual Thank you For choosing our Custom Closet Collection to fit all your needs Closets come fully assembled to make your project an enjoyable and satisfying experience. With quality Custom
In addition to this general mounting and adjustment instruction you need the fitting specification document, where the individual drilling dimensions
 Mounting and Adjustment Instruction for corner carrousel fitting In addition to this general mounting and adjustment instruction you need the fitting specification document, where the individual drilling
A great addition to Sub-Zero's complete line of
 with Refrigeration Drawers Discreet lighting Full-view glass door (standard) Roller-assembly shelves UV-resistant glass Lighted electronic control panel Divider gasket Model 427R Lighted display shelf
" BASE CABINET
 INSTALLATION GUIDE INSTALLATION GUIDE Before You Begin Installing Your Kitchen Cabinets 1. Read through installation guide to understand all steps and gather tools needed. 2. Verify that all of the hardware,
Section 1. Kitchen installation. Base cabinets
 Section 1 Kitchen installation Base cabinets Pre-build - Cabinet leg... page 16 Pre-build - Alternative cabinet leg... page 18 Pre-build - Cabinets.... page 19 Pre-build - Corner base cabinet centre upright
SEMBLANCE MAIN MODULAR SYSTEM ASSEMBLY INSTRUCTIONS
 SEMLANCE MODULAR SYSTEM MAIN ASSEMLY INSTRUCTIONS To view the Semblance assembly video, scan this code with a QR reader or visit http://www.bdiusa.com/semblance/ assembly.shtml DIUSA.COM TWO PERSON ASSEMLY
Section 2. Profiles - How to use
 Section s - How to use overview.... page 36 End larder profile - length 94mm/mm... page 37 Mid larder profile - length 94mm/mm... page 38 Worktop profile - length 3000mm.... page 39 Drawer profile - length
Entrance Cabinet Plans
 Entrance Cabinet Plans www.andrewharriswoodwork.com Page 1 of 19 Introduction I have tried to ensure all steps are covered in these plans but if you find any errors in the plans or have a question then
DOLCE STIL NOVO. Tips & tricks for a perfect alignment Consigli e suggerimenti per un perfetto allineamento
 DOLCE STIL NOVO Tips & tricks for a perfect alignment Consigli e suggerimenti per un perfetto allineamento EN This installation manual is accompanied by a demonstration video that can be viewed at: www.youtube.com/user/smegspa
INSTRUCTION SHEET U19
 U19 All Refrigerator and All Freezer Trim Kit Installation Product Line: U19 All Refrigerator and All Freezer Models Parts Included in Kit TRIMKITEZ1 (Part# 297333500): Single Trim Kit Components Single
Installation Instructions - Model V4JSD 1
 Installation Instructions - Model V4JSD 1 Support Assemblies: Parts list: (Note see enclosed cut sheet for quantities and dimensional information) A vertical structural member (1 ½ x 1 ½ modular frame)
v1.0 ASSEMBLY GUIDE Mia Wide Bookcase
 v1.0 ASSEMBLY GUIDE Mia Wide Bookcase Components Upon unpacking your bookcase from it s delivery box, you should have the pieces shown. Follow the steps on the next pages to assemble your new bookcase.
CROWN IMPERIAL ASSEMBLY INSTRUCTIONS
 CROWN IMPERIAL ASSEMBLY INSTRUCTIONS Standard Drawer Box Page 1 of 14 Standard Drawer Box Parts Parts Supplied B C D A E F G Page 2 of 14 Part Letter Part Name Quantity 300-600 Deep Pan A Base Panel 1
Setup. The Faraday Cage is available in two types of configurations. Cage for mounting to a full perimeter enclosure on series tables.
 Faraday CageSetup, 2017 Setup The Faraday Cage is available in two types of configurations. Cage for mounting to a full perimeter enclosure on 63-500 series tables. Cage with a base plate for use on a
PULLOUT SHELF ROCKLER BUILD IT WITH BUILD CUSTOMIZE
 BUILD Stock Item 12229 Drawer s, 2 1 2" x 48" 63420 Baltic Birch Ply, 1/4" x 24" x 30" 38742 Maple, 3/4" x 3" x 24" 45953 100# Zinc Over-Travel Drawer Slides - Centerline 757-20" 30254 #8 x 1 1 4" Square
Kitchen Visuals Plot 4
 Kitchen Visuals Plot 4 R3.70 MATT TOPO LAMINATE & R3.10 MATT MOUSSE LAMINATE - INTEGRATED HANDLE KRION WORKTOP PEARL (12MM) Kitchen Plans Plot 4 1. 600mm Tower Unit Int. Fridge / Int. Freezer / Door (RH)
BUILDERS ONE Framed Cabinet. Installation Manual
 BUILDERS ONE Framed Cabinet Installation Manual 1 BEFORE YOU BEGIN: Check your cabinetry against your design plan to ensure that you have all required cabinetry moldings, fillers and accessories to complete
CABINETRY Assembly Instructions
 www.hdicabinetry.com Assembly Instructions TABLE OF CONTENTS Category Page(s) Section 1: Framed Series Base Cabinet Instructions Wall Cabinet Instructions Easy Reach Cabinet Instructions 1.01-1.04 1.05-1.06
Merloni Elettrodomestici. Technical Fitting Manual FRIDGE. Language Issue/Edition Page GB /
 GB 99-11-03/01 1-38 Index 1 CONFORMITY OF APPLIANCE 3 2 MAIN ASSEMBLY TYPES 3 2.1 Under worktop 3 2.2 Double door 10 2.3 Combined 14 2.4 Single door Fridge or single door Freezer 19 2.5 Combined free-standing
The easy way to an affordable kitchen
 quality, affordable, pre-assembled The easy way to an affordable kitchen In association with All Insta-Cupboard carcass units are supplied pre-assembled to simplify installation Choose the colour of your
27693 Trend Podium Desk
 1 27693 Trend Podium Desk Assembly Instructions #27693 Trend Podium Desk Hardware List Part Drawing Description Qty P-1 Table Top 1 EA Part Drawing Description Qty A Screw M6 X 15mm 13 EA B Screw M6 X
LIBRA H7 APPLICATIONS: SCREW FIXING and DOWEL FIXING WITH OPTIONAL ALUMINIUM BARS
 LIBRA H7 APPLICATIONS: SCREW FIXING and DOWEL FIXING WITH OPTIONAL ALUMINIUM BARS BENEFITS OF LIBRA H7 HANGING SYSTEM: - Vertical and in-depth adjustments as well as the locking of the cabinet, can be
ClicWall. Decorative wall covering
 ClicWall Decorative wall covering ClicWall Installation guide Overview 1. Product description... 3 2. Dimensions and weight... 3 3. Transport... 3 4. Storage and installation conditions... 3 5. Installation
Exponents Bench Cushion
 Exponents Bench Cushion Power Drill #2 Phillips Bit Bit Holder Page 1 of 2 939500640 Rev A 1. Place cushion on top of the bench, so the black Coalesse tag is in the right rear corner of the bench. 2. From
Mounting Instructions Item No.: xxx
 Mounting Instructions Item No.: 271.92.xxx Wall-Beds 1 General Notes For vertical folding beds Successful and safe installation of Bed-Lift and construction of casework requires a professional skill level
Technical product descriptions WORKTOPS STANDARD SLIM LINE. 1. Material thickness 38 mm. 2. Core/substrate material Chipboard
 Technical product descriptions WORKTOPS I STANDARD 1. 38 mm 2. Chipboard 3. Surface material Laminate (CPL, HPL) 4. Laminate thickness 0,6-0,8 mm 5. Surface structure Wood pore or relief, matt, gloss 6.
786 Kurka Jig Owners Manual
 7 Kurka Jig Owners Manual Please Read Carefully! 7 Parts List Parts listed in this box are shown in photos in the instructions. Part Description Quantity 7B Jig Plate Set, pieces..................... Six
AVENTOS. An inspiring range of lift systems.
 AVENTOS An inspiring range of lift systems www.blum.com 2 Ease of motion multitude of options The AVENTOS lift system brings ease of motion to the wall cabinet. Even large and heavy lift systems can be
PROJECT PLAN OUTFEED TABLE
 BUILD IT WITH ROCKLER PROJECT PLAN OUTFEED TABLE BUILD Stock # Item 00 ' Universal T-Track () 0 T-Track Intersection Kit 70 JIG IT Universal Drawer Slide Jig 0 " Drawer Slides () 77 Auto-Adjust Jig Clamp
ASSEMBLY GUIDE. Mia Narrow Bookcase
 ASSEMBLY GUIDE Mia Narrow Bookcase Components: Upon unpacking your bookcase from it s delivery box, you should have the pieces shown. Follow the steps on the next pages to assemble your new bookcase. Step
#916 CLASSIC 16 GUN CABINET ASSEMBLY INSTRUCTIONS
 Thank you for purchasing this quality product. A list of PARTS and INSTRUCTIONS is included to assist you. Unpack and identify all parts included on the Parts List and Hardware List. If parts are missing,
ClicWall. Decorative wall covering Installation guide
 Decorative wall covering Installation guide Table of contents. Product description. Dimensions and weight. Transport. Storage and installation conditions 5. Installation instructions 5. GENERAL INFORMATION
Leveling System Solutions
 Leveling System Solutions Cabinet & Furniture Levelers The Cabinet Leveling System is the most versatile system for the woodworking industry. The variety of available products meets any requirement a craftsman
Bathroom Installation Manual
 Bathroom Installation Manual MAKING SPACE MORE VALUABLE May 2016 1 2 Contents page 1. Introduction Page 4 2. Tools required / key Page 5 3. Fittings Page 6 4. 600 cistern unit Page 7 5. 600 vanity unit
FRAMED CABINETRY INSTALLATION MANUAL
 FRAMED CABINETRY INSTALLATION MANUAL AN INDUSTRY GUIDE FOR PROFESSIONAL INSTALLATION RESULTS TO AVOID DAMAGE OR INJURY, READ IN ENTIRETY BEFORE STARTING MATERIAL & TOOL LIST FOR INSTALLATION Safety Glasses
Please read these instructions before use and keep for future reference
 Wardrobe Assembly Guide Allen Key Provided (if required) Philips Screwdriver Required Hammer Required Please read these instructions before use and keep for future reference Caution! Two Person Assembly
How To Measure Your Finished Opening
 3000 Series Bifold Doors How To Measure Your Finished Opening MEASURE FROM RIGHT TO LEFT 2 PLACES (WIDTH) MEASURE FROM TOP TO BOTTOM 2 PLACES (HEIGHT) Tools Required for Assembly: Tools Needed: Phillips
Pantry IMPORTANT NOTE Carefully remove all the parts from the carton and put them individually on a soft cloth to prevent scratches or oth
 88 5076 691 Pantry IMPORTANT NOTE Carefully remove all the parts from the carton and put them individually on a soft cloth to prevent scratches or other damages occurring to the parts. We have taken great
Vibe Buffet Assembly Instructions
 ssembly Instructions Thank you for your purchase. Please follow the instructions below for correct assembly. bolt bolt locking dowel long x nut x x0 screw x8 x H I J K small screw x4 V W safety strap x
TIP FOR GETTING STARTED
 Tip for getting started TIP FOR GETTING STARTED Be careful not to drill into any electrical wires, ductwork, plumbing or other damagable components. If you have any questions on the locations of these
AVENTOS HK-XS. Small fitting, great convenience. Technical data sheet.
 Small fitting, great convenience Technical data sheet www.blum.com Order specification 2 1 8a 8b well suited for wall cabinets and larder units cabinet heights of 20 to 00 mm Interior depth of 12 mm minimum
Patrol Box Plans by David J. Yarusso Troop 609
 Patrol Box Plans by David J. Yarusso Troop 609 Materials List: 1. One 4 x8 sheet of ½ thick cabinet grade (birch or oak) or AC plywood. If using AC grade, use the A grade surface on the outside for a clean
LINK OPENING SYSTEMS FOR FLAP AND DROP DOWN DOORS. click 2 INSTALLATION UNHANDED MECHANISM COVER CAP INSERTION
 INSTALLATION Recommended fi xing countersunk head wood screws Ø 4 x 18 mm for door 18 mm min. thick. Pre-inserted screw Ø 3,5 x 16 mm - PZ2. The door bracket has to be placed with the narrow part of the
Chapter 22 - Cabinets & Vanities
 Chapter 22 - Cabinets & Vanities Contents Chapter 22 - Cabinets & Vanities... 22-1 Timing & Prerequisites... 22-2 Cabinets... 22-3 Cabinet Layout... 22-3 Wall Cabinets... 22-4 Assemble the Wall Units...
NEXUS SERIES CABINETS
 NEXUS SERIES CABINETS STANDARD BASE ASSEMBLY INSTRUCTIONS Also applies to: Galaxy Series, Nexus Series, Ridgeline Series, Statesman Series, and Waterford Series FOR YOUR INFORMATION: These assembly instructions
Barnside Pantry IMPORTANT NOTE Carefully remove all the parts from the carton and put them individually on a soft cloth to prevent scratch
 88 5516 653 Barnside Pantry IMPORTANT NOTE Carefully remove all the parts from the carton and put them individually on a soft cloth to prevent scratches or other damage occurring to the parts. We have
ASSEMBLY INSTRUCTIONS MANUAL
 PAGE 1 OF 9 RECOMMENDED TOOLS FOR ASSEMBLY: ALLEN WRENCH (INCLUDED) BOX WRENCH (INCLUDED) PHILLIPS SCREW DRIVER (NOT INCLUDED) PARTS IN CARTON: ALLEN WRENCH SCREWS (20 EACH) ROUND HEAD SCREWS (8 EACH)
Width Height Depth White Antique White Secret Candlelight Cognac Mahogany Coco Chocolate Unit Price 16
 Don t forget to order your door and drawer sets for your cabinets. base cabinets 3160.000.00 3160.000.07 3160.000.01 3160.000.09 3160.000.06 3160.000.04 3160.000.08 3160.000.03 $330.00 26 23 3175.000.00
Materials and Tools: Printer s Triple Console Cabinet. Free Plans to build a Triple Console Cabinet
 Materials and Tools: Materials: 3 sets euro style bottom corner mount drawer slides, 16 length 3 sets inset hinges 24 cup style handles 8 2x2 @ 8 feet long 6 1x3 @ 8 feet long 6 1x2 @ 8 feet long 1 sheet
Technical product data sheet
 Seite 1 von 9 Worktops I Standard 1) 38 mm 2) Chipboard 3) Surface material Laminate (CPL/HPL) 4) Laminate thickness 0,6-0,8 mm 5) Surface structure Wood pore or relief, matt, gloss 6) Front edge types
Version 1.0. Forbes Credenza File Cabinet.
 Version 1.0 Forbes Credenza File Cabinet www.fantasticfurniture.com.au Enjoy Your purchase from Australia s Best Value Furniture Store www.fantasticfurniture.com.au PAGE 2 Assembly checklist Read through
ASSEMBLY INSTRUCTIONS FOR SL500A AND SL500AL
 ASSEMBLY INSTRUCTIONS FOR SL500A AND SL500AL January 2013 The SL500A is a square upright glass cabinet with a single hinged lockable door. It has five adjustable shelves plus the base. It also has an optional
Tried-and-tested quality.
 Tried-and-tested quality. Rugged single and full-extension drawer slides in tried-and-tested quality for top requirements. www.grass.at, info@grass.eu Roller slides Tried-and-tested quality and functionality.
Required Tools: Suggested Additional Tools: 1 Cordless Drill with Robertson Bits 1 Ratchet Wrench 1 7/16 or 11mm socket 1 7/16 or 11mm Gear Wrench
 Thank you for your recent purchase of a Cabinets by Hayley garage cabinet system. You are about to experience the best made cabinets that you can purchase. Cabinets by Hayley are designed for beauty and
FURNITURE HARDWARE & ACCESSORIES - PART 3 : LEVELLERS AND HANGERS
 www.hafeleindia.com FURNITURE HARDWARE & ACCESSORIES - PART 3 : LEVELLERS AND HANGERS ABOUT ITALIANA FERRAMENTA ITALIANA FERRAMENTA is specialized in the production of high quality accessories and ironmongery
PLANS BY TOM BURY MURPHY WORKTABLE TOTAL DIMENSIONS: FOLDED UP 30 X 48 X 0 FOLDED DOWN 30 X 58 X 84
 MURPHY WORKTABLE TOTAL DIMENSIONS: FOLDED UP 30 X 48 X 0 FOLDED DOWN 30 X 58 X 84 MATERIALS LIST: (2) 2 x8 x8 (3) 2 x4 x8 (1) 1 x2 x8 (1) 48 x96 3/4 plywood (2) 1-1/2 x30 continuous hinge (1) Left-side
Laminate Cabinet Installation Instructions
 Laminate Cabinet Installation Instructions www.easygaragestorage.com/installation How To Use These Instructions Thank you for your purchase! Please read each step of this manual thoroughly to ensure proper
You just bought a Mobalpa Kitchen. We thank you for your trust, and we hope that it will bring you comfort and satisfaction.
 NOT_0000_00_EN / Update : May 06 Dear customers, You just bought a Mobalpa Kitchen. We thank you for your trust, and we hope that it will bring you comfort and satisfaction. In order to help you fit, use
Selekta Pro 2000 Fast assembly hinges for office and commercial furniture
 Fast assembly hinges for office and commercial furniture 99 The program opening angles 180 and 270 with pre-mounted pan-head screws with eccentric height adjustment ± 2 mm with eccentric overlay adjustment
The classic RESOPAL IN THE KITCHEN
 The classic RESOPAL IN THE KITCHEN ORIGINAL RESOPAL WORKTOPS Pure esthetics, ideal properties in use The current Ideal collection (worktops) The most classical area of application of RESOPAL is without
KnobsandPulls.com. Presents. A Simplified Approach to Building Cabinets Using the 32mm System
 KnobsandPulls.com Presents the KISS II system. A Simplified Approach to Building Cabinets Using the 32mm System Available online at www.cabsystems.com Revised September 2007 by Joel Ketner or www.kissii.com
Fitted Furniture Installation and Aftercare Guide
 Fitted Furniture Installation and Aftercare Guide Customer Service Contact Number 08008 778899 Important Information In the unlikely event that your product is damaged or faulty in any way, this must be
Assembly Instructions
 Selling Station Assembly Instructions View from above without top A B C D Rounded finished corners on A & D Square unfinished 3-sides on B & C Selling Station Components (2) 2' x 6' Side s Have a channel
ENTRÉ E : CABINETS FOR LIFE. Our stock cabinetry line with fast delivery and the fine styles and finishes you demand. DOOR STYLES 4-7 ACCESSORIES 8-11
 ENTREE : CABINETS FOR LIFE Our stock cabinetry line with fast delivery and the fine styles and finishes you demand. DOOR STYLES 4-7 ACCESSORIES 8-11 KEEP IT GREEN! 12 ADA COMPATIBLE 12 EXTRA BENEFITS 13
Owner s Choice DIY. Kitchen Island Cabinet Project
 Owner s Choice IY Kitchen Island Cabinet Project Kitchen Island ssembly Instructions: Project plans includes assembly drawings, instructions and materials available through Home Building Centre and Home
Bathroom Installation Guide
 Bathroom Installation Guide Please read instructions carefully and check products before starting. Products should be fitted/installed by an experienced and competent fitter, failure to do so may invalidate
General Mounting/Installation manual 2019
 General Mounting/Installation manual 209 Important, before you start! Read this manual thoroughly! Think about this before you start to mount. Note that this is a general mounting instruction! Pre-assemble
Copyright Black Box Corporation. All rights reserved Park Drive Lawrence, PA Fax
 Copyright 2003. Black Box Corporation. All rights reserved. 1000 Park Drive Lawrence, PA 15055-1018 724-746-5500 Fax 724-746-0746 JULY 2003 RM3010A RM315-R2 RM323-R2 RM329 RM451 RM457 RM3020A RM316 RM324-R2
 www.hafeleindia.com www.hafeleindia.com INTRODUCTION Intuitive furniture is the need of the hour. In times like these where every extra square meter is considered as good as gold, installing versatile
14/08/15 AVAILABLE FROM MIDRAND RANDBURG DURBAN UMHLANGA MARGATE CAPE TOWN GHANA
 4/08/5 AVAILABLE FROM MIDRAND RANDBURG DURBAN UMHLANGA MARGATE CAPE TOWN GHANA PINETOWN BALLITO KRABY DROP DOWN with Kimana Hinges (pg 3) For further information: www.italianaferramenta.com > CATALOGUE
 www.hafeleindia.com www.hafeleindia.com Silver Gold Rose Gold Graphite Dark Bronze PROFIN : ONE RANGE. MANY SOLUTIONS. 2. Stack Modular Shelving Pg. 23-32 3. Rail Door Profiles Pg. 33-41 1. Gola Profiles
TABLETOP. Cut a 1/4" chamfer along front and back edges of each shelf (top side only).
.") PRTS tabletop boards/shelves - pine - (5) 3 /4" x 12" x 35 3 /4" B aluminum angles - (10) 3 /4" x 3 /4" x 3 /32" x 12" rear braces - maple - (2) 3 /4" x 2 1 /2" x 50" rear rails - maple - (2) 3 /4" x 2
PRTS tabletop boards/shelves - pine - (5) 3 /4" x 12" x 35 3 /4" B aluminum angles - (10) 3 /4" x 3 /4" x 3 /32" x 12" rear braces - maple - (2) 3 /4" x 2 1 /2" x 50" rear rails - maple - (2) 3 /4" x 2
BASE & WALL CABINET SETUP GUIDE BY SUNSTONE
 BASE & WALL CABINET SETUP GUIDE BY SUNSTONE Read all instructions before you install cabinet. Very important to follow each step in order as detailed in this Instruction Guide!!! To installer or person
A. Top Unit 1 Pc. For assembly see instructions in carton:
 88 5005 9441 Kitchen Island IMPRTANT NTE Carefully remove all the parts from the carton and put them individually on a soft cloth to prevent scratches or other damage occurring to the parts. We have taken
Kitchen space organizers
 Kitchen space organizers Index Pull-out base filler page 6 Rotating pantry unit page 16 Pull-out organizer page 8 Straight pantry unit page 17 Wire pull out drawers page 9 spacers Maxi pantry unit page
Visit us at or
 Features of AFA server rack 1. Disassembled packing, saving shipping space and warehouse storage. 2. Latest out looking design: double section side panels; pluggable front door, rear door and external
Product Spec Sheet & Order Form
 Product Spec Sheet & Order Form 7601 E. Treasure Dr Ste 2120 North Bay Village, - FL 33141 Ph: 305-9991543 Email:info@steelkitchenweb.com Web:www.steelkitchenweb.com MODULAR KITCHEN CABINETS Material Specs:
Left Unit. G. Shelf 1 pc. Small Cam Lock 6 pcs.(+1 extra) Cam Lock Screw 2 pcs.(+1 extra) Cam Lock Screw 6 pcs.(+1 extra)
 Cam Lock Screw 2 pcs.(+1 extra) Cam Lock Screw 6 pcs.(+1 extra)") 88 5180 181 Art & Craft Computer Desk (Cottage Oak) IMPORTANT NOTE Carefully remove all the parts from the carton and put them individually on a soft cloth to prevent scratches or other damages occuring
88 5180 181 Art & Craft Computer Desk (Cottage Oak) IMPORTANT NOTE Carefully remove all the parts from the carton and put them individually on a soft cloth to prevent scratches or other damages occuring
ASSEMBLY INSTRUCTIONS
 ASSEMBLY INSTRUCTIONS ITEM No. :Quilty/ 3 A helpful Assembly Video can be found on www.arrowcabinets.com in the Video Section under Quilty Incorrect Correct The turning direction of attaching The arrow
C-Series & S-Series Classic Frame with Transom (Single or Pair)
") 1. TOOLS REQUIRED Tape measure 6' magnetic level 3' magnetic level Safety Glasses Screw gun #2 Screwdriver tip #3 Screwdriver tip Philips Head screwdriver (Used to move frame on wall using oval slots on
1. TOOLS REQUIRED Tape measure 6' magnetic level 3' magnetic level Safety Glasses Screw gun #2 Screwdriver tip #3 Screwdriver tip Philips Head screwdriver (Used to move frame on wall using oval slots on
Installation Guide. Ceiling Suspended Acoustical Panels
 Installation Guide Ceiling Suspended Acoustical Panels Before Getting Started Check Your Panels Make sure you received everything you ordered. Please let us know if you have any questions or concerns by
INSTALLATION INSTRUCTIONS GT1006E TALL CABINET, RESIN WALL MOUNT
 INSTALLATION INSTRUCTIONS GT1006E TALL CABINET, RESIN WALL MOUNT CARTON CONTENTS PART 1 - CABINET ASSEMBLY QUANTITY DESCRIPTION CARTON #1 1 CABINET COMPONENTS PART 2 - WALL MOUNTING QUANTITY DESCRIPTION
Organisational Kitchen Fittings Kitchen Cabinet Accessories
 Kitchen waste bin systems Single waste bin, capacity 1 litres Carcase width: Min. 400 mm For door mounting: For left and right hand use Installation: Screw fixing to side panel Housing: Steel, plastic
Furniture Fittings Concealed Hinges
 Blum Clip Top Blumotion, opening angle 110 Material: Steel cup and arm : Screw fixing Installation: Door onto carcase without tools (Clip system) Adjustment: 3 dimensional (with appropriate mounting plate)
Office Partitions WARNING. Assembly Instructions. Customer Service A S S E M B LY HARDWARE H1 H2 H3 H4 H5 H8 H9 H10 H11 H12
 Customer Service 1-800-645-2986 Assembly Instructions WARNING In order to prevent structural failure, instability, t i p - o v e r, and/or serious injury, please follow i n s t ructions care f u l l y.
WILDING WALLBEDS INSTALLATION INSTRUCTIONS Bed with storage headboard
 WILDING WALLBEDS INSTALLATION INSTRUCTIONS Bed with storage headboard INSTRUCTION BOOKLET #13 WARNING! ALL MURPHY/WALLBED SYSTEMS CONTAIN POWERFUL LIFTING COMPONENTS. FAILURE TO USE AND FOLLOW THESE INSTRUCTIONS
Parts List (Continued) 18 each: #8 x 0.625" Truss Head Phillips Screw 20 each: #8 x 1.75" Flat Head Phillips Screw 4 each: #8 x 1.25" Flat Head Philli
 18 each: #8 x 0.625 Truss Head Phillips Screw 20 each: #8 x 1.75 Flat Head Phillips Screw 4 each: #8 x 1.25 Flat Head Philli") EVO Tall Pull-Out Wood Pantry Important Notes Always read the instructions completely and carefully before beginning assembly. Remove and check contents for damage and/or missing parts. Keep the original
EVO Tall Pull-Out Wood Pantry Important Notes Always read the instructions completely and carefully before beginning assembly. Remove and check contents for damage and/or missing parts. Keep the original
Kirra Buffet Assembly Instructions
 Thank you for your purchase. lease follow the instructions below for correct assembly. C B dowel screw x x6 wedge x4 screw x4 bolt x locking nut x long screw x F screw slide x6 rail x N wheel x4 G slide
Blum Movento Visual User Guide.
 Blum Movento Visual User Guide. Introduction Overview The Blum Movento Visual Package from Solid Setup adds the Blum Movento drawers and Inner drawers (Rollouts), to Cabinet Vision Solid. It provides drilling
INSTALLATION INSTRUCTIONS
 INSTALLATION INSTRUCTIONS Furniture Solutions: 68 Shipstation with Storage Shelf Model Numbers: PB001 (D9001, D9010N, D9021, D9030, D9032/D9033, D9098, RC4054) Introduction This document provides the Pitney
CAPTUR COMPONENTS. We make food look better.
 CAPTUR COMPONENTS TOP EDGE GLASS CONNECTORS GCA6 6mm (1/4") Glass GCA10 10mm (3/8") Glass 2.76 2.90 2.76 2.90 TOP BOTTOM 1.13 1.13 6mm GLASS GC906 6mm (1/4") Glass 10mm GLASS GC9010 10mm (3/8") Glass Adjustable
AVENTOS HK-XS. Small fitting, great convenience.
 AVENTOS HK-XS Small fitting, great convenience www.blum.com 2 Small fitting high quality AVENTOS HK-XS is the compact fitting for small stay lifts in high and wall cabinets. Thanks to the narrow style,
Melamine Plastic Laminate. Toilet Partition Installation Manual
 Melamine Plastic Laminate Toilet Partition Installation Manual PHONE: FAX: 1-866-317-2786 ATTENTION DO NOT MIX FASTENER PACKS EACH FASTENER PACK HAS THE NECESSARY BOLTS, BARRELS AND SCREWS TO INSTALL THE