INSTALLATION. For more information on this product or to order samples call or visit our website at builddirect.com.
|
|
|
- Olivia McKinney
- 6 years ago
- Views:
Transcription
1 Page 1
2 Page 2
3 Page 3
4 Page 4
5 Page 5
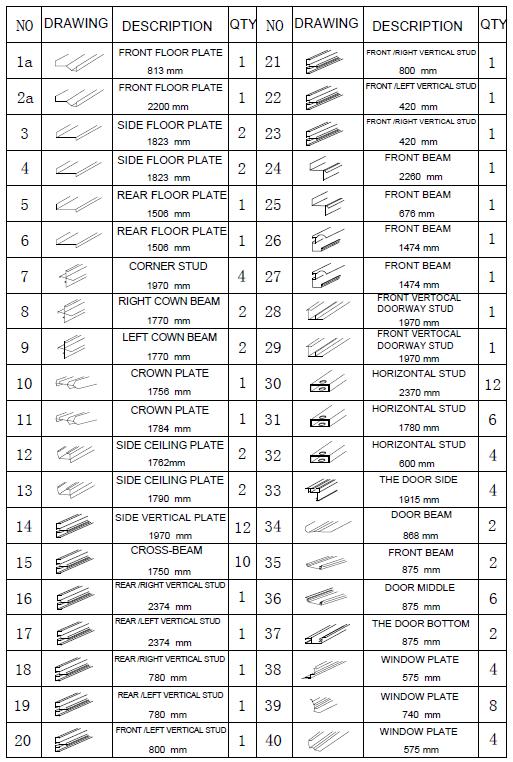
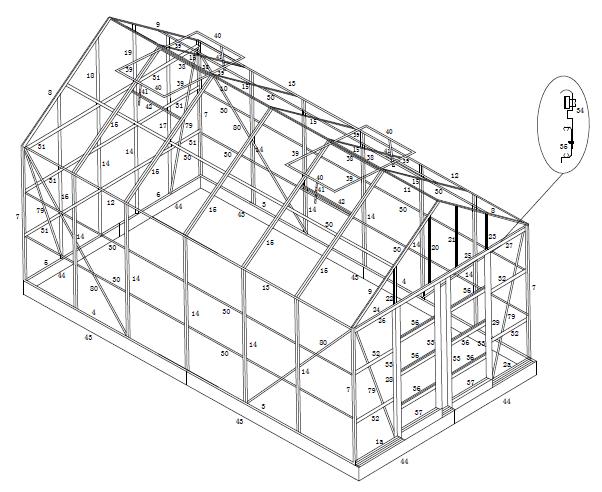
6 1. Door Assembly: Step A: Attach part #34 to part #35 with screws #65/67. Step B & C: Attach part# 34.35(36) to part #33 with two #70 screws. Step D: Insert door bottom slider #51 into the end of part #37 and attach part #37 to part #33 with two #70 screws on both edges of part #37. Page 6


7 2. Window Assembly: Step E: Attach part #39 to part #40 with screws #65/67. Step F: Attach part #41 to part #40 with screw part #71. Step G & H: Put screw part #65 first and slide panel #61 into frame #38, 39 and attach part #38 to part #39 with screw #65/67. Page 7
8 3. Side Assembly: Step I, J, K, L: Insert screw #65 first and attach part#13, #30 to part #14 with screw part #65, #66, #67. Repeat step L to attach to part #4. Step M: Attach part #4 to part #3 with 3 #65, #67 screw sets. Step M1: Attach part #12 to part #13 with screw parts #65, #67. Page 8
9 4. Back Assembly: Step N: Use #65, 67, 78 screw parts to attach part #9, 31, 7 to bracket #49. Step O: Fasten part #6 to part #7 with screw parts #65/67. Step P: Insert screw part #66 into part #16 first, then join part #31 with part #16 and fasten with screws #66/67. Step Q: Insert screw part #65 to part #9 first and fasten part #9 to part #17 with screw s#65/67. Step R: Insert screw #65 into part#14 profile, then attach and fix part#6 to part#14 with screw #67 screw #65/67. Step S: Fasten connector #48 to parts #31,18,14 with screw parts #65(66)/67. Step T: Attach part #5 to part #6 with screw parts #65 and 67. Step U: Attach part #31 to part #7 with screw parts #66 and 67. Page 9
10 5. Front Assembly: Step V: Attach part #32 to part #29 with screw parts #66 and 67. Step W: Fasten corner bracket #49 to parts #8/9,24,7 with screw parts #65, 66 and 67. Step X: Insert two screw parts #65 to part #26,#27 and attach part #26, #27 to part #24 with screw parts #65 and 67. Step Y: Insert screw part #65 to part #20 first, then part #24 with screw part 65/67. Step Y1: Insert screw part #65 to part #20 first, then attach part #9 with screw parts 65 and 67. Step Z: Attach part #24 to part #29 with screw parts #65/67. Step AA: Attach part #2a to part #1a with screw parts #65/67. Page 10
11 6. Base Assembly: ** Use connectors #45 and 46 to attach part #43 and #44 with screw parts 68 and 69 as shown. Page 11

12 7. INSTALLATION Step AA & AH: Using corner bracket#49 to attach part #9(8),31,7 with screw part #65(78)/67. Attach part #12(13),7,80 together with screw part #66/67. Step AB: Attach part #4,#5 to part #7 with screw parts #65/67. Step AC: Insert screw part #65 to part #15 first, then attach part #15 to part #11 with screw parts 65 and 67. Step AD: Attach part #8 and #9 to part #10 with screw parts #65 and 67. Step AE: Attach part #38 to part #10 with screw parts #65 and 67. Step AF: Insert screw part #65 to part #15 first, then attach part #15 to part #42 with screw parts 65 and 67. Step AI: Slide part #47 under the lip of part #43 and attach part #47,43,14 with screw parts #65 and 67. Step AJ: Attach part #11 to part #10 with screw #65/67. Step AK: Insert screws #66/67 to part #30, then attach part #30 with screw #66/67. Step AL: Insert screw #78 to part #14 and add part #81 to cover up screw #78, then attach part #80 with screw part# 67. Step AM: Attach part #50 to part #42 with screw #71. Page 12
Franklin Mills Stackable Movable Lateral Instructions
 Franklin Mills Stackable Movable Lateral Instructions Table of Contents: Table of contents...1 Tools Required...2 Stationary Shelving Assembly...3-7 Mobile Shelving Assembly...8-16 Rail Assembly...8-11
STRAIGHT HANDLEBAR KIT
 STRAIGHT HANDLEBAR KIT P/N 2881973 APPLICATION All straight bar applications, excluding 550 Indy and Voyageur models BEFORE YOU BEGIN Read these instructions and check to be sure all parts and tools are
HANDLEBAR KIT P/N APPLICATION BEFORE YOU BEGIN KIT CONTENTS TOOLS REQUIRED. Instr Rev Page 1 of 6
 HANDLEBAR KIT P/N 2881993 APPLICATION All straight bar applications, excluding 550 Indy and Voyageur models BEFORE YOU BEGIN Read these instructions and check to be sure all parts and tools are accounted
4Post Trakslider Instructions
 4Post Trakslider Instructions FOR ASSEMBLY ASSISTANCE CONTACT CUSTOMER SERVICE AT 1-866-217-0330 (MONDAY THRU FRIDAY 8 AM - 5 PM EST) PAGE 1 OF 31 INST0083 REV2 WS 4/16/08 Tools Required for Assembly Or
USE STRAIGHT ALLEN WRENCH (Bz) WITH AN ELECTRIC SCREWDRIVER TO TIGHTEN SCREWS - NOTE: DO NOT OVER TIGHTEN
 WITH AN ELECTRIC SCREWDRIVER TO TIGHTEN SCREWS - NOTE: DO NOT OVER TIGHTEN") ASSEMBLY INSTRUCTIONS (VK) MODEL NO. 836-944P1 Made in Vietnam Thank you for purchasing this Powell product. We want to make sure it is complete and to your satisfaction. Please check all packing material
ASSEMBLY INSTRUCTIONS (VK) MODEL NO. 836-944P1 Made in Vietnam Thank you for purchasing this Powell product. We want to make sure it is complete and to your satisfaction. Please check all packing material
** Do Not Contact the Store ** For Assistance, including missing or broken parts, Call Customer Service at:
 3/01/2007 VISIT THE LITIME WEB SITE: WWW.LITIME.COM ** Do Not Contact the Store ** For Assistance, including missing or broken parts, Call Customer Service at: 1 (800) 225-3865 Double Shed Doors for Back
2007 Chevrolet Colorado
 DIGITAL RADIO RECEIVER REPLACEMENT Removal Procedure IMPORTANT: Do NOT swap digital radio receivers between vehicles. Swapping digital receivers between vehicles will activate the digital radio Theftlock,
You Can Build an Architectural Bookcase
 Jeff Branch WOODWORKING You Can Build an Architectural Bookcase Heavy moldings bring this project to life. By JEFF BRANCH I am drawn to architecture. In particular, I like the orderly nature of Palladian
Depending on the size you ordered you will have either 5 Foot sections which will build the 10 Foot frame or 6 Foot sections which will build the 12
 XL Quilting Frame 1 Depending on the size you ordered you will have either 5 Foot sections which will build the 10 Foot frame or 6 Foot sections which will build the 12 Foot frame Printed 2 June 2014 Updated
SECTION 7 CHANNEL & SUPPORT SYSTEMS
 SECTION 7 CHANNEL & SUPPORT SYSTEMS Unitrunk Intelok Channel is a strong, easy to erect support system, ideal for supporting cable trays, cable ladders, pipes and ducting and is adaptable for use in many
Template. Blue 242. May 2018 trademarks of Suncor Stainless, Inc. Loctite is a registered trademark of Henkel Corporation
 ATLANTIS RAIL Contact Information: Atlantis Rail Systems 70 Armstrong Road 3900 Civic Center Drive Plymouth, MA 02360 North Las Vegas, NV 89030 (800) 541-6829 or (508) 732-9191 (508) 732-9798 www.atlantisrail.com
CHICKEN COOP & CHICKEN RUN. Tools required for assembly (not included)
") CHICKEN COOP & CHICKEN RUN ASSEMBLY MANUAL SKU# 6839 Tools required for assembly (not included) Distributed by: TRACTOR SUPPLY COMPANY 0 VIRGINIA WAY, BRENTWOOD, TN 3707 For customer support, call: -888-376-960
CHICKEN COOP & CHICKEN RUN ASSEMBLY MANUAL SKU# 6839 Tools required for assembly (not included) Distributed by: TRACTOR SUPPLY COMPANY 0 VIRGINIA WAY, BRENTWOOD, TN 3707 For customer support, call: -888-376-960
Perforation Options for Rockfon Specialty Metal Ceilings
 Part of the ROCKWOOL Group Perforation Options for Rockfon Specialty Metal Ceilings Perforation Options for Decorative, Acoustic and Other Design Purposes Project 90 Elgin in Ottawa, Ontario Product Rockfon
WALL SHELVING SYSTEM 250/750
 468 2/7 Installation Example Ceiling Height (CH) : 2800 mm Ceiling Height (CH) : 28 mm Corner Installation 2 design panels are used to cover mm space in case of ceiling height 28 mm. Corner Example 469
Tape Measure Carpenter s Square Touch-up Paint Chalk Line. Blue 242. Template
 ATLANTIS RAIL Contact Information: Atlantis Rail Systems 70 Armstrong Rd. Plymouth, MA 02360 (800) 541-6829 or (508) 732-9191 (508) 732-9798 www.atlantisrail.com NOVA System Installation Instructions The
*** All chrome surfaces should be cleaned using a clean damp cloth. *** No abrasive cleaning agents or materials should be used.
 Cleaning *** All chrome surfaces should be cleaned using a clean damp cloth. *** No abrasive cleaning agents or materials should be used. *** No chemical cleaners can be used on the glass use only mild
Designer Rope. Functional displays with a clean design and distinctive rope accent. DR1
 Designer Rope by Functional displays with a clean design and distinctive rope accent. DR1 SMALL SINGLE PAD 2 1/2 x 2 3/8 LARGE SINGLE PAD 3 1/4 x 4 1/8 PETITE 5 3/8 x 3 1/2 - $15/17 4015 1 PAD- $9 1/4
Installation, Maintenance & Parts Manual
 Installation, Maintenance & Parts Manual 00 Series End Drive Conveyors Table of Contents Warnings General Safety........................... Introduction....................................... Product Description.................................
SM-RAZOR-ART2-L / SM-RAZOR-ART2-XL
 SM-RAZOR-ART2-L / SM-RAZOR-ART2-XL Strong Razor Series Articulating Mount for Large and Extra Large Displays INSTRUCTION MANUAL Installation Manual Warnings: Installation of this product should be done
ATLANTIS RAIL Contact Information: Atlantis Rail Systems 70 Armstrong Road 3900 Civic Center Drive Plymouth, MA North Las Vegas, NV 89030
 ATLANTIS RAIL Contact Information: Atlantis Rail Systems 70 Armstrong Road 3900 Civic Center Drive Plymouth, MA 02360 North Las Vegas, NV 89030 (800) 541-6829 or (508) 732-9191 (508) 732-9798 www.atlantisrail.com
Cleaning. This instruction will cover installation of the following units Codes:
 Cleaning *** All chrome surfaces should be cleaned using a clean damp cloth. *** No abrasive cleaning agents or materials should be used. *** General glass cleaner can be used for the screen, but ensure
303SPH SPHERICAL VR HEAD
 INSTRUCTIONS 303SPH SPHERICAL VR HEAD The spherical VR head is designed to allow virtual scenes to be created by Computer from a various panoramic sequences of digital or digitised photographs, taken at
Installation, Maintenance & Parts Manual
 Installation, Maintenance & Parts Manual 00 Series End Drive Conveyors Table of Contents Warnings General Safety........................... Introduction....................................... Product Description.................................
AMISHGAZEBOSHOP.COM VINYL GAZEBO KIT CONTENTS
 VINYL GAZEBO KIT CONTENTS Hardware for assembling your gazebo (provided): 2 1/2" screws Use to fasten joist together fasten posts to outside joist fasten rafters to rafter header fasten benches & cupola
Antenna Workspaces Installation Instructions
 Antenna Workspaces Page Title January 2013 2 Page Title Worksurface x1 Worksurface x1 Worksurface x1 Worksurface x1 Leg x2 Horizontal Rail x2 Worksurface x1 Worksurface (x1) Leg x2 Leg (x2) Horizontal
mk Profile Technology
 mk Profile Technology One Construction Kit, Many Options Base Technology Profile Technology Conveyor Technology Factory Equipment Linear Motion better products, better solutions One basic technology, four
FEET, WHEELS, FLOOR FASTENINGS, SUPPORTS
 SYSTEM COMPONENTS FEET, WHEELS, FLOOR FASTENINGS, SUPPORTS s t r oppu S, s gn i n e t s af r oo l F, s l eehw, t e ef FEET, WHEELS, FLOOR FASTENINGS, SUPPORTS 136 MINITEC PROFILE SYSTEM BASE AND TRANSPORT
DESIGN TRIPLE PANE BATH SCREEN
 DESIGN TRIPLE PANE BATH SCREEN DBTSC1500 INSTALLATION INSTRUCTIONS IMPORTANT - Please read before installation Please read these instructions carefully before starting installation and keep in a safe place
IN 578. Tools Required. Torque Specification: 10mm Socket 7/16 Socket 1/2 Socket 1/2 Wrench 7/16 Wrench 1/8 Allen Wrench.
 Tools Required 2011-C Ford F250/F350 No Drilling into Vehicle is Required 10mm Socket 7/16 Socket 1/2 Socket 1/2 Wrench 7/16 Wrench 1/8 Allen Wrench FL277 x 1 Torque Specification: 1/4 Bolts - 6 Ft Lbs.
Dublin Stalls Installation Instructions
 Dublin Stalls Installation Instructions RAMM Horse Fencing and Stalls 13150 Airport Hwy. Swanton, OH 43558-9615 1-800-434-8456 Rev. 9/13/17 Part Identification Round Track Bracket (4) (Not Painted) Round
ROPE Designer Rope. Displays with a clean design and distinctive rope accent. Ideal for retail and showcase use.
 Designer Rope by Displays with a clean design and distinctive rope accent. Ideal for retail and showcase use. www.ovadia.com 139 SMALL SINGLE PAD 2 5/8 x 3 1/4 LARGE SINGLE PAD 3 1/4 x 4 1/8 PETITE 5 3/8
Color Stories Studio Installation Instructions
 Tools Required 1 - Stud Finder 8 - Carpet Sliders 1 - Level 1 - Phillips Screwdriver 1 - Flathead Screwdriver 1 - Power Drill with 3/16 Bit 1 - Package of Shims 2-8 Ft. Step Ladder Components V (2) Wall
POWER PET. Low-E Automatic Patio Pet Door Installation and Operating Instructions
 POWER PET Low-E Automatic Patio Pet Door Installation and Operating Instructions Power Pet, Regular Height, Patio Door Assembly Steps Estimated assembly time: Under 1 hour STEP 1: Assemble the tools you
You Can Build a Bedside Table
 You Can Build a Bedside Table Jeff Branch WOODWORKING If you like making panels, you ll love this project. By JEFF BRANCH M y current home is a modest one. But it is a big improvement over our small starter
How To Measure Your Finished Opening
 3000 Series Bifold Doors How To Measure Your Finished Opening MEASURE FROM RIGHT TO LEFT 2 PLACES (WIDTH) MEASURE FROM TOP TO BOTTOM 2 PLACES (HEIGHT) Tools Required for Assembly: Tools Needed: Phillips
Fig A. ADDICTIVE DESERT DESIGNS Preparation: Installation:
 Preparation: Disconnect the negative battery terminal. Park the vehicle on level ground and set the emergency brake. We recommend reading through the installation instructions in whole before performing
Blackout Instructions. 4 R-Series Fascia Installation Outside Mount
 Blackout Instructions 4 R-Series Fascia Installation Outside Mount 1 Components Needed page 3 Tools Needed page 4 System Diagram page 5 Instructions Step 1: Install Brackets. Page 6 Step 2: Mount Back
Safety Glasses Work Gloves Chop Saw with Cutting Disk. Half Round File Pencil Marker
 ATLANTIS RAIL Contact Information: Atlantis Rail Systems 70 Armstrong Road 3900 Civic Center Drive Plymouth, MA 02360 North Las Vegas, NV 89030 (800) 541-6829 or (508) 732-9191 (508) 732-9798 www.atlantisrail.com
PROFILE Flat Panel Console System Installation Manual
 PROFILE Flat Panel Console System Installation Manual Table of Contents Page Introduction... 2 Important Safety Information...3, 4 Installation Overview... 4, 5, 6 Single Sided/Single Unit... 7 Double
mila-wall (Series100) General Operating Instructions page 1 of 15
 General Operating Instructions page 1 of 15") mila-wall (Series100) General Operating Instructions page 1 of 15 Step #1: Before setting up walls, lower adjustable leveling feet on each panel approximately 1". This will allow access to the threaded
mila-wall (Series100) General Operating Instructions page 1 of 15 Step #1: Before setting up walls, lower adjustable leveling feet on each panel approximately 1". This will allow access to the threaded
Официальный представитель: ООО «СпортРус» , Российская Федерация, г.москва, Варшавское шоссе, д.33 Телефон: (495) ,
 ,") Официальный представитель: ООО «СпортРус» 117105, Российская Федерация, г.москва, Варшавское шоссе, д.33 Телефон: (495) 276 27 26, 221 26 29 www.aerofit.ru MLM-300 OWNER'S MANUAL HARDWARE ILLUSTRATION
Официальный представитель: ООО «СпортРус» 117105, Российская Федерация, г.москва, Варшавское шоссе, д.33 Телефон: (495) 276 27 26, 221 26 29 www.aerofit.ru MLM-300 OWNER'S MANUAL HARDWARE ILLUSTRATION
8000 SERIES SLIDER - 2 LITE (DUAL SLIDE) (ELEVATION DRAWING)
 (ELEVATION DRAWING)") - 2 LITE (DUAL SLIDE) (ELEVATION DRAWING) HEAD (MEETING RAIL) NOTE: ELEVATION VIEWED FROM THE OUTSIDE LOOKING IN. ELEVATION DRAWING 3" = 1' - 0" SL1.1 - 3 LITE (END VENT) (ELEVATION DRAWING) HEAD 3 LITE
- 2 LITE (DUAL SLIDE) (ELEVATION DRAWING) HEAD (MEETING RAIL) NOTE: ELEVATION VIEWED FROM THE OUTSIDE LOOKING IN. ELEVATION DRAWING 3" = 1' - 0" SL1.1 - 3 LITE (END VENT) (ELEVATION DRAWING) HEAD 3 LITE
Assembly and Installation Guide
 The Easy Hang Closet Solution SM Install Your elfa In An Instant. Enjoy The Benefits For A Lifetime. Basic Tools For elfa Assembly and Installation Level Hand or Power Drill Drill Bits 1/8", 3/8", 5/16"
Chalk Line. #4 Phillips Driver Bit. Cable Cutters
 ATLANTIS RAIL Contact Information: Atlantis Rail Systems 70 Armstrong Road 3900 Civic Center Drive Plymouth, MA 02360 North Las Vegas, NV 89030 (800) 541-6829 or (508) 732-9191 (508) 732-9798 www.atlantisrail.com
On-Roof Mounting Sets for Flat-Plate Collectors
 Engineering Submittal Sheet Installation sets for collectors Fig. 1 Installation set for 2 collectors 1 basic installation set, 1 extension installation set Basic installation set for each collector array
Installation, Maintenance & Parts Manual
 Installation, Maintenance & Parts Manual Multi Tier Aluminum Support Stands Table of Contents WARNINGS General Safety..................... 2 Introduction................................ 3 Product Description..........................
Kirra Buffet Assembly Instructions
 Thank you for your purchase. lease follow the instructions below for correct assembly. C B dowel screw x x6 wedge x4 screw x4 bolt x locking nut x long screw x F screw slide x6 rail x N wheel x4 G slide
Hover. Installation Instructions. Raised Panel. Version
 Installation Instructions Version 8-2-17 Raised Panel Table of Contents Page Raised Panel Trough 3-13 Platform Trough 14-20 Platform 120 Degree Trough 21-24 Electrical 25-28 Type A Electric Bases 29-31
TECHN. DATA/ITEMS SUPPLIED APPLICATIONS ASSEMBLY. - Connection of profiles
 MOUNTING BRACKET 45 Part N 21.1411/0 - GD Zn, powder coated, grey Weight 0,426 kg - Connection of profiles - For subsequent fitting of profiles into existing constructions, displacable in direction of
MISCELLANEOUS CABINET REPAIRS
 MISCELLANEOUS CABINET REPAIRS 167 168 NOTES MISCELLANEOUS CABINET REPAIRS Cabinet Panel Repairs 175 SIDE PANEL REPLACEMENT - GDM SERIES INSTALLATION INSTRUCTIONS Tools Required 1/8" drill Rivet Tool Silicone
EDGE-, COVER-, SLIDEAND SEALING PROFILES
 PROFILE SYSTEM EDGE-, COVER-, SLIDE- AND SEALING PROFILES s e l i f o r P gn i l aes dna - ed i l S, - r evoc, - egde EDGE-, COVER-, SLIDEAND SEALING PROFILES These profiles are used for groove covering
WORKSURFACE ASSEMBLY
 WORKSURFACE ASSEMBLY Notes: Worksurfaces should be installed last. This provides easy access to Core/Walls. For Double Sided configurations, repeat the following sequences for the opposite side of the
INSTALLATION INSTRUCTION RRU DOUBLE LIGHT POLE MOUNT
 INSTALLATION INSTRUCTION RRU Double Light Pole Mount for installation of two RRU units on mast, towers or other vertical structures. CUE DEE YOUR INNOVATIVE PARTNER 1 CONTENTS 1. PRODUCT COVERED IN THIS
Handleless Uni t Specification
 Handleless Uni t Specification QUALITY BRITISH CRAFTSMANSHIP 160 Handless Fitting Guide - Parts Index & Base Cabinet Section 1 150 325 DRAWER 870 870 870 73 73 720 720 DOOR 685 325 2 x
November 30, Courtney Wilton Portland Public Schools 501 North Dixon Portland, OR 97227
 November 30, 2016 Courtney Wilton Portland Public Schools 501 North Dixon Portland, OR 97227 Via email: Regarding: cwilton@pps.net Lead Paint Condition Assessment Abernethy Elementary School 2421 SE Orange
NEXUS SERIES CABINETS
 NEXUS SERIES CABINETS STANDARD BASE ASSEMBLY INSTRUCTIONS Also applies to: Galaxy Series, Nexus Series, Ridgeline Series, Statesman Series, and Waterford Series FOR YOUR INFORMATION: These assembly instructions
EmagiKit. Privacy Pod Plus. Quiet. Easy. Affordable. INSTRUCTIONS ASSEMBLY
 EmagiKit Privacy Pod Plus Quiet. Easy. Affordable. INSTRUCTIONS ASSEMBLY DIMENSIONS AND COMPONENTS 47 47 Ceiling Unit 2-B 2-L 2-R Glass Door Corner Trim Door Handle 90 Adjustable Height Work Surface 1-B
FOLDING HARDWARE STARTEC T-SNAP G2/G4
 FOLDING HARDWARE STARTEC T-SNAP G2/G4 T-SNAP G2 T-SNAP G4 Technical data: 40 kg for package throughout Height according 36+7 mm Fix bracket every 400 mm T-SNAP G2: 1x door leaf package T-SNAP G4: 2x door
Installation Instructions for TruLine 1A Center Feed Power Channel Connector
 IMPORTANT INFORMATION - This instruction must be used concurrently with other TruLine A BIY installation instructions. - This product is wall or ceiling mount. - This instruction shows a typical installation.
Thank you for purchasing out product! *Please read these instructions and follow them step by step. *
 Page 1 of 7 AD17 AA DS 4 X 16 T12 Thank you for purchasing out product! *Please read these instructions and follow them step by step. * STEP 1. Slide two support posts (REF. # 24) into the two outside
Installing the CACS Ceiling with Aisle Ducts
 Installing the CACS Ceiling with Aisle Ducts Complete these instructions to install the Cold Aisle Containment System (CACS) Ceiling with Aisle Ducts. The CACS Ceiling and Aisle Ducts are designed to work
K-KR4Z - Kona INSTRUCTION MANUAL KK002
 K-KR4Z - Kona INSTRUCTION MANUAL 07.10 KK002 Please keep this manual and product code number for future reference and replacement parts ordering if necessary. CURVED GLASS SLIDING SHOWER DOOR CURVED GLASS
Setup. The Faraday Cage is available in two types of configurations. Cage for mounting to a full perimeter enclosure on series tables.
 Faraday CageSetup, 2017 Setup The Faraday Cage is available in two types of configurations. Cage for mounting to a full perimeter enclosure on 63-500 series tables. Cage with a base plate for use on a
Jeff Branch WOODWORKING YOU CAN BUILD A. By adding subtle design elements, a traditional furniture style becomes decidedly modern.
 Jeff Branch WOODWORKING YOU CAN BUILD A By adding subtle design elements, a traditional furniture style becomes decidedly modern. Jeff Branch WOODWORKING Publisher: Jeff Branch Editor: Jeff Branch Art
EZ-One Woodworking Center. Eurekazone, LLC 1904 NE Jacksonville Rd Ocala, FL v14-01
 EZ-One Woodworking Center EZ-ONE WOODWORKING CENTER When using the EZ-One Woodworking Center [EZ-One] with any power tool, be sure you have read and understand the operating manual for the tool before
4Post Shelving Assembly Instructions
 4Post Shelving Assembly Instructions ATTENTION: BEFORE STARTING ASSEMBLY, DETERMINE WHICH STYLE OF SHELVING IS TO BE BUILT AND FIND THE CORRESPONDING SECTION OF THE INSTRUCTIONS. READ ALL INSTRUCTIONS
 SUPREME WALL GARDEN ASSEMBLY INSTRUCTIONS 24/08/16 www.hallsgreenhouses.com Please refer to website for the most up to date instructions. SAFETY WARNING 1. Always wear protective glasses, shoes, gloves
WALL UNIT. Assembly Guide For Internal Use: FI.WR.INS.034_WKIN00124_WALL_ _1Dr_Rev4.indd
 WLL UNIT ssembly uide 150 200 350 400 500 300 450 600 or Internal Use: I.WR.INS.034_WKIN00124_WLL_150-600_1Dr_Rev4.indd WLL UNIT ssembly uide EORE YOU STRT INSTLLTION SHOULD E PERORMED Y OMPETENT PERSON
Официальный представитель: ООО «СпортРус» , Российская Федерация, г.москва, Варшавское шоссе, д.33 Телефон: (495) ,
 ,") Официальный представитель: ООО «СпортРус» 117105, Российская Федерация, г.москва, Варшавское шоссе, д.33 Телефон: (495) 276 27 26, 221 26 29 www.aerofit.ru MTH-1100 OWNER'S MANUAL HARDWARE ILLUSTRATION
Официальный представитель: ООО «СпортРус» 117105, Российская Федерация, г.москва, Варшавское шоссе, д.33 Телефон: (495) 276 27 26, 221 26 29 www.aerofit.ru MTH-1100 OWNER'S MANUAL HARDWARE ILLUSTRATION
8' x 10' OUTDOOR SHED
 8' x 10' OUTDOOR SHED Owner s Manual with Assembly Instructions Level Surface Notice: Lifetime 8 x 10 Outdoor Shed MODEL #6440 You could win $200! 1. You automatically will be entered to win $200 in our
DESIGN QUADRANT SINGLE DOOR
 DESIGN QURANT SINGLE DR DQSSC0800 DQSSC0900 DQSSC1000 800mm SINGLE DR 900mm SINGLE DR 1000mm SINGLE DR INSTALLATIN INSTRUCTINS IMPRTANT - Please read before installation Please read these instructions
Installation Instructions PREMIUM Replacement Top (Part # )
") 0 7-0 9 U n l i m i t e d ( 4 D o o r ) NOTE: Read entire instructions thoroughly before installing this product. It is recommended to install this Top when temperatures are above 70 degrees. The top can
0 7-0 9 U n l i m i t e d ( 4 D o o r ) NOTE: Read entire instructions thoroughly before installing this product. It is recommended to install this Top when temperatures are above 70 degrees. The top can
INSTALLING INVISIRAIL GLASS PANELS POST INFORMATION... 2 PRE-INSTALLATION... 2
 Contents POST INFORMATION... 2 PRE-INSTALLATION... 2 STEP A1: MEASURING FOR INVISIRAIL CUSTOM GLASS PANELS (skip if using Standard Sized Panels)... 2 STEP A2: GATHER ADDITIONAL TOOLS/SUPPLIES... 2 STEP
TOOLS REQUIRED Metal Wood Wood and Metal Screws. #16 Drill #12-24 Tap. 1/8 Drill
 DEVICES COVERED IN THIS DOCUMENT: 4700S Surface Vertical Rod Device 4700SF Fire Exit Surface Vertical Rod Device TOOLS REQUIRED Metal Wood Wood and Metal Screws Sex Bolts #7 Drill ¼ -20 Tap #16 Drill #12-24
BROKEN OUT SECTION DIMETRIC VIEW REVISION HISTORY REV DESCRIPTION DATE APPROVED. NAME sweetpc. DATE 10/26/14 LS-Fornells
 ISION HISTORY DESCRIPTION APPROVED BROKEN OUT SECTION DIMETRIC VIEW PL ±X.XX PL ±X.XXX /6/ LS-Fornells A Bomba SCALE: WEIGHT: SHEET OF ±0.00 P P Q D Q ISION HISTORY DESCRIPTION APPROVED A A M Cilindro
Frameless Bypass Slider
 INSTALLATION INSTRUCTIONS Frameless Bypass Slider QCI-5301 3/8 or 1/4 Glass Bypass Slider with Exposed Rollers QCI5301 Rev 1 Page 1 Certified 6/5/2017 Tools: To install your New Shower Enclosure, you may
INSTALL/REMOVAL INSTRUCTIONS: WINDOW REGULATOR
 REMOVAL/INSTALL OF WINDOW REGULATOR (741-584) Ford Focus 2000-2007 General Tech Tips: Use painter s tape rather than duct tape to secure window. It will not damage paint or leave sticky residue. A plastic
ASSEMBLY INSTRUCTIONS MANUAL
 PAGE 1 OF 9 RECOMMENDED TOOLS FOR ASSEMBLY: ALLEN WRENCH (INCLUDED) BOX WRENCH (INCLUDED) PHILLIPS SCREW DRIVER (NOT INCLUDED) PARTS IN CARTON: ALLEN WRENCH SCREWS (20 EACH) ROUND HEAD SCREWS (8 EACH)
Installation guide. ROCKFON VertiQ. ROCKFON System T, ROCKFON System HAT. Impact-resistant and high impact-resistant acoustic wall panel solutions
 Installation guide ROCKFON ROCKFON System T, ROCKFON System HAT Impact-resistant and high impact-resistant acoustic panel solutions ROCKFON System T, ROCKFON System HATT Contents System selection...3 Edges
Horizontal Cable Systems
 ALUMINUM RAILING INSTALLATION INSTRUCTIONS Horizontal Cable Systems 1) Check Contents Of Packages: Verify that all parts have arrived and that they match the packing list. 1A) Coastal applications: Confirm
Pet Door Panel Installation Manual
 Pet Door Panel Installation Manual 400-558-1 1 4/3/03, 3:26 PM Components: Pet Door Panel Panel Latch Assembly Foam Weather-stripping Glass Sweep (4) Binding Posts (6) #6 x 1/2 Sheet Metal Screws (4) 8-32
Outdoor Enclosure. VIVOTEK Pan/Tilt & Fixed Dome Series. Installation Guide
 VIVOTEK Pan/Tilt & Fixed Dome Series Outdoor Enclosure Using AE-131/-132 Outdoor Enclosure, AE-151 Outdoor Enclosure, AM-114 Pendant Head (outdoor), AM-116 and AM-117 Pendant Pipes, AM-221 Gooseneck, AM-212
NETpodium Rack ( & ) INSTRUCTION SHEET Jan 2017 Rev B
 INSTRUCTION SHEET Jan 2017 Rev B") (1-1671405-1 & 1-1671405-2) 411-117000 Jan 2017 Rev B 1-1671405-2 1-1671405-1 1. Kit Content Bottom Frame Assembly Top Frame Assembly Carboard Stencil Vertical Profile Assembly Wire Basket Bracket Wire
(1-1671405-1 & 1-1671405-2) 411-117000 Jan 2017 Rev B 1-1671405-2 1-1671405-1 1. Kit Content Bottom Frame Assembly Top Frame Assembly Carboard Stencil Vertical Profile Assembly Wire Basket Bracket Wire
11 MACHINING SERVICES
 11 MACHINING SERVICES Machining your TSLOTS is an alternate way of assembling your project. Rather than using brackets and joining plates you can have your TSLOTS machined and ready in kit form for quick
DOREL ASIA DESK, HUTCH & CHAIR. Lot number: Date of purchase: / /
 DOREL ASIA DESK, HUTCH & CHAIR Model No. : WMP-DC (White) WMP-DC (White) WMEP-DC (Espresso) WMEP-DC (Espresso) UPC CODE: 0-6585-50-8 (White) 0-6585-50-5 (White) 0-6585-565- (Espresso) 0-6585-565-9 (Espresso)
Perfect Fit blinds. Preparation. Measuring Instructions. Step 1 - Measure glass size. Step 2 - Measure window depth
 Preparation Before you begin, ensure there is a 6mm clearance all around the outside of your window beading to allow enough room for the Perfect Fit framework. Also check that the seals of your window
Installation Manual for Metal Emperor Lockers
 P a g e 1 Table of Contents Page General Notes and Tools Required 2-3 Assemble Shelves with Coat Hooks/Coat Rods 4 Fastening Chart 5 Knock Down Locker Assembly (Banks of Three) 6-12 Appendix A: Dress End
WALL UNIT. Assembly Guide Lift. 288 x x x x 800
 Assembly uide 288 x 600 288 x 800 360 x 600 360 x 800 or Internal Use: I.WR.INS.032_WKIN00121_WALL_600_800_Lift_Rev2.indd Assembly uide EORE YOU START INSTALLATION SHOULD E PERORMED Y A OMPETENT PERSON
For installation assistance, contact SARGENT at DOORS SHOWN HERE SWING IN FOR ILLUSTRATION PURPOSES ONLY.
 SARGENT Installation Instructions for LP8600 x LR8600 & 12-LP8600 x 12-LR8600 Series Low Profile Panic and Fire Exit Devices on Double Egress & Double Doors or LS8600 & 12-LS8600 Low Profile Exit Device
X 12 SOLARIUM ASSEMBLY INSTRUCTIONS Two or more adults required for assembly
 adlonco@hotmail.com 1212-12 12 X 12 SOLARIUM ASSEMBLY INSTRUCTIONS Two or more adults required for assembly Base Dimensions 12 ½ x12 ½, Largest Dimensions 13 6 x13 6 (see pg.1) Overall Height 110 ZZZ-182.1212-12.1030-15.GP.EN.HER
Tufftec Solid Plastic Lockers
 Tufftec Solid Plastic Lockers Installation Instructions Please read all of the installation instructions prior to installing this product. If you have any questions contact Scranton Products as soon as
Mounting a BalanceBox 400 to a brick wall
 Unpack the BalanceBox 400 and remove the Wall frame cover and its bag of screws. Slide the cover out at the top. NOTE: the cover is NOT included with the BalanceBox 400H LOCK SCREW HOLE MOBILE STAND MOUNTING
W6 series greenhouse
 W series greenhouse ssembly instructions Model W0 Model W07 Model W0 Model W Model W Walk-in Greenhouse Statement Dear Customer! May we congratulate you on your new Greenhouse. We feel sure that by following
Version 1.0 WIGGLES LOWBOY 3 DRAWER.
 Version 1.0 WIGGLES LOWBOY 3 DRAWER Enjoy Your purchase from Australia s Best Value Furniture Store PAGE 2 Assembly checklist Read through the instructions carefully care before you y begin. g Make sure
Wenger Corporation 2014 Printed in USA 08/14 Part #145V Wenger Corporation, 555 Park Drive, P.O. Box 448, Owatonna, Minnesota
 Assembly Instructions Wardrobe Cabinet CONTENTS Important User Information...........................2 General......................................2 Manufacturer.................................2 Intended
Assembly instructions. 6x4. Model GH1354A. 6x6. Model GH1357A. 6x8. Model GH1360A. 6x10. Walk-in Greenhouse. Model GH1363A
 ssembly instructions x Model GH x Model GH7 x8 Model GH0 x0 Model GH Walk-in Greenhouse Statement ear Customer! May we congratulate you on your new Greenhouse. We feel sure that by following the detailed
Table and Furniture Base Fittings Plinth Adjusting Fittings
 Adjusting screw with M8 or M thread Rigid, for glide inserts, steel thread Finish/Colour: Black, thread galvanized Version: With acceptance Ø30 mm Thread M8 650.22.381 M 650.22.382 Packing: 1 or 0 pcs.
CIRRUS AIRPLANE MAINTENANCE MANUAL MODELS SR22 AND SR22T CHAPTER 56-30: DOOR GENERAL. Door 56-30: DOOR. 1. General
 CIRRUS AIRPLANE MAINTENANCE MANUAL Door CHAPTER 56-30: DOOR GENERAL 56-30: DOOR 1. General The cabin door windows are manufactured of acrylic and adhesive bonded to the door structure. Replacement is accomplished
Installation Instructions - Model V4JSD 1
 Installation Instructions - Model V4JSD 1 Support Assemblies: Parts list: (Note see enclosed cut sheet for quantities and dimensional information) A vertical structural member (1 ½ x 1 ½ modular frame)
PORTA-DOCK, INC. AP17 APD DS 4 X 16 T12 AW17 CPD DS 4 X 16 T12
 Page 1 of 7 PORTA-DOCK, INC. AP17 APD DS 4 X 16 T12 AW17 CPD DS 4 X 16 T12 *For Beige Decking Add the Letter B to Model* Thank you for purchasing out product! *Please read these instructions and follow