|
|
|
- Jayson Cox
- 5 years ago
- Views:
Transcription


1 SUPREME WALL GARDEN ASSEMBLY INSTRUCTIONS 24/08/16 Please refer to website for the most up to date instructions.
2 SAFETY WARNING 1. Always wear protective glasses, shoes, gloves and headgear when handling glass sharp edges can cause injury. 2. Broken glass is a safety hazard. Clean up immediately dispose of with care. 3. Any difficulty in fitting glass, contact our Customer Service Department for advice do not use force. Telephone Option PREPARATION, SITE SELECTION AND MAINTENANCE Site Selection Important: Choose a sunny spot for your greenhouse, with as much protection from the wind as possible. In strong winds close all vents and doors. Observe all building regulations. TOOLS REQUIRED - Screwdrivers (normal and crosshead), 10mm AF spanner or wrench, power drill and bits. Suitable fasteners with a Philips head (not a dome or flat head) will also be required depending on your wall construction, tape measure, spirit level and small step ladder. ASSEMBLY - Important: Before starting assembly, check the parts against the parts list one section at a time to aviod mixing up bundles. Remove packs from the box in order to identify parts. If anything is missing, please contact our Customer Service Department on Option 1, within 2 weeks of receipt. MAINTENANCE - To keep your greenhouse clean, wash thoroughly with mild detergent solution. The glass may be cleaned with any cleaning solution which does not adversely affect the aluminium frame, acrylic panels, glazing gaskets and glazing clips. Ensure that the upper and lower door tracks are regularly cleaned to prevent an accumulation of debris. NOTE Retain these instructions for future use. We recommend that you include your greenhouse in your home insurance. Please recycle packaging. 1
3 PARTS LIST SECTION TOTAL M6 x 10mm SQUARE HEAD ALUMINIUM BOLT M6 ALUMINIUM HEX NUT BASE "J" CLIP FRONT BASE RAIL (1920mm) SIDE BASE RAIL (660mm) BASE CORNER BRACKET (100mm) GROUND ANCHOR/BASE CORNER BRACKET (345mm) No. 6 x 8mm PAN HEAD SELF-TAPPING SCREW DOOR TRACK SILL BAR (1862mm) GABLE END BAR LEFT HAND (2433mm) GABLE END BAR RIGHT HAND (2433mm) DOOR TRACK SUPPORT, HORIZONTAL (631mm) DOOR TRACK (1260mm) DOOR END VERTICAL BAR LEFT HAND (1725mm) DOOR END VERTICAL BAR RIGHT HAND (1725mm) CORNER BRACKET (25mm) m6 x 12mm CROPPED HEAD ALUMINIUM BOLT CURVED WALL GLAZING BAR (2416mm) RIDGE BAR (632mm) SIDE SILL BAR (633mm) OUTER SHELF BAR / SIDE BRACE (631mm) UPPER SHELF FRONT SUPPORT LEFT HAND (615mm) UPPER SHELF FRONT SUPPORT RIGHT HAND (615mm) ROOF BRACE (631mm) SELF ADHESIVE FOAM STRIP (6000mm) WALL FIXING BRACKET WIRE SHELF GRID 608 x SHELF BRACKET PLASTIC SEED TRAY WIRE SHELF GRID 608 x SMALL SHELF BRACKET INTERMEDIATE SHELF BAR (631mm) SHELF SIDE SUPPORT LEFT HAND (631mm) SHELF SIDE SUPPORT RIGHT HAND (631mm) SMALL SIDE SUPPORT (195mm) HORIZONTAL SHELF SUPPORT (989mm) WALL SHELF SUPPORT (440mm) LOWER SHELF FRONT SUPPORT LEFT HAND (615mm) LOWER SHELF FRONT SUPPORT RIGHT HAND (615mm) ALUMINIUM SHELF (1215mm) ALUMINIUM SHELF BRACKET DOOR WEATHER SEAL (1684mm) M6 STEEL HEX NUT M4 STEEL HEX NUT DOOR WHEEL No. 6 x 16mm PAN HEAD SELF TAPPING SCREW M4 STEEL WASHER M4 x 16mm PAN HEAD MACHINE SCREW M6 x 40mm MUSHROOM HEAD MACHINE SCREW DOOR BOTTOM BAR SLIDER DOOR WHEEL HOUSING (618mm) TOP DOOR BAR (626mm) INTERMEDIATE DOOR BAR (626mm) BOTTOM DOOR BAR (626mm) VERTICAL DOOR BAR (1684mm) DOOR TRACK SUPPORT, VERTICAL (487mm) DOOR TRACK SUPPORT SPACER TUBE ROOF VENT STAY CAP (USUALLY SUPPLIED FITTED) ROOF VENT STAY PEG ROOF VENT STAY M6 x 6 PAN HEAD MACHINE SCREW M6 STEEL SQUARE FLAT NUT ROOF VENT SIDE BAR (522mm) ROOF VENT SILL (642mm) ROOF VENT HINGE (602mm) ROOF VENT BOTTOM BAR (602mm) BENDABLE GLAZING CLIP GLAZING STRIP (22500mm) GLAZING SPRING CLIP GLASS RETAINING CLIP PLASTIC Z-SECTION (610mm) GLAZING CAPPING (2500mm) 2 2


4 2. BASE Ensure base is firm, square and level. A prefabricated galvanised steel base is supplied. It should either be fixed using the ground anchors fastened in concrete pockets or drilled and fastened to concrete paving. For the latter, the ground anchors will need to be cut down with a hack saw level with the base for the second option as in picture 2a. If the wall is not perpendicular, suitably shaped battens must also be fitted to ensure a good fit. Timber battens should be tanalised. Take care not to affect the damp proofing of the building to which the greenhouse is attached. 2a 2b 3


")


5 3. Door Gable End Lay out 01717, 12401, 12701, 12702, and on the ground and bolt loosely together as shown using bolts and nuts (3a, 3c, 3d, 3e). Secure parts corner brackets (x2) to 12401, and using screws 00402; 3c. From the outside, loosely fit 2 bolts and nuts to and slide into place; 3b. Fit bolt and nut to hole in 08604; 3a a 3c b e (INSIDE) 3d (INSIDE) 4 3c (INSIDE)
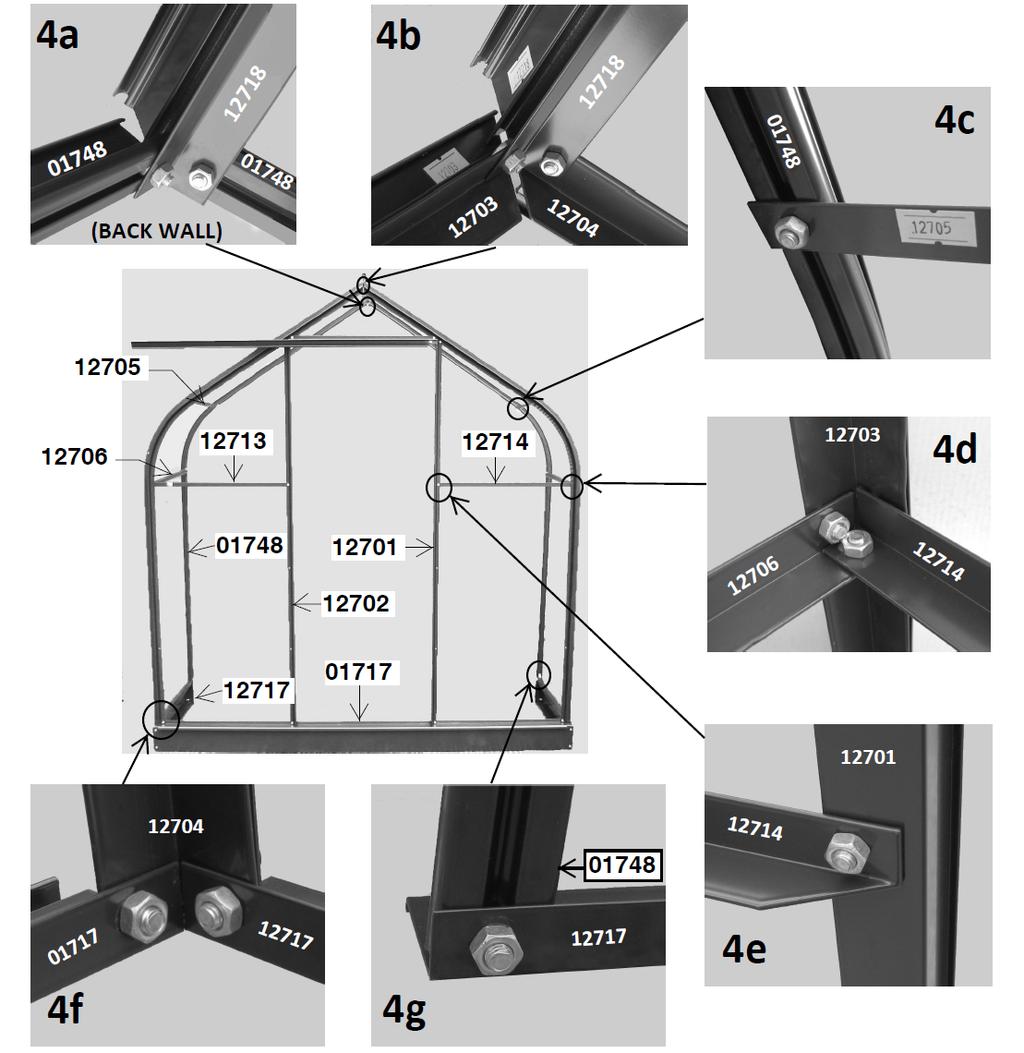
 4c, 12706 (x2) 4d, 12717 (x2) 4g to 01748 (x2).")
6 4. Assembly (N.B. SMALL PHOTOS OPPOSITE ARE FROM INSIDE) Slide 2 bolts into each end of each a. Using bolts and nuts secure parts (x2) 4c, (x2) 4d, (x2) 4g to (x2). Then to and b, and secure to 12706, then and to e/4d (note holes are offset) and Ensure that the frame is square and tighten all fixings
7 6
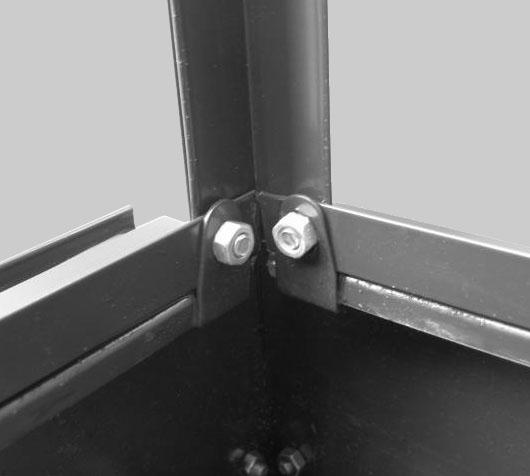
8 5. Installation Fit self-adhesive draught excluder to each 01748; 5a. Lift the building onto the base. Using cropped headed bolts and nuts 00697, secure (x8) in suitable locations to fix to wall, avoiding holes in frame on front gables where the shelves will be fitted later; 5b. Ensuring that the building is square, the diagonal measurements (5c) are equal and using a spirit level on 12718, the roof ridge bar is level, mark through the holes in onto the wall. Fasten the greenhouse to the wall using fixings suitable for your wall (not supplied) with a Philips head as opposed to a dome or flat head screw. Fix the greenhouse to the base using 6 x 50391, the J shaped clips supplied, by hooking them under the lip on the top inside of the base, undoing the nut at the bottom of the vertical uprights (12701, 12702, and 12704) hooking the J clip onto the bolt, then do the nut back up as shown in 5d. Check again the squareness of the building (5c) before tightening wall fixings and re-tighten fasteners if necessary. 7


9 a 5b c d 8
 into each end of 01727 and assemble door as shown in 6a, 6b, 6c (note photos are from the inside).")
10 6. Door Lay parts out on the ground. It is essential to get the door profiles the correct way round. Push (x2) into each end of and assemble door as shown in 6a, 6b, 6c (note photos are from the inside). It is easier to use an electric drill on the lowest torque setting to drill in the screws. Making sure the wheels are the correct way round before attaching them as in picture 6d with the nodule facing the metal, fit wheels (x2) to (6d). Attach to (6e). Place the door weather seal into a bucket of warm soapy water. Apply diluted washing up liquid down the bars before inserting the seal. Insert weather seal into each and, ensuring that it is not stretched, cut to length (6f). The easiest way to get the weather seal in is by pushing one side in from top to bottom then use a large spoon or small, smooth round spanner to push the other side in. Slide door onto track ensuring that fits around as shown in 6g. Fit to using screw 01747, spacer tube and nut (6h) and to using bolt and nut (6i). Note that will not be dead straight! Adjust using the bolts and nuts in so that the door runs smoothly but doesn't pop out at the top. 9


11 a 6e 6d b f c BASE 6g 4 (VIEW FROM BEHIND) h 6i
. Slide vent onto 12718 (7g) and fit stay pegs 08616 and stay 08617 using screws 00402 (7h).")
12 7. Vent Fit to and using self-tapping screw 402 in the predrilled hole (7a) and cropped headed bolt in for the slot (7b). Assemble vent around glazing using screws and nuts (7c, 7d, 7e, 7f). Slide vent onto (7g) and fit stay pegs and stay using screws (7h). End cap should already be fitted to as shown 7i. 11


13 a 7b FROM INSIDE c e 7d SLIDE ON FROM END 7g h f i
.")
14 8. Shelves All fixings to the wall should be made using fixings as in 5 above (not supplied). Start at the bottom. Use cropped head bolts and nuts to secure parts to All other fixings use square head bolts and nuts. ROW 1: Fit brackets to parts 12701, 12702, and (8a). Fit 2 more brackets to the wall at the same height to support 2 grids Tighten all fixings. ROW 2: Assemble parts x 2 (make sure these are level using a spirit level before attaching), x 2, X 2 and x 2 (8b). Also see 4d. Secure to wall. Do not tighten fully. Repeat on other side and fit 2 grids Fit smaller grid between parts using brackets ROW 3: Lay all the parts on the ground to start with, in roughly the position they will be in once fitted. Assemble parts 12707, and to and (8c). Repeat for the other side using in place of Fit parts between the two supports (8c). This assembly holds seed trays (8d). Finally, attach the shelf to the wall using brackets (8e). You may need to bend the bracket to be able to screw it to the wall. Then bend back. 13


15 BOLT HEAD NUT x b 8a c d 8e


16 9. Glazing Please refer again to SAFETY WARNING on PAGE 1. Fit glazing strip (9a) on all the vertical profiles. Glass is secured with spring clips (9b). Retaining strip is used to join the acrylic to the glass. LONG PANE TOUGHENED GLAZING Start glazing from the bottom, centralising each sheet of glass between the glazing bars and securing using 4 of "W" spring wire clips, 00453, per side. Before fitting the acrylic, start on the roof. Ensure that the glass fits under the ridge and vent sill. Secure with "W" clips. Then fit the Black Plastic "Z" Section (widest part for the glass) to the bottom of the roof pane, making sure it is pushed as far onto the glass as it will go. Peel the film off BOTH sides of the acrylic panels. Then slot the acrylic panel underneath the glass into the Black Plastic 00711, again pushing it in as far as it will go. Then fit the other "Z" Section onto the bottom pane of glass making sure the acrylic will overlap the glass once fitted. Then slot the acrylic panel into that "Z" Section. Next fit 3 "W" Spring Clips to either side of the acrylic panel. Finally, fit capping to the front of and (9c). If you wish to fit flashing (not supplied) over the joint between the greenhouse and the wall, this may be done now. To help prevent panes blowing out in strong winds, clear silicone sealant (not supplied) may be applied around the glazing clips and corners of each pane a 9b 15


17 GLAZING PLAN FOR LONG PANE TOUGHENED GLASS "Z" clips and Bendable Clips are NOT required for the long pane, only Horticultural Glass on the following page. The roof glass should be fully inserted into the ridge bar before securing the Acrylic Panel with the Spring Clips CLEAR "H" SECTION BLACK PLASTIC "Z" SECTION c 16
18 SPLIT PANE HORTICULTURAL GLAZING PLAN If using split pane horticultural class, bendable glazing clips are used in the roof opposite the vent (9d). Start glazing from the bottom, centralsing the glass panes before fixing in with 2 "W" Spring Wire Clips, 00453, on each side. Overlap upper sheets outside the lower using retaining overlap clips Stop when you get to the acrylic and start on the roof glazing, pushing the top pane right up into the ridge bar and roof vent sill bar and secure with on the sides. Peel the film of BOTH sides of the acrylic panels. Then fit the acrylic panels with the Black Plastic Strips but don't secure with the "W" clips yet. (The wider side of the is for the glass.) Make sure that all top panes/panels overlap the bottom one for rainwater run-off. To prevent damage to panes during strong wind, clear silicone sealant (not supplied) may be used around glazing clips and corners of each pane d e 17
19

20 This product is delivered by a company in the Juliana Group -
46, 66, Page /01/17
 46, 66, 86 46 Only Instructions Page 29-31 www.hallsgreenhouses.com Please refer to website for the most up to date instructions. 05/01/17 333 1106 No. 6 x 16mm Long 711 F B D E C A G I,H J K L M
Gardman Lean-to Greenhouse Assembly Instructions
 Page 1 Gardman Lean-to Greenhouse Assembly Instructions Our Help Line provides support and advice to customers of Summer Garden Buildings after ordering. For advice before you buy you can phone us free
Greenhouse Assembly Instructions
 Greenhouse Assembly Instructions Our Help Line provides support and advice to customers of Summer Garden Buildings after ordering. For advice before you buy you can phone us free 7 days a week on 0800
GROWING BETTER THROUGH DESIGN. 6ft Lean-To LEAN-TO. Assembly Instructions 04/02
 GROWING BETTER THROUGH DESIGN 6ft Lean-To LEAN-TO Assembly Instructions 04/02 6ft Lean-To Greenhouse Base Plan Introduction/Tools/Contents / / Contents This is a copy of our Lean-To greenhouse base plan.
LAWN AND GARDEN GREENHOUSE
 MODEL# OGAL-66 OGrow Walk-in 6' x ' LAWN AND GARDEN GREENHOUSE With Heavy Duty Aluminium Frame Let'sGrow Together! Thank you for purchasing the OGROW greenhouse Follow the assembly and safety instructions
LAWN AND GARDEN GREENHOUSE
 MODELS# OG0AL8-BKE OGAL-8 OGrow Walk-in ' x 8' LAWN AND GARDEN GREENHOUSE With Heavy Duty Aluminium Frame MANUAL VERSION # Grow r! e h t e g To Let's Thank you for purchasing the OGROW greenhouse Follow
Zero Threshold TM. Hints and Tips Handbook. Birdlip. Burford. Blockley. Bourton
 Birdlip Burford Zero Threshold TM Hints and Tips Handbook Blockley www.edengreenhouses.com Bourton Customer Helpline: +44 (0)1242 676625 Mon Fri 9:00am 5:00pm mail@eden greenhouses.com EH 1.02 Dear Customer,
E N G L I S H GARDEN SHED. Assembly Instructions. Suitable for Models WITH VARYING DEPTHS
 GARDEN SHED Assembly Instructions Suitable for Models 6' Wide 8' Wide 0' Wide WITH VARYING DEPTHS GI0003 November 0 INSTALLATION ADVICE It's Not That Difficult! The construction of your shed isn't as complicated
IMPORTANT!!! ASSEMBLY ASSEMBLY INSTRUCTIONS. (Internal Dimensions)
") ASSEMBLY ASSEMBLY INSTRUCTIONS (Internal Dimensions) Ent Spec Edition Ltr v-0- Overall dimensions including base: 7. L x 9 W x 0 H cms 97.5" L x 7" W x 8.7" H IMPORTANT!!! Please read these instructions
ASSEMBLY ASSEMBLY INSTRUCTIONS (Internal Dimensions) Ent Spec Edition Ltr v-0- Overall dimensions including base: 7. L x 9 W x 0 H cms 97.5" L x 7" W x 8.7" H IMPORTANT!!! Please read these instructions
12 Wide Evolution Cedar Partition Assembly Instructions
 06/13 12 Wide Evolution Cedar Partition Assembly Instructions Contents: Introduction Base Preparation Side Assembly Glazing Door Installation Frame Finishing Section - 1 2 3 4 5 Page 3 4 5-6 7 8-9 10-14
Garden Room 2.4m BCGRSM2360 Assembly Instructions
 Garden Room 2.4m CGRSM2360 Assembly Instructions IMPORTANT: Please read these instructions thoroughly before starting the assembly. Please check that you have all of the parts listed on pages 3-6 before
Extension Standard building 03/15
 Extension Standard building 03/15 8 Wide Evolution Extension Assembly Instructions Contents: Introduction Base Preparation Overview Base Assembly Side Assembly Front Assembly Extension Installation Rear
Cold Frame Instructions
 1 05/13 Cold Frame Instructions Thank you for purchasing your new Alton cold frame. We recommend you familiarise yourself with the instructions and read all safety information before you commence assembly.
GREENHOUSE 6'x8' ASSEMBLY INSTRUCTIONS. (Internal Dimensions) Overall Dimensions (Approx.) L 193 W 200 H cms 97.5" L 76" W 78.
 Overall Dimensions (Approx.) L 193 W 200 H cms 97.5 L 76 W 78.") ASSEMBLY INSTRUCTIONS GREENHOUSE 'x8' (Internal Dimensions) Overall Dimensions (Approx.) 7. L 9 W 00 H cms 97." L 7" W 78.8" H 0 IMPORTANT You must read these instructions carefully before you start to
ASSEMBLY INSTRUCTIONS GREENHOUSE 'x8' (Internal Dimensions) Overall Dimensions (Approx.) 7. L 9 W 00 H cms 97." L 7" W 78.8" H 0 IMPORTANT You must read these instructions carefully before you start to
Version 2016_1.1 VICTORIAN ASSEMBLY INSTRUCTIONS. Victorian Vi-23, 34, 36
 Version 2016_1.1 VICTORIAN ASSEMBLY INSTRUCTIONS Victorian Vi-23, 34, 36 PRODUCT INFORMATION Dear customer, Thank you for buying a high-quality aluminium greenhouse. REMARKS The drawings in these instructions
8 Wide Evolution Cedar Partition Assembly Instructions
 09/13 8 Wide Evolution Cedar Partition Assembly Instructions Contents: Introduction Overview Base Preparation Partition Frame Assembly Glazing Door Installation Parts List Section - 1 2 3 4 5 Page 3 4
S H E D A S S E M B L Y I N S T R U C T I O N S
 T I T A N R A N G E S H E D A S S E M B L Y I N S T R U C T I O N S 8 X 10 ft Approx = 2550 x 3140 cm COMPONENT LIST Component illustrations are given as a visual guide only and are not in proportion PART
Assembly instructions. 6x4. Model GH1354A. 6x6. Model GH1357A. 6x8. Model GH1360A. 6x10. Walk-in Greenhouse. Model GH1363A
 ssembly instructions x Model GH x Model GH7 x8 Model GH0 x0 Model GH Walk-in Greenhouse Statement ear Customer! May we congratulate you on your new Greenhouse. We feel sure that by following the detailed
S H E D A S S E M B L Y I N S T R U C T I O N S
 T I T A N R A N G E S H E D A S S E M B L Y I N S T R U C T I O N S 6 X 4ft = 190 x 150 cm 6 X 6ft = 190 x 190 cm 6 X 8ft = 190 x 255 cm COMPONENT LIST Component illustrations are given as a visual guide
SteelChief Installation Instructions for pre-assembled panel form sheds GABLE ROOF
 SteelChief Installation Instructions for pre-assembled panel form sheds GABLE ROOF Please read fully before commencing work...any queries will be promptly answered, contact theboss@steelchief.com.aui MPORTANT
CONSTRUCTION GUIDE 27ft Wide and 30ft Wide SHEEP HOUSE
 The Outside, Inside CONSTRUCTION GUIDE 27ft Wide and 30ft Wide SHEEP HOUSE Thank you for purchasing a Premier Sheep House. Please take the time to carefully read through this Construction Guide before
Walk-in Greenhouse. Assembly instructions. 8x6. 8x8. 8x10. 8x12. Model GH1399A Model GH1400A. Model GH1402A Model GH1403A. Model GH1405A Model GH1406A
 Assembly instructions 8x6 Model GH1399A Model GH1400A 8x8 Model GH1402A Model GH1403A 8x10 Model GH1405A Model GH1406A 8x12 Model GH1408A Model GH1409A Walk-in Greenhouse Statement Dear Customer! May we
GROWING BETTER THROUGH DESIGN LEAN-TO. Lean-To. Assembly Instructions 04/02
 GROWING BETTER THROUGH DESIGN Lean-To LEAN-TO Assembly Instructions 04/02 2 Lean-To Greenhouse Base Plan Introduction / Tools / Contents This is a copy of our Lean-To greenhouse base plan. Dimensions shown
6 Wide AMATEUR CEDAR GREENHOUSE
 6 Wide AMATEUR CEDAR GREENHOUSE ASSEMBLY INSTRUCTIONS PLEASE READ ALL INSTRUCTIONS BEFORE PROCEEDING 04/11 6 WIDE AMATEUR CEDAR GREENHOUSE Assembly Instructions Contents Page YOUR NEW GREENHOUSE Introduction
ASSEMBLY INSTRUCTIONS FOR SL500A AND SL500AL
 ASSEMBLY INSTRUCTIONS FOR SL500A AND SL500AL January 2013 The SL500A is a square upright glass cabinet with a single hinged lockable door. It has five adjustable shelves plus the base. It also has an optional
W6 series greenhouse
 W series greenhouse ssembly instructions Model W0 Model W07 Model W0 Model W Model W Walk-in Greenhouse Statement Dear Customer! May we congratulate you on your new Greenhouse. We feel sure that by following
CONSTRUCTION GUIDE 21ft Wide and 24ft Wide SHEEP HOUSE
 The Outside, Inside CONSTRUCTION GUIDE 21ft Wide and 24ft Wide SHEEP HOUSE Thank you for purchasing a Premier Sheep House. Please take the time to carefully read through this Construction Guide before
Greenhouse 05 Assembly Instructions 6 x8, 6 x6 and 6 x4
 Greenhouse 05 Assembly Instructions 6 x8, 6 x6 and 6 x4 x1.93m) 6 Introduction Safety Precautions are required when assembling a greenhouse. The wearing of protective gloves and stout footwear is essential
8 Wide AMATEUR CEDAR GREENHOUSE
 8 Wide AMATEUR CEDAR GREENHOUSE ASSEMBLY INSTRUCTIONS Our Help Line provides support and advice to customers of Summer Greenhouses after ordering. For advice before you buy phone us free 7 days a week
6 5 Wide TRADITIONAL CEDAR GREENHOUSE
 6 5 Wide TRADITIONAL CEDAR GREENHOUSE ASSEMBLY INSTRUCTIONS PLEASE READ ALL INSTRUCTIONS BEFORE PROCEEDING 08/04 6 5 WIDE TRADITIONAL CEDAR GREENHOUSE Assembly Instructions Contents Page Introduction 3
English/French 06/04
 E000 PLEASE READ ASSEMBLY INSTRUCTIONS COMPLETELY BEFORE ASSEMBLING YOUR BUILDING CAUTION: Some parts have sharp edges. Care must be taken when handling the various pieces to avoid a mishap. For safety
10 Wide AMATEUR CEDAR GREENHOUSE
 10 Wide AMATEUR CEDAR GREENHOUSE ASSEMBLY INSTRUCTIONS Our Help Line provides support and advice to customers of Summer Greenhouses after ordering. For advice before you buy phone us free 7 days a week
8 Wide AMATEUR CEDAR GREENHOUSE
 8 Wide AMATEUR CEDAR GREENHOUSE ASSEMBLY INSTRUCTIONS PLEASE READ ALL INSTRUCTIONS BEFORE PROCEEDING 04/11 8 WIDE AMATEUR CEDAR GREENHOUSE Assembly Instructions Contents Page YOUR NEW GREENHOUSE Introduction
GREENHOUSE EXTENSION 6 X4
 ASSEMBLY INSTRUCTIONS GREENHOUSE EXTENSION 6 X Overall Dimensions (Approx.) 0 L x 93 W x 00 H cms 9" L x 76" W x 8.7" H 0 IMPORTANT You must read these instructions carefully before you start to assemble
INSTALLATION INSTRUCTIONS DANUBE ACRYLIC NEO ANGLE
 INSTALLATION INSTRUCTIONS DANUBE ACRYLIC NEO ANGLE March 2013 DOOR 2 Page 1 of 5 INSTALLATION INSTRUCTIONS NEO ANGLE 6MM FRAMELESS AND 4MM FRAMED SHOWER DOOR DANUBE, DELTA, SIGNATURE, OCEANIA, CASCADE
10 Wide AMATEUR CEDAR GREENHOUSE
 10 Wide AMATEUR CEDAR GREENHOUSE ASSEMBLY INSTRUCTIONS PLEASE READ ALL INSTRUCTIONS BEFORE PROCEEDING 04/11 10 WIDE AMATEUR CEDAR GREENHOUSE Assembly Instructions Contents Page YOUR NEW GREENHOUSE Introduction
*** All chrome surfaces should be cleaned using a clean damp cloth. *** No abrasive cleaning agents or materials should be used.
 Cleaning *** All chrome surfaces should be cleaned using a clean damp cloth. *** No abrasive cleaning agents or materials should be used. *** No chemical cleaners can be used on the glass use only mild
INFINITE RANGE - CENTRE FOLDING DOOR
 INFINITE RANGE - CENTRE FOLDING DOOR CENTRE FOLDING DOOR ONLY ( RECESS) Please read these instructions before installing, as incorrect fitting will invalidate the guarantee-carry out each stage before
ASSEMBLY INSTRUCTIONS
 GARDEN SHED 6X5ft B/C 9400988362649 GARDEN SHED 6X7ft B/C 9400988362656 GARDEN SHED 6X9ft B/C 9400988362663 GARDEN SHED 6X1 B/C 9400988362670 111 ft ASSEMBLY INSTRUCTIONS Product specifications may change
Orion. English Garden VITAVIA 6' x 6'(3800) and 6' x 8' (5000) These revised instructions replace the original instructions provided in the kit.
 and 6' x 8' (5000) These revised instructions replace the original instructions provided in the kit.") 6' x 8' Orion English Garden VITAVIA 6' x 6'(3800) and 6' x 8' (000) These revised instructions replace the original instructions provided in the kit. 7979 State Route 36 Mount Vernon, WA 9873-369 Ph.
6' x 8' Orion English Garden VITAVIA 6' x 6'(3800) and 6' x 8' (000) These revised instructions replace the original instructions provided in the kit. 7979 State Route 36 Mount Vernon, WA 9873-369 Ph.
6 Wide Evolution Cedar Greenhouse Assembly Instructions
 1 02/14 6 Wide Evolution Cedar Greenhouse Assembly Instructions Contents: Introduction Base Preparation Overview Base Assembly Side Assembly Rear Assembly Front Assembly Roof Assembly Louvre Assembly Glazing
A (mm) B (mm) A (mm) B (mm) 12 x x x ft extension. 8ft extension ft extension ft extension 3720
 B (mm) A (mm) B (mm) 12 x x x ft extension. 8ft extension ft extension ft extension 3720") NOMINAL SIZE A (mm) B (mm) NOMINAL SIZE A (mm) B (mm) 12 x 8 2632 6ft extension 1860 12 x 10 3824 3252 12 x 12 3872 8ft extension 2480 10ft extension 3100-12ft extension 3720 Thank you for purchasing your
NOMINAL SIZE A (mm) B (mm) NOMINAL SIZE A (mm) B (mm) 12 x 8 2632 6ft extension 1860 12 x 10 3824 3252 12 x 12 3872 8ft extension 2480 10ft extension 3100-12ft extension 3720 Thank you for purchasing your
Model No. EP84-A, EP84AR-A, P84L
 E000 Model No. EP84-A, EP84AR-A, P84L PLEASE READ ASSEMBLY INSTRUCTIONS COMPLETELY BEFORE ASSEMBLING YOUR BUILDING CAUTION: Some parts have sharp edges. Care must be taken when handling the various pieces
Allora ALCOVE ENCLOSURE INSTALLATION BEFORE INSTALLATION CHECK THAT YOUR ALLORA SHOWER ENCLOSURE SYSTEM IS UNDAMAGED
 Allora ALCOVE ENCLOSURE INSTALLATION BEFORE INSTALLATION CHECK THAT YOUR ALLORA SHOWER ENCLOSURE SYSTEM IS UNDAMAGED ALCOVE SHOWER Your shower can be installed to open Left hand or Right hand by rotating
Titan 79 EB Greenhouse Assembly Instructions
 Titan 9 EB Greenhouse Assembly Instructions Model Titan 9 EB Hunkin Garden Products Ltd sales@hunkin.co.nz www.hunkin.co.nz Ph 0800 8 Dear Customer! Thank you for purchasing one of our greenhouses. We
C R O S S C O U N T R Y S E R I E S C U R V E D L E A N T O M O D E L G R E E N H O U S E I N S T R U C T I O N S
 Contents Foreword....................................................................... 2 User Notes..................................................................... 2 List of Drawings.................................................................
Walk-in Greenhouse. Assembly instructions. 6x4. 6x6. 6x8. Model GH0490 Model GH0491 Model GH1040. Model GH0492 Model GH0493 Model GH1041
 ssembly instructions x4 Model GH0490 Model GH049 Model GH040 x Model GH049 Model GH049 Model GH04 x Model GH0494 Model GH049 Model GH04 Walk-in Greenhouse Statement Congratulations on purchasing your new
GROWING BETTER THROUGH DESIGN. Regent Royale Rosette Regal GREENHOUSE. Assembly Instructions 04/02
 GROWING BETTER THROUGH DESIGN Regent Royale Rosette Regal GREENHOUSE Assembly Instructions 04/02 Greenhouse Base Plan We cannot emphasis how important it is to have a proper base for your Robinsons Greenhouse
6 x 6 OCTAGONAL CEDAR GREENHOUSE
 6 x 6 OCTAGONAL CEDAR GREENHOUSE ASSEMBLY INSTRUCTIONS PLEASE READ ALL INSTRUCTIONS BEFORE PROCEEDING 07/2010 6 x 6 OCTAGONAL CEDAR GREENHOUSE Assembly Instructions Contents Page Introduction 3 Safety
INSTALLATION GUIDE SLIMLINE ROOF LANTERN 4 PANE CONFIGURATION
 INSTALLATION GUIDE SLIMLINE ROOF LANTERN 4 PANE CONFIGURATION SLIMLINE STEP-BY-STEP INSTALLATION GUIDE Thank you for choosing Roof Maker, we hope you are delighted with your new rooflight. Our roof lanterns
INFINITE RANGE - CENTRE FOLDING DOOR
 INFINITE RANGE - CENTRE FOLDING DOOR CENTRE FOLDING DOOR + 2 SIDE RETURN PANELS (PENINSULA) Please read these instructions before installing, as incorrect fitting will invalidate the guarantee-carry out
Assembly instructions
 Commission: Order no.: Rondo Pavilion PR Ø3.9 Technical changes reserved Assembly instructions As at: 05.011 Sliding door Dear Garden lover, we congratulate you on the purchase of a quality product from
Extension Standard building 10/14
 Standard building Extension 10/14 8 Wide Victorian Cedar Greenhouse Extension Assembly Instructions Contents: Introduction Base Preparation Overview Base Assembly Side Assembly Frame Assembly Door Installation
ASSEMBLY INSTRUCTIONS FOR STORETTE STA42
 ASSEMBLY INSTRUCTIONS FOR STORETTE STA42 A01 CAUTION: Some parts have sharp edges. Care must be taken when handling the various pieces to avoid a mishap. For safety sake, please read the safety information
Assembly Instructions 10 X 10 Aluminum Roof Support
 Assembly Instructions 10 X 10 Aluminum Roof Support Aluminum Roof Support Bolt Package 16-5/16 X 2 ¼ SS Bolt 24-5/16 X 1 SS Bolt 40-5/16 SS Nylon Lock Nuts 16-5/16 SS Flat Washers 28-4 ½ Wood Screws 36-1
ENGINEERING STRENGTH INSTAL L AT I O N M A NUAL OUR STRENGTH IS OUR STRENGTH
 ENGINEERING STRENGTH INSTAL L AT I O N M A NUAL OUR STRENGTH IS OUR STRENGTH RAFTER PREPERATION RAFTER PREPARATION A FRAME PREPERATION AND ASSEMBLY A FRAME PREPARATION AND ASSEMBLY... Open boxes, remove
Assembly Instructions 10 X 10 Aluminum Frame Building
 Assembly Instructions 10 X 10 Aluminum Frame Building 27 97 9 8 47 36 74 52 10 10 X 10 Square Building W/ Dome Includes: The Steel Entry Door with a Dead Bolt Lock assembly and Aluminum Door Frame. Metal
Installation Guide Simplicity Alfresco. V1.9 Lu070318
 0333 305 5272 www.canoports.co.uk Installation Guide Simplicity Alfresco V1.9 Lu070318 Tools Required Below is a list of tools that you will require to install your the Simplicity Alfresco System. Cordless
GIRTS ON BACK OF BUILDING
 GIRTS ON BACK OF BUILDING ALL GIRTS ARE 1 1/2 SQUARE TUBE. GIRT LENGTHS FOR 12, 20, 24, AND 30 WIDE BUILDINGS: ON 12 WIDE BUILDINGS GIRTS ARE 67 3/4 LONG ON 20 WIDE BUILDINGS GIRTS ARE 56 3/4 LONG ON 24
T R A D I T I O N A L S E R I E S C O T T A G E R O O F F R E E S T A N D I N G M O D E L G R E E N H O U S E I N S T R U C T I O N S
 Contents Foreword....................................................................... 2 User Notes..................................................................... 2 List of Drawings.................................................................
Summer Greenhouses 6x8 GREENHOUSE 185. Assembly instructions for the. 6x8 Aluminium Greenhouse 185 PLEASE READ ALL INSTRUCTIONS BEFORE PROCEEDING
 Summer Greenhouses 6x8 GREENHOUSE 185 Assembly instructions for the 6x8 Aluminium Greenhouse 185 PLEASE READ ALL INSTRUCTIONS BEFORE PROCEEDING Summer Greenhouses phone us free on 0800 9777 828 CONTENTS
CORNER ENTRY ENCLOSURE
 CORNER ENTRY ENCLOSURE SUPREME INSTALLATION INSTRUCTIONS IMPORTANT - Please read before installation Please read these instructions carefully before starting installation and keep in a safe place for future
C R O S S C O U N T R Y S E R I E S C U R V E D M O D E L G R E E N H O U S E I N S T R U C T I O N S
 Contents Foreword....................................................................... 2 User Notes..................................................................... 2 List of Drawings.................................................................
ALLORA SWING PANEL INSTALLATION INSTRUCTIONS
 ALLORA SWING PANEL INSTALLATION INSTRUCTIONS Before Installation Please check that your Allora Swing Panel is undamaged SEQUENCE OF INSTALLATION These instructions are also available from the Athena website:
Hinge Door + Side Panel
 Hinge Door + Side Panel Instruction Manual KL+ KR Important Information Toughened glass is completely safe for use in our shower enclosures and bath screens; providing our products are installed according
Connect Transit Shelter
 Tools Required *denotes special tools required Connect Shelter, 8ft Connect Shelter, 12ft *Soft, non abrasive protective surface such as a furniture blanket *Source of compressed air (for thorough dust
Walk-in Greenhouse. Assembly instructions A B. MODEL A (mm) B (mm) C (mm) / / 2. Hobby / / 16
 B (mm) C (mm) / / 2. Hobby / / 16") ssembly instructions C MODEL (mm) (mm) C (mm) Hobby Passion 689 8 9 7 / 8 3666 5 / 6 438 4 4 / 4 7 0 5 / 6 Walk-in Greenhouse Climapod ssembly Tips and Tricks Prior to the assembly of the greenhouse, you
ssembly instructions C MODEL (mm) (mm) C (mm) Hobby Passion 689 8 9 7 / 8 3666 5 / 6 438 4 4 / 4 7 0 5 / 6 Walk-in Greenhouse Climapod ssembly Tips and Tricks Prior to the assembly of the greenhouse, you
Stratco Sanctuary INSTALLATION BEFORE YOU START TOOLS REQUIRED GUIDE
 INSTALLATION GUIDE Stratco Sanctuary Verandahs, Patios and Carports BEFORE YOU START It is important to check with your Local Government Authority prior to the installation of your new Stratco Sanctuary
Potting Store Assembly Instructions
 Before assembly We recommend that time is taken to read the instructions before starting assembly, then follow the easy step by step guide. The instruction sheet is only a guide to the assembly. Certain
Before Assembling the Storage Wall
 Chapter 1 Assembling the Lista Storage Wall Lista provides two types of standard Storage Walls: B251 and B255. The design, construction, assembly, and quality are identical for both types, however, B251
12ft Ultra Polytunnel Assembly Instructions
 CONTENTS Section Page 1. FOUNDATION TUBES: Option A Hammered-In Foundation Tubes 3 2. FOUNDATION TUBES: Option B Ground Anchor Plates 4 3. FOUNDATION TUBES: Option C Concreted Foundation Tubes 5 4. STEEL
ASSEMBLY INSTRUCTIONS
 Quality Built In ASSEMBLY INSTRUCTIONS MK3 BASE SIZE 3380mm x 1715mm ASSEMBLY INSTRUCTIONS Tools Required: Drill Drill Bit 3.5mm Drill Bit 6mm (for clear roof panel only) Hex Drive 5/16 Riveter Hammer
Taurean Sectional Garage Door INSTALLATION INSTRUCTIONS
 BEFORE YOU BEGIN MAKE SURE THESE INSTRUCTIONS ARE READ AND UNDERSTOOD COMPLETELY. THESE INSTRUCTIONS ARE INTENDED FOR PROFESSIONAL GARAGE DOOR INSTALLERS. ALL REFERENCES ARE TAKEN FROM THE INSIDE LOOKING
Additional help from 'The Greenhouse People'.
 Additional help from 'The Greenhouse People'. Please read all information before you begin, some of the tips and techniques may save you a lot of time and frustration later on. These help sheets should
Assembly Instructions
 Selling Station Assembly Instructions View from above without top A B C D Rounded finished corners on A & D Square unfinished 3-sides on B & C Selling Station Components (2) 2' x 6' Side s Have a channel
JEEP JK ( 3 DOOR ) SLIMLINE II - FULL TRAY EXTREME RACK KIT
 SLIMLINE II - FULL TRAY EXTREME RACK KIT") JEEP JK ( 3 DOOR ) SLIMLINE II - FULL TRAY EXTREME RACK KIT FAJK004 / KRJW016T INSTALL TIME: 2 Hours NOTE: Your Jeep JK (3 Door) Extreme Roof Rack Kit consists of four boxes. (1) the Tray, (2) the Roll
JEEP JK ( 3 DOOR ) SLIMLINE II - FULL TRAY EXTREME RACK KIT FAJK004 / KRJW016T INSTALL TIME: 2 Hours NOTE: Your Jeep JK (3 Door) Extreme Roof Rack Kit consists of four boxes. (1) the Tray, (2) the Roll
8 x 10 GREENHOUSE. Visit our website at:
 8 x 10 GREENHOUSE With Two Vents 9390 Assembly Instructions Visit our website at: http://www.harborfreight.com Read this material before using this product. Failure to do so can result in serious injury.
INSTALLATION INSTRUCTIONS LS X 12-2 X 7 1/2 FRAME LOAFING SHED
 INSTALLATION INSTRUCTIONS LS-24 24 X 12-2 X 7 1/2 FRAME ACTUAL FRAME BASE SIZE: 24 X 12-2 LOAFING SHED Our unique assembly process quickly transforms the individual pieces into a finished structure that
Easy2Build TM. 6 x 8 Easy-Grow Greenhouse. Assembly Instructions. Smart Tech solutions
 EasyBuild TM Smart Tech solutions 6 x 8 Easy-Grow Greenhouse Assembly Instructions 0 S tr uct ure 7 PC SHELL Systems Trading Corporation 50 7th Avenue Suite 809, New York, NY 03 Customer Service: (877)
INSTALLATION INSTRUCTIONS LS X 12-2 X 7 1/2 FRAME LOAFING SHED
 INSTALLATION INSTRUCTIONS LS-30 30 X 12-2 X 7 1/2 FRAME ACTUAL FRAME BASE SIZE: 30 X 12-2 LOAFING SHED Our unique assembly process quickly transforms the individual pieces into a finished structure that
Absco Aviary Assembly Instructions Model: A23231G
 Absco Aviary Assembly Instructions Model: A23231G FRONT: 2.26m SIDE : 2.22m HEIGHT: 1.96m WHEN LAYING YOUR CONCRETE SLAB, CHAMFER THE 50mm EDGES DOWNWARDS BY 10mm. 50mm 10mm 50mm THIS WILL ENSURE THAT
INSTALLATION INSTRUCTIONS LS X 12-2 X 7 1/2 FRAME LOAFING SHED
 INSTALLATION INSTRUCTIONS LS-12 12 X 12-2 X 7 1/2 FRAME ACTUAL FRAME BASE SIZE: 12 X 12-2 LOAFING SHED Our unique assembly process quickly transforms the individual pieces into a finished structure that
A (mm) B (mm) A (mm) B (mm) 14 x x x ft extension. 8ft extension ft extension ft extension 3720
 B (mm) A (mm) B (mm) 14 x x x ft extension. 8ft extension ft extension ft extension 3720") NOMINAL SIZE A (mm) B (mm) NOMINAL SIZE A (mm) B (mm) 14 x 8 2610 6ft extension 1860 14 x 10 3230 4450 14 x 12 3850 8ft extension 2480 10ft extension 3100-12ft extension 3720 Thank you for purchasing your
NOMINAL SIZE A (mm) B (mm) NOMINAL SIZE A (mm) B (mm) 14 x 8 2610 6ft extension 1860 14 x 10 3230 4450 14 x 12 3850 8ft extension 2480 10ft extension 3100-12ft extension 3720 Thank you for purchasing your
INSTALLATION GUIDE. Outback. Flat Attached BEFORE YOU START ADDITIONAL MATERIALS TOOLS REQUIRED. VERAnDAHS PATIOS CARPORTS
 INSTALLATION GUIDE Outback VERAnDAHS PATIOS CARPORTS Flat Attached BEFORE YOU START It is important to check your Local Government Authority requirements before the installation of your new Stratco Outback
AWNING / PATIO COVER INSTALLATION INSTRUCTIONS
 AWNING / PATIO COVER INSTALLATION INSTRUCTIONS Before You Begin Read the installation instructions thoroughly before beginning the installation procedure. Perspective In the Awning Instructions, Back means
8 Wide Evolution Cedar Greenhouse Assembly Instructions
 02/14 8 Wide Evolution Cedar Greenhouse Assembly Instructions Contents: Introduction Base Preparation Overview Base Assembly Side Assembly Rear Assembly Front Assembly Roof Assembly Louvre Assembly Glazing
Dura-Lock Roof System
 DLR-14 Dura-Lock Roof System Assembly and Installation Instructions Read the instructions before starting the job. They explain the steps required to produce a finished product that will meet factory specifications.
INSTALLATION GUIDE. Flat Roof Homesheds TM. Onto Concrete BEFORE YOU START TOOLS REQUIRED
 INSTALLATION GUIDE Flat Roof Homesheds TM Onto Concrete BEFORE YOU START It is important to check your Local Government Authority requirements before the installation of your new Stratco Flat Roof Homeshed.
OUTBACK FLAT ATTACHED VERANDAH PATIO CARPORT - INSTALLATION GUIDE BEFORE YOU START TOOLS REQUIRED ADDITIONAL MATERIALS
 BEFORE YOU START It is important to check your Local Government Authority requirements before the installation of your new Stratco Outback Flat Verandah. It is the builder s responsibility to ensure any
INFINITE RANGE - HINGE DOOR
 INFINITE RANGE - HINGE DOOR HINGE DOOR + 1 SIDE RETURN PANEL (CORNER) Please read these instructions before installing, as incorrect fitting will invalidate the guarantee-carry out each stage before moving
ASS 70 FD folding / sliding door. Installation Guide
 ASS 70 FD folding / sliding door Installation Guide IMPORTANT! These doors should be fitted by competent and trained installers. Please read these instructions thoroughly before beginning the installation.
Installation Guide. Evolve bi-fold. 8. Door restrictor- optional p9. 1. Before you start p2. 9. Adjustment. 2. Measuring and surveying p2
 Evolve bi-fold Installation Guide 1. Before you start p2 8. Door restrictor- optional p9 2. Measuring and surveying p2 3. Configuration details p4 4. Installation p5 5. Glazing p5 6. Glazing packer details
Installation Site Preparation - Site Preparation
 S c u l p t u r e s Bespoke Single Door / Bespoke Frameless Hinged Door + Inline Panel Instruction Manual Truelife Consumer Guarantee Please make sure the purchaser/end user completes and returns the Guarantee
Sliding Door Kit
 YOU MUST READ THIS DOCUMENT BEFORE YOU BEGIN TO ASSEMBLE THE DOOR KIT. Thank you for purchasing this GrowSpan door kit. When properly assembled and maintained, this product will provide years of reliable
NOMINAL SIZE A (mm) B (mm)
 B (mm)") NOMINAL SIZE A (mm) B (mm) X 1990 X 8 198 210 X 10 3230 X 12 3850 Thank you for purchasing your new Robinsons greenhouse. We recommend you familiarise yourself with the instructions and read all safety
NOMINAL SIZE A (mm) B (mm) X 1990 X 8 198 210 X 10 3230 X 12 3850 Thank you for purchasing your new Robinsons greenhouse. We recommend you familiarise yourself with the instructions and read all safety
IMPORTANT INSTALLATION GUIDE VALENCIA SQUARE CORNER SHOWER READ ALL INSTRUCTIONS CAREFULLY BEFORE STARTING THE
 INSTALLATION GUIDE VALENCIA SQUARE CORNER SHOWER NOTE: Acrylic wall, tray and tapware not included. Supplied handles may differ from image. SEALANT REQUIRED TO COMPLETE THIS INSTALLATION: (Not supplied)
ASSEMBLY INSTRUCTIONS FOR "GA" MODULAR BUILDINGS ALL MODELS
 ASSEMBLY INSTRUCTIONS FOR "GA" MODULAR BUILDINGS ALL MODELS W01 CAUTION: Some parts have sharp edges. Care must be taken when handling the various pieces to avoid a mishap. For safety sake, please read
Installation Guide for Andersen Architectural Clad Inswing Entry and Patio Doors
 Installation Guide for Andersen Architectural Clad Inswing Entry and Patio Doors Congratulations! You have just purchased one of the many fine Andersen products. Proper assembly, installation and maintenance
JEEP JK ( 5 DOOR ) SLIMLINE II - FULL TRAY EXTREME RACK KIT
 SLIMLINE II - FULL TRAY EXTREME RACK KIT") JEEP JK ( 5 DOOR ) SLIMLINE II - FULL TRAY EXTREME RACK KIT FAJK001 / KRJW014T INSTALL TIME: 2.5 Hours NOTE: Your Jeep JK (5 Door) Extreme Roof Rack Kit consists of four boxes. (1) the Tray, (2) the Roll
JEEP JK ( 5 DOOR ) SLIMLINE II - FULL TRAY EXTREME RACK KIT FAJK001 / KRJW014T INSTALL TIME: 2.5 Hours NOTE: Your Jeep JK (5 Door) Extreme Roof Rack Kit consists of four boxes. (1) the Tray, (2) the Roll
16ft Polytunnel Assembly Instructions
 CONTENTS Section Page 1. FOUNDATION TUBES: Option A Ground Anchor Plates 3 2. FOUNDATION TUBES: Option B Concreted Foundation Tubes 5 3. STEEL FRAME ASSEMBLY & INSTALLATION 6 4. CROP BARS 8 5. TIMBER END