Raceline / Shockline/Endloop Installation Manual
|
|
|
- Ross Anderson
- 5 years ago
- Views:
Transcription


1 Raceline / Shockline/Endloop Installation Manual Scan this QR code to watch the Installation Video. Trouble Shooting Hotline


2 Flex Fence Raceline/Shockline Fence Installation Guide Before you layout your fence call 8. An 8 representative will take info about your project and notify appropriate utility companies to come out and mark buried lines so that you can dig safely around them. 8 is not responsible to indicate any lines you or the previous owner have run underground, for example: cable, septic etc. You are responsible for indicating where those lie. Please follow directions for a long lasting installation that will not sag after tension is applied to the Flex Fence Raceline and or Shockline rails. PROPER BRACING OF CORNER AND END POSTS IS THE KEY TO A QUALITY INSTALLATION. Please note that all concrete footings need to extend past the frost line. All diagonally braced corner and end post footers should have a belled shaped bottom as shown in the diagrams and diagonal brace footers should be squared off as shown in the following drawings, or you can use the new all underground structure as outlined in this guide. POST REQUIREMENTS Listed below are the post specification recommended for use with Flex Fence Raceline and Shockline fencing. Use round wood posts for all applications (ends, corners, lines). ALL WOOD POSTS MUST BE TREATED! Post Type * Post Diameter Length Hole Depth (2 diameter) Line Corner 6 min or below the frost line Gate and/or end 6 min or below the frost line *Diagonal Braces with footers 4 min 7 8 or below frost line Note: The post diameters are to be measured on the small end. CONCRETE FOOTER REQUIREMENTS Mix each 80lb bag of concrete according to the concrete manufacturer s methods found on the bag. *or equivalent *All concrete footer depths must be below the frost line for your area * If frost line is unknown talk with your local extension office Concrete volumes for post footers can very depending on hole size and soil conditions. Coner post 8 minimum belled shaped bottom 8 Northern states concrete requirements (approximate) (4) 80lb. bags for 6 x 9 corner/gate end posts. (4) 80lb. bags for each diagonal brace post Southern States and areas south of mason dixon line. (frost line less than 8 ) (3) 80lb. bags for 6 x 9 corner/gate end posts. (2) 80lb. bags for each diagonal post Diagonal brace post 8 deep or below frost line (Can be replaced with alternative gate or corner post without diagonal bracing see page 5) Fence Installation Instructions - Page


")

 J.")
 E.")
")

3 Tools Equipment and Hardware. Marking Pen 2. String line and Marking Paint 3. Tape Measure-25ft minimum 4. Chain saw 5. Post hole digger, tamping bar and spade shovel 6. Utility Knife and blades 7. Lineman pliers (heavy duty) 8. Hammers (claw and 2lb Sledge) 9. 2 auger (36-48 as required) 0. Paint brush or Roller for painting posts. Safety glasses 2. Spinning jenny #SJ 3. Stakes 4. High tensile wire cutters #WC 5. Pivot Square 6. Level #SJ #WC Fencing Components and Supplies A. Corner/end posts #69P G. S bolt- #SBOLT B. Diagonal brace posts #48P OR 58P H. PVC pipe and elbows /2 ( for Buried electric line) C. Concrete I. Tensioner- #RTI D. Rolls of High Impact raceline #RC (W,B,BR) J. Line Post High Impact Insulator- #ICC(W,B) E. Rolls of high impact shockline # 320SL (W,B,BR) K. End loop assembly- #ELA (W,B,BR) F. Brace Plate #BRACEPLATE L. Homemade template A. #69P B. #48P OR 58P C. D. #RC (W,B,BR) E. #320SL (W,B,BR) F. #BRACEPLATE Or equivilant G. #SBOLT H. I. J. K. /2 #RTE #ICC (W,B) #ELA (W,B,BR) L. Fence Installation Instructions - Page Ramm Fence Sytems Inc.
4 Step Call local utilities before digging (dial 8 they will mark your utility lines.) Step 2 Gather necessary tools- see page 2 for details. Step 3 Typical Post Installation Specifics. See the diagram below and on the following pages. A. Line Post Fence Installation Instructions - Page 3
5 B. End Post 8 Fence Installation Instructions - Page 4

6 C. Corner Post Note: All diagonal posts are to be in the concrete approximately -2 8 Fence Installation Instructions - Page 5


7 D. Alternative Gate or Corner Post Note: A. Alternative structure for B & C without Diagonal Bracing 56 Grass Line or below frost line Fence Installation Instructions - Page 6
8 Step 3 Cont. A. Line post: Typical line post with tamped soil (ground level indicated by dashed line) The depth of the hole should be deep. Set your posts at 58 above ground level before flow is determined The post will be cut off after the flow of the fence has been determined (See diagram Step 3A on page 3) B. End post: Typical end post with concrete illustrated (ground level indicated by dashed line) Note: end post should be set to lean approximately away from tension to ensure level post after tension is applied. (See diagram Step 3B on page 4) ** All footers must be below frost line C. Corner post: Typical corner with concrete illustrated (ground level indicated by dashed lines) Note end post should be set to lean approximately away from tension to ensure level post after tension is applied. (See diagram Step 3C on page 5) ** All footers must be below frost line D. Alternative gate or corner post without diagonal bracing: Drill two, 2 dia holes 8 apart One for the 6 gate/corner post, to be placed in the hole as shown in the diagram 2 on next page. Place the 6 dia. post in the hole away from the faced off area. Both will need to be below frost line. One will be faced off 24 wide and 8 deep. (See diagram Step 3D on page 6) Step 4 Layout fence line perimeter (example on next page 600 x 600 perimeter) A. B. Locate all corner and gate posts. Run string lines (dashed line) approximately 6 past corners and stake (solid black squares) into ground as shown in sketch on page 9. C. To assure square corners use the triangle method corner (as shown in sketch on page 9) D. Use marking paint to mark each post location with an X this should include all gate/end, corner, diagonal brace and line post locations. (Line post spacing recommended at 2 apart.) F. When running rails to the inside of an area, make sure the corner and end posts are inset so the rail can be run around the outside of these posts. This will allow the rail to run next to and past each line post. (as shown in sketch on page 9) E. When placing a gate in the corner set the corner post to the outside of string line as shown in corner Fence Installation Instructions - Page 7
9 A. It is your option to select a bracing structure for your corner and end posts. For example: With or without diagonally bracing B. The fence is representative as a solid line along the perimeter. See how the fence goes around the corner post and then back inside for the line post. B 2 C 3 Squaring Corners This should be done on all corners and ends to square fence. Measure out 3 on side 2 Measure 4 on side If corner is square, the measurement of side 3 will be 5 E Typical 2 Gate Opening Line Post Alternative stand alone structure without diaginal bracing A Fence F Fence Installation Instructions - Page Ramm Fence Sytems Inc.

. D. Continue tamping process until hole is filled to ground level around line posts.")
10 Step 5 Dig all holes using a 2 auger. Step 6 The use of concrete A. The corner and end post need to be set in concrete as shown in diagrams on pages 3-6, this holds true whether you choose to use a diagonally braced structure or the alternative. NOTE: Make sure all concrete is cured prior to tightening the rails. Step 7 Set Line Posts A. Place line posts into line post holes, which are deep along the string line. B. Level posts in both directions then add some dirt. C. Tamp soil around line posts. Do this by adding 3-6 segments of soil (tamp soil between segments). D. Continue tamping process until hole is filled to ground level around line posts. Alternative gate or corner post without diagonal bracing 56 Grass Line or below frost line Fence Installation Instructions - Page 9
11 Step 8 Establish post top line for proper flow of fencing. A. Mark on the side of the post a small line at 54 from the ground using a tape measure. Do this on all posts. B. Starting at the gate/end post using a thick and visable string wrapping it tightly around every post. C. Make sure it is tight between each post. D. Site over the string line and you will see abrupt changes in the flow. By raising and lowering the string line you can make the flow smooth from post to post. E. Keep the corner/gate/end posts string at the 54 mark, do not move the string line on them. F. You are looking for the average height of your fence over the entire length. Step back and make sure your satisfied with the flow of the fence. G. Make sure you are satisfied with your flow of the string line because it will influence the overal appearance of the fence itself. Take your time. A proper flow makes for a beautiful fence. H. Look at your string line from various directions. I. More than one opinion is helpful. String determines the top of the post Fence Installation Instructions - Page 0
12 End posts that are diagonally braced 2 6 END LOOP CLOSE UP ITEM # End Post Material List PART NAME gate/end post diagonal brace post QTY. diagonal brace plate inline tensioner 7 insulated jumper wire nail for braceplate 8 post footer (concrete) brace post footer (concrete) barbed fence staple 4 underground burial cable PVC pipe split bolt 3 end loop assembly Diameter Diameter 8 Face Fence Installation Instructions - Page
13 Alternative gate or corner post structure without diagonal bracing END LOOP CLOSE UP 9 ITEM # End Post Material List PART NAME QTY. 2 gate/end post inline tensioner 7 3 insulated jumper wires post footer (concrete) barbed fence staple underground burial cable 4 7 PVC pipe 8 split bolt 3 9 end loop assembly Diameter 30 Fence Installation Instructions - Page 2
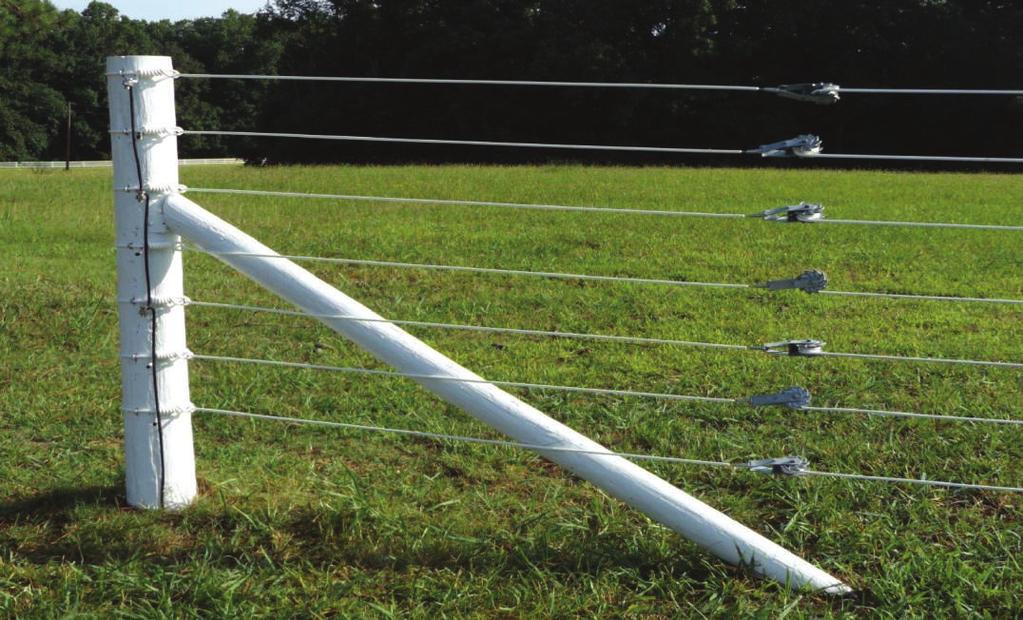
14 Typical spacing for a 7 rail Flex Fence Raceline/ Shockline products lean post Grass Step 9 A. B. Marking Posts. Mark the new string line on the rail side. The string line is the top of your post and will be cut off with a chain saw. Make sure you use your homemade template and mark all rail locations accordingly. C. D. E. Remove your string Cut the post top off at the top mark (string line mark) This illustration is for 7 rails only. Your spacing will vary with different amounts of Flex Fence Shockline/Raceline products. Fence Installation Instructions - Page 3


15 Step 0 Attach Flex Fence Raceline/Shockline End Loops to end posts A. Hammer 2 staples half way in the end post at each mark. In our example it will be 4 locations. Two per rail. Note: Do the same on the matching end post at the opposite end. B. Select which side of the posts you will install your Flex Fence Raceline and or Shockline rails. C. Using the tail of your end loop feed them into each set of staples. The first staple you feed will be the side you selected your rail to be on. D. Lace the tail end through the eye of the coil as shown. E. Hammer all staples into post up to /8 away, never tight. F. Do this at all 7 locations for this example. G. Do the same on the opposite end post-again at all locations. Staple Detail Feed the End Loop into the staple first Push against post Fence Installation Instructions - Page 4


16 Step Paying out the Flex Fence Raceline and or Shockline rails A. B. C. NOTE: ALL OF OUR COATED PRODUCTS ARE DESIGNED TO RUN ON THE INSIDE OF PASTURES NEXT TO YOUR ANIMAL EXCEPT AROUND CORNERS. Pull out Raceline and or Shockline around your fence perimeter. THE USE OF A SPINNING JENNY IS REQUIRED FOR PAYING OUT YOUR FLEX FENCE. Staple your Raceline to line and corner posts at your pre-marked points of each post. D. Do the same with Flex Fence Shockline except use insulators insted of staples at your premarked points of each post. E. At the corner posts it s reccommended to use 3 insulators at each location. It is important to put the Shockline in the 3 insulators and then attach them to the corner post. Spinning Jenny Typical Spacing for Raceline with Staples and Shockline with Insulators Detail for Flex Fence Shockline Installation Detail for Flex Fence Shockline Insulator around a corner Fence Installation Instructions - Page Ramm Fence Sytems Inc.
17 Step 2 Tensioner Installations A. Remove /4 of polymer off the tail of each Flex Fence End Loop as shown. B. Insert bare wire into the cone of your tensioner. Do this on all wires. C. Do this at all locations. Cone Step 3 Concrete is to cure per manufacturers recommendation. Never put any pressure on end and or corner posts without letting the concrete cure. Fence Installation Instructions - Page 6

18 Step 4 Attaching End Loops to Flex Fence Raceline/ Shockline rails 5 A. Start at one end of your fence, and remove 5 of polymer off the wire. Do this on all rails using a utility knife. NOTE: Make sure you always push the knife away from your body. B. Insert bare wire into hole in the matching tensioner spool and with the aid of linemans pliers bend the end of the wire over about a half of inch in length making it 90º. *Make sure to wind coating into tensioner 3 C. With the aid of a tensioner handle ratchet up the 5 of bare wire including a couple wraps with polymer onto the tensioner spool. Do this on all tensioners at this end. Step 5 Attaching End Loops and tightening rail A. Go to the other end of your fence run. B. Pull all slack out of your rails back toward these tensioners. C. Pull rail past tensioner about 5 and cut off access rail at this point. D. Strip back about 5 of polymer using a utility knife. E. Insert bare wire into hole in tensioner spool and with lineman pliers bend the end of the wire over about half of an inch in length making it 90 º F. With tensioner handle ratchet up all rails making them tight. NOTE: YOU NEED TO MAKE SURE THE POLYMER IS SPOOLED INTO THE TENSIONER DURING THIS OPERATION. Step 6 Hooking up your charger to your Flex Fence Shockline A. Cut a proper length of burial cable to use as jumpers between the End Loops. This wire should be about 3 longer than the distance between the Shockline rails. B. Strip off about of plastic from both ends of the pre-measured jumpers then bend this bare wire 90º. C. Remove of polymer including cap off of the End Loops that are attached to your Shockline rail. Do this to all Shockline rails. D. Attach necessary split bolts at each jumper locations tying it into the underground burial cable that runs into your charger. E. Staple underground burial cable to the post as required. NOTE: NEVER DRIVE IN THE STAPLE TOO TIGHT. KEEP IT LOOSE. F. Installation is complete when you turn on your electric charger. Check for current in Shockline then let your animals in. Fence Installation Instructions - Page 7

19 Attach split bolt at both locations and tighten on wires Burial cable jumper wire Measure back ¾ from end cap and cut plastic off of wire. This will also remove end cap. The information contained in this document is the sole property of RAMM Horse Fencing and Horse stalls. Any reproduction in part or as a whole without the written permission of RAMM Horse Fencing and Horse Stalls is prohibited. 205 No fence product is totally safe. There remains potential for injury to animals; therefore the manufacturer shall in no event be responsible for any injury to persons, animals or personal property. Also, electrifying your fence runs will help to keep animals off of it. Fence Installation Instructions - Page Ramm Fence Systems. Inc.
High-Tensile Coated Wire Fence Installation Guide
 High-Tensile Coated Wire Fence Installation Guide Please follow directions for a long lasting installation that will not sag after tension is applied to the rails. Proper bracing of corner and end posts
Flex Fence Instruction Manual
 The Safer Stronger Smarter Choice Flex Fence Instruction Manual Table of contents 2 3 4 4 5 5 6 7 8 10 10 11 11 12 13 13 15 18 18 19 20 22 Table of contents Supplies, tools and equipment Introduction Laying
INSTALLATION MANUAL WARRANTY, TOOLS AND HARDWARE
 INSTALLATION MANUAL WARRANTY, TOOLS AND HARDWARE 2802 East Avalon Avenue Muscle Shoals, AL 35661 Ph / 800-348-7787 256-248-2403 Fax / 256-248-2418 Email / info@centaurhtp.com Web / www.centaurhorsefence.com
1. Layout. Step 1. Step 2. Step 3. Fig. 1
 1-3/8 Panel Clamp Tools You Will Need: Tape Measure, Mason s String, Stakes, Hole Digger, Shovel, Level, Wheelbarrow, Wrenches or Adjustable Wrench, Hacksaw, Pliers, Cutting Pliers, Fence Stretcher and
CENFLEX INSTALLATION MANUAL
 CENFLEX INSTALLATION MANUAL WARRANTY, TOOLS AND HARDWARE P/N 306007 Rev 0317 2802 East Avalon Avenue Muscle Shoals, AL 35661 Ph / 800-348-7787 or 256-248-2556 Email / info@centaurhtp.com Web / www.centaurhorsefence.com
6a. Eight Steps to Chain-Link Fence Installation
 6a. Eight Steps to Chain-Link Fence Installation Before You Start You will need the following tools to install your chain-link fence: Post hole digger Wheelbarrow, shovel and hoe for mixing concrete Tape
CertainTeed INSTALLATION GUIDE SIMTEK FENCE PRODUCTS. Fence Installation Guide 3', 4' & 6' High
 CertainTeed INSTALLATION GUIDE SIMTEK FENCE PRODUCTS Fence Installation Guide 3', 4' & 6' High INSTALLATION GUIDE These instructions are designed to assist both professional installers and do-it-yourselfers
CENTAUR AND HOT RAIL INSTALLATION MANUAL
 CENTAUR AND HOT RAIL INSTALLATION MANUAL WARRANTY, TOOLS AND HARDWARE P/N 306001 Rev 0117 2802 East Avalon Avenue Muscle Shoals, AL 35661 Ph / 800-348-7787 or 256-248-2556 Email / info@centaurhtp.com Web
COMPONENTS INSTALLATION
 PIPE BRACE ASSEMBLY - 8' FIXED-KNOT FENCE Brace posts... 14'x 2 7/8" Structural Tubing Cross Members... 10'x 2 3/8 Structural Tubing Angle Brace... 12'x 2 3/8 Structural Tubing Angle Brace Foot... 6' x
INSTALLATION INSTRUCTIONS CHAIN-LINK FENCE AND GATE
 INSTALLATION INSTRUCTIONS CHAIN-LINK FENCE AND GATE 1 BEFORE YOU START, IT S IMPORTANT TO CHECK......That fence footings do not exceed legally established property lines. If uncertain, refer to real estate
CENTAUR INSTALLATION MANUAL
 CENTAUR INSTALLATION MANUAL WARRANTY, TOOLS AND HARDWARE 2802 East Avalon Avenue Muscle Shoals, AL 35661 Ph / 800-348-7787 or 256-248-2556 Email / info@centaurhtp.com Web / www.centaurhorsefence.com ENGLISH
Assembly Instructions
 18' W x 10' H or 12' H Peak Style Frame Assembly Assembly Instructions Before you start: 2+ individuals recommended for assembly, approximate time 3 hours. Recommended tools: Power Drill, Safety Glasses,
ELK EXCLUSION USING WOVEN WIRE FENCING
 Fencing Order No. 307.252-1 September 2001 Agdex 724 ELK EXCLUSION USING WOVEN WIRE FENCING This factsheet outlines the use of woven wire to exclude elk in high pressure areas such as feed storage yards.
PRO-RIB FENCE PANELS INSTALLATION GUIDELINES. Virtually Maintenance Free Available in 24 Colors Custom Heights Available by the Inch
 PRO-RIB FENCE PANELS INSTALLATION GUIDELINES Virtually Maintenance Free Available in 24 Colors Custom Heights Available by the Inch www.midwestmanufacturing.com Page 2 TOOLS NEEDED Measuring Tape Drill
Congratulations! Your dog is going to love you!
 DIY INSTRUCTIONS Congratulations! Your dog is going to love you! Thank you for ordering your non-electric dog fence kit from Pet Playgrounds. In less than a day you will have your very own personal dog
Ranch Rail Vinyl Fence
 Ranch Rail Vinyl Fence INSTALLATION INSTRUCTIONS These instructions are to be used as general guidelines for the installation of your vinyl fence under normal installation conditions. Local conditions
SECTION CHAIN LINK FENCING AND GATES AND SOFTBALL BACKSTOP
 1 1 1 0 1 0 1 0 1 SECTION 1 1 CHAIN LINK FENCING AND GATES AND SOFTBALL BACKSTOP BASED ON DFD MASTER SPECIFICATION DATED /01/ P A R T 1 - G E N E R A L SCOPE The work under this section shall consist of
Installation Fence Guide Kodiak Iron. Exceptional Fencing Extraodinary Customer Service
 Installation Fence Guide Kodiak Iron Exceptional Fencing Extraodinary Customer Service Kodiak Fence System Installation Guide Thank you for the purchasing the Kodiak Fence System. Fence installation is
HOW TO BUILD A DEER OR ELK-PROOF FENCE. Saskatchewan Environment Resource Stewardship Branch 112 Research Drive Saskatoon, Saskatchewan S7K 2H6
 HOW TO BUILD A DEER OR ELK-PROOF FENCE Saskatchewan Environment Resource Stewardship Branch 112 Research Drive Saskatoon, Saskatchewan S7K 2H6 Revised March 2005 1 This information is intended to assist
BRACE ASSEMBLIES FOR WIRE FENCES. What They Are - How They Work - How To Construct Them
 Fencing Order No. 307.220-1 Agdex: 724 March 1996 BRACE ASSEMBLIES FOR WIRE FENCES What They Are - How They Work - How To Construct Them When constructing wire fences, brace assemblies are required to
Instructions For Installing A Pig Fence
 Instructions For Installing A Pig Fence A Multi-wire Fence on a Single Line of Posts Height: 18 Inches Polywire for seasonally removable fences Aluminum wire for permanent fences These pages provide the
Classic Roll Tarp. Installation Instructions. Attention Dealers: Please give this owners manual to the customer when the product is delivered.
 Serving the Truck & Trailer Industry Since 1944 Classic Roll Tarp Attention Dealers: Please give this owners manual to the customer when the product is delivered. Call 800-535-9545 www.aeroindustries.com
FLEXIBLE 5 RAIL. year WHITE BLACK BROWN. CenFlex flexible fence systems provide strength and safety at a lower cost for moderate installation budgets.
 FLEXIBLE 5 RAIL flexible fence systems provide strength and safety at a lower cost for moderate installation budgets. year LIMITED WARRANTY WHITE BLACK BROWN WHAT MAKES Centaur The Horse Friendly Fence
TRADITIONAL & SCALLOP PICKET INSTALLATION INSTRUCTIONS
 TRADITIONAL & SCALLOP PICKET 1 WHAT YOU LL NEED TO INSTALL POWER AUGER OR POST HOLE DIGGER(CLAMSHELLS) SHOVEL DIGGING BAR (OPTIONAL) BRIGHT COLORED SPRAY PAINT STRING LINE STAKES AND LEVEL CORDLESS OR
Centaur FLEXIBLE 5 RAIL WHITE BLACK BROWN
 Centaur FLEXIBLE 5 RAIL is our deluxe horse friendly fence system. Crafted with HTP, a specialized blend of high tensile polymers, each rail is embedded with three strands of 12.5 gauge high tensile steel
WAL-MART SUPERCENTER # ; Milwaukie, OR: SPECIFICATIONS. Revisions to Specification Fence
 MILWAUKIE OR #3144-00 ADDENDUM #5 NARRATIVE: 11-08-12 WAL-MART SUPERCENTER #3144-00; Milwaukie, OR: SPECIFICATIONS SPECIFICATIONS Revisions to Specification 02822 Fence Spec division 02822 has been revised
Oxford Stalls Installation Instructions
 Oxford Stalls Installation Instructions RAMM Horse Fencing and Stalls 13150 Airport Hwy. Swanton, OH 43558-9615 1-800-434-8456 Rev. 8/15/17 Before You Start Typical stall sizes are 10 x 10, 12 x 12 or
Hoop House Plans By Steve Robinson
 Hoop House Plans By Steve Robinson This Ebook is Shareware It is meant to be shared by farmers alike. I give you permission to share this EBook to as many people as you like. It can not be sold, but it
Classic Roll Tarp. Installation Instructions. Attention Dealers: Please give this owners manual to the customer when the product is delivered.
 Serving the Truck & Trailer Industry Since 1944 Classic Roll Tarp Attention Dealers: Please give this owners manual to the customer when the product is delivered. Call 800-535-9545 www.aeroindustries.com
NON-ELECTRIC DOG FENCES
 NON-ELECTRIC DOG FENCES Thank you! Thank you for ordering your non-electric dog fence kit from Pet Playgrounds. In less than a day you will have your very own personal dog park installed on your property.
PRIVACY FENCE WITH SCALLOPED PICKET INSTALL INSTRUCTIONS
 PRIVACY FENCE WITH SCALLOPED PICKET INSTALL INSTRUCTIONS These instructions are to be used as general guidelines for the installation of your vinyl fence under normal installation conditions. Local conditions
BUMP GATE FITTING INSTRUCTIONS.
 1 BUMP GATE FITTING INSTRUCTIONS. HEAVY DUTY MODEL FOR STEEL POSTS. Hinge post Lock post Bump arms Two-way lock Thank you for purchasing a Bump Gate. This device will provide you with many years of good
PRIVACY FENCE WITH LATTICE INSTALLATION INSTRUCTIONS
 PRIVACY FENCE WITH LATTICE INSTALLATION INSTRUCTIONS These instructions are to be used as general guidelines for the installation of your vinyl fence under normal installation conditions. Local conditions
ASPEN STYLE. ORNAMENTAL GATE INSTALLATION GUIDE 3 Rails, Pressed Top/Flat Bottom Model No. EGBR5842-N2P
 1 ASPEN STYLE ORNAMENTAL GATE INSTALLATION GUIDE 3 Rails, Pressed Top/Flat Bottom Model No. EGBR5842-N2P INSTALLATION VIDEO AVAILABLE AT: video01.xcelfence.com Item Description Gate installation and assembly
> Installation Instructions
 SmarterFence BY BEDFORD TECHNOLOGY > Installation Instructions BEFORE YOU START > Check to see if a permit is needed in your area. > Check with your local utility companies to locate any underground utilities.
FENCE INSTALLATION GUIDE 8 HIGH WALLS
 FENCE INSTALLATION GUIDE 8 HIGH WALLS 1.866.648.9336 www.simtekfence.com INSTALLATION GUIDE These instructions are designed to assist both professional installers and do-it-yourselfers of SimTek decorative
CONSTRUCTION GUIDE 21ft Wide and 24ft Wide SHEEP HOUSE
 The Outside, Inside CONSTRUCTION GUIDE 21ft Wide and 24ft Wide SHEEP HOUSE Thank you for purchasing a Premier Sheep House. Please take the time to carefully read through this Construction Guide before
FENCE INSTALLATION GUIDE 6 HIGH FENCE
 FENCE INSTALLATION GUIDE 6 HIGH FENCE 1.866.648.9336 www.simtekfence.com INSTALLATION GUIDE These instructions are designed to assist both professional installers and do-it-yourselfers of SimTek decorative
RANCH RAIL FENCE INSTALLATION INSTRUCTIONS
 1 WHAT YOU LL NEED TO INSTALL POWER AUGER OR POST HOLE DIGGER(CLAMSHELLS) SHOVEL DIGGING BAR (OPTIONAL) BRIGHT COLORED SPRAY PAINT STRING LINE STAKES AND LEVEL CORDLESS OR POWER DRILL WITH DRILL AND SCREW
SEMI-PRIVACY PANEL AND GATE INSTALLATION INSTRUCTIONS
 SEMI-PRIVACY PANEL AND GATE INSTALLATION INSTRUCTIONS 1 BEFORE YOU START, IT S IMPORTANT TO CHECK: That fence or the fence post footings do not exceed your lot lines of your property. If you can locate
High Tensile Installation Guide
 High Tensile Installation Guide High Tensile Installation Guide CONTENTS Why High Tensile?............1 Successful HowTo............1 Post Installation.............2 Driven Posts..............2 HandSet
How to make a template to mount your plaque to a surface
 How to make a template to mount your plaque to a surface A piece of heavy paper 3 4 wider than your plaque on all four sides (paper grocery bag works great too) Small amount of paint (latex dries the fastest)
ClearSpan PolyMax Windbreak Wall
 ClearSpan PolyMax Windbreak Wall Photo may show a different but similar model. 2007 ClearSpan All Rights Reserved. Reproduction is prohibited without permission. Revision date: April 2007ldg STK# DIMENSIONS
Bounce Back How to install Plastic Coated Wire Fencing
 Bounce Back How to install Plastic Coated Wire Fencing The information provided is suggested only. It is up to the individual to ensure they use the correct fencing method suitable for their situation.
A Quick Reference Guide to Planning an Installation
 PAGE 1 A Quick Reference Guide to Planning an Installation Plan and Measure Your Aluminum Fence Layout Before installing your fence, draw a plan to scale on a piece of graph paper as shown in the example.
SW Region Asset Specifications: Four Strand Barbed Wire Fence Specifications
 Lands Division Sustainable Resource Development SW Region Asset Specifications: Four Strand Barbed Wire Fence Specifications Prior to commencement of construction, contact must be made with the following
ClearSpan PolyMax Windbreak Wall
 ClearSpan PolyMax Windbreak Wall Photo may show a different but similar model. 2007 ClearSpan All Rights Reserved. Reproduction is prohibited without permission. Revision date: February 2007ldg STK# DIMENSIONS
UNIVERSAL PANEL AND GATE
 PVC Fencing / Residential Style UNIVERSAL PANEL AND GATE INSTALLATION INSTRUCTIONS Fencing Without Boundaries TM 1 BEFORE YOU START, IT S IMPORTANT TO CHECK......That fence footings do not exceed legally
Kwik-Lock. Installation Instructions. Attention Dealers: Please give this owners manual to the customer when the product is delivered.
 Serving the Truck & Trailer Industry Since 1944 Installation Instructions Attention Dealers: Please give this owners manual to the customer when the product is delivered. Call 800-535-9545 www.aeroindustries.com
INSTALLATION INSTRUCTIONS 10' WIDE FRAME FRAME SIZE: 10 X 18 X 7 (2 SQUARE TUBING) STORAGE SHELTER / CARPORT
 STORAGE SHELTER / CARPORT") INSTALLATION INSTRUCTIONS 10' WIDE FRAME FRAME SIZE: 10 X 18 X 7 (2 SQUARE TUBING) STORAGE SHELTER / CARPORT STORAGE SHELTER CARPORT Our unique assembly process quickly transforms the individual pieces
INSTALLATION INSTRUCTIONS 10' WIDE FRAME FRAME SIZE: 10 X 18 X 7 (2 SQUARE TUBING) STORAGE SHELTER / CARPORT STORAGE SHELTER CARPORT Our unique assembly process quickly transforms the individual pieces
How to Build a Fold- Down Greenhouse
 How to Build a Fold- Down Greenhouse This simple, inexpensive greenhouse folds down to protect your plants during early frosts and cold snaps, then can be raised up on warmer days. Made with PVC pipe and
CARPORT INSTALLATION INSTRUCTIONS FOR 4 1/2 ON CENTER FRAMES
 CARPORT INSTALLATION INSTRUCTIONS FOR 4 1/2 ON CENTER FRAMES FRAME SIZES: WIDTH: 12, 14, 18, 20, 24, AND 30 ON CENTER FRAME SPACING: 4 1/2 FRAME LENGTH: 18 EAVE HEIGHTS: START AT 7 TO 12 1/2. Our unique
INSTALLATION GUIDE
 MASON S BRICK INSTALLATION GUIDE 800.945.4440 WWW.STYLECRESTINC.COM MASON S BRICK INSTALLATION GUIDE INSTALLATION SUMMARY Your new Mason s Brick skirting comes in 4-1/2 foot long panels that are either
How To Install the Bounce Back Horse Fence Including Tool Preparation
 How To Install the Bounce Back Horse Fence Including Tool Preparation The information provided is suggested only. It is up to the individual to ensure they use the correct fencing method suitable for their
UNIVERSAL INSTALLATION INSTRUCTIONS FOR CARPORTS
 UNIVERSAL INSTALLATION INSTRUCTIONS FOR CARPORTS FRAME SIZES: WIDTH: 10, 12, 14, 16, 18, 20, 24, AND 30 ON CENTER FRAME SPACING: 4, 4 1/2, AND 5 FRAME LENGTH: 4 ON CENTER 20-2, 4 1/2 ON CENTER 18 AND 5
GrowSpan Series 500 Roll-Up Ends
 GrowSpan Series 500 Roll-Up Ends Photo may show a different but similar model. Doorframe materials are not included. 2016 Growers Supply All Rights Reserved. Reproduction is prohibited without permission.
Kit 102 Series Installation Instructions for Wood or Metal Posts on Level Runs
 Kit 102 Series Installation Instructions for Wood or Metal Posts on Level Runs A. Drill Posts Hole size for 1/8" or 3/16" cable installation This kit may also be used for stairs or runs that exit the end
Installation Instructions. Tools Needed. Tape measure. Level. Shovel or Post hole digger. Concrete. Drill. Stakes. Mallet or hammer.
 Installation Guide EcoStone Fence 1330 West 400 North Orem, UT 84057 Toll Free 1.866.648.9336 Tel. 1.801.655.5236 Fax 1.801.655.5240 www.ecostonefence.com Installation Instructions Introduction. These
Installa on Guide: Fence Distributors. YourNextFence.com
 TM YourNextFence.com Plan Your Fence each line by dividing the length of each line in inches by 97. Round any remainder up. 2 Calculate Materials Tools Needed Stakes Circular Saw String Line Drill Marking
GROWING BETTER THROUGH DESIGN. 6ft Lean-To LEAN-TO. Assembly Instructions 04/02
 GROWING BETTER THROUGH DESIGN 6ft Lean-To LEAN-TO Assembly Instructions 04/02 6ft Lean-To Greenhouse Base Plan Introduction/Tools/Contents / / Contents This is a copy of our Lean-To greenhouse base plan.
FRAMELESS GLASS FENCING DIY GUIDE
 FRAMELESS GLASS FENCING SITE MEASURE 1. Planning is the first step of any successful project. 2. We have a large range of sizes to allow for varying site requirements. 3. Simply decide where you would
INSTALLATION MANUAL. 2. Check with local utility companies for locations of underground cables or pipe lines.
 INSTALLATION MANUAL Install our maintenance free fencing system yourself! About 90% of our residential clientele install our fencing systems themselves. Why hire and pay someone to install it when you
MSU Extension Publication Archive. Scroll down to view the publication.
 MSU Extension Publication Archive Archive copy of publication, do not use for current recommendations. Up-to-date information about many topics can be obtained from your local Extension office. Fencing
10x10 Trellis Pergola
 0x0 Trellis Pergola ASSEMBLY GUIDE Ver.0-7 Table of Contents PAGE Introduction & Overview...................................................... Pergola Materials Overview..............................................................
Constructing Wire Fences
 1 of 6 12/3/2010 9:48 AM University of Missouri Extension G1192, Reviewed October 1993 Constructing Wire Fences Richard E. Phillips Department of Agricultural Engineering This guide will provide some basic
PAINT & MISC. Notes. Table of Contents. Front Handrail Posts Front Handrails Closet Shelving Exterior Deck...
 118 PAINT & MISC. Table of Contents Front Handrail Posts... 119 Front Handrails... 122 Closet Shelving... 125 Exterior Deck... 127 Look for painter s tape on the hammer drill for where to set the depth.
PRIVACY INSTALLATION FOR: Standard 6 H x 8 W Privacy Fence 4 x 4 Post Sleeve & Brackets Dog Ear or Straight-Edge Pickets 1.75 x 3.
 PRIVACY INSTALLATION FOR: Standard 6 H x 8 W Privacy Fence 4 x 4 Post Sleeve & Brackets Dog Ear or Straight-Edge Pickets 1.75 x 3.5 Rail Storage and Handling Fence Preparation and Layout Locate and Set
Quick Hoops Seedling and Micro Green Bench Instruction Manual
 Quick Hoops Seedling and Micro Green Bench Instruction Manual 955 Benton Ave., Winslow, ME 04901 Phone: 1-877-564-6697 Fax: 1-800-738-6314 Email: service@johnnyseeds.com Web Site: Johnnyseeds.com This
FOR PROFESSIONAL GARAGE DOOR INSTALLERS
 Composite Garage Doors Installation Instructions FOR PROFESSIONAL GARAGE DOOR INSTALLERS Tools required Screwdriver Claw Hammer Locking Pliers Power Drill Level with a 3/32" Drill Bit Utility Knife 9/16",
Introduction. Planning
 Introduction Since fencing is such an important part of a livestock grazing system, the USDA- Natural Resources Conservation Service (NRCS) has developed specific designs and specifications for landowners
Residential Fencing Picket. Installation Guide
 Residential Fencing Picket. Installation Guide Jabiru Picket Fence White Contents Getting Started 4 Installation Tips 4 Shortening a Panel Tools Required 5 Instructions 6 3 Getting Started Congratulations
Instructions For A 3D Baited Electric Deer Fence Kit
 Rev 1, 03-05-15 Kit Instructions for SKUs: Instructions For A 3D Baited Electric Deer Fence Kit A 3D Fence That Runs on Two Lines of Parallel Posts: One line of posts with a single wire, and one line of
U. M. ARMY Texas Conference. Wheel Chair Ramp Manual
 U. M. ARMY Texas Conference Wheel Chair Ramp Manual June 2014 U. M. ARMY Texas Conference Building & Repair Tips Wheelchair Ramps Complete a site survey to determine the design and layout of the ramp.
Side "A" Stake here. Side "C" Side "D" Side "B" Here Shirley and I are setting up a 10 X 16 ground work.
 Choosing the Location It is always best to locate your greenhouse so that it can receive maximum sunlight at all times of the year especially in winter months. If Possible orient the long side towards
INS A KSCR INSTALLATION INSTRUCTIONS STANDARD PROCEDURE. 1. Unpacking the KSCR Splicing the KSCR (If Required)...
...") INS-88.500-0A KSCR INSTALLATION INSTRUCTIONS STANDARD PROCEDURE 1. Unpacking the KSCR... 2 2. Splicing the KSCR (If Required)... 4 3. Assemble Curb and Rail Corners... 5 4. Install Cross Bracing (If Required)...
INS-88.500-0A KSCR INSTALLATION INSTRUCTIONS STANDARD PROCEDURE 1. Unpacking the KSCR... 2 2. Splicing the KSCR (If Required)... 4 3. Assemble Curb and Rail Corners... 5 4. Install Cross Bracing (If Required)...
CONSTRUCTION GUIDE 27ft Wide and 30ft Wide SHEEP HOUSE
 The Outside, Inside CONSTRUCTION GUIDE 27ft Wide and 30ft Wide SHEEP HOUSE Thank you for purchasing a Premier Sheep House. Please take the time to carefully read through this Construction Guide before
Using High Tensile Wire
 Fencing Systems for Rotational Grazing Using High Tensile Wire Using High Tensile Wire Tom Cadwallader and Dennis Cosgrove University of Wisconsin-Extension 1 Installing the High Tensile Wires There are
Chain Link Fence Installation Manual
 Chain Link Fence Installation Manual Before You Begin: 1. Obtain necessary zoning and building permits. There may be local zoning or deed restrictions pertaining to height and type of fence. Check out
ALUMINUM FENCE. Additional freight charges may apply depending on order size. Please call for quote at
 ALUMINUM FENCE Additional freight charges may apply depending on order size. Please call for quote at 1-888-662-1788 Powder Coat Finish FORGERIGHT Fences are offered in the choice of three colors: Black,
MEASURE AND INSTALLATION GUIDE FOR BABY-LOC REMOVABLE MESH FENCE
 MEASURE AND INSTALLATION GUIDE FOR BABY-LOC REMOVABLE MESH FENCE Measuring The distance Baby-Loc fence units should be installed away from a pool is a minimum of 2½ feet. This will allow room for walking
MOBILE POLE FOR A HAM RADIO ANTENNA By Cordell Vail KE7ZBQ
 MOBILE POLE FOR A HAM RADIO ANTENNA By Cordell Vail KE7ZBQ I wanted to build a mobile pole for my 2 meter J-pole Ham Radio antenna so I could take it with me anywhere I needed to go in an emergency. Here
Low/High Tunnel Greenhouse Plans
 Low/High Tunnel Greenhouse Plans Tools Needed (See the complete list of Greenhouse Tools) Hacksaw or Reciprocating Saw Socket Wrench, Adjustable Wrench or Nut Drivers Electric Drill with Drill Bits Sledge
Ledgewood Farm greenhouse. construction
 Ledgewood Farm greenhouse How do I Start? construction to I m Finished! Post layout The string will be 7 above the ground and the posts will be driven until the proper drill hole is at the string. Spacing
12x24x10 Run-In Shed #51451
 12x24x10 Run-In Shed #51451 Please read instructions completely before assembly ATTENTION: BOLTS ARE NOT NEED- ED OR INCLUDED FOR EVERY CONNECTION BUT MAY BE PURCHASED BY CALL- ING THE NUMBER BELOW Description
OPEN PICKET PANEL AND GATE INSTALLATION INSTRUCTIONS
 For All Your Vinyl Fencing Needs OPEN PICKET PANEL AND GATE INSTALLATION INSTRUCTIONS 1 BEFORE YOU START, IT S IMPORTANT TO CHECK: That fence or the fence post footings do not exceed your lot lines of
Downtown Rack. Custom logo option available
 Custom logo option available Downtown Rack The Downtown Rack uses thick, square-tube construction that can t be cut with a pipe cutter. The extended width of the Downtown Rack makes for easy bike parking
Aluminum Pre-Built Fence For Standard & Heavy-Duty Series
 ALUMFENCEA-BOM Aluminum Pre-Built Fence For Standard & Heavy-Duty Series INSTALLATION INSTRUCTIONS Read all instructions prior to installing product. Refer to manufacturers safety instructions when operating
Installa on Guide: Fence Distributors. YourNextFence.com
 YourNextFence.com Plan Your Fence each line by dividing the length of each line in inches by 96. Round any remainder up. 2 Calculate Materials * For standard single gates (46 1/4 opening) : (1) small Trex
Post & Rail Crossbuck
 Post & Rail Crossbuck 1. Getting Started 6. Crossbuck Be sure to call underground prior to digging Assemble gates (if necessary) and decide where they will be located Stake out the fence line Space and
FENCE INSTALLATION GUIDE 3, 4, & 6 HIGH FENCE
 FENCE INSTALLATION GUIDE 3, 4, & 6 HIGH FENCE 1.866.648.9336 www.simtekfence.com INSTALLATION GUIDE These instructions are designed to assist both professional installers and do-it-yourselfers of SimTek
INSTALLATION INSTRUCTIONS LS X 12-2 X 7 1/2 FRAME LOAFING SHED
 INSTALLATION INSTRUCTIONS LS-12 12 X 12-2 X 7 1/2 FRAME ACTUAL FRAME BASE SIZE: 12 X 12-2 LOAFING SHED Our unique assembly process quickly transforms the individual pieces into a finished structure that
16ft Polytunnel Assembly Instructions
 CONTENTS Section Page 1. FOUNDATION TUBES: Option A Ground Anchor Plates 3 2. FOUNDATION TUBES: Option B Concreted Foundation Tubes 5 3. STEEL FRAME ASSEMBLY & INSTALLATION 6 4. CROP BARS 8 5. TIMBER END
REGENCY TIMBER BUILDINGS
 REGENCY TIMBER BUILDINGS TEL 01948 830460 UNIT 22 PENLEY IND EST, PENLEY.WREXHAM. LL13 0LQ 1 Garage fitting instructions Tools needed handsaw, hammer, Stanley knife with hook blade, tape measure, battery
ASSEMBLY INSTRUCTIONS FOR SOFTOP SHADE COVER
 ASSEMBLY INSTRUCTIONS FOR SOFTOP SHADE COVER Our unique assembly process quickly transforms individual pieces into a finished structure that will give you a lifetime of service. Great care has been taken
10 x 10 Flat Top Pergola
 0 x 0 Flat Top Pergola A S S E M B L Y G U I D E Models: Venetian, Tuscany, Luxor, Acadia O P T I O N A L A C C E S S O R I E S Arch Kit System ( Arches) Privacy Fence Panel System ( Panels & Middle Post)
10 x 10 Flat Top Two Tone Pergola
 0 x 0 Flat Top Two Tone Pergola Models: Bordeaux ASSEMBLY GUIDE OPTIONAL ACCESSORIES Arch Kit System ( Arches) Privacy Fence Panel System ( Panels & Middle Post) Bolt Down Bracket Kit ( for Pergola) Ver.0-00
PAC-12 Kit Contents. Tools Needed Soldering iron Phillips screwdriver Wire stripper Wrenches, 7/16 and 1/2 Terminal crimp tool Pliers Solder
 PAC-2 Kit Contents Part Quantity Screws: 8/32 x 3/8 Screws: 8-32 x 5/6 Screw: 8-32 x /4 #8 internal tooth washers #8 solder lug ring terminals Bolt: Aluminum, /4-20 x.5 /4 internal tooth washer Nut: Aluminum
Al Keller s Inexpensive Backyard Greenhouse Plans
 Al Keller s Inexpensive Backyard Greenhouse Plans There are many ways to construct low cost greenhouses for your property. This is just one man s design, using easily obtainable and fairly inexpensive
INSTALLATION INSTRUCTIONS LS X 12-2 X 7 1/2 FRAME LOAFING SHED
 INSTALLATION INSTRUCTIONS LS-24 24 X 12-2 X 7 1/2 FRAME ACTUAL FRAME BASE SIZE: 24 X 12-2 LOAFING SHED Our unique assembly process quickly transforms the individual pieces into a finished structure that
Installation Guide. Capped Cellular PVC Fencing. Table of Contents. Storage and Handling Tools Needed Fence Layout and Locating Posts
 Capped Cellular PVC Fencing Installation Guide Table of Contents Storage and Handling Tools Needed Fence Layout and Locating Posts Installation instructions 4 x 4 Over Sleeve Post - 3.5 Rail Privacy Shadowbox