Trebuchet Parts List and Overview
|
|
|
- Samson Robinson
- 5 years ago
- Views:
Transcription

1 Trebuchet Trebuchet Parts List and Overview The trebuchet pictured above is armed and ready to throw an object. Pulling the pin out of the trigger allows the counterweight to fall. The long end of the throwing arm swings up rapidly, pulling the sling forward. The sling, with an object in its pouch, swings around the end of the throwing arm picking up speed. When the throwing arm rotates past vertical, one end of the sling releases from the slot in the end of the arm. This releases the object from the pouch allowing it to fly forward. The physics of this ancient device is complicated involving gravitational potential energy, angular momentum, velocity ratio and kinetic energy. The Simple Explanation: When the counter-weight falls, its gravitational potential energy is changed to kinetic energy in the moving projectile. A more detailed discussion of Trebuchet Physics: (Word document) 2:21:18 PM]

2 Trebuchet Trebuchet after "firing". Parts: 2:21:18 PM]

3 Trebuchet 2:21:18 PM]

4 Trebuchet Throwing Arm 2:21:18 PM]
 - 1.8 cm x 27.5 cm (long side, angle 45 degrees) http://hila.webcentre.ca/projects/trebuchet/trebuchet_parts.")
5 Trebuchet All material is 3/4" softwood. A - main base (1) - 9 cm x 30 cm B - Base Supports (3) cm x 14 cm C - Uprights (2) - 28 cm x 1.8 cm D - braces (2) cm x 27.5 cm (long side, angle 45 degrees) 2:21:18 PM]

6 Trebuchet Trigger block 1.8 cm x 7.5 cm 1.8 cm slot cut in one end. 2:21:18 PM]
7 Trebuchet Return 2:21:18 PM]

8 Construct the counter weight basket Construct the counter-weight basket: 1: Apply white glue to both basket end pieces. 2:21:42 PM]
 2: Align basket bottom piece with end pieces and nail in place with 1\" common nails. http://hila.")
9 Construct the counter weight basket (Important: one of the end pieces has a slot cut in it to accommodate the arm. Make sure the longest part of the slot is on the outside of the basket.) 2: Align basket bottom piece with end pieces and nail in place with 1" common nails. 2:21:42 PM]

10 Construct the counter weight basket 3: Apply glue to sides of end pieces and attach side plates with 1/2" #6 flat head screws. 2:21:42 PM]

11 Construct the counter weight basket 2:21:42 PM]

12 Construct the counter weight basket Continue to instructions for assembling base. Return 2:21:42 PM]

13 1 Assemble Trebuchet Base 1 - Use white glue and screws to attach main uprights to one of the small base stands. 2:22:30 PM]

14 1 Start with one screw and then make sure the uprights are at 90 degrees (right angle) to the base stand and they align with the outer edge. Tighten both screws. 2 - Set the main base on the three base stands as shown. The two end pieces are aligned with the end of main base. The piece holding the uprights is placed at the distance indicated. (Distance is important). 2:22:30 PM]

15 1 Fasten with 1 1/4" #6 screws and glue. 3 - Attach diagonal braces with 3/4 " #6 screws and glue. 2:22:30 PM]

16 1 5 - attach trigger plate to end of base. Make sure the slot is up and aligned as pictured. 2:22:30 PM]

17 1 Continue to sling assembly instructions. Return 2:22:30 PM]
18 Create the sling Create the sling. 1: Tie string around the 4 nails on the sling template. 2: Cut a 10 cm piece of duct tape, center it sticky-side up under the strings. Press the strings into the tape. 2:22:56 PM]
19 Create the sling 3: Cut a second piece of tape and tape it over the first, capturing the strings. 2:22:56 PM]

20 Create the sling 4: Pull one nail to release the string. 2:22:56 PM]

21 Create the sling 5: Cut two narrow strips of duct tape, use them to shape the duct tape into a pouch. 2:22:56 PM]

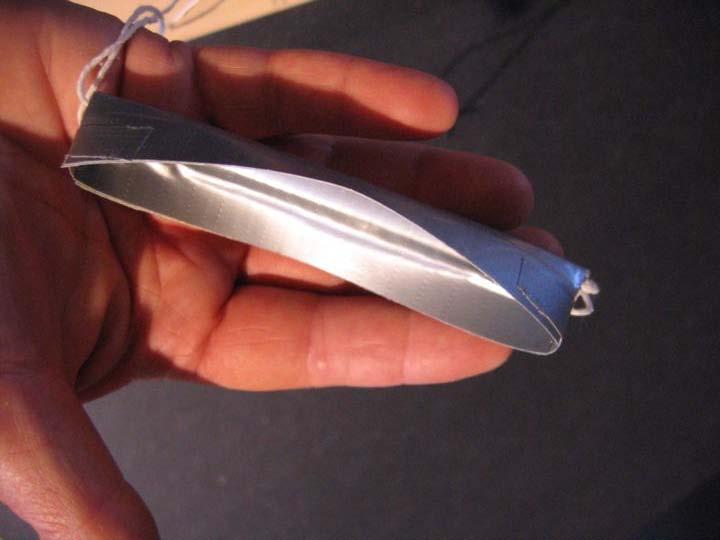
22 Create the sling 2:22:56 PM]
23 Create the sling Proceed to Final Assembly Return 2:22:56 PM]

24 Final Assembly Final Assembly 1: Use a loop of wire to attach one end of sling to hole in bottom of throwing arm. 2: Shape a loop of wire so that it easily slides in and out of release slot. Attach this wire to other end of sling. 2:23:23 PM]

25 Final Assembly 3: Pull throwing arm to loaded position. Tape a loop of wire to the back of the pouch so that it protrudes through the slot in the trigger mechanism. 4: Use a straightened paper clip as the trigger pin. Attach a string to it so you can pull from a safe distance. 2:23:23 PM]

26 Final Assembly Proceed to loading your trebuchet. Return 2:23:23 PM]
Cautionary and Warning Statement. How a Trebuchet Works. Materials Included. Items Required (not included) Building the Base.
 Building the Base.") Cautionary and Warning Statement This kit is designed and intended for educational purposes only. Use only under the direct supervision of an adult who has read and understood the instructions provided
Cautionary and Warning Statement This kit is designed and intended for educational purposes only. Use only under the direct supervision of an adult who has read and understood the instructions provided
Fryer's Trebuchet Paper Kits
 Fryer's Trebuchet Paper Kits Things you will need 7 sheets of card approx. 0.3 mm or 0.01 inches thick 1 sheet of paper to print out to download. 2 x 6-7 mm dowel or pencils 1 paper clip String 6 cms (2.5
Trebuchet Construction Instructions
 Trebuchet Construction Instructions Follow these instructions step by step to create your trebuchet. Materials: Trebuchet Template (6 pages cardstock) Trebuchet Template (1 page paper) One unsharpened
Catapult Engineering
 With support from Oxfordshire County Council, Science Oxford is pleased to present; Catapult Engineering The Physics of Siege Weapons STEM Club Resource Pack Introduction: Catapult engineering involves
Desktop Trebuchet Kit Assembly Instructions
 Desktop Trebuchet Kit Assembly Instructions Contents of package (drawings are not to scale for clarity, parts that have duplicates are indicated with total number of that part to be found, example: 2X
GE 100 Trebuchet Field Activity Instruction Sheet
 GE 100 Trebuchet Field Activity Instruction Sheet Safety Instructions: 1) Make sure that at the time of trebuchet launch, no person is leaning over/or is in close proximity of the rotating arm. 2) Only
MantelMount. TM1A Installation Instructions IMPORTANT SAFETY INSTRUCTIONS - SAVE THESE INSTRUCTIONS
 MantelMount TMA Installation Instructions IMPORTANT SAFETY INSTRUCTIONS - SAVE THESE INSTRUCTIONS TM Thank you for choosing the MantelMount television wall mount. Please read this entire manual before
DATE: January, 01, 2011 AUTHOR: Craig Macomber TOPIC: Making and operating a model onager
 DATE: January, 01, 2011 AUTHOR: Craig Macomber TOPIC: Making and operating a model onager INTRODUCTION This guide will walk you through the construction and operation of a hand held scale Roman Onager,
Project: Trebuchet Overview: This medieval launcher would reek. Materials: 3/4 plywood, 2 of 5/8 threaded. Minimum Cutting Area: 2 sheets of plywood
 Project: Trebuchet Overview: This medieval launcher would reek havoc on enemies castles. However, the modern day conversion using 20lbs of weight will easily through a tennis ball the length of a gymnasium.
CONTENTS. x 32 ½ ½ ½ ½ ½ ½ ½ ½ ½ ½ ½ ½ ½ ½ ½ ½. x 4. A Planks. B Planks. C Planks. Basic Planks for Construction x 14 Basic Planks for Targets x 18
 Torque Rope s CONTENTS A Planks B Planks C Planks Basic Planks for Construction x 14 Basic Planks for Targets x 18 Foam Pad Projectiles Bands 3 Bamboo Shafts x 4 x 2 x 2 x 32 Wood Glue Barrel SETUP Before
TeacherGeek Launcher Example Build
 LAUNCHER EXAMPLE BUILD TeacherGeek Launcher Example Build TeacherGeek, 2011 LAUNCHER EXAMPLE BUILD TeacherGeek 2 LAUNCHER BASE PARTS A B D F E C G LAUNCHER EXAMPLE BUILD TeacherGeek 3 ASSEMBLING THE LAUNCHER
Sentinel Series Cigar Humidor End Tables
 Sentinel Series Cigar Humidor End Tables Assembly Instructions Models: Sentinel 500, 1000 and 1500 Style: Contemporary SENTINEL ASSEMBLY INSTRUCTIONS Congratulations! You have purchased a superior cigar
8 Design Parameters. Totally Trebuchet builders need to carefully consider the 8 design parameters that affect the trebuchet s performance.
 Totally Trebuchet Construction Guide An Illustrated Assembly Manual Introduction Medieval engineers designed and built trebuchets capable of accurately hurling large masses over distances spanning hundreds
The Stirling WarWolf Trebuchet Kit RLT.com Industries Copyright, 2007
 The Stirling WarWolf Trebuchet Kit RLT.com Industries Copyright, 2007 If any part of these instructions are unreadable, you can download a PDF version from http://www.rlt.com/instructions/stirlingwarwolf.pdf
How To Measure Your Finished Opening
 3000 Series Bifold Doors How To Measure Your Finished Opening MEASURE FROM RIGHT TO LEFT 2 PLACES (WIDTH) MEASURE FROM TOP TO BOTTOM 2 PLACES (HEIGHT) Tools Required for Assembly: Tools Needed: Phillips
Playground Assembly Instructions
 Before You Begin Playground Assembly Instructions Locate the playground set on firm, level ground. Assemble the playground on or close to its permanent location Two people are recommended to assemble the
Projectiles: Earth to Earth; The Dynamics of Catapults & Trebuchets
 NATURE Sunday Academy 2012-2013 Projectiles: Earth to Earth; The Dynamics of Catapults & Trebuchets Ann Vallie (TMCC) and Dr. Bob Pieri (NDSU) Description: In this Sunday Academy session, students will
INSTRUCTIONS TS93 GSR PT RIGHT HAND ACTIVE LEFT HAND INACTIVE RIGHT HAND INACTIVE LEFT HAND ACTIVE
 INSTRUCTIONS ATTENTION!!! Before you begin, determine installation type (RIGHT HAND ACTIVE OR INACTIVE). Door coordinator suitable for door from 59 to 98 in width. Inactive door width in the case of unequal
The Useless Machine. Parts Only - Build Guide v0001
 TM The Useless Machine Parts Only - Build Guide v0001 For the best outcome, follow each step in order. We recommend reading this guide entirely before you get started. Tools required: One phillips screwdriver,
MM340 Installation Instructions IMPORTANT SAFETY INSTRUCTIONS - SAVE THESE INSTRUCTIONS
 MM30 Installation Instructions IMPORTANT SAFETY INSTRUCTIONS - SAVE THESE INSTRUCTIONS Please read this entire manual before you begin. Do not unpack any contents until you verify all requirements on PAGE.
ASSEMBLY INSTRUCTIONS FOR STORETTE STA42
 ASSEMBLY INSTRUCTIONS FOR STORETTE STA42 A01 CAUTION: Some parts have sharp edges. Care must be taken when handling the various pieces to avoid a mishap. For safety sake, please read the safety information
Instructions for Catalina Round/Square Extension Tables
 Unpack the table onto a soft level surface and identify the listed items. Instructions for Catalina Round/Square Extension Tables Hardware included: ¼ - #20 x 35mm s (4) ¼ - #20 x 50mm s (8) Cross nuts
Bunk Pod Front Entry Assembly Instructions
 Bunk Pod Front Entry Assembly Instructions www.podtime.co.uk enquiries@podtime.co.uk Working House Ltd How to assemble your pod This step by step guide will show how to assemble your pod(s) on site. It
ASSEMBLY AND ADJUSTMENT
 EDGE MONITOR ARM EDGE Rev A 2/17 Model EDGE-SLV Model EDGE-BLK Model EDGE-WHT ASSEMBLY AND ADJUSTMENT EDGE MONITOR ARM PARTS AND TOOLS PLEASE REVIEW these instructions before beginning the assembly and
MM Strut Tower Brace, GT (MMSTB-5.1)
") 3430 Sacramento Dr., Unit D San Luis Obispo, CA 93401 Telephone: 805/544-8748 Fax: 805/544-8645 www.maximummotorsports.com MM Strut Tower Brace, 1996-97 GT (MMSTB-5.1) MMSTB-5.1 is for 1996-97 GT s with
3430 Sacramento Dr., Unit D San Luis Obispo, CA 93401 Telephone: 805/544-8748 Fax: 805/544-8645 www.maximummotorsports.com MM Strut Tower Brace, 1996-97 GT (MMSTB-5.1) MMSTB-5.1 is for 1996-97 GT s with
MM540 Installation Instructions IMPORTANT SAFETY INSTRUCTIONS - SAVE THESE INSTRUCTIONS
 MM50 Installation Instructions IMPORTANT SAFETY INSTRUCTIONS - SAVE THESE INSTRUCTIONS Please read this entire manual before you begin. Do not unpack any contents until you verify all requirements on PAGE.
WPS crew Doors Installation instructions
 WPS-132-133 crew Doors Installation instructions ORDER OF INSTALLATION FOR A COMPLETE ENCLOSURE OF A CREW WPS (Weather Protection System) IS AS FOLLOWS: 1. Heater 2. Rear Thresholds - Right Hand & Left
Baby Grande with Crank, Housing, and Side Rails Installation Instructions
 Baby Grande with Crank, Housing, and Side Rails Installation Instructions Tools Needed Hardware Provided (per shade) Hardware Needed Drill 3/8 Metal Drill Bit ¼ Masonry Drill Bit Measuring Tape Pencil
33/3547A. Special tools needed: #10-24 tap Drill bits: #25, 5/16, 13/32, 1/2
 911404-00 Concealed Vertical Rod Exit Device 33/3547A Installation Instructions Devices covered by these instructions: 33/3547A and 33/3548A Concealed Vertical Rod Exit Device 33/3547A-F and 33/3548A-F
Sentinel Series Cigar Humidor End Tables
 Sentinel Series Cigar Humidor End Tables Assembly Instructions Models: Sentinel 500, 1000 and 1500 Style: Traditional SENTINEL ASSEMBLY INSTRUCTIONS Congratulations! You have purchased a superior cigar
Baby Grande or Grande Crank Shade with Cables and Housing Installation Instructions
 Baby Grande or Grande Crank Shade with Cables and Housing Installation Instructions Tools Needed Drill 3/8 Metal Drill Bit Screwdriver (Flat & Phillips) Measuring Tape Pencil 4 Level Plumb Line ¼ Masonry
Track Rack. * Track Racks are not lockable
 The Track Rack s unique staggered, sliding hook design creates the greatest parking efficiency while still providing easy access to any particular bike. When adding or removing a bike to the rack, simply
Router Table. Construction
 Router Table A router table is an invaluable tool. The problem, however, is that ready-built router tables are usually relatively expensive and too narrow for many projects. This router table provides
Installing flat panels on the MPL15 wall mount
 Installing flat panels on the MPL15 wall mount The MPL15 (DS-VW775) is a full-service video wall mount that can accommodate tiled LCD panels with up to a 400 x 400 mm VESA pattern in portrait and landscape
Baby Grande or Grande Crank Shade with Cables and Housing Installation Instructions
 Baby Grande or Grande Crank Shade with Cables and Housing Installation Instructions Tools Needed Drill 3/8 Metal Drill Bit Screwdriver (Flat & Phillips) Measuring Tape Pencil 4 Level Plumb Line ¼ Masonry
Vigilant Cigar Humidor Vault. Assembly Instructions
 Vigilant Cigar Humidor Vault Assembly Instructions Models: 1000, 1500, and 2000 Congratulations! You have purchased a superior cigar humidor. These humidors have been specifically designed to properly
96 (Standard Length)
") Setbacks 96 (Standard Length) Bike Files may be lined up end to end to fill the available space. A 36 aisle should be left between the ends of bikes in racks facing one another. 36 aisle 50 Installation
Setbacks 96 (Standard Length) Bike Files may be lined up end to end to fill the available space. A 36 aisle should be left between the ends of bikes in racks facing one another. 36 aisle 50 Installation
LCD LIFT Flat Panel Display System Installation Manual. Table of Contents
 LCD LIFT Flat Panel Display System Installation Manual Table of Contents Page Installation Overview... 2 Trim Ring Installation... 3 LCD Lift Installation....4 Actuator Switch Installation.5 Top Plate
EDGE2 DUAL MONITOR ARM
 EDGE2 DUAL MONITOR ARM EDGE2 Rev A 2/17 Model EDGE2-SLV Model EDGE2-BLK Model EDGE2-WHT ASSEMBLY AND ADJUSTMENT EDGE2 DUAL MONITOR ARM PARTS AND TOOLS PLEASE REVIEW these instructions before beginning
Installation Instructions. Oakmont Folding Doors
 Before You Start For quick and easy installation of your Oakmont folding door, read these instructions thoroughly. A few minutes of prior planning will make the job easier and ensure years of trouble-free
Installation instructions, accessories. Rails. Volvo Car Corporation Gothenburg, Sweden. Instruction No Version Part. No
 Instruction No Version Part. No. 8685942 1.0 Rails J8401014 Page 1 / 9 Equipment A0000162 A0000161 J8401006 Page 2 / 9 INTRODUCTION Read through all of the instructions before starting installation. Notifications
MODEL 1703E THE CHAMBERLAIN ARM TM INSTALLATION INSTRUCTIONS To be used in conjunction with the Lift-Master Garage Door Operator Owner's Manual
 MODEL 1703E THE CHAMBERLAIN ARM TM INSTALLATION INSTRUCTIONS To be used in conjunction with the Lift-Master Garage Operator Owner's Before you begin, please read this ENTIRE instruction manual. One- Piece
*** All chrome surfaces should be cleaned using a clean damp cloth. *** No abrasive cleaning agents or materials should be used.
 Cleaning *** All chrome surfaces should be cleaned using a clean damp cloth. *** No abrasive cleaning agents or materials should be used. *** No chemical cleaners can be used on the glass use only mild
METAL BLINDS. Deluxe GETTING STARTED OPTIONAL HARDWARE. A few simple tools are required: STANDARD HARDWARE
 METAL BLINDS Deluxe GETTING STARTED OPTIONAL HARDWARE A few simple tools are required: Steel Tape Measure Pencil Level Hold Down Brackets with Screws Extension Bracket Power Drill and Drill Bits Flathead
SmartView Mounting Frame 3 Wide x 3 Deep Video Wall Display Installation Guide
 SmartView Mounting Frame 3 Wide x 3 Deep Video Wall Display Installation Guide WMK-034 This display kit mounts ViewSonic 46 Video Wall displays in a 3 wide by 3 deep landscape configuration. The frame
Grade 8 Enriched Math Catapult Project 2012 Step by Step Instructions to building a catapult
 Grade 8 Enriched Math Catapult Project 2012 Step by Step Instructions to building a catapult Grade 8 Enriched Math Project INSTRUCTION SHEET FOR CATAPULT Procedures, materials and tools: below is a step-bystep
End of Row Doors. Revision Number 1
 End of Row Doors Single Swing Door Café Style Doors Revision Number 1 Wright Line LLC 160 Gold Star Boulevard Worcester, MA 01606 Tel: 800-225-7348 508-852-4300 Fax: 508-365-6178 www.wrightline.com info@wrightline.com
WORKSURFACE ASSEMBLY
 WORKSURFACE ASSEMBLY Notes: Worksurfaces should be installed last. This provides easy access to Core/Walls. For Double Sided configurations, repeat the following sequences for the opposite side of the
FORWARD FUSELAGE SIDES & REAR TOP SKINS
 FORWARD FUSELAGE SIDES & REAR TOP SKINS WORK REPORT Step No. Check Parts / Tools Qty Preparations. 1 [ ] 6F5-3 Upper Front Longerons 2 2 [ ] 6F5-5 Heel Support 1 3 [ ] 6F5-2 Front Floor Skin 1 3 [ ] Firewall
Deck Mount Installation with Bench
 Deck Mount Installation with Bench 1. Mark track with square. 2. Cut tracks with saw. 3. Drill ¼ hole (if needed.) 4. Countersink track. 5. Countersink all track 6. File all track ends. ends. 7. Lay out
MM Strut Tower Brace, Cobra (MMSTB-7)
") The MM strut Tower Brace attaches to each strut tower and to the firewall. 3430 Sacramento Dr., Unit D San Luis Obispo, CA 93401 Telephone: 805/544-8748 Fax: 805/544-8645 www.maximummotorsports.com MM
The MM strut Tower Brace attaches to each strut tower and to the firewall. 3430 Sacramento Dr., Unit D San Luis Obispo, CA 93401 Telephone: 805/544-8748 Fax: 805/544-8645 www.maximummotorsports.com MM
a.k.a. casegoods instructions
 a.k.a. casegoods instructions a a.k.a. workwall installation IMPORTANT NOTES Failure to install product according to installation instruction will result in loss of warranty. Tools required for assembly
fun and adaptable pie shooting catapult!
 fun and adaptable pie shooting catapult! (made with 3D printing) a project by Maya & Noah the MyPie Catapult project: The MyPie Catapult is designed by Maya and Noah. Maya is the brains behind the design.
Oxford Stalls Installation Instructions
 Oxford Stalls Installation Instructions RAMM Horse Fencing and Stalls 13150 Airport Hwy. Swanton, OH 43558-9615 1-800-434-8456 Rev. 8/15/17 Before You Start Typical stall sizes are 10 x 10, 12 x 12 or
Bear-Resistant Trash Can Caddy: Enclosed Design Designed by Eagle Scout Michael Mezich
 Bear-Resistant Trash Can Caddy: Enclosed Design Designed by Eagle Scout Michael Mezich The Florida Fish and Wildlife Conservation Commission offers the following design for areas with frequent bear visits.
Using the RhAT II Universal
 Using the RhAT II Universal To use the Original RhAT Tools, the main shaft of the machine had to be rotated to the setting position, either mechanically or electronically, while the needle bar was disengaged
For additional assistance call
 The following pages will help guide you through the process of assembling your new 48 custom prize wheel. Choose an assembly area with plenty of room to lay your pieces on the floor and also a bench or
Mounting a BalanceBox 400 to a brick wall
 Unpack the BalanceBox 400 and remove the Wall frame cover and its bag of screws. Slide the cover out at the top. NOTE: the cover is NOT included with the BalanceBox 400H LOCK SCREW HOLE MOBILE STAND MOUNTING
IMPORTANT: WILL NOT FIT COUNTRYMAN MODELS
 Part #1410-0102-07 2 3 1 IMPORTANT: WILL NOT FIT COUNTRYMAN MODELS Apply masking tape around the bottom grille opening and across the bottom of the upper facto ry grille.. Open the hood and remove the
NEXUS SERIES CABINETS
 NEXUS SERIES CABINETS STANDARD BASE ASSEMBLY INSTRUCTIONS Also applies to: Galaxy Series, Nexus Series, Ridgeline Series, Statesman Series, and Waterford Series FOR YOUR INFORMATION: These assembly instructions
Passage 4 Bike Hitch Rack
 Thank you for purchasing the XPORT Passage 4 Bike Hitch rack. This rack will securely carry up to 4 bicycles. The trigger and lift assist mechanisms allow the rack to tilt up or down allowing easy access
Jenny Legs Assembly Instructions
 Jenny Legs Assembly Instructions R EXTENDED PHILLIPS BIT MM ALLEN WRENCH 6MM HEX DRIVE /" 007 Steelcase Inc. Grand Rapids, MI 90 U.S.A. Printed in U.S.A. Page of 6 88000 Rev F Jenny Club Instructions:
MANUAL INSTALLATION. Linear Bar Grille LBP. v000 Issue Date: 09/17/ Price Industries Limited. All rights reserved.
 MANUAL INSTALLATION Linear Bar Grille LBP v000 Issue Date: 09/17/18 2018 Price Industries Limited. All rights reserved. TABLE OF CONTENTS Product Overview Overview...1 Before You Start...1 Getting Started...1
LANDING GEAR. 1. Fit landing gear into slots on bottom of fuselage.
 LANDING GEAR 1. Fit landing gear into slots on bottom of fuselage. 4. Use channel-lock pliers to press blind nuts into position (note: drilled hole should be slightly smaller than shaft of blind nut for
1 PREPARE HEADER AND ROUGH OPENING
 CONTENTS. HEADER & TRACK ASSEMBLY. END BRACKET PLAIN 3. FLOOR PLATE.. 8. 4. SPLIT STUD 6 5. CARRIER (987) 6. QUICK RELEASE PLATE (960) 7. DOOR GUIDE SET (9883) 3. 4. 7. 8. BUMPER KIT (988) 9. #8 X 3/4
Lok Fast Column Clamp General Information
 Lok Fast Column Clamp General Information Gates Lok-Fast Column Clamp Has These Advantages: Can Be Job Built Gang Formed No Loose Pieces Designed For Rapid Placement of Concrete Rapid Locking Action 3
Paper Pinwheel. Supplies
 Paper Pinwheel 1. Draw some lines. Measure and cut a square piece of paper.» Use the ruler and pen to draw lines from each corner of the paper towards the center. These lines should be half the size of
18600 Angular Momentum
 18600 Angular Momentum Experiment 1 - Collisions Involving Rotation Setup: Place the kit contents on a laboratory bench or table. Refer to Figure 1, Section A. Tip the angular momentum apparatus base on
Woodline USA Woodline Spacer Fence System
 Woodline USA Woodline Spacer Fence System MADE IN THE USA Includes: (1) ¼ Spacer Fence (1) 3/8 Spacer Fence (1) ½ Spacer Fence (1) Hardware Package (1) 3 Piece Brass bar set (2) Setup Blocks Visit Us Online
The Marbleous Contraption. April 22, 2009
 The Marbleous Contraption April 22, 2009 Aaron Curtis: Designer, Builder, Report Tyler Bowland: Designer, Builder, Report Wesley Shepard: Designer, Builder, Report 2 Introduction: For our final EF 151
200A FLB VERTICAL 22113V LIFT W/CHAIN DRIVE WINCH
 PG. 1 OF 11 PORTA-DOCK, INC. 200A FLB VERTICAL 22113V LIFT W/CHAIN DRIVE WINCH STEP 1. Separate and group like parts and fasteners together. Locate the winch side member with the longer upright tube and
Heliac Solar Cooker Assembly Manual
 Heliac Solar Cooker Assembly Manual (v4.3) Mirror Assembly 1 Build the outer frame from N2 and N3. Predrill holes and screw the corners together. Use 8x 3.5*40screws for this process. A proper wood glue
2016/02 Hideo Nakano STRAW KITE
 2016/02 Hideo Nakano nh1886@yahoo.co.jp STRAW KITE Introduction We can build up an improvised airplane, which has a plastic straw skeleton, a rubbish bag sheet wing and a rubber band powered toy propeller.
Scratch Build a Water Tower
 Here s some Prototype details Photos Courtesy of Rodney Doster Water Spout and Discharge Pipe Tank Bands Here s some more Prototype details Photos Courtesy of Rodney Doster Weather Vane as a Finial Using
System 3000 specifications
 System 3000 specifications Scope: Materials: Type of Bookstack: This specification covers delivery and installation of steel library shelving of the bracket type. Height, depth and accessories shall be
3 wide x 3 deep Video Wall Display Installation Guide
 HoverTrack Series 3 wide x 3 deep Video Wall Display Installation Guide VWD-3X3-X462 This display kit mounts NEC X461UN and X462UNS LCD monitors in a 3 wide by 3 deep landscape configuration. The frame
Hatch Whiteboard: Portable Stand Installation Instructions
 Hatch Whiteboard: Portable Stand Installation Instructions Remove Projector Wall Plate 1. Open the wall mount for the projector. 2. Remove the shipping screw from the front center of the mount arm. 1 P
INSTALL/REMOVAL INSTRUCTIONS: WINDOW REGULATOR
 REMOVAL/INSTALL OF WINDOW REGULATOR (741-526) Jeep Liberty 2002 2006 General Tech Tips: Use painter s tape rather than duct tape to secure window. It will not damage paint or leave sticky residue. A plastic
ELEVEN COLLABORATIVE. CONFERENCE TOPS Assembly Instructions
 ELEVEN COLLABORATIVE Table of Contents SUPPORT BRACE ASSEMBLY.... 3 TABLE BASE FRAME ASSEMBLY.... 4 LEG ATTACHMENT.... 5 TOP JOINING PLATE ASSEMBLY... 6 TOP CLAMP/TOP SPACER INSTALLATION.... 7 TOP PLACEMENT
INSTALL/REMOVAL INSTRUCTIONS: WINDOW REGULATOR
 REMOVAL/INSTALL OF WINDOW REGULATOR (748-569) Jeep Liberty 2002 2006 General Tech Tips: Use painter s tape rather than duct tape to secure window. It will not damage paint or leave sticky residue. A plastic
About Trebuchets. WarSerpent Construction. Paul Schmidt s WarSerpent trebuchet construction article. Left:
 Paul Schmidt s WarSerpent trebuchet construction article Left: Two full sized trebuchets, reenacting the historic construction of the famous WarWolf on NOVA s video documentary Secrets of Lost Empires
Rocketry Challenge - Technical Document I
 Rocketry Challenge - Technical Document I This document includes a list of what is inside the kit with pictures for hard to decipher parts and a simple step-by-step process of how to assemble and launch
Door window. Front door window, assembly overview
 64-50 Door window Front door window, assembly overview 1 - Window channel Pushed onto flange 2 - Door window Removing Page 64-52 Adjusting Page 64-53 3 - Door 4 - Outer window channel Pushed onto flange
KENECO FLOW RACK INSTALLATION INSTRUCTIONS
 KENECO FLOW RACK INSTALLATION INSTRUCTIONS Shipment and Components: Keneco flow racks are shipped unassembled and consist of some, but not necessarily all, of the following basic components: Vertical Frames
SE5a Instrument Board part 2 - rev 1.1
 SE5a Instrument Board part 2 - rev 1.1 Fuel (Petrol) Valve This valve uses two circular name plates, eight brass screws, one black plastic base, copper wire and two black plastic risers. You can pick any
6 1/2 x 6 1/2 Wood Grain Flat Top Pergola
 / x / Wood Grain Flat Top Pergola A S S E M B LY G U I D E Models: Lakewood OPTIONAL ACCESSORY Bolt Down Bracket Kit V.-09 Ta b l e o f Co n t e n t s The PAGE Introduction & Overview.......................................................
CHAIR COVER AND PILLOW A. 1 Front. 2 Side. 3 Arm Front. 4 Skirt Front. 5 Back. 6 Pillow CUTTING LAYOUTS CHAIR COVER AND PILLOW A
 ## PATTERN PIECES 4069 McCALL'S CRAFTS CHAIR COVER AND PILLOW A 1 Front 2 Side CHAIR COVER C,D 7 Guide PAGE 1 of 6 3 Arm Front 4 Skirt Front 5 Back 6 Pillow CUTTING LAYOUTS Cut other pieces first, allowing
Texas Essential Knowledge and Skills - Grade Three
 12 Texas Essential Knowledge and Skills - Grade Three (6) Force, (A) motion, explore and different energy. forms The student of energy, knows including that forces mechanical, cause change light, sound,
for Andersen 400 Series Woodwright Transom over 400 Series Woodwright Double-Hung or 400 Series Woodwright Picture Window
 for Andersen 400 Series Woodwright Transom over 400 Series Woodwright Double-Hung or 400 Series Woodwright Picture Window Congratulations! You have just purchased one of the many fine Andersen products.
MANUAL DE MONTAJE ASSEMBLY MANUAL AIREADOR DE PLUG AERATOR MODEL # AE-48T. Hardware & Parts Listing Assembly Instructions Maintenance Notes for
 ASSEMBLY MANUAL Hardware & Parts Listing Assembly Instructions Maintenance Notes for 48 PLUG AERATOR MANUAL DE MONTAJE Lista de piezas y tornillería Instrucciones de armado Notas de mantenimiento para
Bashing The Hanger 9 Cessna 182 ARF Part 4
 Bashing The Hanger 9 Cessna 182 ARF Part 4 Eric Helms Pongo Air This is the final installment of a four-part article covering a variety of modifications incorporated into a Hanger 9 Cessna 182 ARF. Upgrades
Installing Your Electronic Deadbolt
 Ultra Security Plus Electronic Deadbolt Installation Instructions http://www.hberger.com/video-gallery/electronic-deadbolt New Installation Lock Location Preparation (Skip this section if you door has
TOOLS 2 ½ hole saw (a good sharp one. You re going to make 36 holes.) Sharp pencil Yard stick Compass Protractor Sandpaper Rasp Drill Motor Jig Saw
 Sharp pencil Yard stick Compass Protractor Sandpaper Rasp Drill Motor Jig Saw") My version of this upright rifle rack does not have a turntable or lazy Suzan on it. I need to be able to move my rifles around so I opted to put casters on the bottom of the rack. With four casters, it
My version of this upright rifle rack does not have a turntable or lazy Suzan on it. I need to be able to move my rifles around so I opted to put casters on the bottom of the rack. With four casters, it
ANATOMY OF A BIT TM how you can tell top from bottom. four on the floor!
 ARCADE GAME BASICS 1 Learn BITSNAP ANATOMY OF A BIT TM how you can tell top from bottom. TOP BOTTOM BIT FEET 2 which COLOR-CODED BY FUNCTION Bits TM are grouped into four different categories, are color-coded.
Installation and Assembly - Universal Articulating Swivel Double-Arm for 42" - 60" Plasma Screens
 Installation and Assembly - Universal Articulating Swivel Double-Arm for 42" - 60" Plasma Screens Models: PLAV 70-UNL, PLAV 70-UNL-S PLAV 70-UNLP, PLAV 70-UNLP-S R This product is UL Listed. It must be
#11179 Wellington ARBOR
 #11179 Wellington ARBOR Assembly INSTRUCTIONS TOOLS NEEDED Tape Measure Variable Speed Drill with #2 Phillips Bit (recommended) or Phillips Screwdriver Hammer or Mallet ARBOR SIDE PANEL ASSEMBLY (Refer
Installation and Assembly: In-wall Mount for 32" to 71" Flat Panel Screens
 Installation and Assembly: In-wall Mount for 32" to 71" Flat Panel Screens Model# IM760P, IM760P-S IM760PU, IM760PU-S Screen size range 32" to 71" (81 to 180 cm) 32" to 60" (81 to 152 cm) IM760P IM760P-S
Installation Instructions
 Contents Page General Information and Installer Tips.......... 2 Panels & Posts............................. 3 Enclosure Description..................... 4 Hinge Door Hardware................... 4-5 Step-by-Step
Thank you for purchasing our product! *Please read these instructions and follow them step by step.*
 07/07/08.rev1 PAGE 1 OF 11 601AL VERTICAL 60120VL LIFT W/CHAIN DRIVE WINCH Thank you for purchasing our product! *Please read these instructions and follow them step by step.* Step 1. Separate and group
Tools: Sharpie, Square, Vise, Hack saw, Ruler, Punch, Hammer, File. 2. Cut the stock Place stock in vise and cut with hack saw
 Purpose: MAKE CATAPULT ARM Step 1 Tools: Sharpie, Square, Vise, Hack saw, Ruler, Punch, Hammer, File Materials: Flat aluminum ½ inch stock (see picture below) Gloves required 1. Pick up the aluminum ½