5-Function Combination Machine Manual
|
|
|
- Shonda Holland
- 6 years ago
- Views:
Transcription


1 5-Function Combination Machine Manual LAGUNA TOOLS 2072 Alton Parkway Irvine, California Ph: Model Number: A , Laguna Tools, Inc. LAGUNA and the LAGUNA Logo are the registered trademarks of Laguna Tools, Inc. All rights reserved.
2
3 Table of contents Page number Safety Rules 4 Limited warranty 5 Noise emission 6 Specification sheet 6 Receiving your machine 8 Introduction to Table Saws 8 Parts of the machine 9 Where to locate your machine 15 Unpacking your machine 16 What you will receive with the machine 16 Levelling the machine 18 Assembly and setup 19 Using and adjusting the machine 36 Maintenance and troubleshooting 43 Electrical drawing 52 Exploded view drawings and parts lists 53 3
4 Safety Rules As with all machinery, there are certain hazards involved with the operation and use. Using it with caution will considerably lessen the possibility of personal injury. However, if normal safety precautions are overlooked or ignored, personal injury to the operator may result. If you have any questions relative to the installation and operation, do not use the equipment until you have contacted your supplying distributor. Read the following carefully before operating the machine: 1. Keep the working area clean and be sure adequate lighting is available. 2. Do not wear loose clothing, gloves, bracelets, necklaces or ornaments. Wear face, eye, respiratory and body protection devices as indicated for the operation or environment. 3. Be sure that the power is disconnected from the machine before tools are serviced or an attachment is to be fitted or removed. 4. Never leave the machine with the power on. 5. Do not use dull, gummy or cracked cutting tools. 6. Be sure that the keys and adjusting wrenches have been removed and all the nuts and bolts are secured. 4
5 Limited Warranty New machines and accessories sold by Laguna Tools carry a one-year warranty effective from the date of shipping. Machines sold through dealers must be registered with Laguna Tools within 30 days of purchase to be covered by this warranty. Laguna Tools guarantees all new machines and accessories sold to be free of manufacturers defective workmanship, parts and materials. We will repair or replace, without charge, any parts determined by Laguna Tools, Inc. to be a manufacturer s defect. We require that the defective item/part be returned to Laguna Tools with the complaint. Any machines returned to Laguna Tools must be returned with packaging in the same manner in which it was received. If a part or blade is being returned it must have adequate packaging to ensure no damage is received during shipping. In the event the item/part is determined to be damaged due to lack of maintenance, cleaning or misuse/abuse, the customer will be responsible for the cost to replace the item/part, plus all related shipping charges. This limited warranty does not apply to natural disasters, acts of terrorism, normal wear and tear, product failure due to lack of maintenance or cleaning, damage caused by accident, neglect, lack of or inadequate dust collection, misuse/abuse or damage caused where repair or alterations have been made or attempted by others. Laguna Tools, Inc. is not responsible for additional tools or modifications sold or performed (other than from/by Laguna Tools, Inc.) on any Laguna Tools, Inc. machine. Warranty maybe voided upon the addition of such described tools and/or modifications, determined on a case-by-case basis. Software purchased through Laguna Tools Inc. is not covered under this warranty and all technical support must be managed through the software provider. Software is non-refundable. Normal user alignment, adjustment, tuning and machine settings are not covered by this warranty. It is the responsibility of the user to understand basic machinery operation, settings and procedures and to properly maintain the equipment in accordance with the standards provided by the manufacturer. Parts, under warranty, are shipped at Laguna Tools, Inc. s cost either by common carrier, FEDEX ground service or a similar method. Technical support to install replacement parts is primarily provided by phone, fax, or Laguna Tools Customer Support Website. The labor required to install replacement parts is the responsibility of the user. Laguna Tools is not responsible for damage or loss caused by a freight company or other circumstances not in our control. All claims for loss or damaged goods must be notified to Laguna Tools within twenty-four hours of delivery. Please contact our Customer Service Department for more information. Only new machines sold to the original owner are covered by this warranty. For warranty repair information, call
6 Noise emission. Notes concerning noise emission: Given that there exists a relationship between noise level and exposure times, it is not precise enough to determine the need for supplementary precautions. The factors affecting the true level of exposure to operators are clearly the amount of time exposed, the characteristics of the working environment, other sources of dust and noise, etc. For example, adjacent machines, in other words, affect the level of ambient noise. It is possible that exposure level limits will vary from country to country. Specification sheet. Table saw Blade capacity Spindle diameter Blade speed Blade tilt Max depth of cut Scoring blade Spindle diameter Blade speed Motor Table size Planer Table size Max height Max depth of cut Motor Cutter head Cutter speed Feed rate Dust port 10-inch machine [3 blade] 10 inch 30 mm 4050 rpm 90 to 45 degrees 2 1/4 inches at degrees 1 5/8 inches at 45 degrees 3 1/2 inches 20 mm 9000 rpm 3 hp 3 phase 220 volts 48 inches x 33 inches 250 mm x 600 mm 180 mm (7 inches) 2.5 mm 2 hp 3 phase 220 volts 3 blade 4800 rpm 8 mm/min 4 inches diameter 6
7 Jointer Table size Max width Max depth of cut Dust port Fence tilt Mortiser Spindle speed Table size Vertical stroke Lateral stroke Table vertical travel Tool diameter Motor Shaper Spindle diameter Spindle travel Max cutter diameter Motor Spindle speed Dust port Total weight 250 mm x 1085mm 250 mm 2.5 mm 4 inches diameter 90 to 45 degrees 4800 rpm 161mm x 368mm 0 to 80 mm 0 to 140 mm 0 to 90 mm 16 mm 2 hp 220 volts 3 phase 30 mm 130 mm 140 mm 3 hp 220 volts 3 phase 3500, 5500, 7000 rpm 4 inch diameter 1000 lbs 7
8 Receiving your machine. Note: It is probable that your machine will be delivered by a third party. Before you unpack your new machine, you will need to first inspect the packing, invoice and shipping documents supplied by the driver. Insure that there is no visible damage to the packing or the machine. You need to do this prior to the driver leaving. All damage must be noted on the delivery documents and signed by you and the delivery driver. You must then contact the seller [Laguna Tools] within 24. Introduction to combination machines. This combination machine is designed to give you years of safe service. Read this owner s manual in its entirety before assembly or use. The machine is a compact one-stop shop with the following functions. Table saw, jointer, planer, shaper and mortiser all built into one machine. 8

9 Parts of the machine Sliding table. 2. Table clamp. 3. Table saw fence. 4. Blade angle adjustment handle. 5. Support rail. 6. Emergency stop button. 7. Support table. 8. Main saw table. 9. Identification plate. 9
10 Fence clamp handle. 2. Blade vertical adjustment handle. 3. Blade angle clamp handle. 4. Motor control box. 5. Sliding table. 10

11 Body. 2. Mortiser. 3. Mortiser slot width handle. 4. Mortiser vertical adjustment handle. 5. Jointer guard. 6. Jointer fence. 7. Jointer table vertical adjustment handle. 8. Jointer/planer stop and start button. 9. Mortiser chuck. 10. Table saw dust port. 11. Jointer/planer dust port. 11
12 Sliding table. The sliding table is manufactured from heavy-duty aluminium extrusion and is attached to the cabinet. The table is adjustable for being level and vertical. The table is supported by ball bearings that roll on polished flat plates. The advantage of the bearing system is that there is only point contact between the balls and the plates, which virtually eliminates the problem of dirt building up, and the sliding table will remain accurate for many years. Table clamp. The table clamp is attached to the sliding table T slot. It can be adjusted along the length of the T slot to suit the job. It is a heavy steel construction and is vertically adjustable. The clamp action is over center cam. Table saw fence. The table saw fence is adjustable along an extension rail, which is attached to the side of the main table. The fence is designed to give superior rigidity and is adjustable for being parallel to the blade. Blade angle adjustment handle. The blade angle adjustment handle is located at the front of the cabinet and adjusts the blade angle from 90 to 45 degrees. It has a locking handle, which is located at the side of the machine. Support rail. The support rail is an aluminium extrusion and supports the extension table. It is located on the front of the machine. Emergency stop button. The emergency stop button is located on the front of the machine and when pressed remains in the off position. To reset the emergency stop button, twist until the button pops out. Support table. The support table is a welded construction and is attached to the side of the sliding table. It can be moved along the sliding table to suit the job at hand. It is adjustable vertically and for parallelism to the sliding table. 12
13 Main saw table. The saw table is manufactured from cast iron and is attached to the cabinet. The table is adjustable for level and vertical. Identification plate. There is an identification plate at the front of the machine, listing all the manufacturing data including the serial number, model, etc. Fence clamp handle. The fence is clamped in position using the fence clamp handle located at the side of the fence casting. Blade vertical adjustment handle. The blade vertical adjustment handle is located at the side of the machine. It is locked in position with a clamp screw located behind the handle. Blade angle clamp handle. The blade can be set at various angles and is clamped in position with the clamp handle, which is located at the side of the machine. Motor control box. Switches control the motor located on the control box. The control box is located on the side of the machine. Body. The body of the machine is a welded construction from heavy-gauge steel plate. The heavy construction gives the machine a stable base that is less susceptible to vibration. Mortiser. The mortiser is a heavy cast iron construction that is located on the back of the machine. Mortiser slot width handle. The slot width handle controls the movement of the table between stops. Mortiser vertical adjustment handle. The vertical adjustment handle moves the table of the mortiser vertically. 13
14 Jointer guard. The jointer guard can be adjusted vertically to suit the job. It can also be adjusted laterally to suit the position of the fence. Jointer fence. The jointer fence is constructed from a heavy aluminium extrusion and can be adjusted angularly from 90 to 45 degrees. Jointer table vertical adjustment handles. The jointer vertical adjustment handles are located under the tables at the back of the machine. The handles adjust the in-feed and out-feed tables in relationship to the cutter head. Jointer/planer stop and start button. The jointer/planer stop and start buttons are located at the back of the machine. Mortiser chuck. The mortiser chuck is attached to the end of the jointer/planer cutter head. Table saw dust port. The table dust is located on the side of the machine and will accommodate a 4- inch dust collection hose. It connects to the bottom of the trunnion assembly and collects the sawdust as it leaves the blade. There is a 1 1/2 inch pipe to low connection to the blade guard. You will need a dust collection system with a minimum of 1,000 cubic feet per minute (the stronger the better). Jointer/planer dust port. The jointer/planer dust port is part of the yellow cutter guard and will take a 4- inch dust hose. You will need a dust collection system with a minimum of 1,000 cubic feet per minute (the stronger the better). Trunnion. The trunnion assembly is attached to the table. It is of heavy cast iron construction. It houses the motor, saw spindle, riving knife, tilt mechanism, scoring mechanism and vertical movement adjustment. This is the heart for your saw. 14
15 Electrical system. The electrical system consists of electrical motors, start switch, stop switch and contactors. A cable is supplied but may not be fitted with a plug, as the type of plug will depend on your installation. If you require a longer cable than the one supplied, the cable that is supplied can be replaced by connecting a new cable to the contactor box (see electrical connection). Throat plate. The throat plate is attached to the main table. Miter fence. The miter fence is manufactured from heavy-duty gauge aluminium extrusion. It is supplied with a flip stop. It can be set at any angle and has built-in stop for 90 and 45 degrees. It is supplied with an adjustable flip stop and can be extended. Where to locate your machine. Before you remove your machine from the pallet, select the area where you will use your machine. There are no hard and fast rules for its location, but below are a few guidelines: 1. There should be an area surrounding the machine suitable for the length of wood that you will be cutting. 2. Adequate lighting. The better the lighting the more accurately and safely you will be able to work 3. Solid floor. You should select a solid, flat floor, preferably concrete or something similar. 4. Locate close to power source and dust collection. 5. Allow an area for the storage of blanks and cut jobs. 15


16 Unpacking your machine. 1. Dismantle the box and lift the box off the pallet. 2. Using the knife, cut the plastic wrap. 3. Remove all the parts that have been packed with the machine. 4. Remove the machine from the pallet with a forklift. Note: If you have any doubt about the described procedure, seek professional assistance. Do not attempt any procedure that you feel is unsafe or that you do not have the physical capability of achieving. Packed machine Cleaning the machine. Remove the rust protection grease with WD 40 or a similar solvent. It is important that you remove all the grease and re-lubricate with a Teflon-based lubricant because Teflon has less tendency to attract sawdust and cause clogging. You should also wax the table, as this also protects the cast iron from rust and reduces friction. Machine with box removed What you will receive with the machine. Mortiser 16


17 Blade guard dust hose Mortiser chuck Shaper fence and parts Saw extension table Mortiser handle Jointer guard Push stick Blade guard hose support Tools Rip fence Miter fence 17


18 Manual Blade guard Clamp s Jointer fence Straight line shoe Extension table support rail Leveling the machine. The machine is provided with leveling feet. Move your machine to its final position, and, using a sprit level on the table, adjust the leveling feet so that the table is level in both directions. Ensure that the machine does not rock. Levelling feet 18


19 Assembly and setup. Fitting the mortiser Fit the mortiser chuck to the spindle of the jointer/planer. Note. The spindle thread is left handed. Fit the two fixing bolts to the machine and slide the mortiser onto the bolts. Do not fully tighten. Mortiser chuck Mortiser fixing bolt Adjust the table of the mortiser so that the central fixing is in the center of the access hole and fit the fixing bolt snug. Jacking screw Central fixing bolt 19


20 Fit a steel rod into the chuck and tighten. The mortiser table will need to be adjusted parallel. Adjust the table parallel to the steel rod by adjusting the jacking screws and tightening the clamp bolts. It is advisable to use feeler gauges to check that the table is parallel. Steel rod Fit the chuck guard with the two fixing bolts. Jacking screw Chuck guard 20


21 Fit the clamp shaft to the table and secure with the nut and washer. Note. The clamp can be fitted to either side of the table. Note. The clamp has two holes to allow it to cover the complete table. Fit the adjusting handle through the top bearing and into the bottom bearing. Fit the vertical adjusting handle and secure with the fixing screw. Clamp Adjusting handle Vertical adjusting handle Fit the fence clamp to the casting with the two fixing bolts. Slide the fence into the clamp and secure with the clamp screw. Fence Fence clamp Fit the guard arm to the side of the table with the clamp screw. Clamp screw Guard arm 21


22 Hold the guard plate under the extrusion with the clamp screw adjusted out. Guard plate Slide the guard into the aluminum extension and clamp with the clamp screw. The guard can be adjusted vertically with the adjusting screw. Adjusting screw Guard Fit the push/pull handle to the sliding table T slot. The handle can be fitted at any position along the sliding table to suit. Push pull handle Attach the extension table rail to the body of the machine so that it is approximately equally on spaced either side of the machine, and clamp in position. The rail position will be adjusted once the extension table is fitted. Rail clamp 22


23 The rail has stops at both ends. Remove one stop. Loosen the clamps on the support table. Slide the support bracket into the rail T slot. While you are fitting the support bracket to the rail, slide the support table clamps into the sliding table T slot in the sliding table. The support table can be positioned at any position along the sliding table to suit the job at hand. Stop Extension table clamps Extension table To adjust the extension table level with the top of the sliding table: 1. Loosen the two clamps. 2. Place a straight edge on the sliding table and the extension table. 3. Adjust the screw until the extension table is level with the sliding table. Note. The adjustment must be completed at both sides of the extension table. Note. The level must be checked with the clamps tight. Straight edge Adjusting screw 23
 to enable the miter fence to be fitted on both")


24 Fitting the miter fence. There are two pivot holes (one on each side of the table) to enable the miter fence to be fitted on both sides of the extension table. It can be set at 90 degrees and adjusted between 90 and 45 Fence pivot degrees. Fence pivot hole Pivot clamp block The fence can be adjusted Fence toward or away from the blade by loosening the pivot clamp block, moving to the required position and re-clamping. To fit the fence to the table, insert the pivot pin into the selected hole. Push the fence against the table flip stop and lock in position with the clamp under the fence. If required, the table flip stop can be adjusted by loosening the lock nut, rotating the screw to the required position and locking with the locking nut. The adjustment method is covered later. 90-degree flip stop The fence has an adjustable flip stop. Fence flip stop 24


25 The fence can be extended by loosening the clamp screw (the underside of fence), sliding the extension out and re-clamping. Fence extension Fit the table clamp to the sliding table T slot. The clamp can be slid to any position on the sliding table to suit the job at hand. Clamp The straight line shoe is fitted into the T Slot in the sliding table. The shoe is used to cut straight edges on uneven-width plank by jamming the plank under the shoe and clamping the opposite end with the table clamp. Straight line shoe 25
.")


26 Slide the rip fence onto the side rail. Note. The side rail can be fitted in either low or high positions (shown in the low position). Rip fence Rip fence extension (low position) Side rail Loosen the clamp screws, slide the fence onto the clamp strip and tighten the clamp screws. Rip fence clamp strip (Rip fence in high position) Curser To adjust the fence: Loosen the fence lock and move the fence to the approximate position. Clamp the fine adjustment lock. While looking through the curser, move the fine adjustment wheel to adjust the fence to the required position. Clamp the fence in position with the fence lock. Fence lock Fine adjustment wheel Fine adjustment lock 26


27 Fit the shaper fence to the table with the clamp screws. Assemble the shaper guard to the body with the two screws and fit to the fence. Shaper fence Guard assembly screws Shaper guard body Dust collection Fence clamp screws Fence lock screw The fences are sideways adjustable and are locked in position by tightening the clamp screws at the back of the shaper guard. The fences can be moved forward and back by adjusting the fence adjustment screw and locking in position with the clamp screw. Fence adjustment screw 27


28 To release the guard, pull the guard release handle toward the back of the guard. Guard release handle Shaper vertical adjustment handle Shaper vertical lock handle The shaper spindle has three speeds: 3500 rpm, 5500 rpm and 7000 rpm. To select the required speed, move the drive belt to the correct pulley by loosening the motor, moving the belt to the correct pulley, re-tensioning the belt and tightening the motor. The belt should be tensioned so that there is approximately 1/16-inch deflection of the belt when the belt is pressed with moderate thumb pressure. The pulleys are accessed by opening the side door. The door is fitted with a safety micro switch that removes power from the motor, but this must never be relied on Shaper spindle speed Safety micro switch 28


29 and power must be disconnected from the machine prior to accessing the pulleys or motor. Shaper spindle speed selection pulleys Motor Drive belt Motor clamp nut When fitting a cutter head to the molder spindle, lock the spindle with a wrench on the spindle flats. Shaper spindle Spindle flats 29


30 Fitting a blade. Spindle lock Lock the spindle by inserting rod the spindle lock rod through the hole in the table. The spindle lock rod aligns with a hole in the spindle, and the spindle will need to be rotated until the hole aligns with the rod. Remove the clamp bolt and washer. Assemble the blade onto the spindle, ensuring that the teeth are in the correct direction. Replace the washer and clamp bolt. Loosen the two clamp bolts on the riving knife. Adjust the riving knife to suit the blade and re-clamp. Fit the guard to the riving knife. Fit the dust hose to the blade guard. Fit the dust hose to the dust extraction port. Remove the spindle lock rod. Dust hose Blade guard Dust hose 30


31 Fitting the scoring blade. Lock the spindle by inserting the spindle lock rod. The spindle lock rod aligns with a hole in the spindle, and the spindle will need to be rotated until the hole aligns with the rod. Remove the clamp screw and washer. Assemble the blade to the spindle, ensuring that the teeth are in the correct direction. Replace the washer and clamp bolt. Remove the spindle lock rod. Spindle lock rod Sideways adjusting of the blade. To adjust the blade toward the sliding table, rotate the central screw clockwise. To adjust the blade away from the sliding table, turn the central screw counterclockwise. Adjusting the blade vertically. To adjust the blade up, loosen screw B and tighten screw A. To lower the blade, loosen screw A and tighten screw B. Side adjustment B A 31

32 Electrical connection. Note. The machine may not be supplied with an electrical plug, as the type of plug will be dependent on the installation. A qualified electrician must carry out the electrical installation. If a longer cable than that supplied is required, the following wire sizes are recommended. Cable size 10.3 gauge for runs of up to 20 ft. For longer runs up to 50 ft, use cable 8-3 gauge. Recommended breaker size Electrical control box is 30 amps. If a longer cable is required, it must be terminated in the junction box located inside the machine. Machine electrical control switches. Never access the electrical control box with the machine connected to the power. Before starting the machine. 1. Read and understand the instruction manual before operating the saw. 2. If you are still not thoroughly familiar with the operation of the saw, get advice from a qualified person. 3. Make sure the machine is properly grounded and that the wiring codes are followed. 4. Do not operate the machine while under the influence of drugs, alcohol or medicine or if tired. 5. Always wear eye protection, safety glasses or a safety shield, and hearing protection. 6. Wear a dust mask. Long-term exposure to the fine dust is not healthy. 7. Remove your tie, rings, watch and all jewelry. Roll up your sleeves and never wear loose clothing. You do not want anything to get caught in the blades or cutters. 8. Make sure that the guards are in place and use them at all times. The guards protect you from coming in contact with the blade/cutters. 9. Make sure that the saw blade teeth point in the correct direction. 10. Stop the machine before removing the scrap piece from the table. 32

. 2. Press switch B on left (saw/shaper). 3.")
33 11. Always keep your hands and fingers away from the blade or cutters. 12. Make sure that you use the proper size and type of tools. 13. Hold the work piece firmly against the table. Do not attempt to saw stock that does not have a flat surface facing down. 14. Use a push stick at the end of a cut. This is the most dangerous time because the cut is complete and the blade is exposed. 15. Hold the wood firmly and feed it into the machine at a moderate speed. 16. Turn off the machine if you have to back the material out of an incomplete or jammed cut. To start saw. 1. Turn switch C to right, position 2 (saw). 2. Press switch B on left (saw/shaper). 3. Press switch A on right. To stop saw blade. Press either of the emergency stop buttons or press switch A on left. To start shaper. 1. Turn switch C to left, position 1 (shaper). 2. Press switch B on left (saw/shaper). 3. Press switch A on right. To stop shaper. Press either of the emergency stop buttons or press switch A on left. To start jointer/planer. 1. Turn switch C to center Press switch B on left (jointer/planer). 3. Press switch A on right. 4. Press green start button. To stop jointer/planer. Press either of the emergency stop buttons or red jointer/planer stop button. Note. To reset the emergency stop button, twist and pull. Jointer / plainer start button Jointer/planer stop button A B C 33


34 Emergency stop button Emergency stop button Machine test. Now is the time to test the machine. Note. To reset the emergency stop button, twist and pull out. 1. Check that the machine is clear of all tools and other loose objects. 2. Check that all the adjusting and locking handles are tight. 3. Check that there is no blade or cutter fitted; it is far safer to test the machine without a blade or cutter fitted. 4. Start the saw described earlier in the manual. 5. The saw arbor is now turning. 6. Now is the time to check that the safety switch is functioning correctly before you fit a blade. 7. With the machine running (no blade fitted), operate the red stop switch by pressing toward the machine. The motor should have the power removed and slow down. 8. If the safety switch fails to operate correctly, do not use the machine until the fault has been corrected. 9. Start the shaper as described earlier in the manual. 10. With the machine running (no cutter head fitted), operate the red emergency stop switch by pressing toward the machine. The motor should have the power removed and slow down. 11. If the safety switch fails to operate correctly, do not use the machine until the fault has been corrected. 34
35 12. Start the jointer/planer as described earlier in the manual. 13. With the machine running, operate the red emergency stop switch by pressing toward the machine. The motor should have the power removed and slow down. 14. If the safety switch fails to operate correctly, do not use the machine until the fault has been corrected. 15. Start the jointer/planer as described earlier in the manual. 16. With the machine running, operate the red stop switch by pressing toward the machine. The motor should have the power removed and slow down. 17. If the stop switch fails to operate correctly, do not use the machine until the fault has been corrected. 18. Start the jointer as described earlier in the manual. 19. With the machine running, lift the out-feed table until the safety micro switch operates. The motor should have the power removed and slow down. 20. If the safety micro switch fails to operate correctly, do not use the machine until the fault has been corrected. 21. Set the machine in planer configuration. 22. Start the planer as described earlier in the manual. 23. With the machine running, lift the duct chute until the safety micro switch operates. The motor should have the power removed and slow down. 24. If the safety micro switch fails to operate correctly, do not use the machine until the fault has been corrected. Before you cut any wood, read the safety rules at the front of this manual. Fit the dust extraction hose. Fit a 4-inch dust extraction hose between the machine and your dust extractor. Note. You will need a dust collection system with a minimum of 1,000-cubicfeet-per-minute capacity. The stronger the dust collection, the better, as the machine is capable of producing a lot of waste. 35
36 Using and adjusting the machine. Adjustments. Note. The machine has had all its functions calibrated at the factory, but some movement may have taken place due to shipping conditions. This is unavoidable, and it is recommended that the following checks are made prior to starting production. As the machine is used, some functions may move and it is, therefore, good practice to know the process for adjusting the machine prior to production. Sliding table adjustments. The sliding table is locked in position with a spring-loaded lock pin that aligns with a hole when the table is level with the end of the carriage. Spring-loaded lock pin Vertical jacking bolts Sliding table clamp bolts Side stop bolt The sliding table comes factory set, but should adjustment be required, below is the procedure: Sliding table adjustment for parallel with the saw blade. The table must run parallel with the saw blade. The gap between the edge of the sliding table and the table is not important. To check if the table is running true, clamp a piece of wood (1 in x 1 in or 2 in x 2 in) to the table. Cut the wood slowly. The teeth of the saw blade should make contact with the front and the back of the blade evenly. If the table is not cutting parallel, adjust as follows. Note. Only adjust one end of the sliding table. 1. Loosen the sliding table clamp bolt. 2. Loosen the lock nut on the side stop bolt and adjust the side stop bolt either in or out, depending on the adjustment required. Tighten the lock nut. 36

37 3. With the sliding table tight against the side stop bolt, tighten the sliding table clamp bolt. Tighten the lock nut. 4. Recheck if the table is running parallel as described earlier and readjust if required. Note. It is recommended that adjustments are carried out in small increments, and you will find that it is quicker to use small adjustments rather than trying to adjust in one big step. Adjusting the sliding table level with the main table. Using a straight edge, check that the sliding table is level with the main table. (The main table should be 0 in to inch lower than the sliding table.) The table comes factory set, but should adjustment be required, jacking screws are provided in the black steel block. 1. Loosen the lock nuts on the clamp bolt and the jacking bolts. 2. Loosen the clamp bolt. 3. Adjust the jacking bolts either up or down, depending on the adjustment required. 4. Ensure that the table is tight against the side stop, then bolt and tighten the clamp bolt. 5. Recheck for level. 6. Tighten all the lock nuts. Vertical jacking bolts Note. Unless the sliding table is Sliding table clamp bolt tilted to the main table, adjust both jacking bolts the same amount. Note. Check both ends of the table for level. Note. Adjust one end of the table at a time. Straight edge Side stop bolt 37


38 Fine-tuning the miter fence. Several methods are acceptable to fine-tune the fence, but we have found that the following is a very practical way to achieve a square panel: 1. Clamp the fence locked at 90 degrees against the stop. 2. Clamp a sheet onto the sliding table and cut a straight edge ( A ). Mark A. 3. Move the sheet so that edge A is tight against the fence, clamp in position, cut edge B and mark B. 4. Flip the sheet so that edge A is still against the fence, but edge B is furthest away from the saw blade. Cut edge C and mark C. 5. If the sheet is cut square, edges B and C should be parallel. Check this by measuring across the width of the sheet at both ends. Note. This method will double the amount of error, and any adjustment that is required should be halved. Also, the stop is closer to the table than the end of the sheet, so only adjust the stop in very small amounts. Example: If you are using a 2 ft x 2 ft sheet and you are out of parallel by 1/16 in, adjust the stop 0.01 in and repeat the cuts. First cut. Second cut. Third cut. Measure both ends. Move the fence to the other set of holes and repeat the procedure. 38


39 Move the fence to the other set of holes and repeat the procedure. Fitting the miter gauge for angular cuts. Fit the extrusion to the center hole and the slot. Note. Ensure that the 90-degree pins are in the down position. Move fence to the required angle and clamp. Feed roller lever Depth scale Planer. Engaging the feed rollers. With the motor running, move the feed roller lever from the stop position to the engaged position (up). Setting the planer depth scale. The simplest way to check if the planer scale is set correctly is to machine a piece of wood. Check the finished thickness of the wood and check that the scale is reading the correct dimension. If adjustment is required, loosen the gauge clamp screws and adjust the scale. Anti-kickback teeth The anti-kickback teeth must be free to move, or they will not fulfill their function. Antikickback teeth With the power disconnected, check that all the teeth move freely. If they do not, lubricate with Teflon-based lubricant. Table lock Cutter head Feed roller 39

40 Fitting blades to parallel blade cutter head. Blades must be HSS 250 x 30 x 3 mm and must meet the requirements of EN847. WARNING! Disconnect the machine from the mains before any adjustment. 1. Lift the tables to the vertical position. 2. Release the clamping screws. 3. The blade will be released, and the springs will eject the blade. 4. Remove the blade and clean the bearing surface. 5. Clean the new blade carefully. It is very sharp and can cut you very easily. 6. Insert the new blade and tighten the clamping screws using a suitable blade height setting fixture or gauge to set the blade to the correct height. Note. Screw tightening sequence. Start tightening the center screw and work outwards on either side of the center screw. Note. The maximum amount that the blade can extend past the surface of the cutter head is 1.1 mm. It is recommended that you set the blades to 0.7 to 0.8 mm above the cutter head. Note. Before you close the tables and start the machine, check that all the clamping screws are tight. WARNING! Never use blades that are narrower than 17 mm, as the clamping area is too small and there is a real danger that the blades can fly out of the machine, causing injury or death. 40


41 Out-feed table Converting from jointer to planer. 1. Release the out-feed table lock and lift the table. 2. Release the in-feed table lock and lift the table. 3. Lift the dust collection chute and ensure that the black spring clip is engaged with the pin to lock it in position. Pin Black spring clip Dust collection hood Note. When the out-feed table is in the jointer position, it depresses a shaft that activates a micro switch. This is a safety device, and if the micro switch is not connected, the jointer will not start. 41


42 Note. When the dust chute is locked in the planer position, it activates a micro switch. This is a safety device and if the micro switch is not connected, the machine will not start. Jointer. Adjusting the table locking clamps. Note. Disconnect the power from the machine. 1. Lift the tables to the vertical position. 2. Loosen the lock nut, adjust the bolt and tighten the locking nut. 3. Lower the table and engage the locking clamp. 4. Repeat until the locking clamp securely clamps and locks the table. Table lock bolt Setting the out-feed table to the cutter head. The out-feed table must be level with the cutter head blade when the blade is at top dead center (T.D.C.) and the table must be locked. 1. Rotate the cutter head so that the blade is at the T.D.C. position. 2. Place a straight edge on the out-feed table over the cutter head and check that the blades just touch the straight edge. Note. This has to be checked at both sides of the table. Scale Adjusting the in-feed table. 1. Place a straight edge on the out-feed table so that it overhangs the in-feed table. 2. Release the table lock. Table lock 42


43 3. Adjust the height of the table with the table height control knob so that both tables are level. 4. Lock the table lock. 5. Check that the table is lined up with the scale at If adjustment of the scale is required, loosen the screws that clamp the scale and adjust. Note. Never operate the jointer with the table unlocked. Table height control knob Adjusting the jointer fence. Jointer fence Loosen the clamp handles and move the fence so that it is hard against the stop screw and clamp the handles. Using an engineer s square, check that the fence is at 90 degrees to the table. If adjustment is required, proceed as follows. 1. Loosen the lock nut and stop screw. 2. Set the fence to 90 degree to the jointer table using an engineer s square and tighten the clamp Stop screw and lock nut handles. 3. Adjust the stop screw so that it is tight against the fence stop and tighten the lock nut. 4. Recheck with the engineer s square and readjust if required. 43
44 Maintenance and troubleshooting. All tools and machines require regular maintenance, and this machine is no exception. This section details the general maintenance and care of your machine. In general, we recommend that you only use a Teflon-based lubricant on the machine. Regular oil attracts dust and dirt, and the Teflon tends to dry and has less tendency to accumulate dirt and sawdust on your machine.we also recommend that you wax the tables to help prevent rust. Weekly maintenance. 1. Generally inspect the machine for damage and loose or worn parts. 2. Clean the machine and check that the dust hoses are clear. Make sure that all moving parts are clean and free from sawdust and dirt. 3. Lubricate all moving parts with a Teflon-based lubricant. 4. Wax the table and all non-painted parts. 5. Check blades and cutter teeth for chips and dullness. 6. Check the dust extraction for blockages and any large bits that could cause blockages. Drive belts. The drive belts should last for many years (depending on the usage) but need to be inspected regularly for cracks, cuts and general wear. If damage is found, replace belts. To re-tension the belts, loosen lock nut. The weight of the motor should put enough tension on the belts. Then tighten the lock nut. The belts come factory set, but they should be checked for tension after about 8 hours of use. The belts may to be re-tensioned, as they will have bedded into the V grooves. Bearings. All bearings are sealed for life and do not require any maintenance. If a bearing becomes faulty, replace it. Rust. The tables are made from steel and cast iron. All non-painted surfaces will rust if not protected. It is recommended that the table be coated with wax. All moving non-painted surfaces should be lubricated/protected with a Teflonbased lubricant. 44
45 Troubleshooting. Problem Cause Corrective action Motor will not start or fuses or circuit breakers blow. 1. Emergency button depressed. 1. Rotate until the switch returns to off position 2. Short circuit. 2. Repair or replace short circuit item. Machine will not start. 3. Start capacitor faulty. 3. Fit new capacitor. 4. Motor thermal 4. Replace thermal protection circuit protection circuit breaker faulty, or motor breaker in motor or is at fault. replace motor. 5. Open circuit in motor or loose connections. 1. Check that the start switch is fully depressed. 2. Check that the electrical power cord is plugged into the power outlet. 3. Check that the electrical supply is on. 4. With the power disconnected from the machine, check that the wiring in the plug is correct. Check that the rubber insulation is stripped enough and is not causing a bad connection. Check that all the screws are tight. 5. Replace or repair motor or loose connection. 1. Fully depress the start switch. 2. Plug the power cord into power outlet. 3. Reset the breaker. 4. Correct the wiring. 5. With the power 5. Correct the wiring. 45
46 Motor tries to start but will not turn. The machine will not stop. This is a very rare occurrence, as the machine is designed to be fail-safe. If it should occur and you cannot fix the fault, seek professional assistance. The machine must be disconnected from the disconnected from the machine, check that the wiring to the machine is correct. Check that the rubber insulation is stripped enough and is not causing a bad connection. Check that all the screws are tight. 6. Check that you have the correct power: 220V, not 110V. 7. Check that the ground wire is wired correctly. 1. With the power disconnected from the machine, try to turn the blade by hand. If the blade will not turn, check the reason for the jamming. A typical reason is wood jamming the blade. 6. Supply correct power. 7. Correct wiring. 1. Remove the reason for the jam. 2. Capacitor faulty. 2. Replace the capacitor. 3. Motor faulty. 3. Replace the motor. 1. Stop switch faulty. 1. Replace the stop switch. 46
47 power and never run until the fault has been rectified. Fuses or circuit breakers blow. Motor will not develop full power or motor speed slows with load, overheats or stalls. Motor overheats and stops. Cutter head slows or belt squeals when cutting. Loud noise coming from machine. 2. Internal contactor faulty. 2. Replace the contactor. 1. Motor drawing 1. Repair or replace excessive current. motor. 2. Cutter head or motor 2. Remove jam. jammed. 3. Short circuit. 3. Repair or replace short circuit item. 1. Motor run capacitor 1. Replace the at fault. capacitor. 2. Machine overloaded. 2. Take smaller cuts. 3. Motor overheating. 3. Clean motor, taking care to make sure that all the cooling fins are clean. 4. Short circuit in motor or loose connections. 4. Repair or replace motor/loose connections. 1. Internal terminal 1. Wait until motor has overload protector trips. cooled and then restart. 2. Dull blade. 2. Change blade. 3. Overfeeding the 3. Slow feed rate. wood. 4. Motor cooling fins 4. Clean motor cooling clogged. fins. 5. Excessive ambient 5. Wait for ambient temperature. temperature to cool. 1. V-belt loose. 1. Tighten V-belt 2. V-belt worn out. 2. Replace V-belt 1. Motor pulley set 1. Replace or tighten if screws or keys are necessary. 47
48 Tables are hard to adjust. Tables will not lock. Excessive snipe. (gouge in the end of the board that is uneven with the rest of the cut). Job stops or slows during cut. Chipping or marks (consistent pattern). Furry finish on the grain. Lines or ridges that run along the board Chatter marks across the face of the board. Uneven blade. missing or loose. 2. Drive belts are damaged. 1. Table spindles are tight. 1. Table locks too high or too low. 1. Out-feed table is too low. 2. Operator pushing down on trailing end of job. 3. Job is not supported as it leaves the out-feed of the planer. 1. Taking too deep of a cut. 2. Pitch or build up on planer components. 1. Knots or conflicting grain direction in wood. 2. Nicked, chipped or dull blade. 3. Taking too deep of a cut. 1. Wood has high moisture content or surface wetness. 2. Replace drive belts. 1. Clean and lubricate spindles. 1. Adjust lock bolts. 1. Reset out-feed table with cutter head. 2. Eliminate downward pressure on trailing end of job. 3. Support the job as it leaves the out-feed of the planer. 1. Take smaller cuts. 2. Clean the tables and cutter head components 1. Inspect job for knots and grain direction; only use good material. 2. Replace the blade. 3. Take smaller cuts. Take small cuts on hard woods. 1. Check moisture content and allow to dry. 2. Blunt blades. 2. Replace the blades. 1. Nicked or chipped 1. Replace blades. blades. 1. Blades not adjusted at even heights. 1. Adjust the blades so they are set up evenly in the cutter head. 48
49 2. Worn cutter head bearings. 3. Replace cutter head bearings. Shiny finish. 1. Blades are blunt. 1. Replace the blades. 2. Too fine a cut. 2. Increase the depth of cut. Chip marks, random pattern. Board edge is concave or convex after jointing. Tilt mechanism tight. Vertical mechanism tight. 1. Chips not removed from cutter head. 1. Job not held with even pressure on infeed and out-feed table during cut. 2. Job started too uneven. 3. Board has excessive bow or twist along its length. 4. Insufficient number of passes. 1. Check that nothing is jamming the mechanism. 2. Check that the worm gear and screw are clean and lubricated. 1. Check that nothing is jamming the mechanism. 2. Check that the worm gear and screw are clean and lubricated. 1. Use a dust collection system, or a stronger dust collection system. 1. Hold job with even pressure as it moves over the cutter head. 2. Take small cuts to remove the extreme high spots before doing a full pass. 3. Surface plane one face so there is a good surface to position against the fence. 4. It may take 3 to 5 passes to achieve a good edge, depending on starting condition of board and depth of cut. 1. Remove the jam. 2. Re-lubricate. 1. Remove the jam. 2. Re-lubricate. 3. Check that the guide 3. Clean and re- 49
50 Saw. Poor cut. Squeaking noise. Saw blade slows down during a cut. Blade or cutter overheats. plate is not jamming. 4. Inspect the guide plate and bearing plate for wear and damage. lubricate. Ensure that you clean the whole guide plate by moving the saw arbor fully up and fully down, cleaning the exposed part of the guide plate. 4. If damaged or worn, replace. 1. Dull blade. 1. Change the blade. 2. Bent tooth. 2. Change the blade. 3. Wrong type of blade 3. Change the blade. for the job. 1. Motor cooling fan is 1. Adjust motor cooling contacting the fan fan. cover. 2. Baring faulty. 2. Replace bearing. 3. Dive belt faulty or 3. Replace or tighten loose. the drive belt. 1. Loose drive belt. 1. Re-tension the belt. 2. Dull blade. 2. Replace the blade or have it re-sharpened. 3. Feeding the wood too 3. Slow down the feed fast. rate. 4. Insufficient set on the 4. Change the blade for teeth (wood nipping the a blade with the correct blade). set. 5. Oil or dirt on the 5. Clean or replace the drive belt. drive belts. 6. Fence not aligned 6. Align fence. correctly. 1. Dull blade or cutter. 1. Change the blade/cutter or resharpen. 2. Pitch is too small for 2. Change to a 50
51 Machine vibrates. Causes of the saw blade dulling. Poor dust collection. the depth of cut. 3. Wood too hard for the selected blade/cutter. 1. Machine not level on the floor. blade/cutter with the correct pitch. 3. Change the blade/cutter. 1. Re-level the machine, ensuring that it has no movement. 2. Damaged drive belt. 2. Replace belts. 1. Wrong blade for the 1. Change the job. blade/cutter. 2. Overfeeding the job. 2. Reduce the feed rate. 3. Cutting painted wood 3.Change blade or or abrasive material. cutter. 1. Check the capacity of 1. Upgrade dust the dust collection collection. system. You need a minimum of 1,000 cubic feet per minute at the machine. The stronger the dust collection the better. 2. Check that the dust hose is not blocked. 3. Check that the dust collector is not full. 2. Remove blockage. 3. Empty dust collector. 51

52 Electrical drawing 52

53 53

54 54

55 55

56 56

57 57

58 58
59 59

60 60

61 61

62 62

63 63

64 64

65 65

66 66

67 67

68 68

69 69

70 70

71 71
72 72

73 73

74 74
75 Copyright 2010 Laguna Tools, Inc ** Warning no portion of these materials may be reproduced without written approval from Laguna Tools, Inc. All documentation subject to change without notice 75
76 2072 Alton Parkway. Irvine, CA Ph: Laguna Tools is not responsible for errors or omissions. Specifications subject to change. Machines may be shown with optional accessories. 2018, Laguna Tools, Inc. LAGUNA and the LAGUNA Logo are the registered trademarks of Laguna Tools, Inc. All rights reserved.
PLATINUM SERIES TABLESAW W/DOVETAIL MECH LEFT-TILT MANUAL
 PLATINUM SERIES TABLESAW W/DOVETAIL MECH LEFT-TILT MANUAL LAGUNA TOOLS 2072 Alton Parkway Irvine, California 92606 Ph: 800.234.1976 www.lagunatools.com 2018, Laguna Tools, Inc. LAGUNA and the LAGUNA Logo
PLATINUM SERIES LATHE MANUAL
 PLATINUM SERIES 6-43 LATHE MANUAL LAGUNA TOOLS 2072 Alton Parkway Irvine, California 92606 Ph: 800.234.976 www.lagunatools.com 208, Laguna Tools, Inc. LAGUNA and the LAGUNA Logo are the registered trademarks
12 5-Function Combination Machine Manual
 12 5-Function Combination Machine Manual LAGUNA TOOLS 2072 Alton Parkway Irvine, California 92606 Ph: 800.234.1976 www.lagunatools.com Model Number: MCO8000-0250 2018, Laguna Tools, Inc. LAGUNA and the
DriftMaster Fence System Manual
 DriftMaster Fence System Manual LAGUNA TOOLS 2072 Alton Parkway Irvine, California 92606 Ph: 800.234.1976 www.lagunatools.com Model Number: ABAND1000-0180 2018, Laguna Tools, Inc. LAGUNA and the LAGUNA
MSANOES6X OPERATING MANUAL
 Pro Series Oscillating Edge Sander MSANOES6X89-2-0320 OPERATING MANUAL 2072 Alton Parkway, Irvine, CA 92606 www.lagunatools.com 800.234.1976 Dear Woodworker, Thank you for your purchase and welcome to
JOINTERS. MJO MJO phCSA MJO phCSA OPERATION MANUAL
 JOINTERS MJO6405-0800 MJO6012-0800-3phCSA MJO6012-0800-1phCSA OPERATION MANUAL Dear Woodworker, Thank you for your purchase and welcome to the Laguna Tools group of discriminating woodworkers. I understand
Dear Woodworker: Thank you for your purchase and welcome to the Laguna Tools group of discriminating woodworkers. I understand that you have a choice
 Platinum Series Tablesaw w/ Dovetail Mech Left-tilt Manual 17101 Murphy Avenue, Irvine, CA 92614 www.lagunatools.com 800.234.1976 MTS0300-0180 1 Table saw Dear Woodworker: Thank you for your purchase and
13" Moulder Planer Manual
 13" Moulder Planer Manual LAGUNA TOOLS 2072 Alton Parkway Irvine, California 92606 Ph: 800.234.1976 www.lagunatools.com Model Numbers: MPL1301-0130 2018, Laguna Tools, Inc. LAGUNA and the LAGUNA Logo are
Bat Master CNC Router Manual
 Bat Master CNC Router Manual LAGUNA TOOLS 2072 Alton Parkway Irvine, California 92606 Ph: 800.234.1976 www.lagunatools.com Part No. MCNC Bat Master 2018 Laguna Tools, Inc. All rights reserved. Table of
Platinum Series 18/47 Lathe Manual
 Platinum Series 18/47 Lathe Manual LAGUNA TOOLS 2072 Alton Parkway Irvine, California 92606 Ph: 800.234.1976 www.lagunatools.com Model Numbers: L A175017 2018, Laguna Tools, Inc. LAGUNA and the LAGUNA
FOURTH-AXIS ATTACHMENT FOR 3-AXIS CNC MACHINES
 FOURTH-AXIS ATTACHMENT FOR 3-AXIS CNC MACHINES LAGUNA TOOLS 2072 Alton Parkway Irvine, California 92606 Ph: 800.234.1976 MCNC SS1 24 x 48-0158 www.lagunatools.com 2018, Laguna Tools, Inc. LAGUNA and the
Jointer/ Planer Combination Machine Manual
 Jointer/ Planer Combination Machine Manual LAGUNA TOOLS 2072 Alton Parkway Irvine, California 92606 Ph: 800.234.1976 www.lagunatools.com Model Number: MJOPL104200 2018, Laguna Tools, Inc. LAGUNA and the
Revo 10x16 Mini Lathe Manual
 Revo 10x16 Mini Lathe Manual LAGUNA TOOLS 2072 Alton Parkway Irvine, California 92606 Ph: 800.234.1976 www.lagunatools.com Model Numbers: MLA10X16-1_2-0130 2018, Laguna Tools, Inc. LAGUNA and the LAGUNA
CNC Lathe 3-Axis Manual
 CNC Lathe 3-Axis Manual LAGUNA TOOLS 2072 Alton Parkway Irvine, California 92606 Ph: 800.234.1976 www.lagunatools.com Model Number: MCNC Lathe 1000-0233 2018, Laguna Tools, Inc. LAGUNA and the LAGUNA Logo
8" JOINTER MANUAL. LAGUNA TOOLS 2072 Alton Parkway Irvine, California Ph:
 8" JOINTER MANUAL LAGUNA TOOLS 2072 Alton Parkway Irvine, California 92606 Ph: 800.234.1976 www.lagunatools.com 2018, Laguna Tools, Inc. LAGUNA and the LAGUNA Logo are the registered trademarks of Laguna
TS / TSS Tablesaw Manual
 TS / TSS Tablesaw Manual LAGUNA TOOLS 2072 Alton Parkway Irvine, California 92606 Ph: 800.234.1976 www.lagunatools.com Model Number: MTSS000020 2018, Laguna Tools, Inc. LAGUNA and the LAGUNA Logo are the
VARIABLE SPEED WOOD LATHE
 MODEL MC1100B VARIABLE SPEED WOOD LATHE INSTRUCTION MANUAL Please read and fully understand the instructions in this manual before operation. Keep this manual safe for future reference. Version: 2015.02.02
24" x 24" OSCILLATING SPINDLE MANUAL
 24" x 24" OSCILLATING SPINDLE MANUAL LAGUNA TOOLS 2072 Alton Parkway Irvine, California 92606 Ph: 800.234.1976 www.lagunatools.com 2018, Laguna Tools, Inc. LAGUNA and the LAGUNA Logo are the registered
LBM 200 Mortiser Manual
 LBM 200 Mortiser Manual LAGUNA TOOLS 2072 Alton Parkway Irvine, California 92606 Ph: 800.234.1976 www.lagunatools.com Model Numbers: MT0LBM200 2018, Laguna Tools, Inc. LAGUNA and the LAGUNA Logo are the
Agricultural Mechanics and Technology Power Tool Safety Rules
 Agricultural Mechanics and Technology Power Tool Safety Rules Name: BAND SAW Use: Cutting curves, circles and irregular shapes. 1. Use clean SHARP blades. 2. The teeth should always point DOWN. 3. Adjust
Inventory (Figure 2)
") MODEL T10127 12" SPIRAL CUTTERHEAD INSTRUCTIONS The Model T10127 indexable insert spiral cutterhead is designed to replace the straightknife cutterhead from the Grizzly jointer Model G0609. The total procedure
MODEL T10127 12" SPIRAL CUTTERHEAD INSTRUCTIONS The Model T10127 indexable insert spiral cutterhead is designed to replace the straightknife cutterhead from the Grizzly jointer Model G0609. The total procedure
.com. More than a machine. Power your life. Operating Manual
 Operating Manual www.maxnovomachine +86-514-87892928 info@maxnovomachine Dear Customer, Thank you very much for purchasing a product made by MAXNOVO MACHINE. Our machines offer a maximum of quality, technical
MODEL H " BYRD SHELIX CUTTERHEAD INSTRUCTIONS
 MODEL H9291 12" BYRD SHELIX CUTTERHEAD INSTRUCTIONS The Model H9291 12" Byrd Shelix cutterhead is designed to replace the straight-knife cutterhead on the Grizzly jointer Model G0609. The total procedure
 Surface planer or buzzer. Performs the tasks of dressing, squaring and straightening timber Machining short lengths of timber. Without the bridge guard. Without the appropriate training. Without PPE. Set
MODEL T " HELICAL CUTTERHEAD INSTALLATION INSTRUCTIONS
 MODEL T27696 12" HELICAL CUTTERHEAD INSTALLATION INSTRUCTIONS For questions or help with this product contact Tech Support at (570) 546-9663 or techsupport@grizzly.com Introduction The Model T27696 indexable
VARIABLE SPEED WOOD LATHE. Model DB900 INSTRUCTION MANUAL
 VARIABLE SPEED WOOD LATHE Model DB900 INSTRUCTION MANUAL 1007 TABLE OF CONTENTS SECTION...PAGE Technical data.. 1 General safety rules....1-3 Specific safety rules for wood lathe.....3 Electrical information.4
T800i Shaper Manual. LAGUNA TOOLS 2072 Alton Parkway Irvine, California Ph: Model Number: MT0T800I
 T800i Shaper Manual LAGUNA TOOLS 2072 Alton Parkway Irvine, California 92606 Ph: 800.234.1976 www.lagunatools.com Model Number: MT0T800I 2018, Laguna Tools, Inc. LAGUNA and the LAGUNA Logo are the registered
16 Planer with ShearTec II Manual
 16 Planer with ShearTec II Manual LAGUNA TOOLS 2072 Alton Parkway Irvine, California 92606 Ph: 800.234.1976 www.lagunatools.com Model Numbers: MPLAN1510-0120 2018, Laguna Tools, Inc. LAGUNA and the LAGUNA
OPERATOR'S MANUAL ROUTER MOUNTING KIT
 OPERATOR'S MANUAL MOUNTING KIT 4950301 (FOR USE WITH BT3000 AND BT3100 TABLE SAWS) Your new router mounting kit has been engineered and manufactured to Ryobi's high standard for dependability, ease of
Powermatic Model 31A Combination Belt-Disk Sander
 OPERATING PROCEDURE FOR: Powermatic Model 31A Combination Belt-Disk Sander INTRODUCTION: The combination belt-disk sander is used to sand the edges of boards. It can be used to smooth the edge or to remove
Home Workshop System WARNING. MARK V Model 500. Summary Manual. Designed and Built in Dayton, Ohio.
 Shopsmith Mark V Home Workshop System MARK V Model 500 Summary Manual Designed and Built in Dayton, Ohio. WARNING Read the SAFETY information in the Introduction section and complete the ASSEMBLY AND ALIGNMENT
TB & SB Series Drill Presses
 TB & SB Series Drill Presses OWNERS MANUAL BENCH AND FLOOR DRILL PRESS TB-16 Series & SB-16-25-32-Series FOR YOUR OWN SAFETY AND OPTIMUM OPERATION READ INSTRUCTION MANUAL BEFORE OPERATING DRILL PRESS RETAIN
MODEL T " SPIRAL CUTTERHEAD INSTALLATION INSTRUCTIONS
 MODEL T27449 8" SPIRAL CUTTERHEAD INSTALLATION INSTRUCTIONS The Model T27449 indexable insert spiral cutterhead is designed to replace the straightknife cutterhead on the Grizzly jointer Model G0490W/G0490XW
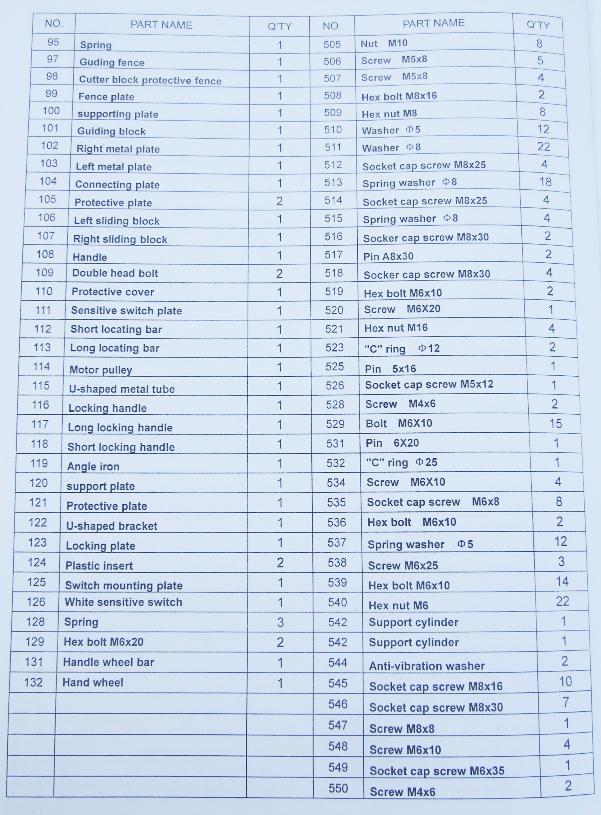
SECTION 9: PARTS. Table Breakdown REF PART # DESCRIPTION REF PART # DESCRIPTION
 SECTION 9: PARTS Table Breakdown 1 2 3 4 5 6 7 8 9 10 11 12 13 14 15 16 17 18 19 20 21 22 23 24 23 25 17 26 27 8 1 P0675001 CAP SCREW M8-1.25 X 30 15 P0675015 SUPPORT BLOCK 2 P0675002 TABLE SUPPORT BLOCK
20 x 42 LATHE MANUAL. LAGUNA TOOLS 2072 Alton Parkway Irvine, California Ph:
 20 x 42 LATHE MANUAL LAGUNA TOOLS 2072 Alton Parkway Irvine, California 92606 Ph: 800.234.1976 www.lagunatools.com 2018, Laguna Tools, Inc. LAGUNA and the LAGUNA Logo are the registered trademarks of Laguna
HOLE CUTTER SHARPENER ASSEMBLY & SERVICE MANUAL
 HOLE CUTTER SHARPENER ASSEMBLY & SERVICE MANUAL WARNING You must thoroughly read and understand this manual before operating the equipment, paying particular attention to the Warning & Safety instructions.
10" Wet Tile Cutting Saw
 8035735 10" Wet Tile Cutting Saw Owner s Manual Read and understand all instructions before operation. Keep this manual for future reference pg. 2 SPECIFICATIONS ITEM DESCRIPTION Overall Dimensions (saw
ET-110 EXTREMA MACHINERY COMPANY, INC. P.O. BOX 1450, ALBANY, LOUISIANA (877) FAX (225)
 FAX (225)") ET-0 EXTREMA MACHINERY COMPANY, INC. P.O. BOX 450, ALBANY, LOUISIANA 707 (877) 398-7362 FAX (225) 567-2966 PREFACE The XT-0 is precision built and manufactured to satisfy the highest standards. For maximum
ET-0 EXTREMA MACHINERY COMPANY, INC. P.O. BOX 450, ALBANY, LOUISIANA 707 (877) 398-7362 FAX (225) 567-2966 PREFACE The XT-0 is precision built and manufactured to satisfy the highest standards. For maximum
EllisSaw.com. EllisSaw.com P.O. Box Verona, WI
 P.O. Box 9019 Verona, WI 9-019 GENERAL OPERATING & SAFETY INSTRUCTIONS * READ INSTRUCTIONS BEFORE USE * CAUTION: Disconnect power supply cord from power source when doing repair work or changing belt.
SAFETY AND OPERATING MANUAL
 SAFETY AND OPERATING MANUAL BladeRunner X2 WX572 9 10 8 11 5 7 12 6 20 1 2 4 3 14 13 15 A2 A1 17 18 B2 B1 1 2 1 2 19 B3 3 4 2 C 1 D1 D1 C 2 1 E1 D2 1 2 E2 1 2 F G1 G1 F OFF ON G2 G3 H1 H2 I1 I2 I1 I2 J
.com. More than a machine. Power your life. Operating Manual
 Operating Manual Dear Customer, Thank you very much for purchasing a product made by MAXNOVO MACHINE. Our machines offer a maximum of quality, technical good solutions and convince by an outstanding price
12mm (Max) 6mm (Max) 82mm (Max) 12mm (Max) 6mm (Max)
 6mm (Max) 82mm (Max) 12mm (Max) 6mm (Max)") 1 1 2 2 3 3 82mm (Max) 12mm (Max) 12mm (Max) 6mm (Max) 4 4 5 6 8 6mm (Max) 0.5 0mm 1 5 6 7 7 8 9 9 A = B 10 11 12 D B 1 13 14 15 0 C A D E 16 17 18 F G D B N H J G I K 19 A 20 G L 21 C K 1mm L M 1mm 22
1 1 2 2 3 3 82mm (Max) 12mm (Max) 12mm (Max) 6mm (Max) 4 4 5 6 8 6mm (Max) 0.5 0mm 1 5 6 7 7 8 9 9 A = B 10 11 12 D B 1 13 14 15 0 C A D E 16 17 18 F G D B N H J G I K 19 A 20 G L 21 C K 1mm L M 1mm 22
College of Forestry 610: Power Tools
 College of Forestry 610: Power Tools Safety Policy & Procedure Manual Section 600: Workshops and Shop Tools Effective: 01 January 2007 Revised: August 2014 PURPOSE The purpose of this section is to provide
ELECTRIC SLIP ROLL MACHINE. Model: ESR-1300X2.5/ESR-1300X4.5 ESR-1550X3.5/ESR-1580X2.0
 ELECTRIC SLIP ROLL MACHINE Model: ESR-1300X2.5/ESR-1300X4.5 ESR-1550X3.5/ESR-1580X2.0 Operation Manual Table of contents I MAIN SPECIFICATION...2 II SAFETY INSTRUCTIONS.. 2 III OPERATION INSTRUCTIONS..4
6 BLADE CUTTER MODEL # PCC-6 OPERATION MANUAL
 4511 WAYNE AVENUE PHILADELPHIA PA 19144 TEL: 888-800-2663 FAX: 800-582-9643 6 BLADE CUTTER MODEL # PCC-6 OPERATION MANUAL CONTENTS I. INTRODUCTION TO BOND PCC-6 / MACHINE SPECIFICATIONS II. SAFETY PRECAUTIONS
Inventory (Figure 2)
") MODEL T10130/T10126 6" & 8" SPIRAL CUTTERHEAD INSTRUCTIONS The Model T10126/T10130 indexable insert spiral cutterheads are designed to replace straightknife cutterheads from the Grizzly jointer Models
MODEL T10130/T10126 6" & 8" SPIRAL CUTTERHEAD INSTRUCTIONS The Model T10126/T10130 indexable insert spiral cutterheads are designed to replace straightknife cutterheads from the Grizzly jointer Models
planer/thicknesser 200 x 120mm
 instructions for planer/thicknesser 200 x 120mm model no: sm1311 Thank you for purchasing a Sealey product. Manufactured to a high standard, this product will, if used according to these instructions,
 GENERAL OPERATIONAL PRECAUTIONS WARNING! When using electric tools, basic safety precautions should always be followed to reduce the risk of fire, electric shock and personal injury, including the following.
OPERATORS MANUAL. JOINTER by INVICTA. Model DI-42. (877) East (800) West
 East (800) West") OPERATORS MANUAL JOINTER by INVICTA Model DI-42 INVICTA USA (877) 308-6423 - East (800) 499-4682 - West English Version Model DI-42 General Instructions As with all equipment, safety is to be a priority.
OPERATORS MANUAL JOINTER by INVICTA Model DI-42 INVICTA USA (877) 308-6423 - East (800) 499-4682 - West English Version Model DI-42 General Instructions As with all equipment, safety is to be a priority.
Guild of Oregon Woodworkers Shop Safety Test
 Guild of Oregon Woodworkers Shop Safety Test You must pass the Test with an 80% or better and self-correct it to 100% Make sure you put the answers under the correct portion of the answer sheet for the
Page number Safety Rules 4. Warranty 8. Noise emission 9. Specification sheet 10. Receiving your machine 11. Introduction to your machine 12
 1 8 Table of contents. Page number Safety Rules 4 Warranty 8 Noise emission 9 Specification sheet 10 Receiving your machine 11 Introduction to your machine 12 Parts of the machine 12 What you will receive
Lumber Smith. Assembly Manual. If you are having problems assembling the saw and need assistance, please contact us at:
 Lumber Smith Assembly Manual If you are having problems assembling the saw and need assistance, please contact us at: 804-577-7398 info@lumbersmith.com 1 Step 1 Safety Carefully read the Owners Manual.
General Wood Shop Notes
 General Wood Shop Notes Restricted Materials No METAL or BONE of any kind on any machine or in the room o See additional restrictions individual machine All reclaimed and other than new lumber must be
HAND HELD SAW W MILL
 HAND HELD SAW W MILL 92247 ASSEMBLY AND OPERATING INSTRUCTIONS 3491 Mission Oaks Blvd., Camarillo, CA 93011 Visit our Web site at http://www.harborfreight.com Copyright 2004 by Harbor Freight Tools. All
Horizontal and Vertical. Metal Cutting Band Saw MODEL: BS-115
 Horizontal and Vertical Metal Cutting Band Saw MODEL: BS-5 SAFETY. Know your band saw. Read the operator s Manual carefully. Learn the operations, applications and limitation.. Use recommended accessories.
INSTRUCTION MANUAL. Lathe Duplicator MODEL North Glenn Road, Casper, Wyoming woodworker.com
 140-069LatheDuplictr(1/12) 10/30/06 8:20 AM Page 1 INSTRUCTION MANUAL Lathe Duplicator MODEL 140-069 1108 North Glenn Road, Casper, Wyoming 82601 1-800-645-9292 woodworker.com 140-069LatheDuplictr(1/12)
Cyclone Upcut Cut off saw
 Cyclone Upcut Cut off saw Operation manual WARNING The operator must thoroughly read and understand this manual before operating the cut off saw or starting any servicing. All safety and warning instructions
Operating, Servicing, and Safety Manual Model " Foot Shear CAUTION: Read and Understand
 Operating, Servicing, and Safety Manual Model 3000 52" Foot Shear CAUTION: Read and Understand These Operating, Servicing, and Safety Instructions, Before Using This Machine. SAFETY The purpose of the
Introduction to Carpentry Power Tools
 Youth Explore Trades Skills Introduction to Carpentry Power Tools Description s use power tools every day, and the ability to use these tools correctly and safely is paramount. In this Activity Plan, students
Model W1837 (For Machines Mfd. Since 8/18) PARTS. Main PARTS -83-
 PARTS. Main PARTS -83-") -83- Main 29 30 31 34 35 36 37 38 39 40 41 42 43 44 45 46 47 48 49 50 51 52 53 54 55 56 57 58 61 62 63 64 65 66 67 68 69 70 71 72 73 74 75 113 96 90 91 92 93 95 96 97 98 100 101 102 103 104 105 106 109
-83- Main 29 30 31 34 35 36 37 38 39 40 41 42 43 44 45 46 47 48 49 50 51 52 53 54 55 56 57 58 61 62 63 64 65 66 67 68 69 70 71 72 73 74 75 113 96 90 91 92 93 95 96 97 98 100 101 102 103 104 105 106 109
10 BANDSAW OPERATING INSTRUCTIONS MODEL: W715
 Machinery & Tooling at its best! 10 BANDSAW OPERATING INSTRUCTIONS MODEL: W715 Charnwood, Cedar Court, Walker Road, Bardon, Leicestershire, LE67 1TU Tel. 01530 516926 Fax. 01530 516929 email; sales@charnwood.net
SECTION 10: PARTS. Main Model G0771Z (Mfd. Since 09/16)
") SECTION 10: PARTS Main 96 103 105 119 104 120 102 101 124 29-1 29-4 29-2 29-5 29-3 29-6 29-7 29-8 29-9 29-10 97 98 99 121 100 106 97 98 99 100 121 96 29 27 28 125 24 25 26 30 53 41 40 39 31 34 114 115
SECTION 10: PARTS Main 96 103 105 119 104 120 102 101 124 29-1 29-4 29-2 29-5 29-3 29-6 29-7 29-8 29-9 29-10 97 98 99 121 100 106 97 98 99 100 121 96 29 27 28 125 24 25 26 30 53 41 40 39 31 34 114 115
MI MI OPERATING MANUAL
 MODEL NO.: MI-76100 MI-76150 OPERATING MANUAL RULES for SAFE OPERATION MAGNUM INDUSTRIAL MI-76100 and MI 76150 DRILL PRESSES To help ensure safe operation, please take a moment to learn the how to operate
SPIDA SAW OPERATIONS MANUAL
 SPIDA SAW OPERATIONS MANUAL CM SERIAL NUMBER. OCTOBER 2000 CONTENTS Page description 1.) Contents 2.) Safety First 3.) CM Overview 4.) CM Specifications 5.) CM Installation 6.) CM Operation Setting the
ATD AMP Variable Speed Reciprocating Saw Owner s Manual
 ATD-10535 7 AMP Variable Speed Reciprocating Saw Owner s Manual Manufactured in China To ATD Tools, Inc. Specifications TECHNICAL SPECIFICATIONS Voltage: 120V Frequency: 60Hz Power input: 7 Amps No load
10 x 6 Planer/Thicknesser
 01550 10 x 6 Planer/Thicknesser Please read and fully understand the instructions in this manual before operation. Keep this manual safe for future reference. 1 Specifications 2 Safety Rules.3-4 Unpacking.5
Due to possible damage in shipping, the vertical stop assembly has been removed from this machine.
 Due to possible damage in shipping, the vertical stop assembly has been removed from this machine. To assemble, insert the threaded rod through the shroud opening in the top of the machine. Start the four
Inventory (Figure 2)
") MODEL T24631 8" SPIRAL CUTTERHEAD Installation INSTRUCTIONS For questions or help with this product contact Tech Support at (570) 546-9663 or techsupport@grizzly.com Introduction The Model T24631 spiral
MODEL T24631 8" SPIRAL CUTTERHEAD Installation INSTRUCTIONS For questions or help with this product contact Tech Support at (570) 546-9663 or techsupport@grizzly.com Introduction The Model T24631 spiral
25-200H. 12 Planer / Jointer. with Helical Cutterhead. Parts List.
 25-200H 12 Planer / Jointer with Helical Cutterhead 4001824 Parts List www.rikontools.com CABINET ASSEMBLY PARTS EXPLOSION & PARTS LIST KEY NO. DESCRIPTION KEY NO. DESCRIPTION 1 Pan Head Screw M6x12 P25-200H-1
Quick Set Dovetail Jig
 Quick Set Dovetail Jig FOR HELP OR ADVISE ON THIS PRODUCT PLEASE CALL OUR CUSTOMER SERVICE HELP LINE : 01509 500359 THE MANUFACTURER RESERVES THE RIGHT TO ALTER THE DESIGN OR SPECIFICATION TO THIS PRODUCT
18 GAUGE ELECTRIC METAL SHEAR
 241-9895 18 GAUGE ELECTRIC METAL SHEAR Operator s Manual SAVE THIS MANUAL You will need this manual for safety instructions, operating procedures and warranty. Put it and the original sales receipt in
MODEL T27697 & T " & 8" HELICAL CUTTERHEADS INSTALLATION INSTRUCTIONS
 MODEL T27697 & T27699 6" & 8" HELICAL CUTTERHEADS INSTALLATION INSTRUCTIONS For questions or help with this product contact Tech Support at (570) 546-9663 or techsupport@grizzly.com These indexable insert
INSTRUCTION BOOK AND PARTS LIST
 Rag Cutter MODEL WE WARNING This machine is equipped with a very sharp knife. Keep hands, arms, and hair away from the knife area at all times. Misuse of this machine or failure to follow all safety instructions
Trautman Carvers. Product Manual
 Trautman Carvers Product Manual Contents Product Specifications.... 4 Operating Precautions.... 6 Floor Carver Use.... 7 Floor Carver Diagram.... 10 Trautman Motor Lift Assist.... 11 Use of the Lift Assist....
MODEL T " SPIRAL CUTTERHEAD INSTRUCTIONS
 MODEL T10125 6" SPIRAL CUTTERHEAD INSTRUCTIONS The Model T10125 spiral cutterhead is designed to replace the straight knife cutterhead on the Model G0452 6" jointer. The total procedure of changing the
Mortising Attachment
 Mortising Attachment Owner s Manual WARNING: Read carefully and understand all ASSEMBLY AND OPERATION INSTRUCTIONS before operating. Failure to follow the safety rules and other basic safety precautions
Record the serial number and date of purchase on your parts list for future reference.
 Jointer Model: 0-0 Parts List Record the serial number and date of purchase on your parts list for future reference. Serial number: Date of purchase: Part # 0-0PL For more information: www.rikontools.com
SMALL GAUGE NIBBLER ASSEMBLY & OPERATING INSTRUCTIONS Mission Oaks Blvd., Camarillo, CA Visit our Web Site at
 SMALL GAUGE NIBBLER 91739 ASSEMBLY & OPERATING INSTRUCTIONS 3491 Mission Oaks Blvd., Camarillo, CA 93011 Visit our Web Site at www.harborfreight.com Copyright 2004 by Harbor Freight Tools. All rights reserved.
MODEL SETUP & OPERATION MANUAL DOVETAIL JIG FEATURES
 SETUP & OPERATION MANUAL FEATURES New clamping system for greater accuracy. Lockable template height for a stable platform for the router. Cuts precision matching dovetails with the same accuracy found
G0513X2 Main. G0513 Series Bandsaws (Mfd. Since 07/18) A V2
 A V2") G0513X2 Main 55 17 48 7 16 55A 14 15 49 13 47 50 12 10 71 70 72 73 59 69 74 46 11 9 8 76 5 75 4 68 81 80 67 66 48 50 39 78 79 23 17-3 17-2 17-1 17-4 17-2 21 22 24 17-5 32 33 34 35 28 2 45 3 38 44 39 43
G0513X2 Main 55 17 48 7 16 55A 14 15 49 13 47 50 12 10 71 70 72 73 59 69 74 46 11 9 8 76 5 75 4 68 81 80 67 66 48 50 39 78 79 23 17-3 17-2 17-1 17-4 17-2 21 22 24 17-5 32 33 34 35 28 2 45 3 38 44 39 43
Grizzly Drill Press SOP
 Grizzly Drill Press SOP Drill Press is wired to run on 0V. Drill Press has a built in light with a ON/OFF switch. Never hold a workpiece by hand while drilling. Clamp it down or hold it in a vice. Never
OPERATOR'S MANUAL RULES FOR SAFE OPERATION
 OPERATOR'S MANUAL #4950300 ROUTER AND JIG SAW MOUNTING KIT (FOR USE WITH THE BT3000 TABLE SAW) CONGRATULATIONS AND THANK YOU FOR BUYING THIS RYOBI ROUTER AND JIG SAW MOUNTING KIT. Your new #4950300 Router
MODEL SETUP & OPERATION MANUAL DOVETAIL JIG FEATURES SPECIFICATIONS
 SETUP & OPERATION MANUAL FEATURES Male and female dovetail joints are cut simultaneously, to ensure perfectly matched dovetail joints. Side stops provided, allow repeated precise dovetail joint cutting
Electric Chainsaw Sharpener
 FPP CHAINSS Electric Chainsaw Sharpener Instruction Manual For your own safety, please ensure you have read these instructions before use and have fully understood all the safety guidelines. Specifications
SAVE THIS FOR FUTURE REFERENCE THIS PRODUCT IS FOR PROFESSIONAL LABORATORY USE ONLY USER'S MANUAL
 DENTAL, INC. TECHNICAL BULLETIN G801-022510 5860 FLYNN CREEK ROAD READ ALL INSTRUCTIONS P.O. BOX 106 BEFORE PROCEEDING COMPTCHE, CALIFORNIA, U.S.A. 95427-0106 SAVE THIS FOR FUTURE REFERENCE www.wellsdental.com
Shop Fox Oscillating Spindle Sander
 OPERATING PROCEDURE FOR: Shop Fox Oscillating Spindle Sander INTRODUCTION: The oscillating spindle sander is used to sand the edges of boards. It can be used to smooth the edge or to remove material to
Tapping Screw (W/Flange) 46 Cord Armor 47 Tube (D) 48 Cord. 45 Cord Clip. Tapping Screw (W/Flange) 10 Gear Cover Ass'y. 12 Socket (B) Ass'y
 46 Cord Armor 47 Tube (D) 48 Cord. 45 Cord Clip. Tapping Screw (W/Flange) 10 Gear Cover Ass'y. 12 Socket (B) Ass'y") W8VB The exploded assembly drawing should be used only for authoized service center. W8VB Item No. Part time 1 Magnetic Hex. Socket 2 Sub Stopper 3 O-Ring (S-16) 4 Locator (A) 5 Lock Sleeve (A) 6 O-Ring
W8VB The exploded assembly drawing should be used only for authoized service center. W8VB Item No. Part time 1 Magnetic Hex. Socket 2 Sub Stopper 3 O-Ring (S-16) 4 Locator (A) 5 Lock Sleeve (A) 6 O-Ring
GENERAL OPERATIONAL PRECAUTIONS PRECAUTIONS ON USING DISC GRINDER
 GENERAL OPERATIONAL PRECAUTIONS WARNING! When using electric tools, basic safety precautions should always be followed to reduce the risk of fire, electric shock and personal injury, including the following.
Lassco Spinnit EBM-2.1 Paper Drill
 Lassco Spinnit EBM-2.1 Paper Drill User's Manual Provided By http://www.mybinding.com http://www.mybindingblog.com Serial Number: Date of Purchase: Dealer: Address: Before operating this equipment, please
Policy Sponsor: Assistant Vice President Facilities Management. Responsible Unit: Trade Services
 Safe Work Instructions for Powered Mitre Cut Hack Saw (Mitercut Model 220M) Policy Sponsor: Assistant Vice President Facilities Management Responsible Unit: Trade Services Approval Date: November 2016
8-Ton Manual Splitter OWNER S MANUAL
 8-Ton Manual Splitter OWNER S MANUAL WARNING: Read carefully and understand all ASSEMBLY AND OPERATION INSTRUCTIONS before operating. Failure to follow the safety rules and other basic safety precautions
ST1007/ST1012 PARTS ST1007
 ST1007/ST1012 PARTS ST1007 Main Breakdown 30-7 30-8 30-10 30-9 30-1 30-3 30-6 30-2 30-4 30-5 82 83 84 77 78 79 80 30 60 59 58 62 64 61 46 44 63 66 65 55 56 26 45 27 45 27 25 43 37 41 50 42 72 73 51 53
Ellis Drill Press Model 9400
 Ellis Drill Press Model 9400 Instruction Manual POWER FEED DRILL PRESS Infinitely Variable Speed Model 9400 Operation Manual February 17, 2006 CONTENTS Page Number Preface 2 Installation Instruction 2
PLATE JOINER 4 INCH. ASSEMBLY and OPERATING INSTRUCTIONS. Distributed Exclusively by Harbor Freight Tools
 PLATE JOINER 4 INCH 38437 ASSEMBLY and OPERATING INSTRUCTIONS Distributed Exclusively by Harbor Freight Tools 3491 Mission Oaks Blvd., Camarillo, CA 93011 Copyright 1998 by Harbor Freight Tools. All rights
7th/8th Grade Industrial Tech General Safety. Give your undivided attention to the machine in which you are using.
 7th/8th Grade Industrial Tech General Safety Wood Lab Safety General Safety Always wear safety glasses. Report all injuries to the instructor. No baggy clothing or open toed shoes. Give your undivided
MODEL 7000 BEVEL-MILL
 MODEL 7000 BEVEL-MILL HECK INDUSTRIES P.O. BOX 425 HARTLAND, MI 48353 TOLL FREE: 800-886-5418 PHONE: 810-632-5400 FAX: 810-632-6640 WWW.HECKIND.NET INSTRUCTION MANUAL Save This Manual You will need the
CX301 5-HP HEAVY DUTY SHAPER with DIGITAL READOUT User Manual
 CX301 5-HP HEAVY DUTY SHAPER with DIGITAL READOUT User Manual TABLE OF CONTENTS General Safety Instructions...3 Specific Safety Instructions...4 CX301Features...5 Physical Features...6 Set Up...7 Un-Packing...7
CX303 1-HP WOOD SHAPER USER MANUAL
 CX303 1-HP WOOD SHAPER USER MANUAL TABLE OF CONTENTS General Safety Instructions...3 Specific Safety Instructions...4 CX303 Features...5 Physical Features...6 Un-Packing...7 Set Up...7 Proper Grounding...8
Circular Saw MODEL MT581. WARNING: For your personal safety, READ and UNDERSTAND before using. SAVE THESE INSTRUCTIONS FOR FUTURE REFERENCE.
 ENGLISH Circular Saw MODEL MT58 005337 DOUBLE INSULATION I N S T R U C T I O N M A N U A L WARNING: For your personal safety, READ and UNDERSTAND before using. SAVE THESE INSTRUCTIONS FOR FUTURE REFERENCE.
Dust Collector. Model No: DC2200 (FM300S)
") Dust Collector Model No: DC2200 (FM300S) GENERAL SAFETY INSTRUCTIONS Before attempting to operate this machine, it is important that you read, understand and follow these instructions very carefully. They
Dust Collector Model No: DC2200 (FM300S) GENERAL SAFETY INSTRUCTIONS Before attempting to operate this machine, it is important that you read, understand and follow these instructions very carefully. They