SYnaPSe oct SYSteM. An enhanced set of instruments and implants for posterior stabilization of the upper spine
|
|
|
- Blake Boyd
- 6 years ago
- Views:
Transcription


1 SYnaPSe oct SYSteM An enhanced set of instruments and implants for posterior stabilization of the upper spine SurgIcal technique
2 Table of Contents Introduction SYNAPSE OCT System 2 AO Principles 5 Indications and Contraindications 6 Surgical Technique Preparation 7 Surgical Technique 9 Additional Techniques 20 Implant Removal 29 Assembly Guide 33 SYNAPSE OCT System Compatibility Matrix 38 Introduction Occipital Cervical Fusion System 39 Surgical Technique Preparation 42 Occipital Plate Technique 44 Occipital Fusion Connectors 55 Occipital Clamp Technique 59 Occipital Plate/Rod Technique 68 Implant Removal 74 OC Fusion System Compatibility Matrix 75 Image intensifier control DePuy Synthes Companies SYNAPSE OCT System Surgical Technique


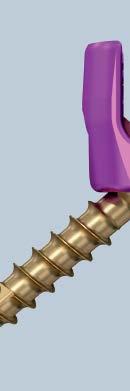
3 depuy SYntheS SPIne SYnaPSe oct SYSteM the DePuy Synthes Spine SYnaPSe occipito-cervicothoracic Fixation System is an enhanced set of instruments and implants, including clamps, top loading variable axis screws, hooks, transconnectors, and transverse bars and rods, designed for posterior stabilization of the upper spine. the implants provide the flexibility required to accommodate variations in patient anatomy. the DePuy Synthes Spine SYnaPSe oct System uses 3.5 mm and 4.0 mm rods, allowing components from SYnaPSe System, axon Pedicle Screw System, and DePuy Synthes Spine occipital cervical Fusion systems to be interchanged. additionally, tapered rods are available to extend DePuy Synthes Spine SYnaPSe oct System constructs to the lower spine using the DePuy Synthes Spine expedium Spine System. System features 3.5 mm and 4.0 mm titanium* rods top-loading hooks Multiple implant options for crossing the cervicothoracic junction Fully compatible with the oc Fusion System Square-threaded locking screws robust polyaxial screws top-loading transconnectors *titanium-6% aluminum-7% niobium alloy 1 DePuy Synthes Companies SYNAPSE OCT System Surgical Technique

4 DePuy Synthes Spine Synapse OCT System Top-loading transconnectors Head-to-head connection for increased stability Adjustable connector available in four variable lengths to accommodate different patient anatomy Assemble on the head of any SYNAPSE Polyaxial Screw Straight and angled versions offer enhanced flexibility options DePuy Synthes Companies SYNAPSE OCT System Surgical Technique 3


 4.5 mm diameter 3.")

 50")
 Self-tapping")

5 depuy Synthes Spine SYnaPSe oct System Robust polyaxial screws top loading 4.0 screws accommodate 3.5 mm diameter and 4.0 mm diameter rods one-piece body Self-tapping three diameters with cancellous profile: 3.5 mm diameter 4.0 mm diameter (rescue screw) 4.5 mm diameter 3.5 mm diameter and 4.0 mm diameter cancellous screws offer up to 50 angulation (4.0 mm diameter screws offer up to 40 angulation) Shaft screw lengths from 18 mm 50 mm* with a 10 mm unthreaded shaft (2 mm increments) Self-tapping Shaft screws with cortical profile offers 40 angulation in all directions the threaded driver eliminates driver sticking to the bone screw. *Screw length is total length. 1 DePuy Synthes Companies SYNAPSE OCT System Surgical Technique
6 AO Principles In 1958, the AO formulated four basic principles, which have become the guidelines for internal fixation. 1 They are: Anatomic reduction Stable internal fixation Preservation of blood supply Early, active mobilization The fundamental aims of fracture treatment in the limbs and fusion of the spine are the same. A specific goal in the spine is returning as much function as possible to the injured neural elements. 1,2 1. Müller ME, Allgöwer M, Schneider R, Willenegger H. Manual of Internal Fixation, 3rd Edition. Berlin: Springer-Verlag; aebi M, Thalgott JS, Webb JK. AO ASIF Principles in Spine Surgery. Berlin: Springer-Verlag; DePuy Synthes Companies SYNAPSE OCT System Surgical Technique 5
7 Indications AND CONTRAINDICATIONS Indications The SYNAPSE OCT System is indicated as follows: The Synapse OCT System, including Synapse, OC Fusion, and Axon, is intended to provide immobilization and stabilization of spinal segments as an adjunct to fusion for the following acute and chronic instabilities of the craniocervical junction, the cervical spine (C1 to C7) and the thoracic spine (T1-T3): traumatic spinal fractures and/or traumatic dislocations; instability or deformity; failed previous fusions (eg, pseudarthrosis); tumors involving the cervical/thoracic spine; and degenerative disease, including intractable radiculopathy and/or myelopathy, neck and/or arm pain of discogenic origin as confirmed by radiographic studies, and degenerative disease of the facets with intability. The Synapse OCT System is also intended to restore the integrity of the spinal column even in the absence of fusion for a limited time period in patients with advanced stage tumors involving the cervical spine in whom life expectancy is of insufficient duration to permit achievement of fusion. In order to achieve additional levels of fixation, the Axon and Synapse Systems may be connected to the Synthes Universal Spinal System using parallel connectors and tapered rods. The Synapse OCT System can also be linked to the titanium DePuy EXPEDIUM Spine System using the 3.5 mm/5.5 mm and 4.0 mm/5.5 mm titanium tapered rods. CONTRAINDICATIONS Contraindications for the use of the Synapse OCT System include: Active systemic infection or an infection localized to the site of the proposed implantation Severe osteoporosis may prevent adequate fixation of the screws and preclude the use of this or any other spinal instrumentation system Patients who have been shown to be safely and predictably treated without internal fixation Open wounds Foreign body sensitivity Mental or physical impairment, which compromises or prevents a patient s ability to comply with necessary limitations or precautions, may place that patient at a particular risk during postoperative rehabilitation. Factors such as the patient s weight, activity level, and adherence to weight- bearing or load-bearing instructions have an effect on the stresses to which the implant is subjected. Additional factors which may preclude the possibility of fusion include any underlying physiological conditions such as kidney dialysis, cancer, osteopenia, smoking, or diabetes. The Synapse OCT System (hooks) are contraindicated for use in postlaminectomy cases. WARNINGS This device is not intended for screw attachment or fixation to the posterior elements (pedicles) of the thoracic (T4-T12) or lumbar spine. CoCr rods are not intended to be used with the Synapse System. Additionally, CoCr tapered rods are not intended to connect the Synapse System to the DePuy EXPEDIUM Spine System. The safety and effectiveness of pedicle screw spinal systems have been established only for spinal conditions with significant mechanical instability or deformity requiring fusion with instrumentation. These conditions are significant mechanical instability or deformity of the thoracic, lumbar, and sacral spine secondary to severe spondylolisthesis (grades 3 and 4) of the L5-S1 vertebra, degenerative spondylolisthesis with objective evidence of neurologic impairment, fracture, dislocation, scoliosis, kyphosis, spinal tumor, and failed previous fusion (pseudarthrosis). The safety and effectiveness of these devices for any other conditions are unknown. Please refer to package insert for complete labeling. For detailed cleaning and sterilization instructions of the instruments used with the Synapse OCT System, please refer to: 6 DePuy Synthes Companies SYNAPSE OCT System Surgical Technique

8 Preparation 1 Preparation Required set E or e SYNAPSE Instrument and Titanium Implant Set SYNAPSE 4.0 mm Instrument and Titanium Implant Set Optional set e E E E E E occipital Cervical Fusion Instrument and Titanium Implant Set OC Fusion Enhancement Set for 3.5 mm Rod OC Fusion Enhancement Set for 4.0 mm Rod SYNAPSE Enhancement Instrument Set 3.5 mm Ti Curved Rod Set for SYNAPSE System 4.0 mm Ti Curved Rod Set for SYNAPSE System DePuy Synthes Companies SYNAPSE OCT System Surgical Technique 7
9 Preparation 2 Preoperative planning All necessary imaging studies should be available to plan implant placement and visualize individual patient anatomy. Use of cross sectional imaging (ie, CT and/or MRI) for posterior cervical screw placement is recommended due to the unique risks in the cervical spine. The use of planar radiographs alone may not provide the necessary imaging to mitigate the risk of improper screw placement. In addition, use of intra-operative imaging should be considered to guide and/or verify device placement, as necessary. 3 Position patient Patient positioning is critical for cervical posterior fusion procedures. Place the patient on the operating table in the prone position with the patient s head securely immobilized. Proper patient position should be confirmed via direct visualization prior to draping and by radiograph. Always use caution when positioning the patient, as physiologic alignment may not be attainable. 4 Approach Use the standard surgical approach to expose the spinous processes and laminae of the vertebrae to be fused. 5 Assemble instruments The following instruments must be assembled prior to use: Screwdriver Persuader Drill Guide Depth Gauge Assemble instruments according to the assembly instructions found on page 33 37, or refer to 8 DePuy Synthes Companies SYNAPSE OCT System Surgical Technique

10 Surgical Technique 1 Start screw hole Instrument Awl Determine the entry point and trajectory for the screw and use the awl to create a pilot hole. This helps to prevent displacement of the drill bit during initial insertion. 2 Select screw and drill guide mm Drill Bit with 65 mm stop, quick coupling Screw Turn-to-Lock Diameter Drill Bit Drill Guide Drill Guide 3.5 mm mm mm drill Guide with graduation, for 2.4 mm Drill Bit mm Drill Bit with 65 mm stop, quick coupling Drill Guide with graduation, for 3.2 mm drill Bit Alternative instruments * Turn-to-Lock Drill Guide for 2.4 mm Drill Bit * Turn-to-Lock Drill Guide for 3.2 mm Drill Bit Select the drill bit and drill guide that correspond to the screw diameter to be used. The 3.5 mm and 4.0 mm screws have the same core diameter (2.4 mm) and require the use of the same drill bit and drill guide, identified with a yellow band. The 4.5 mm screws have a larger core diameter (3.2 mm) and require the use of the drill bit and drill guide identified with a light blue color band. See table to right. *Additionally available. DePuy Synthes Companies SYNAPSE OCT System Surgical Technique 9

11 Surgical Technique 3 Set drill guide depth Drill Guide with graduation, for 3.2 mm drill Bit or drill Guide with graduation, for 2.4 mm Drill Bit To set the drill guide to the desired depth, slide back the latch to release the inner tube; align the distal end of the internal drill guide tube with the appropriate depth calibration on the window. Release the latch to lock the drill guide at the desired depth. Alternative instrument * Drill Guide, 14 mm, for 2.4 mm drill bit A drill guide with a fixed depth of 14 mm is additionally available for both 3.5 mm and 4.0 mm screws. Alternative instruments * Turn-to-Lock Drill Guide for 2.4 mm Drill Bit * Turn-to-Lock Drill Guide for 3.2 mm Drill Bit Slide inner tube until desired depth aligns with markings. To lock this drill guide, pull back the latch, rotate the tube clockwise, and release the latch. *Additionally available. 11 DePuy Synthes Companies SYNAPSE OCT System Surgical Technique

12 Surgical Technique 4 Drill hole drill Guide with graduation, for 2.4 mm Drill Bit mm Drill Bit, quick coupling, with 65 mm stop Straight Ball Tip Probe Drill to the desired trajectory and depth, using the 2.4 mm drill bit and drill guide. Use the straight ball tip probe to confirm, by palpation, accurate placement within the pedicle. Caution: Do not touch the latch when drilling. Touching the latch could disengage the lock resulting in uncontrolled depth and potential harm to the patient. Alternative instruments mm Drill Bit with 65 mm stop, quick coupling drill Guide with graduation, for 3.2 mm Drill Bit * Turn-to-Lock Drill Guide for 2.4 mm Drill Bit * Turn-to-Lock Drill Guide for 3.2 mm Drill Bit Alternative technique Pedicle Probe, 2.4 mm Curved Pedicle Probe, 2.4 mm Pedicle preparation may also be performed using either the pedicle probe or curved pedicle probe. *Additionally available. DePuy Synthes Companies SYNAPSE OCT System Surgical Technique 11

13 Surgical Technique Optional technique Small Pedicle Marker, beaded Small Pedicle Marker, long beaded The small pedicle markers may be used to radiographically confirm position and orientation of screw sites. 5 Measure Instrument Depth Gauge Use the depth gauge to confirm hole depth and select the corresponding screw length. The depth gauge reading and the screw length indicate actual bone purchase. The depth gauge must sit directly on the bone. 11 DePuy Synthes Companies SYNAPSE OCT System Surgical Technique

14 Surgical Technique 6 Insert screw threaded Holding Sleeve, for polyaxial screws cross Pinned StarDrive Screwdriver Shaft, T15, self-retaining, quick coupling Quick Coupling Handle, with swivel cap Optional instruments Slip Sleeve, for Threaded Holding Sleeve cross Pinned Hexagonal Screwdriver Shaft, quick coupling * Ratchet T-Handle with Quick Coupling * Small Ratchet Handle with Quick Coupling Refer to page for screwdriver assembly and implant attachment instructions. Insert the selected 3.5 mm or 4.5 mm self-tapping DePuy Synthes Spine SYNAPSE OCT System screw. A 4.0 mm emergency screw may be used if the primary 3.5 mm screw has less than optimal fixation. Note: The optional slip sleeve may be used to grip the holding sleeve during screw insertion. *Additionally available. DePuy Synthes Companies SYNAPSE OCT System Surgical Technique 11
15 Surgical Technique Alternative technique tap for 4.5 mm Cancellous Bone Screws, 205 mm, 50 mm calibration mm/3.5 mm Tap Sleeve tap for 3.5 mm Cancellous Bone Screws, 50 mm calibration tap for 3.5 mm Cortex Screws, 50 mm calibration Alternative instruments undersized Tap for 3.5 mm Cancellous Screws undersized Tap for 4.5 mm Cancellous Screws Short Tap for 3.5 mm Cancellous Bone Screws with sharp tip Short Tap for 4.5 mm Cancellous Bone Screws with sharp tip Dense bone may be tapped using the appropriate tap, depending on the chosen screw. The tap sleeve may be used as a tissue protector, and to indicate tap depth. Tap selection guide Undersized* Nominal 3.5 mm Cancellous Screw mm Cancellous Screw N/A 4.5 mm Cancellous Screw mm Cortex Screw N/A * undersized taps are 0.5 mm smaller than nominal, eg, the Undersized tap for 3.5 mm screws has a diameter of 3.0 mm. 11 DePuy Synthes Companies SYNAPSE OCT System Surgical Technique
 Contour the rod template to fit the anatomy.")
16 Surgical Technique 7 Place additional screws Use the same technique to insert the remaining screws. 8 Contour template Instrument Rod Template, 240 mm (for 3.5 mm and 4.0 mm rods) Contour the rod template to fit the anatomy. DePuy Synthes Companies SYNAPSE OCT System Surgical Technique 11


17 Surgical Technique 9 Bend and cut rod Rod Cutter Rod/Plate Bender Use the rod/plate bender to contour the rod to match the curve of the template. The bend line arrow indicates where the rod will be bent. Use the rod cutter to cut the rod to the appropriate length. Alternative technique Shorter rod sections may be bent by placing one end of the rod on the internal ledge of the bending feature. Internal ledge Alternative instruments Bending Iron, left Bending Iron, right The bending irons can also be used as pipe rod benders. Insert the rod into the rear of each bending iron and lock in place by turning the thumbwheels clockwise. With both ends locked inside the irons, the rod may be contoured. Caution: Repeated bending and notching may weaken rod. 11 DePuy Synthes Companies SYNAPSE OCT System Surgical Technique

18 Surgical Technique 10 Insert rod Instrument Holding Forceps Optional instruments Bending Iron, left Bending Iron, right Alignment Tool * Rod Pusher/Head Turner Insert the rod into the variable axis heads of the screws using the holding forceps. The alignment tool may be used to help orient the heads to the correct position. The bending irons may be used to adjust the curve of the rod. 11 Insert locking screw StarDrive Screwdriver Shaft, T15, self-retaining, quick coupling Nm Torque Limiting Handle, with quick coupling Loosely fasten the locking screws using the StarDrive Screwdriver Shaft with the 2 Nm torque limiting handle. When inserting the locking screws, they may be turned one-quarter to one-half turn counterclockwise to seat the thread before tightening. Alternative instrument * Dual Sided Locking Cap Inserter Caution: Not meant to be used for final tightening. *Additionally available. DePuy Synthes Companies SYNAPSE OCT System Surgical Technique 11


19 Surgical Technique Alternative technique Instrument Persuader or Persuader, for 4.0 mm rods Use the persuader to introduce the titanium rod into the variable axis head of the screw. Place the persuader over the rod and onto the variable axis head so the tip of the persuader sits below the screwhead reduction feature. Squeeze the handle to engage the persuader and introduce the rod into the head of the screw. Loosely fasten the locking screws using the StarDrive Screwdriver Shaft with the 2 Nm torque limiting handle through the cannulation of the persuader. When inserting the locking screws, they may be turned one-quarter to one-half turn counterclockwise to seat the thread before tightening. Optional instrument * Locking Persuader Handle If using the Locking Persuader Handle, squeeze the handle to engage the pursuader and introduce the rod into the head of the screw. Thread the nut down to lock reduced position. Optional technique Instrument Rod Holder If rotation of the rod is desired, it is recommended that the rod holder be used. *Additionally available. 11 DePuy Synthes Companies SYNAPSE OCT System Surgical Technique


20 Surgical Technique Optional technique * Rocker Fork for 4.0 mm Rod * Rocker Fork for 3.5 mm Rod Place the open center of the rocker fork onto the top of the rod, with the feet below the screw side notches. Lever the fork back until the rocker fork engages the side notches of the screw. In a slow and controlled way, lever the fork until the rod is seated into the polyaxial head. 12 Lock construct StarDrive Screwdriver Shaft, T15, self-retaining, quick coupling Countertorque or Countertorque, for 4.0 mm rods Nm Torque Limiting Handle After final adjustment of the construct, fully tighten all locking screws with the screwdriver shaft and the 2 Nm torque limiting handle. The construct is now rigidly locked. Final tightening should be accomplished after all locking screws have been placed, and should be aided by the countertorque tool. Note: The persuader may be used in place of the countertorque tool. *Additionally available. DePuy Synthes Companies SYNAPSE OCT System Surgical Technique 11

21 Surgical Technique 13 Apply compression or distraction Distraction Forceps Compression Forceps Compression or distraction with variable axis heads is only possible if the locking screws have not been tightened. Use the compression forceps to achieve compression, or the distraction forceps to achieve distraction, and then tighten the setscrew as described in Step 12. Note: All setscrews are designed to be flush or recessed from the top of the implant when locked. To ensure proper implant and rod (3.5 mm or 4.0 mm) configuration, please verify the part number of the implant. 22 DePuy Synthes Companies SYNAPSE OCT System Surgical Technique


22 Additional Techniques A. Place top loading hooks StarDrive Screwdriver Shaft, T15, self-retaining, quick coupling Implant Holding Forceps Quick Coupling Handle, with swivel cap Optional instruments * Ratchet T- handle with Quick Coupling * Dual Sided Cap Inserter * Small Ratchet Handle with Quick Coupling Position hook Attach implant holding forceps to the appropriate hook. Place the hook in the desired location using the StarDrive Screwdriver as an aid. Insert rod Insert locking screw Tighten the locking screw using the StarDrive Screwdriver Shaft with quick coupling handle. Turn the screwdriver one-quarter to one-half turn counterclockwise to seat the thread before tightening. *Additionally available. DePuy Synthes Companies SYNAPSE OCT System Surgical Technique 22


23 Additional Techniques B. Insert top loading transconnectors Note: The DePuy Synthes Spine SYNAPSE OCT System Top Loading Transconnector, compatible only with the SYNAPSE OCT System, is placed on top of two mono-segmental variable axis screws to cover the exposed spinal cord following laminectomy. 1 Insert transconnector locking screw StarDrive Screwdriver Shaft, T15, self-retaining, quick coupling Nm Torque Limiting Handle Loosely fasten the transconnector locking screws using the StarDrive Screwdriver Shaft and 2 Nm torque limiting handle. When inserting the transconnector locking screws, they may be turned one-quarter to one-half turn counterclockwise to seat the thread before tightening. 2 Lock construct StarDrive Screwdriver Shaft, T15, self-retaining, quick coupling Countertorque Nm Torque Limiting Handle Optional instruments Persuader * Locking Persuader Handle After final adjustment of the construct, fully tighten all locking screws using the screwdriver shaft and 2 Nm torque limiting handle. The construct is now rigidly locked. Final tightening should be accomplished after all locking screws have been placed, and should be aided by the countertorque tool. Note: The persuader may be used in place of the countertorque. *Additionally available. 22 DePuy Synthes Companies SYNAPSE OCT System Surgical Technique

24 Additional Techniques 3 Insert transconnector Instrument Holding Forceps Select a straight or angled transconnector of appropriate length. Place the transconnector on the DePuy Synthes Spine SYNAPSE OCT System Screw construct to assess fit. Hold the transconnector with the holding forceps. Adjust as necessary. Both sides of the transconnector should be placed over the locking screws before proceeding. Note: Ensure the etched band on the transconnector shaft is not visible when implanting. Caution: Do not bend the transconnector. DePuy Synthes Companies SYNAPSE OCT System Surgical Technique 22

25 Additional Techniques 4 Tighten locking nut StarDrive Screwdriver Shaft, T15, self-retaining, quick coupling Nm Torque Limiting Handle Transconnector Nut Driver, 7.5 mm Select and place the locking nut onto the transconnector locking screw using the 7.5 mm nut driver. To provide alignment, insert the StarDrive Screwdriver Shaft and 2 Nm torque limiting handle into the cannula of the 7.5 mm nut driver and engage the T15 recess. Loosely thread the locking nut onto the transconnector locking screw using the 7.5 mm nut driver. After all locking nuts have been placed, firmly tighten them with the 7.5 mm nut driver, using the StarDrive Screwdriver Shaft and 2 Nm torque limiting handle as countertorque. Tip: Use the 7.5 mm nut driver to help seat the transconnector onto the transconnector locking screw. Note: When inserting the locking nuts, they may be turned one-quarter to one-half turn counterclockwise to seat the thread before tightening. Ensure the nuts are fully seated. Caution: Use only one hand to tighten. Overtightening may make removal difficult. Do not turn the transconnector locking screw with the T15 while final tightening. Optional technique T15 Shaft for Torque Limiting Nut Driver* Nm Torque Limiting Nut Driver* To provide allignment, insert the T15 shaft for torque limiting nutdriver into the cannula of the torque limiting nut driver. After locking nuts have been placed, firmly tighten them until the nut driver clicks. * Additionally available. 22 DePuy Synthes Companies SYNAPSE OCT System Surgical Technique


26 Additional Techniques 5 Lock connection Instrument Unlocked Crimper, for use with Transconnector Secure the locking sleeve with the crimper. When locking the connection, ensure that the gold tip of the instrument is touching the gold portion of the transconnector shaft. The transconnector is now rigidly locked. Locked Notes: If necessary, the connection can be unlocked using the same instrument with the gold tip touching the blue portion of the transconnector. Locking more than once may weaken the transconnector. C. Adding rod-to-rod transconnectors StarDrive Screwdriver Shaft, T15, self-retaining, quick coupling Rod Cutter Quick Coupling Handle, with swivel cap Crimper for Transconnector Holding Forceps Position the transconnector Place the transconnector on the DePuy Synthes Spine SYNAPSE OCT System rod construct. The transconnector may be held with the holding forceps. DePuy Synthes Companies SYNAPSE OCT System Surgical Technique 22

 configuration, please verify the part number of the implant. Lock connections Lock both bushing connections with the crimper.")
27 Additional Techniques Tighten clamp Tighten the setscrew of the transconnector hook on the rod with the StarDrive Screwdriver Shaft. Slide the rod within the hook if necessary. Hold the second hook in the appropriate position and tighten the setscrew. Tip: The rod may be bent to accommodate the anatomy. Locking one end of the transconnector with the crimper may facilitate placement. Note: All setscrews are designed to be flush or recessed from the top of the implant when locked. To ensure proper implant and rod (3.5 mm or 4.0 mm) configuration, please verify the part number of the implant. Lock connections Lock both bushing connections with the crimper. Ensure that the gold tip of the instrument is facing medially when locking the connection. The transconnector is now rigidly locked. Note: If necessary, the connection can be unlocked using the same instrument with the gold tip facing laterally. The rod may be shortened with the rod cutter. 22 DePuy Synthes Companies SYNAPSE OCT System Surgical Technique


28 Additional Techniques D. Adding transverse bars StarDrive Screwdriver Shaft, T15, self-retaining, quick coupling Quick Coupling Handle, with swivel cap Place the opening of the appropriate titanium transverse bar over the rod. Loosely attach the transverse bar to the rod. Introduce the transverse bar into the variable axis head of the screw. Insert the locking screw in the variable axis head as described in Steps 11 and 12 of the SYNAPSE OCT System technique. Tighten the setscrew of the transverse bar using the StarDrive Screwdriver Shaft. Note: All setscrews are designed to be flush or recessed from the top of the implant when locked. To ensure proper implant and rod (3.5 mm or 4.0 mm) configuration, please verify the part number of the implant. E. Parallel connectors Open parallel connectors allow side loading of the rods. Either side of the connector may be connected first. Tighten the setscrew on one side, then connect the remaining rod and tighten the setscrews. Note: All setscrews are designed to be flush or recessed from the top of the implant when locked. To ensure proper implant and rod (3.5 mm or 4.0 mm) configuration, please verify the part number of the implant. DePuy Synthes Companies SYNAPSE OCT System Surgical Technique 22

29 Additional Techniques F. Tapered rods Tapered rods may be used to extend a DePuy Synthes Spine SYNAPSE OCT System construct. Connect the 3.5 mm or 4.0 mm section to the SYNAPSE OCT System polyaxial screws as instructed in Steps 8 10 of the surgical technique. Connect the 5.0 mm/6.0 mm end of the rod to the appropriate USS Spinal System. The DePuy Synthes Spine SYNAPSE OCT System may be linked to the DePuy Synthes Spine EXPEDIUM 5.5 Titanium Spine System using the 3.5 mm/5.5 mm and 4.0 mm/5.5 mm titanium tapered rods. G. Occipital fusion technique Occipital plates or occipital clamps may be attached to the occiput as described in the Occipital Cervical Fusion System Technique. These plates or clamps can then be connected to the DePuy Synthes Spine SYNAPSE OCT System. 22 DePuy Synthes Companies SYNAPSE OCT System Surgical Technique

30 IMPLANT REMOVAL Implant removal StarDrive Screwdriver Shaft, T15, self-retaining, quick coupling cross Pinned Hexagonal Screwdriver Shaft, quick coupling Crimper for Transconnector All DePuy Synthes Spine SYNAPSE OCT System implants can be removed with a T15 StarDrive Screwdriver. The transconnectors also require that the crimper be used for removal. Note: SYNAPSE OCT System Polyaxial Screws may also be removed with the cross pinned hex shaft, with quick coupling. Removing top loading transconnectors Instrument Transconnector Nut Driver, 7.5 mm Alternative Instrument * 2.5 Nm Torque Limiting Nut Driver Remove nut To remove the top loading transconnector, remove the nut using the 7.5 mm nut driver. *Additionally available. DePuy Synthes Companies SYNAPSE OCT System Surgical Technique 22

31 Implant Removal Option A Remove transconnector StarDrive Screwdriver Shaft, T15, self-retaining, quick coupling Nm Torque Limiting Handle Use the StarDrive Screwdriver Shaft and 2 Nm torque limiting handle to unlock the locking screw and remove the transconnector. Remove transconnector locking screw StarDrive Screwdriver Shaft, T15, self-retaining, quick coupling Nm Torque Limiting Handle Use the StarDrive Screwdriver Shaft and 2 Nm torque limiting handle to remove the transconnector locking screw. 33 DePuy Synthes Companies SYNAPSE OCT System Surgical Technique

32 Implant Removal Option B Remove transconnector Instrument * Top Loading Implant Remover First, remove the nuts from the top loading implant. Ensure the inner shaft has not been advanced too far before placing over the screw/transconnector interface, otherwise instrument will not engage. Engage the distal end of the instrument to bottom of the implant. While aligning the implant remover to the axis of the transconnector locking screw, slowly turn the knob to thread the handle down. Continue turning slowly until the implant become released from the transconnector locking screw. *Additionally available DePuy Synthes Companies SYNAPSE OCT System Surgical Technique 33


33 Implant Removal Option C Remove transconnector Crimper for Transconnector Holding Forceps Remove the 7.5 mm locking nuts Grip the transconnector loop midline using the holding forceps. Loosen the interface by rocking the transconnector loop cranially-caudally, as needed to release. Move to the opposite loop and repeat. Once loosened, remove the transconnector. 33 DePuy Synthes Companies SYNAPSE OCT System Surgical Technique
34 Assembly Guide Screwdriver Holding Sleeve with thread Hexagonal Screwdriver Shaft, cross pinned Handle with Quick Coupling Button Optional instrument Outer Sleeve for Holding Sleeve no Add the outer sleeve to the holding sleeve. Insert the holding sleeve through the slotted end of the outer sleeve past the threads of the holding sleeve. Snap the outer sleeve over the speed bump. (Fig 1) Insert the back end of the cross pinned hexagonal screwdriver shaft through the distal tip of the holding sleeve (Fig 2). Press the button on the holding sleeve while inserting the screwdriver shaft. Ensure that the holding sleeve has bottomed out on the cross pin at the distal end of the screwdriver shaft. Connect the handle with quick coupling to the hexagonal screwdriver shaft (Fig 3). Reset the driver by pressing the button on the sleeve and pulling back on the sleeve until it hits the handle (Fig 4). The green color band on the sleeve should not be visible. Driver is ready for use. Speed bump Green color band Outer sleeve Figure 1 Figure 2 Figure 3 Figure 4 DePuy Synthes Companies SYNAPSE OCT System Surgical Technique 33
. Slide the sleeve until it comes in contact with the body of the polyaxial screw (Fig 6).")
35 assembly guide Screwdriver Attach screwdriver to polyaxial screw ensure that the driver is in the reset position. the green color band on the holding sleeve should not be visible. Insert the tip of the hexagonal screwdriver shaft into the bone screw of the polyaxial screw (Fig 5). Slide the sleeve until it comes in contact with the body of the polyaxial screw (Fig 6). rotate the sleeve clockwise until it bottoms out on the cross pin of the hexagonal screwdriver shaft (Fig 7). the green color band should be visible. the polyaxial screw is ready for bone insertion. Remove screwdriver from the polyaxial screw rotate the sleeve counterclockwise. before accepting another polyaxial screw, the driver should be reset as shown in Figure 4. the green color band on the holding sleeve should not be visible. Figure 5 Figure 6 Figure 7 31 DePuy Synthes Companies SYNAPSE OCT System Surgical Technique
 1 2 2 1 3 DePuy Synthes Companies SYNAPSE OCT System")
36 assembly guide PerSuader InStruMent ( ) DePuy Synthes Companies SYNAPSE OCT System Surgical Technique 35

37 Assembly Guide Drill guides 1 Drill Guide with Graduation for 2.4 mm Drill Bit Turn-to-Lock Drill Guide for 2.4 mm Drill Bit DePuy Synthes Companies SYNAPSE OCT System Surgical Technique
38 Assembly Guide Depth Gauge ( ) DePuy Synthes Companies SYNAPSE OCT System Surgical Technique 33
39 SYNAPSE OCT System Compatibility Matrix SYNAPSE 4.0 mm Rod System SYNAPSE 3.5 mm Rod System Features and Design Rods 4.0 mm Titanium Tapered Rod 3.5 mm Titanium Tapered Rod 4.0 mm Titanium Straight Rod 3.5 mm Titanium Straight Rod 4.0 mm Titanium Pre-Curved Rod 3.5 mm Titanium Pre-Curved Rod Screws accommodate 4.0 mm Rods and 3.5 mm Rods Accommodate 3.5 mm Rods Polyaxial O one piece body T top-loading Square thread locking screw T t15 StarDrive Recess 3.5 mm Titanium Cancellous Screws 3.5 mm Titanium Cancellous Screws 8 mm 50 mm (2 mm increments) 8 mm 50 mm (2 mm increments) 50 maximum angulation 50 maximum angulation 4.0 mm Titanium Cancellous Screws 4.0 mm Titanium Cancellous Screws 8 mm 50 mm (2 mm increments) 8 mm 50 mm (2 mm increments) 50 maximum angulation 50 maximum angulation 4.5 mm Titanium Cancellous Screws 4.5 mm Titanium Cancellous Screws 8 mm 50 mm (2 mm increments) 8 mm 50 mm (2 mm increments) 40 maximum angulation 40 maximum angulation 3.5 mm Titanium Cortex Shaft Screw 3.5 mm Titanium Cortex Shaft Screw 18 mm 50 mm (2 mm increments) 18 mm 50 mm (2 mm increments) 40 maximum angulation 40 maximum angulation Hooks Side-loading Lamina Hooks not offered with Lamina Hooks (side-loading) the 4.0 system left and right offset T t15 StarDrive Recess T top-loading Lamina Hooks L left, right, and straight offsets Short and long versions Transconnector Top-Loading Transconnector 4.0 mm Rod-to-Rod Transconnector 3.5 mm Rod-to-Rod Transconnector T transconnector Locking Screw and 7.5 mm Locking Nut Additional components 4.0 mm Transverse Bars and Open Parallel 3.5 mm Transverse Bars and Open C connectors Parallel Connectors 33 DePuy Synthes Companies SYNAPSE OCT System Surgical Technique


40 occipital cervical FuSIon SYSteM Implants and instruments designed to optimize fixation to the occiput the DePuy Synthes SYnaPSe oct System additionally contains implants and instruments that are intended to provide immobilization and stabilization as an adjunct to fusion of the occipito cervical junction. the oc Fusion System includes a complete set of implants and instruments designed to optimize fixation to the occiput and easily connect with DePuy Synthes Spine cervical and thoracic Systems. Slender design maximizes visualization universal joint and flexible instruments accommodate minimal exposures depth control on drills and taps adapt to varying patient anatomy Features the oc Fusion System offers the surgeon several implant options to maximize fixation to the occiput and minimize the implant footprint. the instrumentation is designed to accommodate minimal exposures and varying patient anatomy. Midline plate construct Lateral wedge plate construct DePuy Synthes Companies SYNAPSE OCT System Surgical Technique 39


41 occipital cervical Fusion System One-hole clamp construct Two-hole clamp construct Plate/rod construct 11 DePuy Synthes Companies SYNAPSE OCT System Surgical Technique


42 Occipital Cervical Fusion System OC Fusion implants for DePuy Synthes Spine SYNAPSE OCT System 4.0 mm Rods (or plate/rod) When used in conjunction with the DePuy Synthes Spine Synapse 4.0 System, specific 4.0 mm implants are necessary. 4.0 mm Midline Plate 4.0 mm Lateral Wedge Plate One-hole and Two-hole clamps for 4.0 mm rods 4.0 mm Plate/Rods 4.0 Top Loading OC Connector 4.0 mm Pre-bent rods DePuy Synthes Companies SYNAPSE OCT System Surgical Technique 44

43 Preparation 1 Preparation Required sets E E or E Optional sets E E Occipital Cervical Fusion Instrument and titanium Implant Set Synapse Instrument and Titanium Implant Set Synapse 4.0 mm Rod Instrument and titanium Implant Set OC Fusion Enhancement Set for 3.5 mm Rod OC Fusion Enhancement Set for 4.0 mm Rod DePuy Synthes Companies SYNAPSE OCT System Surgical Technique
44 Preparation 2 Preoperative planning All necessary imaging studies should be available to plan occipital screw placement and accommodate varying patient anatomy. 3 Position patient Patient positioning is critical for occipitocervical fusion procedures. The patient should be placed on the operating table in the prone position with the patient s head securely immobilized. Confirm proper patient position by direct visualization before draping, and by radiograph. Always use caution when positioning the patient, as physiological alignment may not be attainable. 4 Approach Make a standard midline incision from the external occipital protuberance and continue caudally, to appropriately expose the cervical/thoracic levels to be surgically treated. DePuy Synthes Companies SYNAPSE OCT System Surgical Technique 44

45 Occipital Plate Technique 1 Attach bone anchors Attach bone anchors to the cervical and thoracic spine as described in the DePuy Synthes Spine SYNAPSE OCT System, and AXON Pedicle Screw System technique guides. 2 Select occipital plate xx Template, for Occipital Plate Plate Holder Select a template of the plate style and size estimated to best fit the occiput, as determined by the separation of the rods. Contour the template to fit the anatomy. 44 DePuy Synthes Companies SYNAPSE OCT System Surgical Technique


46 Occipital Plate Technique 3 Contour plate Instrument Plate Bender Use the plate bender to contour the plate to fit the anatomy, using the template as a guide. The plate bender can be used across any section of the plate, including the area lateral to the rod attachment bodies. Note: Reverse bending of the plates should not be attempted. Extreme bending over the rod attachment body travel slot will limit the amount of medial/lateral adjustment in the rod attachment body. Alternative instrument Locking Pliers Locking pliers can be used to create more acute bends. Note: Reverse bending of the plates should not be attempted. Extreme bending over the rod attachment body travel slot will limit the amount of medial/lateral adjustment in the rod attachment body. DePuy Synthes Companies SYNAPSE OCT System Surgical Technique 44

47 Occipital Plate Technique 4 Set drill guide depth Instrument Adjustable Drill Guide Set the adjustable drill guide to the desired depth. Slide back the latch to release the inner tube. Align the indicator of the inner tube with the appropriate depth calibration on the outer tube. Release the latch to lock the drill guide at the desired depth. 44 DePuy Synthes Companies SYNAPSE OCT System Surgical Technique

48 Occipital Plate Technique 5 Drill Adjustable Drill Guide mm Drill Bit Quick Coupling Handle, with swivel cap Plate Holder Caution: Do not touch the latch when drilling. Touching the latch could disengage the lock, resulting in uncontrolled depth and potential harm to the patient. Drill a hole to the desired trajectory and depth, using the 3.2 mm drill bit through the adjustable drill guide. Drill to the stop. Drilling must occur through the occipital plate to ensure proper drilling depth. Alternative instrument mm Drill Bit with Flexible Shaft * 3.2 mm Drill Bit with Flexible Shaft (new) Caution: Do not touch the latch when drilling. Touching the latch could disengage the lock, resulting in uncontrolled depth and potential harm to the patient. Drill a hole to the desired trajectory and depth, using the 3.2 mm drill bit with flexible shaft through the adjustable drill guide. Drill to the stop. Drilling must occur through the occipital plate to ensure proper drilling depth. *Additionally available. DePuy Synthes Companies SYNAPSE OCT System Surgical Technique 44


49 Occipital Plate Technique 6 Measure Instrument Depth Gauge Use the depth gauge to confirm hole depth and select the corresponding screw length. The depth gauge reading and the screw length indicate actual bone purchase. The depth gauge must sit directly on the bone. 44 DePuy Synthes Companies SYNAPSE OCT System Surgical Technique


50 Occipital Plate Technique 7 Tap Adjustable Drill Guide Tap for 4.5 mm Occipital Screws Quick Coupling Handle Caution: Do not touch the latch when tapping. Touching the latch could disengage the lock resulting in uncontrolled depth and potential harm to the patient. Tap through the adjustable drill guide and occipital plate, to ensure proper tapping depth. Note: Tapping is required for all screws. Alternative technique universal Joint Tap for 4.5 mm Occipital Screws Holding Forceps Caution: Do not touch the latch when tapping. Touching the latch could disengage the lock resulting in uncontrolled depth and potential harm to the patient. Set the tap depth by turning the tap sleeve to the desired depth. Lock the tap sleeve by turning down the locking nut to contact the tap sleeve. Finger-tighten the lock nut. Use the holding forceps to provide axial force and stability. Tapping must occur through the occipital plate to ensure proper tapping depth. DePuy Synthes Companies SYNAPSE OCT System Surgical Technique 44


51 Occipital Plate Technique 8 Insert screw Quick Coupling Handle, with swivel cap StarDrive, Locking Screwdriver Shaft, T15 Optional * Ratchet T-Handle with Quick Coupling * Small Ratchet Handle with Quick Coupling Insert the selected 4.5 mm occipital screw and provisionally tighten. Note: A 5.0 mm emergency screw may be used if the primary screw has less than optimal fixation. Alternative technique Universal Joint Screwdriver, T Quick Coupling Handle, with swivel cap Holding Forceps Optional instruments * Ratchet T-Handle with Quick Coupling * Small Ratchet Handle with Quick Coupling Use the universal joint screwdriver to insert the selected screw. Use the holding forceps to provide axial force and stability. *Additionally available. 55 DePuy Synthes Companies SYNAPSE OCT System Surgical Technique
 Contour the rod template to fit the anatomy and to seat fully in the cervical and upper thoracic bone anchors.")
52 Occipital Plate Technique 9 Insert additional screws Insert remaining screws, as in Steps Contour rod template Instrument Rod Template, 240 mm (3.5 mm and 4.0 mm rods) Contour the rod template to fit the anatomy and to seat fully in the cervical and upper thoracic bone anchors. Create the occipitocervical bend and ensure sufficient rod length to connect with the occipital plate. DePuy Synthes Companies SYNAPSE OCT System Surgical Technique 55


53 Occipital Plate Technique 11 Bend rod Rod Cutter Rod/Plate Bender Contour the 3.5 mm or 4.0 mm rod to match the template. Use the rod cutter to cut the rod to the appropriate length. Caution: Repeated bending may weaken the rod. Optional technique : * Template for OC Rod Angles Measure the OC Angle Using Template for OC Rod Angles. Select a rod to match the angle as revealed by the template. Note: If template reading shows it to be between 2 sizes, choose the larger angle. *Additionally available. 55 DePuy Synthes Companies SYNAPSE OCT System Surgical Technique


54 Occipital Plate Technique 12 Attach rods Positioning Tool or Positioning Tool, for 4.0 mm Rod Quick Coupling Handle, with swivel cap StarDrive, Locking Screwdriver Shaft, T15 Insert rods into the rod attachment body. Ensure that the rods extend slightly past the end of the plate. Use the locking screwdriver shaft to insert the titanium locking screw. Use the positioning tool to facilitate rod placement and locking screw insertion. Alternative instruments Universal Joint Screwdriver, T Holding Forceps * Ratchet T-Handle with Quick Coupling * Dual Sided Locking Cap Inserter * Small Ratchet Handle with Quick Coupling Use the universal joint screwdriver and holding forceps to insert the titanium locking screw. *Additionally available. DePuy Synthes Companies SYNAPSE OCT System Surgical Technique 55

55 Occipital Plate Technique 13 Final tightening Quick Coupling Handle, with swivel cap StarDrive, Locking Screwdriver Shaft, T15 Use the locking screwdriver shaft for final tightening of all occipital screws and locking screws. Alternative instruments Universal Joint Screwdriver, T Holding Forceps * Ratchet T-Handle with Quick Coupling * Small Ratchet with Quick Coupling Use the universal joint screwdriver and the holding forceps for final tightening of all occipital screws and locking screws. *Additionally available. 55 DePuy Synthes Companies SYNAPSE OCT System Surgical Technique

56 OCCIPITAL Fusion Connectors Optional technique From Step 9, follow the surgical technique below if OC fusion connectors are used. 1 Insert transconnector locking screw Instrument StarDrive Screwdriver Shaft, T15, self retaining, quick coupling Nm Torque Limiting Handle, with quick Coupling Loosely fasten the transconnector locking screws to the sub-occipital bone anchors using the StarDrive Screwdriver Shaft and 2 Nm torque limiting handle. When inserting the transconnector locking screws, they may be turned one-quarter to one-half turn counterclockwise to seat the thread before tightening. 2 Trial using the rod template, by seating the template into the occipital plate saddle and creating the bend angle necessary to reach the sub-axial bone anchor. Contour a straight or angled OC connector to match the trialed rod Rod Template Rod Cutter Rod/Plate Bender Caution: Do not bend the loop/bushing interface. DePuy Synthes Companies SYNAPSE OCT System Surgical Technique 55

57 OC Fusion Connectors 3 Insert Occipital Connector Instrument Holding Foreceps Place the top loading connector over the transconnector locking screw using the holding forceps and adjust as necessary. 4 Insert locking screw into the occipital plate Instrument StarDrive, Locking Screwdriver Shaft, T15 Use the positioning tool to facilitate rod placement and locking screw insertion. Provisionally tighten locking screw (do not final tighten). Caution: Ensure the rod is flush with the plate and the bend of the rod does not interface with the locking screw. 55 DePuy Synthes Companies SYNAPSE OCT System Surgical Technique

58 OC Fusion Connectors 5 Insert the locking nut Transconnector Nut Driver, 7.5 mm T15 Shaft for Torque Limiting Nut Driver Quick Coupling Handle, with swivel cap Alternative instrument * 2.5 Nm Torque Limiting Nut Driver Optional instruments * Ratchet T-Handle with Quick Coupling * Small Ratchet Handle with Quick Coupling Place the locking nut onto the transconnector locking screw using the torque limiting nut driver. Insert the straight STARDRIVE, T15 Shaft, into the cannula. Provisionally tighten locking nut (do not final tighten). 6 Final tighten the OC locking screw Quick Coupling Handle, with swivel cap StarDrive, Locking Screwdriver Shaft, T15 Optional instruments * Ratchet T-Handle with Quick Coupling * Small Ratchet Handle with Quick Coupling Use the locking screwdriver shaft for final tightening of all occipital screws and locking screws. *Additionally available. DePuy Synthes Companies SYNAPSE OCT System Surgical Technique 55


59 OC Fusion Connectors 7 Final tighten the locking nut T15 Shaft for Torque Limiting Nut Driver Nm Torque Limiting Nut Driver Quick Coupling Handle, with swivel cap Alternative instrument Transconnector Nut Driver, 7.5 mm Optional instruments * Ratchet T-Handle with Quick Coupling * Small Ratchet Handle with Quick Coupling Final tighten both locking nuts using the 2.5 Nm Torque Limiting Nut Driver. Note: If removal is required, please refer to page and follow the same removal technique as the Transconnector. *Additionally available. 55 DePuy Synthes Companies SYNAPSE OCT System Surgical Technique


60 Occipital Clamp Technique 1 Attach bone anchors Attach bone anchors to the cervical and thoracic spine as described in the DePuy Synthes Spine SYNAPSE OCT System, and AXON Pedicle Screw System technique guides. 2 Contour rod template Instrument Rod Template, 240 mm (for 3.5 mm and 4.0 mm rod) Contour the rod template to fit the anatomy and to seat fully in the cervical and upper thoracic bone anchors. Create the occipitocervical bend and ensure sufficient rod length to connect with the occipital clamp. DePuy Synthes Companies SYNAPSE OCT System Surgical Technique 55

61 Occipital Clamp Technique 3 Bend rod Rod Cutter Rod/Plate Bender Contour the 3.5 mm or 4.0 mm rod to match the template. Use the rod cutter to cut the rod to the appropriate length. Caution: Repeated bending may weaken the rod. 4 Place clamp on rod Quick Coupling Handle, with swivel cap StarDrive, Locking Screwdriver Shaft, T15 Provisionally place the occipital clamp on the titanium rod by tightening the setscrew in the clamp to engage the rod. 66 DePuy Synthes Companies SYNAPSE OCT System Surgical Technique
62 Occipital Clamp Technique 5 Set drill guide depth Instrument Adjustable Drill Guide Set the adjustable drill guide to the desired depth. Slide back the latch to release the inner tube. Align the indicator of the inner tube with the appropriate depth calibration on the outer tube. Release the latch to lock the drill guide at the desired depth. DePuy Synthes Companies SYNAPSE OCT System Surgical Technique 66

63 Occipital Clamp Technique 6 Drill Adjustable Drill Guide mm Drill Bit Quick Coupling Handle, with swivel cap Holding Forceps Caution: Do not touch the latch when drilling. Touching the latch could disengage the lock, resulting in uncontrolled depth and potential harm to the patient. Drill a hole to the desired trajectory and depth, using the 3.2 mm drill bit through the adjustable drill guide. Drilling must occur through the occipital clamp to ensure proper drilling depth. Alternative instrument mm Drill Bit with Flexible Shaft * 3.2 mm Drill Bit with Flexible Shaft (new) Caution: Do not touch the latch when drilling. Touching the latch could disengage the lock, resulting in uncontrolled depth and potential harm to the patient. Drill a hole to the desired trajectory and depth, using the 3.2 mm drill bit with flexible shaft through the drill guide. Drilling must occur through the occipital clamp to ensure proper drilling depth. *Additionally available. 66 DePuy Synthes Companies SYNAPSE OCT System Surgical Technique


64 Occipital Clamp Technique 7 Measure Instrument Depth Gauge Use the depth gauge to confirm hole depth and select the corresponding screw length. The depth gauge reading and the screw length indicate actual bone purchase. The depth gauge must sit directly on the bone. DePuy Synthes Companies SYNAPSE OCT System Surgical Technique 66


65 Occipital Clamp Technique 8 Tap Adjustable Drill Guide Tap for 4.5 mm Occipital Screws Quick Coupling Handle, with swivel cap * Ratchet T-Handle with Quick Coupling * Small Ratchet Handle with Quick Coupling Caution: Do not touch the latch when tapping. Touching the latch could disengage the lock, resulting in uncontrolled depth and potential harm to the patient. Tap through the adjustable drill guide and occipital clamp, to ensure proper tapping depth. Note: Tapping is required for all screws. Alternative technique universal Joint Tap for 4.5 mm Occipital Screws Holding Forceps Caution: Do not touch the latch when tapping. Touching the latch could disengage the lock, resulting in uncontrolled depth and potential harm to the patient. Set the tap depth by turning the tap sleeve to the desired depth. Lock the tap sleeve by turning down the locking nut to contact the tap sleeve. Finger-tighten the lock nut. Use the holding forceps to provide axial force and stability. Tapping must occur through the occipital clamp to ensure proper tapping depth. *Additionally available. 66 DePuy Synthes Companies SYNAPSE OCT System Surgical Technique


66 Occipital Clamp Technique 9 Insert screw Quick Coupling Handle, with swivel cap StarDrive, Locking Screwdriver Shaft, T15 Optional instruments * Ratchet T-Handle with Quick Coupling * Small Ratchet Handle with Quick Coupling Insert the selected 4.5 mm occipital screw. Note: A 5.0 mm rescue screw may be used if the primary screw has less than optimal fixation. Alternative instruments Universal Joint Screwdriver, T Holding Forceps Use the universal joint screwdriver to insert the selected 4.5 mm occipital screw. Use the holding forceps to provide axial force and stability. *Additionally available. DePuy Synthes Companies SYNAPSE OCT System Surgical Technique 66

67 Occipital Clamp Technique 10 Insert additional screws and clamps Insert remaining screws and clamps, as in Steps 4 9. A minimum of 2 clamps per rod is required. 66 DePuy Synthes Companies SYNAPSE OCT System Surgical Technique

68 Occipital Clamp Technique 11 Final tightening Quick Coupling Handle, with swivel cap StarDrive, Locking Screwdriver Shaft, T15 Use the locking screwdriver shaft for final tightening of all occipital screws and clamp setscrews. Alternative instruments Universal Joint Screwdriver, T Holding Forceps Ratchet T-Handle with Quick Coupling* Small Ratchet Handle with Quick Coupling* Use the universal joint screwdriver and the holding forceps for final tightening of all occipital screws and clamp setscrews. *Additionally available. DePuy Synthes Companies SYNAPSE OCT System Surgical Technique 66


69 Occipital Plate/Rod Technique 1 Attach bone anchors Attach bone anchors to the cervical and thoracic spine as described in the DePuy Synthes Spine SYNAPSE OCT System, and AXON Pedicle Screw System technique guides. 2 Contour rod template Instrument Template, for Occipital Plate/Rod Contour the template to fit the anatomy and to seat fully in the cervical and upper thoracic bone anchors. 66 DePuy Synthes Companies SYNAPSE OCT System Surgical Technique

70 Occipital Plate/Rod Technique 3 Bend rod Rod Cutter Rod/Plate Bender Contour the 3.5 mm or 4.0 mm rod to match the template. Use the rod cutter to cut the rod to the appropriate length. Caution: Repeated bending may weaken the rod. 4 Set drill guide depth Instrument Adjustable Drill Guide Set the adjustable drill guide to the desired depth. Slide back the latch to release the inner tube. Align the indicator of the inner tube with the appropriate depth calibration on the outer tube. Release the latch to lock the drill guide at the desired depth. DePuy Synthes Companies SYNAPSE OCT System Surgical Technique 66
71 Occipital Plate/Rod Technique 5 Drill Adjustable Drill Guide mm Drill Bit Quick Coupling Handle, with swivel cap Holding Forceps Caution: Do not touch the latch when drilling. Touching the latch could disengage the lock, resulting in uncontrolled depth and potential harm to the patient. Drill a hole to the desired trajectory and depth, using the 3.2 mm drill bit through the adjustable drill guide. Drilling must occur through the occipital plate/rod to ensure proper drilling depth. Alternative instrument mm Drill Bit with Flexible Shaft * 3.2 mm Drill Bit with Flexible Shaft (new) Caution: Do not touch the latch when drilling. Touching the latch could disengage the lock, resulting in uncontrolled depth and potential harm to the patient. Drill a hole to the desired trajectory and depth, using the 3.2 mm drill bit with flexible shaft through the adjustable drill guide. Drilling must occur through the occipital plate/rod to ensure proper drilling depth. *Additionally available. 77 DePuy Synthes Companies SYNAPSE OCT System Surgical Technique


72 Occipital Plate/Rod Technique 6 Measure Instrument Depth Gauge Use the depth gauge to confirm hole depth and select the corresponding screw length. The depth gauge reading and the screw length indicate actual bone purchase. The depth gauge must sit directly on the bone. DePuy Synthes Companies SYNAPSE OCT System Surgical Technique 77


73 Occipital Plate/Rod Technique 7 Tap Adjustable Drill Guide Tap for 4.5 mm Occipital Screws Quick Coupling Handle, with swivel cap Caution: Do not touch the latch when tapping. Touching the latch could disengage the lock, resulting in uncontrolled depth and potential harm to the patient. Tap through the adjustable drill guide and plate, to ensure proper tapping depth. Note: Tapping is required for all screws. Alternative instruments universal Joint Tap for 4.5 mm Occipital Screws Holding Forceps Caution: Do not touch the latch when tapping. Touching the latch could disengage the lock, resulting in uncontrolled depth and potential harm to the patient. Set the tap depth by turning the tap sleeve to the desired depth. Lock the tap sleeve by turning down the locking nut to contact the tap sleeve. Finger-tighten the lock nut. Tapping must occur through the occipital plate/rod to ensure proper tapping depth. 77 DePuy Synthes Companies SYNAPSE OCT System Surgical Technique
Synapse System. An enhanced set of instruments and implants for posterior stabilization of the upper spine.
 Synapse System. An enhanced set of instruments and implants for posterior stabilization of the upper spine. Technique Guide 100º Instruments and implants approved by the AO Foundation Table of Contents
Technique Guide. Synapse System. An enhanced set of instruments and implants for posterior stabilization of the cervical and upper thoracic spine.
 Technique Guide Synapse System. An enhanced set of instruments and implants for posterior stabilization of the cervical and upper thoracic spine. Table of Contents Introduction Synapse System 2 AO Principles
Technique Guide. Occipito-Cervical Fusion System. Implants and instruments designed to optimize fixation to the occiput.
 Technique Guide Occipito-Cervical Fusion System. Implants and instruments designed to optimize fixation to the occiput. Table of Contents Introduction Overview 2 AO ASIF Principles 4 Indications and Contraindications
Technique Guide. Synapse System. An enhanced set of implants and instruments for posterior stabilization of the cervical and upper thoracic spine.
 Technique Guide Synapse System. An enhanced set of implants and instruments for posterior stabilization of the cervical and upper thoracic spine. Image intensifier control Warning This description alone
Occipito-Cervical Fusion System
 Implants and Instruments designed to enhance Fixation to the Occiput Occipito-Cervical Fusion System Surgical Technique Image intensifier control This description alone does not provide sufficient background
SYNAPSE SYSTEM An enhanced set of implants and instruments for posterior stabilization of the cervical and upper thoracic spine
 SYNAPSE SYSTEM An enhanced set of implants and instruments for posterior stabilization of the cervical and upper thoracic spine Instruments and implants approved by the AO Foundation. This publication
Occipito-Cervical Fusion System. Implants and instruments designed to optimize fixation to the occiput.
 Occipito-Cervical Fusion System. Implants and instruments designed to optimize fixation to the occiput. Technique Guide This publication is not intended for distribution in the USA. Instruments and implants
OCCIPITO-CERVICAL FUSION SYSTEM Implants and instruments designed to optimize fixation to the occiput
 OCCIPITO-CERVICAL FUSION SYSTEM Implants and instruments designed to optimize fixation to the occiput Instruments and implants approved by the AO Foundation. This publication is not intended for distribution
URS Degen. Top loading pedicle screw system for posterior stabilization.
 URS Degen. Top loading pedicle screw system for posterior stabilization. Technique Guide This publication is not intended for distribution in the USA. Table of Contents Introduction URS Degen 2 AO Principles
ACLP Anterior Cervical Locking Plate System TECHNIQUE GUIDE
 ACLP Anterior Cervical Locking Plate System TECHNIQUE GUIDE Instruments and implants approved by the AO Foundation ACLP Anterior Cervical Locking Plate System The ACLP System is designed to reduce the
Optima ZS Spinal Fixation System
 Surgical Technique Optima ZS Spinal Fixation System The low-profile, in-line, polyaxial pedicle screw system. Optima ZS Surgical Technique 1 Optima ZS Spinal Fixation System The Optima ZS Spinal Fixation
Pangea Degenerative Spine System. Top Loading Preassembled Pedicle Screw System for Posterior Stabilization of the Thoracolumbar Spine.
 Technique Guide Pangea Degenerative Spine System. Top Loading Preassembled Pedicle Screw System for Posterior Stabilization of the Thoracolumbar Spine. Contents Introduction AO ASIF Principles 4 Indications
Vectra, Vectra-T and Vectra-One. Anterior cervical plating for spinal fusion.
 Vectra, Vectra-T and Vectra-One. Anterior cervical plating for spinal fusion. Technique Guide Instruments and implants approved by the AO Foundation Table of Contents Introduction Vectra, Vectra-T and
Surgical Technique ANAX TM OCT. Spinal System
 Surgical Technique ANAX TM OCT Spinal System Product Overview Occipital plate Medial occipital plate (Small, Medium, Large) Lateral occipital plate (Small, Medium, Large) Cortical screw (D4.5mm), Rescue
BLACKBIRD Spinal System
 BLACKBIRD Spinal System Cervical-Thoracic Spinal Fixation System The ChoiceSpine BLACKBIRD Cervical-Thoracic Spinal Fixation System is a comprehensive system for posterior fixation of the cervical and upper
Top Loading Pedicle Screw and Hook System for Posterior Stabilization. URS System. Surgical Technique
 Top Loading Pedicle Screw and Hook System for Posterior Stabilization URS System Surgical Technique Image intensifier control This description alone does not provide sufficient background for direct use
ACCS Anterior Cervical Compression System TECHNIQUE GUIDE
 ACCS Anterior Cervical Compression System TECHNIQUE GUIDE Original Instruments and Implants of the Association for the Study of Internal Fixation AO ASIF ACCS Anterior Cervical Compression System The Anterior
VECTRA. SURGICAL TECHNIQUE. Anterior cervical plate system. This publication is not intended for distribution in the USA.
 VECTRA. Anterior cervical plate system. This publication is not intended for distribution in the USA. SURGICAL TECHNIQUE Contents Indications and contraindications Implants Vario Case Instruments Surgical
VECTRA SURGICAL TECHNIQUE. Anterior cervical plate system. This publication is not intended for distribution in the USA.
 VECTRA Anterior cervical plate system This publication is not intended for distribution in the USA. SURGICAL TECHNIQUE Image intensifier control This description alone does not provide sufficient background
Gibralt. Occipito-Cervico Thoracc System. Operative Technique
 Gibralt Occipito-Cervico Thoracc System Operative Technique TABLE OF CONTENTS GIBRALT...1 OPERATIVE TECHNIQUE OVERVIEW...2 HOOK PLACEMENT...2 SCREW PLACEMENT...2 DETAILED OPERATIVE TECHNIQUE...4 PLACEMENT
OPERATIVE TECHNIQUE CENTURION POSTERIOR OCCIPITAL CERVICO-THORACIC (POCT) SYSTEM
 SYSTEM") OPERATIVE TECHNIQUE CENTURION POSTERIOR OCCIPITAL CERVICO-THORACIC (POCT) SYSTEM TABLE OF CONTENTS Introduction 2 System Overview 3 Cervical Operative Technique 4 Thoracic Operative Technique 10 Thoracic
OPERATIVE TECHNIQUE CENTURION POSTERIOR OCCIPITAL CERVICO-THORACIC (POCT) SYSTEM TABLE OF CONTENTS Introduction 2 System Overview 3 Cervical Operative Technique 4 Thoracic Operative Technique 10 Thoracic
Part of the DePuy Synthes Cannulated Screw System. 3.5 mm Cannulated Screws
 Part of the DePuy Synthes Cannulated Screw System 3.5 mm Cannulated Screws Surgical Technique Table of Contents Introduction 3.5 mm Cannulated Screws 2 AO Principles 3 Indications 4 Surgical Technique
Cervical Solutions. Lineum OCT. Spine System. Surgical Technique Guide
 Cervical Solutions Lineum OCT Spine System Surgical Technique Guide 2 Lineum OCT Spine System Surgical Technique Guide Designed to encourage optimal screw placement and procedural efficiency Lineum OCT
7.0 mm Cannulated Screws
 Part of the DePuy Synthes Cannulated Screw System 7.0 mm Cannulated Screws Surgical Technique Table of Contents Introduction 7.0 mm Cannulated Screws 2 AO Principles 3 Indications 4 Surgical Technique
Vertebral Body Derotation System Guide and Ordering Information
 Vertebral Body Derotation System Guide and Ordering Information Introduction DePuy Spine continues to support the goal of providing solutions to surgeon challenges when treating spinal disorders. Collaborating
Technique Guide. Quadrilateral Surface Plates 3.5. Part of the Low Profile Pelvic System 3.5.
 Technique Guide Quadrilateral Surface Plates 3.5. Part of the Low Profile Pelvic System 3.5. Table of Contents Introduction Quadrilateral Surface Plates 3.5 2 AO Principles 4 Indications 5 Surgical Technique
Aesculap Spine S 4 Spinal System. Instrumentation Guide
 Aesculap Spine S 4 Spinal System Instrumentation Guide S 4 Spinal System S 4 From initial conception, the S 4 Spinal System was developed to meet the spine surgeon s need for an extremely low profile and
Technique Guide. 4.5 mm Cannulated Screws. Part of the Synthes Cannulated Screw System.
 Technique Guide 4.5 mm Cannulated Screws. Part of the Synthes Cannulated Screw System. TableofContents Introduction 4.5 mm Cannulated Screws 2 AO Principles 3 Indications 4 Surgical Technique Surgical
1.5 MM LCP SYSTEM. For treatment of fractures and arthrodeses of canines and felines SURGICAL TECHNIQUE
 1.5 MM LCP SYSTEM For treatment of fractures and arthrodeses of canines and felines SURGICAL TECHNIQUE TABLE OF CONTENTS INTRODUCTION 1.5 mm LCP System 2 AO Principles 4 SURGICAL TECHNIQUE Reduce Fracture
Anterior Cervical Plate SURGICAL TECHNIQUE GUIDE. Surgeon Driven Innovation
 Anterior Cervical Plate SURGICAL TECHNIQUE GUIDE Surgeon Driven Innovation 1 The Snowmass Anterior Cervical Plate System is intended for the surgical treatment and correction of traumatic and pathologic
Reflex TM Surgical Technique. Anterior Cervical Plate
 Reflex TM Surgical Technique Anterior Cervical Plate Surgical Technique Acknowledgement: Stryker Spine extends their thanks to the following surgeons for their participation in the development of the Reflex
Technique Guide. 7.0 mm Cannulated Screws. Part of the Synthes Cannulated Screw System.
 Technique Guide 7.0 mm Cannulated Screws. Part of the Synthes Cannulated Screw System. Table of Contents Introduction 7.0 mm Cannulated Screws 2 AO Principles 3 Indications 4 Surgical Technique Surgical
Technique Guide. 2.4/2.7 mm Locking Tarsal Plates. Talus Plate, Navicular Plate and Cuboid Plate.
 Technique Guide 2.4/2.7 mm Locking Tarsal Plates. Talus Plate, Navicular Plate and Cuboid Plate. Table of Contents Introduction 2.4/2.7 mm Locking Tarsal Plates 2 AO Principles 4 Indications 5 Clinical
Surgical Technique. Deformity - Degenerative. Interbody Fusion. Tumour - Trauma. Cervical. Emerging Technology
 Surgical Technique Deformity - Degenerative Interbody Fusion Tumour - Trauma Cervical Emerging Technology MONARCH SPINE SYSTEM Contents Introduction & Philosophy 2 Surgical Technique Monarch Bolts with
Lineum OCT Spine System
 Surgical Technique Lineum OCT Spine System Designed to Encourage Optimal Screw Placement and Procedural Efficiency Game Changing Translation Screw 3.0mm of medial/lateral translation encourages optimal
Instructions for Use. LCP Locking Compression Plate. Combine without Compromise.
 Instructions for Use LCP Locking Compression Plate. Combine without Compromise. Table of Contents LCP: Combine without Compromise 2 AO ASIF Principles of Osteosynthesis 4 Indications and Contraindications
CSLP Variable Angle. For Use with the Cervical Spine Locking Plate System TECHNIQUE GUIDE. Self-drilling Screw. Variable Screw Angulation
 CSLP Variable Angle For Use with the Cervical Spine Locking Plate System TECHNIQUE GUIDE Self-drilling Screw Variable Screw Angulation Original Instruments and Implants of the Association for the Study
3.5 mm Cannulated Screw Technique Guide
 3.5 mm Cannulated Screw Technique Guide An Integral Part of the SYNTHES Cannulated Screw System Original Instruments and Implants of the Association for the Study of Internal Fixation AO ASIF The 3.5 mm
Thoracolumbar Solutions. Vitality Spinal Fixation System. Surgical Technique Guide
 Thoracolumbar Solutions Vitality Spinal Fixation System Surgical Technique Guide Vitality Spinal System Surgical Technique Vitality Spinal System Surgical Technique Description, Indications and Contraindications...
2.4 mm and 3.0 mm Headless Compression Screws
 For Fixation of Small Bones and Small Bone Fragments 2.4 mm and 3.0 mm Headless s Surgical Technique Table of Contents Introduction 2.4 mm and 3.0 mm Headless 2 Technique Overview 4 AO Principles 5 Indications
Lateral Mass Fixation Surgical Technique. and Product Catalog. Distribution For EU Only
 Lateral Mass Fixation Surgical Technique and Product Catalog Distribution For EU Only INTRODUCTION The MOUNTAINEER Occipito-Cervico-Thoracic Spinal System offers a comprehensive solution for rigid posterior
Variable Angle LCP Mesh Plate 2.4/2.7. Part of the Variable Angle LCP Forefoot/Midfoot System 2.4/2.7.
 Variable Angle LCP Mesh Plate 2.4/2.7. Part of the Variable Angle LCP Forefoot/Midfoot System 2.4/2.7. Surgical Technique This publication is not intended for distribution in the USA. Instruments and implants
VARIABLE ANGLE LOCKING HAND SYSTEM
 VARIABLE ANGLE LOCKING HAND SYSTEM For fragment-specific fracture fixation with variable angle locking and locking technology Instruments and implants approved by the AO Foundation. This publication is
LCP Pilon Plate 2.7/3.5. Surgical Technique
 LCP Pilon Plate 2.7/3.5 Surgical Technique Image intensifier control This description alone does not provide sufficient background for direct use of DePuy Synthes products. Instruction by a surgeon experienced
Integra. Capture Screw System SURGICAL TECHNIQUE
 Integra Capture Screw System SURGICAL TECHNIQUE Table of Contents Indications... 2 Contraindications... 2 System Description... 2 System Features... 2 Cannulated Low-Profile Screws (AC-Series) Overview...
OPERATIVE TECHNIQUE RIVAL REDUCE FRACTURE PLATING SYSTEM. foot & ankle trauma procedures
 OPERATIVE TECHNIQUE RIVAL REDUCE FRACTURE PLATING SYSTEM foot & ankle trauma procedures INTRODUCTION 3 SYSTEM DESCRIPTION 3 TECHNICAL DETAILS 4 SALES AND MARKETING CONFIGURATION 5 OPERATIVE TECHNIQUE 7
SURGICAL TECHNIQUE. SpineTune THORACO-LUMBAR POSTERIOR OSTEOSYNTHESIS SYSTEM
 SURGICAL TECHNIQUE SpineTune TM TL THORACO-LUMBAR POSTERIOR OSTEOSYNTHESIS SYSTEM SURGICAL TECHNIQUE SpineTune TM TL Table of Contents page Step 1 - Site preparation.......................................................................................
LCP Pilon Plate 2.7/3.5
 Surgical Technique LCP Locking Compression Plate Original Instruments and Implants of the Association for the Study of Internal Fixation AO/ASIF Table of contents Indications 3 Implants 4 Instruments 5
6.5 mm and 7.3 mm Cannulated Screws Technique Guide
 6.5 mm and 7.3 mm Cannulated Screws Technique Guide An Integral Part of the SYNTHES Cannulated Screw System Original Instruments and Implants of the Association for the Study of Internal Fixation AO ASIF
Ascent. Posterior Occipital Cervico-Thoracic (POCT) System
 System") Ascent Posterior Occipital Cervico-Thoracic (POCT) System Ascent Posterior Occipital Cervico-Thoracic (POCT) System VERSATILITY, RELIABILITY AND SIMPLICITY FOR COMPLEX SPINAL PROCEDURES The Ascent POCT
Ascent Posterior Occipital Cervico-Thoracic (POCT) System Ascent Posterior Occipital Cervico-Thoracic (POCT) System VERSATILITY, RELIABILITY AND SIMPLICITY FOR COMPLEX SPINAL PROCEDURES The Ascent POCT
Variable Angle LCP Forefoot/Midfoot System 2.4/2.7. Procedure specific plates for osteotomies, arthrodeses and fractures of the foot.
 Instruction for Use Variable Angle LCP Forefoot/Midfoot System 2.4/2.7. Procedure specific plates for osteotomies, arthrodeses and fractures of the foot. Table of Contents Introduction VA-LCP Forefoot/Midfoot
D. Greg Anderson, MD Thomas Jefferson University Hospital Philadelphia, PA
 Surgical Technique D E S I G N I N G S U R G E O N S D. Greg Anderson, MD Thomas Jefferson University Hospital Philadelphia, PA Robert Heary, MD University of Medicine and Dentistry of New Jersey Newark,
VARIABLE ANGLE LOCKING HAND SYSTEM
 VARIABLE ANGLE LOCKING HAND SYSTEM For fragment-specific fracture fixation with variable angle locking and locking technology SURGICAL TECHNIQUE TABLE OF CONTENTS INTRODUCTION Variable Angle Locking Hand
Technique Guide. Modular Sternal Cable System. Flexibility and strength in sternal closure and repair.
 Technique Guide Modular Sternal Cable System. Flexibility and strength in sternal closure and repair. Table of Contents Introduction Overview 2 Indications and Contraindications 3 Surgical Technique A.
LCP Pilon Plate 2.7/3.5
 LCP Pilon Plate 2.7/3.5 Surgical Technique This publication is not intended for distribution in the USA. Instruments and implants approved by the AO Foundation. Table of contents Indications 2 Implants
REXIOUS SPINAL SYSTEM
 REXIOUS SPINAL SYSTEM SURGICAL TECHNIQUE www.diomedical.com. Site Preparation. Screw Insertion 3. Rod Preparation and Insertion 4. Rod Instruction 5. Set screw Insertion 6. Compression, Distraction & Rotation
Instruments for Removing DePuy Synthes Screws. Screw Removal Set
 Instruments for Removing DePuy Synthes Screws Screw Removal Set Surgical Technique Table of Contents Introduction Screw Removal Set 2 Surgical Technique Preoperative Planning and Preparation 6 Removal
POLYAXIAL SPINE SYSTEM SURGICAL TECHNIQUE
 POLYAXIAL SPINE SYSTEM SURGICAL TECHNIQUE P O L Y A X I A L S P I N E S Y S T E M POLYAXIALITY STABILITY EFFICIENCY All the implants offer the Polyaxiality, including Hooks, Claws, Sacral Plates and of
A M E D S MART SOLUTIONS FAMILY MEMBER
 A M E D S MART SOLUTIONS FAMILY MEMBER Based in the United Kingdom, Medsmart Solutions is a dynamic 100% British owned company which is dedicated to the manufacture and supply of an extensive range of
OPERATIVE TECHNIQUE COVER IMAGE OPTIONAL (DETAIL) IMAGE FIREBIRD NXG. spinal fixation system
 IMAGE FIREBIRD NXG. spinal fixation system") OPERATIVE TECHNIQUE COVER IMAGE OPTIONAL (DETAIL) IMAGE FIREBIRD NXG spinal fixation system TABLE OF CONTENTS Introduction 1 Operative Technique 2 Reduction Body Technique 18 Implants and Instruments 24
OPERATIVE TECHNIQUE COVER IMAGE OPTIONAL (DETAIL) IMAGE FIREBIRD NXG spinal fixation system TABLE OF CONTENTS Introduction 1 Operative Technique 2 Reduction Body Technique 18 Implants and Instruments 24
MatrixMANDIBLE Preformed Reconstruction Plates. Preshaped to the mandibular anatomy.
 MatrixMANDIBLE Preformed Reconstruction Plates. Preshaped to the mandibular anatomy. Technique Guide CMF Matrix Table of Contents Introduction MatrixMANDIBLE Preformed Reconstruction Plates 2 AO Principles
Technique Guide. LCP Pilon Plate 2.7/3.5
 Technique Guide LCP Pilon Plate 2.7/3.5 LCP Pilon Plate 2.7/3.5 Table of contents Indications 3 Implants 4 Instruments 5 Surgical technique 6 Implant removal 12 Image intensifier control Warning This
TRULY POLYAXIAL, SOLID AND POWERFUL
 S U R G I C A L T E C H N I Q U E V2 TRULY POLYAXIAL, SOLID AND POWERFUL P O L Y A X I A L S P I N E S Y S T E M a decade of results P O L Y A X I A L S P I N E S Y S T E M TRULY POLYAXIAL, SOLID AND POWERFUL
S 4. Aesculap. Spinal System. Percutaneous Approach Surgical Technique. Aesculap Spine
 Aesculap Percutaneous Approach Surgical Technique S 4 Spinal System Aesculap Spine S 4 Spinal System Small The S 4 Spinal System features a revolutionary pressure vessel design capable of delivering unmatched
MATRIX COMBO PLATING SYSTEM. Streamlined set for craniofacial and mandibular trauma and reconstruction
 MATRIX COMBO PLATING SYSTEM Streamlined set for craniofacial and mandibular trauma and reconstruction MATRIXCOMBO PLATING SET MATRIXCOMBO PLATING SET (01.503.400) The aim of surgical fracture treatment
Variable Angle LCP Tarsal Plates 2.4/2.7. Navicular Plate and Cuboid Plates.
 Variable Angle LCP Tarsal Plates 2.4/2.7. Navicular Plate and Cuboid Plates. Surgical Technique This publication is not intended for distribution in the USA. Instruments and implants approved by the AO
UNIQUE PATIENTS SPECIFIC INDICATIONS IN ONE SYSTEM. Surgical Technique
 UNIQUE PATIENTS SPECIFIC INDICATIONS IN ONE SYSTEM Surgical Technique Joint Spine Sports Med Mecta-C Plate Surgical Technique 2 INDEX 1. INTRODUCTION 4 1.1 Mecta-C Cervical Plates 4 1.2 Bone Screws 4 1.3
PAC PLATE A N T E R I O R C E RV I CA L P L AT E SYST E M S U R G I C A L T E C H N I Q U E
 PAC PLATE A N T E R I O R C E RV I CA L P L AT E SYST E M S U R G I C A L T E C H N I Q U E PAC PLATE ANTERIOR CERVICAL PLATE SYSTEM Table of Contents INTRODUCTION System Overview... 1 SURGICAL TECHNIQUE
Small Fragment Locking Compression Plate (LCP ) System Stainless Steel and Titanium TECHNIQUE GUIDE
 System Stainless Steel and Titanium TECHNIQUE GUIDE") Small Fragment Locking Compression Plate (LCP ) System Stainless Steel and Titanium TECHNIQUE GUIDE R Original Instruments and Implants of the Association for the Study of Internal Fixation AO ASIF Introduction
Small Fragment Locking Compression Plate (LCP ) System Stainless Steel and Titanium TECHNIQUE GUIDE R Original Instruments and Implants of the Association for the Study of Internal Fixation AO ASIF Introduction
UNIQUE PATIENTS SPECIFIC INDICATIONS IN ONE SYSTEM. Surgical Technique
 UNIQUE PATIENTS SPECIFIC INDICATIONS IN ONE SYSTEM Surgical Technique Joint Spine Sports Med Mecta-C Plate Surgical Technique 2 INDEX 1. INTRODUCTION 4 1.1 Mecta-C Cervical Plates 4 1.2 Bone Screws 4 1.3
The Titanium Cannulated Lateral Entry Femoral Recon Nail. Expert nailing system with radiolucent instrumentation.
 The Titanium Cannulated Lateral Entry Femoral Recon Nail. Expert nailing system with radiolucent instrumentation. Technique Guide EXPERT Nailing System Table of Contents Introduction Titanium Cannulated
DLS Dynamic Locking Screw. Combined with LCP Locking Compression Plate.
 DLS Dynamic Locking Screw. Combined with LCP Locking Compression Plate. Instructions for Use Discontinued June 2016 DSEM/TRM/0517/0844(1) Table of Contents Introduction DLS Dynamic Locking Screw 2 Indications
3.5 mm and 4.5 mm Curved Locking Compression Plates (LCP )
") For Minimally Invasive Osteosynthesis 3.5 mm and 4.5 mm Curved Locking Compression Plates (LCP ) Surgical Technique Table of Contents Introduction 3.5 mm and 4.5 mm Curved Locking Compression 2 Plates
For Minimally Invasive Osteosynthesis 3.5 mm and 4.5 mm Curved Locking Compression Plates (LCP ) Surgical Technique Table of Contents Introduction 3.5 mm and 4.5 mm Curved Locking Compression 2 Plates
VLP FOOT Variable Angle Locked Plating System
 Surgical Technique VLP FOOT Variable Angle Locked Plating System Surgical Technique Table of Contents Product overview Implant selection...2 Introduction...3 System overview...4 Indications...4 Design
Small Plate and Screw System SURGICAL TECHNIQUE
 MINI MAXLOCK EXTREME Small Plate and Screw System SURGICAL TECHNIQUE Contents Key Design Features 2 Surgical Technique 3 Implants and Instruments 9 Proper surgical procedures and techniques are the responsibility
OPERATIVE TECHNIQUE RIVAL BITE HEADED CANNULATED AND HEADLESS COMPRESSION SCREWS. foot & ankle applications
 OPERATIVE TECHNIQUE RIVAL BITE HEADED CANNULATED AND HEADLESS COMPRESSION SCREWS foot & ankle applications INTRODUCTION 3 SYSTEM DESCRIPTION 3 TECHNICAL DETAILS 4 SALES AND MARKETING CONFIGURATION 6 OPERATIVE
MaxAn Anterior Cervical Plate System
 Surgical Technique MaxAn Anterior Cervical Plate System Designed to Help Minimize the Potential for Adjacent Level Ossification Allows for screw placement up to 30 cephalad on the superior end of the plate
MTP Set SURGICAL TECHNIQUE
 MINI MAXLOCK EXTREME MTP Set SURGICAL TECHNIQUE Contents Table of Contents Key Design Features 3 Surgical Technique Standard MTP Plate 4 MTP Plate with POCKETLOCK Technology 10 Implants and Instruments
Xia 3 Reference Guide. Version 3-August 2015
 Xia 3 Reference Guide Xia 3 Reference Guide Version 3-August 2015 Table of Contents Implants 03 Blocker 03 Monoaxial Screws 04 Polyaxial Screws 05 Uniplanar Screws 06 Iliac Bolts 07 Rod-to-Rod Connectors
Aviator Anterior Cervical Plating System Surgical Technique
 Aviator Anterior Cervical Plating System Surgical Technique Table of Contents System Overview...3-4 Patient Positioning and Exposure...5 Implant Selection and Preparation.... 6-7 Screw Hole Preparation....
ThinLine Anterior Cervical Plate
 ThinLine Anterior Cervical Plate Surgical Technique Solutions by the people of Zimmer Spine. zimmerspine.com Designed for those times when less means more. From the people of Zimmer Spine. ThinLine is
Virage OCT Spinal Fixation System
 Virage OCT Spinal Fixation System Virage OCT Spinal Fixation System Change Your Perspective Become a Part of the Posterior Fixation Revolution The Virage System is an Occipital-Cervico-Thoracic (OCT) spinal
ACP 1. Anterior Cervical Plating System. Surgical Technique
 ACP 1 Anterior Cervical Plating System Surgical Technique Table of Contents System Overview.... 3 Patient Positioning and Exposure.... 5 Implant Selection and Preparation... 7 Screw Hole Preparation...
2.4 mm Cannulated Screw. An integral part of the Synthes Cannulated Screw System (CSS).
.") 2.4 mm Cannulated Screw. An integral part of the Synthes Cannulated Screw System (CSS). Surgical Technique This publication is not intended f distribution in the USA. and implants approved by the AO Foundation.
2.4 mm Cannulated Screw. An integral part of the Synthes Cannulated Screw System (CSS). Surgical Technique This publication is not intended f distribution in the USA. and implants approved by the AO Foundation.
Table of Contents 2-6. Introduction. Indications Surgical Technique. Ordering Information 15-24
 Table of Contents Introduction Product information ExtremiFix Midsize Large Screw Offering Headless Screw Characteristics Design Features & Benefits Instrumentation Technical Details Calibrated Drill Bits
Technique Guide. Cable System. For Orthopaedic Trauma Surgery.
 Technique Guide Cable System. For Orthopaedic Trauma Surgery. Table of Contents Introduction Overview 2 AO Principles 4 Indications and Contraindications 5 Surgical Technique Standard Cerclage Technique
OPERATIVE TECHNIQUE RIVAL VIEW PLATING SYSTEM. foot & ankle reconstruction procedures
 OPERATIVE TECHNIQUE RIVAL VIEW PLATING SYSTEM foot & ankle reconstruction procedures INTRODUCTION 3 SYSTEM DESCRIPTION 3 TECHNICAL DETAILS 4 SALES AND MARKETING CONFIGURATION 5 OPERATIVE TECHNIQUE 7 OPERATIVE
Interlagos Retractor System Surgical Technique
 Interlagos Retractor System Surgical Technique TABLE OF CONTENTS Instructions for Use Design Rationale Surgical Technique 1. Pre-Operative Preparation 2. Pedicle Preparation 3. Primary Retraction 4. Secondary
Cerclage Passer. For minimally invasive application of cerclage cables.
 Cerclage Passer. For minimally invasive application of cerclage cables. Handling Technique Cable application This publication is not intended for distribution in the USA. Instruments and implants approved
Technique Guide. Variable Angle LCP Opening Wedge Plates 2.4/2.7. Part of the Variable Angle LCP Forefoot / Midfoot System 2.4 / 2.7.
 Technique Guide Variable Angle LCP Opening Wedge Plates 2.4/2.7. Part of the Variable Angle LCP Forefoot / Midfoot System 2.4 / 2.7. Table of Contents Introduction Variable Angle LCP Opening Wedge Plates
The Percutaneous Reduction Forceps Technique Guide
 The Percutaneous Reduction Forceps Technique Guide Indications + Product Overview Introduction The Percutaneous Reduction Forceps The Percutaneous Reduction Forceps facilitate standard technique for fixation
Fibula Plating System
 ANATOMIC LOCKED PLATING SYSTEM Fibula Plating System Securing optimal fixation through versatile locked and compression plating technology Contents Surgeon Design Team 2 Introduction 3 Anatomic Fibula
Thoracolumbar Solutions. Polaris. Deformity System. Trivium. Derotation System. Surgical Technique Guide
 Polaris Deformity System Thoracolumbar Solutions Trivium Derotation System Surgical Technique Guide 2 Polaris Deformity System and Trivium Derotation System Surgical Technique Guide Polaris Deformity System
MEDIALMAX System SURGICAL TECHNIQUE
 MAXLOCK EXTREME MEDIALMAX System SURGICAL TECHNIQUE Contents The MEDIALMAX Advantage Design Feature Various flex options POCKETLOCK Technology Anatomic design Advantage Provides the surgeon with multiple
HCS 1.5. The countersinkable compression screw.
 HCS 1.5. The countersinkable compression screw. Surgical Technique This publication is not intended for distribution in the USA. Instruments and implants approved by the AO Foundation. Table of Contents
HCS 2.4/3.0. The countersinkable compression screw.
 Technique Guide HCS 2.4/3.0. The countersinkable compression screw. Table of Contents Introduction Features and Benefits 2 Functional Principle 3 Indications 4 Surgical Technique Hand Scaphoid 5 Foot
Part Name Part Number Quantity
 Part Name Part Number Quantity Flex Arm Adapter Triangular 03.612.013 2 3mm Drill Bit with Stop 16mm 324.16 1 2.5mm Drill Bit with Stop 13mm 324.152 1 2.5mm Drill Bit with Stop 16mm 324.155 2 2.5mm Drill
Technique Guide Supplement. Standard DHS Lag Screw with LCP DHHS Sideplate.
 Technique Guide Supplement Standard DHS Lag Screw with LCP DHHS Sideplate. Table of Contents Surgical Technique Standard DHS Lag Screw with LCP DHHS 2 Sideplate Technique DHS One-step Lag Screw with DHHS
MaxTorque. surgical technique. Cannulated Screw System. Foot & Ankle. OrthoHelix Technology
 MaxTorque Cannulated Screw System OrthoHelix Technology surgical technique Foot & Ankle 2 M A X T O R Q U E C A N N U L A T E D S C R E W S Y S T E M Table of Contents Advantages 3 Indications 4 Contraindications
Universal Humeral Nail
 990210009 INDEX Indications Preoperative Planning Patient Position Surgical Technique - Step 1 Open Humerus - Step 2 Calibrate The Nail - Step 3 Insert Nail - Step 4 Proximal Locking - Step 5 Assemble