gently pry up all your door switches.. disconnect them.. same with the mirror control on the drivers side..
|
|
|
- Amy Holland
- 6 years ago
- Views:
Transcription
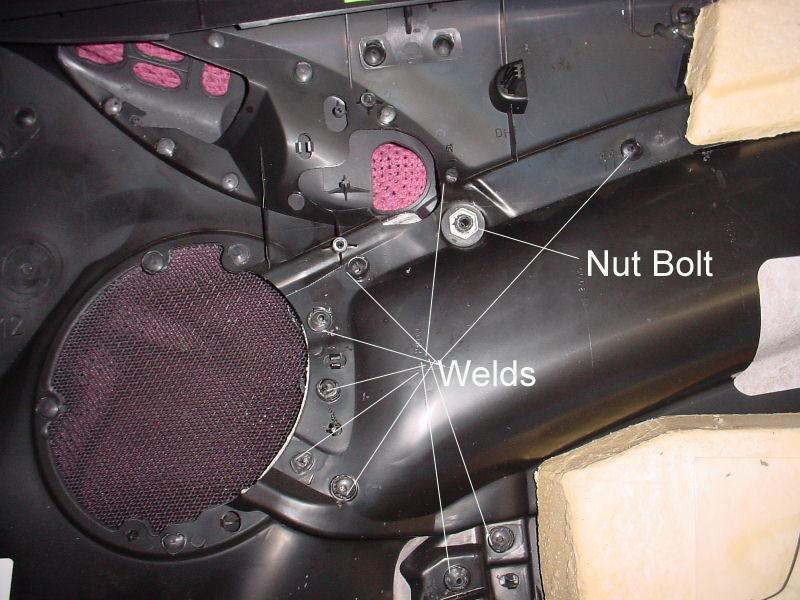
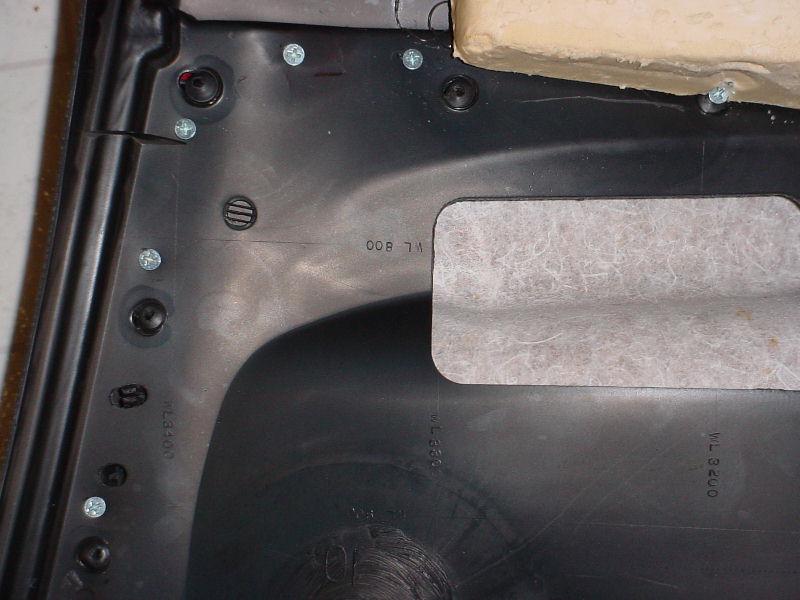
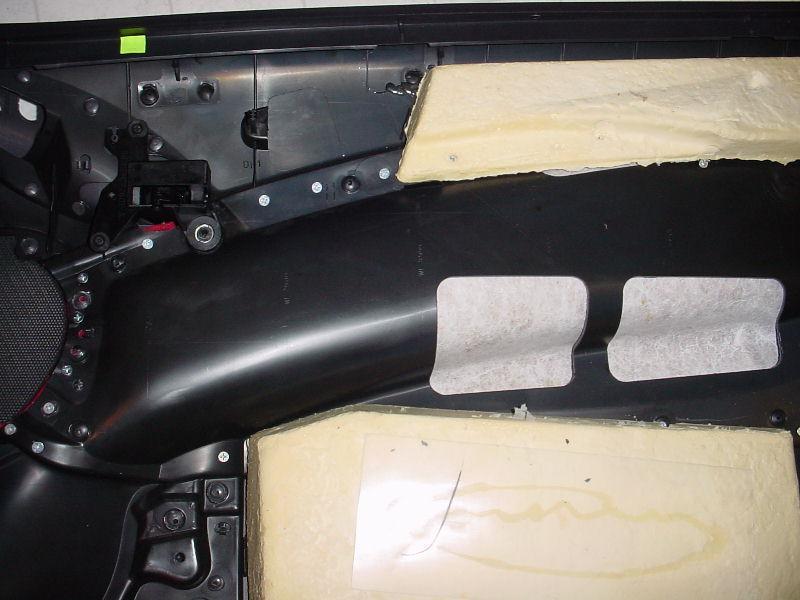
1 How To Recover Door Panels By: Crispy SUPPLY/TOOL LIST NEEDED Dremel with drill cutter attachment (or drill with drill bit) contact cement 1/2 inch self tapping screws Carpet/Headliner spray on glue Phillips Head Screwdriver Flat Head Screwdriver Torq screwdriver set Pliers Soldering Iron or Plastic Epoxy (if you choose to take off the speaker grills) Extra set of hands for prying panel apart when welds are broke Gloves (optional) Additional items needed if you have vinyl on your doors or want to lay vinyl onto the panels putty scraper power sander (Black and Decker Mouse is great) FRONT DOOR PANELS remove entire door panels -- remove the 2 lower plastic plugs in the carpet area of the door and gently pry out the kitty head in the swoopy door handle.. behind all those areas there are screws that you must remove.. some are phillips some are torq.. remove the small screws from around the sides of the panel.. there are 3 torq screws you must remove.. 2 onthe outer area and 1 inside the door jam where the door and fender area of the panel are... gently pry up all your door switches.. disconnect them.. same with the mirror control on the drivers side.. lift up the entire panel and pull forward.. it should be free.. you need to now disconnect the door cable.. pull it out of the holder and then out of the black hole when you have the tip lined up.. (once you are doing this it will make complete sense) remove entire door panel.. flip it over... there is a large metal washer/nut on the back of the swoopy handle.. grab the pliers and unscrew it.. this will allow the panel to bend back so you can pull the insert out later.. remove the 2 screws for the door handle and take it completely out.. take notice of all the plastic welds.. you will need to break these in order to get the insert out.. take your dremel and start drilling right thru the center of each one that holds the panel in.. be careful in thin areas such as the speaker grills so you don't drill thru.. use common sense when drilling.. you should be able to tell when to stop or when you are thru the weld..
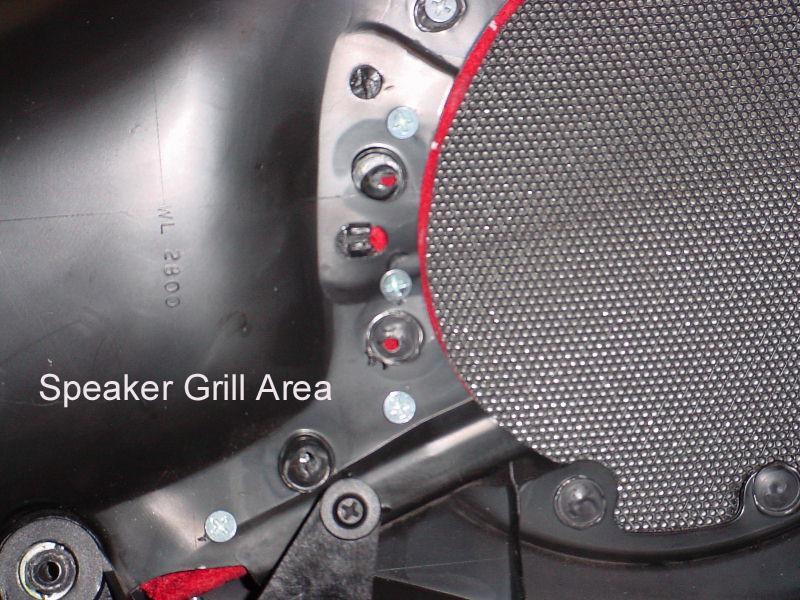
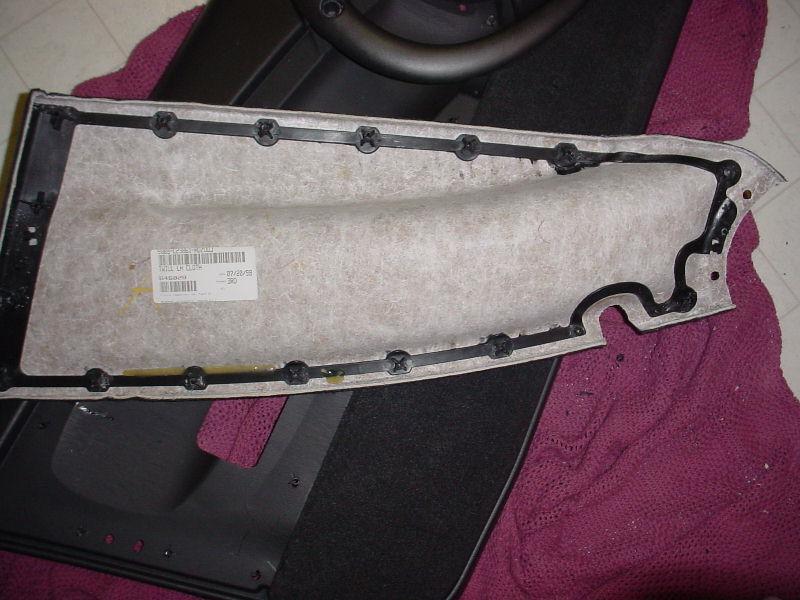
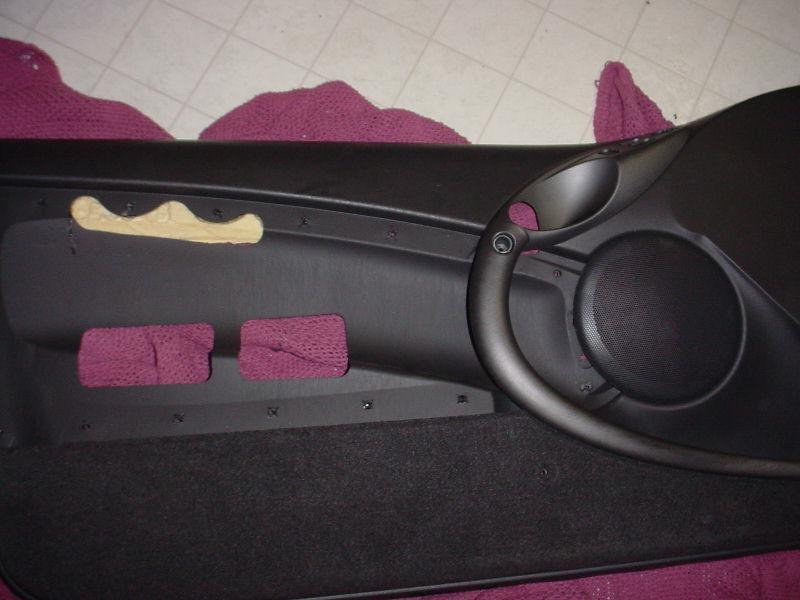
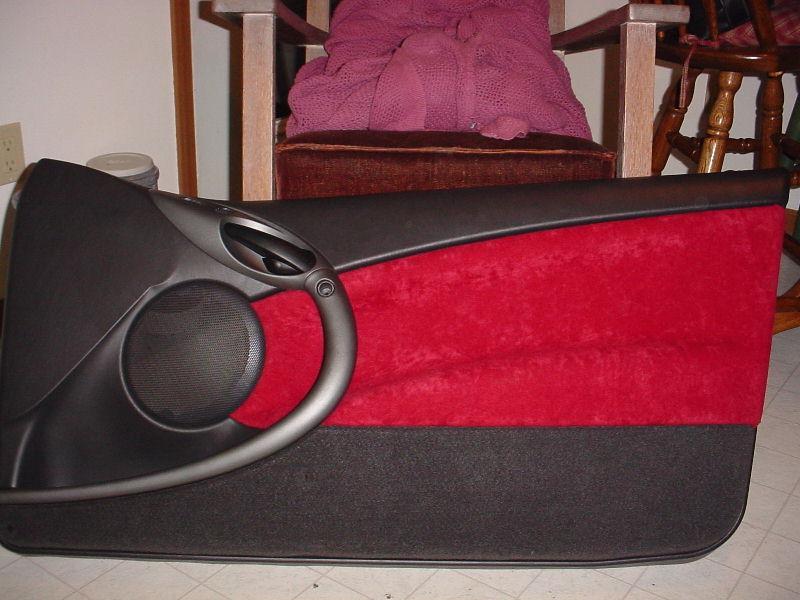
2 now put on a pair of gloves and grab a flat head screwdriver... insert the driver twards the rear of the panel side and start prying -- you will hear and feel the welds cracking apart.. do not be alarmed you MUST do this.. you will have to insert your hands behind the panel and push down on the front of the door panel with your knees.. now take the screwdriver and insert it around the back of the speaker grill -- you need to lift up that area to break those welds and to lift the cloth panel off of the posts that are there to keep the panel in.. I found that another set of hands at this time is pretty helpful -- you take a screwdriver and pry the grill up from the front while holding the door between your knees or your feet as the other person pulls the panel twards them from the side... at this time you can remove the speaker grill completely or leave on.. it is your call just do not drill thru the grill.. also take care with the swoopy handle.. you could break it off.. Once the insert is out it is time to recover.. fabric best for this is something that will stretch a bit and will not bleed or get soaked when you are gluing.. I used Ultra Suede which I bought from Fields Fabric.. If you have vinyl on your doors you will need to remove it with a putty scraper and then sanding the fiberglass liner smooth before you recover... if you have fabric you can recover fabric over fabric.. if you plan on laying vinyl over fabric you will need to remove the cloth and foam as well.. for the fabric over fabric use the Carpet/headliner spray on glue.. spray alot on the insert and a bit on the back of the fabric you want to use for recovering.. lay the fabric down on one portion of it and work the rest down a little at a time with your hands.. you will need to stretch a bit and press where needed.. it's time consuming to get it perfectly smooth but you can do it.. these 2 panels are easiest of all.. if you are laying vinyl you need to use the contact cement.. let your inserts dry 24 hours and then put it back into the door panel.. put the door handle back into the panel - same with the silver nut... now you must take the self tapping screws and a drill and start putting those in next to the welds you broke.. use as many as possible to keep the door feeling sturdy.. again be careful in the thin areas, you do not want to have the screws go thru the insert... if you used vinyl you will have to back down on your screw size or else you will drill thru it.. if you removed the speaker drill completely you will need to reattach it.. you can either use plastic epoxy or use a hot soldering iron and re-melt those areas back together.. re-install the door the same way you took it off the frame...
3
4
5
6
7
8
9
Fig. 1 Fig. 2. Fig. 3 Fig. 4 TOOLS REQUIRED: *Phillips Screwdriver *Three Inch Putty Knife*Panel Removal Tool *10mm Nut Driver CONTENTS:
 *Phillips Screwdriver *Three Inch Putty Knife*Panel Removal Tool *10mm Nut Driver CONTENTS: 2EA. 6X9 TWO WAY SPEAKERS P/N 05030281AA 1EA. INSTRUCTIONS P/N RBI05LXREAR 300c and Charger 1. Remove the lower
DIY S2000 Door Card Removal
 DIY S2000 Door Card Removal This Do-It-Yourself guide is intended to guide you through removing the door cards from your S2000. Tools Required: Phillips Head Screwdriver Trim tools (pry tool and a trim
OpenROV. Guide 3 - Electronics. We will now move to the assembly of the electronics that will control the ROV. Written By: OpenROV
 OpenROV Guide 3 - Electronics We will now move to the assembly of the electronics that will control the ROV. Written By: OpenROV 2017 openrov.dozuki.com Page 1 of 33 INTRODUCTION We will introduce soldering
Signal Mirror Installation Instructions
 Signal Mirror Installation Instructions 2006 2007 Honda Ridgeline THE safety accessory of the 21 st Century. P/N 210 0142 0 Rev. A (9/5/07), BTV 2007 Muth Company, LLC Professional Installation Recommended:
Explorer Wiring Kit (assembled)
") Explorer Wiring Kit (assembled) For Vintage, Firestorm & Standard Series Please Read All Instructions Before Beginning. Tools you will need: Soldering Iron (35 watt preferably) Solder Wet Sponge Wire Clippers
Explorer Wiring Kit (assembled) For Vintage, Firestorm & Standard Series Please Read All Instructions Before Beginning. Tools you will need: Soldering Iron (35 watt preferably) Solder Wet Sponge Wire Clippers
T-Top Headliner Repair Guide With detailed instructions
 T-Top Headliner Repair Guide With detailed instructions Supplies: Fabric: 1 ¼ yards will do -You can use any kind of fabric you want. Some fabrics will be harder to install than others. I d highly recommend
Repairing Microsoft Wedge Touch Mouse Battery Cover Retaining Clip
 Repairing Microsoft Wedge Touch Mouse Battery Cover Retaining Clip Disassembly, repair and reassembly of Wedge Touch mouse when the battery cover will not stay closed. Also is a good guide to repair other
Installing Your New Creature From The Black Lagoon Tail Light DMD Panel MOD
 Installing Your New Creature From The Black Lagoon Tail Light DMD Panel MOD A few things before we start: The wooden speaker panel provided in this MOD was manufactured using a Precision CNC machine and
Signal Mirror Installation Instructions Toyota Tacoma
 Signal Mirror Installation Instructions 2005-2015 Toyota Tacoma THE safety accessory of the 21 st Century. P/N 210-0115-0 Rev. A4 (3/11/15), BTV 2005 Muth Mirror Systems, LLC Page 3 of 12PplPage 3 of 12
Rugged Ridge 2 Receiver Hitch Kit (J21068)
") Rugged Ridge 2 Receiver Hitch Kit (J21068) Installation Time: 1-2 Hours Tools Required: ¾ Open End Wrench 18 mm Socket ¼ drive Pliers/Needle nose pliers/channel locks, etc. Torque wrench Phillips head
Rugged Ridge 2 Receiver Hitch Kit (J21068) Installation Time: 1-2 Hours Tools Required: ¾ Open End Wrench 18 mm Socket ¼ drive Pliers/Needle nose pliers/channel locks, etc. Torque wrench Phillips head
INSTALL/REMOVAL INSTRUCTIONS: WINDOW REGULATOR
 REMOVAL/INSTALL OF WINDOW REGULATOR (741-584) Ford Focus 2000-2007 General Tech Tips: Use painter s tape rather than duct tape to secure window. It will not damage paint or leave sticky residue. A plastic
Standard Kit #1 (3-way switch)
") Standard Kit #1 (3-way switch) Please Read All Instructions Before Beginning. Tools you will need: Soldering Iron (35 watt preferably) Solder Wet Sponge Wire Clippers 3/8 Drill Bit 1/4 Drill Bit Variable
Standard Kit #1 (3-way switch) Please Read All Instructions Before Beginning. Tools you will need: Soldering Iron (35 watt preferably) Solder Wet Sponge Wire Clippers 3/8 Drill Bit 1/4 Drill Bit Variable
Bi-Color Signal Mirror Installation Instructions
 Bi-Color Signal Mirror Installation Instructions 2005-2009 Toyota Tacoma THE safety accessory of the 21 st Century. P/N 210-0141-0 Rev. A2 (3/30/09), BTV 2007 Muth Mirror Systems, LLC Page 3 of 13PplPage
AUDI A8 D3 REPLACING THE OUTSIDE DRIVER DOOR HANDLE
 AUDI A8 D3 REPLACING THE OUTSIDE DRIVER DOOR HANDLE The keyless entry system in the D3 is a great feature. If you have the car key fob in your pocket, putting your hand under the door handle will unlock
Applications: Section 1: Getting Started Tools Needed: BEFORE
 Installation of KBD Body Kits Porsche GT 3 Look/Style 2 Piece Polyurethane Front Bumper & Lip Applications: Porsche 996: 1999-2001 Porsche Boxster 986: 1997-2004 Page 1 Tools Needed: Philips Head Screwdriver
iphone 1st Generation Battery Replacement Written By: irobot ifixit CC BY-NC-SA Page 1 of 15
 Written By: irobot ifixit CC BY-NC-SA www.ifixit.com Page 1 of 15 INTRODUCTION Battery not lasting long? Swap it out (requires soldering). TOOLS: Probe and Pick Set (1) Desoldering Braid (1) SIM Card Eject
2015 GMC Yukon. Upper Class Grille Insert
 Upper Class Grille Insert TOOLS REQUIRED: Flat Head Screwdriver Long Flat Head Screwdriver Phillips Screwdriver 7mm Socket 10mm Socket Ratchet & Extensions 3/16 Drill Bit Power Drill Cutting Wheel or Saw
Jeep. Flat Style Fender Flares Front Pair. Included in Hardware Kit:
 Jeep Flat Style Fender Flares Front Pair STEP 1 PRIOR TO INSTALLATION A) Bushwacker only approves installing the fl ares according to these written instructions with the hardware provided. WARNING: Failure
Standard Kit #1 (5-way switch)
") Standard Kit #1 (5-way switch) Please Read All Instructions Before Beginning. Tools you will need: Soldering Iron (35 watt preferably) Solder Wet Sponge Wire Clippers 3/8 Drill Bit 1/4 Drill Bit Variable
Standard Kit #1 (5-way switch) Please Read All Instructions Before Beginning. Tools you will need: Soldering Iron (35 watt preferably) Solder Wet Sponge Wire Clippers 3/8 Drill Bit 1/4 Drill Bit Variable
Gen 3 Prius Door Upholstery
 Gen 3 Prius Door Upholstery I installed Katskin Leather upholstery in my Prius. Door Upholstery The Katskin upholstery comes with pre-cut oversized vinyl pieces for the four doors. The color matches the
Mac mini Model A1283 PRAM Battery Replacement
 Mac mini Model A1283 PRAM Battery Replacement Written By: Walter Galan ifixit CC BY-NC-SA www.ifixit.com Page 1 of 10 INTRODUCTION The time and date, as well as other settings, are kept by the PRAM battery
Exterior Door Handle - LH - Unpainted (05-14 All)
") Tools Required: Exterior Door Handle - LH - Unpainted (05-14 All) 1) 10mm and 7mm sockets 2) Socket wrench (small size recommended) 3) T30 Torx bit 4) Plastic pry/molding tool (below, A) 5) Thin plastic
Tools Required: Exterior Door Handle - LH - Unpainted (05-14 All) 1) 10mm and 7mm sockets 2) Socket wrench (small size recommended) 3) T30 Torx bit 4) Plastic pry/molding tool (below, A) 5) Thin plastic
Ford Super Duty 4x4 CB Antenna Installation 2004 F250 4x4 XLT Sport Back to 2004 F250 Main Page
 Ford Super Duty 4x4 CB Antenna Installation 2004 F250 4x4 XLT Sport Back to 2004 F250 Main Page I wanted to install a CB in my truck but I didn't particularly like any of the typical antenna installation
Signal Mirror Installation Instructions Honda Odyssey
 Signal Mirror Installation Instructions 2005-2009 Honda Odyssey THE safety accessory of the 21st Century. P/N 210-0122-0 Rev. A4 (6/9/09), BTV 2006 Muth Company, LLC PROFESSIONAL INSTALLATION RECOMMENDED
Disassembling Laptop Toshiba Satellite P855 P850 plus Hinge FIX,
 Disassembling Laptop Toshiba Satellite P855 P850 plus Hinge FIX, I have described how to open and fully disassemble an laptop Toshiba Satellite P885 (more exact, P855-339). The info is for any Toshiba
Mac mini (PowerPC) Hard Drive Replacement
 Hard Drive Replacement") Mac mini (PowerPC) Hard Drive Replacement Written By: irobot INTRODUCTION Upgrade your storage with a new hard drive. TOOLS: 1.5" Thin Putty Knife (1) Phillips #00 Screwdriver (1) Phillips #1 Screwdriver
Mac mini (PowerPC) Hard Drive Replacement Written By: irobot INTRODUCTION Upgrade your storage with a new hard drive. TOOLS: 1.5" Thin Putty Knife (1) Phillips #00 Screwdriver (1) Phillips #1 Screwdriver
Signal Mirror Installation Instructions
 Signal Mirror Installation Instructions Honda CRV 1997-2003 THE safety accessory of the 21 st Century. P/N 210-0032-0 Rev B2 (6-26-04), GG 2003 Muth Mirror Systems, LLC. Note: Professional Installation
The Useless Machine. DIY Soldering Edition. Instruction Guide v0004
 The Useless Machine DIY Soldering Edition Instruction Guide v0004 TM For the best outcome, follow each step in order. We recommend reading this guide entirely before you get started. Tools required: Soldering
Making a Cement Upper Molding Surface for Compression Molding of Shape&Roll Prosthetic Foot Cores
 Making a Cement Upper Molding Surface for Compression Molding of Shape&Roll Prosthetic Foot Cores Andrew Hansen, PhD Steven Steer, MS Kerice Tucker Elizabeth Klodd Craig Heckathorne, MS Northwestern University
ipad 2 GSM Right Cellular Data Antenna Replacement
 ipad 2 GSM Right Cellular Data Antenna Replacement Replace the right cellular data antenna in your ipad 2 GSM. Written By: Brett Hartt ifixit CC BY-NC-SA www.ifixit.com Page 1 of 43 INTRODUCTION Use this
TOYOTA COROLLA EC REARVIEW MIRROR Section I Installation Preparation
 Section I Installation Preparation Part Number: PT374-02030 Section I Installation Preparation Kit Contents Item # Quantity Reqd. Description 1 1 AD Mirror Assembly w/compass & Maplights 2 1 Hardware Bag
The IntoPlay build. This section will show how to fill the components into the case halves, and also the case base, which will look like this:
 The IntoPlay build Ok, I presume you have read the sections about cutting the holes in the case front, speaker holes and spray painting, modding components, preparing the case, etc. So far, the guides
Signal Mirror Installation Instructions
 Signal Mirror Installation Instructions 2005-2010 Chevy Corvette C6 THE safety accessory of the 21 st Century. P/N 210-0144-0 Rev. A3 (9/29/2011), BTV 2007 Muth Mirror Systems, LLC Page 3 of 10PplPage
Congratulations on purchasing the Spirit Rails Magnetic Attach that allows easy wand to pack removal and reattachment by just getting close!
 Introduction Congratulations on purchasing the Spirit Rails Magnetic Attach that allows easy wand to pack removal and reattachment by just getting close! The Spirit Rails Magnetic Attach Kit is designed
GT3B Hack Kit Install Instructions Written By Austin Hutchison
 GT3B Hack Kit Install Instructions Written By Austin Hutchison Step 1: Remove 4 screws located on top of the radio. 1 Step 2: There are small plastic latches that also hold the top in place. The easiest
C-Bot. User Guide. Cautionary and Warning Statements
 C-Bot User Guide Cautionary and Warning Statements This kit is designed and intended for educational purposes only. Use only under the direct supervision of an adult who has read and understood the instructions
All Terrain Flares 2014 Chevy Silverado
 Page 1/8 Components: 1. Front Flares (2) 2. Rear Flares (2) Tools required: - Utility knife - #2 Phillips driver - Socket wrench - 13 mm Socket - 6 mm Allen Wrench - T-15 Torx bit - Trim Removal Tool -
Continue gluing the remaining top parts ensuring the angled piece is glued well. Set aside and let dry. See photo below
 Radiator rev 1.1 The SE5a s radiator is one of the most recognized radiators in WW1. It is one of the components that defines the SE5a. The original SE5a has seen multiple radiator designs used during
Solio Xcellerator and Hub Battery Pack Solar Panel Replacement
 Solio Xcellerator and Hub Battery Pack Solar Panel Replacement This guide covers the replacement of an unusable solar panel. Written By: Brian Sukkar ifixit CC BY-NC-SA www.ifixit.com Page 1 of 10 INTRODUCTION
ZROADZ Grille series - LED Installation Guide
 ZROADZ Grille series - LED Installation Guide START HERE The ZROADZ Series Grilles comes into 2 different configurations. One style features the LED Light Bar mounting hidden on the backside, while the
Deck Mount Installation with Bench
 Deck Mount Installation with Bench 1. Mark track with square. 2. Cut tracks with saw. 3. Drill ¼ hole (if needed.) 4. Countersink track. 5. Countersink all track 6. File all track ends. ends. 7. Lay out
Asus ZenFone 2 Display Replacement
 Asus ZenFone 2 Display Replacement Replace your display if it isn't functioning correctly or if it is cracked or broken. Written By: Jessica Nguyen ifixit CC BY-NC-SA www.ifixit.com Page 1 of 14 INTRODUCTION
Mac mini Model A1283 Internal Frame
 Mac mini Model A1283 Internal Frame Replacement Written By: Walter Galan ifixit CC BY-NC-SA www.ifixit.com Page 1 of 9 INTRODUCTION Remove your internal frame to access most of your mini's internals. TOOLS:
#11179 Wellington ARBOR
 #11179 Wellington ARBOR Assembly INSTRUCTIONS TOOLS NEEDED Tape Measure Variable Speed Drill with #2 Phillips Bit (recommended) or Phillips Screwdriver Hammer or Mallet ARBOR SIDE PANEL ASSEMBLY (Refer
Under Seat Storage Drawer Installation Instructions
 Under Seat Storage Drawer Installation Instructions Parts List: 1) Drawer Assembly 8) Self Tapping Screws 1) Instructions 1) Template Tools Needed: Drill and/or Bit Driver Tape Measure Jigsaw or metal
WATCH VIDEO INSTALL! HOW-TO INSTALL CV-TL-80S-EB. Page: Instructions for Installation on: Toyota Land Cruiser 80 Series
 Clearview Towing Mirrors (Electric Power Adjustable) CV-TL-80S-EB Instructions for Installation on: Toyota Land Cruiser 80 Series 1990-1997 Page: 1 OF 13 Clearview s premiere line of replacement towing
Mac mini Model A1283 Speaker Replacement
 Mac mini Model A1283 Speaker Replacement Written By: Walter Galan ifixit CC BY-NC-SA www.ifixit.com Page 1 of 14 INTRODUCTION Restore sound to your mini by replacing the speaker. TOOLS: Jimmy (1) Phillips
Motorola E815 / E816 Disassembly / Assembly Guide. Ver. 1.1 By Chubbs_WA
 Motorola E815 / E816 Disassembly / Assembly Guide Ver. 1.1 By Chubbs_WA April 10, 2007 Table of Contents Disassembly Tools needed 3 Disassembly for dummies 4 Just a note 5 Disassembly of keypad housing
Proctor Silex 2-Slice Extra Wide Slot Toaster Teardown
 Proctor Silex 2-Slice Extra Wide Slot Toaster Teardown Taking apart the Proctor Silex 2-Slice Toaster is order to access it's circuit board for maintenance. Written By: Cory ifixit CC BY-NC-SA www.ifixit.com
Repairing your Porsche 928 Central Warning System (CWS) controller
 controller") Repairing your Porsche 928 Central Warning System (CWS) controller Disclaimer: This procedure is for a 1984 Porsche 928 S controller. Overview: Under the left foot pedal (dead pedal) of the Porsche 928
Repairing your Porsche 928 Central Warning System (CWS) controller Disclaimer: This procedure is for a 1984 Porsche 928 S controller. Overview: Under the left foot pedal (dead pedal) of the Porsche 928
Installation tutorial for Console Customs Xbox 360 Dual Rapid fire Microchip for wired and wireless controllers (all versions)
") Installation tutorial for Console Customs Xbox 360 Dual Rapid fire Microchip for wired and wireless controllers (all versions) This tutorial is designed to aid you in installation of a console customs
Installation tutorial for Console Customs Xbox 360 Dual Rapid fire Microchip for wired and wireless controllers (all versions) This tutorial is designed to aid you in installation of a console customs
BMW Z3/M Roadster
 Convertible Top Installation Guide 1996-2002 BMW Z3/M Roadster What s Included A new convertible top includes sewn-in plastic retainers and tinted plastic window. Also, we enclose new BMW original metal
Mac mini Model A1176 Speaker Replacement
 Mac mini Model A1176 Speaker Replacement Written By: Walter Galan ifixit CC BY-NC-SA www.ifixit.com Page 1 of 16 INTRODUCTION Restore sound to your mini by replacing the speaker. TOOLS: Jimmy (1) Phillips
Signal Mirror Installation Instructions
 Signal Mirror Installation Instructions 2004 2008 Ford F-150 XLT, FX4, & Lariat Pre-wired without side signals Pre-wired with side signals Without side directional lights, see page 2 With side directional
Black and Decker CD2500 Motor Replacement
 Black and Decker CD2500 Motor Replacement The guide shows you how to replace the motor in a Black and Decker CD2500. Written By: Ashley ifixit CC BY-NC-SA www.ifixit.com Page 1 of 9 INTRODUCTION Make sure
Mac mini Model A1176 PRAM Battery Replacement
 Mac mini Model A1176 PRAM Battery Replacement Written By: Walter Galan ifixit CC BY-NC-SA www.ifixit.com Page 1 of 12 INTRODUCTION The time and date, as well as other settings, are kept by the PRAM battery
TI-84 Plus Silver Edition Individual Key Replacement
 TI-84 Plus Silver Edition Individual Key Replacement This guide will show you how to replace an individual key on your TI-84 Plus Silver Edition. Written By: Kale McKinney ifixit CC BY-NC-SA www.ifixit.com
Recaro sport seat strip down and rebuild
 Recaro sport seat strip down and rebuild So why do this, well I managed to find a set of Recaro s left in a wet shed for over 25 years and Rather than pay for someone to strip these down i decided to have
Installation Instructions
 Installation Instructions Complete 19-piece carpet set for Porsche 911 77 through 86 Complete 16-piece carpet set for Porsche 911 69 through 73 2 B E FORE YOU BEGIN Installation of your carpet set takes
Jeep. Flat Style Fender Flares Set of 4. Included in Hardware Kit: STEP 1 PRIOR TO INSTALLATION. Set Part # Rev-3 1/11/2016
 STEP 1 PRIOR TO INSTALLATION A) Bushwacker only approves installing the fl ares according to these written instructions with the hardware provided. WARNING: Failure to install according to these instructions
Installation Instructions 8115F 8115SF
 TM Installation Instructions 85F 85SF Single Control Centerset Lavatory Faucet with Speed Connect Drain Congratulations on purchasing your American Standard faucet with the Speed Connect Drain, a feature
Written By: Ben Eisenman
 iphone 3GS Front Panel Replacement Replace a cracked front panel on an iphone 3GS. Written By: Ben Eisenman ifixit CC BY-NC-SA www.ifixit.com Page 1 of 18 INTRODUCTION Use this guide to separate and replace
GEN II Toyota Prius Back Door Opener Switch Replacement & License Plate Lights
 GEN II Toyota Prius Back Door Opener Switch Replacement & License Plate Lights Rubber Surface of Switch had Degraded to Tar-like Substance Vehicle Manufacture Date 10/06 OLD SWITCH IN GARNISH SWITCH REMOVED
INSTALL/REMOVAL INSTRUCTIONS: WINDOW REGULATOR
 REMOVAL/INSTALL OF WINDOW REGULATOR (741-870) Ford Windstar 1995 2003, Ford Freestar 2004 2006 & Ford Monterey 2004 2006 General Tech Tips: Use painter s tape rather than duct tape to secure window. It
Page 1 of 5 Instructions for Fitting Lower Grille to S Type Jaguar. Part Code 9048
 Page 1 of 5 Instructions for Fitting Lower Grille to S Type Jaguar. Part Code 9048 To fit this grille you will need: Torch, 10mm spanner, 10mm socket with extension, T30 torx bits, Screwdrivers, Pliers,
SE5a Wing Panels rev 1.0
 SE5a Wing Panels rev 1.0 The top and bottom wings are different. They might look the same but the bottom wing has one less rib and some rib spacing difference. This is due to where the wooden interplane
Installation Instructions for FC2 & FC15 Forward Controls for the Super Magna
 Installation Instructions for FC2 & FC15 Forward Controls for the Super Magna It is highly recommended that you use a thread lock compound such as Loctite brand on all threads to keep them from vibrating
Modular ottoman. assembly instructions
 Modular ottoman assembly instructions Smooth & Wrinkle-Free Fabric Covers: In addition to these printed instructions, you may want to watch our beauty tips videos on the customer service page of our website.
Rough Country JK Modular Winch Mount Bumper With Light End Caps
 Rough Country JK Modular Winch Mount Bumper With Light End Caps Note: These instructions involve cutting parts of your vehicle. Please read all instructions prior to starting. Note: This installation also
Team Xecuter Joycon Mod By: XxWiReDxX
 Team Xecuter Joycon Mod By: XxWiReDxX Works With Every Switch SX OS Works with every Nintendo Switch and every firmware version! Play Every Game With SX OS you can play all your favorite games straight
Restoring Apple AC Adapter Broken Cable
 Restoring Apple AC Adapter Broken Cable A way to repair your Apple AC Adapter with minimal effort whilst also leaving the least amount of marks. Scritto Da: Darie H ifixit CC BY-NC-SA it.ifixit.com Pagina
Included in Hardware Kit. Jeep Cut-Out Fender Flare Set of 4 Set Part # Rev STEP 1 PRIOR TO INSTALLATION
 Jeep Cut-Out Fender Flare Set of 4 Set Part #10926-07 Rev-01 09-11-12 STEP 1 PRIOR TO INSTALLATION A) Bushwacker only approves installing the flares according to these written instructions with the hardware
INSTALL/REMOVAL INSTRUCTIONS: WINDOW REGULATOR
 REMOVAL/INSTALL OF WINDOW REGULATOR (740-666) Lincoln Town Car 1990 94 General Tech Tips: Use painter s tape rather than duct tape to secure window. It will not damage paint or leave sticky residue. A
Rugged Ridge Body Armor Guard Kit, 5 Pieces, Black (07-Current JK 4-door)
") Rugged Ridge Body Armor Guard Kit, 5 Pieces, Black (07-Current JK 4-door) Installation Time: 60 Minutes Tools Required: Notes: Phillips head screwdriver 3/8 socket or Flat head screwdriver 1/2 socket 7
Rugged Ridge Body Armor Guard Kit, 5 Pieces, Black (07-Current JK 4-door) Installation Time: 60 Minutes Tools Required: Notes: Phillips head screwdriver 3/8 socket or Flat head screwdriver 1/2 socket 7
Repairing Sheet-Molded Compound (SMC) With Epoxy
 With Epoxy") Repairing Sheet-Molded Compound (SMC) With Epoxy 1. Properties: A. It does not dent. B. It does not rust C. Panels are formed using a flat sheet or compound that is heat molded in a press. 2. Preparation
Repairing Sheet-Molded Compound (SMC) With Epoxy 1. Properties: A. It does not dent. B. It does not rust C. Panels are formed using a flat sheet or compound that is heat molded in a press. 2. Preparation
Fabric Replacement Top Without Upper Doors
 Fabric Replacement Top Without Upper Doors Installation Guidelines For: 2010-2015 Jeep Wrangler JK 2-Door & 4-Door!!STOP!! Before proceeding make sure the top is the correct item for the vehicle you are
10" E-Series D-Series - Pair. kit includes (14) (4) (4) It is strongly recommended that this product be installed by a professional.
 (4) (4) It is strongly recommended that this product be installed by a professional.") 2014 GMC 1500 grille installation instructions 10" E-Series D-Series - Pair kit includes (14) (14) (4) 5 /16-18x 5 /8 Button Socket 5 /16-18 Low Profile Nylock Nut M6-1.0x30mm Button Head Socket (14) (4)
2014 GMC 1500 grille installation instructions 10" E-Series D-Series - Pair kit includes (14) (14) (4) 5 /16-18x 5 /8 Button Socket 5 /16-18 Low Profile Nylock Nut M6-1.0x30mm Button Head Socket (14) (4)
How to Assemble Your Solar Light & Accessories
 1 How to Assemble Your Solar Light & Accessories geolitesolar.com customerservice@geolitesolar.com 2 Table of Contents 1. Put on Cotton Gloves...3 2. Assemble Base...3 3. Secure Base to Ground...4 4. Attach
HONEYCOMB SHADES. Cordless INSIDE MOUNT. A few simple tools are required: STANDARD HARDWARE OPTIONAL HARDWARE
 HONEYCOMB SHADES Cordless GETTING STARTED BRACKET INFORMATION A few simple tools are required: Steel Tape Measure Pencil Level (for outside mount) The brackets you received with your product are REQUIRED
Jeep. Flat Style Fender Flares Rear Pair. Included in Hardware Kit:
 Jeep Flat Style Fender Flares Rear Pair STEP 1 PRIOR TO INSTALLATION A) Bushwacker only approves installing the fl ares according to these written instructions with the hardware provided. WARNING: Failure
1/4 Rubber Spacer, 26 pcs. M5-.8 Machine Screw, 26 pcs 13. Female Wire Connector, 4 pcs
 97-06 Jeep Wrangler TJ Set Part #10920-07 Rev-3 12-15-08 A) B) C) D) E) F) G) STEP 1 - PRIOR TO INSTALLATION Bushwacker only approves installing the fl ares according to these written instructions with
Rubber Grommet, 36 pcs. 3/4 Screw, 10 pcs. Nut, 10 pcs
 Jeep Cherokee ZJ Set Part #10916-07 Rev-2 03-11-10 THESE INSTRUCTIONS INVOLVE CUTTING THE FENDERS OF THE VEHICLE. IT IS IMPORTANT TO READ ALL INSTRUCTIONS PRIOR TO THE CUTTING AND INSTALLATION OF THESE
HEAVY DUTY 11 STEEL CABINET
 HEAVY DUTY STEEL CABINET ASSEMBLY INSTRUCTIONS ONE DRAWER BASE CABINET 05-206 Parts List Part No Description Qty Image ONE DRAWER BASE CABINET Part No Description Qty Image SB- Cabinet Body EH-0 Euro Hinge
INSTALLATION. Preparation:
 INSTALLATION Preparation: Average Time Required: 2 to 3 hours Place a blanket down in the area which you will be working in. This will prevent scratches on the rear fascia / valance. Remove your License
ELECRAFT Application Note
 ELECRAFT Application Note Front Panel Microphone Circuit Modification Revision A, November 12, 2008 Copyright 2008, Elecraft, Inc., All Rights Reserved Background Some K3 owners have noted distorted transmit
Interior CHAPTER 21. Phantom Roadster Instruction Manual 273
 CHAPTER 21 Interior When you get to this chapter you are now starting on the finish that will make your car one that will be complete your hard work. This chapter will cover the installation of the door
2009 Subaru Impreza WRX Front Speaker
 2009 Subaru Impreza WRX Front Speaker Replacement Replaces front speaker of 2009 Subaru Impreza WRX. Rédigé par: Jared Spadaro ifixit CC BY-NC-SA fr.ifixit.com Page 1 de 13 INTRODUCTION This guide shows
Athearn RTR AMD103/P42 Tsunami Digital Sound Decoder Installation Notes
 Athearn RTR AMD103/P42 Tsunami Digital Sound Decoder Installation Notes Overview This application note describes how to install a TSU-AT1000 into an Athearn HO Ready-To-Roll GE AMD103/P42. Skill Level
TRUE TECHNICAL SERVICE MANUAL - ALL MODELS. DOORS/DRAWERS/LIDS
 DOORS/DRAWERS/LIDS 55 56 NOTES DOORS/DRAWERS/LIDS Springs 97 TORSION SPRING REPLACEMENT GDM RADIUS FRONT - SWING DOOR INSTALLATION INSTRUCTIONS Tools Required (2) - 1 8" drift Punch (forged) Needle-Nose
Plastic Welding Experiences
 Plastic Welding Experiences In the past I have advocated plastic solvent welding with ABS solvent to rejoin ABS plastic parts without repainting. Solvent is inexpensive but it does takes considerable time
TRUE TECHNICAL SERVICE MANUAL - ALL MODELS. DOORS/DRAWERS/LIDS
 DOORS/DRAWERS/LIDS 55 56 NOTES DOORS/DRAWERS/LIDS Swing s 73 74 NOTES INSTALLATION OF A GDM-SWING DOOR Phillips Head Screwdriver (2) - 1/8" Drift Punches (forged) Top Bracket NOTE: It may be necessary
Flat Style Fender Flares Rear Pair. Jeep. Included in Hardware Kit:
 Jeep Flat Style Fender Flares Rear Pair STEP 1 PRIOR TO INSTALLATION A) Bushwacker only approves installing the fl ares according to these written instructions with the hardware provided. WARNING: Failure
Mac mini Model A1283 RAM Replacement
 Mac mini Model A1283 RAM Replacement Written By: Walter Galan ifixit CC BY-NC-SA www.ifixit.com Page 1 of 10 INTRODUCTION Accessing the RAM requires the removal of the internal frame. TOOLS: Jimmy (1)
Early Mustang & Cougar cowl repair
 Early Mustang & Cougar cowl repair Okay, I m no expert but Bob suggested that I describe my experiences in replacing a rusty cowl in my 68 Mustang fastback I thought the cowl was good when I bought this
Instructions for Lighting an S Scale Caboose
 Instructions for Lighting an S Scale Caboose The S Scale Caboose lighting kit is adaptable for most caboose models of rolling stock including American Flyer (TM) and contains the same components as found
Installation tutorial for Console Customs Xbox Mode Dual Button (RFX-5B) Rapid fire Microchip for all Wired and Wireless controllers
 Rapid fire Microchip for all Wired and Wireless controllers") Installation tutorial for Console Customs Xbox 360 5-Mode Dual Button (RFX-5B) Rapid fire Microchip for all Wired and Wireless controllers This tutorial is designed to aid you in installation of a console
Installation tutorial for Console Customs Xbox 360 5-Mode Dual Button (RFX-5B) Rapid fire Microchip for all Wired and Wireless controllers This tutorial is designed to aid you in installation of a console
Bushwacker Jeep Flat Style Fender Flares Front Pair
 Bushwacker Jeep Flat Style Fender Flares Front Pair Note: These instructions involve cutting parts of your vehicle. Please read all instructions prior to starting. Installation Time: 3-4 Hours Tools Required:
Included in Hardware Kit: Jeep Pocket Style Fender Flare Set of 4. Set Part # Rev-0 3/15/2013 TOOLS FOR EASY INSTALLATION:
 STEP 1 PRIOR TO INSTALLATION A) Bushwacker only approves installing the fl ares according to these written instructions with the hardware provided. WARNING: Failure to install according to these instructions
JPM COACHWORKS INSTALLATION GUIDE
 JPM COACHWORKS INSTALLATION GUIDE 2015+ FORD MUSTANG MANUAL SHIFT BOOT Pre-Installation Warning: The installation of this product requires adhesives for proper assembly. Please read and follow all safety
It is important you read this entire assembly manual before putting your track together.
 It is important you read this entire assembly manual before putting your track together. We need to be notified of damaged/missing parts within 30 days of the delivery of your order. Important notes on