3/ /
|
|
|
- Myra Lane
- 5 years ago
- Views:
Transcription


1


2 SUNGLAZE system is designed for both rafter and purlin construction options. Recommended minimum roof slope for Sunglaze applications is 5 o. Where lower slopes are necessary, we recommend rafter construction. In case of metal rafters, thermal isolation is required between the rafters and the Alu base profile. This is usually obtained by inserting EPDM stripes between rafters and profiles. 75kg/m² 100kg/m² 125kg/m² 75kg/m² 100kg/m² 125kg/m² 75kg/m² 100kg/m² 125kg/m² 3/ / /
3 Installation
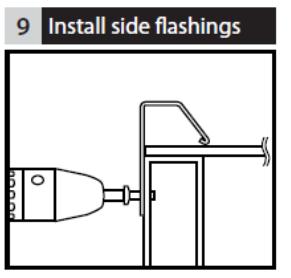
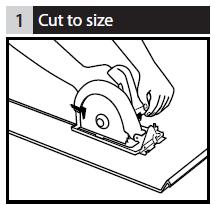
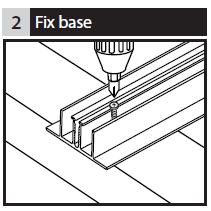
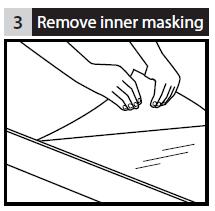
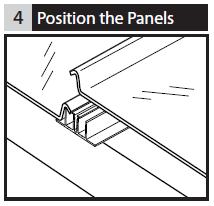
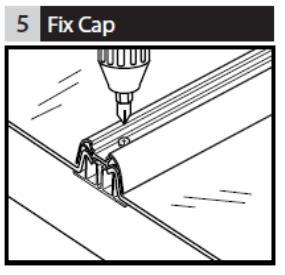
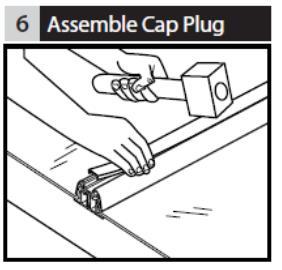
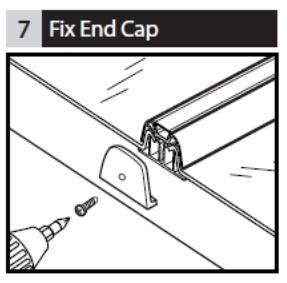
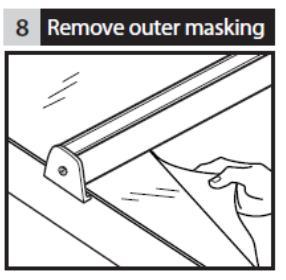
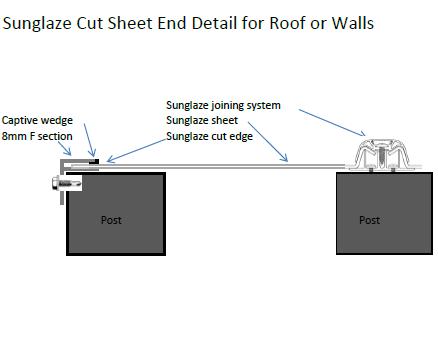
4 1. Cut to size (Fig. 1) Cut Aluminium profiles to length, allowing for overhangs of up to 100mm at each end. An overhang of minimum50mm over the gutter is recommended. Cut panels to length, 20mm shorter then Aluminium profiles for expansion allowance. Use a circular saw or hand saw with fine tooth blades and a moderate feeding rate to ensure a smooth cut. 2. Fix Base profile (Fig. 2) Set the first Base profile at the center of the supporting structure, and fix it to the structure using the provided fixing screws. Fix screw at each purlin or by the recommended span on a rafter. (It is recommended to position screws on each base side alternately). 3. Remove inner masking foil (Fig. 3) Remove protective foil from the panel s internal face only. To avoid scratching, keep this side away from the roof purlins until the Panel is finally positioned. 4. Position Panels (Fig. 4) Position the first Panel onto the two Base profiles. Make sure the Panel is correctly seated along their whole length. 5. Lock Cap (Fig. 5) Position Cap onto the Base and Panels edges. Predrill 5mm holes along the positioning groove every 25cm (it is recommended to perform pre-drilling in advance on the ground). Fix the Cap with locking screws through the pre-drilled holes and into to the Base profile. (It is recommended to position 2 screw at 50mm apart to the start and finish of each cap) 6. Expansion locking screw Drill a #11(.1910 inch) hole through the side of the cap, sheet and base outer upright. Screw through this hole, in the cap and sheet and into the base to prevent creeping during expansion and contraction (This locking screw should be located at the gutter line or under the ridge flashing. Sheets over 5.0m should have this screw through both sides of the cap) 7. Insert Cap Plug (Fig. 6) Click Cap Plug into place on the Cap using a rubber mallet or your fist, performing moderate strikes with short intervals. (Use dabs of silicone, under the approximately 200mm centres to prevent possible dislodgement). 8. Fix End Closure (Fig. 7) Fix End Closure at the bottom end of the Aluminium profiles (gutter end). 9. Remove outer masking foil (Fig. 8) Remove the protective foil from the Panel s external face shortly after installation. Delaying foil removal can make it very difficult to remove later (on hot days remove top protective film immediately after installation to prevent film from bonding to the panel). 10. Fix next Base Position the next Base to meet the first Panel edge. Make sure the edge is at the correct length when in place. Fix screw at each purlin or by the recommended span on a rafter. (It is recommended to locate screws on each base side alternately. Starting and finishing approximately 50mm from each end). 11. Repeat stages 3 to Cut side panels to size Determine width of the required side panels and cut to size. Use a circular saw or hand saw with fine tooth blades and moderate feeding rate for easier and better cutting. 13. Side Flashings (Fig. 9) Insert the cut edge of the Sunglaze sheet between the gap in the F section. The leg of the F section to be neat against the barge fascia and fastened there to. Insert the captive wedge to the upper side of the Sunglaze sheet and the underside of the upper portion of the F section. This is to hold it firm and seal it from the weather. SUNGLAZE system does not require the use silicones or adhesives for parts interface. For sealing of flashing assemblies use only PALRAM approved accessories, silicones, sealing tape, closure fixtures etc. For cleaning SUNGLAZE panels use water pressure cleaner and allow natural drying. Do not use cloth/ sponge/ chamois or similar, doing this can scratch the panels and harm their performance.


5 Polycarbonate Roofing (07)
SUNGLAZE. Solid Polycarbonate Standing Seam Architectural System
 CONSTRUCTION ARCHITECTURE SUNGLAZE Solid Polycarbonate Standing Seam Architectural System SUNGLAZE Solid Polycarbonate Standing Seam Architectural System Content Introduction 2 Main Benefits 2 Applications
SUNGLAZE. Solid Polycarbonate Standing Seam Architectural System
 CONSTRUCTION ARCHITECTURE SUNGLAZE Solid Polycarbonate Standing Seam Architectural System SUNGLAZE Solid Polycarbonate Standing Seam Architectural System Content Introduction 2 Main Benefits 2 Applications
ClearVue Roofing System Technical Manual
 Technical Manual Components CLEARVUE RAFTER BRACKETS CV-02 2 Components CLEARVUE EXTRUSIONS CV-03 3 Components END PLATES - 6mm SHEET CV-04 4 Components END PLATES - 8mm SHEET CV-05 5 Components MECHANICAL
SUNLITE TWIN-WALL POLYCARBONATE SHEET CATALOGUE & INSTALLATION GUIDE. Overview. Main Benefits. Energy efficiency - High thermal insulation
 SUNLITE TWIN-WALL POLYCARBONATE SHEET CATALOGUE & INSTALLATION GUIDE 1 Piece Joiner 2 Piece Joiner Overview SUNLITE twinwall sheeting combines the strength of polycarbonate with superior insulation due
PolyCarb has good resistance to many chemicals. Some chemicals may harm the PolyCarb sheets. Contact us when in doubt about any chemical.
 Polycarbonate Panels This manual provides the basic information for working with and installing PolyCarb sheets. Due to their hollow core, prior preparation is needed before the actual installation, with
SUNPAL. Multiwall Polycarbonate Standing Seam Architectural System
 CONSTRUCTION ARCHITECTURE SUNPAL Multiwall Polycarbonate Standing Seam Architectural System SUNPAL Multiwall Polycarbonate Standing Seam Architectural System Content Introduction 2 Main Benefits 2 Applications
SIMPLER BETTER FASTER
 SIMPLER BETTER FASTER 1. FITTING RING BEAMS DETAILS Always work anti-clockwise viewed from outside the roof. Each bar should be sequentially numbered, i.e. 1, 2, 3. Select the ring beam, position the left
Installation Guide Simplicity 16. V2.9 Lu171117
 0845 869 6006 www.canoports.co.uk Installation Guide Simplicity 16 V2.9 Lu171117 Tools Required Below is a list of tools that you will require to install the Simplicity 16 Canopy or Carport. Cordless Drill
ClearVue Roofing System Components, Installation & Maintenance Manual
 Components, Installation & Maintenance Manual Important Installation Considerations Manual & Design, Span Table & Technical Manual also available Components CLEARVUE RAFTER BRACKETS CV-02 3 Components
SUNLITE Plus. Installation Instructions for Greenhouses. Multiwall Polycarbonate Sheet with Built-in Condensation Control
 SUNLITE Plus Multiwall Polycarbonate Sheet with Built-in Condensation Control Installation Instructions for Greenhouses www.palram.com SUNLITE Plus Contents Chapter Page Sheet Dimensions 2 Distance Between
INSTALLATION GUIDE SLIMLINE ROOF LANTERN 4 PANE CONFIGURATION
 INSTALLATION GUIDE SLIMLINE ROOF LANTERN 4 PANE CONFIGURATION SLIMLINE STEP-BY-STEP INSTALLATION GUIDE Thank you for choosing Roof Maker, we hope you are delighted with your new rooflight. Our roof lanterns
Dura-Lock Roof System
 DLR-14 Dura-Lock Roof System Assembly and Installation Instructions Read the instructions before starting the job. They explain the steps required to produce a finished product that will meet factory specifications.
SUNPAL. Multiwall Polycarbonate Standing Seam Architectural System
 CONSTRUCTION ARCHITECTURE SUNPAL Multiwall Polycarbonate Standing Seam Architectural System SUNPAL Multiwall Polycarbonate Standing Seam Architectural System Content Introduction 2 Main Benefits 2 Applications
INSTALLATION INSTRUCTIONS FOR ULTRA LATTICE AND ALUMAWOOD ARBORS
 INSTALLATION INSTRUCTIONS FOR ULTRA LATTICE AND ALUMAWOOD ARBORS GENERAL INFORMATION: Lattice arbors are designed to be freestanding or attached. They are designed to resist a 10 lb. to 30 lb. per square
Pocket Door Installation Instructions
 Installation Instructions Before getting started: Read instructions thoroughly. Be sure that you have the necessary tools and materials before starting the installation. Consult your local building code
Multi-wall Polycarbonate Installation Instructions
 Multi-wall Polycarbonate Installation Instructions Multi-wall polycarbonate sheet can be used on both gable and arched style greenhouses. These easy to install panels can be attached directly to the greenhouse
LUX INSTALLATION GUIDE. LUX Panel V Groove Installation. Installation Guide. February
 LUX Panel V Groove Installation Installation Guide February 2017 www.luxpanel.ca LUX Panel V Groove Installation LUX panel steel cladding is designed to be installed vertically, horizontally, diagonally
DAYLIGHT HARVESTING MULTIWALL. Applications:
 DAYLIGHT HARVESTING MULTIWALL Applications: ROOFING FAÇADE INTERIOR OUTDOOR PRODUCT RANGE Tuflite Hollow & Cellular Polycarbonate Sheets: Twin Wall Triple Wall Four Wall Tuflite Multiwall Polycarbonate
CINTRALUX ALU BARREL VAULT EP 10/10
 CINTRALUX ALU BARREL VAULT EP 10/10 Installation instructions EN 14963 Artn 43984 E_MH_Cintralux EP 10/10 mm AG.PLASTICS QUALITY 1 Installation instructions Cintralux aluminium barrel vault: Cintralux
Curium 19H Installation Instructions & Parts List
 Curium 19H Installation Instructions & Parts List Illustration Curium 19H Right Hand Page 1 of 15 01/07/2016 Revision 2.1 IMPORTANT This shower screen / enclosure must be installed by suitably qualified
This installation guide has been created to assist in constructing a Liniar conservatory roof from a kit format.
 1.00 - Introduction This installation guide has been created to assist in constructing a Liniar conservatory roof from a kit format. Please note, each roof has been individually designed to meet specific
INSTRUCTION GUIDE SANCTUARY CANOPY. C & A SUPPLIES LTD, Bidder Street, London E16 4ST tel: WEB:
 INSTRUCTION GUIDE SANCTUARY CANOPY 1. Add gasket to wall plate 2. Drill holes in wall plate along the two rib lines The first pair of holes should be 25mm from the edge and then spaced every 525mm along
ENGINEERING STRENGTH INSTAL L AT I O N M A NUAL OUR STRENGTH IS OUR STRENGTH
 ENGINEERING STRENGTH INSTAL L AT I O N M A NUAL OUR STRENGTH IS OUR STRENGTH RAFTER PREPERATION RAFTER PREPARATION A FRAME PREPERATION AND ASSEMBLY A FRAME PREPARATION AND ASSEMBLY... Open boxes, remove
40mm Thermoclick. Type II Class 1 Clear Satin Anodize - 201R1 (Mid Grade Commercial)
") http://www.sundancesupply.com 40mm Thermoclick Type II Class 1 Clear Satin Anodize - 201R1 (Mid Grade Commercial) U-Profile 12' Lengths $39 Out System offers a complete set of extrusions and accessories
http://www.sundancesupply.com 40mm Thermoclick Type II Class 1 Clear Satin Anodize - 201R1 (Mid Grade Commercial) U-Profile 12' Lengths $39 Out System offers a complete set of extrusions and accessories
10 x 10 Flat Top Two Tone Pergola
 0 x 0 Flat Top Two Tone Pergola Models: Bordeaux ASSEMBLY GUIDE OPTIONAL ACCESSORIES Arch Kit System ( Arches) Privacy Fence Panel System ( Panels & Middle Post) Bolt Down Bracket Kit ( for Pergola) Ver.0-00
*** All chrome surfaces should be cleaned using a clean damp cloth. *** No abrasive cleaning agents or materials should be used.
 Cleaning *** All chrome surfaces should be cleaned using a clean damp cloth. *** No abrasive cleaning agents or materials should be used. *** No chemical cleaners can be used on the glass use only mild
FIXING GUIDE. Designed for Garages & Sheds, Houses, DIY, Flat Roofs, Industrial & Agricultural Buildings etc. IS THE LONG TERM ROOFING SOLUTION
 FIXING GUIDE Designed for Garages & Sheds, Houses, DIY, Flat Roofs, Industrial & Agricultural Buildings etc. IS THE LONG TERM ROOFING SOLUTION Permaroof Permaroof Permaroof Profile Roofing Manufacturers
DESIGNER SERIES GUTTER SYSTEM INSTALLATION INSTRUCTIONS
 DESIGNER SERIES GUTTER SYSTEM INSTALLATION INSTRUCTIONS GENERAL DESCRIPTION: The Designer Series Gutter System is a specially designed roof edge drainage product for industrial, commercial, and high end
DUTCH GABLE FREESTANDING CARPORT
 DUTCH GABLE FREESTANDING CARPORT STRATCO OUTBACK ASSEMBLY INSTRUCTIONS. Your complete guide to building a FREESTANDING Outback DUTCH GABLE CARPORT BEFORE YOU START Carefully read these instructions. If
INSTALLATION GUIDE ECONOMICAL PVC CLADDING SHEET IDEAL FOR WALLS & CEILINGS 10 YEAR GUARANTEE
 INSTALLATION GUIDE ECONOMICAL CLADDING SHEET IDEAL FOR WALLS & CEILINGS 10 YEAR GUARANTEE Ariel Cladding Sheet offers a range of lightweight and hardwearing solid and foam panels in matt, gloss or satin
Series Sloped glazed Curtain wall. Installation Instructions
 Series 5600 Sloped glazed Curtain wall Installation Instructions Part NO. Y308 February 2013 SECTION TABLE OF CONTENTS PAGE I. General Notes & Guidelines. 3-4 II. Gutter and Mullion Assembly.. 5 III. End
Wave Profile Installation Guide
 Wave Profile Installation Guide American Pa o Covers Plus Proudly Builds With Tools & Hardware Wave Profile Installation Guide Tape Measure Square Level Felt tipped Marker and/or grease pencil 3/8" Nut
B A T H R O O M G L A S S
 mistley B A T H R O O M G L A S S vaug16 Page 2 Thank you for purchasing this Trinity shower screen. Please study these instructions carefully before assembly and installation and check all supplied parts
HOW TO INSTALL HORIZONTAL ROD RAILING TREX SIGNATURE STANDARD
 HOW TO INSTALL HORIZONTAL ROD RAILING NOTES:» Adjust drill power to lowest setting that will drive screw. DO NOT OVER TORQUE 6 STAINLESS STEEL STAINLESS FASTENERS.» NEVER use impact tools on 6 Stainless
This installation guide has been created to assist in constructing a Liniar conservatory roof from a kit format.
 1.00 - Introduction This installation guide has been created to assist in constructing a Liniar conservatory roof from a kit format. Please note, each roof has been individually designed to meet specific
Fitting Instructions
 Fitting Instructions = Actions. Red = Notes you must read before continuing. Grey = Only applies to canopies over 4m widths. Overview 1. Tools you will need. 2. What you will need to provide. 3. Description
Gardman Lean-to Greenhouse Assembly Instructions
 Page 1 Gardman Lean-to Greenhouse Assembly Instructions Our Help Line provides support and advice to customers of Summer Garden Buildings after ordering. For advice before you buy you can phone us free
8 x 8 Flat Top Pergola
 A S S E M B L Y G U I D E O P T I O N A L A C C E S S O R Y Bolt Down Bracket Kit Models: Mirage, Mandalay Ver 6/00 Ta b l e o f Co n t e n t s Introduction & Overview......................................................
LOCKN LOAD FIRST TIME INSTALLATION
 LOCKN LOAD TM TRACK MOUNTING KIT NISSAN NAVARA D40 2004-2015 2 BAR TRACK HEAVY DUTY ROOF RACK SYSTEM MAX VEHICLE ROOF LOAD RATING: 100KG TOTAL LOAD EQUALS WEIGHT OF ROOF RACKS + ACCESSORIES + CARGO FIRST
Greenhouse Assembly Instructions
 Greenhouse Assembly Instructions Our Help Line provides support and advice to customers of Summer Garden Buildings after ordering. For advice before you buy you can phone us free 7 days a week on 0800
Corrugated Installation and Technical Guide
 Corrugated Installation and Technical Guide AmeriLux International, in partnership with Menards, offers high quality polycarbonate, pvc and fiberglass panels which feature the latest in product technology.
SpeedDeck. Fixing and Handling Guide
 SpeedDeck Section 1 Delivery/Storing On Site/Handling l SpeedDeck is factory or on-site manufactured. l Straight SpeedDeck bundles are a maximum 1 tonne, sheets nestled and banded with polypropylene or
Installation Instructions Split Shake, Staggered Shake, Shingle, Perfection Shingle, and Shapes
 Installation Instructions Split Shake, Staggered Shake, Shingle, Perfection Shingle, and Shapes General Guidelines These instructions show one type of installation and are intended for the professional
Belham Living Harbor Bay Pergola
 Belham Living Harbor Bay Pergola A S S E M B LY G U I D E OPTIONAL ACCESSORY Bolt Down Bracket Kit Models: Ver.0-08065 Belham Living Harbor Bay Ta b l e o f Co n t e n t s B elham Living Harbor Bay Pergola
6 1/2 x 6 1/2 Flat Top Pergola
 6 / x 6 / Flat Top Pergola A S S E M B L Y G U I D E Models: Portland, Liberty O P T I O N A L A C C E S S O R Y Bolt Down Bracket Kit V.-0506 Ta b l e o f Co n t e n t s PAGE The Introduction & Overview......................................................
SolarMount (E)volution
volution") SolarMount (E)volution SOLARMOUNT (E)VOLUTION: THE BEST JUST GOT BETTER. Engineering, Excellence, and Ease. Performance Engineered for versatility and reduced installation time, SolarMount (E)volution
SolarMount (E)volution SOLARMOUNT (E)VOLUTION: THE BEST JUST GOT BETTER. Engineering, Excellence, and Ease. Performance Engineered for versatility and reduced installation time, SolarMount (E)volution
6 1/2 x 6 1/2 Wood Grain Flat Top Pergola
 / x / Wood Grain Flat Top Pergola A S S E M B LY G U I D E Models: Lakewood OPTIONAL ACCESSORY Bolt Down Bracket Kit V.- Ta b l e o f Co n t e n t s The PAGE Introduction & Overview.......................................................
IMPORTANT!!! ASSEMBLY ASSEMBLY INSTRUCTIONS. (Internal Dimensions)
") ASSEMBLY ASSEMBLY INSTRUCTIONS (Internal Dimensions) Ent Spec Edition Ltr v-0- Overall dimensions including base: 7. L x 9 W x 0 H cms 97.5" L x 7" W x 8.7" H IMPORTANT!!! Please read these instructions
ASSEMBLY ASSEMBLY INSTRUCTIONS (Internal Dimensions) Ent Spec Edition Ltr v-0- Overall dimensions including base: 7. L x 9 W x 0 H cms 97.5" L x 7" W x 8.7" H IMPORTANT!!! Please read these instructions
Installation guide. Step-by-step instructions
 Installation guide Step-by-step instructions Contents Tools Required to Install p1 Screws & Fixings p2 Injection Moulded Solid Components p3 Components p4 Georgian Hips & Ancillaries p5 Fixing Eaves Beam
PEAKED ROOF w/ inner cover underneath. Telescoping Outer Covers. p.1
 PEAKED ROOF w/ inner cover underneath Telescoping Outer Covers p.1 HIVE FRAMES - STEP 2 Our new wedge-top frames come with an optional, insertable wedge comb guide to make your frames foundationless or
Austin Standing Seam Awning Assembly and Installation Instructions. Assembly Instructions
 Austin Standing Seam Awning Assembly and Installation Instructions Be sure to use safety glasses when assembling and installing the awning. Some metal parts may have sharp edges. Use work gloves to handle
6 1/2 x 6 1/2 Wood Grain Flat Top Pergola
 6 / x 6 / Wood Grain Flat Top Pergola A S S E M B LY G U I D E Models: Lakewood OPTIONAL ACCESSORY Bolt Down Bracket Kit Ver /AUG/0 Ta b l e o f Co n t e n t s PAGE The 6.5 x 6.5 Wo o d Grain Flat Top
The Mirage Pergola ASSEMBLY GUIDE. OPTIONAL ACCESSORY Bolt Down Bracket Kit. Ver 3/2009
 ASSEMBLY GUIDE OPTIONAL ACCESSORY Bolt Down Bracket Kit Ver /009 Table of Contents PAGE Introduction & Overview...................................................... Mirage Pergola Materials Overview.....................................................
Construction details: Master-C type profiles and joints:
 Construction details: Master-C type profiles and joints: Master-C 3g 32 mm. (1 1/4 ) 1000 mm. (39 3/8 ) outer face inner face 10.5 fixing details: sealing washers shall be installed through a 2-3/8 x 1-9/16
Installation Guide Contemporary Alfresco V1.3 LU
 Installation Guide Contemporary Alfresco V1.3 LU 010818 Tools Required Below is a list of tools that you will require to install you're the Contemporary Alfresco System. Cordless Drill Mastic Gun Spirit
HOW TO INSTALL HORIZONTAL ROD RAILING TREX SIGNATURE STANDARD
 HOW TO INSTALL HORIZONTAL ROD RAILING NOTES:» Adjust drill power to lowest setting that will drive screw. DO NOT OVER TORQUE 36 STAINLESS STEEL STAINLESS FASTENERS.» NEVER use impact tools on 36 Stainless
Titan Series Awning Assembly and Installation Instructions
 Titan Series Awning Assembly and Installation Instructions Be sure to use safety glasses when assembling and installing the awning. Some metal parts may have sharp edges. Use work gloves to handle them.
TREX TRANSCEND RAILING
 RAILING NOTES:» RAILINGS ARE DESIGNED TO BE INSTALLED OVER THE DECKING FRAME OR ON INSIDE OF RIM JOIST. NOTCHING OF PRESSURE-TREATED POSTS OR POSTS INSTALLED ON OUTSIDE OF RIM JOIST IS NOT ALLOWED.» All
Dubnium 11 Installation Instructions & Parts List
 Dubnium 11 Installation Instructions & Parts List Illustration Dubnium, H1 Handle Right Hand: Open Out Page 1 of 25 IMPORTANT This shower screen / enclosure must be installed by suitably qualified individuals.
Instructions for Installation on a Pitched Roof LIGHTWAY optical tube LW 260, LW 320, LW 520, LW 760
 Lightway, s.r.o. Registered office: Ledvinova 1714, 149 00 Praha 4 Offices: Za Humny 1054/4a, 161 00 Praha 6 tel.: 235 300 694, fax: 235 300 218 Company ID No.: 63669366, Tax ID No.: CZ63669366 Bank: KB
Everbright E610 polycarbonate light panels Installation guidance
 Everbright E610 polycarbonate light panels Installation guidance Mono-pitched applications: Eaves For pitched roofs above 0-degree fix aluminium angle EL17 to supporting structure with self drilling screws
TRADITIONAL GABLE ATTACHED PATIO AND CARPORT. Your complete guide to building an ATTACHED Outback TRADITIONAL GABLE PATIO or CARPORT
 TRADITIONAL GABLE ATTACHED PATIO AND CARPORT STRATCO OUTBACK ASSEMBLY INSTRUCTIONS. Your complete guide to building an ATTACHED Outback TRADITIONAL GABLE PATIO or CARPORT BEFORE YOU START Carefully read
INSTALLATION INSTRUCTIONS
 INSTALLATION INSTRUCTIONS TOOLS REQUIRED Rechargeable, variable speed drill 3/8 diameter drill bit 3 Robertson bits #0, #1 and #2 Slot screwdriver Non marring hammer with 1 head Level Caulk or sealant
10x10 Trellis Pergola
 0x0 Trellis Pergola ASSEMBLY GUIDE Ver.-007 Table of Contents PAGE 0x0 Trellis Pergola Introduction & Overview...................................................... Pergola Materials Overview..............................................................
Installation Guide Simplicity Alfresco. V1.9 Lu070318
 0333 305 5272 www.canoports.co.uk Installation Guide Simplicity Alfresco V1.9 Lu070318 Tools Required Below is a list of tools that you will require to install your the Simplicity Alfresco System. Cordless
RENU PANELING SYSTEM Installation Guide PLEASE READ GUIDE COMPLETELY BEFORE ASSEMBLY. Version 1.0 ALL STATED SIZES ARE NOMINAL DIMENSIONS.
 RENU PANELING SYSTEM Installation Guide Version 1.0 PLEASE READ GUIDE COMPLETELY BEFORE ASSEMBLY. ALL STATED SIZES ARE NOMINAL DIMENSIONS. Components Trim Track (TT) 1" x 1 3 4" (GER3TTAA): fastens to
8 x 8 Flat Top Pergola
 A S S E M B L Y G U I D E O P T I O N A L A C C E S S O R Y Bolt Down Bracket Kit Models: Mirage, Mandalay Ver 8.0/MAR 0 Ta b l e o f Co n t e n t s PAGE Introduction & Overview......................................................
Revision Date: April 01, Paramount Enclosure
 Paramount Enclosure www.urbanindustries.com 15 Urban Industries, Inc. 2008 Tools The following tools are recommended for the installation of the Paramount Aluminum Enclosure and roof. 1 2 Level 1 4 Level
12 x 24 Flat Top Pergola
 A S S E M B LY G U I D E OPTIONAL ACCESSORIES: Bolt Down Bracket Kit Privacy Wall (6 for Pergola) Pergola Planter Ver.-75 Ta b l e o f Co n t e n t s PAGE Introduction & Overview......................................................
Installation Guide Simplicity 6. v3.5 lu171117
 0845 869 6006 www.canoports.co.uk Installation Guide Simplicity 6 v3.5 lu171117 Tools Required Below is a list of tools that you will require to install the Simplicity 6 Canopy or Carport. Cordless Drill
Installation Instructions
 Installation Instructions Roof edge trim profile Series TAG multi-piece aluminium profile Front face height: 250-1050 mm supplied with patented 4F brackets as standard height-adjustable, horizontally moveable,
Finesse Profiles. Nailstrip
 Installation Details Profile and Lap Detail 265/465 38mm NAILSTRIP *other widths available CD GRADE PLYWOOD 19mm STRUCTURE SILICONE * MIN 20mm VENTILATION GAP * WHEN ROOF PITCH IS UNDER 7.5 OR TOTAL COMBINED
Figure 1: Various Pro-Sky Skylight and Side Light Arrangements
 Introduction: Pro-Sky is a high quality light-transmitting, corrugated polycarbonate panel designed to match Pro-Rib and Premium Pro-Rib panels. It is designed for single or multi-panel skylights or side
COMPONENTS OF THE CLICKFAST FASCIA AND GUTTER SYSTEM 5: INTERNAL MITRE
 INTRODUCING THE CLICKFAST FASCIA AND GUTTER SYSTEM The Clickfast Fascia and Gutter System was originally designed by Stratco and has proven to be the most successful fascia and gutter system in Australia
Curium 19.4H Installation Instructions & Parts List
 Curium 19.4H Installation Instructions & Parts List Illustration Curium 19.4H Right Hand Page 1 of 21 30/06/2016 Revision 1.0 IMPORTANT This shower screen / enclosure must be installed by suitably qualified
Installation Guide. Bi-fold Doors
 Installation Guide Bi-fold Doors Installation Guide Components box 1. 6. 2. 3. 7. 5. 4. 8. Contents 1. Fixing plugs 2. Wedge gasket 3. Bottom trolley 4. Top trolley 5. Magnetic keep (x 2 if door height
Kocked Down with Ends Assembled
 Installation Instructions for Quarter Round (QR) Kocked Down with Ends Assembled Note: Prior to starting Installation, check unit/parts for damage. Please read entire Installation Instructions & review
ULTRA WINDOW & DOOR EXPANDERS AND RECEIVERS INSTALLATION INSTRUCTIONS
 ULTRA WINDOW & DOOR S AND RECEIVERS INSTALLATION INSTRUCTIONS! CAUTION: *REMEMBER SAFETY FIRST* Proper Eye and! Hearing Protection must always be worn during installation of all window and door products.
Garage Door Frame Retro-Fit Clad Installation Instructions
 Garage Door Frame Retro-Fit Clad Installation Instructions Patent # US 7,111,433 B2, CA 2,415,545, Other Patents Pending Tools required Screw driver (screw gun), hammer, pry bar, tape measure, compound
6 1/2 x 6 1/2 Wood Grain Flat Top Pergola
 / x / Wood Grain Flat Top Pergola A S S E M B LY G U I D E Models: Lakewood OPTIONAL ACCESSORY Bolt Down Bracket Kit V.-09 Ta b l e o f Co n t e n t s The PAGE Introduction & Overview.......................................................
The Leka System Installation Guide
 Installation Guide The Leka System Installation Guide The following guide has been created to assist in the fabrication and installation of the Leka System. Please note that each roof is individual and
CURVED ROOF ASSEMBLY INSTRUCTIONS ATTACHED VERANDAH. Your supplementary guide to building an ATTACHED CURVED ROOF VERANDAH or PATIO BEFORE YOU START
 ROOF ATTACHED VERANDAH ASSEMBLY INSTRUCTIONS Your supplementary guide to building an ATTACHED ROOF VERANDAH or PATIO This set of instructions should be used in conjunction with the Stratco instruction
Installation - Sub Cills
 Installation - Sub Cills Fitting of Subcill Drainage paths through the sub-cill can be seen on the illustration alongside so care must be taken to ensure they are not obstructed and that screw fixings
Oceanside Outdoor Vinyl Shower Kit (3 x 3 Enclosure)
") Oceanside Outdoor Vinyl Shower Kit ( x Enclosure) A B ASSEMBLY GUIDE REQUIRED FOR INSTALLATION (A) Zippity Post Extension for In-Ground Installation (Sold as 4-Packs) (B) Zippity Galvanized Steel Surface
Oceanside Outdoor Vinyl Shower Kit ( x Enclosure) A B ASSEMBLY GUIDE REQUIRED FOR INSTALLATION (A) Zippity Post Extension for In-Ground Installation (Sold as 4-Packs) (B) Zippity Galvanized Steel Surface
PATIO INSTALLATION MANUAL
 PATIO INSTALLATION MANUAL A few minutes spent reviewing the following instructions will help insure quick and proper assembly. The Patio Sauna Kit will arrive on a stretchwrapped pallet including pre-built
McCue Bumper Installation Instructions
 McCue Bumper Installation Instructions McCue 8" Bumper Tools Required: Saw with 10-12" blade Tape measure Flat head screwdriver Phillips screw driver Pencil or chalk line Drill with Philips driver bit
IMPORTANT -- SPECIAL INSTALLATION INSTRUCTIONS
 IMPORTANT -- SPECIAL INSTALLATION INSTRUCTIONS ** READ ALL INSTALLATION INSTRUCTIONS BEFORE STARTING!** If at any point, you have questions, call 1-800-851-0865...(The manufacturer will not be responsible
Installation Guide. Guardian Slate Roof System. England, Scotland & Wales
 Installation Guide Guardian Slate Roof System England, Scotland & Wales March 2016 Product Information Construction: Manufactured from resin bonded crushed limestone Size (slate): 445 x 294mm (ridgecap):
The better way to build TM. Installation Manual ROOF SIPs
 The better way to build TM Installation Manual ROOF SIPs August 2017 ROOF SIPs Installation Manual Table of Contents Topics General Requirements.................................... 3 Materials..............................................
BBA BRITISH BOARD OF AGREMENT CERTIFICATE NO. 87 / 1823 / C
 Fixing Guide BBA BRITISH BOARD OF AGREMENT CERTIFICATE NO. 87 / 1823 / C Onduline Fixing Guide Introduction Onduline is the world s largest manufacturer of bituminous corrugated sheets. Onduline roofing
SpeedZip. Fixing and Handling Guide
 Section 1 Delivery/Storing On Site/Handling l SpeedZip is factory or on-site manufactured. l Straight SpeedZip bundles are a maximum 1 tonne, 2 No. sheets nestled and then and placed face to face, banded
GROWING BETTER THROUGH DESIGN. 6ft Lean-To LEAN-TO. Assembly Instructions 04/02
 GROWING BETTER THROUGH DESIGN 6ft Lean-To LEAN-TO Assembly Instructions 04/02 6ft Lean-To Greenhouse Base Plan Introduction/Tools/Contents / / Contents This is a copy of our Lean-To greenhouse base plan.
MILANO INSTRUCTIONS CODE: 0093 TOLL FREE: _Milano_11x11_Instructions_V1.2. Front Elevation Plan View Footprint 12'-0" 11' "
 INSTRUCTIONS CODE: 0093 12'-0" 11'-0 3 4 " 12'-0" 6'-9" 9'-4 15 16 " 11'-0 3 4 " 12'-0" Front Elevation Plan View Footprint 0093_Milano_11x11_Instructions_V1.2 EN IMPORTANT CODE: 0093 TOOLS NEEDED BEFORE
VINYL PERGOLA. Structural. Recommended Tools. What's Included. SuperiorPlasticProducts.com. SuperiorPlasticProducts.com
 Structural VINYL PERGOLA Recommended Tools Safety Glasses Tape Measure & Level Power Drill w/ (1/8", 1/4", 5/8") bits Hammer Drill w/ (1/8") bit Circular Saw w/ Fine Tooth Blade Rubber Mallet Ladder What's
Solara Adjustable Patio Cover Installation Instructions
 Solara Adjustable Patio Cover Installation Instructions We divided the installation instructions in 6 major sections. Reference your project to the drawings below, this way you ll know you are on the right
Installation Guide (888)
") BamDeck Installation Guide (888) 788-2254 The Collection Decking Systems BAMDECK 3G 5-7/16 Wide Plank Dims: 96 L x 5-7/16 W x 13/16 H BAMDECK 3G 16FT. 5-7/16 Wide Plank Dims: 192 L x 5-1/2 W x 13/16 H
BamDeck Installation Guide (888) 788-2254 The Collection Decking Systems BAMDECK 3G 5-7/16 Wide Plank Dims: 96 L x 5-7/16 W x 13/16 H BAMDECK 3G 16FT. 5-7/16 Wide Plank Dims: 192 L x 5-1/2 W x 13/16 H
CXT PRO RAILING INSTALLATION INSTRUCTIONS For Installations Using Aluminum and Glass Balusters Sold Separately
 CXT PRO RAILING INSTALLATION INSTRUCTIONS For Installations Using Aluminum and Glass Balusters Sold Separately CCRR-0171 PFS AA-652 Drill/power screwdriver Assorted drill bits Hammer Miter or circular
Installation instructions, accessories. Rails. Volvo Car Corporation Gothenburg, Sweden. Instruction No Version Part. No
 Instruction No Version Part. No. 8685942 1.0 Rails J8401014 Page 1 / 9 Equipment A0000162 A0000161 J8401006 Page 2 / 9 INTRODUCTION Read through all of the instructions before starting installation. Notifications
Installation Guidelines
 Page 1 Tools You ll Need 4 ft. Carpenter s level Chalk line (to mark U channel locations) Cordless drill/nut driver Caulking gun Chop saw with a metal cutting blade on it (required to make accurate and
12 x 12 Flat Top Pergola
 x Flat Top Pergola Model: Regency, Roosevelt ASSEMBLY GUIDE OPTIONAL ACCESSORIES: Bolt Down Bracket Kit Canvas Weave Shade Kit Privacy Wall Pergola Planter ( for Pergola) (Regency Only) (Regency Only)