Fitting Instructions
|
|
|
- Stanley Roberts
- 5 years ago
- Views:
Transcription
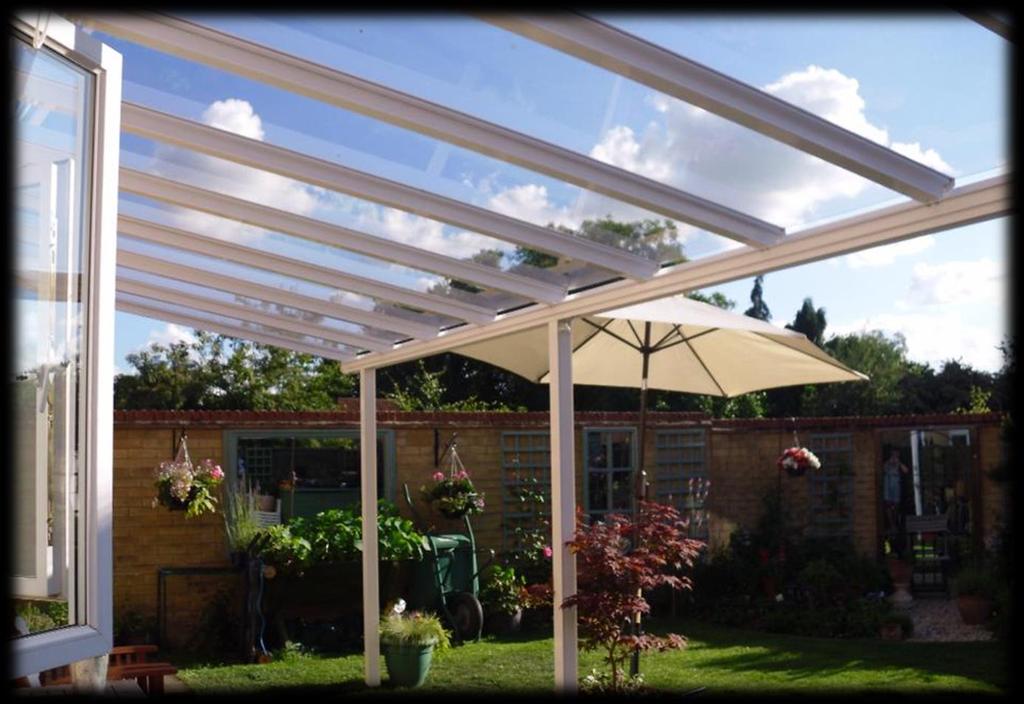

1 Fitting Instructions
2 = Actions. Red = Notes you must read before continuing. Grey = Only applies to canopies over 4m widths. Overview 1. Tools you will need. 2. What you will need to provide. 3. Description of the parts supplied with your canopy. 4. Fitting steps overview. 5. Detailed fitting steps. 1. Tools you will need Item Tool Description 1 Metal drill bits - dia. 3.8mm (for pilot) 2 Driver Bit, Phillips Head, PH2 (for driving the self-tapping screws) NOT Pozidriv 3 51mm Hole saw. 4 10mm Socket 5 Ratchet Driver for 10mm socket (item 04). 6 Spirit Level. 7 Power Drill/Driver, Hammer Drill Amp Extension cable. 9 Marker Pen. 10 Soft Lead pencil. 11 Robust Step Ladder(s). 12 Digging Equipment for Supporting Post foundation holes. 13 Hacksaw 2. What you will need to provide Item Item Description 1 Fixings to secure Wall Plate usually masonry fixings 2 Drill bits for fixings in Item 1 3 Fixings for securing Supporting Post Feet 4 Drill bits for fixings in Item 3 5 Sand and cement/ post mix and water if you are cementing the post instead of bolts Notes: Self-tapping screws are easier to fix if they are greased or wax before use. Cleaning and maintenance information can be found at the back of these instructions. Clear As Glass (6mm) roof panel assembly information on the back page. 2 Copyright LuMac ltd 2012


3 3. Description of the parts supplied with your canopy Supporting Leg Post/Foot L Bracket Wall Plate Gutter Edge Glazing Bar Middle Glazing Bar Sheet Closure Roof Panel Edge Glazing End Cap Main Glazing bar end cap Gutter End Plate Wall Plate end cap 4. Fitting steps Overview: 1. Dig your post/foot holes. 2. Fix wall plate. 3. Fit L brackets to the gutter. 4. Fit the gutter to the legs & check levels. 5. Makes holes where the rain will drain through to the legs. 6. Fit the end glazing bars (from gutter to wall plate) & check levels. 7. Fit the roof panels and inner glazing bars. 8. Re-position glazing bars to achieve the correct spacing. 9. Fit the sheet closure bars to the roof panels (at the gutter end). 10. Secure the glazing bars in place at both the wall plate and the gutter. 11. Secure post feet in foundations & Make rain drainage holes in the legs. 3 Copyright LuMac ltd 2012
. Dig holes for each Supporting Post.")

4 5. Detailed Fitting steps 1. Digging your post/foot holes Width (m) Projection (m) Poly Projection wall to inside face of supporting post (mm) Roof Pitch = 10 degrees N/A mm 1491 N/A mm 1981 N/A mm 2471 N/A mm 2961 N/A mm 3461 N/A mm 3951 Mark position of each Supporting Post (Use the graph above). Dig holes for each Supporting Post. These holes should be a minimum of 300mm square & 500mm deep. Depending on grounds conditions you may need to dig deeper untill secure ground is reached. Pour concrete mix into each hole to a depth of 100mm to provide footing for Supporting Post Feet. Do not overwater as the mix needs to start skinning over as soon as possible so the legs to not sink when you stand them on the concrete. Note: Concrete mix should ideally be: 1 part cement: 3.5 parts sand : 2.5 parts course aggregate. If using combined aggregate the mix should be: 1 part cement: 5 parts combined aggregate. 4 Copyright LuMac ltd 2012


5 Fit the Supporting Posts with the Supporting Post Feet. Insert 2 Post feet per leg. The Post Foot will slide into the channels on the inside of the Post. Secure the feet to the post Drill 2 x 3.5mm holes. Then use 2 x self-tapping screws. Repeat this process for all supporting posts. Each post should have 2 foot brackets attached. 2. Fix Wall Plate Drill the holes in the wall plate before it is shown up to the wall. Keep the holes centered along the wall plate. Holes should be no more than 450 mm apart. Wall fixings are not supplied as your wall plate could be fixed to wide variety of materials. Please use appropriate fixings for your application 5 Copyright LuMac ltd 2012


 Underside of Eaves/Gutter beam height Ground level to underside of wall plate")
6 Remove protective film from the wall plate end caps. Use self-tapping screws to secure the wall plate end caps. Make sure the holes in the end cap align with the screw ports in the wall plate. The Following step is only required if your wall plate was supplied in 2 sections Insert Joining Plate into joining plate slots on one of the wall-plates. The Joining Plate is 350mm in length and is designed to be a tight fit. You may file this or cut it shorter to make fitting it easier. Use a Rubber Mallet to tap in the Joining Plate into the joining plate slots to half its length. Join the other wall plate to the first section that has the joining bar now fitted. If there are more than 2 sections repeat until all wall plates are connected together. The wall plate can now be fixed to the wall Use the chart below to find the height of your wall plate Projection (m) Underside of Eaves/Gutter beam height Ground level to underside of wall plate height. (metres) Ground level to underside of wall plate height. (millimetres) Copyright LuMac ltd 2012


7 Present the Wall-plate to its fixing location. Mark the fixing locations of an outer most hole through one of the holes drilled in the wall-plate. Remove the wall plate & drill the outermost hole. Run 2 beads of silicon along the back of the wall plate. Re-present the wall plate and secure the first fixing through the wall-plate into the hole you have just drilled. Make sure the wall-plate is level using a spirit level before drilling the next holes Drill into the fixing surface through the remaining holes in the wall plate. Apply the remaining fixings to finish securing the wall-plate. Once wall-plate is secure apply a large bead of silicone along the top edge, sealing the wall and the wall-plate. 3. Fitting L brackets to the Eaves/Gutter Each L bracket needs 4 set screws. End leg/posts only have one L bracket fitted. Slot the required number of set screws into the set screw channels. Make sure there is an even number of set screws in each channel 7 Copyright LuMac ltd 2012


8 Fit the L brackets to the screws. Tighten the M6 nuts, but leave them loose enough to slide the L brackets along the channels. Remember the End leg/posts only need 1 bracket but supporting posts (middle posts) need 2 brackets The Following step is only required if your Eaves/Gutter was supplied in 2 sections Insert Joining Plate into joining plate slots on one of the Eaves/gutter sections. The Joining Plate is 350mm in length and is designed to be a tight fit. You may file this or cut it shorter to make fitting it easier. Use a Rubber Mallet to tap in the Joining Plate into the joining plate slots to half its length. If there are more than 2 sections repeat until all Eaves/Gutters sections contain a joining bar. Do not connect them all together yet. 8 Copyright LuMac ltd 2012


9 Apply silicone sealant to the ends of the Eaves/Gutter. Make sure the screw holes of the end cap line up with the screw ports in the gutter. Secure the Gutter end plate with 4 self-tapping screws. Smooth the silicone sealant that will have compressed out from the edges. This will help seal the join between the End cap and the gutter 4. Fit the gutter to the legs & check levels This will take a minimum of 2 people. Put the posts in position. Whilst the posts are being held, lift the gutter onto the top of the posts. Slide the L Brackets along so they are in position on the outside of the supporting posts Remember the end posts only have 1 L bracket. Middle posts have 2 L brackets You must make sure the levels are correct. 9 Copyright LuMac ltd 2012


10 The Following step is only required if your Eaves/Gutter was supplied in 2 sections Join the Gutter sections together as shown Smooth sealant over the join on both the inside and outside of the joint. Secure the outside supporting post by drilling 2 holes and using 2 selftapping screws.. This is completed on just the inside of the gutter. Each outer post will have 2 screws used, 2 on inside only as shown 10 Copyright LuMac ltd 2012


11 Secure the brackets in position by tightening the M6 Nuts Secure the brackets to the posts Hold the L bracket, post and Gutter tightly in position. Drill 4 holes through the L bracket into the posts. Screw the L bracket to the posts with 4 self-tapping screws. 11 Copyright LuMac ltd 2012


 MAKE A NOTE")
 Secure either end of the end-glazing")
12 5. Makes a hole where the rain will drain through to the leg. Decide on which leg will be the downpipe. Drill a 51mm hole above centre of leg. This hole is to allow rainwater to drain down the support leg so take extra care ensuring the holes are drilled above the leg. Silicone seal around the rainwater adapter. Slot in position. 6. Fit the end glazing bars (from gutter to wall plate) & check levels. Place the End-Glazing bar in positing and check the levels. (In this image the gutter end cap has been removed to demonstrate how much gap should be left, your end cap will have been fitted already) MAKE A NOTE OF THE DISTANCE BETWEEN YELLOW ARROWS Or make a block to use as a spacer for the remaining glazing bars (Blue arrow) Secure either end of the end-glazing bar by drilling a single hole and by using a self-tapping screw. There should be 1 screw at the Gutter end and one at the wall-plate end. 12 Copyright LuMac ltd 2012


13 Fit the end glazing bar to the other end of the gutter to complete the frame. Check the levels at this point. Also check the canopy is square i.e. the glazing bars are perpendicular to the wall plate. 7. Fit the roof panels and inner glazing bars IF YOU HAVE CLEAR AS GLASS ROOF PANELS PLEASE REFER TO THE LAST PAGE. Remove the protective film from the Roof Panels The protective film with the writing on is the top of the panel The edge with the silver tape on it goes at the Wall end, the grey breather tape at the Gutter end. Slide in position all the roof panels and inner glazing bars DO NOT FIX THEM IN POSITION YET Repeat the process until all roof panels and glazing bars are in position To fit the last roof sheet you will need to remove the end glazing bar temporarily BEFORE REMOVING THE END GLAZING BAR YOU WILL NEED TO SECURE THE LAST INNER GLAZING BAR AT THE WALL AND GUTTER END. This will make sure the canopy frame holds its shape. Fit the last roof panel into position. Re-Fit the end glazing bar 13 Copyright LuMac ltd 2012
 glazing bars If your width has been cut to a nonstandard size please")
14 Over 3m Projection Up to 3m Projection LuMac Fitting Instructions 8. Re-position the glazing bars to achieve the correct spacing Use the following chart to give you the spacing for the main (inner) glazing bars If your width has been cut to a nonstandard size please refer to the spacing sheet delivered with your canopy.!!for CLEAR AS GLASS 6MM PLEASE SEE PAGE 18!! Main Glazing Bar Spacing Canopy Width (mm) Wall-Plate and Eaves/Gutter width (mm) Qty. of Edge Bars Qty. of Glazing Bars Qty. Panels Panel width (mm) Edge bar base width (mm) Glazing Bar base width (mm) Space to be allowed between each glazing bar (mm) Dimension from same edge to same edge, glazing bar to glazing bar (mm) 2,106 2, ,106 3, ,200 4, ,200 5, ,300 6, ,400 7, ,106 2, ,800 2, ,506 3, ,206 4, ,906 4, ,606 5, ,306 6, ,006 7, ,806 7, ,406 8, ,206 9, (Also) Length of Sheet Closures (mm) Position the main inner glazing bars so they are evenly spaced. Mark their correct position with a pencil (you will need this mark in the next steps). Use the spacing in the table above. DO NOT SECURE THE MAIN GLAZING BARS YET 14 Copyright LuMac ltd 2012
.")
.")


15 9. Fit the sheet closure bars to the roof panels (at the gutter end) Make sure there is a breather gap between the end of the roof sheet and the end sheet closure of roughly 8mm (purple arrow). Run silicone along the top edge of the sheet closure where it meets the top of the roof panel to stop water ingress (Yellow arrow). o CLEAR AS GLASS DOES NOT USE THESE Fit the end cap on the glazing bars (Green Arrow). You will need to lift the glazing bars up so you can get the screw driver over the gutter top to reach the end cap screw head. 10. Secure the glazing bars in place at both the wall plate and the gutter. Check the positions of the main glazing bars If you cut a measuring block earlier for the edge glazing bars use this to get the correct distance from the gutter. If not use a tape measure. Secure the main glazing bars in position by drilling the first of 2 holes and inserting that screw then repeat for the second hole and screw. If you do not follow the above and try to drill both holes first you could snap the 15 Copyright LuMac ltd 2012


.")


16 screw. 11. Secure post feet in the foundations & Make rain drainage holes in the legs. Pour Concrete mix into Supporting Post Holes covering the Supporting Post Feet with recommended 300mm cube of concrete. Make the surface good. Once installation is complete and the ground has been made good around support posts. Cut the rainwater drainage holes in Supporting Post(s). Make sure that the hole is on the correct face of the Supporting Post(s) so that the rainwater flows out of the hole in the correct direction. This hole(s) should be drilled as close as possible to the ground level This Final Step only applies if you have more than one gutter section Apply Flash-band to the internal join of the (2) Eaves/Gutters. This is to seal the join in the gutter. 16 Copyright LuMac ltd 2012

 they must have an edge strip fitted along their length.")
17 Congratulations!! You have completed the installation of your LuMac Canopy. Drop us an , or call, to let us know how it went and if there is anything we could have done differently to make your installation easier Clear as Glass Roof Panel Assembly So that the roof sheets can secure into the glazing bars (rafters) they must have an edge strip fitted along their length. (Marked by Orange arrows). Glazing bar (Blue Arrow). Make sure the end of the strips line up with the end of the roof panel The top of the roof panel is the side with the writing on it. Once these Have been they will then secure (rafters) like this: fitted to the roof sheet into the glazing bars 17 Copyright LuMac ltd 2012
18 Clear as glass panels do not have sheet end closures fitted. 18 Copyright LuMac ltd 2012

19 19 Copyright LuMac ltd 2012
20 20 Copyright LuMac ltd 2012 Care and Maintenance Your LuMac canopy will require very little care and maintenance. The metalwork is powder coated in polyester. This is very hard-wearing. The roof panels are formed in polycarbonate. This is 200 times stronger than glass and is highly impact resistant. Cleaning 1. The metalwork can be cleaned with a soft cloth and soapy water. 2. The (polycarbonate) roof panels can be cleaned: a. Gently wash sheet with a solution of mild soap and lukewarm water, using a soft, grid-free cloth or sponge to loosen any dirt or grime. b. Fresh paint splashes; grease and smeared glazing compounds can be removed easily before drying by rubbing lightly with a soft cloth using petroleum ether (BP65), hexane or heptane. Afterwards, wash the sheet using mild soap and lukewarm water. c. Scratches and minor abrasions can be minimised by using a mild automobile polish. Test on a small area of sheet before using on the entire sheet is recommended. d. Finally, thoroughly rinse with clean water to remove any cleaner residue and dry the surface with a soft cloth to prevent water spotting. Other important instructions for (polycarbonate) roof panels: 1. Never use abrasive or highly alkaline cleaner on polycarbonate materials. 2. Never use aromatic or halogenated solvents like toluene, benzene, gasoline, acetone or carbon tetrachloride on polycarbonate materials. 3. Use of in with polycarbonate sheet can cause structural and/or surface damage. 4. Contact with harsh solvents such as methyl ethyl ketone (MEK) or hydrochloric acid can result in surface degradation and possible crazing of polycarbonate sheet. 5. Never scrub with brushes, steel wool or other abrasive materials. 6. Never use squeegees, razorblades or other sharp instruments to remove deposits or spots. 7. Do not clean polycarbonate in direct sunlight or at high temperatures as this can lead to staining. 8. For all mentioned chemicals consult the manufacturers material safety data sheets for proper safety precautions.
Document: Installation Guide Guide No: 019 Description: Omega Canopy, Free-Standing, Gable-Roof, Type 1
 Page 1 of 42 Sections: Section No. Section Description Page No. 01 Essential Tools 2 02 Tools that will make Installation easier 2 03 Items to be supplied by Installer 2 04 Canopy main components 3 05
Installation and Care Instructions: Rear Windshield - CFMOTO UForce 800
 Installation and Care Instructions: Rear Windshield - CFMOTO UForce 800 *** DO NOT REMOVE PROTECTIVE LAYER FROM THE WINDSHIELD AT THIS TIME. THIS SHOULD BE YOUR LAST AND FINAL INSTALLATION STEP AS WINDSHIELD
Document: Installation Overview Guide No: 017a Description: Omega Canopy, Lean-To Style, Post-Supported, Glass-Clear Plate Polycarbonate Roof Panels
 Page 1 of 11 Sections: Section No. Section Description Page No. 01 Essential Tools 2 02 Tools that will make Installation easier 2 03 Items to be supplied by Installer 2 04 main components 3 05 Overview
TRX SERIES LIGHTBARS
 3/14/2016 TRX SERIES LIGHTBARS TRX-20 TRX-35 TRX-50 TRX-25 TRX-30 TRX-40 TRX-45 TRX-60 Product Manual TOMAR OFF-ROAD, 2100 W OBISPO AVE, GILBERT, AZ 85233 800-338-2133 www.tomaroff-road.com Wiring Main
Installation Guide Simplicity 16. V2.9 Lu171117
 0845 869 6006 www.canoports.co.uk Installation Guide Simplicity 16 V2.9 Lu171117 Tools Required Below is a list of tools that you will require to install the Simplicity 16 Canopy or Carport. Cordless Drill
Installation Guide Simplicity Alfresco. V1.9 Lu070318
 0333 305 5272 www.canoports.co.uk Installation Guide Simplicity Alfresco V1.9 Lu070318 Tools Required Below is a list of tools that you will require to install your the Simplicity Alfresco System. Cordless
Installation Guide Contemporary Alfresco V1.3 LU
 Installation Guide Contemporary Alfresco V1.3 LU 010818 Tools Required Below is a list of tools that you will require to install you're the Contemporary Alfresco System. Cordless Drill Mastic Gun Spirit
Installation Guide Simplicity 6. v3.5 lu171117
 0845 869 6006 www.canoports.co.uk Installation Guide Simplicity 6 v3.5 lu171117 Tools Required Below is a list of tools that you will require to install the Simplicity 6 Canopy or Carport. Cordless Drill
Vacant Properties Clear Boarding with SecureView
 Vacant Properties Clear Boarding with SecureView SecureView Product Data Sheet Description: SecureView is an industrial grade sheet material extruded from post-industrial grade recycled polycarbonate
Greenhouse Assembly Instructions
 Greenhouse Assembly Instructions Our Help Line provides support and advice to customers of Summer Garden Buildings after ordering. For advice before you buy you can phone us free 7 days a week on 0800
Gardman Lean-to Greenhouse Assembly Instructions
 Page 1 Gardman Lean-to Greenhouse Assembly Instructions Our Help Line provides support and advice to customers of Summer Garden Buildings after ordering. For advice before you buy you can phone us free
Titan - Double Skin Steel Partitioning. Installation Pack
 Titan - Double Skin Steel Partitioning Installation Pack Troax Lee Manufacturing Ltd. Scan me Troax Lee Manufacturing Ltd Telephone : +44 (0) 1384 277 441 Building 52, Third Avenue, Facsimilie : +44 (0)
Installation Guidelines
 Page 1 Tools You ll Need 4 ft. Carpenter s level Chalk line (to mark U channel locations) Cordless drill/nut driver Caulking gun Chop saw with a metal cutting blade on it (required to make accurate and
Wave Profile Installation Guide
 Wave Profile Installation Guide American Pa o Covers Plus Proudly Builds With Tools & Hardware Wave Profile Installation Guide Tape Measure Square Level Felt tipped Marker and/or grease pencil 3/8" Nut
Centre-fold Door. Installation Instructions. Please note: Images shown are for illustration purposes only
 Centre-fold Door Installation Instructions Please note: Images shown are for illustration purposes only Please read these instructions in full before installing. The enclosure can be installed to give
WETROOM WALK-IN TWIN ENTRANCE AWT1500 AWT1200 AWT900
 WETROOM WALK-IN TWIN ENTRANCE AWT500 AWT00 AWT900 INSTALLATION PARTS LIST 5 AF /6 IMPORTANT Before disposing of carton and/or commencing assembly, please check all the parts to ascertain that none are
INFINITE RANGE - CENTRE FOLDING DOOR
 INFINITE RANGE - CENTRE FOLDING DOOR CENTRE FOLDING DOOR ONLY ( RECESS) Please read these instructions before installing, as incorrect fitting will invalidate the guarantee-carry out each stage before
Titan Install Guides.
 Titan Install Guides http://www.troax.com/gb Contents Titan Partitioning Pages 3-10 Titan King 1 Pages 11-17 Titan SSS Handle Pages 18 Page 2 http://www.troax.com/gb Rev B 21/02/17 Titan Partition You
Dura-Lock Roof System
 DLR-14 Dura-Lock Roof System Assembly and Installation Instructions Read the instructions before starting the job. They explain the steps required to produce a finished product that will meet factory specifications.
INFINITE RANGE - HINGE DOOR
 INFINITE RANGE - HINGE DOOR HINGE DOOR + 1 SIDE RETURN PANEL (CORNER) Please read these instructions before installing, as incorrect fitting will invalidate the guarantee-carry out each stage before moving
Installation Guidelines
 Page 1 Tools You ll Need 4 ft. Carpenter s level Chalk line (to mark U channel locations) Cordless drill/nut driver Caulking gun Chop saw with a metal cutting blade on it (required to make accurate and
Curium 19H Installation Instructions & Parts List
 Curium 19H Installation Instructions & Parts List Illustration Curium 19H Right Hand Page 1 of 15 01/07/2016 Revision 2.1 IMPORTANT This shower screen / enclosure must be installed by suitably qualified
IMPORTANT!!! ASSEMBLY ASSEMBLY INSTRUCTIONS. (Internal Dimensions)
") ASSEMBLY ASSEMBLY INSTRUCTIONS (Internal Dimensions) Ent Spec Edition Ltr v-0- Overall dimensions including base: 7. L x 9 W x 0 H cms 97.5" L x 7" W x 8.7" H IMPORTANT!!! Please read these instructions
ASSEMBLY ASSEMBLY INSTRUCTIONS (Internal Dimensions) Ent Spec Edition Ltr v-0- Overall dimensions including base: 7. L x 9 W x 0 H cms 97.5" L x 7" W x 8.7" H IMPORTANT!!! Please read these instructions
St. Tropez Canopy Assembly Instructions
 Before assembly We recommend that time is taken to read the instructions before starting assembly, then follow the easy step by step guide. The instruction sheet is only a guide to the assembly. Certain
Step-by-Step Installation Instructions for
 Step-by-Step Installation Instructions for Customer helpline number: 01604 633607 8892_Step_By_Step_900_Quad_V5.indd 1 1/9/10 18:01:22 Before Starting: Please read and understand these instructions. Not
Assembly instructions
 Assembly instructions SF 55 / SF 55c SF 75 / SF 75c / SF 75H A B B C D Scope of delivery: Safety instructions: A. Top rail B. Vertical profile C. Floor rail D. Hinged panel, sliding panel Accessories pack
CORNER ENTRY ENCLOSURE
 CORNER ENTRY ENCLOSURE SUPREME INSTALLATION INSTRUCTIONS IMPORTANT - Please read before installation Please read these instructions carefully before starting installation and keep in a safe place for future
tile redi redi DOOR Redi Redi Swing Slide g TM TM...Opening Doors to Stunning Showers! TM TM SERIES: CONFIGURATION: MOUNTING PACKAGE:
 redi DOOR INSTALLATION INSTRUCTIONS tile redi Redi Redi Swing Slide g TM TM...Opening Doors to Stunning Showers! TM TM SERIES: CONFIGURATION: MOUNTING PACKAGE: 3000 Door-Door Header, sliding doors RDQCI5301
ESSENCE - H SHOWER / TUB DOOR INSTALLATION INSTRUCTIONS
 ESSENCE - H SHOWER / TUB DOOR INSTALLATION INSTRUCTIONS IMPORTANT DreamLine reserves the right to alter, modify or redesign products at any time without prior notice. For the latest up-to-date technical
Xenon 05 Installation Instructions & Parts List
 Xenon 05 Installation Instructions & Parts List Illustration Xenon 05, H1 Handle Left Hand: Open Out 26/05/2016 Revision 2.1 Page 1 of 19 IMPORTANT This shower screen / enclosure must be installed by suitably
ELEGANCE SHOWER DOOR/ENCLOSURE INSTALLATION INSTRUCTIONS. Style A Style B Style C Style D
 ELEGANCE SHOWER DOOR/ENCLOSURE INSTALLATION INSTRUCTIONS IMPORTANT DreamLine reserves the right to alter, modify or redesign products at any time without prior notice. For the latest up-to-date technical
KD Table Base Assembly and Top Attachment Instructions
 KD Table Base Assembly and Top Attachment Instructions 4011xx 5000xx 7014xx 8001xx 8206xx Congratulations on the purchase of your Tropitone furniture. Read through all steps before starting assembly. CAUTION:
Safety Glasses Safety Gloves Ladders Measuring Tape Spirit Level String Line. Tin-Snips Rivet Gun Caulking Gun Silicone Socket Set
 BEFORE YOU START Carefully read these instructions and refer to them constantly during each stage of construction. If you do not have all the necessary tools or information, contact Stratco for advice.
Basic Assembly For Conventional Series 9000 Structural Panels
 Steelcase, Inc. Grand Rapids, MI 49501 U.S.A. 1-888-783-3522 Basic Assembly For Conventional Series 9000 Structural Panels NOTE: Assembly directions for curved panels are the same as standard panels. Tools
PolyCarb has good resistance to many chemicals. Some chemicals may harm the PolyCarb sheets. Contact us when in doubt about any chemical.
 Polycarbonate Panels This manual provides the basic information for working with and installing PolyCarb sheets. Due to their hollow core, prior preparation is needed before the actual installation, with
INFINITE RANGE - CENTRE FOLDING DOOR
 INFINITE RANGE - CENTRE FOLDING DOOR CENTRE FOLDING DOOR + 2 SIDE RETURN PANELS (PENINSULA) Please read these instructions before installing, as incorrect fitting will invalidate the guarantee-carry out
SLIDING DOOR for CORNER installation ONLY - this door closes to side panel -
 by KUDOS INSTALLATION INSTRUCTIONS SLIDING DOOR for CORNER installation ONLY - this door closes to side panel - Please read these instructions throughout before installing as incorrect fitting will invalidate
ESSENCE. Shower / Tub Door Installaion Instructions
 ESSENCE Shower / Tub Door Installaion Instructions IMPORTANT DreamLine reserves the right to alter, modify or redesign products at any time without prior notice. For the latest up-to-date technical drawings,
INSTALLATION INSTRUCTIONS FRAMELESS CONTINUOUS HINGE SHOWER ENCLOSURE QCI5233
 INSTALLATION INSTRUCTIONS FRAMELESS CONTINUOUS HINGE SHOWER ENCLOSURE QCI5233 QCI5233 Rev 0 Page 1 Certified 06/20/2016 INSTALLATION NOTES: Unpack your unit carefully and inspect for freight damage. Lay
Two Panel Frameless Bypass Door
 INSTALLATION INSTRUCTIONS Two Frameless Bypass Door Series 00 Please Record Model Number From Carton Label Here Please read these instructions carefully to familiarize yourself with the required tools,
W L. Standard Sizes: 2.125m underside of gutters m total height m roof m roof m roof.
 H Standard Sizes: H 2.125m underside of gutters. 2.280m total height. L L 5.450m roof. 6.050m roof. 7.250m roof. W W 3.000m roof/2.640m between posts. 3.600m roof/3.240m between posts. 5.400m roof/5.040m
12 Wide Evolution Cedar Partition Assembly Instructions
 06/13 12 Wide Evolution Cedar Partition Assembly Instructions Contents: Introduction Base Preparation Side Assembly Glazing Door Installation Frame Finishing Section - 1 2 3 4 5 Page 3 4 5-6 7 8-9 10-14
Gallium 03 Installation Instructions & Parts List
 Gallium 03 Installation Instructions & Parts List Illustration Gallium 03, H1 Handle Left Hand: Open Out 04/05/2016 Revision 1.1 Page 1 of 19 IMPORTANT This shower screen / enclosure must be installed
GROWING BETTER THROUGH DESIGN. 6ft Lean-To LEAN-TO. Assembly Instructions 04/02
 GROWING BETTER THROUGH DESIGN 6ft Lean-To LEAN-TO Assembly Instructions 04/02 6ft Lean-To Greenhouse Base Plan Introduction/Tools/Contents / / Contents This is a copy of our Lean-To greenhouse base plan.
Curium 19.4H Installation Instructions & Parts List
 Curium 19.4H Installation Instructions & Parts List Illustration Curium 19.4H Right Hand Page 1 of 21 30/06/2016 Revision 1.0 IMPORTANT This shower screen / enclosure must be installed by suitably qualified
ClearVue Roofing System Components, Installation & Maintenance Manual
 Components, Installation & Maintenance Manual Important Installation Considerations Manual & Design, Span Table & Technical Manual also available Components CLEARVUE RAFTER BRACKETS CV-02 3 Components
VALENCIA CORNER DOOR WITH RETURN
 VALENCIA CORNER DOOR WITH RETURN INSTALLATION GUIDE SEALANT REQUIRED TO COMPLETE THIS INSTALLATION: ( not supplied) Sika Silaflex NG To seal the WHITE shower door and returns to the shower tray. Usage:
LOCKN LOAD FIRST TIME INSTALLATION
 LOCKN LOAD TM TRACK MOUNTING KIT NISSAN NAVARA D40 2004-2015 2 BAR TRACK HEAVY DUTY ROOF RACK SYSTEM MAX VEHICLE ROOF LOAD RATING: 100KG TOTAL LOAD EQUALS WEIGHT OF ROOF RACKS + ACCESSORIES + CARGO FIRST
Titan Series Awning Assembly and Installation Instructions
 Titan Series Awning Assembly and Installation Instructions Be sure to use safety glasses when assembling and installing the awning. Some metal parts may have sharp edges. Use work gloves to handle them.
Dubnium 11 Installation Instructions & Parts List
 Dubnium 11 Installation Instructions & Parts List Illustration Dubnium, H1 Handle Right Hand: Open Out Page 1 of 25 IMPORTANT This shower screen / enclosure must be installed by suitably qualified individuals.
Step-by-Step Installation Instructions for
 Step-by-Step Installation Instructions for Version 5-06/11 Before Starting: Please read and understand these instructions. Not following these instructions will invalidate your warranty (although this
The Pergola. ShadeTree Canopy Systems Assembly Instructions. ShadeTree Deluxe or Basic Pergola supported by a vinyl free-standing support structure.
 ShadeTree Canopy Systems Assembly Instructions ShadeTree Deluxe or Basic Pergola supported by a vinyl free-standing support structure. 2012 The Pergola Dear Customer: Thank you for purchasing our ShadeTree
GREENHOUSE 6'x8' ASSEMBLY INSTRUCTIONS. (Internal Dimensions) Overall Dimensions (Approx.) L 193 W 200 H cms 97.5" L 76" W 78.
 Overall Dimensions (Approx.) L 193 W 200 H cms 97.5 L 76 W 78.") ASSEMBLY INSTRUCTIONS GREENHOUSE 'x8' (Internal Dimensions) Overall Dimensions (Approx.) 7. L 9 W 00 H cms 97." L 7" W 78.8" H 0 IMPORTANT You must read these instructions carefully before you start to
ASSEMBLY INSTRUCTIONS GREENHOUSE 'x8' (Internal Dimensions) Overall Dimensions (Approx.) 7. L 9 W 00 H cms 97." L 7" W 78.8" H 0 IMPORTANT You must read these instructions carefully before you start to
Series----SP3600A SHOWER DOOR
 Series----SP3600A SHOWER DOOR INSTALLATION INSTRUCTIONS Please read these instructions carefully to familiarize yourself with the required tools, materials, and installation sequences. The Exploded Diagram
YUKON PATIO COVER INSTALLATION INSTRUCTIONS
 YUKON PATIO COVER INSTALLATION INSTRUCTIONS Before You Begin: Consult your local building department for any required permits You may be required to obtain a building permit for this structure. Contact
PRODUCT: LOKI INSTALLATION INSTRUCTIONS. Product is covered by U.S. patents. For more information visit
 R INSTALLATION INSTRUCTIONS PRODUCT: LOKI CONFIGURATION: SINGLE DOOR MOUNT: GLASS MOUNT Product is covered by U.S. patents. For more information visit www.krownlab.com . TOOLS + MATERIALS REQUIRED TOOLS
INSTALLATION INSTRUCTIONS FOR ULTRA LATTICE AND ALUMAWOOD ARBORS
 INSTALLATION INSTRUCTIONS FOR ULTRA LATTICE AND ALUMAWOOD ARBORS GENERAL INFORMATION: Lattice arbors are designed to be freestanding or attached. They are designed to resist a 10 lb. to 30 lb. per square
VALENCIA RONDO DOOR WITH RETURN
 VALENCIA RONDO DOOR WITH RETURN INSTALLATION GUIDE SEALANT REQUIRED TO COMPLETE THIS INSTALLATION: ( not supplied) Sika Silaflex NG To seal the WHITE shower door and returns to the shower tray. Usage:
MIRAGE-X / BELLA. Shower Door Installation Instructions
 MIRAGE-X / BELLA Shower Door Installation Instructions IMPORTANT DreamLine reserves the right to alter, modify or redesign products at any time without prior notice. For the latest up-to-date technical
Double Beam Freestanding Pergola Installation Guide
 Double Beam Freestanding Pergola Installation Guide Patent Pending. Copyright 2011 USAVinyl, LLC - All Rights Reserved The information contained in these instructions are proprietary to USAVinyl, LLC and
The following instructions will guide you through the installation of your new vinyl railing.
 Installation Guide St. James Vinyl T-Rail Tools Required Protective eye glasses 3/8 x 3 Concrete Anchors/Fasteners (for Tape measure concrete installations) Variable speed drill/screwdriver Philips Driver
INSTALLATION INSTRUCTIONS
 Tools required for the installation. A. Core Drill 87mm Drill bit B. Tape measure C. Spirit Level D. Marking pen E. Caulking gun F. Cutting Pliers G. Cordless Drill and Philips head bit, 5mm Drill bit.
WEAR SAFETY GLASSES WHEN INSTALLING THIS KIT.
 INSTALLATION INSTRUCTIONS Trans4mer Mounting Systems Part No. 29753 (black) Part No. 65654 (stainless) for full size GM pickups, and Blazer, Yukon, Suburban, Tahoe As you read these instructions, you will
GV Standard Sliding Over Roof Installation Instruction Manual
 GV Standard Sliding Over Roof Installation Instruction Manual Technical experts in the design, manufacture and supply of precision engineered, architectural rooflights for residential and commercial buildings.
I N S TA L L AT I O N & M A I N T E N A N C E G U I D E
 I N S TA L L AT I O N & M A I N T E N A N C E G U I D E E N V I R O B U I L D. C O M + 4 4 ( 0 ) 2 0 8 0 8 8 4 8 8 8 Version 3.2 EnviroBuild 2018 C O N T E N T S Storage & Handling 03 Tools 04 Calculating
JEEP JK ( 5 DOOR ) SLIMLINE II - FULL TRAY EXTREME RACK KIT
 SLIMLINE II - FULL TRAY EXTREME RACK KIT") JEEP JK ( 5 DOOR ) SLIMLINE II - FULL TRAY EXTREME RACK KIT FAJK001 / KRJW014T INSTALL TIME: 2.5 Hours NOTE: Your Jeep JK (5 Door) Extreme Roof Rack Kit consists of four boxes. (1) the Tray, (2) the Roll
JEEP JK ( 5 DOOR ) SLIMLINE II - FULL TRAY EXTREME RACK KIT FAJK001 / KRJW014T INSTALL TIME: 2.5 Hours NOTE: Your Jeep JK (5 Door) Extreme Roof Rack Kit consists of four boxes. (1) the Tray, (2) the Roll
CAVALIER. Shower Door Installation Instructions
 CAVALIER Shower Door Installation Instructions IMPORTANT DreamLine reserves the right to alter, modify or redesign products at any time without prior notice. For the latest up-to-date technical drawings,
Vinyl Windows and Doors
 Vinyl Windows and Doors Manufactured by Pella Corporation Installation Instructions for Replacement of Aluminum Sliding Doors in Hard Coat Stucco Applications. Part Number: V981555 2009 Pella Corporation
CITI RANGE - ASSEMBLY INSTRUCTION MANUAL. PRODUCT DESCRIPTION: CORNER WORKSTATION - SINGLE - 1 PERSON (1800 x 1500 x 750)
") CITI RANGE - ASSEMBLY INSTRUCTION MANUAL PRODUCT DESCRIPTION: CORNER WORKSTATION - SINGLE - 1 PERSON (1800 x 1500 x 750) CODE/S: CTWS1815S CITI RANGE - ASSEMBLY INSTRUCTION MANUAL IMPORTANT Please read
CITI RANGE - ASSEMBLY INSTRUCTION MANUAL PRODUCT DESCRIPTION: CORNER WORKSTATION - SINGLE - 1 PERSON (1800 x 1500 x 750) CODE/S: CTWS1815S CITI RANGE - ASSEMBLY INSTRUCTION MANUAL IMPORTANT Please read
 SUPREME WALL GARDEN ASSEMBLY INSTRUCTIONS 24/08/16 www.hallsgreenhouses.com Please refer to website for the most up to date instructions. SAFETY WARNING 1. Always wear protective glasses, shoes, gloves
SIMPLER BETTER FASTER
 SIMPLER BETTER FASTER 1. FITTING RING BEAMS DETAILS Always work anti-clockwise viewed from outside the roof. Each bar should be sequentially numbered, i.e. 1, 2, 3. Select the ring beam, position the left
Optima 450 LED Edge-Lit Single-Sided Light Box. Installation Instructions INSTALLATION INSTRUCTIONS. Figure 1. Tools you ll need
 Installation Instructions Optima 450 LED Edge-Lit Single-Sided Light Box Figure 1 INSTALLATION INSTRUCTIONS Before you begin These instructions illustrate the Stylmark Optima 450 LED Edge-Lit Single-Sided
SHOWERGLIDE 600B, 690B, 692B, SERIES
 Installation Instructions SHOWERGLIDE SERIES 600B, 60B, 6B, 6B, 65B, 67B IMPORTANT: You should check with your local plumbing or building code agency about this product for compliance before it is installed.
8 Wide Evolution Cedar Partition Assembly Instructions
 09/13 8 Wide Evolution Cedar Partition Assembly Instructions Contents: Introduction Overview Base Preparation Partition Frame Assembly Glazing Door Installation Parts List Section - 1 2 3 4 5 Page 3 4
UNIDOOR (STYLE B & C)
") UNIDOOR (STYLE B & C) SHOWER DOOR GLASS PANEL INSTALLATION INSTRUCTIONS IMPORTANT DreamLine TM reserves the right to alter, modify or redesign products at any time without prior notice. For the latest
UNIDOOR (STYLE B & C) SHOWER DOOR GLASS PANEL INSTALLATION INSTRUCTIONS IMPORTANT DreamLine TM reserves the right to alter, modify or redesign products at any time without prior notice. For the latest
Step-by-Step Installation Instructions for
 Customer helpline number: 01604 633607 8892_Step_By_Step_Corner_Door&Side_Panel_V4.indd 1 1/9/10 17:57:38 Before Starting: Please read and understand these instructions. Not following these instructions
INSTALLATION INSTRUCTIONS
 Tools required for the installation. A. Core Drill 87mm Drill bit B. Tape measure C. Spirit Level D. Marking pen E. Caulking gun F. Cutting Pliers G. Cordless Drill and Philips head bit, 5mm Drill bit.
Extension Standard building 03/15
 Extension Standard building 03/15 8 Wide Evolution Extension Assembly Instructions Contents: Introduction Base Preparation Overview Base Assembly Side Assembly Front Assembly Extension Installation Rear
B A T H R O O M G L A S S
 mistley B A T H R O O M G L A S S vaug16 Page 2 Thank you for purchasing this Trinity shower screen. Please study these instructions carefully before assembly and installation and check all supplied parts
*** All chrome surfaces should be cleaned using a clean damp cloth. *** No abrasive cleaning agents or materials should be used.
 Cleaning *** All chrome surfaces should be cleaned using a clean damp cloth. *** No abrasive cleaning agents or materials should be used. *** No chemical cleaners can be used on the glass use only mild
How to operate (folding)
") How to operate (folding) LEFT HAND STACKING OUTWARD OPENING How to operate (folding) RIGHT HAND STACKING OUTWARD OPENING LOCK BOTH LEVER HANDLE AND FLAT HANDLE UTILISING THE D-HANDLE LOCATED ABOVE THE
How to operate (folding) LEFT HAND STACKING OUTWARD OPENING How to operate (folding) RIGHT HAND STACKING OUTWARD OPENING LOCK BOTH LEVER HANDLE AND FLAT HANDLE UTILISING THE D-HANDLE LOCATED ABOVE THE
Radon 07 Installation Instructions & Parts List
 Radon 07 Installation Instructions & Parts List Illustration Radon 07, H1 Handle Right Hand: Open Out 14/06/2016 Revision 1.1 Page 1 of 21 IMPORTANT This shower screen / enclosure must be installed by
Heartland Pergola. Assembly Manual
 Heartland Pergola Assembly Manual Pergola Assembly Manual Thank you for your purchase of this Pergola This manual is designed to simplify the assembly process, however we recommend having an experienced
tile redi redi DOOR Redi Swing SERIES: CONFIGURATION: MOUNTING PACKAGE:
 redi DOOR INSTALLATION INSTRUCTIONS tile redi Redi Swing g TM TM...Opening Doors to Stunning Showers! TM TM SERIES: CONFIGURATION: MOUNTING PACKAGE: 2900V Door-Panel No header, offset pivot hinges, u-channel
ENGINEERING STRENGTH INSTAL L AT I O N M A NUAL OUR STRENGTH IS OUR STRENGTH
 ENGINEERING STRENGTH INSTAL L AT I O N M A NUAL OUR STRENGTH IS OUR STRENGTH RAFTER PREPERATION RAFTER PREPARATION A FRAME PREPERATION AND ASSEMBLY A FRAME PREPARATION AND ASSEMBLY... Open boxes, remove
Installation Guide. Frameless Sliding Door - Alcove. These instructions must be left with the user
 Frameless Sliding Door - Alcove These instructions must be left with the user Note! For instructions on installing a sliding door enclosure, please disregard this guide and refer to the guide packed with
Hinge Door + Side Panel
 Hinge Door + Side Panel Instruction Manual KL+ KR Important Information Toughened glass is completely safe for use in our shower enclosures and bath screens; providing our products are installed according
Zero Threshold TM. Hints and Tips Handbook. Birdlip. Burford. Blockley. Bourton
 Birdlip Burford Zero Threshold TM Hints and Tips Handbook Blockley www.edengreenhouses.com Bourton Customer Helpline: +44 (0)1242 676625 Mon Fri 9:00am 5:00pm mail@eden greenhouses.com EH 1.02 Dear Customer,
Sliding Door Kit
 YOU MUST READ THIS DOCUMENT BEFORE YOU BEGIN TO ASSEMBLE THE DOOR KIT. Thank you for purchasing this GrowSpan door kit. When properly assembled and maintained, this product will provide years of reliable
Frameless Quadrant Enclosure. These instructions must be left with the user. Installation Guide W2-B
 Frameless Quadrant Enclosure These instructions must be left with the user Installation Guide 1 1317134-W2-B Introduction Thank you for purchasing a quality Mira product. To enjoy the full potential of
Step-by-step Installation Guide
 Product: Resco Series Product Code: S-5000WW Installation Guide Wall to wall version. July 2017 Step-by-step Installation Guide WALL TO WALL VERSION JULY 2017 Job# 5147 Resco Series-5000 WW version. Step-by-step
AQUA ULTRA SHOWER DOOR & TUB DOOR INSTALLATION INSTRUCTIONS
 AQUA ULTRA SHOWER DOOR & TUB DOOR INSTALLATION INSTRUCTIONS IMPORTANT DreamLine TM reserves the right to alter, modify or redesign products at any time without prior notice. For the latest up-to-date technical
Pergola Installation Instructions
 Pergola Installation Instructions TOOLS REQUIRED HAMMER DRILL 1/2 MASONRY BIT PENCIL DRILL 3/16 DRILL BIT LEVEL SQUARE LADDER WRATCHET & SOCKETS RUBBER MALLET 2 TAPE MEASURE Column/Post Placement Table
SHOWER DOORS INSTALLATION INSTRUCTIONS SHOWER DOORS: LBSDD Version 4.0
 D SHOWER DOORS INSTALLATION INSTRUCTIONS SHOWER DOORS: LBSDD7279 Version 4.0 PREPARATION FOR INSTALLATION SHOWER DOORS PREPARATION FOR INSTALLATION READ ALL INSTRUCTIONS BEFORE UNPACKING THE PRODUCT 2
TRADITIONAL GABLE ATTACHED PATIO AND CARPORT. Your complete guide to building an ATTACHED Outback TRADITIONAL GABLE PATIO or CARPORT
 TRADITIONAL GABLE ATTACHED PATIO AND CARPORT STRATCO OUTBACK ASSEMBLY INSTRUCTIONS. Your complete guide to building an ATTACHED Outback TRADITIONAL GABLE PATIO or CARPORT BEFORE YOU START Carefully read
Masking: Each mirrored sheet is well protected by a durable paint backing and
 STORAGE Horizontal storage: If mirror sheets are stored flat, care must be taken to avoid warping, slipping and scratching. If different sizes are stored together the largest panels should at the bottom
INSTALLATION INSTRUCTIONS FRAMELESS CONTINUOUS HINGE SHOWER ENCLOSURE QCI5232
 INSTALLATION INSTRUCTIONS FRAMELESS CONTINUOUS HINGE SHOWER ENCLOSURE QCI5232 QCI5232 Rev 0 Page 1 Certified 06/20/2016 INSTALLATION NOTES: Unpack your unit carefully and inspect for freight damage. Lay
ENIGMA AIR ENCLOSURE
 ENIGMA AIR ENCLOSURE SHOWER ENCLOSURE INSTALLATION INSTRUCTION IMPORTANT DreamLine reserves the right to alter, modify or redesign products at any time without prior notice. For the latest up-to-date technical
31 / 39 / 59 Basin 31 / 39 / 59 Basin Frame Introduction Parts supplied - basin frame
 31 / 39 / 59 Basin US-WF0813SCW / US-WF1003SCW / US-WF1503SCW 31 / 39 / 59 Basin Frame US-WF80X81C / US-WF100X81C / US-WF150X81C Installation Instructions Introduction Parts supplied - basin frame All
WARNING. Failure to observe these instructions could lead to severe injury or death.
 INSTALLATION INSTRUCTIONS WINCH MOUNTING KIT Part Number: 80156, 80160 Application: 2008 Ford F150 Your safety, and the safety of others, is very important. To help you make informed decisions about safety,