SUNPAL. Multiwall Polycarbonate Standing Seam Architectural System
|
|
|
- Robert Lester
- 6 years ago
- Views:
Transcription

1 CONSTRUCTION ARCHITECTURE SUNPAL Multiwall Polycarbonate Standing Seam Architectural System


2 SUNPAL Multiwall Polycarbonate Standing Seam Architectural System
3 Content Introduction 2 Main Benefits 2 Applications 2 Panel Types 3 Colors 4 SUNPAL Projects Gallery 4 Typical Physical Properties 7 Thermal Insulation 7 Flammability 7 Assembly Details 7 SUNPAL Principles 8 System Components 9 Installation Data 10 Installation Guidelines 12 Typical Installation Details 14 Manufacturer s Lifetime Warranty 22 1

4 Introduction SUNPAL is an advanced multiwall polycarbonate panel system that combines proven design, light transmission, thermal insulation and strength. It offers a lightweight, leak-proof design that withstands very high loads and accommodates expansion and contraction. The system s distinct advantages make it ideal for long-term application on many types of projects. As with any true architectural glazing system, SUNPAL is appropriate for a variety of roofing and cladding designs, flat or curved. SUNPAL is a self-fastening system, based on multiwall panels, and is available in a range of thicknesses. The panels join together by polycarbonate or aluminum joiners, which are sealed at the ends by End-Caps. T-Fasteners fix the entire system to the structure, allowing the panels to be clamped in place, without any point fastener penetration through the panels. Ventilated Sealing Tape seals the panel lower end, to prevent dirt from entering the flutes, while also providing sufficient drainage. U-Profiles (polycarbonate or aluminum) or F-Profiles (aluminum) seal the upper ends of the panels. Aluminum F-Profiles finish off side edges of the plane, creating a fully framed installation. Main Benefits 99Withstands very high loads 99Accommodates expansion & contraction 99Simple & fast installation 99Leak-proof 99High thermal insulation 99Ideal for curved designs 99Double sided UV protection 99SolarSmart cool light colors Applications Architectural roofing & glazing Commercial and retail roofing Sport facilities - translucent roofing Covered walkways, awnings & entrances Open markets - light roofing Service stations - translucent roofing Parking structure covering Swimming pool covers 2
5 Panel Types SUNPAL panels are of multiwall structure, available by thicknesses of 8mm, 10mm, 18mm and 20mm. Standard SUNPAL panels have UV protection on both sides (specific order can be produced with UV protection on one side only). Maximum panel length is (typical stock length). Type Panel Data Drawing SUNPAL 8/600 Lite Width: 600mm Height: 23.5mm Height with PC-Joiner: 33mm Weight: 1.11 Kg/m, 1.83 Kg/m² Min. cold bending radius: 2.0m SUNPAL 8/600 Width: 600mm Height: 23.5mm Height with PC-Joiner: 33mm Weight: 1.24 Kg/m, 2.00 Kg/m² Min. cold bending radius: 2.0m SUNPAL 10/600 Width: 600mm Height: 25.5mm Height with PC-Joiner: 35mm Weight: 1.56 Kg/m, 2.60 Kg/m² Min. cold bending radius: 2.4m SUNPAL 18/1000 Width: 1000mm Height: 33.5mm Height with PC-Joiner: 41mm Weight: 3.11 Kg/m, 3.11 Kg/m² Min. cold bending radius: 3.0m SUNPAL 20/1000 Width: 1000mm Height: 35.5mm Height with PC-Joiner: 43mm Weight: 3.19 Kg/m, 3.19 Kg/m² Min. cold bending radius: 3.0m Scan for product video overview 3

6 Diffuser Plus Colors Color SUNPAL 8/600, 10/600 SUNPAL 18/1000, 20/1000 %LT SHGC SC %LT SHGC SC Clear Bronze White Opal White Ice Green Blue Red Solar Ice Solar Grey Solar Control Bluish Breeze Clear Bronze White Opal Green Blue Red Solar Ice Grey LT (Light Transmission) = The percentage of incident visible light that passes through an object. SHGC (Solar Heat Gain Coefficient) = The percentage of incident solar radiation transmitted by an object, which includes the direct solar transmission and the part of the solar absorption radiated inward. SC (Shading Coefficient) = The amount of the sun s heat transmitted through a given window compared with that of a standard 3mm thick single pane of glass under the same conditions. SolarSmart - Energy Efficiency SolarSmart energy-efficient tints break the traditional ratio between light transmission and shading coefficient. By blocking Infrared energy that causes heat buildup, they transmit cool light and reduce air-conditioning and lighting costs. DiffuserPlus - Double Diffusion Effect DiffuserPlus offers double diffusion which prevents both transmitted and reflected light from excessive glare. SUNPAL Project Gallery Project: Huzot Hamifratz Mall - Haifa, Israel Application: Covered Street - 3,700 sqm SUNPAL Type: 10mm Solar Control 4


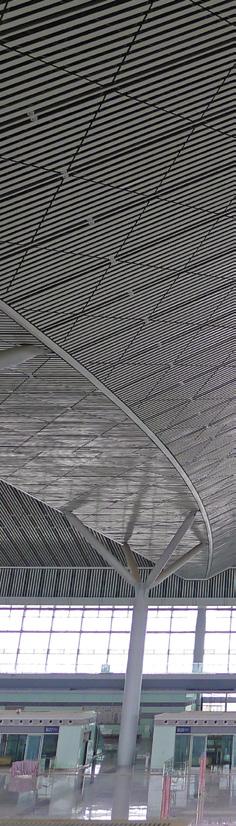
7 Project: Huizhou Olympic Sports Centre Stadium, China Architect: CCDI Application: Skylight - 6,700sqm SUNPAL Type: 10mm Clear Project: Technion Institute of Technology, Israel Application: Roof - 3,200sqm SUNPAL Type: 18mm Diffuser Plus Bronze 5


8 Project: Kelmscott Train Station, Australia Application: Sidelight SUNPAL Type: 10mm Clear Project: James Boag Brewery, Australia Application: Sidelight SUNPAL Type: 10mm Clear Project: Griffith University at Gold Coast, Australia Application: Study Pod Walling SUNPAL Type: 8mm Clear 6
9 Typical Physical Properties Property Method* Conditions Units Value Density D-792 g/cm³ 1.2 Heat deflection temperature (HDT) D-648 Load: 1.82 MP C 130 Service Temperature - Short term C -50 to +120 Service Temperature - Long term C -50 to +100 Coefficient of linear thermal expansion D-696 cm/cm C 6.5 x 10⁻⁵ Tensile strength at yield D mm/min MPa 62 Elongation at break D mm/min % >80 Impact falling dart ISO 6603/1 J Practical Thermal expansion/contraction rate mm/m 3 Coefficient of linear thermal expansion D-696 cm/cm C 6.5 x 10-⁵ *ASTM method except where noted otherwise Thermal Insulation Type U-Value [Watts /m² C] R-Value [m² C / Watt] SUNPAL Lite 8 mm SUNPAL 8 mm SUNPAL 10 mm SUNPAL 18/20 mm Flammability SUNPAL flammability classification appears in the attached table, based on a test performed by certified independent laboratories. The quoted certificate represents the flammability performance of the entire system. Method Classification* EN 135 *Depends on panel thickness. B, s1, d0 Assembly Details # Legend Panel 02 PC Joiner 03 End-Cap for PC Joiner 04 Aluminum Joiner C 05 End-Cap for Alu Joiner C 06 Aluminum Sealing Strip 07 Polycarbonate U-Profile 08 T-Fastener 2 09 T-Stopper 10 Aluminum Span-Bar Aluminum F-Profile 12 Metal Screw 6 13 Wood Screw 14 Aluminum U-Profile 8 7
10 SUNPAL Principles A SUNPAL system is primarily defined by the panel thickness. All other components are selected to match this panel. Joiners The Joiners (PC or aluminum) fit all panel types. The choice between them is usually decided by the application - PC Joiner for roofing (or any situation where the seam is external); Alu-Joiner C for cladding (hidden seam). The PC Joiner is 22mm high and 39mm wide, extruded polycarbonate colored to match the panels. Maximum length is 11990mm, with weight of 160gr/m. The PC-Joiner should overhang about 100mm beyond the last fastener. PC Joiner End-Cap for PC-Joiner is a clear acrylic cap, designed to plug the PC-Joiner ends. This end-cap prevents water and dirt from entering the joiner, it helps to reinforce the joiner ends, and provides styled appearance to the systems ends. Alu Joiner Fasteners Alu Joiner - C is 39mm wide and 54mm high, extruded aluminum with mill finish. Maximum length is 6000mm. The Alu-Joiner should overhang about 250mm beyond the last fastener. End-Cap for Alu Joiner - C is a mill-finish aluminum plate, designed to close the Alu-Joiner ends. This end-cap is fixed by inserting four screws into the joiner end face. Note: for curved applications, polycarbonate joiners can be cold-curved. Aluminum joiners have to be pre-curved. T-Fastener - SUNPAL roofing system is attached to the supporting structure by the T-Fasteners. These are stainless steel concealed clips that are fixed onto the structure with screws. The fasteners have four different sizes to match each panel type. For installing SUNPAL system onto wooden structure, the T-Fasteners are fixed with Wood Screws. For metal structure, Metal Screws are used. As standard, each fastener is fixed with two screws. T-Fastener For high wind areas, using three screws per fastener is recommended. T-Stopper (part 09) - To prevent travelling of the panels, it is recommended to fix one T-Stopper at a certain fixing point along each Joiner. This will be the only longitudinal fixed point, while all other fixings of this panel are floating, by regular T-Fasteners. It is a special T-Fastener with added stopper plate, which fits into a slit cut in the attached panels (prepared on spot). Sealing & end cap Strips The Alu Sealing Strips are mill-finished aluminum profiles in four sizes, to match each type of panel. Maximum length is 6000mm (stock length). These are used as a closure for the panels end (usually the lower), to prevent penetration of dirt end moisture, and provide efficient drainage. U-Profile is used for sealing the panel s upper end, preventing penetration of moisture and dirt. PC U-Profiles are made of polycarbonate, and have two types to suite 8mm and 10mm panels. Their maximum length is 6m (stock length). Alu Sealing Strip Alu U-Profile is an aluminum profile mill finished, with two types of sizes to suit 18mm and 20mm panels. Their maximum length is 6000mm (stock length). Alu F-Profiles are available in four sizes to match each panel type. These are aluminum profiles mill finished, with maximum length of 6000mm (stock length). The F-Profiles are used generally as a side fixing detail, also applicable for an upper-end closure. Alu Span-Bar (Per spcial request) The Alu Span Bar is an aluminum hollow bar that can be used as a rafter on a structure frame. It can be straight or curved (by pre-rolling), and designed to perform both as a rafter and a fastener (no T Bar Fasteners required in Span-Bar applications). Span-Bars come in four sizes to match each panel type, and its maximum length of 6000mm. Alu Span Bar 8
11 System Components Component Part No. (Type) Drawing Suppliance Data PC Joiner 0200 Length: 12m Colors: panel matched End-cap for PC Joiner 0300 Quantity: 200/box Colors: Natural Clear T-Fastener 0808 (8mm) 0810 (10mm) 0818 (18mm) 0820 (20mm) Quantity: 200/box Sizes: 8mm, 10mm, 18mm, 20mm Finish: Stainless T-Stopper 0908 (8mm) 0910 (10mm) 0918 (18mm) 0920 (20mm) Quantity: 50/box Sizes: 8mm, 10mm, 18mm, 20mm Finish: Stainless Wood Screw Hex-head tapping screw 5x25mm (1 ) 1500 Quantity: 500/box Metal Screw Hex-head self-drilling screw 4.8x19mm (3/4 ) 1400 Quantity: 500/box Aluminum (Solid) Tape 8mm: mm: mm & 20mm: Quantity: 50m / Roll Breather (Ventilated) Tape 8mm: mm: mm & 20mm: Quantity: 33m / Roll Aluminum Joiner - C 0400 Length: 6m Finish: Mill (Natural) End-Cap for Aluminum Joiner - C 0500 Finish: Mill (Natural) 9
12 Component Part No. (Type) Drawing Suppliance Data Aluminum Sealing Strip 0608 (8mm) 0610 (10mm) 0618 (18mm) 0620 (20mm) Length: 6m Finish: Mill (Natural) PC U-Profile 0708 (8mm) 0710 (10mm) Length: 6m Finish: Mill (Natural) Aluminum U-Profile 1618 (18mm) 1620 (20mm) Length: 6m Finish: Mill (Natural) Aluminum F-Profile 1108 (8mm) 1110 (10mm) 1118 (18mm) 1120 (20mm) Length: 6m Finish: Mill (Natural) Aluminum Span-Bar 1008 (8mm) 10 (10mm) 18 (18mm) 1020 (20mm) Length: 6m Finish: Mill (Natural) Installation Data Roof structure SUNPAL system fits for both rafter and purlin construction. The recommended minimum roof slope for SUNPAL applications is 5%. For lower slopes rafter design is recommended. Assembled System Width SUNPAL 8/600 and 10/600 SUNPAL 18/1000 and 20/ mm 1002mm 10
13 Purlin Design - Recommended spans (For wind load of 1kPa) Polycarbonate Joiner Aluminum Joiner - C Type (mm) Panel Width (mm) Mid-Span (mm) End-Span (mm) Mid-Span (mm) End-Span (mm) SUNPAL Lite 8 mm ,500 1,100 SUNPAL 8 mm ,600 1,200 SUNPAL 10 mm 600 1, ,800 1,400 SUNPAL 18/20 mm 1,000 1,350 1,000 1,800 1,400 Rafter Design - Recommended Spans (With maximum intervals of T-Fasteners along rafters for wind load of 1kPa) Polycarbonate Joiner Aluminum Joiner - C Type (mm) Rafter Centers (mm) Internal Fasteners (mm) Fasteners at Rafter Ends (mm) Internal Fasteners (mm) Fasteners at Rafter Ends (mm) SUNPAL Lite 8 mm ,500 1,100 SUNPAL 8 mm ,600 1,200 SUNPAL 10 mm 602 1, ,800 1,400 SUNPAL 18/20 mm 1,002 1,350 1,000 1,800 1,400 Notes: 1. The above spans are specified for wind loads of 1000 Pa (21 psf ) in roofing applications. For vertical or internal applications, contact your local SUNPAL distributor. 2. In curved applications, Aluminum Joiners will have to be pre-rolled, while Polycarbonate Joiners can be cold curved to the roofing radius. Maximum Spans Between Purlins Panel Type (mm) Multi-Span Single Span (mm) Mid-Span (mm) End-Span (mm) Notes: 1. When using an Aluminum Joiner rather than a Polycarbonate Joiner, span data in the above table can be increased by 5%. 2. For specific data or any other planning consultation, please contact Palram s Marketing Support department. 3. The values are based on deflection criterion of L/20 of the Polycarbonate panels. 4. The table is valid for purlin installation only. 5. The dimensions depicted do not supersede the requirements of local construction codes T-Stopper Installation B T-stopper Required notch 2mm 5.2mm 11
14 Installation Guidelines A Cut to Size B Slit for AL Sealing Strip C Remove Inner Masking D Slit for T-Stopper E T-Fastener F Fixing T-Stopper G Assemble H Assemble I Remove Outer Masking J Fix Sealing Strip K Fix Joiner End-Caps L Fix Side Flashings *Referene to the illustrations above appear in brackets in the text below. 1. Cut to size (A): Cut panels to length allowing for an overhang of no more than 100mm at each end. A penetration of minimum 50mm into the gutter is recommend. Use a circular or hand saw with fine tooth blades for easier and more precise cutting. 2. Slit for Aluminum Sealing-Strip (B): Using a small cutting disc (2mm thick), prepare 18mm deep horizontal cuts at each end of the panel teeth. This cut should be in parallel to the panel top face, but without damaging the panel surface. Since this step needs precision, it is highly recommended to perform this action at ground floor level. 12
15 3. Remove cutting chips: Use a vacuum cleaner or an air compressor with blow gun to blow out any swarf or loose particles from inside the panel. Make sure that both ends of panel are not covered with the protective film. 4. Position first panel: To achieve a symmetric installation, determine the layout of the first panel, starting at the center of the structure. Measure the structure s width, to determine using odd or even number of the prepared panels. Accordingly, mark on the support purlins the location of the middle panel or middle pair of panels. For side to side installation, set up the first panel, fitted to the side flashing at the preferred starting side. 5. Remove inner masking (C): Remove the protective film from the internal face only. Keep this side away from the roof purlins until final positioning of the panel, to avoid scratching. 6. Fix T-Stopper (D, F & G): The T-stopper s main function is to create a fix point (zero movement) for each panel. This will allow to control the direction of thermal expansion and contraction, and prevent the panels from shifting due of gravity. Fix the T-Stopper using hex head fixings provided while considering the following recommendations: Curved application: The T-stopper will be normally fixed at the peak. Roof end with no gutter: The T-stopper shall be fixed at the last purlin in order to eliminate differential movements (esthetics). Roof end with gutter: The T-stopper shall be fixed the opposite of the expansion allowance. Wall Application: The T-Stopper should be fastened at the end of the panel where thermal expansion cannot be accommodated. In this method all thermal expansion is directed to the opposite end of the panel. Proper spacing must be calculated. 7. Fix T-Fasteners (E): Along panel on remaining purlins (see span table for rafter design), place T-fasteners against panel and fix into place using hex head fixings provided (2 fixings for standard, 3 fixings for high wind areas and hurricane regions). 8. Position next panel: Remove protective film from underside of second panel and place against T fasteners. 9. Locking the two panels together (H): Using a rubber mallet, start to fix the Joiner, locking the 2 panels together by striking with short intervals (5-10cm) along the joiner. Start at the bottom end, and work your way up the roof (ensure that the joiner overhangs the panel ends by 13mm, where the aluminum sealing strip will be installed later). 10. Remove outer masking (I): Shortly after installation, peel off the protective film from the panel s external face. Delaying removal of the protective film can make it very difficult or impossible to peel off later on. On exceptionally hot days, remove top protective film immediately to prevent it from bonding with the panel. 11. Repeat steps 5 to 9 (or 11) until all panels are in place except for the external panels. 12. Determine width of end panels required. Using a circular saw (fitted with fine tooth blade) or jigsaw cut the external side panels to width. 13. Along the cut edge of the SUNPAL panel, push on the aluminum F section (cut to size) so that it is firmly secured. 14. Lift the end panel into place and repeat step 9 (or 9-11). The aluminum F section should be firmly affixed against last rafter or end of purlins (note: if fixing to metal purlins, make sure the ends of the purlins are closed off ). 15. Fix the F-Section to the rafter or end of purlin using tek screws. 16. Start installing the U-Profile at the panel top end by pushing on. It is designed to be a tight fit, so start by pushing one end on and slowly tap it until it is firmly inserted. PC U-Profile (for SUNPAL 8mm and 10mm) is to tap by hand, for Al U-Profile (SUNPAL 18mm) and 20mm) use a rubber mallet. 17. Start installing the Aluminum Sealing Strip (J) at the panel bottom end by pushing it on. It is designed to be a tight fit, so start by pushing one end on and using a mallet slowly tap it until it is firmly inserted. These sealing strips are necessary to prevent penetration of dirt end moisture. 18. Joiner End-cap fixing (K): Insert Joiner End-cap in both Joiner ends. The End-cap for PC Joiner is pushed into place. The End-cap for Aluminum Joiner is fit with screws. There is no need to use silicone sealants or adhesives of any kind. 19. Side flashings (L): These are used on both sides of the structure as fasteners as well as flashings. They are fit either for full width or cut-to-size panels. Application-specific flashings are required in some situations. End-caps should fit to these flashings on both ends. Notes: SUNPAL system does not require using silicones or adhesives for parts interface. For sealing of flashing assemblies use only PALRAM approved accessories, silicones, sealing tape, closure fixtures etc. For cleaning SUNPAL multi panels use a pressure cleaner and allow natural drying. Do not use cloth/ sponge/ chamois or similar, doing this can scratch the panels and harm their performance. 13
16 Typical Installation Details Please note: All drawings are available as CAD files from Panel 06 Aluminum Sealing Strip 11 Aluminum F-Profile 02 PC Joiner 07 PC U-Profile 12 Metal Screw 03 End-Cap for PC Joiner 08 T-Fastener 13 Wood Screw 04 Aluminum Joiner C 09 T-Stopper 14 Aluminum U-Profile 05 End-Cap for Aluminum Joiner C 10 Aluminum Span-Bar Cladding Detail 1: Cladding Base EXTERIOR 08 (09) Note: Set T-Stopper (09) at the opposite to allow for expansion at this end. 06 Metal flashing Cladding Detail 2: Cladding Base - Hidden Seams 04 Metal angle fixed to supportive structure and 04 EXTERIOR Metal flashing captures panel s base. 10mm drainage holes every 150mm 54 B A A: to match SUNPAL panel type B: to match supportive structure 14
17 Legend Panel 06 Aluminum Sealing Strip 11 Aluminum F-Profile 02 PC Joiner 07 PC U-Profile 12 Metal Screw 03 End-Cap for PC Joiner 08 T-Fastener 13 Wood Screw 04 Aluminum Joiner C 09 T-Stopper 14 Aluminum U-Profile 05 End-Cap for Aluminum Joiner C 10 Aluminum Span-Bar Cladding Detail 3: Corner Details 11 EXTERIOR EXTERIOR 11 Outside corner Inside corner Cladding Detail 4: Panels Cladding Joint 08 (09) 02 30mm minimum Expansion allowance Metal flashing 06 Note: Set T-stopper (09) at the opposite to allow for expansion at this end. 08 (09) 02 20mm minimum 15
18 Legend Panel 06 Aluminum Sealing Strip 11 Aluminum F-Profile 02 PC Joiner 07 PC U-Profile 12 Metal Screw 03 End-Cap for PC Joiner 08 T-Fastener 13 Wood Screw 04 Aluminum Joiner C 09 T-Stopper 14 Aluminum U-Profile 05 End-Cap for Aluminum Joiner C 10 Aluminum Span-Bar Cladding Detail 5: Parallel Apron Flashings EXTERIOR Metal flashing Metal flashing Whole panel Cut panel Cladding Detail 6: Parallel Apron Flashings - Hidden Seams EXTERIOR Metal flashing (by others) Metal flashing 04 Metal angle fixed to supportive structure and 04 Whole panel Cut panel 16
19 Legend Panel 06 Aluminum Sealing Strip 11 Aluminum F-Profile 02 PC Joiner 07 PC U-Profile 12 Metal Screw 03 End-Cap for PC Joiner 08 T-Fastener 13 Wood Screw 04 Aluminum Joiner C 09 T-Stopper 14 Aluminum U-Profile 05 End-Cap for Aluminum Joiner C 10 Aluminum Span-Bar Cladding Detail 7: Cladding Top Flashings EXTERIOR Metal flashing 08(09) 02 Note: Set T-stopper (09) at the opposite to allow for expansion at this end. Cladding Detail 8: Cladding Top Flashing - Hidden Seams 05 Metal angle fixed to supportive structure and 04 Expansion allowance EXTERIOR 04 17
20 Legend Panel 06 Aluminum Sealing Strip 11 Aluminum F-Profile 02 PC Joiner 07 PC U-Profile 12 Metal Screw 03 End-Cap for PC Joiner 08 T-Fastener 13 Wood Screw 04 Aluminum Joiner C 09 T-Stopper 14 Aluminum U-Profile 05 End-Cap for Aluminum Joiner C 10 Aluminum Span-Bar Roofing Detail 1: Apron Flashing Compressible foam Metal flashing Roofing Detail 2: Eave 03 max overhang allowed Gutter Note: For information on allowed overhang please refer to a) Joiners section on page 6. 18
21 Legend Panel 06 Aluminum Sealing Strip 11 Aluminum F-Profile 02 PC Joiner 07 PC U-Profile 12 Metal Screw 03 End-Cap for PC Joiner 08 T-Fastener 13 Wood Screw 04 Aluminum Joiner C 09 T-Stopper 14 Aluminum U-Profile 05 End-Cap for Aluminum Joiner C 10 Aluminum Span-Bar Roofing Detail 3: Barge Details 08 Metal flashing 11 Whole panel Cut panel Roofing Detail 4: Parallel Apron Flashing Optional cladding Optional cladding Metal flashing Metal flashing Whole panel 07 Cut panel 19
22 Legend Panel 06 Aluminum Sealing Strip 11 Aluminum F-Profile 02 PC Joiner 07 PC U-Profile 12 Metal Screw 03 End-Cap for PC Joiner 08 T-Fastener 13 Wood Screw 04 Aluminum Joiner C 09 T-Stopper 14 Aluminum U-Profile 05 End-Cap for Aluminum Joiner C 10 Aluminum Span-Bar Roofing Detail 5: Ridge Flashing Metal flashing (optional) Compressible foam Metal flashing Roofing Detail 6: Hip Flashing Compressible foam Metal flashing
23 Legend Panel 06 Aluminum Sealing Strip 11 Aluminum F-Profile 02 PC Joiner 07 PC U-Profile 12 Metal Screw 03 End-Cap for PC Joiner 08 T-Fastener 13 Wood Screw 04 Aluminum Joiner C 09 T-Stopper 14 Aluminum U-Profile 05 End-Cap for Aluminum Joiner C 10 Aluminum Span-Bar Roofing Detail 7: Valley Gutter minimum 2" between panels max overhang allowed Note: For information on allowed overhang please refer to Joiners section on page 8. Gutter Roofing Detail 8: Overlap Panels Compressible foam
24 Manufacturer s Lifetime Warranty SUNPAL panels are guaranteed for water leak-proof performance for 25 years. SUNPAL panels bear a limited lifetime warranty not to lose more than 8% of light transmission for 15 years and no more than 1% per year thereafter, when measured according to ASTM D SUNPAL panels are warranted for up to 10 years from the date of purchase not to break or fail as a result of impact by hail measuring up to 20 mm in diameter, in speed of up to 21 m/s. For detailed warranty terms please see Palram Americas website. Please note: Warranties will apply only if the panels are installed and maintained according to Palram specifications and installation instructions. All marketing materials and any content therewith provided by Palram are provided solely for the purpose of supporting and enhancing the marketing of Palram products. These materials are protected by Palram s intellectual property rights and may not be used for any other purpose or in connection with the sale of products of any other manufacturer. These materials may not be transferred to or used by any third party without prior permission of Palram. PALRAM H.Q. Tel: Fax: palram@palram.com PALRAM EUROPE LTD. Tel: Fax: sales.europe@palram.com PALRAM AMERICAS Tel: Fax: palramamericas@palram.com In as much as Palram Industries has no control over the use to which others may put the material, it does not guarantee that the same results as those described herein will be obtained. Each user of the material should make his own tests to determine the material s suitability for his own particular use. Statements concerning possible or suggested uses of the materials described herein are not to be construed as constituting a license under any Palram Industries patent covering such use or as recommendations for use of such materials in the infringement of any patent. Palram Industries or its distributors cannot be held responsible for any losses incurred through incorrect installation of the material. In accordance with our company policy of continual product development you are advised to check with your local Palram Industries supplier to ensure that you have obtained the most up to date information Palram Industries Ltd. SUNPAL is a registered trademark of Palram Industries Ltd.
SUNPAL. Multiwall Polycarbonate Standing Seam Architectural System
 CONSTRUCTION ARCHITECTURE SUNPAL Multiwall Polycarbonate Standing Seam Architectural System SUNPAL Multiwall Polycarbonate Standing Seam Architectural System Content Introduction 2 Main Benefits 2 Applications
SUNPAL. Multiwall Polycarbonate Standing Seam Architectural System
 CONSTRUCTION ARCHITECTURE SUNPAL Multiwall Polycarbonate Standing Seam Architectural System SUNPAL Multiwall Polycarbonate Standing Seam Architectural System Content Introduction 2 Main Benefits 2 Applications
SUNGLAZE. Solid Polycarbonate Standing Seam Architectural System
 CONSTRUCTION ARCHITECTURE SUNGLAZE Solid Polycarbonate Standing Seam Architectural System SUNGLAZE Solid Polycarbonate Standing Seam Architectural System Content Introduction 2 Main Benefits 2 Applications
SUNGLAZE. Solid Polycarbonate Standing Seam Architectural System
 CONSTRUCTION ARCHITECTURE SUNGLAZE Solid Polycarbonate Standing Seam Architectural System SUNGLAZE Solid Polycarbonate Standing Seam Architectural System Content Introduction 2 Main Benefits 2 Applications
3/ /
 SUNGLAZE system is designed for both rafter and purlin construction options. Recommended minimum roof slope for Sunglaze applications is 5 o. Where lower slopes are necessary, we recommend rafter construction.
SUNLITE TWIN-WALL POLYCARBONATE SHEET CATALOGUE & INSTALLATION GUIDE. Overview. Main Benefits. Energy efficiency - High thermal insulation
 SUNLITE TWIN-WALL POLYCARBONATE SHEET CATALOGUE & INSTALLATION GUIDE 1 Piece Joiner 2 Piece Joiner Overview SUNLITE twinwall sheeting combines the strength of polycarbonate with superior insulation due
SUNLITE Plus. Installation Instructions for Greenhouses. Multiwall Polycarbonate Sheet with Built-in Condensation Control
 SUNLITE Plus Multiwall Polycarbonate Sheet with Built-in Condensation Control Installation Instructions for Greenhouses www.palram.com SUNLITE Plus Contents Chapter Page Sheet Dimensions 2 Distance Between
PALDECK. Style for Life
 PALDECK Style for Life Introduction PALDECK is an innovative and durable decking board used for outdoor leisure areas. It is produced using groundbreaking technology and features high aesthetics, outstanding
DAYLIGHT HARVESTING MULTIWALL. Applications:
 DAYLIGHT HARVESTING MULTIWALL Applications: ROOFING FAÇADE INTERIOR OUTDOOR PRODUCT RANGE Tuflite Hollow & Cellular Polycarbonate Sheets: Twin Wall Triple Wall Four Wall Tuflite Multiwall Polycarbonate
PolyCarb has good resistance to many chemicals. Some chemicals may harm the PolyCarb sheets. Contact us when in doubt about any chemical.
 Polycarbonate Panels This manual provides the basic information for working with and installing PolyCarb sheets. Due to their hollow core, prior preparation is needed before the actual installation, with
extend your outdoor lifestyle
 extend your outdoor lifestyle www.laserlite.com.au Up to 50% better heat reduction than standard sheet # only Laserlite has the technology Laserlite is the only polycarbonate sheet product in Australia
AG-TUF Corrugated PVC Liner Panels
 AG-TUF Corrugated PVC Liner Panels Installation Guide A Profile Dimensions: Table 1 Distance between Corrugations Rib Depth Panel Width Number of Corrugations Coverage Overlap Overlap mm mm mm mm Corrugations
Corrugated Installation and Technical Guide
 Corrugated Installation and Technical Guide AmeriLux International, in partnership with Menards, offers high quality polycarbonate, pvc and fiberglass panels which feature the latest in product technology.
HOLLOW CORRUGATED SHEETS
 P R O D U C T C A T A L O G U E HOLLOW CORRUGATED SHEETS www.tuflite.com Bangalore (Head Office) #240/1, Ganesh Krupa, 18th Cross, Sadashivanagar, Bangalore- 560 080, India P: +91 80 4252 5252 F: +91 80
KEITH PANEL SYSTEMS FUNDERMAX- MAX EXTERIOR EXPOSED FASTENER PRESSURE EQUALIZED WALL SYSTEM
 S Y S T E M D E T A I L S FUNDERMAX- MAX EXTERIOR EXPOSED FASTENER PRESSURE EQUALIZED WALL SYSTEM PAGE TITLE PAGE Table of Contents Fundermax Max Exterior Product Information Design and Installation Information
Wave Profile Installation Guide
 Wave Profile Installation Guide American Pa o Covers Plus Proudly Builds With Tools & Hardware Wave Profile Installation Guide Tape Measure Square Level Felt tipped Marker and/or grease pencil 3/8" Nut
KEITH PANEL SYSTEMS FUNDERMAX- MAX EXTERIOR CONCEALED FASTENERS PRESSURE EQUALIZED WALL SYSTEM
 S Y S T E M D E T A I L S FUNDERMAX- MAX EXTERIOR CONCEALED FASTENERS PRESSURE EQUALIZED WALL SYSTEM PAGE TITLE PAGE Table of Contents Fundermax Max Exterior Product Information Design and Installation
SUNLITE Technical Guide
 SUNLITE Technical Guide Multiwall Polycarbonate Sheet Content Introduction 1 Product Range 1 Standard dimensions 1 Colors 2 Typical physical properties 3 Flammability 3 Chemical resistance, compatible
SUNTUF Plus. Corrugated Polycarbonate Sheet with Anti-Condensation. Greenhouse Installation Guide
 SUNTUF Plus Corrugated Polycarbonate Sheet with Anti-Condensation Greenhouse Installation Guide 61326-03.2014 Content Introduction 2 Main Benefits 2 Profile Dimensions 2 Distance Between Purlins 3 Handling
CINTRALUX ALU BARREL VAULT EP 10/10
 CINTRALUX ALU BARREL VAULT EP 10/10 Installation instructions EN 14963 Artn 43984 E_MH_Cintralux EP 10/10 mm AG.PLASTICS QUALITY 1 Installation instructions Cintralux aluminium barrel vault: Cintralux
Installation Guidelines
 Page 1 Tools You ll Need 4 ft. Carpenter s level Chalk line (to mark U channel locations) Cordless drill/nut driver Caulking gun Chop saw with a metal cutting blade on it (required to make accurate and
Installation Tips. Bayer MaterialScience Makrolon multi UV multiwall sheets. multi UV
 Installation Tips Bayer MaterialScience Makrolon multi UV multiwall sheets multi UV Makrolon multi UV multiwall sheets Tips for installing Makrolon multi UV multiwall sheets High impact-resistant including
Impack Pratama TWINWALL. A perfect combination of technology, quality and beauty.
 Impack Pratama 2000+ TWINWALL A perfect combination of technology, quality beauty. www.supremeplastics.co.nz Impack Pratama 2000+ TWINWALL Laserlite 2000+ Twinwall is a premium multi-wall polycarbonate
SUNTUF Corrugated Polycarbonate Panels
 SUNTUF Corrugated Polycarbonate Panels Installation Guide www.palramamericas.com 2 Contents About Palram Americas 1 Introduction to Suntuf 1 Transportation, Handling and Storage 2 Chemical Resistance and
AG-TUF & AG-TUF 9 Corrugated PVC Liner Panels. Installation Guide
 AG-TUF & AG-TUF 9 Corrugated PVC Liner Panels Installation Guide A Profile Dimensions: Table 1 Distance between Corrugations Rib Depth Panel Width Number of Corrugations Coverage Overlap Overlap B in.
Dura-Lock Roof System
 DLR-14 Dura-Lock Roof System Assembly and Installation Instructions Read the instructions before starting the job. They explain the steps required to produce a finished product that will meet factory specifications.
STACKING MULTI-SLIDE DOOR SYSTEM INSTALLATION INSTRUCTIONS
 STACKING MULTI-SLIDE DOOR SYSTEM INSTALLATION INSTRUCTIONS 1290363 Revision 1 12/16 Page 1 Weather Shield Mfg., Inc. NOTICE CAUTION! Failure to install and maintain our product according to these instructions
Installation Guide Simplicity 16. V2.9 Lu171117
 0845 869 6006 www.canoports.co.uk Installation Guide Simplicity 16 V2.9 Lu171117 Tools Required Below is a list of tools that you will require to install the Simplicity 16 Canopy or Carport. Cordless Drill
Design & Install Guide. The New Standard for Commercial Roof Laps. End-Lap Solution for Insulated Panel Roofing AS WEATHER RESISTANCE
 End-Lap Solution for Insulated Panel Roofing AS4046.9 WEATHER RESISTANCE The New Standard for Commercial Roof Laps SecureLap provides a solution to the troublesome sheet to sheet endlap and offers a real
INTEX Millwork Solutions SECTION EXTERIOR PVC PERGOLAS (IBC Compliant)
") SECTION 066030 EXTERIOR PVC PERGOLAS (IBC Compliant) PART 1 - GENERAL 1.1 RELATED DOCUMENTS A. Drawings and other Contract Documents, listed in the agreement between the Owner and Contractor, apply to
SECTION 066030 EXTERIOR PVC PERGOLAS (IBC Compliant) PART 1 - GENERAL 1.1 RELATED DOCUMENTS A. Drawings and other Contract Documents, listed in the agreement between the Owner and Contractor, apply to
LUX INSTALLATION GUIDE. LUX Panel V Groove Installation. Installation Guide. February
 LUX Panel V Groove Installation Installation Guide February 2017 www.luxpanel.ca LUX Panel V Groove Installation LUX panel steel cladding is designed to be installed vertically, horizontally, diagonally
SUNLITE Multiwall Polycarbonate Sheet
 SUNLITE Multiwall Polycarbonate Sheet Technical & Installation Guide www.palramamericas.com Contents Introduction 2 Light Transmission and Solar Heat Gain Coefficient 2 Insulating Properties 2 Typical
INSTALLATION GUIDE AG-TUF. Corrugated PVC Liner Panels.
 AG-TUF Corrugated PVC Liner Panels www.palramamericas.com INSTALLATION GUIDE A Profile Dimensions: Distance between Corrugations in. mm 3 76 3 76 Rib Depth Panel Width Number of Corrugations Effective
Construction details: Master-C type profiles and joints:
 Construction details: Master-C type profiles and joints: Master-C 3g 32 mm. (1 1/4 ) 1000 mm. (39 3/8 ) outer face inner face 10.5 fixing details: sealing washers shall be installed through a 2-3/8 x 1-9/16
CROSSBAR RAFTER ISOMETRIC
 Super Sky Products' typical glazing system consists of glass panels or "lites" which are attached to the main framing members using extruded aluminum "retainers" or "pressure plates". These retainers are
10 YEAR GUARANTEE. Vistalux corrugated sheeting is the ideal general purpose PVC sheet for roofing and cladding PVC SHEET WITH HIGH LIGHT TRANSMISSION
 INSTALLATION GUIDE ECONOMICAL PVC SHEET WITH HIGH LIGHT TRANSMISSION 10 YEAR GUARANTEE Vistalux corrugated sheeting is the ideal general purpose PVC sheet for roofing and cladding Economic, lightweight
Curium 19H Installation Instructions & Parts List
 Curium 19H Installation Instructions & Parts List Illustration Curium 19H Right Hand Page 1 of 15 01/07/2016 Revision 2.1 IMPORTANT This shower screen / enclosure must be installed by suitably qualified
extend your outdoor lifestyle
 extend your outdoor lifestyle www.laserlite.com.au Up to 50% better heat reduction than standard sheet # only Laserlite has the technology Laserlite is the only polycarbonate sheet product in Australia
Multi-wall Polycarbonate Installation Instructions
 Multi-wall Polycarbonate Installation Instructions Multi-wall polycarbonate sheet can be used on both gable and arched style greenhouses. These easy to install panels can be attached directly to the greenhouse
DUTCH GABLE FREESTANDING CARPORT
 DUTCH GABLE FREESTANDING CARPORT STRATCO OUTBACK ASSEMBLY INSTRUCTIONS. Your complete guide to building a FREESTANDING Outback DUTCH GABLE CARPORT BEFORE YOU START Carefully read these instructions. If
40mm Thermoclick. Type II Class 1 Clear Satin Anodize - 201R1 (Mid Grade Commercial)
") http://www.sundancesupply.com 40mm Thermoclick Type II Class 1 Clear Satin Anodize - 201R1 (Mid Grade Commercial) U-Profile 12' Lengths $39 Out System offers a complete set of extrusions and accessories
http://www.sundancesupply.com 40mm Thermoclick Type II Class 1 Clear Satin Anodize - 201R1 (Mid Grade Commercial) U-Profile 12' Lengths $39 Out System offers a complete set of extrusions and accessories
TRIM-KLIP INNOVATIVE END/EXPANSION JOINT SOLUTION FOR LYSAGHT TRIMDEK
 TRIM-KLIP INNOVATIVE END/EXPANSION JOINT SOLUTION FOR LYSAGHT TRIMDEK LYSAGHT TRIM-KLIP The new TRIM-KLIP system provides installers with a quick and easy end joint/expansion joint solution between overlapping
LIFE TIME. polycarbonate sheeting
 LIFE TIME polycarbonate sheeting blocks Enjoy the freedom of outdoor living safe from UV danger Solasafe polycarbonate sheeting provides 99.9% protection from harmful UV rays that cause sunburn and skin
Five Star Panel Installation Instructions
 Five Star Panel Installation Instructions How to Store Five Star Panels You will need to store FIVE STAR PANELS in dry place to prevent staining, deterioration and possibly void all warranties. Stand the
DESIGNER SERIES GUTTER SYSTEM INSTALLATION INSTRUCTIONS
 DESIGNER SERIES GUTTER SYSTEM INSTALLATION INSTRUCTIONS GENERAL DESCRIPTION: The Designer Series Gutter System is a specially designed roof edge drainage product for industrial, commercial, and high end
for Rigid Sun Lite Planning the layout
 for Rigid Sun Lite These instructions refer to installations on a flat and pitched roof. Various roof flashing units are available according to the particular roof covering. The roof flashing will be boxed
Global Roofing Solutions Klip-Tite
 GRS Klip-Tite Global Roofing Solutions Klip-Tite www.globalroofs.co.za marketing@globalroofs.co.za GRS Klip-Tite GRS Klip-Tite 09/18 Typical Specification Materials The roofing shall be Klip-Tite profile,
Building With Polycarbonate 101
 Building With Polycarbonate 101 Presented by The Polycarbonate Store A division of Charley s Greenhouse & Garden We make building easy! Multi-Wall Polycarbonate Insulated for lower heating cost Nearly
SUNLITE. Technical Guide. Multiwall Polycarbonate Sheet.
 SUNLITE Multiwall Polycarbonate Sheet Technical Guide www.palram.com SUNLITE Contents Chapter Page Introduction 2 Standard dimensions 2 Colors & light transmissions 2 Typical physical properties 2 Flammability
SunTrackerTwo Preparation
 TOLL FREE:(888)29-2705 FAX:(941)77-9460 info@eco-smart.com SunTrackerTwo Preparation Cutting Holes and Preparing Curbs T.G.I Or Truss CIRALIGHT INSTALLATION MANUAL Page 1 Cutting Holes and Preparing Curbs
Installation Guide. Step 3. Valley Flashing. Step 7. Transition Flashings and Accessories. Step 6. Hip and Ridge Installation
 Step 7. Transition s and Accessories Step 3. Valley Step 6. Hip and Ridge Installation Step 2. Rake Trim Step 5. Installing the Shingles Step 1. Eave Starter Installation Step 4. Endwall s Installation
SpeedDeck. Fixing and Handling Guide
 SpeedDeck Section 1 Delivery/Storing On Site/Handling l SpeedDeck is factory or on-site manufactured. l Straight SpeedDeck bundles are a maximum 1 tonne, sheets nestled and banded with polypropylene or
SolarMount (E)volution
volution") SolarMount (E)volution SOLARMOUNT (E)VOLUTION: THE BEST JUST GOT BETTER. Engineering, Excellence, and Ease. Performance Engineered for versatility and reduced installation time, SolarMount (E)volution
SolarMount (E)volution SOLARMOUNT (E)VOLUTION: THE BEST JUST GOT BETTER. Engineering, Excellence, and Ease. Performance Engineered for versatility and reduced installation time, SolarMount (E)volution
Series Sloped glazed Curtain wall. Installation Instructions
 Series 5600 Sloped glazed Curtain wall Installation Instructions Part NO. Y308 February 2013 SECTION TABLE OF CONTENTS PAGE I. General Notes & Guidelines. 3-4 II. Gutter and Mullion Assembly.. 5 III. End
ULTRA WINDOW & DOOR EXPANDERS AND RECEIVERS INSTALLATION INSTRUCTIONS
 ULTRA WINDOW & DOOR S AND RECEIVERS INSTALLATION INSTRUCTIONS! CAUTION: *REMEMBER SAFETY FIRST* Proper Eye and! Hearing Protection must always be worn during installation of all window and door products.
GLOSSARY OF TERMS SECTION 8
 GLOSSARY OF TERMS SECTION 8 Anchor Bolt Angle Base Plate Bay Blocking CCB Centerline Chord Cladding Clip Closure Strip An A-307 steel bolt embedded in the concrete footing to anchor the base plate of the
Corrugated Sheet. Installation Instructions
 Corrugated Sheet Installation Instructions corrugated sheets are installed with an overlap, whenever the opening is greater than the width of the sheet (ie., approx. 41 (1045 mm) for the IMPACT WP3 76/18)
ENGINEERING STRENGTH INSTAL L AT I O N M A NUAL OUR STRENGTH IS OUR STRENGTH
 ENGINEERING STRENGTH INSTAL L AT I O N M A NUAL OUR STRENGTH IS OUR STRENGTH RAFTER PREPERATION RAFTER PREPARATION A FRAME PREPERATION AND ASSEMBLY A FRAME PREPARATION AND ASSEMBLY... Open boxes, remove
ClearVue Roofing System Technical Manual
 Technical Manual Components CLEARVUE RAFTER BRACKETS CV-02 2 Components CLEARVUE EXTRUSIONS CV-03 3 Components END PLATES - 6mm SHEET CV-04 4 Components END PLATES - 8mm SHEET CV-05 5 Components MECHANICAL
CONTENTS OVERVIEW. For a complete set of CAD drawing details, please visit LaminatorsInc.com. 1 Essential Equipment. 1 Essential Supplies
 LaminatorsInc.com CONTENTS 1 Essential Equipment 1 Essential Supplies 2 Panel Preparation 4 Panel Extrusion Preparation 5 Panel Assembly 6 Wall Sheathing Preparation (Over Plywood) 6 Wall Sheathing Preparation
Installation Guide (888)
") BamDeck Installation Guide (888) 788-2254 The Collection Decking Systems BAMDECK 4G 5-7/16 Wide Plank Dims: 192 L x 5-7/16 W x 13/16 H BAMDECK 4G WIDE 8-1/4 Wide Plank Dims: 96 L x 8-1/4 W x 13/16 H BAMDECK
BamDeck Installation Guide (888) 788-2254 The Collection Decking Systems BAMDECK 4G 5-7/16 Wide Plank Dims: 192 L x 5-7/16 W x 13/16 H BAMDECK 4G WIDE 8-1/4 Wide Plank Dims: 96 L x 8-1/4 W x 13/16 H BAMDECK
Global Roofing Solutions Klip-Lok 406 Aluminium
 GRS Klip-Lok 406 Global Roofing Solutions Klip-Lok 406 Aluminium www.globalroofs.co.za marketing@globalroofs.co.za GRS Klip-Lok 406 GRS Klip-Lok 406 Alum. 09/18 Typical Specification Materials The roofing
isd dunaferr Product catalogue
 isd dunaferr Product catalogue HOT-DIP GALVANIZED PRODUCTS The base material of hot-dip galvanizing is cold rolled wide coil. Metal coating is performed in course of continuous hot-dip galvanizing Sendzimir
SANERI 3 º. Self-adhesive SBS-elastomer bitumen cap sheet
 SANERI 3 º Self-adhesive SBS-elastomer bitumen cap sheet 0809 www.katepal.fi 06 EN 13707 Producer: KATEPAL OY P. O. Box 33 FI-37501 LEMPÄÄLÄ FINLAND Tel. +358 (0)3 375 9111 Fax +358 (0)3 375 0974 E-mail:
This installation guide has been created to assist in constructing a Liniar conservatory roof from a kit format.
 1.00 - Introduction This installation guide has been created to assist in constructing a Liniar conservatory roof from a kit format. Please note, each roof has been individually designed to meet specific
Curium 19.4H Installation Instructions & Parts List
 Curium 19.4H Installation Instructions & Parts List Illustration Curium 19.4H Right Hand Page 1 of 21 30/06/2016 Revision 1.0 IMPORTANT This shower screen / enclosure must be installed by suitably qualified
INSTALLATION MANUAL STORAGE
 IMVersion 1.1 INSTALLATION MANUAL GENERAL GUIDE: The information in this IM is intended to serve as a general guide to proper installation with no warranties intended or implied. Prime Panels assumes no
Intex Engineered Pergola System Installation Instructions. NOTE: See Appendix for Foundation Requirements
 Intex Engineered Pergola System Installation Instructions NOTE: See Appendix for Foundation Requirements Pergola Installation, Freestanding (If pergola will be attached-to-structure, skip to page 3) 1.
Pocket Door Installation Instructions
 Installation Instructions Before getting started: Read instructions thoroughly. Be sure that you have the necessary tools and materials before starting the installation. Consult your local building code
CURVED ROOF ASSEMBLY INSTRUCTIONS ATTACHED VERANDAH. Your supplementary guide to building an ATTACHED CURVED ROOF VERANDAH or PATIO BEFORE YOU START
 ROOF ATTACHED VERANDAH ASSEMBLY INSTRUCTIONS Your supplementary guide to building an ATTACHED ROOF VERANDAH or PATIO This set of instructions should be used in conjunction with the Stratco instruction
lindab we simplify construction LindabSandwichPanels Installation instructions PIR Panels
 lindab we simplify construction LindabSandwichPanels Installation instructions PIR Panels Assembly instructions Before you start Check that the panel support structures are level. Position the packages
Sign & Display Products Portfolio Bring Your Colors To Life
 Sign & Display Products Portfolio Bring Your Colors To Life About Palram For over 50 years Palram has been a global leader in manufacturing extruded thermoplastic sheets. This production and application
Multi-layer Insulation Blanket for
 Data Sheet for Fitting Superquilt Under or over Rafters to Roofs To Order Superquilt direct at Lowest prices in the UK or Europe UK Customers Call 0844 9919949 From outside the UK Call 0044 1143230474
To Order Superquilt direct at Lowest prices in the UK or Europe UK Customers Call From outside the UK Call
 Data Sheet for Fitting Superquilt Under or over Rafters to Roofs To Order Superquilt direct at Lowest prices in the UK or Europe UK Customers Call 0844 9919949 From outside the UK Call 0044 1143230474
INSTRUCTION GUIDE SANCTUARY CANOPY. C & A SUPPLIES LTD, Bidder Street, London E16 4ST tel: WEB:
 INSTRUCTION GUIDE SANCTUARY CANOPY 1. Add gasket to wall plate 2. Drill holes in wall plate along the two rib lines The first pair of holes should be 25mm from the edge and then spaced every 525mm along
Care Instruction: Wash vehicle roof prior to installing Rhino Tracks.
 Important: Please read these instructions carefully prior to installation. Please refer to your fitting instruction to ensure that the roof racks are installed in the correct locations. Check the contents
Polytegola N. Bitumen Roof shingles. Application guide
 Polytegola N Bitumen Roof shingles Application guide Application manual POLYTEGOLA N CONTENT 1. Foreword - General conditions 3 2. POLYTEGOLA N designs 4 3. Roof pitches 5 4. Storage 5 5. Roof decking
Global Roofing Solutions Klip-Lok 700
 GRS Klip-Lok 700 Global Roofing Solutions Klip-Lok 700 www.globalroofs.co.za marketing@globalroofs.co.za GRS Klip-Lok 700 GRS Klip-Lok 700 09/18 Typical Specification Materials The roofing shall be Klip-Lok
KS SERIES - VERTICAL INSTALLATION
 CS-DS-01-KSV CS DISCLAIMER CS-PJ-01-KSV KS42SL EXPANDED PANEL JOINT CS-PJ-02-KSV KS42SL ENGAGED PANEL JOINT CS-PJ-03-KSV KS45SL EXPANDED PANEL JOINT CS-PJ-04-KSV KS45 FLAT ENGAGED PANEL JOINT CS-PJ-05-KSV
Klip-Lok 406 Aluminium
 Klip-Lok 406 Alumin GRS Klip-Lok 406 Global Roofing Solutions TM Klip-Lok 406 Aluminium Talk to THE SMART ROOF PEOPLE Visit www.globalroofs.co.za or email info@globalroofs.co.za GRS Klip-Lok 406 GRS Klip-Lok
Dubnium 11 Installation Instructions & Parts List
 Dubnium 11 Installation Instructions & Parts List Illustration Dubnium, H1 Handle Right Hand: Open Out Page 1 of 25 IMPORTANT This shower screen / enclosure must be installed by suitably qualified individuals.
Installation Guide. Guardian Slate Roof System. England, Scotland & Wales
 Installation Guide Guardian Slate Roof System England, Scotland & Wales March 2016 Product Information Construction: Manufactured from resin bonded crushed limestone Size (slate): 445 x 294mm (ridgecap):
*** All chrome surfaces should be cleaned using a clean damp cloth. *** No abrasive cleaning agents or materials should be used.
 Cleaning *** All chrome surfaces should be cleaned using a clean damp cloth. *** No abrasive cleaning agents or materials should be used. *** No chemical cleaners can be used on the glass use only mild
Safety Glasses Safety Gloves Ladders Measuring Tape Spirit Level String Line. Tin-Snips Rivet Gun Caulking Gun Silicone Socket Set
 BEFORE YOU START Carefully read these instructions and refer to them constantly during each stage of construction. If you do not have all the necessary tools or information, contact Stratco for advice.
Installation Guide Simplicity Alfresco. V1.9 Lu070318
 0333 305 5272 www.canoports.co.uk Installation Guide Simplicity Alfresco V1.9 Lu070318 Tools Required Below is a list of tools that you will require to install your the Simplicity Alfresco System. Cordless
Installation Manual. Last Updated 4 February, Postal PO Box 932 Bayswater VIC
 Installation Manual Last Updated 4 February, 2013 Part 1: Provided Material The Panel Expandable Foam Sealing Strip Barge Capping Z-Fascia Structural Screws Timber: 3/8 head size Metal: 5/16 head size
for Flexi Sun Lite Planning the layout
 for Flexi Sun Lite These instructions refer to installations on a flat and pitched roof. Various roof flashing units are available according to the particular roof covering. The roof flashing will be boxed
Instructions for Installation on a Pitched Roof LIGHTWAY optical tube LW 260, LW 320, LW 520, LW 760
 Lightway, s.r.o. Registered office: Ledvinova 1714, 149 00 Praha 4 Offices: Za Humny 1054/4a, 161 00 Praha 6 tel.: 235 300 694, fax: 235 300 218 Company ID No.: 63669366, Tax ID No.: CZ63669366 Bank: KB
Gallium 03 Installation Instructions & Parts List
 Gallium 03 Installation Instructions & Parts List Illustration Gallium 03, H1 Handle Left Hand: Open Out 04/05/2016 Revision 1.1 Page 1 of 19 IMPORTANT This shower screen / enclosure must be installed
Care Instruction: Wash vehicle roof prior to installing Rhino Tracks.
 Important: Please read these instructions carefully prior to installation. Please refer to your fitting instruction to ensure that the roof racks are installed in the correct locations. Check the contents
COMPOSITE SIDING INSTALLATION GUIDE
 CENTURY HOME LIVING COMPOSITE SIDING INSTALLATION GUIDE Read all instructions prior to installing any siding product. Failure to install and finish this product in accordance with all local building codes,
GIRTS ON BACK OF BUILDING
 GIRTS ON BACK OF BUILDING ALL GIRTS ARE 1 1/2 SQUARE TUBE. GIRT LENGTHS FOR 12, 20, 24, AND 30 WIDE BUILDINGS: ON 12 WIDE BUILDINGS GIRTS ARE 67 3/4 LONG ON 20 WIDE BUILDINGS GIRTS ARE 56 3/4 LONG ON 24
GSE INTEGRATION INSTALLATION MANUAL For photo-voltaic systems partially covering the roof
 GSE INTEGRATION INSTALLATION MANUAL For photo-voltaic systems partially covering the roof V 7.5 WWW.GSEINTEGRATION.COM Contents STEP BY STEP Presentation of system p.4 Contents of kit p.5 GSE Integration
Radon 07 Installation Instructions & Parts List
 Radon 07 Installation Instructions & Parts List Illustration Radon 07, H1 Handle Right Hand: Open Out 14/06/2016 Revision 1.1 Page 1 of 21 IMPORTANT This shower screen / enclosure must be installed by
DYNEX SOFFIT SYSTEM. Product. Scope. Building Regulations. Appraisal No. 908 [2016] Appraisal No. 908 (2016) BRANZ Appraisals
![DYNEX SOFFIT SYSTEM. Product. Scope. Building Regulations. Appraisal No. 908 [2016] Appraisal No. 908 (2016) BRANZ Appraisals](/thumbs/80/82189805.jpg "DYNEX SOFFIT SYSTEM. Product. Scope. Building Regulations. Appraisal No. 908 [2016] Appraisal No. 908 (2016) BRANZ Appraisals") DYNEX SOFFIT SYSTEM BRANZ Appraisals Technical Assessments of products for building and construction. Dynex Extrusions Limited PO Box 19-133 Avondale Auckland Tel: 09 828 2800 Fax: 09 828 2801 Web: www.dynex.co.nz
DYNEX SOFFIT SYSTEM BRANZ Appraisals Technical Assessments of products for building and construction. Dynex Extrusions Limited PO Box 19-133 Avondale Auckland Tel: 09 828 2800 Fax: 09 828 2801 Web: www.dynex.co.nz
Skypod. Pitched PVC-U skylights. Installation guide PITCHED PVC-U SKYLIGHTS ISSUE 1
 Skypod Pitched PVC-U skylights PITCHED PVC-U SKYLIGHTS Installation guide ISSUE 1 Skypod pitched PVC-U skylights Installation guide Contents 1. Surveying 3 2. Installation 4 3. Additional information 10
Santa Fe Cover INSTALLATION GUIDE. Alumawood TM Newport with MAXX Panel TM Installation Guide
 Alumawood TM Newport with MAXX Panel TM Installation Guide Santa Fe Cover INSTALLATION GUIDE Whatever the weather, you can enjoy the sophisticated charm of a lattice cover. The Santa Whatever the weather,
Series 1100 Aluminum Door Canopy
 Series 00 Aluminum Door Canopy with Support Arms It is our recommendation that you read instructions carefully prior to assembly and installation. Series 00 with Support Arms MOUNTING BAR (A) TOP TRIM
Global Roofing Solutions Klip-Tite
 GRS Klip-Tite Global Roofing Solutions Klip-Tite Talk to us, THE SMART ROOF PEOPLE Visit www.globalroofs.co.za or email info@globalroofs.co.za GRS Klip-Tite Typical specification Materials The roofing
Revision Date: April 01, Paramount Enclosure
 Paramount Enclosure www.urbanindustries.com 15 Urban Industries, Inc. 2008 Tools The following tools are recommended for the installation of the Paramount Aluminum Enclosure and roof. 1 2 Level 1 4 Level