VISUAL GUIDE MANUAL DRO INSTALLATION ON LATHE / TURNING MACHINE. By ebay ID: TheDroStore
|
|
|
- Claribel Posy West
- 5 years ago
- Views:
Transcription

1 VISUAL GUIDE MANUAL DRO INSTALLATION ON LATHE / TURNING MACHINE By ebay: TheDroStore info@thedrostore.com
2 1 2. Basic Installation Principles scale should be centered and be aligned such that it could cover the whole travel length of the machine. If in any case it does not cover the whole travel length, it is advisable to install a screw to limit the travel so that the scale will not be accidentally damaged by over-traveling. The preferred method is to mount the scale to the moving axis and the reader head to stationary axis, this is to prevent cable from wear and tear during operation. Normally it can be done for X axis, but Y axis, most of the time the reader head will be on the moving axis. 3 You can install the scale facing downwards /outwards, but it should not be install upside down, as it will expose the scale to coolant or metal chips
3 You can mount the Z axis in various configuration as shown in the following pictures.

4 Z axis installation BEFORE AFTER


5 Z1. Dismantle the 8 screws from the Red plastic securing the reader head. Remove screws from the Red Plastic


6 Z2. Dismantle the Rear Cover (if your lathe has it)

7 Z3. Move the saddle to the extreme left (close to the spindle)


8 Z4. Plan the mounting of the Reader Head, this also determine where you mount the scale. Use a scriber to mark the bottom bracket. This is where the Reader head is resting.

9 Z5. Placed the Scale with the reader head above the marked line.


10 Z6. Use the bracket as a guide, adjust the scale left and right to make sure that there is enough space for it to move to the extreme. Once satisfied, use the scriber to make a marking.


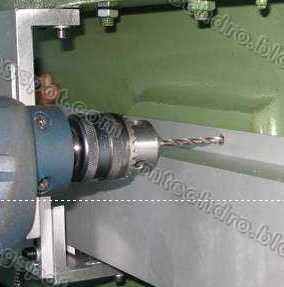
11 Z7. Drill and Tap holes for the scale mounting Drill Tap


12 Z8. Use the mounting Blocks if there are uneven surface or obstruction. Tighten the scale with the screw. Surface protruding, so we need to use blocks to elevate the scale


13 Z9. Keep the scale horizontal, if you are alone, use something to support the other end.

14 Z10. We are going to make the scale roughly aligned. Use a Vernier to measure from a reference point (e.g. the rail) to the scale.


15 Z11. Using the same distance on the vernier, align the other end of the scale. Now the scale will be roughly aligned. Mark with a scriber.

16 Z12. Drill and Tap Hole for the scale mounting

17 Z13. Screw with the mounting block in place.


18 Z14. Check with the vernier again for parallel alignment. Adjust if required. This is just a rough alignment, we will do the fine tune shortly. REAR FRONT

19 Z15. Mark the 2 slot for the bracket mounting

20 Z16. Drill and Tap 2 holes to hold the bracket

21 Z17. Put 2 Dial Indicator at the end and set it to zero. One for checking flatness, the other for check levelness


22 Z18. Move the Z axis to the other end and check how much is the misalignment. Adjust the flatness and levelness to achieve zero error and tighten the screw. (Recommended error to be within 0.020mm).


23 Z19. Adjust the flatness by adding shim to reduce the error. ADD SHIM


24 Z20. Adjust the levelness by adjusting the scale up and down.


25 Z21. Install the bracket


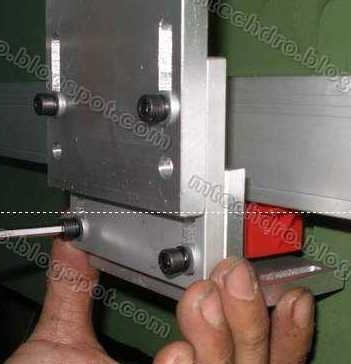
26 Z22. Tighten the Reader Head to the bracket. Make sure the reader head is align to the scale body


27 Z23. Adjust the height of the reader head. Visually check the Red Plastic should fill the gap nicely. The red pastic must also be able to move in and out without difficulty. Tighten the Reader Head and check the gap again. Move in and out Push up and press against the red plastic

28 Z24. Z scale is installed


29 Z25. Now we install the Z cover. Put the cover on and make sure it cover the whole scale. Make sure the cover does not touch the bracket.


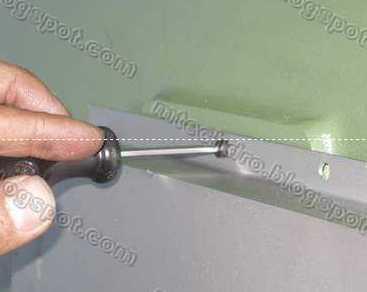
30 Z26. Drill and Tap and screw REAR FRONT

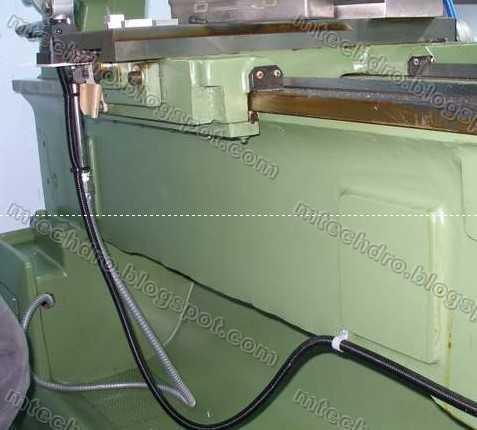
31 Z27. Move the Z axis to the extreme end and check the correct cable length

32 Z28. Tie cable-tie to arrange the cable nicely and prevent entanglement. (Reader Head Area)

33 Z29. Tie cable-tie to arrange the cable nicely and prevent entanglement. (Travel area)


34 Z30. Travel to both end to make sure the cable lag is enough for the complete travel and that there is no entanglement Move to Rear Move to Front
35 Z31. Z axis installation completed


36 X1. For X axis installation, sometimes the lamp or coolant pipe may be a obstruction. So we need to dismantle them and re-locate them to a suitable place. COOLANT PIPE LAMP


37 X2. We need to rotate the Tool post away to make some space for installation. We need to loosen the 3 screws. Loosen the 3 screws

38 X3. Rotate the Tool post away
")
39 X4. Remove the gease if they are present (especially in new machine) GREASE


40 X5. Unscrew 4 screws to remove cover from X mounting bar (if available)


41 X6. Placed the mounting bar and check with the cover to make sure they are not too tall to obstruct the tool post. Check that it does not obstruct the tool post


42 X7. Mark the 2 slot with a scribbler


43 X8. Drill and Tap 2 holes Drill Tap


44 X9. Tighten the screw lightly, so we can make some adjustment


45 X10. Mount the cover and check that the height is in-line with the saddle. Tighten the mount screws.


46 X11. Remove the screws from the Red plastic, leave behind the long plastic for checking the gap later. Remove the screws Keep the long plastic for checking gap


47 X12. Mount the scale with screws


48 X13. Check the alignment of the scale with a Dial indicator. Set it to zero at one end and move it to the other end.


49 X14. Adjust the scale height until the dial indicator is zero. (Recommended error to be within 0.020mm).

.")
50 X15. Check and adjust the scale flatness until the dial indicator is zero. (Recommended error to be within 0.020mm). Set dial to zero Move to the other end


51 X16. Decide how and where to mount the reader head. Check that it can accommodate the whole transverse length. Check the position allows for full travel length Check location of bracket


52 X17. Mark the slot position using a scribbler

53 X18. Drill and Tap 2 holes for the bracket.

54 X19. Mount the block and tighten the screw

55 X20. Make sure the block does not rub against the moving slide Make sure it does not rub against the slide

56 X21. If the surface the block is resting is not flat, you must add some pecking/washer to make it flat.

57 X22. Using the reader head holes as a guide, mark the holes with a scribber

58 X23. Drill and Tap 2 holes for tightening the reader head.

59 X24. Mount the reader and tighten the screws

60 X25. Check that the reader head is in-line with the scale. Use your thumb to feel that it is in-line or not.


61 X26. If it is not in-line, we have to add shim to make it flat. Check for flatness. Tighten the screws while pushing it upwards against the red plastic. This is to get the gap between reader head and scale correct. Push upwards and tighten screws Check flatness

62 X27. Check the gap, the red plastic must also be able to move in and out without difficulty.

63 X28. Put some silicon glue on the bar, so that it will make the sealing more resistance to coolant and prolong the working life.

64 X29. Put the cover and tighten all the 4 screws (shown by arrow)

65 X30. Drill and Tap hole for holding the cable

66 X31. Use the cable holder to keep the cable in place


67 X32. Re-install the lamp and the coolant pipe so that it does not obstruct the scales


68 X33. If your lathe has a tail-stock, make a stopper to prevent it from hitting the scale. Drill and Tap a hole in a position that can block the tail-stock If you have a tailstock, add a screw to protect the scale. Screw must be longer then the scale height, so it will stop the tail stock from hitting the scale
69 X34. X scale installation completed
70 DRO installation


71 D1. Decide where to install the DRO Arm. Adjust the position and mark the 2 holes using a scriber. Mark the hole using a scriber

72 D2. Drill and Tap the 2 mounting holes

73 D3. Attach the Earth cable to one of the screws. Tighten the 2 screws

74 D4. Tighten the 4 leveling screws to make sure the Arm is straight.


75 D5. Attach the swivel arm to the base

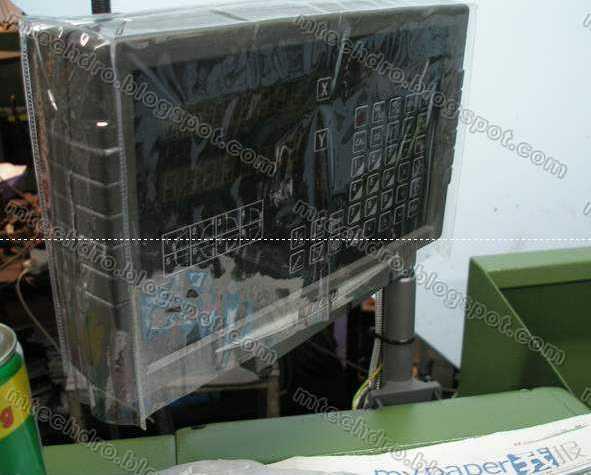
76 D6. Tighten the DRO to the base plate with the 4 screws

77 D7. Adjust the tilting angle and tighten the screw


78 D8. Tighten all the screws on the arm

79 D9. Attach the other end of the Earth cable to the DRO
80 D10. The mtech DRO accept 100~240Vac and there are normally 2 ways to connect the power to the DRO. a) If there is a power socket on your machine, you can plug in directly. b) If there is NO power socket, you need to check if the electrical cabinet has any suitable source of electric supply. (Normally, we can get it from the transformer.) c) You can also connect it to any external power source independent of the machine. (e.g. your wall socket).

81 D11. Check if the electric supply on the transformer is suitable. We will connect to 110Vac (1 wire will go 110V and the other wire will go to 0V


82 D12. Drill a hole for the power cable. Pull the power cable through. Add a cable-tie, so that it will prevent the cable from being pulled.
.")
83 D13. Power OFF the machine. Then connect the cables. (the black cable to 110V and the white cable to 0V). It is advisable to connect the green cable to Earth/Ground.


84 D14. Connect the Power cable, Scales connector and Earth cable.

85 D15. Power on and check that the DRO is ok. Check that Scales are reading correctly.
 DRO INSTALLATION ON LATHE / TURNING MACHINE By ebay: TheDroStore")
86 VISUAL GUIDE MANUAL D16. Tied the cables together with the cable-ties provided. (DRO side) DRO INSTALLATION ON LATHE / TURNING MACHINE By ebay: TheDroStore info@thedrostore.com

87 D17. Install the rear cover REAR COVER

88 D18. Lock the Tool post in place

89 D19. Installation is completed. Give yourself a pat on the shoulder. Any questions/doubts, please info@thedrostore.com We are always glad to be of service to you. Cheers.
(Clearance > 10mm) Fig. 1
 Fig. 1") INSTALLATION MANUAL PRECAUTIONS Before commencing the installation it is important to read this section first. Travel Length 1. The travel length of the glass graduated scale must be longer than the maximum
INSTALLATION MANUAL PRECAUTIONS Before commencing the installation it is important to read this section first. Travel Length 1. The travel length of the glass graduated scale must be longer than the maximum
Door window. Front door window, assembly overview
 64-50 Door window Front door window, assembly overview 1 - Window channel Pushed onto flange 2 - Door window Removing Page 64-52 Adjusting Page 64-53 3 - Door 4 - Outer window channel Pushed onto flange
ASSEMBLY INSTRUCTIONS FOR SL500A AND SL500AL
 ASSEMBLY INSTRUCTIONS FOR SL500A AND SL500AL January 2013 The SL500A is a square upright glass cabinet with a single hinged lockable door. It has five adjustable shelves plus the base. It also has an optional
Mounting a BalanceBox 400 to a brick wall
 Unpack the BalanceBox 400 and remove the Wall frame cover and its bag of screws. Slide the cover out at the top. NOTE: the cover is NOT included with the BalanceBox 400H LOCK SCREW HOLE MOBILE STAND MOUNTING
Wooden Frame Type Instruction Manual
 Wooden Frame TypeInstruction Manual Thank you for selecting our product. Before starting installation, please read this manual thoroughly to ensure correct installation. Please keep this manual at hand
Installation Instructions
 For Medium (15-18.5K) + Heavy duty (22-28.5K) Air Conditioner READ BEFORE INSTALLING UNIT To avoid risk of personal injury, property damage, or product damage due to the weight of this device and sharp
Installation Instructions
 edium + Heavy duty READ BEFORE INSTALLING UNIT Preliminary instructions: 1. Check window opening size: the mounting parts furnished with this air conditioner are made to install in a wooden sill double-hung
READ BEFORE INSTALLING UNIT INSTALLATION WARNINGS AND CAUTION
 edium + Heavy duty READ BEFORE INSTALLING UNIT INSTALLATION WARNINGS AND CAUTION Carefully read the installation manual before beginning. Pay attention to danger and safety notices. be exposed: Carefully
L182 - Installation Sheet Modular Wine Rack ( Wall Mount )
") Modular Wine Rack ( Wall Mount ) 1A 1B 2B 2A Cross Bar Options: 1A 2A 1B 2B Modular Wine Rack ( Wall Mount ) Parts Rail LED arm modules Wine bottle cross bars Rail cover Setscrew cover 1) Drill holes and
Modular Wine Rack ( Wall Mount ) 1A 1B 2B 2A Cross Bar Options: 1A 2A 1B 2B Modular Wine Rack ( Wall Mount ) Parts Rail LED arm modules Wine bottle cross bars Rail cover Setscrew cover 1) Drill holes and
FABA. Installation Instructions. Conductor Bar System. Publication #FABA-03 3/1/04 Part Number: Copyright 2004 Electromotive Systems
 FABA Conductor Bar System Installation Instructions Publication #FABA-03 3/1/04 Part Number: 005-1062 Copyright 2004 Electromotive Systems 1S 100 Z Installation Instructions Contents: Basic Diagram - -
INSTALLATION MANUAL FORTRESS SERIES
 Guardian Security Structures TEL 1-406-212-2334 EMAIL rg@gssdoors.com WEB www.gssdoors.com FORTRESS SERIES GENERAL INSTALLATION GUIDELINES 1. The door frame is installed using 16 bolt screws 7,5 mm in
MACHINE TOOL ALIGNMENT TESTS
 MACHINE TOOL ALIGNMENT TESTS 39 MACHINE TOOL TESTING INTRODUCTION: The surface components produced by machining processes are mostly by generation. As a result, the quality of surface produced depends
POWER PET. Low-E Automatic Patio Pet Door Installation and Operating Instructions
 POWER PET Low-E Automatic Patio Pet Door Installation and Operating Instructions Power Pet, Regular Height, Patio Door Assembly Steps Estimated assembly time: Under 1 hour STEP 1: Assemble the tools you
ABM International, Inc.
 ABM International, Inc. Lightning Stitch required 1 1.0: Parts List head and motor assembly (Qty. 1) Reel stand (Qty. 1) Needle bar frame clamp (Qty. 1) Motor drive (Qty. 1) 2 Cable harness with bracket
BHJ Products, Inc. Parts List & Instructions
 Product Name: Lifter-Tru Kit for Ford Windsor & SVO Small Block V8 Page 1 of 5 Kit Contents: 2x End Plates 2x 5/8 Threaded Adjustment Sleeves 1x Front Angle Bracket 2x 5/8 Adjustment Sleeve Spacers * 1x
Exponents Bench Cushion
 Exponents Bench Cushion Power Drill #2 Phillips Bit Bit Holder Page 1 of 2 939500640 Rev A 1. Place cushion on top of the bench, so the black Coalesse tag is in the right rear corner of the bench. 2. From
Build your own. Pack. Stages 19-22: Continue building Robi s left arm
 Build your own Pack 06 Stages 19-22: Continue building Robi s left arm Build your own All rights reserved 2015 Published in the UK by De Agostini UK Ltd, Battersea Studios 2, 82 Silverthorne Road, London
no mm no Dividers with scriber 150 mm NEW Square wedge-shaped knife edges on the length side
 Summer Promotion valid until 30.06.2013 all quoted prices are incl. VAT for deliveries to EU countries to customers with valid VAT-no. and for deliveries in non EU member countries the VAT is not applicable
Bunk Pod Front Entry Assembly Instructions
 Bunk Pod Front Entry Assembly Instructions www.podtime.co.uk enquiries@podtime.co.uk Working House Ltd How to assemble your pod This step by step guide will show how to assemble your pod(s) on site. It
C70 Window Roller Repair Taken from: Heres the problem:
 C70 Window Roller Repair Taken from: http://www.volvospeed.com/vs_forum/topic/115086-how-to-c70-window-rollers-permanent-fix/ Heres the problem: This happened to two separate window assemblys on my c70
 Menu Board Tilt or Fixed Mount Installation Instructions MDS1T-200, MDS1T-300, MDS1T-400 MDS2T-200, MDS2T-300, MDS2T-400 MDS3T-200, MDS3T-300, MDS3T-400 MDS4T-200, MDS4T-300, MDS4T-400 MDS5T-200, MDS5T-300,
Installation Instructions
 by Plato Woodwork Installation Instructions Plato Woodwork, Inc. 200 Third Street SW P.O. Box 98 Plato, MN 55370 www.platowoodwork.com 800.328.5924 SECTION GUIDE GETTING STARTED PAGE # Installation Methods...
PFW 6875 Installation Guide Installationsanleitung, Guía de Instalacíon, Guida de Installazione, Guide d Installation, Installatie gids
 Maximum Flat Panel Weight: 160 lb. / 72.57 kg. Included Components Wall Mount (Qty 1) Extension Brackets (Qty 2) Bracket (Qty 1 Pair) 5/16 Flat Washers (Qty 4) Universal Spacers (Qty 8) M5 Allen Driver
PFW Installation Guide Installationsanleitung, Guía de Instalacíon, Guida de Installazione, Guide d Installation, Installatie gids
 Maximum Flat Panel Weight: 100 lb. / 45.35 kg. Included Components Wall Mount (Qty 1) Extension Bracket (Qty 1 Pair) Bracket (Qty 1 Pair) 5/16 Flat Washers (Qty 4) Universal Spacers (Qty 8) M5 Allen Driver
Strata. urniture. Adriana Instructions. Parts in the Arm Box: Parts in the Body Box: Watch our assembly videos at
 1A Watch our assembly videos at www.strataf.com/videos Parts in the Arm Box: Arm - Outside View Arm - Inside View 1B Parts in the Body Box: Back Deck x 1 Seat Deck x 1 with the Feet attached Back Panel
Installing CNC Stepper Motor Mounts On A Sherline Lathe
 Installing CNC Stepper Motor Mounts On A Sherline Lathe P/N 6720 (6725 Metric) 4000/4100/4500/4600 Lathes P/N 6730 (6735 Metric) 4400/4410 Lathe USING THE TEMPLATE BLOCKS TO LOCATE NEW MOUNTING HOLES FOR
M14 MODULAR CHASSIS SYSTEM (MOD 1) INSTRUCTION MANUAL. West Springfield, MA Phone: (866) FAX: (413)
 INSTRUCTION MANUAL. West Springfield, MA Phone: (866) FAX: (413)") M14 MODULAR CHASSIS SYSTEM (MOD 1) INSTRUCTION MANUAL Troy Industries, Inc. WWW.TROYIND.COM West Springfield, MA 01089 Phone: (866) 788-6412 FAX: (413) 383-0339 Thank You M14/M1A MODULAR CHASSIS SYSTEM
M14 MODULAR CHASSIS SYSTEM (MOD 1) INSTRUCTION MANUAL Troy Industries, Inc. WWW.TROYIND.COM West Springfield, MA 01089 Phone: (866) 788-6412 FAX: (413) 383-0339 Thank You M14/M1A MODULAR CHASSIS SYSTEM
 (Fig 1) Column to Base 1. Place Column (7) on the Base (13) and align holes in the Column with holes in the Base. 2. Attach using Bolt Washer and Spring Washer hole through the Column and into the Base.
Mounting description. AQUACOMET Kft. Internet:
 Mounting description AQUACOMET Kft. Internet: www.aquacomet.hu E-mail: info@aquacomet.hu Tel/Fax: (+36 96) 314301, 517417, 328971 Mobil: (+36 30) 2046 801, 9578 470 I. Mounting of the rails 1. Measure
M14 MODULAR CHASSIS SYSTEM (MOD 1) INSTRUCTION MANUAL. West Springfield, MA Phone: (866) FAX: (413)
 INSTRUCTION MANUAL. West Springfield, MA Phone: (866) FAX: (413)") M14 MODULAR CHASSIS SYSTEM (MOD 1) INSTRUCTION MANUAL Troy Industries, Inc. WWW.TROYIND.COM West Springfield, MA 01089 Phone: (866) 788-6412 FAX: (413) 383-0339 Thank You M14/M1A MODULAR CHASSIS SYSTEM
M14 MODULAR CHASSIS SYSTEM (MOD 1) INSTRUCTION MANUAL Troy Industries, Inc. WWW.TROYIND.COM West Springfield, MA 01089 Phone: (866) 788-6412 FAX: (413) 383-0339 Thank You M14/M1A MODULAR CHASSIS SYSTEM
BIFOLD FUTON FRAME TRINITY ARM. Seat Rails and Slats x 1. *Note: Use 4pc of 100mm Bolts and 4pc of 60mm Bolts to attach the arms to the Stretchers.
 1A Parts in this box. 2pc with extra holes 2pc with extra holes & plastic stoppers Arms x 2 Back Rails and Slats x 1 Full Size: Slat Supports x 6 3pc are longer for the Back deck Back Side Rails x 2 Seat
ABM International, Inc. Navigator Assembly Manual
 ABM International, Inc. 1 1.0: Parts List Tablet (Qty. 1) Tablet mount (Qty. 1) NOTE: Mount may appear and operate different then image below Control Box (Qty. 1) Motor Power Supply (Qty. 1) 2 X-axis motor
45 CUTTING HEAD TILE SAW-BLADE ALIGNMENT PROCEDURE
 The of the MK-770 may become misaligned with the Cutting Head of the Tile Saw over time. Should misalignment occur, perform the following steps to realign the Tile Saw. NOTE: If alignment problems are
LCD/Plasma Mount Manual
 LCD/Plasma Mount Manual Product Overview: Thank you for your Cheetah Mount purchase. All Cheetah Mounts are designed to provide excellent function, high quality, easy installation and stylish appearance.
PFW 6870 Installation Guide Installationsanleitung, Guía de Instalacíon, Guida de Installazione, Guide d Installation, Installatie gids
 Installationsanleitung, Guía de Instalacíon, Guida de Installazione, Guide d Installation, Installatie gids Max: 72kg/160lbs MOUIN_PFW6870_V01 Included Components Wall Mount (Qty 1) Bracket (Qty 1 Pair)
Portofino Installation Guide
 vjul16 (for 17 or 24 mm Surface Wall Profiles) DO NOT ASSEMBLE WITHOUT FULLY READING THESE INSTRUCTIONS Page 2 Thank you for purchasing this Portofino shower enclosure. Please study these instructions
EmagiKit. Privacy Pod Plus. Quiet. Easy. Affordable. INSTRUCTIONS ASSEMBLY
 EmagiKit Privacy Pod Plus Quiet. Easy. Affordable. INSTRUCTIONS ASSEMBLY DIMENSIONS AND COMPONENTS 47 47 Ceiling Unit 2-B 2-L 2-R Glass Door Corner Trim Door Handle 90 Adjustable Height Work Surface 1-B
Assembly Instructions 10 X 10 Aluminum Roof Support
 Assembly Instructions 10 X 10 Aluminum Roof Support Aluminum Roof Support Bolt Package 16-5/16 X 2 ¼ SS Bolt 24-5/16 X 1 SS Bolt 40-5/16 SS Nylon Lock Nuts 16-5/16 SS Flat Washers 28-4 ½ Wood Screws 36-1
3.2.3 Rear Door Window and Quarter Window Carrier Assembly
 Tighten all bolts. Tighten bolts marked -1- and -2- in specified sequence. Tightening torque: 8 Nm Remaining bolts can be tightened in any sequence. Insert door window -3- through window recess without
Introduction. Rocky Mountain Westy Swing Away Carrier Kit Installation Instructions
 Rocky Mountain Westy Swing Away Carrier Kit Installation Instructions Introduction Thank you for purchasing the Rocky Mountain Westy Swing Away Carrier Kit. We pride ourselves in the products we develop
MM340 Installation Instructions IMPORTANT SAFETY INSTRUCTIONS - SAVE THESE INSTRUCTIONS
 MM30 Installation Instructions IMPORTANT SAFETY INSTRUCTIONS - SAVE THESE INSTRUCTIONS Please read this entire manual before you begin. Do not unpack any contents until you verify all requirements on PAGE.
Giraud Tool Company, Inc.
 Motor Upgrade for Gracey Trimmer This package is intended to allow the user to upgrade their Gracey trimmer with a higher rpm motor and convenience features not found in the production offering. This upgrade
BY ALIEN TECHNOLOGIES CORP
 BY ALIEN TECHNOLOGIES CORP Assembly Instructions TopLift Pros YOU MAY ALSO REVIEW OUR ASSEMBLY VIDEO, PLAY AND PAUSE AT YOUR CONVENIENCE. JUST VISIT US AT WWW.TOPLIFTPROS.COM AND GO TO Customer Support
Lathe. A Lathe. Photo by Curt Newton
 Lathe Photo by Curt Newton A Lathe Labeled Photograph Description Choosing a Cutting Tool Installing a Cutting Tool Positioning the Tool Feed, Speed, and Depth of Cut Turning Facing Parting Drilling Boring
Legacy Woodworking Machinery a division of Phantom Engineering. The Legacy CNC. Assembly Manual
 Legacy Woodworking Machinery a division of Phantom Engineering The Legacy CNC Assembly Manual New Orientation of the Legacy Step one: Re-orientation of the machine Remove the X-axis screw and supports.
Chevy Tahoe Utility Vehicle
 Chevy Tahoe Utility Vehicle 1 TOOLS NEEDED 5/8 Step Drill Bit Hand Drill or Cordless Drill Measuring Tape or Ruler Grease Pencil (White or Black) Small Tie Wraps Silicone Adhesive Sealant Phillips Screw
TITAN2-EDGE Public Access Computer Station Dual Track
 TITAN2-EDGE Public Access Computer Station Dual Track TITAN2-EDGE Rev A 6/17 Model TITAN2-EDGE ASSEMBLY AND ADJUSTMENT TITAN2-EDGE PARTS AND TOOLS PLEASE REVIEW these instructions before beginning the
Deauville Installation Guide
 vjul16 (for Recessed Wall Profiles) DO NOT ASSEMBLE WITHOUT FULLY READING THESE INSTRUCTIONS Page 2 Thank you for purchasing this Deauville shower enclosure. Please study these instructions carefully before
 Installation instruction: Step 1 Remove the bolts (H) with Allen key (F) to separate wall plate unit (A) into two pieces. Wall plate H TV plate Step 2 Step 3 Step 4 10mm (2/5") E D Concrete wall OR Use
Strata. urniture. Mission Rim Instructions. Parts in the Arm Box: Parts in the Body Box:
 1A Watch our assembly videos at www.strataf.com/videos.html Parts in the Arm Box: Arm - Outside View Arm - Inside View Corbels x 4 1B Parts in the Body Box: Back Deck x 1 Seat Deck x 1 with the Feet attached
How To Measure Your Finished Opening
 3000 Series Bifold Doors How To Measure Your Finished Opening MEASURE FROM RIGHT TO LEFT 2 PLACES (WIDTH) MEASURE FROM TOP TO BOTTOM 2 PLACES (HEIGHT) Tools Required for Assembly: Tools Needed: Phillips
Bend-Tech Dragon Assembly Manual
 p.1 Bend-Tech Dragon Assembly Manual IMPORTANT: Please read before unpacking. Place shipping container in a wide open area where you will have room to work and assemble this product. Shipping The Dragon
Heavy-Duty Bypass Track System
 Heavy-Duty Bypass Track System Please Note: This track system must be installed with the screws going into a solid surface such as studs or a header. Due to the spacing of the holes on these Brackets,
Portofino Case2 Installation Guide
 Portofino Case2 Installation Guide vjun16 (for 17 or 24 mm Surface Wall Profile) DO NOT ASSEMBLE WITHOUT FULLY READING THESE INSTRUCTIONS Page 2 Thank you for purchasing this Portofino Case 2 shower enclosure.
Installation and Operating Instructions
 INSTRUCTIONS Installation and Operating Instructions In these installation instructions is described the replacement of the elevating support with gas springs. This conversion kit applies to all California
TIP FOR GETTING STARTED
 Tip for getting started TIP FOR GETTING STARTED Be careful not to drill into any electrical wires, ductwork, plumbing or other damagable components. If you have any questions on the locations of these
Introduction to Machining: Lathe Operation
 Introduction to Machining: Lathe Operation Lathe Operation Lathe The purpose of a lathe is to rotate a part against a tool whose position it controls. It is useful for fabricating parts and/or features
SERVICE MANUAL AND PARTSLIST
 SERVICE MANUAL AND PARTSLIST Next 20 CONTENTS WHAT TO DO WHEN... 1~3 SERVICE ACCESS FACE COVER... 4 TOP COVER... 4 BASE COVER... 5 REAR COVER... 6 FRONT COVER... 7 MECHANICAL ADJUSTMENT NEEDLE THREAD TENSION...
Deauville Installation Guide
 vjul16 (for 17 or 24 mm Surface Wall Profiles) DO NOT ASSEMBLE WITHOUT FULLY READING THESE INSTRUCTIONS Page 2 Thank you for purchasing this Deauville shower enclosure. Please study these instructions
Aluminum Frame Type Instruction Manual
 Aluminum Frame TypeInstruction Manual Thank you for selecting our product. Before starting installation, please read this manual thoroughly to ensure correct installation. Please keep this manual at hand
BHJ Products, Inc. Parts List & Instructions
 Product Name: Lifter-Tru Kit for General Motors LS V8 Page 1 of 5 Kit Contents: 2x End Plates 2x Threaded Adjustment Sleeves 1x Front Angle Bracket 2x M10-1.5 x 65 Hex Head Bolts * 2x Angle Adapter Blocks
U-bass Kit Assembly Instructions
 U-bass Kit Assembly Instructions Compiled by playubass.com This guide is built from the instructions found here: http://kalabrand.com/ubass-kit/index.html Tools Needed 5/8 (16 mm) Wrench 7/16 (~11 mm)
F l a t S c r e e n A R M S I n s t a l l a t i o n
 ITEM NUMBERS (1) #TOACAORG16 (2) #TOACAORG20 (3) #TOACATRP24 (4) #TOACATRP30 (5) #TOACATRPDS (6) #TOACATRPSS TOOLS REQUIRED (1) 3/8 Wrench (not provided) (2) Phillips head screwdriver (not provided) (1)
BX2173 Installation Instructions Ford Focus (including the 2.3L engine) 2003 Ford Focus SVT
 2003 Ford Focus SVT") BX2173 Installation Instructions 2000-04 Ford Focus (including the 2.3L engine) 2003 Ford Focus SVT Serial No. The front fascia, coolant line bracket and anti-pollution devices are removed for baseplate
BX2173 Installation Instructions 2000-04 Ford Focus (including the 2.3L engine) 2003 Ford Focus SVT Serial No. The front fascia, coolant line bracket and anti-pollution devices are removed for baseplate
Bathroom Installation Guide
 Bathroom Installation Guide Please read instructions carefully and check products before starting. Products should be fitted/installed by an experienced and competent fitter, failure to do so may invalidate
Merloni Elettrodomestici. Technical Fitting Manual FRIDGE. Language Issue/Edition Page GB /
 GB 99-11-03/01 1-38 Index 1 CONFORMITY OF APPLIANCE 3 2 MAIN ASSEMBLY TYPES 3 2.1 Under worktop 3 2.2 Double door 10 2.3 Combined 14 2.4 Single door Fridge or single door Freezer 19 2.5 Combined free-standing
Quill Stop V2 Installation Guide 11/16/2014
 Thank you for purchasing the Quill Stop for the Sieg X3 (Grizzly G0463) and SX3 (Grizzly G0619) mills. Your feedback is always appreciated. Please email questions and comments to gregpriest@cox.net. What
Elimination of Elevator Bounce
 For the Agilent Archon Autosampler Rework Instructions CAUTION This kit is intended for use by Agilent Service personnel only. Elevator Removal 1 Open top cover. 2 Open front lower door. 3 Remove vial
INSTALLATION OF WELLS SUPER QUICK CHUCK LEFT HAND ON RED WING LATHE
 DENTAL, INC. TECHNICAL BULLETIN Q824-022510 5860 FLYNN CREEK ROAD READ ALL INSTRUCTIONS P.O. BOX 106 BEFORE PROCEEDING COMPTCHE, CALIFORNIA, U.S.A. 95427 SAVE THIS FOR FUTURE REFERENCE www.wellsdental.com
MantelMount. TM1A Installation Instructions IMPORTANT SAFETY INSTRUCTIONS - SAVE THESE INSTRUCTIONS
 MantelMount TMA Installation Instructions IMPORTANT SAFETY INSTRUCTIONS - SAVE THESE INSTRUCTIONS TM Thank you for choosing the MantelMount television wall mount. Please read this entire manual before
Installing The Aliens Extermination Deluxe 50" Cabinet with Sintra Marquee
 Installing The Aliens Extermination Deluxe 50" Cabinet with Sintra Marquee Document Part #: 040-0262-01 This document describes how to install The Aliens Extermination Deluxe Cabinet with Sintra Marquee
STEP 1 STEP 2 LEVELER KIT OPTION MOBILE CASTER KIT OPTION
 B SERIES INDUSTRIAL BENCHES TOOLS REQUIRED FOR ASSEMBLY Socket set, Open end wrench set, Cordless drill with 3/8" socket bit (Magnetic recommended). BEFORE ASSEMBLY Read through the assembly instructions
The wick in your heater needs replacing if, after repeated cleanings, any of the following conditions still exist:
 WICK REPLACEMENT The wick in your heater needs replacing if, after repeated cleanings, any of the following conditions still exist: Slow to light, hard movement of the wick adjuster knob, kerosene odor
WASP Extended Shuttle Fitting. Process Overview
 Process Overview Tools needed; metric Hex key set Remove Wasp Plate sealer from all power and pneumatic supplies; situate the unit on a clear work area for access. Ensure the Wasp plate sealer has cooled
TL4100 Top 5 Build Tips
 TL4100 Top 5 Build Tips 1: Top Plate When assembling the top plate, align the top of the top plate brackets with the top of the rods. This can be done by placing a hard flat object (such as a ruler) on
Bed Extension Kit 16 Instructions
 The premier source of tooling, parts, and accessories for bench top machinists. Bed Extension Kit 16 Instructions This kit converts a 7 10, 7 12, and 7 14 mini lathe manufactured by SIEG (including those
SENC 150 Encoder Installation. SENC 150 Encoder Installation. Vertical Knee Mill X axis... First Steps: Mounting Information: Before proceeding:
 Vertical Knee Mill X axis... Mounting hardware is described within the contents of these instructions. Hard Stop ACU-RITE linear encoder *Center support for encoder Fasteners, and hardware that is provided
Trade of Toolmaking. Module 2: Turning Unit 8: Concentric Turning (4-jaw) Phase 2. Published by. Trade of Toolmaking Phase 2 Module 2 Unit 8
 Phase 2. Published by. Trade of Toolmaking Phase 2 Module 2 Unit 8") Trade of Toolmaking Module 2: Turning Unit 8: Concentric Turning (4-jaw) Phase 2 Published by SOLAS 2014 Unit 8 1 Table of Contents Document Release History... 3 Unit Objective... 4 Introduction... 4 1.0
Trade of Toolmaking Module 2: Turning Unit 8: Concentric Turning (4-jaw) Phase 2 Published by SOLAS 2014 Unit 8 1 Table of Contents Document Release History... 3 Unit Objective... 4 Introduction... 4 1.0
MM540 Installation Instructions IMPORTANT SAFETY INSTRUCTIONS - SAVE THESE INSTRUCTIONS
 MM50 Installation Instructions IMPORTANT SAFETY INSTRUCTIONS - SAVE THESE INSTRUCTIONS Please read this entire manual before you begin. Do not unpack any contents until you verify all requirements on PAGE.
Frequently Asked Questions
 Teknatool International Ltd 65 The Concourse Henderson Auckland New Zealand Ph 0064 9 837 6900 Fax 0064 9 837 6901 Email sales@teknatool.com Website www.teknatool.com Frequently Asked Questions Date Raised:
Strata. urniture. Addison Instructions. Parts in the Arm Box: Parts in the Body Box: Watch our assembly videos at
 1A Watch our assembly videos at www.strataf.com/videos.html Parts in the Arm Box: Arm - Outside View Arm - Inside View Corbels x 4 1B Parts in the Body Box: Back Deck x 1 Seat Deck x 1 Back Panel x 1 with
TRUE TECHNICAL SERVICE MANUAL - ALL MODELS. DOORS/DRAWERS/LIDS
 DOORS/DRAWERS/LIDS 55 56 NOTES DOORS/DRAWERS/LIDS Swing s 73 74 NOTES INSTALLATION OF A GDM-SWING DOOR Phillips Head Screwdriver (2) - 1/8" Drift Punches (forged) Top Bracket NOTE: It may be necessary
Vinyl Cutter Instruction Manual
 Vinyl Cutter Instruction Manual 1 Product Inventory Inventory Here is a list of items you will receive with your vinyl cutter: Product components (Fig.1-4): 1x Cutter head unit complete with motor, plastic
STORAGE & SHELVING SYSTEM - INSTALLATION GUIDE
 STORAGE & SHELVING SYSTEM - INSTALLATION GUIDE If you have ordered storage drawers, shelving, hanging rails or shoe racks this guide will help you install your storage and shelving system, together with
User Instructions Multiline Otter Scoreboard Caddy Assembly
 List of parts: User Instructions Multiline Otter Scoreboard Caddy Assembly Single Caddy Double Caddy 1 1 Base assembly with attached wheels 2 4 1 1 2 4 4 8 10 20 12 Uprights (60 or 74 aluminum extrusion)
Strata. urniture Watch our assembly videos at Denali Arms. Parts in the Arm Box: Hardware in this Box:
 1A Denali Arms Watch our assembly videos at www.strataf.com/videos.html Parts in the Arm Box: Arm - Outside View Arm - Inside View 1B Hardware in this Box: (80mm) x 8 Barrel Nuts x 8 x 8 Wood Buttons x
FitWork Walkstation Series 7 AdjusTables
 FitWork Walkstation Tools Required: #2 Phillips Bit with Extension Page 1 of 20 A7TG660606H A7TR663232H FitWork Walkstation 4mm Hex Head Bit A7TG660632H A7TR383030H www.details-worktools.com A7TG663206H
a.k.a. casegoods instructions
 a.k.a. casegoods instructions a a.k.a. workwall installation IMPORTANT NOTES Failure to install product according to installation instruction will result in loss of warranty. Tools required for assembly
Usage and Assembly Instructions
 Instructions #1037447 Product #795234 Revision D Usage and Assembly Instructions Rear Fork (Buttstock) Rear Fork Lock Knob Rail Lock Knob Front Fork (Forend) Rails Tilt Friction Knob Rail Extension Locks
1503 Follow Spot Yoke, Source Four LED
 1503 Follow Spot Yoke, Source Four LED Rev 1.0 2016 City Theatrical, Inc. Getting Started with the City Theatrical Follow Spot Yoke for source four LED Congratulations on the purchase of your City Theatrical
INFINITE RANGE - HINGE DOOR
 INFINITE RANGE - HINGE DOOR HINGE DOOR + 1 SIDE RETURN PANEL (CORNER) Please read these instructions before installing, as incorrect fitting will invalidate the guarantee-carry out each stage before moving
Vanity Installation Instructions
 Vanity Installation Instructions Segments of these instructions will relate to your vanity. Please read these instructions thoroughly and ensure the appropriate instructions are used during the installation
Video Wall Installation Instructions 2W X 3H, 3W X 3H
 Video Wall Installation Instructions 2W X 3H, 3W X 3H www.microndisplaysolutions.com Table of Contents Important Safety Instructions... 3 Configuration... 4 Package Contents, included and optional items...
APES HD-7700 Version Operator s Training Manual
 APES-14-77 HD-7700 Version Operator s Training Manual Issue A1 09/03 P/N 900599 Performance Design Inc. 2350 East Braniff St. Boise Idaho 83716 This manual contains very important safety information and
Bluetooth DRO Installation for Bench Mills
 The premier source of tooling, parts, and accessories for bench top machinists. Bluetooth DRO Installation for Bench Mills These instructions describe how to install the following products: 5494: Digital
Assembly and Installation Guide
 The Easy Hang Closet Solution SM Install Your elfa In An Instant. Enjoy The Benefits For A Lifetime. Basic Tools For elfa Assembly and Installation Level Hand or Power Drill Drill Bits 1/8", 3/8", 5/16"
Box Track INSTALLATION INSTRUCTIONS
 Box Track INSTALLATION INSTRUCTIONS BOX TRACK Recommended Tools Level Tape Measure Pencil Drill with 1/8, and 1/4, Drill Bits, Phillips Bit and Slotted Bit Socket Wrench with 9/16 Socket 9/16 and 5/8 Wrench
MODEL T28000 HEAVY-DUTY MOBILE BASE INSTRUCTIONS
 MODEL T28000 HEAVY-DUTY MOBILE BASE INSTRUCTIONS For questions or help with this product contact Tech Support at (570) 546-9663 or techsupport@grizzly.com Introduction Your new Model T28000 Heavy-Duty
PFW 6851 Display Wall Mount, Turn & Tilt 80 kg INSTALLATION INSTRUCTIONS
 Display Wall Mount, Turn & Tilt 80 kg INSTALLATION INSTRUCTIONS 9531-007-Z00-01 Table of Contents Warning Statements 2 Parts List 3 Installation Tools 3 Wood Stud Installation 5 Concrete Surface Installation
1 of 2 3/3/2017 4:49 PM
 1 of 2 3/3/2017 4:49 PM Front Door Window, Assembly Overview 1 - Window guide - Inserted on flange 2 - Door 3 - Inner window recess seal - Inserted on flange 4 - Bolt - 20 Nm 5 - Carrier assembly - Window