XMOD RAPID FIRE MOD KIT 20 MODES - v4 INSTRUCTIONS
|
|
|
- Prudence Owen
- 5 years ago
- Views:
Transcription


1 v4 ELECTRONICS XMOD RAPID FIRE MOD KIT 20 MODES - v4 INSTRUCTIONS This tutorial is designed to aid you in the installation of a XMOD Rapid Fire microchip. This installation requires soldering several wires to small confined spaces. We do not advise attempting this installation if you are a beginner at soldering. We recommend reading through all the instructions and understanding them before beginning your installation. Please proceed with this installation at your own risk. We will not be held responsible for any damage to yourself,your controller, your Xbox 360 console or any other equipment. Tools Needed Soldering Iron with rosin core solder. Hot Glue gun with glue sticks. Wire cutters and wire strippers (that can strip 30ga wire). Small Phillips head screwdriver. (for wired controllers) 5/32 drill bit Torx T8 Security screwdriver. (You may also use a 2.0 precision flathead screwdriver if you can t find a security torx screwdriver). TORX SCREW T8 TACTILE SWITCH XMOD RAPID FIRE CHIP


2 Wireless Controller Identification With the battery cover removed it is easy to identify the OLD and the NEW style controllers. See the images below. This kit must be installed on the NEW CG/CG2 Board Controllers only. It is not compatible with the OLD MATRIX Board. ELECTRONICS OLD MATRIX OLD MATRIX WIRELESS BOARD From the battery door area you can see that there is NO CAPACITOR on the left side, while the other two versions do have a capacitor. ** NOT COMPATIBLE ** ELECTRONICS NEW CG NEW CG WIRELESS BOARD From the battery door area you can see the CAPACITOR is horizontally oriented. ELECTRONICS NEW CG2 NEW CG2 WIRELESS BOARD From the battery door area you can see the CAPACITOR is vertically oriented.


3 In the NEW style-cg Controller, you will see a single chip rotated 45 degrees NEW STYLE - CG XELECTRONICS In the NEW style-cg2 Controller, you will see a single chip. NEW STYLE - CG2 XELECTRONICS ** NOT COMPATIBLE ** In the old style controller There are two chips. Some controllers will not Have the silver shield over the larger chip. OLD STYLE XELECTRONICS

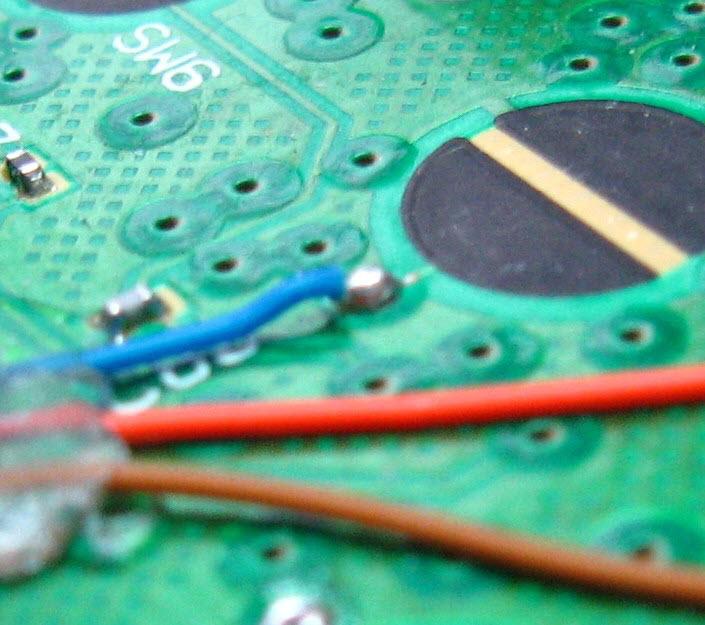
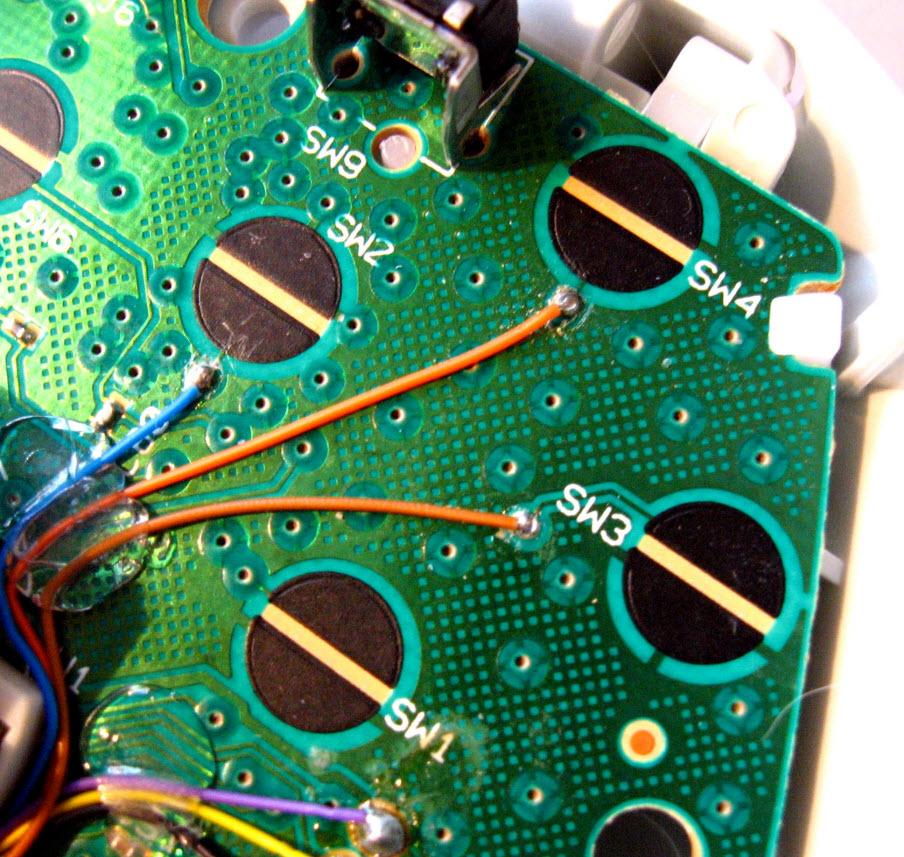
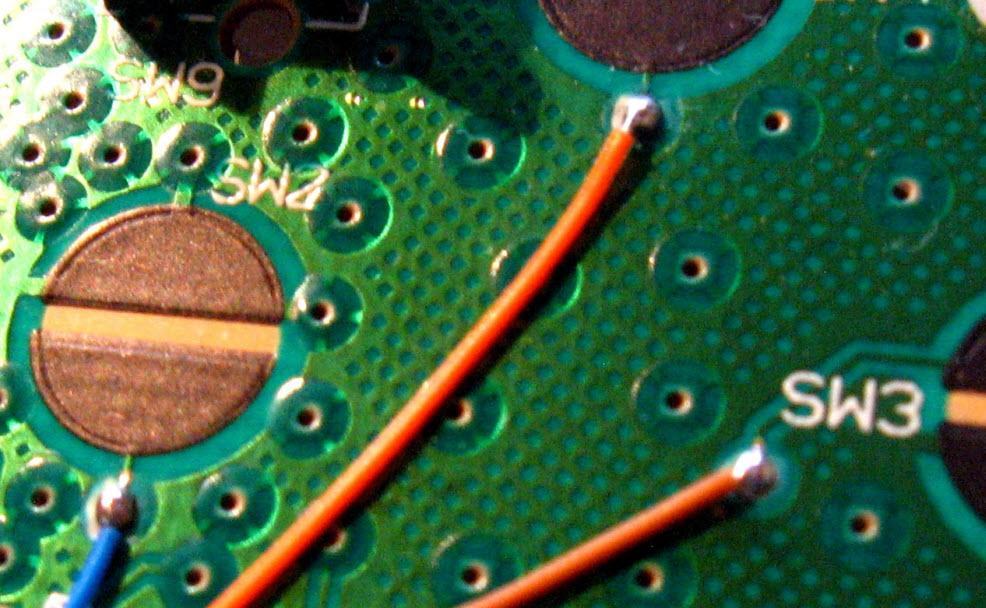
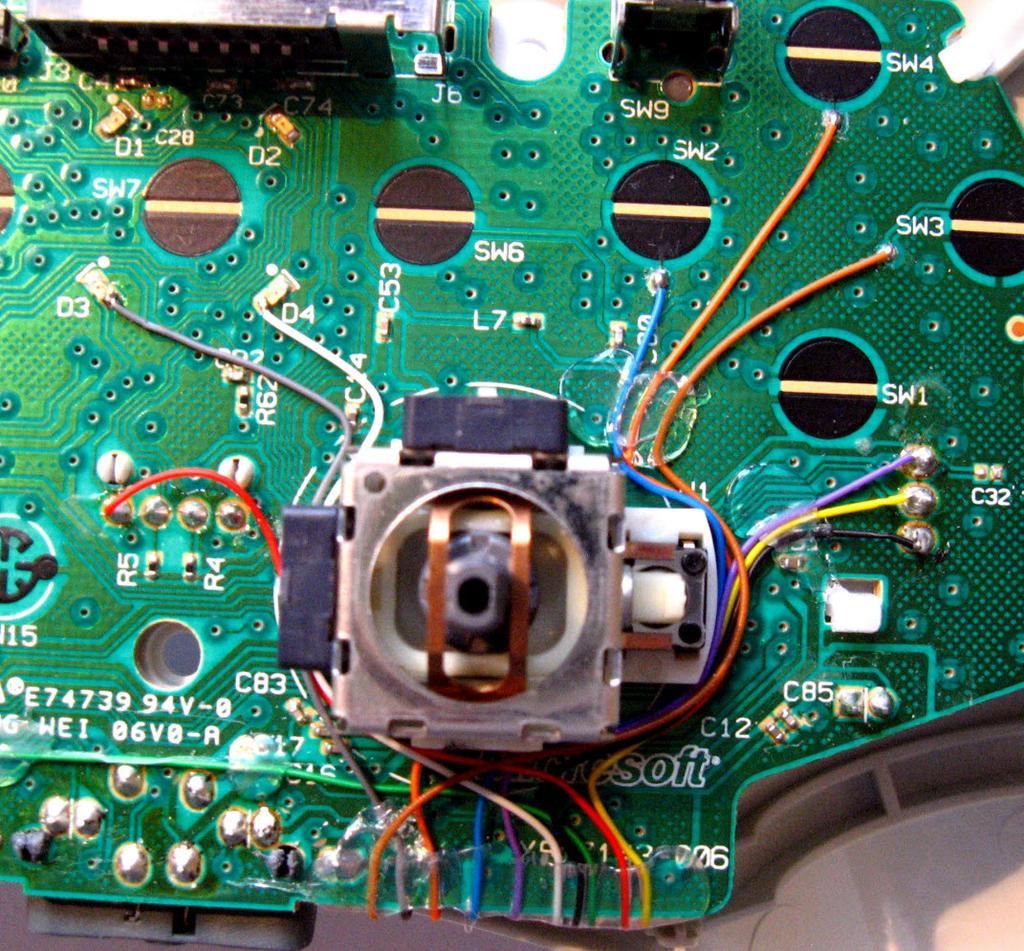
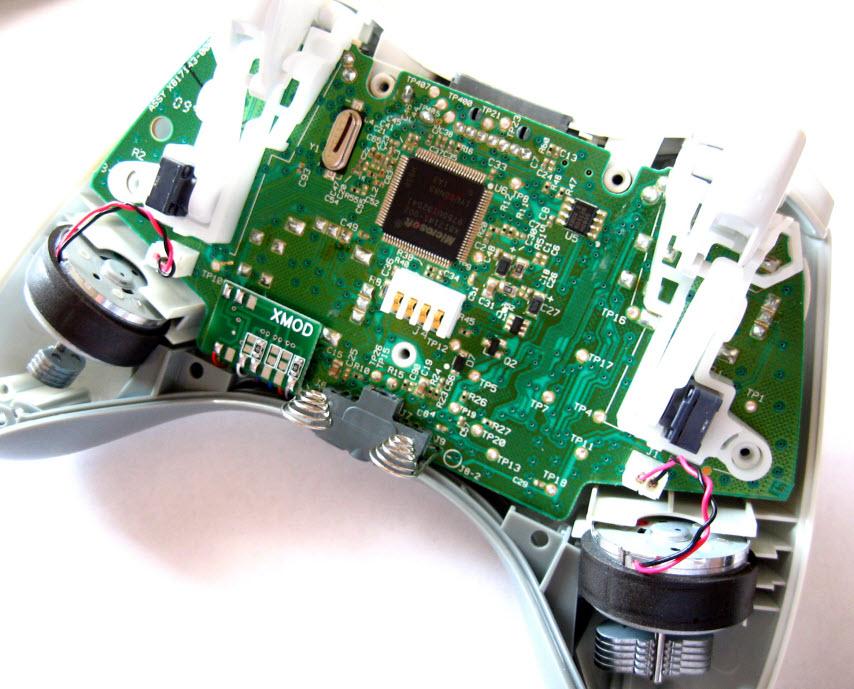
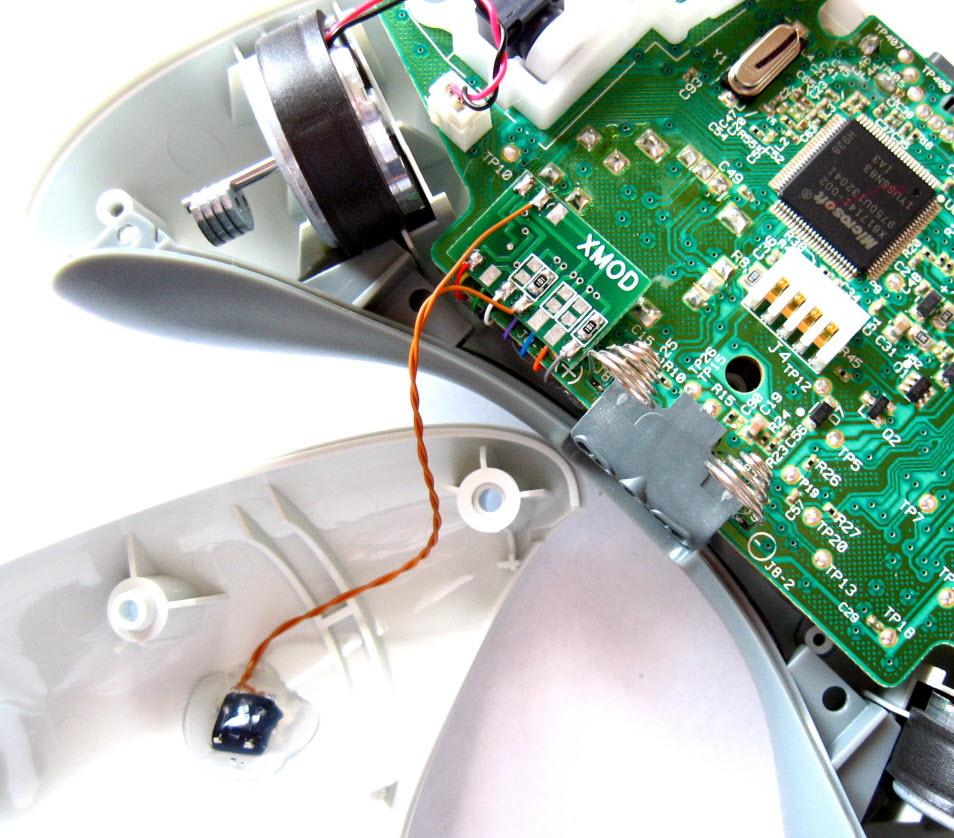
4 XMOD RAPID FIRE BOARD YELLOW D RT (middle) GREEN BLACK PURPLE I E C LT (middle) RT (down) RT (up) BLUE B X button XMOD ORANGE BROWN A J Y button B button XMOD GRAY H 3rd Player LED GREEN to TACTILE button WHITE G 4th Player LED GREEN to TACTILE button RED F Positive


5 XMOD MODE BUTTON GREEN GREEN to TACTILE button


6 CG2 BOARD

7 CG BOARD


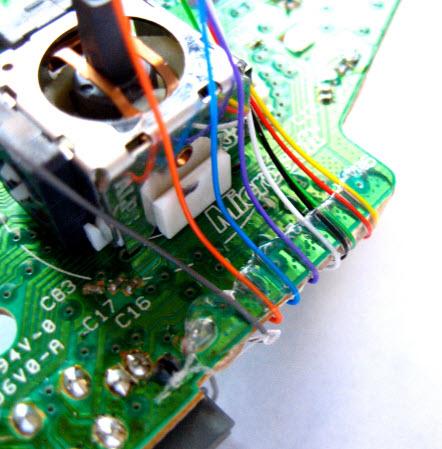


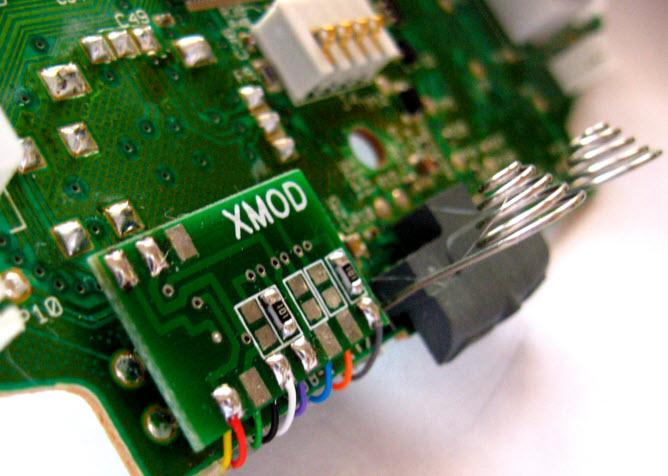
8 Attach the chip and wires to the PCB using a hot glue


9


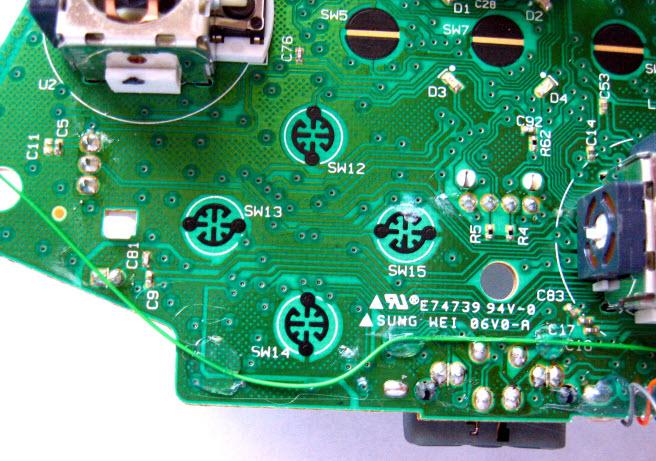
10 X - Y - B BUTTONS With the help of a magnifier and an exacto or box cuter blade carefully scrape the via's protective coating off till you see the copper, but not any further or you will damage the copper trace.


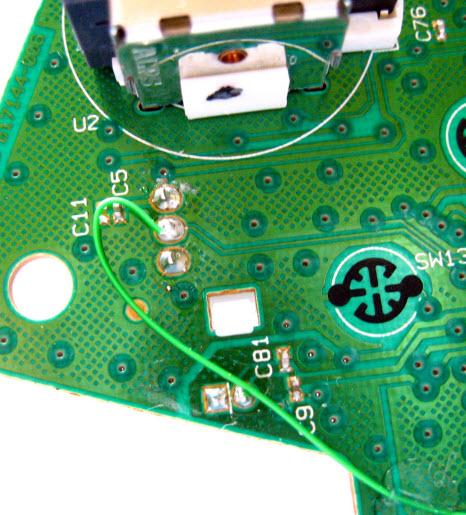
11 Apply a little bit of solder on the scraped area and then attach the wires
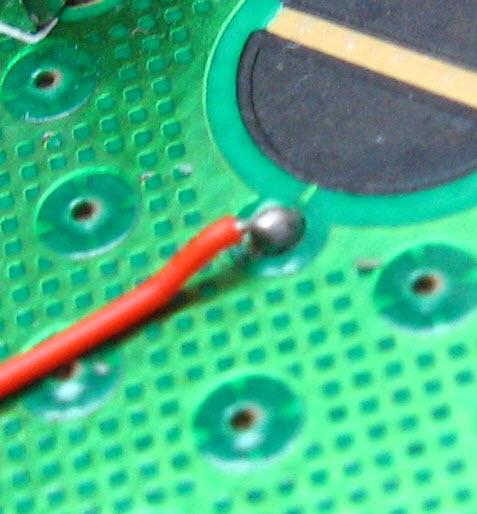
12


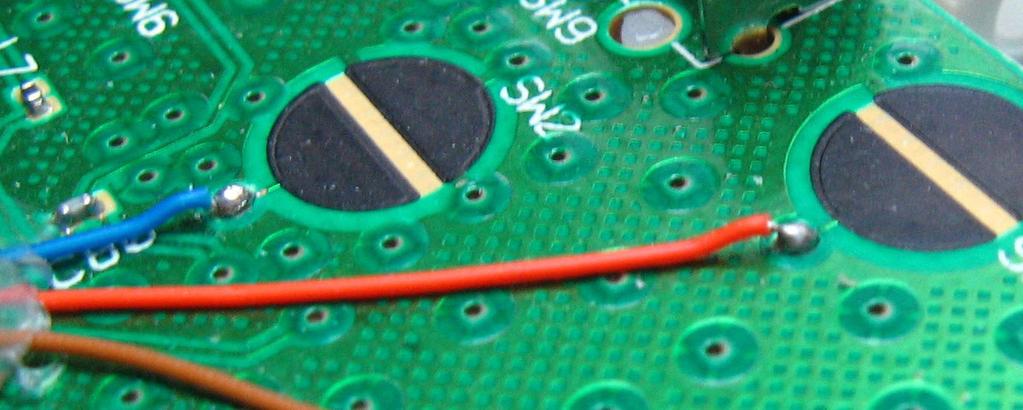
13 CG BOARD X - Y - B BUTTONS


14 CG2 BOARD X -Y - B BUTTONS


15


16 Make sure not to apply to much heat while you are soldering the LEDs, it will cause a malfunctioning or you can easily burn them.


17

18


19 Drill one hole with a 5/32 drill bit. Next use hot glue to secure the button in place. Do not attempt to use Super Glue or any other adhesives as it will soak into the button mechanism and cause it to stop working.
20


21 The last thing you need to do is reassemble everything. The easiest way we found to do this is to leave the top piece face down so all the buttons do not fall out, and hold the PCB to the back of the controller and flip it over on the top case. Align the rumble motors so they are in their holders and lay the PCB and back of the case onto the front of the case. Keep it face down and use your finger to work the thumb sticks through the holes and work the case closed. Do not force it, you may have wires preventing the case from closing entirely. Just go slow and look at any areas to see what is stopping it from closing all the way. Now just screw the controller back together and your done.


. QUICK Rapid Fire ON/OFF.")

22 Our XMOD RAPID FIRE CHIP uses the RIGHT and LEFT TRIGGERS to fire your weapon. Simply choose the rapid fire setting you are most satisfied with, and press the triggers to fire. It will dramatically increase your performance and accuracy during the game play. This XMOD RAPID FIRE CHIP has been designed specifically for the Call of Duty series, but works great for almost all first person shooters. This controller is 100% online compatible with recent game patches. Online compatible with COD 4-5-6, GoW 1-2, Halo 3, Halo ODST, Battlefield Bad Company 2, Left 4 Dead 1-2, and more!!! XMOD Rapid Fire Kit-20 Modes 3 pre-programmed speeds (SLOW - MEDIUM - FAST). 1 User Programmable mode - 65 speeds. JITTER MODES - Slow - Fast - Aim Assisted BURST FIRE ( round burst). AKIMBO-MIMIC modes + AKIMBO-JITTER + AKIMBO BURST DUAL TRIGGER modes. AUTOMATIC DROP SHOT with or without Rapid Fire. 2 COD5-WAW online compatible modes (SLOW - FAST). QUICK Rapid Fire ON/OFF. ENABLE-DISABLE modes function. DEFAULT RESET Function. Easy operation with 2 LEDs status indicator. Tactile push button for a quick access to all functions. Connect a Wireless Controller to Your Console Before you can use the Xbox 360 Wireless Controller with your Xbox 360 console, you need to insert batteries into the controller and introduce the controller to the console by wirelessly connecting the two. To connect your wireless controller to your console: 1. Press and hold down the Xbox Guide button or the Start button until the controller turns on. 2. If your console is not on, press the power button to turn on the console. 3. Press and release the connect button on the console. 4. Press and release the SYNC button on the controller. 5. After the Ring of Light on the console spins and the 1st Player LED on the controller blinks, your console and controller are connected. This XMOD Rapid Fire Mod uses the 3rd and 4th player LEDs exclusively as a status indicator for a complete and easy look of the current functions.
23 RAPID FIRE MODES To change modes: Press & hold the LEFT TRIGGER and TAP the MODE button located underneath the controller to cycle through the 6 modes. The 3rd Player LED will blink to indicate the mode you are in. Once the mode has been activated, TAP the MODE button to cycle through the different speeds. The 4th Player LED will blink to indicate the speed you are in. V4 USER PROGRAMMABLE MODE This adjustable rapid fire mode gives you the freedom to easily make your own speed. You can choose anywhere from 5sps - 35sps. In that range, there are 60 speeds to select from. You can slow down automatic weapons to pinpoint precision or even speed single shot weapons to unreal speeds. The programmed speed will be kept on memory to work on Regular Modes (mode 1) and Dual Triggers (mode 5).Speed adjustments are made directly from the controller, no need to hook up to a computer to change the settings. During the programming process, you can check the speed in real game by pressing the Right Trigger at any time, to see how your weapon responds to it.
.")
24 AKIMBO-MIMIC MODE Tired of holding both, Left and Right Triggers for your akimbo pistols? This function solves your problem. Put the controller into AKIMBO-MIMIC mode, pull the RIGHT TRIGGER ONLY and watch BOTH pistols fire. 4 modes: Slow, Medium, Fast and Burst Akimbo ( shots). AKIMBO-JITTER: press & hold the MODE button for 3 sec. to activate/deactivate the AKIMBO JITTER. JITTER MODES JITTER MODE 1: Jitter mode allows you to work with many weapons that do not work with regular rapid fire. Works for the FAMAS, M16A4, M93, good for STRIKER, AA12, M1014 shotguns. With the Jitter mode the accuracy is decreased, due to limited ability to aim down the sights. JITTER MODE 2: Unlike any other JITTER controller in the market, we solved the aim problem and designed this mode to be more playable. In this mode, when you press the LEFT Trigger to aim down, the weapon will fire in the regular rapid fire you are in, and automatically back to Jitter mode when the left trigger is released. JITTER - FAST MODE: Press & hold the MODE button for 3 sec. to activate/deactivate the FAST MODE. Due the high speed and special signal needed for this feature, the controller tends to switch weapons when you release the Right Trigger, this is a normal behavior for this glitch. BURST FIRE This function allows you to adapt the Burst Fire to your favorite weapon to save ammo. You can choose 2, 3, 4 or 5 round. The burst setting will be kept on memory to work on the AKIMBO-BURST(mode 2). DUAL TRIGGER MODE In this mode, Rapid Fire can be controlled independently on LEFT and RIGHT TRIGGERS, great for Halo 3. Four modes: Slow, Medium, Fast and User Programmable. COD5 COMPATIBLE MODES 2 online compatible modes (SLOW-FAST) for Call of Duty "World at War". Not compatible with akimbo or burst functions. AUTOMATIC DROP SHOT This automatic drop shot feature allows you to quickly lay down aim and fire with the click of the RIGHT TRIGGER. When you come face to face with an opponent just press the RIGHT TRIGGER and you instantly lay on the floor as you shoot with rapid fire, when your opponent shoots over your head. You need never remove your thumb off from the right thumb sticks to press the "B" button, so your aim will never be affected and this makes the difference between living and dying, giving you a massive advantage over other players. Just pushing the Right Trigger it will drops you all the way to the ground, aim and shoot, all in one action. When you push the Left Trigger it will shoot with a REGULAR Rapid Fire letting you stay behind a barrier aiming down the sight and shot without dropping. AUTOMATIC DROP SHOT - without RAPID FIRE To activate/deactivate the Auto Drop Shot without RAPID FIRE (rapid fire OFF): -Turn the RAPID FIRE OFF -Press & Hold the MODE button for 3 sec. -Repeat the same actions to activate or deactivate this feature. QUICK ON/OFF To enable/disable the rapid fire, just hold down the LEFT TRIGGER and push the Mode Button for 2 sec. No need to cycle through all the modes.
25 LED INDICATORS This XMOD CHIP uses the 3rd and 4th player LEDs exclusively as a status indicator for a complete and easy look of the current functions. Note that just the 1st & 2nd Player LEDs will flash when you SYNC or connect the controller with the XBOX 360 console. ENABLE/DISABLE MODES FUNCTION You can easily enable/disable any mode. For example, if you don t play COD5 and you don t want to use the DUAL FIRE, you can program the controller and disable MODE 5 and MODE 6, in that way changing modes will cycle through modes 1, 2, 3 and 4 only, skipping modes 5 & 6. No need to cycle through all the modes. You can do this with any mode at any time. QUICK ON/OFF To enable/disable the rapid fire, just hold down the LEFT TRIGGER and push the Mode Button for 2 sec. No need to cycle through all the modes. FACTORY DEFAULT You can restore factory default configuration. It will clear all data and restore all settings to the factory default values. Holding down the SYNC button for the normal 2-3 seconds will still allow you to synchronize your wireless controller to any XBOX 360 System. The chip will remember the fire rate even when you turn your controller off or remove the batteries. Although this chip is very fast, you are still limited by how fast the game allows a weapon to shoot. CALL OF DUTY 4 Infinity Ward released a new patch for this game on 09/03/09, limiting your firing speed. Although this chip is very fast, you are still limited by how fast the game allows a weapon to shoot. TIP: You can use a DOUBLE TAP feature (second tier Perk) to increase the rate of fire on some weapons (G3, pistols, etc) Additional information about CALL OF DUTY 5: This mod chip does not disable or change the detection of rapid fire in Call of Duty 5, this could not be done from a controller. By understanding how the rapid fire detection in the game works we have been able to create the fastest rapid fire possible. But this also means that the rapid fire is not totally immune to the game detecting it. Quickly pulling the trigger multiple times while the rapid fire chip is turned on can cause it to limit your rate of fire as the game will see the rapid fire from the mod chip as well as your manual trigger presses which can sometimes activate the detection within the game and limit your firing rate. But under most circumstances this will not happen. For COD5 you must use: MODE 6 -COD5 online compatible - SLOW/FAST For COD7 - Black Ops you can use: MODE 1 -REGULAR: Speed 1 & USER PROGRAMMABLE (default speed adjusted for this game) MODE 2 -AKIMBO: Speed 1, 3, 4 MODE 3 -JITTER: Speed 1 & 2 MODE 4-BURST: 2,3,4,5 round burst. MODE 5-DUAL: Speed 1 & 4 MODE 6-COD5 compatible: Speed 1 & 2 Although this chip is very fast, you are still limited by how fast the game allows a weapon to shoot. Shooting speed in some games are also limited in game by the weapon's rate of fire and animations.
26 RAPID FIRE ON-OFF There are 2 ways to turn the Rapid Fire OFF: - Press & Hold the LEFT TRIGGER and the MODE button located underneath the controller for 2 sec. - Press and Hold the LEFT TRIGGER + X + Y buttons at the same time. The LEDs will blink 2 times. Release the buttons. To turn the Rapid Fire ON: Hold the Left Trigger & Tap the Mode button. RAPID FIRE MODES To change modes: - Press & hold the LEFT TRIGGER and TAP the MODE button located underneath the controller to cycle through the 6 modes. The 3rd Player LED will blink to indicate the mode you are in. - Once the mode has been activated, TAP the MODE button to cycle through the different speeds. The 4th Player LED will blink to indicate the speed you are in. JITTER - FAST MODE: Once into JITTER mode, press & hold the MODE button for 3 sec. to activate/deactivate the FAST MODE. AKIMBO-JITTER: Once into AKIMBO mode, press & hold the MODE button for 3 sec. to activate/deactivate the AKIMBO JITTER. PROGRAMMING REGULAR - MODE 4 The 4th Regular mode can be programmed with your own speed. You can choose from 5 to 35 sps. in 65 steps. To enter in programming mode: - Turn the Rapid Fire OFF: Press & Hold the LEFT Trigger + Tap the MODE button. Release the buttons. - Press & Hold the LEFT & RIGHT triggers and the MODE button at the same time x 4 sec. Release the buttons. The LEDs will blink 4 times. - TAP the LEFT Trigger to INCREASE speed. - Tap the MODE button to DECREASE speed. - You can test the speed by pressing the RIGHT trigger at any time. - The LEDs will flash when the MINIMUM or MAXIMUM speed are reached. - To SAVE & EXIT: Press & Hold the RIGHT Trigger + Tap the MODE button. Release the buttons. The LEDs will blink 4 times. The programmed speed will work on the Regular 4th mode and Dual Triggers 4th mode.
27 ENABLE-DISABLE MODES To enable/disable any mode: - Turn the Rapid Fire OFF - Press & Hold The LEFT TRIGGER,the X and Y buttons at the same time x 4 sec - Release those 3 buttons. The LEDs will flash for 2 sec. - Tap the MODE button to choose the mode you want to enable/disable. - Tap the Y button to enable the mode. - Tap the X button to disable the mode. - To save & exit, press & hold the RIGTH TRIGGER and tap the MODE button. - The LEDs will flash for 2 sec. AUTO DROP SHOT To activate/deactivate the automatic Drop Shot: - Turn the Rapid Fire OFF - Press & Hold RIGHT TRIGGER and the Tap the MODE button. - The LEDs will flash for 2 sec. AUTO DROP SHOT - without RAPID FIRE To activate/deactivate the Auto Drop Shot without RAPID FIRE (rapid fire OFF): -Turn the RAPID FIRE OFF -Press & Hold the MODE button for 3 sec. -Repeat the same actions to activate or deactivate this feature. FACTORY DEFAULT To restore all settings to factory default values: --Take the BATTERY PACK OUT. - Press & Hold the MODE button and insert the Battery Pack. - The LEDs will flash for 8 seconds FEEDBACK: Get your XMOD Rapid Fire Chip for FREE! You can get your XMOD Rapid Fire Chip for free just by leaving the BEST feedback along with 5 out 5 star Detailed Seller Rating (DSR s) which includes : Item As Described, Communication, Shipping Time and Shipping an Handling Charges. Once a month, we pick three of the best feedbacks from this current month and refund 100% of their purchase price an shipping. So, be CREATIVE and you can be this month winner! We value all of our customers and their opinions and feedback. In the rare instance that you feel that negative feedback needs to be left, please allow us the opportunity to work with you to correct any misunderstanding to avoid this situation. Customer satisfaction is our number one priority and we will work diligently with you to resolve any unforeseen circumstance. We will return all feedbacks as they are left. us at sales@xmodelectronics.com Thank you, XMOD ELECTRONICS

28 XMOD RAPID FIRE CONTROLLER XBOX MODES V4 DROP SHOT WITHOUT RAPID FIRE To activate/deactivate the DROP SHOT without RAPID FIRE (rapid fire OFF): -With the Rapid Fire OFF, Press & Hold the MODE button for 3 sec. -Repeat the same actions to activate/deactivate it. JITTER - FAST MODE Once into JITTER mode, press & hold the MODE button for 3 sec. to activate/deactivate the FAST MODE. V4 AKIMBO- JITTER Once into AKIMBO mode, press & hold the MODE button for 3 sec. to activate/deactivate the AKIMBO JITTER. PROGRAMMING REGULAR - MODE 4 The 4th Regular mode can be programmed with your own speed. To enter in programming mode: - Turn the Rapid Fire OFF. - Press & Hold the LT + RT + MODE buttons at the same time for 4 sec. - Release the buttons. - The LEDs will blink 4 times. - TAP the LEFT Trigger to INCREASE speed. - Tap the MODE button to DECREASE speed. - You can test the speed by pressing the RIGHT trigger at any time. - The LEDs will flash when the MINIMUM or MAXIMUM speed are reached. - To SAVE & EXIT: Press & Hold the RIGHT Trigger + Tap the MODE button. Release the buttons. The LEDs will blink 4 times. The programmed speed will work on: MODE 1: Regular - 4th Speed MODE 2: Akimbo-Mimic - 3rd Speed MODE 5: Dual Triggers - 4th Speed. RAPID FIRE MODES To change modes: - Press & hold the LEFT TRIGGER and TAP the MODE button located underneath the controller to cycle through the 6 modes. The 3rd Player LED will blink to indicate the mode you are in. - Once the mode has been activated, TAP the MODE button to cycle through the different speeds. The 4th Player LED will blink to indicate the speed you are in. RAPID FIRE ON/OFF There are two ways to turn the Rapid Fire OFF: 1- Press & Hold the LEFT Trigger + Tap the MODE button for 2 sec. 2- Press & Hold the LEFT Trigger + X + Y buttons at the same time. Release the buttons. The LEDs will blink 2 times. To turn the Rapid Fire ON: - Press & Hold the LEFT Trigger + Tap the MODE button. - Release the buttons.. The LEDs will blink to indicate the mode you are in. ENABLE-DISABLE MODES To enable/disable any mode: - Turn the Rapid Fire OFF - Press & Hold The LEFT TRIGGER,the X and Y buttons at the same time. x 4 sec - Release those 3 buttons. The LEDs will flash for 2 sec. - Tap the MODE button to choose the mode you want to enable/disable. - Tap the Y button to enable the selected mode. - Tap the X button to disable the selected mode. - To save & exit, press & hold the RIGHT TRIGGER and tap the MODE button. - The LEDs will flash for 2 sec. FACTORY DEFAULT To restore all settings to factory default values: -Take the BATTERY PACK OUT. -Press & Hold the MODE button and insert the Battery Pack. -The LEDs will flash for 8 seconds
XMOD 18 Mode Rapid Fire Mod Chip
 XMOD 18 Mode Rapid Fire Mod Chip INSTALLATION INSTRUCTIONS - PCB version 2 This tutorial is designed to aid you in the installation of a Rapid Fire microchip. This installation requires soldering several
INSTALLATION INSTRUCTIONS
 XMOD 23 Mode Rapid Fire Mod Chip INSTALLATION INSTRUCTIONS This tutorial is designed to aid you in the installation of a XMOD Rapid Fire microchip. This installation requires soldering several wires to
Installation tutorial for Console Customs Xbox Mode Dual Button (RFX-5B) Rapid fire Microchip for all Wired and Wireless controllers
 Rapid fire Microchip for all Wired and Wireless controllers") Installation tutorial for Console Customs Xbox 360 5-Mode Dual Button (RFX-5B) Rapid fire Microchip for all Wired and Wireless controllers This tutorial is designed to aid you in installation of a console
Installation tutorial for Console Customs Xbox 360 5-Mode Dual Button (RFX-5B) Rapid fire Microchip for all Wired and Wireless controllers This tutorial is designed to aid you in installation of a console
Installation tutorial for Console Customs Xbox 360 MaxFire LITE rapid fire Mod Chip.
 Installation tutorial for Console Customs Xbox 360 MaxFire LITE rapid fire Mod Chip. This tutorial is designed to aid you in installation of a console customs MaxFire LITE modchip. This tutorial covers
30 MODE PLUS. XMOD Modded Controller. User s Manual
 30 MODE PLUS XMOD Modded Controller User s Manual Turn on your wireless controller and the console Press the Xbox button on the wireless controller to turn on both the controller and the console. Open
Installation tutorial for Console Customs Xbox 360 Dual Rapid fire Microchip for wired and wireless controllers (all versions)
") Installation tutorial for Console Customs Xbox 360 Dual Rapid fire Microchip for wired and wireless controllers (all versions) This tutorial is designed to aid you in installation of a console customs
Installation tutorial for Console Customs Xbox 360 Dual Rapid fire Microchip for wired and wireless controllers (all versions) This tutorial is designed to aid you in installation of a console customs
Installation tutorial for Console Customs PS3 TrueFire Standard Rapid fire Microchip for Sixaxis and Dualshock 3 controllers
 Installation tutorial for Console Customs PS3 TrueFire Standard Rapid fire Microchip for Sixaxis and Dualshock 3 controllers This tutorial is designed to aid you in installation of a console customs rapid
UserManual
 UserManual Rapid Fire Burst Fire Akimbo Jitter Quick Scope Mimic Drop Shot Jump Shot GOW Perfect Reloads Auto Aim Quick Reload Auto Spotting Auto Run Sniper Breath 10 Programmable Modes Reflex Remapping
CONTENTS. Akimbo (Left Trigger Rapid Fire)
") CONTENTS Page 1: Introduction, Feature access Page 2: Rapid Fire, Burst Fire, Akimbo, Mimic Page 3: Default Modes, Changing Modes, Adjustable Fast Reload Page 4: Sub Modes, Drop Shot, Jump Shot, Automatic
CONTENTS Page 1: Introduction, Feature access Page 2: Rapid Fire, Burst Fire, Akimbo, Mimic Page 3: Default Modes, Changing Modes, Adjustable Fast Reload Page 4: Sub Modes, Drop Shot, Jump Shot, Automatic
Getting to know your controller
 Congratulations on purchasing the World s Fastest Rapid Fire, Fact! We are sure you will love all the Arbiter 3 has to offer, and we are always welcome of suggestions on improvements and extra features
Installation tutorial for Console Customs Xbox ONE MaxFire ONE V2 PCB
 Installation tutorial for Console Customs Xbox ONE MaxFire ONE V2 PCB This tutorial is designed to aid you in installation of a console customs MaxFire ONE V2 Circuit board in the newer Xbox One Controllers
Xbox One / PS4 Guide. Xbox One Quick Guide. PlayStaJon 4 Quick Guide MODE SPEED COMPATIBLE GAMES MODE SPEED COMPATIBLE GAMES
 Xbox One / PS4 Guide This guide will cover all aspects of your Xbox One PlayStation 4 controller. Please read all parts of this guide befe setting up and using your Xbox One PlayStation 4 controller. Please
CONTENTS. or + Akimbo (Dual Trigger Rapid Fire)
") CONTENTS Page 1: Introduction, Feature Access Page 2: Sub Modes, Rapid Fire, Burst Fire, Akimbo, Mimic Page 3: Default Modes, Changing Modes, Adjustable Fast Reload Page 4: Jitter Fire, Drop Shot, Jump
CONTENTS Page 1: Introduction, Feature Access Page 2: Sub Modes, Rapid Fire, Burst Fire, Akimbo, Mimic Page 3: Default Modes, Changing Modes, Adjustable Fast Reload Page 4: Jitter Fire, Drop Shot, Jump
INSTRUCTION MANUAL PS4 JUGGERNAUT VER 7.0
 INSTRUCTION MANUAL PS4 JUGGERNAUT VER 7.0 Congratulations, welcome to the GamerModz Family! You are now a proud owner of a GamerModz Custom Modded Controller. The JUGGERNAUT - VER 7.0 FOR PS4 has been
To maximize your potential, be sure to read the instructions fully before operating the Mega Mod.
 You are now the proud owner of our exclusive Mega Mod! The Mega Mod is our ultimate modded controller and features all of the mods that we offer for the PlayStation 3. The Mega Mod comes with 9 different
PS4. Ragnarok Flex Modchip Installation Instructions.
 PS4 Ragnarok Flex Modchip Installation Instructions Revised 11/25/2013 Tools needed PS4 Controller Viking PS4 Ragnarok Flex modchip DIY Kit (includes mod chip, LED board, and LED lense) Two diodes (included
INSTRUCTION MANUAL XBOX ONE JUGGERNAUT VER 5.1
 INSTRUCTION MANUAL XBOX ONE JUGGERNAUT VER 5.1 Congratulations, welcome to the GamerModz Family! You are now a proud owner of a GamerModz Custom Modded Controller. The JUGGERNAUT - VER 5.1 FOR XBOX ONE
or + Akimbo (Dual Trigger Rapid Fire)
") Page 1: Introduction, Feature access Page 2: Rapid Fire, Burst Fire, Akimbo, Mimic Page 3: Default Modes, Changing Modes, Adjustable Fast Reload Page 4: Sub Modes, Drop Shot, Jump Shot, Automatic Sniper
Page 1: Introduction, Feature access Page 2: Rapid Fire, Burst Fire, Akimbo, Mimic Page 3: Default Modes, Changing Modes, Adjustable Fast Reload Page 4: Sub Modes, Drop Shot, Jump Shot, Automatic Sniper
CONTENTS. or + Akimbo (Left Trigger Rapid Fire)
") CONTENTS Page 1: Introduction, Feature access Page 2: Rapid Fire, Burst Fire, Akimbo, Mimic Page 3: Default Modes, Changing Modes, Adjustable Fast Reload Page 4: Sub Modes, Drop Shot, Jump Shot, Automatic
CONTENTS Page 1: Introduction, Feature access Page 2: Rapid Fire, Burst Fire, Akimbo, Mimic Page 3: Default Modes, Changing Modes, Adjustable Fast Reload Page 4: Sub Modes, Drop Shot, Jump Shot, Automatic
Ragnarok PS4 Flex Mod Chip Operation Instructions
 www.viking360.com Introduction The Viking Ragnarok software platform was developed to make it easier for customers to mix and match mods, on the fly, without needing to scroll through massive numbers of
STRIKEPACK F.P.S. DOMINATOR MODE UPGRADE
 STRIKEPACK F.P.S. DOMINATOR MODE UPGRADE Once your StrikePack has received the Dominator upgrade, you can refer to the rest of this document for operation instructions. UPGRADING THE STRIKEPACK Open the
Arsenal One Install Instructions for Xbox One Controller
 Arsenal One Install Instructions for Xbox One Controller arsenalmod.com Page 1 of 14 Before Proceeding These instructions are for the install of the Arsenal One 28 pin chip for the Xbox One. READ ALL INSTRUCTIONS
XBOX ONE FOR STRIKEPACK F.P.S. DOMINATOR WIRED NEXT GENERATION MOD PACK
 FOR XBOX ONE STRIKEPACK F.P.S. DOMINATOR WIRED NEXT GENERATION MOD PACK Introduction 3 Kit Includes 3 Getting started 4 - Attaching & Pairing the StrikePack F.P.S. Dominator Important Terminology 5 Modology
INSTRUCTION MANUAL PS4 SPS-X2 VER 4.0
 INSTRUCTION MANUAL PS4 SPS-X2 VER 4.0 Congratulations, welcome to the GamerModz Family! You are now a proud owner of a GamerModz Custom Modded Controller. The SPS-X2 - VER 4.0 FOR PS4 has been completely
How to add a push power button to your XBOX S-Type controller
 26.10.2006 Page 1 of 5 http://synapse.wordpress.com How to add a push power button to your XBOX S-Type controller - By Synapse Required Items - XBOX S-Type controller (Wireless ones won t work) Soldering
Xbox One. Arbiter 5. User guide. Rev Speed Head Shot Controllers.
 Xbox One Arbiter 5 User guide Rev 1.1 25 Speed Head Shot Controllers www.headshotcontrollers.co.uk Arbiter 5.0 Customization menu To change and configure the Arbiter you must first enter the customization
Installation Guide for Custom Console Mods Xbox 360 (LED kit)
") Installation Guide for Custom Console Mods Xbox 360 (LED kit) This mod kit works for all versions of the Xbox 360 wireless controllers. This guide is designed to aid you in installing the LED kit from
Installation Guide for Custom Console Mods Xbox 360 (LED kit) This mod kit works for all versions of the Xbox 360 wireless controllers. This guide is designed to aid you in installing the LED kit from
PS4 FOR STRIKEPACK F.P.S. DOMINATOR WIRED NEXT GENERATION MOD PACK
 FOR PS4 STRIKEPACK F.P.S. DOMINATOR WIRED NEXT GENERATION MOD PACK Introduction 3 Getting started - Attaching the StrikePack F.P.S. Dominator 4 - Pairing the StrikePack F.P.S. Dominator with Your Console
PS4 FOR STRIKEPACK F.P.S. DOMINATOR WIRED NEXT GENERATION MOD PACK
 FOR PS4 STRIKEPACK F.P.S. DOMINATOR WIRED NEXT GENERATION MOD PACK Introduction 3 Getting started - Attaching the StrikePack F.P.S. Dominator 4 - Pairing the StrikePack F.P.S. Dominator with Your Console
PS2-SMC-06 Servo Motor Controller Interface
 PS2-SMC-06 Servo Motor Controller Interface PS2-SMC-06 Full Board Version PS2 (Playstation 2 Controller/ Dual Shock 2) Servo Motor Controller handles 6 servos. Connect 1 to 6 Servos to Servo Ports and
PS4 FOR STRIKEPACK F.P.S. DOMINATOR WIRED NEXT GENERATION MOD PACK
 FOR PS4 STRIKEPACK F.P.S. DOMINATOR WIRED NEXT GENERATION MOD PACK Introduction 3 Getting started - Attaching the StrikePack F.P.S. Dominator 4 - Pairing the StrikePack F.P.S. Dominator with Your Console
Never power this piano with anything other than a standard 9V battery!
 Welcome to the exciting world of Digital Electronics! Who is this kit intended for? This kit is intended for anyone from ages 13 and above and assumes no previous knowledge in the field of hobby electronics.
Lighthouse Beginner s soldering kit
 Lighthouse Beginner s soldering kit Kit contains: 1 x 220 ohm resistor (Red, Red, Black) 1 x 82k ohm resistor (Grey, Red, Orange) 2 x 220k ohm resistors (Red, Red, Yellow) 2 x Diodes 1 x Power switch 1
Assembly Instructions: Kit #5
 Assembly Instructions: Kit #5 1. Insert the T-pin into one of the caps. 2. Insert the rotor core into the same cap as shown below. Apply some pressure to push the rotor core approximately 1/2" (10-12 mm)
Compatible with PS 3 /Xbox One wired controller (connect with charging cable).
.") Usage manual Product function: Maxgear Cross attack converter Xbox one controller on PS3 and PC is an adapter that allows you to connect your Wired Xbox One controller (connect with charging cable) to
Usage manual Product function: Maxgear Cross attack converter Xbox one controller on PS3 and PC is an adapter that allows you to connect your Wired Xbox One controller (connect with charging cable) to
DC Motor. Controller. User Guide V0210
 DC Motor Controller User Guide 59757 V0210 This kit provides a great exercise of intermediate soldering skills and creates a device that enables you to control various Pitsco motors, Tamiya gearboxes,
The Useless Machine. DIY Soldering Edition. Instruction Guide v0004
 The Useless Machine DIY Soldering Edition Instruction Guide v0004 TM For the best outcome, follow each step in order. We recommend reading this guide entirely before you get started. Tools required: Soldering
Team Xecuter Joycon Mod By: XxWiReDxX
 Team Xecuter Joycon Mod By: XxWiReDxX Works With Every Switch SX OS Works with every Nintendo Switch and every firmware version! Play Every Game With SX OS you can play all your favorite games straight
x12 BATTERIES INCLUDED
 AGES 8+ 13744 x12 BATTERIES INCLUDED Replace with 12 x 1.5V AA or R6 size alkaline batteries. Phillips/cross head screwdriver (not included) needed to replace batteries. Standard, CRT TV only. Not for
ArduTouch Music Synthesizer
 ArduTouch Music Synthesizer Assembly Instructions rev C Learn To Solder download for free at: http://mightyohm.com/soldercomic The following photos will show you how to solder. But feel free to download
Circuit Board Assembly Instructions for Babuinobot 1.0
 Circuit Board Assembly Instructions for Babuinobot 1.0 Brett Nelson January 2010 1 Features Sensor4 input Sensor3 input Sensor2 input 5v power bus Sensor1 input Do not exceed 5v Ground power bus Programming
INSTRUCTION MANUAL. Force Transducer Output Tube Repair Kit
 INSTRUCTION MANUAL Model 400-TR Force Transducer Output Tube Repair Kit June 4, 2004, Revision 5 Copyright 2004 Aurora Scientific Inc. Aurora Scientific Inc. 360 Industrial Pkwy. S., Unit 4 Aurora, Ontario,
INSTRUCTION MANUAL PS4 SPS-X1 VER 4.0
 INSTRUCTION MANUAL PS4 SPS-X1 VER 4.0 Congratulations, welcome to the GamerModz Family! You are now a proud owner of a GamerModz Custom Modded Controller. The SPS-X1 - VER 4.0 FOR PS4 has been completely
FACTORY CAT TOMCAT CORPORATION
 FACTORY CAT RPS TOMCAT CORPORATION Artificial Turf and Carpet Sweeping Install Kit #349-641 & #349-642 1. Detach batteries so that there is no power running through the machine before starting. 2. Start
Written By: Walter Galan
 iphone 4S Logic Board Replacement Replace a dead logic board in your iphone 4S. Written By: Walter Galan ifixit CC BY-NC-SA www.ifixit.com Page 1 of 22 INTRODUCTION Use this guide to replace your iphone's
HEADS UP FOR SAFETY. A Safety Handbook for Elementary A.D.S.T. and Makerspace Teachers
 A Safety Handbook for Elementary A.D.S.T. and Makerspace Teachers 1 ELEMENTARY MAKER SPACE HEADS UP FOR SAFETY TABLE OF CONTENTS: Makerspace Responsibilities 3 Due Diligence 4 Teacher Tool Safety Checklist
The Useless Machine. Parts Only - Build Guide v0001
 TM The Useless Machine Parts Only - Build Guide v0001 For the best outcome, follow each step in order. We recommend reading this guide entirely before you get started. Tools required: One phillips screwdriver,
FM Wireless Microphone Kit Instructions for Assembly Page 1 of 5
 Instructions for Assembly Page 1 of 5 1. Find Resistor R1. Remove any tape that may be attached to the leads. Bend the leads as needed to insert Resistor R1 into the printed circuit board in the holes
Installation And Programming Instructions For Profile Series With RF Technology
 Installation And Programming Instructions For Profile Series With RF Technology A7691A www.sargentlock.com 1 Table of Contents General Description Page 2 3 4 5 6 7 Installation of RF Technology Lock...1
Congratulations on your purchase of the SparkFun Arduino ProtoShield Kit!
 Congratulations on your purchase of the SparkFun Arduino ProtoShield Kit! Well, now what? The focus of this guide is to aid you in turning that box of parts in front of you into a fully functional prototyping
Scorpion HX User Manual R/C Version
 Table of Contents Features...3 Connections...5 Setup...5 Setup Complete...10 Status Codes...11 Mounting your Scorpion...12 Notes on PCM radios...12 Service and Support...13 Limitations and Warrantees...13
Digital Director Troubleshooting
 Digital Director Troubleshooting Please find below the most common FAQs to assist in the understanding and use of the product. For details related to each specific camera model, refer to the Compatibility
Repairing Microsoft Wedge Touch Mouse Battery Cover Retaining Clip
 Repairing Microsoft Wedge Touch Mouse Battery Cover Retaining Clip Disassembly, repair and reassembly of Wedge Touch mouse when the battery cover will not stay closed. Also is a good guide to repair other
Written By: Walter Galan
 Xbox 360 CPU Heat Sink Replacement CPU heat sink replacement. Written By: Walter Galan ifixit CC BY-NC-SA www.ifixit.com Page 1 of 27 INTRODUCTION Use this guide to remove the CPU heat sink from your Xbox
Hardware Installation. Do this first:
 1 Do this first: Hardware Installation Need some help? Here s what you ll need: 4 AA Batteries Phillips screwdriver Visit us online. support.remotelock.com We re here to help. 1 (877) 254 5625 support@remotelock.com
Under Seat Storage Drawer Installation Instructions
 Under Seat Storage Drawer Installation Instructions Parts List: 1) Drawer Assembly 8) Self Tapping Screws 1) Instructions 1) Template Tools Needed: Drill and/or Bit Driver Tape Measure Jigsaw or metal
Start by building the example racer, then turn it into your own unique design.
 Start by building the example racer, then turn it into your own unique design. For use with TeacherGeek Air Racer Activity Pack, or Maker Cart. To find documents and activity materials, click here. Page
Bill of Materials: Metronome Kit PART NO
 Metronome Kit PART NO. 2168325 The metronome kit allows you to build your own working electronic metronome. Features include a small speaker, flashing LED, and the ability to switch between several different
Installation, Usage and Maintenance Guide. October Install for Typical speaker style...page 3
 Installation, Usage and Maintenance Guide October 2013 Install for Typical speaker style...page 3 Install for Round speaker style (Star Trek)...Page 6 1 WARNING Improper installation, improper use, may
Star Trek TOS communicator upgrade kit Install instructions Hyperdyne Labs 2002
 Star Trek TOS communicator upgrade kit Install instructions Hyperdyne Labs 2002 Package Your package should include: Assembled TOS sound/motor/light board with LEDs and sound chip Moiré motor 9V snap connector
Expandable Series Wireless Multi Unit Doorbell System
 Expandable Series Wireless Multi Unit Doorbell System Thank you for purchasing our Wireless Doorbell system. Please carefully read this user manual before usage and installation. North America Office:
120x165mm. 85x165mm TEMPLATE. ELECTRONIC DEADBOLT model no.: & & Toll-free Number:
 20x65mm 85x65mm ELECTRONIC EABOLT FOR BACSET 2 3/4" ( 70 mm) FOR BACSET 2 3/8" ( 60 mm) Ø 2 /8" ( 54 mm ) Toll-free Number: -800-268-659 IMPORTANT: Please read this manual carefully before installing this
MultiPac 24 in 1 Installation Guide and User s Manual
 MultiPac 24 in 1 Installation Guide and User s Manual Notice Regarding this Upgrade Warning! Although this upgrade has been tested and the techniques used will not directly cause harm to your video game,
Xbox 360 controller modding
 P ford residence southampton, ny Xbox 360 controller modding Apr 20, 2012. There's no end to the mods that have been done to Xbox 360 console cases, and, consequently, there are also quite a few Xbox controller
HP Envy M6-1205DX Screen Replacement
 HP Envy M6-1205DX Screen Replacement This guide will show you how to replace your computer's screen. Written By: Alex Wasilewski ifixit CC BY-NC-SA www.ifixit.com Page 1 of 16 INTRODUCTION We will be showing
tinycylon Assembly Instructions Contents Written by Dale Wheat Version August 2016 Visit dalewheat.com for the latest update!
 tinycylon Assembly Instructions Written by Dale Wheat Version 2.1 10 August 2016 Visit dalewheat.com for the latest update! Contents Assembly Instructions...1 Contents...1 Introduction...2 Quick Start
Explorer Wiring Kit (assembled)
") Explorer Wiring Kit (assembled) For Vintage, Firestorm & Standard Series Please Read All Instructions Before Beginning. Tools you will need: Soldering Iron (35 watt preferably) Solder Wet Sponge Wire Clippers
Explorer Wiring Kit (assembled) For Vintage, Firestorm & Standard Series Please Read All Instructions Before Beginning. Tools you will need: Soldering Iron (35 watt preferably) Solder Wet Sponge Wire Clippers
Maintenance Information
 47104302 Edition 1 November 2012 Cordless Drill/Driver QX Series Maintenance Information Save These Instructions Tool Diagnosis 1. Before servicing this unit, you will need a fully charged battery of known
Installing Your Electronic Deadbolt
 Ultra Security Plus Electronic Deadbolt Installation Instructions http://www.hberger.com/video-gallery/electronic-deadbolt New Installation Lock Location Preparation (Skip this section if you door has
Application Note. Atlas B23-7 Tsunami Digital Sound Decoder Installation Notes
 Application Note Atlas B23-7 Tsunami Digital Sound Decoder Installation Notes Overview This application note describes how to install a TSU-1000 digital sound decoder into an Atlas B23-7. Skill Level 2:
iphone 4S Dismantling Instructions
 iphone 4S Dismantling Instructions These instructions will show you how to open the iphone to replace the digitizer, LCD screen and other internal parts. Opening your iphone will void your warrantee, and
Quick Start Guide. Contents
 1 Quick Start Guide Contents Powering on the Machine Login/Password Entry Jaw Set Up High Security Cut by Code High Security Jaw Set Up Edge Cut Cut by Code Edge Cut Cut by Decode Cutter Replacement Tracer
Desktop Trebuchet Kit Assembly Instructions
 Desktop Trebuchet Kit Assembly Instructions Contents of package (drawings are not to scale for clarity, parts that have duplicates are indicated with total number of that part to be found, example: 2X
Blue Ring Tester Kit Assembly & User Manual
 Blue Ring Tester Kit Assembly & User Manual Alltronics LLC/AnaTek Instruments 2761 Scott Blvd, Santa Clara, CA, 95050, USA March 2015 Edition Tel: 408-778-3868, Fax: 408-778-2558, E mail : tech@alltronics.com
01. Parts. Blink v1.1. Battery Holder x1. Red LED x1 Green LED x1 Blue LED x1. Resistors x3. Battery x1. Blink PCB x1. Push Button Switchers x3
 Blink L1 L2 L3 01. Parts Battery Holder x1 Red LED x1 Green LED x1 Blue LED x1 Resistors x3 Learn to Solder Kit Battery x1 L1 L2 L3 Blink PCB x1 S3 Push Button Switchers x3 02. Tools RECOMENDED Soldering
Roller Shades MOTORIZED SHADE. Simplicity with rechargeable motor. Installation & Care Instructions
 Roller Shades MOTORIZED SHADE Simplicity with rechargeable motor Installation & Care Instructions 152709 C 4/26/2017 GETTING STARTED IMPORTANT: The remote control has not been linked to the shades. Install
Introduction 1. Download socket (the cable plugs in here so that the GENIE microcontroller can talk to the computer)
") Introduction 1 Welcome to the magical world of GENIE! The project board is ideal when you want to add intelligence to other design or electronics projects. Simply wire up your inputs and outputs and away
Introduction 1 Welcome to the magical world of GENIE! The project board is ideal when you want to add intelligence to other design or electronics projects. Simply wire up your inputs and outputs and away
METRICFATS.COM Thank you for purchasing your new Stealth Rear Turn Signals for your Yamaha Raider.
 METRICFATS.COM Thank you for purchasing your new Stealth Rear Turn Signals for your Yamaha Raider. The instructional sheets that follow are thoroughly detailed and should be studied BEFORE picking up a
LASER ENHANCED REVOLVER GRIP OWNER S MANUAL RED LASER GREEN LASER
 LASER ENHANCED RED LASER GREEN LASER REVOLVER GRIP OWNER S MANUAL LASER ENHANCED GRIP Installation Instructions Caution... 3 Safety Labels... 4 Installation...5-7 Programming...8-10 Batteries (Red Laser)...
GETTING STARTED. Instructions IMPORTANT PS B PS B. Record the serial number from the tag on the door front.
 PS-15-20-B IMPORTANT Instructions Record the serial number from the tag on the door front. Keep keys in a secure place away from children. DO NOT STORE KEYS INSIDE SAFE GETTING STARTED When you first receive
INSTRUCTIONS High Tech II Unit Assembly
 INSTRUCTIONS High Tech II Unit Assembly The following instruction is a guideline, illustrating suggested methods, assembly sequence, and tool selection. Actual assembly may vary by each situation. Careful
A3 Pro INSTRUCTION MANUAL. Oct 25, 2017 Revision IMPORTANT NOTES
 A3 Pro INSTRUCTION MANUAL Oct 25, 2017 Revision IMPORTANT NOTES 1. Radio controlled (R/C) models are not toys! The propellers rotate at high speed and pose potential risk. They may cause severe injury
Modifying the Hextronik HX5010 Servo Motors for Babuinobot 1.0
 Modifying the Hextronik HX5010 Servo Motors for Babuinobot 1.0 Brett Nelson January 2010 1 Converting the Hextronik HX5010 to a Geared DC Motor The following pages will describe step by step the process
WPR400 Wireless Portable Reader
 P516-098 WPR400 Wireless Portable Reader User guide Para el idioma español, navegue hacia www.schlage.com/support. Pour la portion française, veuillez consulter le site www.schlage.com/support. Contents
What s New. Updated Feature List February 21, Your Rock Guitar Model Revision 1.3
 What s New Updated Feature List February 21, 2011 Your Rock Guitar Model 1000 - Revision 1.3 Table of Contents Rock Band 3 Pro Mode Playing Alongside RB3 Pro Mode Fret Select Checking Firmware/Librarian/Preset
Pioneer Elite CLD-97 Digital Noise Reduction (DNR) Auto-off Mod DIY Installation Guide
 Auto-off Mod DIY Installation Guide") Pioneer Elite CLD-97 Digital Noise Reduction (DNR) Auto-off Mod DIY Installation Guide Background: The CLD-97 laserdisc player has one of the best video quality outputs of any laserdisc player released.
Pioneer Elite CLD-97 Digital Noise Reduction (DNR) Auto-off Mod DIY Installation Guide Background: The CLD-97 laserdisc player has one of the best video quality outputs of any laserdisc player released.
MTC-2 highlight features: ACU highlight features: Contents. MTC-2 and ACU User Manual V4.0
 MTC-2 can work alone as a twin motor ECS (electronic speed controller) for RC tanks. When the ACU (auxiliary control unit) is connected, it can also control turret rotation, gun elevation, gun firing,
ANATOMY OF A BIT TM how you can tell top from bottom. four on the floor!
 ARCADE GAME BASICS 1 Learn BITSNAP ANATOMY OF A BIT TM how you can tell top from bottom. TOP BOTTOM BIT FEET 2 which COLOR-CODED BY FUNCTION Bits TM are grouped into four different categories, are color-coded.
ET Water SmartWorks Panel Installation Guide
 ET Water SmartWorks Panel Installation Guide You are installing a new piece of equipment that retrofits into an existing irrigation controller in order to create a weather-based irrigation control system.
Lesson 2: Soldering. Goals
 Introduction: Its time to learn how to solder. So you have met all the components needed to make a DIY Gamer, now it s time to put it together. Soldering is joining the components to the printed circuit
Parts. Backplate. Battery Cover. Backup Key. Touchscreen Assembly. Inside Assembly. Thumbturn. Strike. Reinforcement Plate. Bolt.
 Quick Start Guide Backplate Backup Key Battery Cover Touchscreen Assembly Parts Strike Bolt Inside Assembly Thumbturn Reinforcement Plate Set Screw Reinforcement Screws Inside Assembly Screw Backplate
Xylophone Teaching Notes Issue 1.3
 Teaching Notes Issue 1.3 Product information: www.kitronik.co.uk/quicklinks/2105/ TEACHER Xylophone Index of sheets Introduction Schemes of work Answers The Design Process The Design Brief Investigation
Operation and Installation Manual
 The Next Generation of Operation and Installation Manual G-Scale Graphics 5860 Crooked Stick Dr. Windsor, CO 80550 970-581-3567 GScaleGraphics@comcast.net www.gscalegraphics.net Revision C: H: Updated
Gat ew ay T o S pace AS EN / AS TR Class # 07. Colorado S pace Grant Consortium
 Gat ew ay T o S pace AS EN / AS TR 2500 Class # 07 Colorado S pace Grant Consortium One Minute Reports: - Can we have two data loggers? - Do you provide us with cameras? {Hardware Checkout after proposal}
Cylon Raider Lighting Kit
 Cylon Raider Lighting Kit By Madman Lighting Inc Copyright June 2015, all rights reserved. All trademarks property of their respective owners. WARNING: This product contains small parts not suitable for
Signal Lights Demonstration Video Time Duration: - 38 sec. Use the right hand mouse button for video control.
 Tip: - Working Turntable Signals and Cabin Lights using Gold TC7.0F1 and Above Hi All, At long last I completed the project to have working signals and cabin lights on my turntable. This is a record of
Shop Supplies. #00420 Kwik Pak Anchor Kit. #00421 Kwik Pak Carpenter Kit. #00422 Kwik Pak Special Electrical Kit
 #00420 Kwik Pak Anchor Kit 8 Items 00455KP Rapid Drive Wall Anchor Kwik Pak 1 00472KP Heavy Duty Plastic Screw Anchor Kwik Pak 1 00506KP Phillips Binding Head SMS Kwik Pak 1 90620 Carbide Tipped Masonry
LED Cup Holder Lights Installation Guide
 LED Cup Holder Lights Installation Guide (20112015 Kia Optima) Thanks for purchasing this LED Cup Holder Light Kit! If you have any questions or feedback please email us direct at Sales@K5OptimaStore.com
BMG Special Upgrade Installation Revised: May 23, 2017
 BMG Special Upgrade Installation Revised: May 23, 2017 Before you start, read these instructions first to understand how to install and use this product. Assumptions This Pickup Switch Upgrade TM product
Asus ZenFone 2 Display Replacement
 Asus ZenFone 2 Display Replacement Replace your display if it isn't functioning correctly or if it is cracked or broken. Written By: Jessica Nguyen ifixit CC BY-NC-SA www.ifixit.com Page 1 of 14 INTRODUCTION