In order to make this type of print, you will work from a KEY block (the line block, the black or the Outline of the overall composition).
|
|
|
- Betty Barker
- 5 years ago
- Views:
Transcription
1 Multi-Block Printing The tradition: Chiaroscuro Woodcuts The earliest colored woodcuts were intended to imitate the appearance of a type of drawing on colored paper known as chiaroscuro, much sought after by collectors. In these drawings, the colored paper served as the middle tone, and the artist worked toward the light (chiaro) by adding highlights with white gouache, and toward the dark (scuro) by adding crosshatching in pen or a dark wash with a brush. The chiaroscuro woodcut, invented in Germany by Hans Burgkmair around 1509, was created by printing a line block which carried the contours and crosshatching, and could sometimes stand alone as a black and white woodcut together with one or more tone blocks. If there were only one tone block, it would print a mid-tone that would function in the same way as the colored paper did in the drawings. Where more than one tone block was used, it was possible to suggest levels of shading, as in a wash drawing. Where the blocks had been cut away, the paper would remain unprinted, and these white areas would serve as the highlights. Citation: Thompson, Wendy. "The Printed Image in the West: Woodcut". In Heilbrunn Timeline of Art History. New York: The Metropolitan Museum of Art, (October 2003) Block Preparation In order to make this type of print, you will work from a KEY block (the line block, the black or the Outline of the overall composition). All blocks should be the same size. Render your line image onto the key block. Once you cut your key block, print it onto proofing paper. While the proofing print is still wet and you are happy with the cuts you ve made, place the wet print onto your 2 nd block and transfer the line image. You will need to use your registration jig to do this accurately. Your 2 nd block is your Mid-tone block. Carve away the black and white, i.e, the outline and paper area leaving the mid-tone area so it will print your color. If you have more than 2 ink colors you will need to repeat the process of proof printing either the key block or mid-tone block (whichever works best for you to carve for your 3 rd color) onto the 3 rd block and carve away all but the 3 rd colored area that needs to print. Paper Preparation All paper (editioning and proofing) should be the same size. When you have determined the size of the block/image, you ll need to determine the dimensions of the paper (and the kind of paper) on which you ll print the finished image. You may print on Japanese style papers on the press, but heavier etching-style papers will respond better to the pressure offered by the press. It s preferable to hand print using Japanese style papers (laid papers). For an edition of 5 impressions, you should prepare more paper than you think you ll need (it s easy to make mistakes in reduction prints as there are so many steps to keep track of).
2 Consider preparing sheets of archival printmaking paper and an equal number of newsprints sheets if you chose to proof on newsprint. TEAR ALL THE SHEETS (EDITIONING PAPER AND PROOFING PAPER) TO THE EXACT SAME DIMENSIONS. Neatly stack all the sheets together in a pile that is editioning and another pile that is newsprint. Pin Registration System for Hand Printing and the Etching Press The registration system, or jig, allows you place the matrix/block precisely in the same place on the page each time. When you make a registration jig using matting board and flat push pins (this works best for un-mounted linoleum and ¼ inch plywood-thinner matrices), be sure to use the same one for a single edition. You may want to make a jig for various printing paper sizes and blocks. If you do, you should mark the sizes on the matting board jig and save for a later date when you print a new block. How to make a Pin Registration jig out of matting board: With a piece of scrap matting board cut an L shape out of the board where the width of the board is the same as your printing paper. The length should be either the same as the paper or a bit shorter. The thickness of the L should be at least 6 inches. Using a ruler and pencil, draw a line at the 2 mark along the L -measuring from the outer edge to the inner edge of the L. Push pins through the 2 line at intervals (2 pins per L side are enough) all the way through the board. Affix a piece of masking tape to the flat side of the pin- this is the back. Affix a piece of masking tape over the sharp end of the pin and burnish down the tape so the pin is fixed to the board. Make sure the block fits up against the inner part of the L and that your paper edge goes to the edge of the L with enough room for the image to have a 2-3 border from the image. Press each sheet of paper (including the proofing paper) through the pins and place a piece of tape over the pin and paper so it is a tight fit. Remove the paper and proceed to pin or register all of your paper. There are 2 other ways you can register this printing method-the Kento and Board. You may use any of the 3 methods. Stick with one throughout the editioning process.
3
4
5 Mixing Ink There are some fundamental rules to mixing ink colors so that you achieve the color you want quickly and without wasting a lot of ink. Always add dark colors to light, not light colors to dark. Example: to achieve a light blue, using process blue and opaque block white, place a tablespoon or so of white ink on the palette. In an area several inches away from the white ink, lay out some blue ink. Lay the inks out with separate palette knives dedicated to each color. Gradually add the blue to the white ink pile until you achieve the color you want. The cobalt being of strong pigmentation will quickly color the white, so use the blue sparingly and keep adding blue in small amounts until you get the desired effect. Taking notes of your color mixing adventures will help you mix colors more quickly and effectively in the future. You can lighten colors by adding white or a small amount of transparent white ink or transparent base. Example: Mixing opaque white and red will lighten the red, but also make it turn pink quickly. An alternative is to add red ink to the transparent white bit by bit until you achieve the brightness of red you want, however it will be pinkish. Adding red to the transparent base will reduce opacity/increase transparency of the red and maintain the hue more faithfully. Try to mix the amount of ink you ll need for the entire run or drop in advance. This may require you to mix a little more than you think you might need. Recall too that the first application of ink requires more as the wood is dry and absorbent. Do your best to mix as much as you need, but not a vast quantity more than you ll need. Save mixed colors in a zip lock bag, foil envelope or wax paper packet (seal these with paper tape and store in a safe place-away from printing paper). You may hold it in your drawer if you think you ll use it again, or document the contents of your mixed recipe and donate it to the studio. Inking the Block When you re ready to print the first run or drop ( run or drop refers to color or layer), clean the block of debris and dust. Ideally you want to use a brayer that is as wide as the block (or wider) to eliminate lap or roller marks. Ink the block outside of the registration jig don t get ink on the registration jig. Because you are utilizing the pressure of the press, and you are printing several layers of ink on a single sheet, you don t need to apply as much ink to these prints as you did to the handburnished prints to achieve a uniform, dark color. In fact it is better to allow the first run or drop to be just a tad bit dry looking or transparent if a lot of this color will ultimately be buried by other colors. Applying too much ink will slow the process: you ll have to allow more time for the print to dry before applying a second color. Printing Have clean hands by wearing gloves (or wash your hands between inking and printing) to assemble the block and paper to the registration jig always starting with newsprint to proof. Plan to print more impressions than you need for the edition. Print all the editioning paper you tear for the project. You may experience mistakes in the subsequent phases of the print and need extras around just in case.
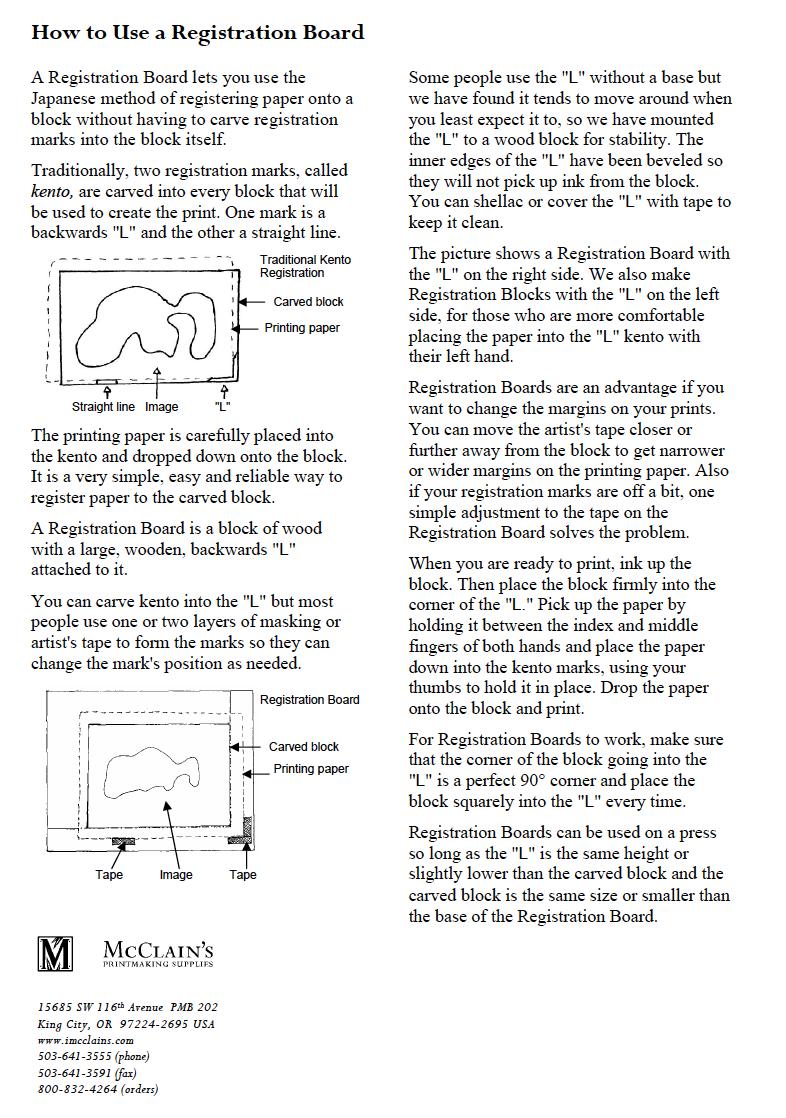
6 Hand printing (Pin, Kento and Board) Once you are ready to print each color, you will jut the inked block against the jig, place down the pre-holed/marked/ paper and carefully press the paper onto the block and rub with the back of the spoon or baren. If you are using the Kento method, match the edge of the paper to the edge of the Kento marks (kagi (key) and the hikitsuke (draw stop). Press Printing with the Pin and Board method DO NOT RUN THE PINS THROUGH THE PRESS! Once you are ready to print each color, you will jut the inked block against the jig, place down the pre-holed paper and carefully press the paper onto the block and rub with your hand so the ink sticks to the paper. CAREFULLY remove the jig. Place the block and paper into the press. Use only the Pusher blanket and a tympan (a piece of matting board or smooth cardboard) in the press. Make sure the pressure is accurate for your use. Too much pressure over time will flatten your matrix and registration will become off. Registration Boards can be used on a press so long as the "L" is the same height or slightly lower than the carved block and the carved block is the same size or smaller than the base of the Registration Board. Drying/Storing Prints in Progress With clean hands remove the print from the jig and block and take immediately to the drying rack. If you choose to print Wet on Dry as opposed to Wet on Wet you will need to print the colors or mid-tone blocks 1 st before you print your key block (which will be last). You will need print each piece of paper with the same block and allow to dry. Remove the print from the rack when it s dry (about 2 5 days depending on how thick the ink application is). Collect these when they are dry; take care of them (place wax paper between the printed sheets to keep them from sticking to each other), as you ll continue printing on them to complete the assignment. Allow the first run or drop to dry thoroughly before printing another color on top of it. If you choose to print Wet on Wet you can print your 2 nd, 3 rd and key block (last) back to back. You may encounter more extreme cases of color mixing if you do this.
Did you know that the numbers on a limited edition print actually mean something?
 AVI3M PRINTMAKING What is a print? Printmaking is the process of transferring an image from one surface (a stamp, roller or block, for example) to another (such as paper, fabric or wood). What is the difference
Art of Work Roles People Play Utah Museum of Fine Arts Educator Resources and Lesson Plans Fall 2016
 Art of Work Roles People Play Utah Museum of Fine Arts www.umfa.utah.edu Educator Resources and Lesson Plans Fall 2016 Artwork, Artist Hirosada was the leading artist and the most prolific of the Osaka
Printmaking Unit. Art 3200
 Printmaking Unit Art 3200 What is Printmaking? Printmaking is a sometimes misunderstood aspect of visual art. Fine art printmaking involves the creation of a master plate from which multiple images are
Extension material for Level 2 Design and Visual Communication Study Guide (page 33)
") Graphic media Extension material for Level 2 Design and Visual Communication Study Guide (page 33) ISBN 978-1-927194-15-7 For individual student use only. No other use permitted. ESA Publications (NZ)
Graphic media Extension material for Level 2 Design and Visual Communication Study Guide (page 33) ISBN 978-1-927194-15-7 For individual student use only. No other use permitted. ESA Publications (NZ)
Title: Animal Impressions. Author: Megan Hagerty, adapted from Cool Art Teacher Blog and Jessie McCormick. Grade Levels: High School, Grades 9-12
 Title: Animal Impressions Author: Megan Hagerty, adapted from Cool Art Teacher Blog and Jessie McCormick Grade Levels: High School, Grades 9-12 Time Span: Five 45 minute periods or three hour and a half
Stratography. Instructions by Tracy Honn. Examples provided by Carol Parker
 Stratography Instructions by Tracy Honn Examples provided by Carol Parker Tracy Honn Notes on Stratography Image Printing on the Vandercook What is Stratography? Stratography or pressure printing, is the
Reduction. Liz Egan, Art Teacher. Liz Egan, 2009 Westbrook Middle School, Westbrook, CT
 Reduction Block Pi Printing Liz Egan, Art Teacher Westbrook Middle School Liz Egan BFA, Purchase College MS, Buffalo State College Painter and Artist Teaching 8 years at WMS CAEA Distinguished Mentor/Cooperating
Printmaking / Monoprinting. Art Explorations WSRHS
 Printmaking / Monoprinting Art Explorations WSRHS PRINTMAKING Like drawings, prints are produced on paper, but with an important difference. PRINTMAKING With printmaking, a print can be produced several
3Insert the second rod no. 4
 Yamato: Step-by-step 37 The stern block and searchlight control towers a b c d e f Recommended tools and materials Wood glue Sandpaper (no. 800 grain) Metal file Putty Craft knife For metal: Super Glue
COLORED PENCIL WITH MIXED MEDIA with Sarah Becktel
 SUPPLY LIST COLORED PENCIL WITH MIXED MEDIA with Sarah Becktel Lesson 1: Introduction to Materials and Techniques Strathmore 500 Series Mixed Media Board or Strathmore 400 Series Mixed Media Paper Artist-grade
60 terms in printmaking
 60 terms in printmaking 1. Aquatint an intaglio method using copper or zinc plates. Tonal areas are obtained by using powdered rosin or spray paint. The more powder or spray and the longer the plate is
Water-colour painting techniques
 INFORMATION SHEET Water-colour painting techniques Andrew Newland T E A C H I N G A R T & D E S I G N Sheeaun, Kilmaley, Ennis, Co. Clare, Ireland. These notes are copyright Andrew Newland Introduction
EXA 0-02a, EXA 1-02a, EXA 2-02a, EXA 3-02a.
 Printing Techniques EXA 0-02a, EXA 1-02a, EXA 2-02a, EXA 3-02a Found Object Printing http://artlabforkids.susanschwake.com/wp/?p=61 Crayon Etching 1. Cover the surface of a piece of paper or card with
CARBORUNDUM MEZZOTYPE dark field & reductive techniques
 CARBORUNDUM MEZZOTYPE dark field & reductive techniques with Akua Carborundum Gel, a platemaking medium July 2017 AKUA CARBORUNDUM GEL The Akua Carborundum Gel for platemaking is used to create collagraph
Printmaking Lesson: Positive and Negative Prints
 Educational Material Printmaking Lesson: Positive and Negative Prints This lesson is intended for K-4th grade but may be adapted for other age groups by using more advanced materials like linoleum or wood
LINOLEUM BLOCK PRINTING ANDY WARHOL REVISITED ANIMAL PRINTS
 LINOLEUM BLOCK PRINTING ANDY WARHOL REVISITED ANIMAL PRINTS DESIGNING THE COMPOSITION 4 X 4 6 X 9 OUTLINE TEMPLATE choose soft Mars Carve or denser linoleum 4 X 4 HAS 2 SIDES to design, cut & print (4
Transfer an Image to Drawing Paper
 Level: Beginner to Advanced Flesch-Kincaid Grade Level: 8.4 Flesch-Kincaid Reading Ease: 64.6 Drawspace Curriculum 1.2.A5 6 Pages and 4 Illustrations Transfer an Image to Drawing Paper A three-step process
Flash Coving. Chapter 8 Flash Coving 8. 1
 8 Flash Coving Chapter 8 Flash Coving 8. 1 Flash Coving A. TOOLS In addition to the normal tools (knives, dividers, recess scribers, straightedges, rollers, trowels, etc.), other tools are also needed
Syracuse University Library Department of Preservation and Conservation Manuals. Drop Spine Box
 Drop Spine Box The "drop spine" box is a more rigid enclosure than the phase box. It is designed to protect vellum and significant bindings from wear, light and rapid environmental changes. All measurements
Vastex Manual Press Registration System Assembly and Operations Manual
 Vastex Manual Press Registration System Assembly and Operations Manual Contents Pg. # Introduction 2 Component Identification 2-3 Pallet Jig Assembly (Manual Rear Clamp) 4 Pallet Jig Assembly (Manual Side
COLORED PENCIL WITH MIXED MEDIA with Sarah Becktel
 COLORED PENCIL WITH MIXED MEDIA with Sarah Becktel SUPPLY LIST Lesson 4: Using Pen and Ink with Colored Pencil Strathmore 400 Series Toned Mixed Media Paper This paper comes in 3 colors: gray, tan, and
MANCHESTER AND ORCHARD HEIGHTS ELEMENTARY TEXT FOR STUDENT DISPLAYS, 2012 FOCUS ON CONCEPTS AND STUDENT LEARNING TARGETS
 MANCHESTER AND ORCHARD HEIGHTS ELEMENTARY TEXT FOR STUDENT DISPLAYS, 2012 FOCUS ON CONCEPTS AND STUDENT LEARNING TARGETS ART BY SIDNEY GLEN IMA INTERMEDIATE MULTI-AGE CLASS: 4 TH AND 5 TH GRADES We completed
Example: Leaf. Cut out the shape using scissors, and carefully use the template to place your sampling outlines evenly around the drawing paper.
 Colored Pencil Samplings Because of the technical skills required to successfully manipulate colored pencils, you must first practice some of the basic techniques involved with drawing colored pencil compositions.
How to make a template to mount your plaque to a surface
 How to make a template to mount your plaque to a surface A piece of heavy paper 3 4 wider than your plaque on all four sides (paper grocery bag works great too) Small amount of paint (latex dries the fastest)
Standards Content Skills Assessments
 Teacher:Bursk Subject: Advanced art 3 Grade: 12 th Month: September Big Idea: The act of drawing from observation is an opportunity to provide the viewer with the artist s interpretation of the world.
Art Masterpiece-The Great Wave at Kanagawa (from a Series of Thirty-Six Views of Mount Fuji) by Katsushika Hokusai
 by Katsushika Hokusai") Art Masterpiece-The Great Wave at Kanagawa (from a Series of Thirty-Six Views of Mount Fuji) by Katsushika Hokusai Pronunciation: Cat-soo-she-kah Ho-koo-sigh Keywords: Contrast, focal point, Perspective,
Art Masterpiece-The Great Wave at Kanagawa (from a Series of Thirty-Six Views of Mount Fuji) by Katsushika Hokusai Pronunciation: Cat-soo-she-kah Ho-koo-sigh Keywords: Contrast, focal point, Perspective,
BUILDING MARTIN-STYLE ACOUSTIC GUITAR KITS 41
 Braces To Be Tucked Into Lining The braces in the photo at right with circles at the ends are those that will be notched into the lining of the guitar. In this procedure, the end of the brace is trimmed
DIY Shaving Cream. Ingredients:
 DIY Shaving Cream Ingredients: 1/3 cup coconut oil (solid, not fractioned) 1/3 cup shea butter ¼ cup sweet almond oil 4-6 drop tobacco bay leaf fragrance oil Plastic bale jar Tools: Microwave-safe bowl
Here is a list of the work to be done, further explanation follows:
 Watercolor Exercises: Overview 1- COLOR WHEELS + STRIPES Using your full array of paints arrange your palette to create both a six unit, and then a twentyfour unit color wheel. Your goal is to use visual
Cardboard Model Buildings
 Cardboard Model Buildings Get more model kits from http://www.modelbuildings.org PRINTING & ASSEMBLY TIPS: These OO designs can easily be resized by reducing the print percentage as follows: OO scale is
Art-Drawing-Painting. 3-D or 3 dimensional when all 3 dimensions: length, height, and width can be touched and felt.
 ART Art-Drawing-Painting *Sculpture words (Additional vocabulary follows the main list) *Crafts and Ceramics (Vocabulary specific to crafts and ceramics follow this main list) Essential Vocabulary Secondary
Omarshauntedtrail.com. Obtained from. Tombstones
 http://www.home.earthlink.net/~tekvov/id1.html Tools Tombstones 1. Permanent black marker 2. Small bowl to mix paint in 3. paper towels 4. 1/4 to 1/2 inch pain brushes 5. 4 inch paint brush or 6. Roller
Temperaprint. Preparing the Egg. By Alex Chater
 Temperaprint By Alex Chater This guide will give you a basic introduction to the process in as simple, quick and low-tech way as possible. Temperaprint is best as a multi coat system of working. In essence,
The Art of Recording. Materials Needed. Background WATERCOLOR TECHNIQUES. Enduring understanding: Grade Level: 6-8. Alignment to Utah Core Curriculum
 The Art of Recording Alignment to Utah Core Curriculum Intended Learning Outcomes (ILO s): 1. Use science process and thinking skills. 2. Manifest scientific attitudes and interests. 3. Understand science
Beyond Rubber: Unique Techniques Your Own Stamps
 Beyond Rubber: Unique Techniques for or Making M Your Own Stamps There are many materials you can carve in order to make your own rubber stamps to use in décor projects. Popular materials include erasers,
Extendable Large Dovetail Jig
 Extendable Large Dovetail Jig Instruction Manual Part # 3458 CAUTION: Please read, understand, and follow all manufacturers instructions, guidelines and owners manuals that come with your power tools.
The Art Of Printmaking
 The Art Of Printmaking Mexican Caleveras (Skulls) Symbols of Life Art 8 Mrs. Brosnan Printmaking Printmaking is an indirect method of creating art where an intermediate plate is used to prepare a drawing
15 Dovetail Jig. Instruction Manual. Part # 3452
 15 Dovetail Jig Instruction Manual Part # 3452 CAUTION: Please read, understand, and follow all manufacturers instructions, guidelines and owners manuals that come with your power tools. Peachtree Woodworking
First Semester Exam Review If packet is 100% complete and turned in the day of the exam, you can earn 10pts extra credit on your exam grade.
 2D Art NAME: First Semester Exam Review If packet is 100% complete and turned in the day of the exam, you can earn 10pts extra credit on your exam grade. PART 1 Exam Review Unit 1 Drawing: Fill in the
PINWHEEL STAR WORKSHOP QUILT
 PINWHEEL STAR WORKSHOP QUILT Finished Size: 9" x 9" FABRIC REQUIREMENTS fat quarter or less of each fabric Fabric A - Medium (or dark) print for center star Fabric B - Dark (or medium) print for pinwheels,
Illustrated Art Lessons
 Pottery around the World Coiling a Pot Materials: 25-pound bag of clay cutting wire tongue depressors or plastic knives pencils or paper clips newspaper plastic bags squares of cardboard bowls of water
Grade 11 Woods Lift Lid Coffee Table. Based on Under the big Top from Popular Mechanics Website
 Grade 11 Woods Lift Lid Coffee Table Based on Under the big Top from Popular Mechanics Website TABLE TOP 1. Select enough lumber to construct a top that is between 22 ½ and 24 wide after jointing. Ensure
There are three primary units to this box: two three-sided trays (one made to fit over the other) and one case that wraps around the trays.
 and one case that wraps around the trays.") Instructions for Basic Drop-Spine Box by Sandra Liddell Reese There are three primary units to this box: two three-sided trays (one made to fit over the other) and one case that wraps around the trays.
Instructions for Basic Drop-Spine Box by Sandra Liddell Reese There are three primary units to this box: two three-sided trays (one made to fit over the other) and one case that wraps around the trays.
Mission Embossible. Tools. Materials: Copper sheeting Ammonia Pickling vinegar Newspapers Copper powder Nail polish or shelac
 Mission Embossible Jazz up your décor with copper Materials: Tools Copper sheeting Ammonia Pickling vinegar Newspapers Copper powder Nail polish or shelac Stylus Abrasive scrub pad Nail Scissors or tin
Glass Painting Techniques & Secrets from an English Stained Glass Studio by David Williams & Stephen Byrne Bee-eater
 Glass Painting Techniques & Secrets from an English Stained Glass Studio by David Williams & Stephen Byrne Bee-eater Original design measures 8 1/2 inches across (about 220 mm). Use a drawing program to
Helen Lucas. Biography of the Artist. The Art Style of Helen Lucas
 Helen Lucas Biography of the Artist Helen Lucas was born in Weyburn, Saskatchewan in 1931. Her parents had emigrated from Greece. When she was six weeks old, her family moved to Saskatoon to operate the
SCA Illumination 101
 SCA Illumination 101 By Lady Safaya bint Ahmet ibn Abdullah Becoming a scribe in the Society for Creative Anachronism is one of the most rewarding activities that any creative person can do. For those
ACRYLICS DEMONSTRATION
 ACRYLICS DEMONSTRATION PALETTE KNIFE STILL LIFE By Will Kemp In this lesson we re going to look at a still life floral arrangement, but we re going to practice loosening up with our acrylic painting, so
Art of Ancient Times, Studio 1 5
 Art of Ancient Times, Studio 1 5 Creating a Clay Relief Sculpture and an In-the-Round Sculpture In this studio you will make a relief sculpture and an in-the-round sculpture inspired by those created by
Elements of Art. Form. Color. Texture. Principles of Design
 Elements of Art Used extensively in studio and will be on exam Line Shape Form Color Value Texture Space path moving point across a surface or through space an area defined by line or other elements; two-dimensional
Printmaking Work! Lesson Plans!!
 Printmaking Work Lesson Plans Julie Karlonas, 2015 1 History of Printmaking Printmaking can be classified as either relief or intaglio. In both cases a plate (printing surface of some kind) is manipulated
Hot or Cold? Warm Colors: Yellow, Orange, Red (excitement) Cool Colors: Green, Blue, Violet (calmness)
 Cool Colors: Green, Blue, Violet (calmness)") Art Basics The Color Wheel Primary Colors: a group of colors from which all other colors can be obtained by mixing. Ex: Yellow, Red, and Blue Secondary Colors: a color resulting from the mixing of two
Art Basics The Color Wheel Primary Colors: a group of colors from which all other colors can be obtained by mixing. Ex: Yellow, Red, and Blue Secondary Colors: a color resulting from the mixing of two
INTAGLIO 101 Maury Spring 2016
 INTAGLIO 101 Maury Spring 2016 Overview of the Intaglio Processes Etching and Drypoint are some of the more common techniques of the Intaglio printmaking process. In each case, grooves are made on a sheet
Figure 2 (left) Continental bobbin with single head. Figure 3 (right) East midlands bobbin with double head
 Continental bobbin with single head. Figure 3 (right) East midlands bobbin with double head") EQUIPMENT Pillow A slightly domed mushroom or cookie pillow is often the most useful when starting lacemaking. These pillows should be used at a slight angle, i.e. they need raising slightly at the back.
EQUIPMENT Pillow A slightly domed mushroom or cookie pillow is often the most useful when starting lacemaking. These pillows should be used at a slight angle, i.e. they need raising slightly at the back.
Pressed Flowers. Materials: Directions: Pressed flowers Heavyweight paper Picture frame Craft glue Small paint brush Tweezers
 Pressed Flowers Pressed flowers Heavyweight paper Picture frame Craft glue Small paint brush Tweezers 1. Pressed flowers can be purchased online or you can easily press them yourself. Begin by folding
TURNING TOOLS CARVING TOOLS
 Multi Jig SVS-50 (37592) TURNING TOOLS Square and skew chisels with straight or curved edges. Max width 32 mm (1¼"). Parting tools Beading tools Roughing gouges Max width 50 mm (2"). CARVING TOOLS Gouges,
Watercolor Christmas Cards
 Watercolor Christmas Cards Demonstrated by Mary Churchill Fun & Happy Holiday from YongChen.com SUPPLIES Watercolor paper, cut to 4.5 x 11 inches Folded size: 4.25 x 5 inches Watercolor paints and brushes
Linoleum Printing Reduction Print
 Linoleum Printing Reduction Print Reduction printing is a method used in relief printmaking, most commonly with wood or linoleum blocks. In relief prints, cuts are made into the flat surface of the block
DEFINING THE FOCAL POINT
 Sunrise 124 10 DEFINING THE FOCAL POINT These projects demonstrate the thought process behind the composition design of two paintings that have strong focal points. You ll begin each painting using your
Silverware Chest Plan
 Silverware Chest Plan 05L14.01 Introduction 1. Measure the space required for your cutlery before beginning this project to be sure that it will fit in the drawers and top compartment. The best way to
Chapter 2.2: Media. Tools and Materials Artists Use
 Chapter 2.2: Media Tools and Materials Artists Use Drawing Media PENCIL - A versatile dry drawing medium because it can be used for quick sketches or for detailed drawings. - Made from GRAPHITE and CLAY,
PRINTMAKING TERMS & I N F O R M A T I O N
 PRINTMAKING TERMS & I N F O R M A T I O N WAVERLY-SHELL ROCK SENIOR HIGH SCHOOL MR. ADELMUND Additive drawing: a direct painting onto glass or plastic that is then printed on paper. Artist s proof: proofs
Elements Of Art Study Guide
 Elements Of Art Study Guide General Elements of Art- tools artists use to create artwork; Line, shape, color, texture, value, space, form Composition- the arrangement of elements of art to create a balanced
e) Attach the faceplate/backing plate assembly to the spindle. PROCESS
 Attach the faceplate/backing plate assembly to the spindle. PROCESS") BOARD TURNING This is an exercise in turning which can open up new vistas and potentials for any turner. A form of segmented turning best described as "STACK LAMINATE TURNING", this is unique in that it
BOARD TURNING This is an exercise in turning which can open up new vistas and potentials for any turner. A form of segmented turning best described as "STACK LAMINATE TURNING", this is unique in that it
Make Your Own Dept 56 Accessories Tombstones. Tombstones
 Make Your Own Dept 56 Accessories This is one of the many Make Your Own Dept 56 Accessories reports that describe, in detail, the necessary steps to make you own D56 accessories. All accessories are made
PRINTMAKING- LINO CUTS. St. Peter s Junior High
 PRINTMAKING- LINO CUTS St. Peter s Junior High What is printmaking? Printmaking is a process for producing a work of art using printing ink. The work of art (called a print) is created indirectly, through
DOROTHY SIMPSON KRAUSE: PROJECTS
 DOROTHY SIMPSON KRAUSE: PROJECTS Gathering Memories: a paper portfolio This small portfolio of colored paper with pockets is perfect to hold and display some of the small items you ll collect on your cruise.
Basic Stenciling Techniques
 Metal Stencil Techniques For each technique you ll need the equipment listed in addition to your stencil and removable tape. To avoid bending your stainless steel stencils, keep them flat at all times.
Curriculum Map for Visual Arts (Group 6)
") Curriculum Map for Visual Arts (Group 6) Unit Title (Time frame) GEOMETRIC FORMS 3 4 weeks Standards IB Objectives Knowledge/Content Skills Assessments Key resources What are students expected to know
Curriculum Map for Visual Arts (Group 6) Unit Title (Time frame) GEOMETRIC FORMS 3 4 weeks Standards IB Objectives Knowledge/Content Skills Assessments Key resources What are students expected to know
Wallgard 1,3 product
 INSTALLATION INSTRUCTIONS Wallgard 1,3 product October 2015 GENERAL Application can be done to smooth, dry, clean, sound walls of concrete, plaster, hardboard, plywood and fibreboard. Board material must
COLORED PENCIL WITH MIXED MEDIA with Sarah Becktel
 COLORED PENCIL WITH MIXED MEDIA with Sarah Becktel Supply List: Lesson 2: Adding Fluid Acrylics to Colored Pencil Strathmore 500 Series Mixed Media Board or Strathmore 400 Series Mixed Media Paper This
Glass Painting Techniques & Secrets from an English Stained Glass Studio by David Williams & Stephen Byrne Dog roses, Daffodils & Poppies
 Glass Painting Techniques & Secrets from an English Stained Glass Studio by David Williams & Stephen Byrne Dog roses, Daffodils & Poppies Copyright 2010 Williams & Byrne Limited Hello and Welcome! Thanks
PUMPKIN TEE. This is a free pattern provided by The Red Boot Quilt Company 2017 STRICTLY NOT FOR RESALE OR DISTRIBUTION. The Red Boot Quilt Company
 This is a free pattern provided by The Red Boot Quilt Company 2017 STRICTLY NOT FOR RESALE OR DISTRIBUTION The Red Boot Quilt Company The Red Boot Quilt Company Resize templates, if necessary, for extra
Art Play Date 2014 Multimedia Poinsettia 2014 by Sandi Strecker
 Multimedia Poinsettia 2014 by Sandi Strecker PALETTE BY DECO ART Soft Sage, Wasabi Green, Soft Blue, Whispering Turquoise, Salem Blue, Spice Pink, Country Red, Deep Burgundy, Bubblegum Pink, Snow White,
How To Make A. Large Diameter Brayer
 How To Make A Large Diameter Brayer Charles G. Morgan Mossworks Studio 77 Moss Street Victoria, B.C. V8V 4M2 CANADA 2008 www.mossworks.com charlesgmorgan@yahoo.com I got the basic design for this homemade
Basic Scrapbook Cover
 A KoalaKat Designs TUTORIAL SKILL LEVEL: BEGINNER Basic Scrapbook Cover 2014 by Geneva Campitelli / Koalakat Designs All Rights Reserved www.koalakat.com This tutorial is about creating a basic chipboard
MAT MASTER TM SYSTEMS
 FrameCo MAT MASTER TM SYSTEMS #14225 BEVEL MOUNT CUTTERS Welcome and thank you for purchasing a FrameCo Mat Master System. Through these instructions we will endeavour to show you the benefits of the system
PanelKeeper GL1500 Kit
 Rudy's ** Removable side panel cover retainer system ** PanelKeeper GL1500 Kit Installs in about 10 minutes per side - No tools required! Both sides included Prevents loss of detachable panels Stop losing
SNEAKING A PEEK. by Barb Halvorson
 SNEAKING A PEEK by Barb Halvorson EXCLUSIVE Sneaking A Peek by Barb Halvorson PALETTE DecoArt Americana Acrylics Honey Brown #13163 Lamp Black #13067 Traditional Burnt Umber #13221 Ultramarine Blue #13225
Complete Dovetail Jig Instructions
 Complete Dovetail Jig Instructions 15 18 4 3 1 12 13 8 19 17 16 6 14 5 9 11 10 2 9 PARTS LIST - Complete Dovetail Jig Introduction Your new dovetail jig will cut Full Through Dovetails and three varieties
GENERAL NOTES: Page 1 of 9
 Laminating A Zia Into A Turning Blank by W. H. Kloepping, Jan. 2009 This describes how a zia (the New Mexico state symbol) can be laminated into a turning blank. Materials needed: Square Turning Block
How to Plane Wood. Method 1 of 2: Planing With a Hand Plane
 How to Plane Wood Two Methods:Planing With a Hand PlanePlaning with a Mechanical Surface Planer A plane is an indispensable tool for smoothing and shaping wood. Planes are used to "shave" thin, uniform
MAT MASTER TM SYSTEMS
 FrameCo MAT MASTER TM SYSTEMS #14225 BEVEL MOUNT CUTTERS Welcome and thank you for purchasing a FrameCo Mat Master System. Through these instructions we will endeavour to show you the benefits of the system
Making a Veneer Sand Shaded Fan
 P. Michael Henderson January 24, 2007 There are many decorative elements for furniture that you can make using veneer in fact, the possibilities are limited only by the imagination of the veneer worker.
A Tree is Growing: Identifying Leaf Patterns and Repetition in Nature as Artist and Nature Printer
 GRADES: 3 4 NATURE GEL PRINTING A Tree is Growing: Identifying Leaf Patterns and Repetition in Nature as Artist and Nature Printer MATERIALS Speedball 5" x 7" Gel Plates Speedball Soft Rubber Brayers Speedball
A Tree is Growing: Identifying Leaf Patterns and Repetition in Nature as Artist and Nature Printer
 GRADES: 3 4 NATURE GEL PRINTING A Tree is Growing: Identifying Leaf Patterns and Repetition in Nature as Artist and Nature Printer MATERIALS Speedball 5" x 7" Gel Plate School Pack Speedball Soft Rubber
A Precision 2000 Mixed Media Project
 Día de los Muertos (Day of the Dead) Panel A Precision 2000 Mixed Media Project PROJECT TITLE: Día de los Muertos (Day of the Dead) Panel DESIGNED BY: Andy Spencer SKILL LEVEL: (Adult 1-5: 1 being the
Building Instructions
 Building Instructions Tools Required Tape measure Straight edge Pencil/pen Jigsaw Table Saw Circular Saw Electric drill 1 Hole saw bit Saw horses/table Protractor Staple gun Caulk gun Paint brush Wrenches
COMPOSITES LAB MANUAL
 COMPOSITES LAB MANUAL Version 1 Lab 3: Surface Preparation, Wet Layup, and Vacuum Bagging The original version of this manual was a one student senior design project written by Katherine White, the Composite
Secrets to Creating Realistic Waterscapes IN MIXED MEDIA. Created exclusively for Craftsy by Antonella Avogadro
 Secrets to Creating Realistic Waterscapes IN MIXED MEDIA Created exclusively for Craftsy by Antonella Avogadro TABLE OF CONTENTS 01 02 05 10 14 18 Meet the Expert Getting Started: Essential Mixed Media
Visual Communication: Basics of Drawing Appendix 1. Synopsis This module is meant as an introduction to the basic elements in drawing.
 10. Basics of Drawing Synopsis This module is meant as an introduction to the basic elements in drawing. Lectures 10. 1 Tools and Surfaces 10.2 Line 10.3 Tonalities 10.4 Perspective 10.5 Freehand Drawing
Name VALUE. Vocabulary. (also on drawing vocab worksheet)
") Name VALUE Value is the relative lightness and darkness of a color or grey tone. Color as well as black and white, has value. When you turn a color photo into a black and white version you can see the
Name VALUE Value is the relative lightness and darkness of a color or grey tone. Color as well as black and white, has value. When you turn a color photo into a black and white version you can see the
Project 1: Instagram Step 1: Step 2: Only Step 3: create 2 different artworks
 Project 1: Instagram Step 1: Create your own ART instagram using your name and an art related term. Example: GaredLuquetArt, ArtByMontana, OliviaCreates, WiseSageArts etc. Be creative! Be obvious that
Application guidance for Printed Vinyl decals
 Paint Masks - Dry Rub Decals - Waterslides - Printed media Telephone: Website: email: +44(0)7872 181119 (mobile) http://www.flightlinegraphics.com sales@flightlinegraphics.com Application guidance for
Turkey Football Panel
 Turkey Football Panel PROJECT TITLE: Turkey Football Turkey Football Panel A Stained Glass Project DESIGNED BY: Jeanne Baruth for Diamond Tech SKILL LEVEL: (Adult 1-5 1 being the easiest, 5 being difficult)
Frilly Jelly Bag. Bag Dimensions are 12 inches wide x 15 inches high (to base of handle), and 4 ½ inches deep.
, and 4 ½ inches deep.") Frilly Jelly Bag This frilly fun bag is another great one to use up some favourite left-over Jelly Roll Strips (or a bag worth buying a bright new jelly roll for!) Aside from the gathered jelly roll strips,
Frilly Jelly Bag This frilly fun bag is another great one to use up some favourite left-over Jelly Roll Strips (or a bag worth buying a bright new jelly roll for!) Aside from the gathered jelly roll strips,
VA.1 VISUAL ART SECTION
 VA.1 VISUAL ART SECTION The Visual Arts Section is a part of the Exhibits Division. When considering an entry in the Visual Art Competition, students must realise that an early start to their project will
GHOSTS & GHOULS. This is a free pattern provided by The Red Boot Quilt Company 2017 STRICTLY NOT FOR RESALE OR DISTRIBUTION
 GHOSTS & GHOULS This is a free pattern provided by The Red Boot Quilt Company 2017 STRICTLY NOT FOR RESALE OR DISTRIBUTION The Red Boot Quilt Company GHOSTS & GHOULS Wall-hanging 40 1/2in square Trick
Winter Home. by Christy Hartman
 Winter Home by Christy Hartman Winter Home By Christy Hartman Palette: DecoArt Americana Acrylics Antique Gold #13009 Bright Yellow #13227 Desert Turquoise #13044 Electric Pink #13231 Hauser Dark Green
Colori. Part I Geometry
 Colori Part I Geometry 1 2 Determine the size of your cane. TOOLS & MATERIALS FOR BUILDING A CANE: - photocopy paper - ruler - pen or a black marker - color markers (optional) - pasta machine - clay of