User Manual for Mini 3D Printer
|
|
|
- Madlyn West
- 5 years ago
- Views:
Transcription


1 User Manual for Mini 3D Printer 3D
2 Content Content... 1 Technical Parameters...2 Packing List... 3 Installation... 4 Instructions...5 I.Printing... 5 II. Taking down the finished printing models...5 III.Pause printing...5 IV.Continue printing...5 V. Stop print... 5 VI. Retract/reload the filament... 5 Note... 6 Instructions for slicing software...7 I. Installation and Operating Guide of Slicing... 7 II. Use of Slicing Software: Understand and Know Well About Software Interface Machine Settings Load Model File Process and Edit Model Files Basic Parameter Setting of Slicing Senior Parameter Setting of Slicing Additional Parameter Setting of Slicing Browse slicing file Export of slicing file Online Printing and Updating Firmware I. Online Printing...20 II. Update Firmware...20 Tips...21 Service support
3 Technical Parameters Name Model Consumable Printer size Build volume Printing accuracy Printing principle Mini 3D Printer EASIER PLA 195*210*275mm 110*110*125mm 0.1mm(Max) FDM Printing temperature 210 X, Y, Z axis position accuracy 0.1mm N.W. G.W. 2.4kg 4kg 2
4 Packing List MINI 3D Printer *1 Power Adapter *1 Power Cable *1 Printing plate *1 TF card *1 Card Reader *1 Glue Stick *1 PLA Filament (280g) *1 Note:Once you received the parcel, please check all the parts; if anything missed, contact us ASAP 3
5 Installation I. Remove the protecting clip on the plain shaft II. Install the Feed Pipe 1. Press down the feeding coupling aside the radiator, then insert the white feed pipe 2. Insert the other end of the feed pipe into the socket of the remote extruder III. Place the printing plate IV. Feed 1. Unpack the PLA filament from the package, and find out the end of it 2. Bend the head material straightly, and trim the end of the material with scissor 3. Press the spring of the extruder by hands, then insert the filament from the hole on the bottom of the extruder to the other end of the Feed Pipe (until you can t insert anymore). Then hang the filament tray on the hook on side of the printer (Note: Arrange the filament neatly and DO NOT in a mess). V. Inserting the TF Card VI. Plug in and Power on 4
6 Instructions I.Printing 1. The LCD screen will display the home page after starting up 2. Press the control knob to enter into the main menu; rotate the knob to select the option Print from SD card, and press the knob to enter into the submenu 3. Rotate the knob, and select the option print file ; press the knob to enter into the submenu 4. Rotate the knob, select the file to be printed, then press the knob to begin printing II. Taking down the finished printing models Take down the printing plate after printing finished, then take down the finished printing model by a slight bending. After that, clean the surface of the printing plate (washable). III.Pause printing 1. During the printing process, press the control knob, and the control menu pops up on the display screen; 2. Rotate the knob, select the option pause print, and press the knob to pause printing. IV.Continue printing This function is only applicable to continue printing after pausing in condition of continuous power on 1. Press the control knob, and the operation menu pops up on the display screen; 2. Rotate the knob, select the option continue print, and press the knob to continue printing. V. Stop print It is not available to continue printing after stopping printing, so please BE CAUTIOUS when using this function 1. During the printing process, press the control knob, and the control menu pops up on the display screen; 2. Rotate the knob, select the option stop print, and press the knob to stop printing. Note: It s IMPOSSIBLE to continue printing after stop print. VI. Retract/reload the filament This printer has been equipped with the function of automatic retract of filament, which can be utilized in condition that the consumable is to be used up or it is necessary to change to different colors 5
7 1. At the home page, press the control knob, then the main menu pops up on the display screen 2. Rotate the knob, select the option Auto-stripper, and press the knob to enter into the operation 3. Processing... will show on the interface, and please wait patiently 4. When the automatic retract of material ends up, the display screen will return to the home page, and the printing head s temperature will fall, then the operation is finished Note I. Clogs & Clear the nozzle In normal conditions, there s no need to worry about this issue as high quality printing filaments are selected for this printer. If you select other consumables, the nozzle may be blocked due to impurities in the material or other reasons, in which condition the following steps may help you. 1. Press the control knob at the home page, press the control knob, and the main menu pops up on the display screen; 2. Rotate the knob, select the option heating print head, and press the knob to enter into the operation; 3. Processing appears on the interface; at this time, the printer is heating the nozzle, and please wait patiently; 4. When the heating is finished, and the display screen returns back to the home page, it shows that the temperature of the nozzle is 230 ; 5. Insert hard the filament into the nozzle to clear, until you can feed smoothly. 6. Power off for cooling down after clearing II. Adjust the height of the nozzle Too high or too low position of the nozzle will influence the printing (too high, the printing material cannot stick on the bottom plate; too low, the nozzle will pin the bottom plate, and the filament cannot be extruded). Adjust the positioning knob properly as per the following figure, to adjust the distance between the nozzle and the bottom plate: 6


8 Instructions for slicing software I. Installation and Operating Guide of Slicing 1. Double click the file in TF card to enter software installation interface. User can select installation catalog in the red frame, then single click [Next] 2.Installation option, Click [Install] for installation. 7

9 3. Installation is processing. 4. Single click [Next] to install drive 8

![[Finish] 6.](/docs-images/82/84872430/images/10-1.jpg "Single click [Next] to")
10 5.After installing drive, single click [Finish] 6. Single click [Next] to complete installation. 9

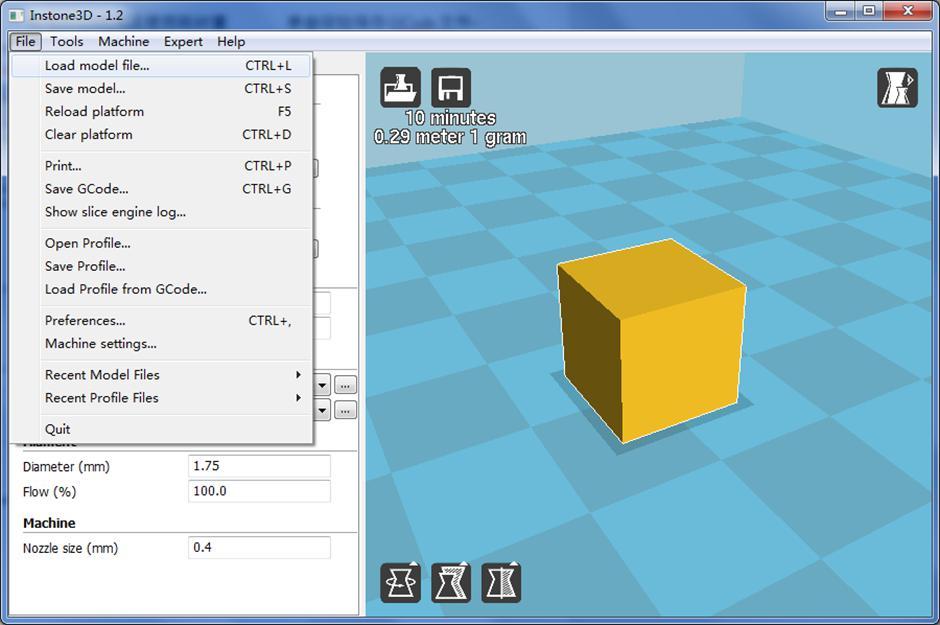
11 II. Use of Slicing Software: 1. Understand and Know Well About Software Interface 10

12 Import model View model Transparent Save Gcode file Normal X-Ray Overhang Layers Rotate Scale Mirror Lay flat To max Mirror X Reset Reset Mirror Y Mirror Z 2. Machine Settings Select corresponding machine for setting, click the Machine and select 2Um1+Normal Print, as shown in the following picture; 11
 click file, select load model file, open the catalog where the model file is stored and select the file; (2) click Load icon in the window directly")

13 3. Load Model File Open the model file, it supports file in the format stl,obj,dae,amf,bmp,jpg,jpeg, png,g,gcode. There are three ways of opening the model file: (1) click file, select load model file, open the catalog where the model file is stored and select the file; (2) click Load icon in the window directly to open the model file; (3) Drag the model file to be opened in the blue region as shown in the picture directly. 4. Process and Edit Model Files User can rotate, zoom, mirror the model according to the demand. ⑴Rotate model ⑵Zoom Y axis rotation Operation instruction: Single click left key of mouse for X axis rotation selecting corresponding rotation line, drag the mouse to rotate the Z axis rotation model with the unit of 15 (press model Shift+ left key of mouse to rotate model with the unit of 1 ) Single click left key of mouse to select corresponding operation point, 12


14 drag them to zoom out the corresponding axial size. Meanwhile, the model center hints the value. User can input specific figure in the dialog box. Please operate the model as per the following picture. X axis scaling rate Y axis scaling rate Z axis scaling rate X axis size value Y axis size value Z axis size value Proportion lock Z axis scale Y axis scale X axis scale Overall zoom ⑶Mirror model Z axis mirror Y axis mirror X axis mirror Single click the icon, three sub-options pop up, which are Z axis mirror image, Y axis mirror image and X axis mirror image from top to bottom. Single click corresponding option to realize transformation. ⑷Function introduction of right key menu Move the mouse on the model, single click right key, then the menu pops up, as shown in the following picture: Put the model in the middle of print plate. Delete model Copy multiple models (quantities can be set manually) Split the model into separate component Delete all the models on the platform Reload the model to software (initialize) Reset the position of all the models Reset the changes of all the models 13

15 5. Basic Parameter Setting of Slicing ⑴Quality Layer height: it is usually set as 0.2, Setting range: The lower the value is, the printing is smoother and the corresponding printing time is longer. Shell thickness: it is usually set as integral multiple of nozzle aperture. The common value is 0.8. Enable retraction: when retraction is enabled, the nozzle rolls back filament automatically and improves the filament drawing. ⑵Fill Bottom/top thickness: the thickness of top layer and bottom layer for the model is usually 1.2mm. Fill density: the fill density of the model is 10%, if the intensity is not required to be high. The higher the value is, the higher the intensity is, and the longer the corresponding printing time is. ⑶Speed and temperature Print speed: it is the default overall speed and usually set as 60. Too high speed results in bad effect of model formation. Printing temperature: nozzle temperature. Usually PLA consumable is set as 200. It depends on the physical property of printing consumables. Thermal bed temperature: refers to the temperature of printing platform. The machine doesn t support platform heating, so the parameter is invalid. ⑷Support Support type: three options: 1None; 2Touching build-plate; 3Everywhere; usually select2, establish support according to the demand. Platform adhesion type: three options: 1None; 2Brim; 3Raft. Usually select2, Option 2 and 3 makes the base layer of model adhere to printing platform better, Brim can solve edge warping problem effectively. however, when the bottom surface is big, it increase the difficulty of taking out the model. When Raft can make model on the print plate easier to take out, but the bottom surface of model is not smooth, user can select correspondingly. ⑸Filament Diameter: the diameter of filament for nozzle is 1.75mm. 14
16 Flow: percentage of consumable usage amount is usually set as 100%. ⑹Machine Aperture of nozzle: 0.4mm. 6. Senior Parameter Setting of Slicing (It is applicable to professional printing effect contrast. The common printing just adopts the default value without entering this setting) Click next tab control Advanced to enter advanced printing setting. ⑴Retraction Speed: corresponds to retraction function of basic parameter for detailed setting. Distance: the length of filament for retract. ⑵Quality Initial layer thickness: thickness of the bottom layer. If the bottom layer is thick, it is good for increasing adhesive force. Initial layer line width: line width when printing the initial layer Cut off object bottom: subsidence model. The subsidence part will not be printed. Dual extrusion overlap: the overlapping length of consumables at the joint when double-color nozzle prints. ⑶Speed Travel speed: the movement speed of nozzle in non-printing. Bottom layer speed: the speed of printing the first layer. When it is low, the adhesive force is increased. Infill speed: the speed of printing the internal infill part. Top/bottom speed: speed of printing top/bottom layer. Outer shell speed: speed of printing the outer shell of the model. Inner shell speed: speed of printing the inner shell of the model. ⑷Cool Minimal layer time: minimum time consumed for printing each layer Enable cooling fan: turn on fan in the process of printing Special notes: 15

 Select menu bar Expert -> Open expert setting to enter the expert printing setting.")
17 ⑴Dual extrusion overlap (the machine doesn t support this function, so the parameter is invalid): it is used for double-color printing to make the fusion of two colors more natural. ⑵Minimal layer time: ensure PLA to have full cooling time and make the printing effect perfecter. ⑶Enable cooling fan: please check this option when printing with PLA filament. 7. Additional Parameter Setting of Slicing (It is applicable to professional printing effect contrast. The common printing just adopts the default value without entering this setting) Select menu bar Expert -> Open expert setting to enter the expert printing setting. ⑴Retraction Minimum travel: the movement distance that triggers retraction. Enable combing: if user turns off the function, when the nozzle moves, it keeps retract. Minimum extrusion before retracting: there should be a certain quantity of extrusion before retract. Z hop when retracting: when starting retract, Z axis raises slightly so as to improve the filament drawing. ⑵Skirt Line count: print a round of filament surrounding model at the bottom layer. Start distance: the distance between the skirt and the first layer of model. Minimal length: the minimal length of skirt. ⑶Cool Fan full on at height: height triggered when the fan runs at full speed. Fan speed min: the lower limit rate of rotation of fan. Fan speed max: the upper limit rate of rotation of fan. Minimum speed: minimal filament feeding speed, avoid too slow printing speed causes consumable overflow. Cool head lift: when the minimal extrude speed is cooled too slowly, withdraw the nozzle to cool for a while. ⑷Infill Solid infill top: check whether the printing model is capped. Solid infill bottom: check whether the bottom of printing model is covered. Infill overlap: if the overlapping value of internal packing and outer wall is bigger, the better they are connected, but more consumables are needed in this case. 16
18 ⑸Support Structure type: the type of support structure. Overhang angle for support: minimum angle triggering the printing support. Fill amount: fill rate of support. Distance X/Y: the distance between support and model subject on X/Y axis. Distance Z: distance between support and model subject on Z axis. ⑹Black magic Spiralize the outer contour: after it is enabled, it can print the surface in a spiral shape and eliminate the interface of each layer. Only follow mesh surface: after it is enabled, it only prints the surface layer, without printing top, bottom and internal support. ⑺Brim Brim line amount: the bigger the number of brim is, the adhesion effect between it and platform is better, but it reduces the printing size. ⑻Raft Extra margin: additional round of edge on the periphery of raft. Line spacing: the distance of each line when the raft prints. Base thickness: thickness of raft printing. Base line width: base layer lines width of raft Interface thickness: thickness of the interface layer, which connected the raft and the model. Interface line width: line width of interface layer. Airgap: the gap between the raft and model. First layer airgap: gap between the last layer of the raft and the first printing layer. Surface layers: amount of surface layers put on top of the raft. Surface layer thickness: thickness of each surface layer. Surface layer line width: width of the lines for each surface layer ⑼Fix horrible Combine everything(type-a): namely integrate all the separate parts of the model into one, Type-A is dependent on the model normal and tries to keep some internal holes intact. Combine everything(type-b): namely integrate all the separate parts of the model into one, Type-B ignores all internal holes and only keeps the outside shape per layer. Keep open faces: software will repair some small damaged surfaces automatically. Extensive stitching: repair the damaged surface at a higher level. 17

19 8. Browse slicing file Click the icon on the top right corner and select Layers. The layer number bar occurs on the right side of interface. Move up and down to view the printing path. Click Normal to restore normal model view. 9. Export of slicing file After completing all the settings, please click the button indicated in the following pictures or select file Save GCode... to save GCode printing file after slicing. (if SD card has been inserted to computer, the file will be saved to SD card automatically) GCode file in the cache Printing time and used quantity Click to save Gcode of filament 18
20 19

21 Online Printing and Updating Firmware I. Online Printing Note: online printing has offline risk: if USB data is disconnected or the computer is shut down occasionally, the equipment will stop printing and fail to continue the last printing. 1. Install the driver: When installing Instone3D 1.2 software, it has finished the installation of driver as default. If the equipment fails to be identified online, please contact us to ask for driver installation package. *Mac: Drivers - Mac - CH341SER_MAC 2. Please use the standard USB data line to connect computer and printer 3. Open Instone3D 1.2 software, click menu bar file machine setting, check communication settings at right bottom corner of dialog box--- serial port --- COM 3 (please select according to the port distribution of computer) Baud rate , click OK button. 4. Icon as shown in the right picture pops up. When USB appears above the icon, it means successful connection. 5. Load model on Instone3D 1.2 software according to the Operation guide in the previous chapter. Then set slicing parameter. When the software slicing is finished, click USB icon, the printer starts heating and printing automatically. II. Update Firmware (only supported by specific machines) The machine has been installed the latest firmware prior to leaving factory. If it is not for maintenance or commissioning, please don t update the firmware programs. 1. As is mentioned above, connect printer to computer successfully, click machine in the software menu bar install custom firmware, select file INSTONE*.*.*.hex. 2. When the dialog box progress bar is finished and displays Done!Installed firmware:instone*.*.*.hex, it means successfully updated. 3. Turn off the power of printer and restart it. Then, the firmware program finishes the updating. 20
22 Tips 1. Avoid warping of the filament In order to make the filament attached to the bottom plate in a preferable way, apply a thin layer of glue on the bottom plate before printing. 2. The TF card attached with the printer has contains some printing models which you can choose for printing; please log in to choose more models. 3. You can visit to download the slicing software. 4. With the quick updates on product versions, this guide may not reflect all the characteristics of the product, please log in for more updates and supports. 21
23 Service support YIWU INSTONE 3D TECHNOLOGY CO.,LTD Website: WhatsApp: Cathy Allen George Skype: Instone 3D Twitter: Instone 3D Facebook: Instone 3D Addr: Bld. 2, Area B, No.E21 Xinke Road, Yiwu, Zhejiang, China 22
CURA WANHAO EDITION USER MANUEL
 CURA WANHAO EDITION USER MANUEL 1.1 Cura Overview We recommend that new users start with Cura as it includes a slicing engine. Host software we recommend to use Repitator. There is separate introduction
ideamaker Manual
 ideamaker Manual Using ideamaker... 2 1 Basic information... 2 1.1 What is ideamaker?... 2 1.2 Where to download ideamaker?... 2 2 Install ideamaker... 3 3 Let s Print!... 6 4 How to use ideamaker?...
CURA WANHAO EDITION USER MANUEL
 CURA WANHAO EDITION USER MANUEL 1.1 Cura Overview We recommend that new users start with Cura as it includes a slicing engine. Host software we recommend to use Repitator. There is separate introduction
Slicer"CURA" User Instructions for Olivetti 3D DESK
 Slicer"CURA" User Instructions for Olivetti 3D DESK 1 Cura Install - 1 Click Next 2 Cura Install - 2 Check all components. Then click Install 3 Cura Install - 3 Click Next 4 Cura Install - 4 The Wizard
Slicer"CURA" User Instructions for Olivetti S2 3D Printer
 Slicer"CURA" User Instructions for Olivetti S2 3D Printer 1 Cura Install - 1 Click Next 2 Cura Install - 2 Check all components. Then click Install 3 Cura Install - 3 Click Next 4 Cura Install - 4 The
Using Cura for the first time
 Cura User manual Using Cura for the first time Initial startup When you start Cura you will be greeted by the following wizard: This wizard will guide you through your initial checkup and calibration of
Table of Contents CONTENTS
 Table of Contents CONTENTS Introduction... 2 Contact TKI... 2 Printer Features & Definitions... 3 Software Parameter Setup... 8 Setting Up A Printer Profile in Cura... 8 Printing Settings... 13 Printing
Lulzbot Taz Workflow Computation + Construction Lab Iowa State University
 Lulzbot Taz Workflow Computation + Construction Lab Iowa State University 3D Printing on the Lulzbot Taz - Guidelines - The following steps that will guide the user on how to 3D print using the Lulzbot
USER MANUAL TABLE OF CONTENT
 USER MANUAL TABLE OF CONTENT A Precautions 2 B Check List 3 C Component Diagram 4 D LCD control Menu and its Function 5 E Technical Specifications 6 F Hardware Installation on Printer 7 G Software installation
Ultimaker 2+ / 3. Guide for. General Information. Self-service 3d printing at the AOC. Ultimaker 2+ UItimaker 3
 Guide for Ultimaker 2+ / 3 Self-service 3d printing at the AOC General Information Location:, 1232 Sullivan (see page 9 for full list of Ultimakers on campus) Access: You can walk-in or reserve the Ultimakers
3D Printing with Ultimaker2, User Guide
 February 25, 2015 3D Printing with Ultimaker2, User Guide University of Victoria, (BDSL) Biomedical Systems Design Laboratory 1 Cleaning and Leveling the Build- Plate Step 1: Use screwdriver to remove
Content. 1. Unpacking Component Description Hardware Installation Software Application...5. (1) Software Installation.
 Software Installation.") WWW.BIQU.EQUIPMENT Content 1. Unpacking 1 2. Component Description.2 3. Hardware Installation...3 4. Software Application...5 (1) Software Installation.5 (2) Slicing Operation...7 Appendix...... 8 5. Automatic
WWW.BIQU.EQUIPMENT Content 1. Unpacking 1 2. Component Description.2 3. Hardware Installation...3 4. Software Application...5 (1) Software Installation.5 (2) Slicing Operation...7 Appendix...... 8 5. Automatic
User Manual Creatr HS
 1 Leapfrog BV Dear customer, Congratulations with the purchase of your very own Leapfrog Creatr HS! We would like to help you get started so you can make your first 3D print on the Creatr HS and many more.
TAZ Lulzbot 3D Printer Standard Operating Procedure [Updated December 21, 2016]
![TAZ Lulzbot 3D Printer Standard Operating Procedure [Updated December 21, 2016]](/thumbs/80/81491041.jpg "TAZ Lulzbot 3D Printer Standard Operating Procedure [Updated December 21, 2016]") TAZ 3 Lulzbot 3D Printer Location of Machine: Composites Lab, RFM 1218 Location of SOP and Machine Operating & Safety Manual: Composites Lab website under resources; Composites Lab TRACS site; and Hardcopy
TAZ 3 Lulzbot 3D Printer Location of Machine: Composites Lab, RFM 1218 Location of SOP and Machine Operating & Safety Manual: Composites Lab website under resources; Composites Lab TRACS site; and Hardcopy
Daan Speth, October Slic3r settings
 Slic3r settings Daan Speth, October 2016 Slic3r is slicing software that can turn a 3D model saved as STL file into a gcode file, containing instructions for the 3D printer. After starting slic3r a startup
F400 QUICK-START GUIDE
 F400 QUICK-START GUIDE PLEASE READ THIS DOCUMENT BEFORE OPERATING YOUR PRINTER Revision 10-1/31/18 Page 1 Table of Contents 1. Introduction... 3 2. What s in the Box... 3 3. Unboxing Your F400... 4 4.
3D Printing Instructions MANTIS CHENG
 3D Printing Instructions MANTIS CHENG CHAPTER 1 How to Print on Thing-O-Matic Our Makerbot Thing-O-Matic (TOM) 3D printer is now several years old. It is not running the latest firmware. It doesn t work
Vinyl Cutter Instruction Manual
 Vinyl Cutter Instruction Manual 1 Product Inventory Inventory Here is a list of items you will receive with your vinyl cutter: Product components (Fig.1-4): 1x Cutter head unit complete with motor, plastic
Quick Start Guide. Simplify3D. Zeemanlaan MV IJsselstein The Netherlands
 Quick Start Guide Simplify3D www.felixprinters.com/support support@felixprinters.com Zeemanlaan 15 3401 MV IJsselstein The Netherlands 1 Introduction Introduction Simplify3D is software to control your
CreatBot 3D Printer. User manual. English V7.2. Henan Suwei Electronics Technology Co., Ltd
 CreatBot 3D Printer User manual English V7.2 Henan Suwei Electronics Technology Co., Ltd. - 1 - CONTENTS Notice 3 Machine Diagram Front 4 New Printer Head 5 Printer Operation Leveling Platform 6 Paving
Printing with the Ultimaker 2
 Printing with the Ultimaker 2 Introduction Ultimaker 2 uses a Fused deposition modeling (FDM) technology that was developed and implemented at first time by Scott Crump, Stratasys Ltd. founder, in 1980s.
Lead Screw Upgrade. How to upgrade your ROBO R1 to the new Lead Screw Upgrade Pack. Written By: Harrison Team RoBo 3D
 Lead Screw Upgrade How to upgrade your ROBO R1 to the new Lead Screw Upgrade Pack. Written By: Harrison Team RoBo 3D 2017 guide.robo3d.com Page 1 of 14 Step 1 Lead Screw Upgrade Begin by powering off and
XYZware User Manual. XYZware User Manual P 1
 XYZware User Manual P 1 Announcement Limitation of Liability Clause Although it is our intention to produce a manual and product functions that are correct and stable, in no event shall XYZprinting be
Hephestos 2 Levelling Guide
 Hephestos 2 Levelling Guide Version: V0.0.0 Author(s): BQ May 18 th 2018 Revised by: Approved by: Jon Goitia Effect date: 18/05/2018 Project: Hephestos 2 Changelog Version Date Changes Author V0.0.0 May
Witbox 2. Quick start guide
 Witbox 2 Quick start guide Welcome. Thank you for choosing us. This manual will help you to use your new 3D printer correctly. Welcome to the world of Witbox 2. How do I use this manual? To make sure that
Intro to 3D Printing. Anatomy of the Printer. Intro to 3D Printing & Certification imagine create learn grow
 Intro to 3D Printing 3D printing is a process of additive manufacture, this is where layers upon layers of material are built up to create a three dimensional object from a digital design. The 3D printer
3D Printing with the Lulzbot 4 Alyssa Schwartz on 7/2/2018
 3D Printing with the Lulzbot 4 Alyssa Schwartz on 7/2/2018 1. Find or Design your Object. This can come from almost any source, but needs to be in a.stl file format. a. Thingiverse.com b. https://3dprint.nih.gov/
Content. Before You Start. Assemble the 3D Printer. Use the 3D Printer. Load Filament Level the Heated Bed Start Printing Support
 Quick Start Guide Content A Before You Start B Assemble the 3D Printer C Use the 3D Printer Load Filament Level the Heated Bed Start Printing Support 2 Before You Start Get the Screwdriver Ready The screwdriver
XYZware User Manual. XYZware User Manual P 1
 XYZware User Manual P 1 Announcement Limitation of Liability Clause Although it is our intention to produce a manual and product functions that are correct and stable, in no event shall XYZprinting be
Digital Portable Overhead Document Camera LV-1010
 Digital Portable Overhead Document Camera LV-1010 Instruction Manual 1 Content I Product Introduction 1.1 Product appearance..3 1.2 Main functions and features of the product.3 1.3 Production specifications.4
F410 QUICK-START GUIDE
 F410 QUICK-START GUIDE PLEASE READ THIS DOCUMENT BEFORE OPERATING YOUR PRINTER Revision 3-5/4/18 Page 1 1. Table of Contents 1. Table of Contents... 2 1. Introduction & Getting Support... 3 2. What s in
Dremel 3D Printer Digital Fabrication Lab College of Design, Iowa State University
 Dremel 3D Printer Digital Fabrication Lab College of Design, Iowa State University 3D Printing - The following steps will guide the user on how to transfer digital work from a design software to setting
LAB 1A: Intro to SolidWorks: 2D -> 3D Brackets
 LAB 1A: Intro to SolidWorks: 2D -> 3D Brackets Set units Create Sketch Add relations Linear patterns Mirror Fillet Extrude Extrude cut First, set units. click Option on top of main menu Open Document Properties
Afinia H480 Training
 Afinia H480 Training By: David Cardarelli Version 2.2 Procedures 1. Note the time, and power the machine on using the rear power switch 2. On the PC, select the Afinia 3D software 3. Navigate to the 3D
TM Quick Start Guide
 TM Quick Start Guide Contacting Pazzles By Phone In the US: 866-729-9537 International: +1-208-922-3558 Phone Hours: Mon - Fri, 9am - 5pm Mountain Time By Email Customer Service: Technical Support: Sales:
Manual Leapfrog Creatr
 1 Leapfrog BV Dear customer, Congratulations with the purchase of your very own Leapfrog Creatr Single or Dual Extruder! We would like to help you get started so you can make your first 3D print on the
Witbox 2 Firmware update and autolevelling guide
 Witbox 2 Firmware update and autolevelling guide Version: 1.0 Author(s): BQ June 28 th 2018 Revised by: Approved by: Jon Goitia Effect date: 28/06/2018 Project: Witbox 2 Changelog Version Date Changes
Epson Stylus Pro QUICK REFERENCE GUIDE
 Epson Stylus Pro 11880 QUICK REFERENCE GUIDE Printer Parts Front Roll paper spindle Roll paper cover Roll paper holder Left ink bay Paper lever Control panel Ink bay lights Ink cover button Right ink bay
ROTATING SYSTEM T-12, T-20, T-50, T- 150 USER MANUAL
 ROTATING SYSTEM T-12, T-20, T-50, T- 150 USER MANUAL v. 1.11 released 12.02.2016 Table of contents Introduction to the Rotating System device 3 Device components 4 Technical characteristics 4 Compatibility
EinScan-SE. Desktop 3D Scanner. User Manual
 EinScan-SE Desktop 3D Scanner User Manual Catalog 1. 2. 3. 4. 5. 6. 7. 8. 1.1. 1.2. 1.3. 1.1. 1.2. 1.1. 1.2. 1.3. 1.1. 1.2. Device List and Specification... 2 Device List... 3 Specification Parameter...
Assembly Guide for Printrbot - Simple Maker s Edition 1405
 Assembly Guide for Printrbot - Simple Maker s Edition 1405 Last update: March 2016 Please Note: be careful on the steps that are underlined 1 Contents Tools Needed:... 3 First step: Check components and
OPERATION MANUAL MIMAKI ENGINEERING CO., LTD.
 OPERATION MANUAL MIMAKI ENGINEERING CO., LTD. http://www.mimaki.co.jp/ E-mail:traiding@mimaki.co.jp D200674 About FineCut for CorelDRAW Thank you very much for purchasing a product of Mimaki. FineCut,
General Help. Last revised: Winter When I try to print something on the computer, it appears to work, but nothing comes out of the printer.
 General Help Last revised: Winter 2015 Problem Solution When I try to print something on the computer, it appears to work, but nothing comes out of the printer. See the next item. When I try to print something
MAKING THE FAN HOUSING
 Our goal is to make the following part: 39-245 RAPID PROTOTYPE DESIGN CARNEGIE MELLON UNIVERSITY SPRING 2007 MAKING THE FAN HOUSING This part is made up of two plates joined by a cylinder with holes in
RISK OF SHOCK: DO NOT WIPE DOWN ANY ELECTRICAL COMPONENTS. ALWAYS KEEP AWAY FROM ALL AREAS WHERE ELECTRONIC COMPONENTS ARE INSTALLED.
 Maintenance General Cleaning Waste material from the printing process can accumulate inside the printer. Using a slightly damp, lint-free cloth, wipe the interior of the CubePro including the print plate,
Silhouette Connect Layout... 4 The Preview Window... 5 Undo/Redo... 5 Navigational Zoom Tools... 5 Cut Options... 6
 user s manual Table of Contents Introduction... 3 Sending Designs to Silhouette Connect... 3 Sending a Design to Silhouette Connect from Adobe Illustrator... 3 Sending a Design to Silhouette Connect from
EULAMBIA ADVANCED TECHNOLOGIES LTD. User Manual EAT-EOM-CTL-2. Alexandros Fragkos
 EULAMBIA ADVANCED TECHNOLOGIES LTD User Manual Alexandros Fragkos (alexandros.fragkos@eulambia.com) 11/28/2016 28/11/2016 User Manual User Manual 28/11/2016 Electro-Optic Modulator Bias Control Unit v2.0
AM8 Printer A metal frame for your Anet A8 By Pheneeny v1.0 April 20, 2017
 AM8 Printer A metal frame for your Anet A8 By Pheneeny v1.0 April 20, 2017 Please read this entire document before printing parts or building this frame Disclaimer: This guide is for informational purposes
Geeetech Delta Rostock mini G2 pro / G2s pro Building Instruction
 Geeetech Delta Rostock mini G2 pro / G2s pro Building Instruction (Document version: 04-11, 2016) CONTENT Safety Instructions... 1 Preparation... 2 1 Base Assembly... 3 1.1 Motor holder assembly... 3 1.2
ISCapture User Guide. advanced CCD imaging. Opticstar
 advanced CCD imaging Opticstar I We always check the accuracy of the information in our promotional material. However, due to the continuous process of product development and improvement it is possible
The ideal K-12 science microscope solution. User Guide. for use with the Nova5000
 The ideal K-12 science microscope solution User Guide for use with the Nova5000 NovaScope User Guide Information in this document is subject to change without notice. 2009 Fourier Systems Ltd. All rights
(Assembling Guide supplied by imakr ) with the support of MyMiniFactory.com
 with the support of MyMiniFactory.com") (Assembling Guide supplied by imakr ) with the support of MyMiniFactory.com Summary Congratulations on beginning on your journey into 3D printing with the STARTT 3D printer. In this guide, you will have
(Assembling Guide supplied by imakr ) with the support of MyMiniFactory.com Summary Congratulations on beginning on your journey into 3D printing with the STARTT 3D printer. In this guide, you will have
Operation Manual. Chap. 1 Attention. Please read the attention carefully before operating the machine.
 Chap. 1 Attention Please read the attention carefully before operating the machine. 1. No magnetic devices should be placed in the vicinity of the plotter, specifically the carriage. 2. Prevent from dropping
DXXX Series Servo Programming...9 Introduction...9 Connections HSB-9XXX Series Servo Programming...19 Introduction...19 Connections...
 DPC-11 Operation Manual Table of Contents Section 1 Introduction...2 Section 2 Installation...4 Software Installation...4 Driver Installastion...7 Section 3 Operation...9 D Series Servo Programming...9
Revision 1. March 21, ADC Operation Manual N 11 th St San Jose CA
 Revision 1 March 21, 2017 ADC Operation Manual www.mountztorque.com - 1080 N 11 th St San Jose CA 95112 408.292.2214 1 Index 1. Installation 3 1.1 Required PC specification 3 1.2 Software 3 2. Operation
APX Mobile and Portable Automated Test and Alignment
 APX Mobile and Portable Automated Test and Alignment Software Updates First things first! Be sure to check that you are running the latest software versions for the 8800SX and its applications. Visit the
Happy Link Software INSTRUCTION MANUAL
 Happy Link Software INSTRUCTION MANUAL 101001E-3 HAPPY Contents Regarding this software Normal Operation -------------------------------------------------------------------------------------------------
Provided: 1.3, 1.5 and 2 mm hex wrenches. Not Provided: Small flat head screw driver, pliers/adjustable. wrench.
 Note: These instructions are a work in progress, and DualStrusion is intended only for bleeding-edge experimenters. The MakerBot Stepstruder MK7 is the first extruder for the MakerBot Thing-O-Matic to
Table of Contents. Vizit s Carousel Menu Gallery Play Favorite Remove Rotate Fill Screen Friends Block Lock Screen Settings Reply Share
 User Guide Table of Contents VIZIT, VIZITME.COM, VIZIT SEE.TOUCH.FEEL, and the Vizit logo are trademarks and/or registered trademarks of Isabella Products, Inc. Other marks are owned by their respective
Instructions for using the CRR10: Creality 3D - Our Trustworthy 3D printer
 Instructions for using the CRR10: Creality 3D - Our Trustworthy 3D printer FABLAB BRIGHTON 2018 Installing Curamaker software The first step is to download the software for this machine. The one we ve
Software Club 402: Create THREAD VELVET Embroidery
 Software Club 402: Create THREAD VELVET Embroidery By Janie Lantz, Embroidery Software Specialist Create THREAD VELVET embroidery with its unique velvety plush texture, using 5D Design Creator in the 5D
ModelSmart 250S. User Guide
 ModelSmart 250S User Guide HowP olaroidareyou.com 1 CONTENTS Introduction 3 Safety Instructions 4 Box Contents 5 Printer Set Up 6 Windows Operating System 9 Installing Cartridges 10 Z-Axis Sheets 13 Camera
1. Creating geometry based on sketches 2. Using sketch lines as reference 3. Using sketches to drive changes in geometry
 4.1: Modeling 3D Modeling is a key process of getting your ideas from a concept to a read- for- manufacture state, making it core foundation of the product development process. In Fusion 360, there are
DragonLink Advanced Transmitter
 DragonLink Advanced Transmitter A quick introduction - to a new a world of possibilities October 29, 2015 Written by Dennis Frie Contents 1 Disclaimer and notes for early release 3 2 Introduction 4 3 The
Operation manual. Thanks very much for purchasing this. cutter/plotter. To ensure you make best use of your machine,
 Operation manual Thanks very much for purchasing this cutter/plotter. To ensure you make best use of your machine, please read this manual carefully and thorughly beforhand. IMMEDIATELY power off the machine
Tevo Tarantula Auto Level Instructions. By ArcadEd. Mounting the Sensor:
 Tevo Tarantula Auto Level Instructions By ArcadEd Mounting the Sensor: First off, the kit does not seem to come with a screw for mounting the sensor. Maybe it does now, but at the time I got my kits, it
SolidWorks & Tinkerine 3D Printing Tutorial ELEC391
 SolidWorks & Tinkerine 3D Printing Tutorial ELEC391 Engineering Services, Dept. of Electrical and Computer Engineering University of British Columbia, Faculty of Applied Science Table of Contents Installing
Modeling Basic Mechanical Components #1 Tie-Wrap Clip
 Modeling Basic Mechanical Components #1 Tie-Wrap Clip This tutorial is about modeling simple and basic mechanical components with 3D Mechanical CAD programs, specifically one called Alibre Xpress, a freely
Reference Guide Brief explanations for routine operations
 Reference Guide Brief explanations for routine operations DCP-T30 DCP-T50W DCP-T70W Brother recommends keeping this guide next to your Brother machine for quick reference. Online User's Guide For more
reference guide reference guide reference guide
 hp photosmart 240 series reference guide reference guide reference guide contents 1 welcome..................................... 1 find more information.............................. 1 what s in the box.................................
GCC LaserPro Laser-cutter
 2/9/17 p. 1/10 Overview Reads Adobe Illustrator files Can cut: along a vector path (for lines, contours, etc) in a raster pattern (for filled areas) Can cut a variety of materials Examples: mat board,
Photoshop Elements Hints by Steve Miller
 2015 Elements 13 A brief tutorial for basic photo file processing To begin, click on the Elements 13 icon, click on Photo Editor in the first box that appears. We will not be discussing the Organizer portion
Converting a solid to a sheet metal part tutorial
 Converting a solid to a sheet metal part tutorial Introduction Sometimes it is easier to start with a solid and convert it to create a sheet metal part. This tutorial will guide you through the process
Ultimaker 2 Extended THINK LARGE, PRINT BIG USER MANUAL
 Ultimaker 2 Extended THINK LARGE, PRINT BIG USER MANUAL R 2 TABLE OF CONTENTS 1. WELCOME TO THE ULTIMAKER 2 EXTENDED 4 Safety and compliance 5 Specifications 7 2. SETTING UP THE ULTIMAKER 2 EXTENDED 8
Lesson 6 2D Sketch Panel Tools
 Lesson 6 2D Sketch Panel Tools Inventor s Sketch Tool Bar contains tools for creating the basic geometry to create features and parts. On the surface, the Geometry tools look fairly standard: line, circle,
J. La Favre Fusion 360 Lesson 2 April 19, 2017
 In this lesson, you will create a round plate with 12 counter-bored holes to fit 6-32 socket head screws. A counter-bored hole has two diameters, one to fit the threaded part of the screw and the other
RR Series TM USER GUIDE. For Vinyl Express R Series Cutters
 RR Series TM USER GUIDE For Vinyl Express R Series Cutters Thank you for choosing an R Series cutter from SignWarehouse, Inc. Before using your cutter, we suggest you read this guide. It will guide you
Explorer Wiring Kit (assembled)
") Explorer Wiring Kit (assembled) For Vintage, Firestorm & Standard Series Please Read All Instructions Before Beginning. Tools you will need: Soldering Iron (35 watt preferably) Solder Wet Sponge Wire Clippers
Explorer Wiring Kit (assembled) For Vintage, Firestorm & Standard Series Please Read All Instructions Before Beginning. Tools you will need: Soldering Iron (35 watt preferably) Solder Wet Sponge Wire Clippers
SKF TKTI. Thermal Camera Software. Instructions for use
 SKF TKTI Thermal Camera Software Instructions for use Table of contents 1. Introduction...4 1.1 Installing and starting the Software... 5 2. Usage Notes...6 3. Image Properties...7 3.1 Loading images
DPM Kit DK-1. Using the DPM Kit
 DPM Kit DK-1 Using the DPM Kit To ensure safe usage with a full understanding of this product's performance, please be sure to read through this manual completely. Store this manual in a safe place where
2012 Monitored Rehab Systems E1201 Manual Kneelax. Installation and user manual
 2012 Monitored Rehab Systems E1201 Manual Kneelax Installation and user manual Table of contents CHAPTER 1 Installation Manual... 3 1.1 Install Kneelax USB driver... 3 1.2 Detect COM-port... 6 1.3 Software
2809 CAD TRAINING: Part 1 Sketching and Making 3D Parts. Contents
 Contents Getting Started... 2 Lesson 1:... 3 Lesson 2:... 13 Lesson 3:... 19 Lesson 4:... 23 Lesson 5:... 25 Final Project:... 28 Getting Started Get Autodesk Inventor Go to http://students.autodesk.com/
COLE. Cutting Plotter CL365/720/870/1100/1350. Instruction Manual
 COLE Cutting Plotter CL365/720/870/1100/1350 Instruction Manual Contents I. General Safety Rules 1 II. Specifications 2 III. Plotter Components Diagram 3 IV. Assembly Diagram of Plotter Stand 4 V. Loading
CobraCam USB III Portable Inspection Camera with USB Interface Instruction Manual
 CobraCam USB III Portable Inspection Camera with USB Interface Instruction Manual 07/13 Test Equipment Depot - 800.517.8431 99 Washington Street, Melrose, MA 02176 TestEquipmentDepot.com CobraCam USB 3
How to Transform your 3D Printer in a CNC MILLING MACHINE
 How to Transform your 3D Printer in a CNC MILLING MACHINE How to Transform your 3D Printer in a CNC milling machine We can finally presents you a tutorial on how to modify our 3D printer K8200 to transform
POWERED BY WANHAO DUPLICATOR I3 PLUS
 POWERED BY WANHAO DUPLICATOR I3 PLUS INSTRUCTION MANUAL POWERED BY WANHAO POWERED BY WANHAO 3D Printer Warranty Details The product is guaranteed to be free from defects in workmanship and mother board
STRUCTURE SENSOR QUICK START GUIDE
 STRUCTURE SENSOR 1 TABLE OF CONTENTS WELCOME TO YOUR NEW STRUCTURE SENSOR 2 WHAT S INCLUDED IN THE BOX 2 CHARGING YOUR STRUCTURE SENSOR 3 CONNECTING YOUR STRUCTURE SENSOR TO YOUR IPAD 4 Attaching Structure
[PTCS 7S OPERATION MANUAL]
![[PTCS 7S OPERATION MANUAL]](/thumbs/83/88765390.jpg "[PTCS 7S OPERATION MANUAL]") 2014 RiCOMA International Version 2.2 [PTCS 7S OPERATION MANUAL] RCM-1201TC-7S / RCM-1501TC-7S Table of Contents PART 1 CONTROL SYSTEM... 1 1.1 SYSTEM OVERVIEW... 1 1.2 PRECAUTIONS... 1 1.3 WORKING ENVIRONMENT...
2014 RiCOMA International Version 2.2 [PTCS 7S OPERATION MANUAL] RCM-1201TC-7S / RCM-1501TC-7S Table of Contents PART 1 CONTROL SYSTEM... 1 1.1 SYSTEM OVERVIEW... 1 1.2 PRECAUTIONS... 1 1.3 WORKING ENVIRONMENT...
3D Printable Dubrovnik Style Chess Set
 3D Printable Dubrovnik Style Chess Set Table of Contents Print Settings...1 PLA...1 Woodfil PLA...2 Supports...4 Print Settings These print settings were used to print the pieces seen in the photographs
Telecaster Wiring Kits Please Read All Instructions Before Beginning. Tools you will need: Soldering tips: Removing Current Wiring: Step 1. Step 2.
 Telecaster Wiring Kits Please Read All Instructions Before Beginning. Tools you will need: Soldering Iron (35 watt preferably) Solder Wet Sponge Wire Clippers Wire Strippers 3/8 Drill Bit 5/32 Drill Bit
Creo Revolve Tutorial
 Creo Revolve Tutorial Setup 1. Open Creo Parametric Note: Refer back to the Creo Extrude Tutorial for references and screen shots of the Creo layout 2. Set Working Directory a. From the Model Tree navigate
Lenovo 3300/3310 Inkjet Printer
 Lenovo 3300/3310 Inkjet Printer User s Guide for Windows Setup troubleshooting A checklist to find solutions to common setup problems. Printer overview Learn about the printer parts and the printer software.
Read Before Use Accessories...2 Operating Precautions...2 Creating Data for the Roll Feeder... 3
 Roll Feeder CONTENTS Read Before Use... 2 Accessories...2 Operating Precautions...2 Creating Data for the Roll Feeder... 3 Activating the Roll Feeder Function...3 Creating Data...4 Weeding Box Function...5
Shenzhen GETECH CO.,LTD GEEETECH. Building Instructions of Geeetech Prusa I3 X
 Building Instructions of Geeetech Prusa I3 X CONTENT CONTENT... 2 Safety Instructions...3 Preparation...4 Unfold the box and check the package list... 5 1. Assemble the threaded rods of Y axis... 6 2.
BIGBOT ASSEMBLY INSTRUCTIONS. 1/18/2017 V0.5
 BIGBOT ASSEMBLY INSTRUCTIONS www.bigbot-3d.com 1/18/2017 V0.5 FOREWORD: PLEASE TAKE CARE WHEN HANDLING THE GANTRY. THE ASSEMBLY SHOULD BE HANDLED ONLY BY THE ALUMINUM FRAME, AND AVOID TOUCHING OR LIFTING
Sashiko-Style Sampler
 Sashiko-Style Sampler Created by Debbi Lashbrook Sashiko, traditionally a Japanese hand embroidery technique, can be imitated using BERNINA Embroidery Software 7 and your embroidery machine. The simple,
-Inventor Series FLASHFORGE CORPORATION----- Create a joyful 3D life with you!
 -Inventor Series- ----- FLASHFORGE CORPORATION----- Create a joyful 3D life with you! < Parameter > Inventor I CE Totally-enclosed Design & Inner Temperature Controlling System. Perfectly Meet Temperature
The Bowflex Revolution XP Home Gym Assembly Instructions. P/N: Rev ( /0 )
") P/N: 001-7057 Rev ( /0 ) The Bowflex Revolution XP Home Gym Assembly Instructions 2 Table of Contents Before You Start... 2 Tools You Will Need / Hardware Contents... 3 Box Contents... 6 Assembling Your
P/N: 001-7057 Rev ( /0 ) The Bowflex Revolution XP Home Gym Assembly Instructions 2 Table of Contents Before You Start... 2 Tools You Will Need / Hardware Contents... 3 Box Contents... 6 Assembling Your
RDworks and Basic Rabbit Laser Operation Tutorial
 RDworks and Basic Rabbit Laser Operation Tutorial File Setup Layer color is how the Rabbit Software designates different operations so, regardless of design software, you will want to organize geometry
JUST EMBROIDER IT! ALL YOU NEED TO KNOW ABOUT HOOP 'N' BUDDYZ
 BERNINA ebook Series JUST EMBROIDER IT! ALL YOU NEED TO KNOW ABOUT HOOP 'N' BUDDYZ Written by: Judy Hahner BERNINA Educator, Professional & Home Embroidery Specialist Hoop 'N' Buddyz Embroidery Hoop and