XYZware User Manual. XYZware User Manual P 1
|
|
|
- Domenic Higgins
- 6 years ago
- Views:
Transcription
1 XYZware User Manual P 1
2 Announcement Limitation of Liability Clause Although it is our intention to produce a manual and product functions that are correct and stable, in no event shall XYZprinting be liable for any direct, special, indirect, incidental, consequential damages (including data loss of your computer). It is strongly recommended to backup or move your important data before using this software to prevent data loss and corruption. Trademarks All trademarks and registered trademarks are the property of their respective owners. Printing History Reprints of this manual's edition number may incorporate changed material since last release. Minor corrections and updates may be incorporated without changing the publication date or edition number. Doc Edition Month Year P 2
3 Outline 1. About XYZware System Requirements Installation Instruction Quick Start Print Single-Color Model(s) Print Dual-Color Model(s) Functions View Move Rotate Scale Info Remove Reminder Print Setup Print Printer Quality Raft Support Advanced Settings Profiles D Density Shells Layer Height Speed Other Functions File Saving File Export Settings and Update Switch Language Preview Printing Color Printer Type Setup Auto Position Objects Firmware Update Monitor Mode Maintenance reminder...27 P 3
4 11. XYZware Pro Printer My Printer Printer Profile Temperature General Layer Height Shell Thickness Infill Speed Shells Infill Others Supports Raft & Brim Supports Retraction Retract Length Activate Threshold Nozzle Lifting for Retraction Add Extra Filament after Travel < Retraction Extrusion Ratio Shell Extrusion Ratio Infill Extrusion Ratio XYZware Color Mode Printer Settings User Interface and Toolbar Mixer Mode Multi-color Mode Blending Zone...50 P 4

5 1. About XYZware XYZware is a brand new application introduced by XYZprinting for designing, customizing and printing digital 3D Models. It can import objects in *.stl file format and create realistic simulated objects. XYZware is also used with the da Vinci 3D printer series, introduced by XYZprinting to quickly print outreal products. XYZware removes the technical barriers of traditional production resulting in an enriched Creative Life for the modern Digital Family. For Mac OS users Mac OS users may find compatible software on the master CD supplied with the printer or the website.for information of latest version or technical support, please go to XYZprinting website: P 5
 Windows 7 / Windows 8 above (Mac) Mac OSX 10.")

6 2. System Requirements Please ensure your Operating System is compatible with the following requirements. Software Hardware Operating System Hardware Requirements (PC) Windows XP (.Net 4.0 required) Windows 7 / Windows 8 above (Mac) Mac OSX bit above Minimum System Requirements: Memory: 512MB, Storage: 100MB or More Monitor Resolution: 1024 x 768 Recommended System Requirements: Memory: 2GB, Storage: 500MB or More Other Firmware and Other Third Party Software Considerations Standard common VGA driver on a computer operating system or a graphics card that does not support OpenGL 2.1, may cause unknown error in XYZware. About.Net Framework On a Windows operating system; XYZware software uses it to improve stability and smoothness. Our XYZware Beta testing has indicated that using older versions may cause install failure and/or software malfunction. It is strongly recommended that you use the latest available version; 4.0 and above. Please refer to the Microsoft website for more information about.net framework. Online Registration XYZware software will request that you register your da Vinci 3D Printer 1.0 series when it is first connected to the PC. We recommend that you take the time to register your product. Periodic updates are made available through the XYZware software and the internet. Registration will permit any updates to complete automatically. Step 1.On XYZware, press "Register Now" Step 2.On the registration page in XYZware, fill in all required information to complete the process. P 6

7 3. Installation Instruction Before working with your printer, please first install XYZware. You can find the installer with the bundled disc. For additional information, system updates and technical support please refer to the XYZprinting online resources: XYZware Setup Wizard will then appear on your screen. Please follow the on screen instructions to finish the installation. You can also setup the program manually. Open the file explorer and search Setup.exe shown below in your disc drive. Double click Setup.exe. Congratulations! Your installation is complete! You can now launch XYZware from the desktop and start creating and printing. P 7

8 4. Quick Start Use this document as a guide to the 3D printing process. Before running the XYZware software on your PC; it is recommended to connect the USB cable from PC to printer. Before importing.stl file, it is advised to check the "Setting" on upper right side. You may select display language, printer type and other settings for a smoother operation. See "8. Setting and Update" for detailed description on Setting. The following is the demonstration of quick printing with da Vinci 1.0 seriprinter: P 8


9 4.1 Print Single-Color Model(s) Click on the Import icon to select files to be 3D printed. The following instructions use Sample.stl as an example on how to print your 3D object. Print Your First Object (Sample file: Sample.stl) P 9

10 Edit and Adjustment You can move, resize or rotate the object by using the icons displayed on the left hand side. Please refer to the next chapter Functions for detailed description. Printing Objects After you have completed editing your object, click on the Print icon to prepare your file. The print settings can be changed to suit your requirements, for more details on this please refer to Chapter Printing Setup. P 10


11 4.2 Print Dual-Color Model(s) To print a dual-color model from da Vinci 2.0 Duo series, it is necessary to import 2 separated.stl objects that made up a complete model. By default, all.stl files will be printed from extruder 1. You may assign one object to be printed from extruder 2. P 11


12 5. Functions In this chapter we will explain the function of the icons on the left hand side. 5.1 View Alternative: Switch the views by clicking and dragging the mouse. NOTE You can view the object contents and structure from any angle P 12

13 5.2 Move Alternative: Move the 3D object by holding ALT key, then click and drag the mouse. NOTE Adjust the value of the X, Y and Z axis to change the printing position of the object on the print bed. 5.3 Rotate NOTE You may want to improve the quality of printing and the strength of the object. This can be done by increasing the contact area between the object and the build plate. Therefore, consider rotating and enlarging your object in order to achieve a better result P 13


14 5.4 Scale NOTE The scale function allows you to enlarge or reduce the printing proportionally without affecting the original file. 5.5 Info View info of.stl on da Vinci 1.0 print bed NOTE You can find more information about the object size and position in the Information window. P 14


15 View info of.stl on da Vinci 2.0 Duo print bed To reassign the extruder for output a.stl file, you may select the extruder in the window. View info of.3w file This window shows the printing settings while exporting the file. To change any printing settings of the file, please import the original 8.STL and export to *.3w with a new set of print preferences. P 15
 and click \"Remove\".")


16 5.6 Remove NOTE To delete model(s) from the virtual print bed, simply select the object(s) and click "Remove". To choose multiple objects, press Shift key while selecting. (Remove only works with STL imported objects. *.3w imports are locked and can't be removed.) 5.7 Reminder The XYZware will automatically find any inappropriately positioned object and mark it with a distinguishing color, this prevents the object from being printed off the print bed. P 16

17 6. Print Setup You can modify the printing results by changing the printing preferences. For example by setting the print speed to slow and checking the Supports box will result in a fine print quality. 6.1 Print Start object printing. 6.2 Printer Select the printer. P 17


18 6.3 Quality Print quality will impact the estimated time it will take for an object to print. For example, high quality prints will take longer to make than low quality prints as each layer printed is thinner creating a more detailed finish. NOTE Print Quality: Standard, Good, Excellent 6.4 Raft Printing thinner and longer objects require more attention due to the shapes physical instability, the object may buckle or twist under its own weight. When printing long thin objects consider increasing the area of contact between your object and the print bed by checking the Raft box. Rafts create stability and can be removed after your object has been printed. P 18

 Support is removed 6.")
19 6.5 Support The supportive structures are printed according to the objects features. Support is used to create structural strength and ensure that your model does not collapse during the printing process. Model with support (rear view) Support is removed 6.6 Advanced Settings Click on the Advanced button for more printing options. P 19

 based on honeycomb structures.")
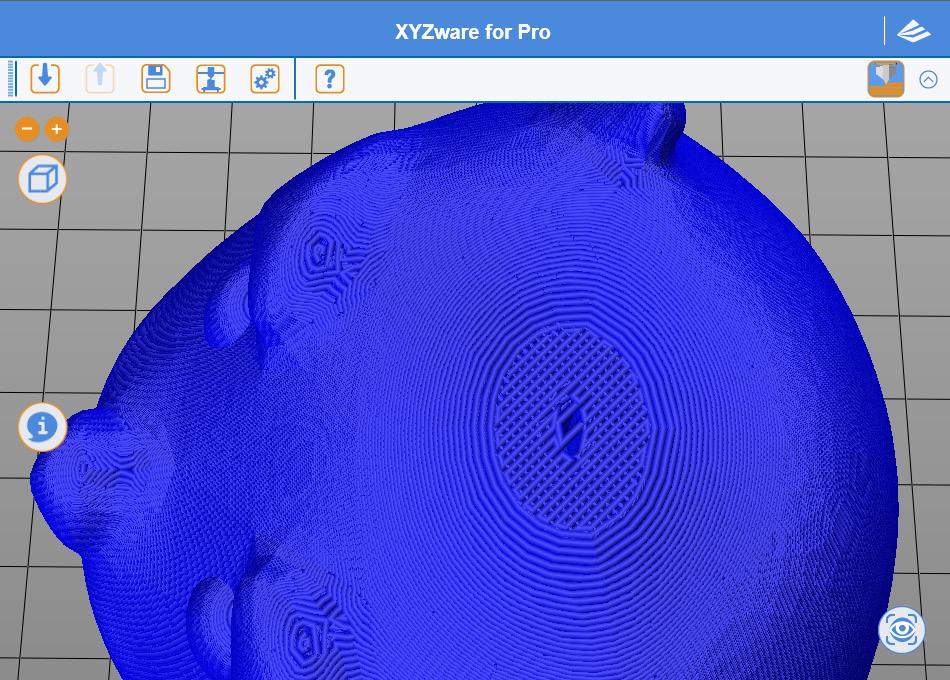
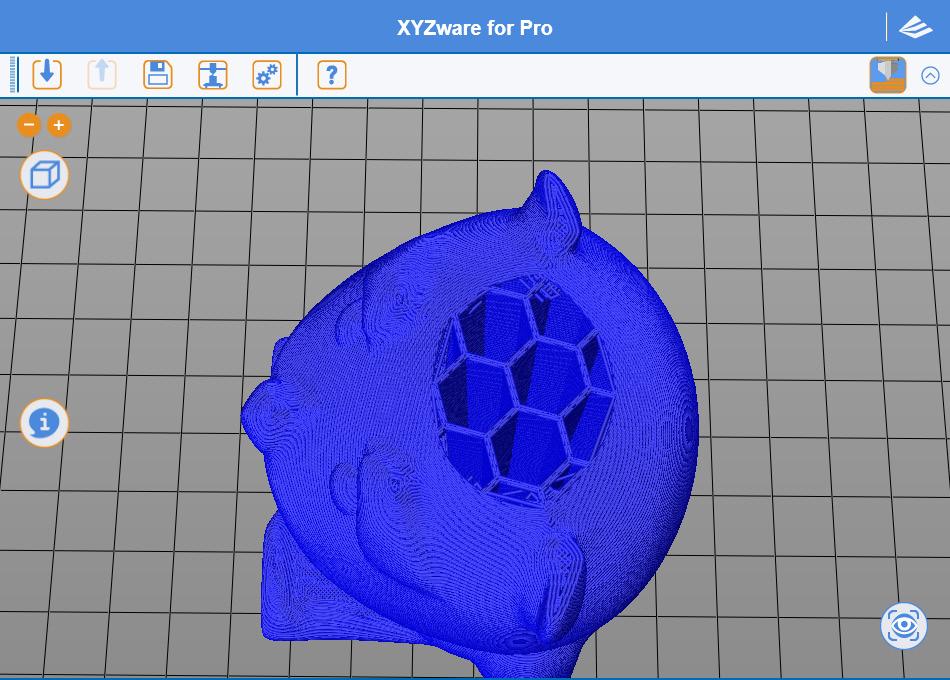
20 6.7 Profiles Add or select saved printing preferences through the Profiles pull-down menu. Different printing preferences can be created, saved and applied to different models depending on the project requirements D Density Before printing, users may use this function to adjust the print density of the object(s). The default printer setting on the da Vinci 3D printer will create the internal structure of the object(s) based on honeycomb structures. Using the 3D density pull-down menu, you can adjust the honeycomb structure density from hollow to high to create desired strength requirements. Low (10%) - this setting requires shorter printing time, but the structure is relatively weak. The setting is suitable for decorative objects. NOTE Available 3D densities Hollow, fewest and scattered honeycomb structure Low Medium High Solid Medium (30%) - The selection gives higher strength to the structure than low density. To print an object for mechanical purpose, it is advised to set the density to 30% or above. High (50%) - For the object which should be durable or will be used as functional mechanical part, it is suggested to select higher density. Solid (90%) - High dense object is more durable. However it takes longer and need more filament for printing. P 20


21 6.9 Shells Shells are the outer layer of the object. Thick shells end in better printing quality but take longer for printing. Thin shells shorten the duration of printing but may be vulnerable to break. Thin: Single layer is outlined under the setting. NOTE Shell settings thin Normal Thick,best quality Normal: The outer structure is consisted of 2 layers. Extra layer strengthens objects. Thick: Thick shell is made up of 3 layers. The strengthened structure is more sustain, but it takes longer for output. P 21

22 The strength of the object is affected by the setting of 3D density and shell. To ensure the sustainability of objects of different size, shape and purpose, different density and shell settings will be required. Here are some suggestion on density and shell settings: Shell 3D Density Hollow (0%) Low (10%) Medium (30%) High (50%) Solid (90%) Thin Normal Thick Smaller, hollow display Larger, hollow display Smaller, flat detailed display Large, taller display Smaller, flat detailed, durable parts Larger, durable parts 6.10 Layer Height By setting different layer heights, you can alter the thickness of each layer that your printer creates. NOTE The printed layer thickness can be adjusted between 0.1mm 0.4mm. For best results,we recommend mm layer printing. P 22


23 6.11 Speed Use the printing speed adjustment to change the settings based on the size and precision of the object. In general a better object quality is accompanied with a lower printing speed. NOTE Printing speed settings Slow, best quality Standard Fast 7. Other Functions Once you have finished customising your object to your preferences, it can be 3D printed or saved for future use. 7.1 File Saving Click on Save, the XYZware will save the file as an *.stl format. P 23


24 7.2 File Export Select Export, the XYZware will save the file as a *.3w format..3w is the specific file format that is developed solely for the "da Vinci" series 3D printers. Programs like XYZware will make slicing calculations from STL files and store the printing profile within.3w file, which will speed up your next 3D printing project. 8. Settings and Update P 24


25 8.1 Switch Language The XYZware supports multiple languages. You can use the pull-down menu to select a language for your XYZware. After selecting a language preference the change will be instant. P 25


26 8.2 Preview Printing Color The settings enable the preview of the filament color from each extruder. Please note that the color is for preview only. It may be different from actual color. 8.3 Printer Type Setup Please select the printer in use from the drop-down list. The size of print bed will be changed according to the selected printer. 8.4 Auto Position Objects Enabling this function when printing with da Vinci 1.0 series, XYZware will cause the imported objects to shift where they land on the print bed to avoid landing on top of each other. It is recommended to disable this function when using da Vinci 2.0 series 3D printer thus landing both imports at the center of the print bed and combining to become one dual filament object avoiding having to reposition the objects after importing. 8.5 Firmware Update For the best 3D printing experience, please keep the software and/or firmware updated. Updating is simple: click "About" icon and XYZware will check for updates. If the XYZware finds a newer version, click the "Software Update"/"Firmware Upgrade" button for updating. Note: make sure to confirm Internet access on the PC before using the about and trying to update firmware or updating XYZware software. P 26


27 9. Monitor Mode Temperature of print bed and extruders can be accessed by clicking "Monitor" icon on bottom right side. This function is disabled when the USB cable to printer is removed. 10. Maintenance reminder Over time, carbon deposits or filament dust buildup on the nozzle may decrease its performance. It is advisable to clean the nozzle after every 25-hour of printing. After every 25 hours of printing interval, XYZware pops up a reminder as shown below. You may click on Yes! Tell me how to watch the tutorial video of nozzle cleaning or refer to the product manual for detailed instructions. P 27
28 11. XYZware Pro. With the promotion of da Vinci 1.0 Professional flagship 3D printer (hereinafter called da Vinci 1.0 Pro), the advanced 3D print software "XYZware Pro" is also released simultaneously for XYZware. The new version of XYZware Pro is as user friendly as the previous one. Nevertheless, it includes many professional capabilities in this version. Operations and examples for XYZware Pro will be introduced in this chapter. The new version of XYZware Pro increases print freedom significantly, so that users may control print environment and forming conditions required for 3D objects through adjustment of "Export"/"Print" category function to further refine object forming quality. Simultaneously, 3D printer model and filament type may also be specified, such that the system will configure recommended settings automatically or the settings may be adjusted by users. Finally, Export ", "Print" function keys are clicked to place slicing information into object for print or for becoming a 3D file. Hint: In this chapter, Export category function will be used for description of the following functions as an example. Parts of functions can be used only in conjunction with da Vinci 1.0 Pro 3D printer. Therefore, we recommend that you purchase and connect da Vinci 1.0 Pro 3D printer for the optimal experience when using this software Function Category Printer General Speed Supports Retraction Extrusion Ratio Category Description Print temperature / print material selection Object structure and fineness parameter setup Extruder moving speed adjustment Selection of support structure supplementary to print object Adjustment of print material squeeze style Adjust output volume of the printing material P 28

29 11.1 Printer My Printer As XYZware Pro is not in connection with a 3D printer, no information will be displayed in this field. Users have to specify product model and print material through "Printer Profile" function. After connection with the 3D printer, the system will read machine information and display default parameters of this printer Printer Profile Users may specify 3D printer model and loading filament type, XYZware Pro will configure print recommended settings. Also, parameters may be adjusted by users and "File Conversion", "Print" functions are placed into object slicing information. Hint: da Vinci 1.0 Pro supports ABS/PLA filament print. Users may switch print loaded print temperature through ABS/PLA. P 29

30 Temperature Operating temperature of print bed and print module is adjusted. The temperature information is saved in object slicing information. Heating Components Print Module Print Bed Temperature Range 170 C ~ 240 C 41 C ~ 90 C Hint: If users specify print temperature in da Vinci 1.0 Pro, XYZware Pro will give priority to print according to the print temperature information in the file. If the temperature for print bed is selected as OFF, room temperature printing will be enabled and the print bed will not be heated. Excessively low extruder temperature may result in poor filament feeding, such that the print module cannot discharge. Therefore, please adjust the operating temperature of the extruder first. Excessively low print bed temperature may result in unstable placement of object in printing, resulting in failed printing. Please attach a bed patch before printing. If there is no improvement, please raise the operating temperature of the print bed. For a print object with a special structure, glue stick may be applied onto the bed patch to increase adhesion. However, the object may be relatively difficult to remove. P 30


31 11.2 General This function supports adjustment for print structure of object, and the use of setting options of structure density and shell print in conjunction to result in different effects Layer Height Users may select smaller layer height to obtain finer print effect, or may select larger layer height to print the object quickly. Fine print effect takes longer. Function Options Layer Height Setting Values 0.05mm 0.4mm (50 microns microns) Hint: Portions of objects with simple structure may achieve high precision print of 0.05 mm (50 microns). P 31

32 Shell Thickness Shell is the surface structure of an object. A thick shell may result in better quality while taking longer to print. Selection of thin shell print also enables quick print, but it should be noted that specific portion of the object should satisfy requirement of surface strength. Normal For the number of print layers of the shell for the body of the object, two layers (layer = 3) are printed from outside to inside to obtain robust shell layer and repair defects due to print of the first layer, such that neither void nor hole is resulted on surface. P 32


33 Top Surface After XYZware Pro finishes the infill structure on the top of the print object, please perform the last print coating on the top. The top is usually the last part of object in print process. Users may adjust the number of layers to be printed on the top. Larger number of print layers, if used, will result in denser and more solid sealing structure on the top. P 33
34 P 34
.")
35 Bottom Surface Before XYZware Pro prints the infill structure of the bottom part of the print object, a complete and solid bottom surface of object is printed. A perfect void free bottom surface is usually resulted through three-layer print (layer = 3). In addition to bottoming effect, better object stability is provided in printing. P 35
 are set to 0, a hollow object will be")
36 Function Options Shell Thickness Setting Values Selection range: 1 (thin shell) - 10 (thick shell), unit: layer Hint: If you are accustomed to the original XYZware style of selection for shell thickness, please refer to the following information setup Thin: 1 layer Normal: 2 layers Thick: 3 layers Hint: If the top part and solid layer (infill) are set to 0, a hollow object will be resulted P 36


37 Infill Infill Density Users may adjust print density of the object, and may generate different effects with denseness of internal structure. The strength of object is susceptible to its 3D density setting. P 37

38 Hint: If infill Density is set to 0, no infill structure will be printed Infill type Includes hive and interwoven modes. P 38

39 11.3 Speed Adjustment of print speed allows users to perform setup according to object size and precision level. Fine object quality is usually accomplished with low speed print Shells Normal Print speed of object body is the key for time and quality of finished product printing. Extremely good effect is available for most print objects with adjustment with lower print speed and appropriate layer height Surface For print speed of object surface, adjustment of print speed for the outermost portion may change print quality of the surface directly and may differ from print speed of internal infill structure, improving print quality of the object and optimizing the entire print time Small Radius If the object has an arc structure with a radius roughly below 2.2 mm, print speed may be adjusted through such setup. For small radius print, adjustment of speed may result in more stable heap of print materials P 39
40 Hint: Excessively fast print speed might result in unstable squeeze of materials. A print speed between 15 mm/s 60 mm/s is relatively appropriate. Filament type will affect print quality If a minimal speed of 5 mm/s is used for printing, the object will take a very long time to print When increasing print speed, please pay attention to the need for operating temperature increase for the extruder to prevent extruder discharge failure due to insufficient material supply Infill XYZware Pro may adjust print style of infill structure for different parts of an object Normal Most infill structures of an object Top Surface For the structure of the object before starting to print coating of top part, the last three structure layers will be selected by the system to perform top part printing Solid Infill For first three structure layers of bottom part of object printed primarily, the system will apply this setup to perform adjustment of print speed Hint: Quicker speed is recommended for print of infill structure. A print speed between 30 mm/s and 60 mm/s is appropriate. A print speed below 30 mm/s has limited benefit to object forming quality Others Bridges Printing Speed As an object is printed in a pattern similar to a " " shape, shorter distance between two endpoints will not result in print support structure to start print, which is referred to as Print Bridges. Quicker print bridges speed may prevent object from sag. Non-printing movement Speed The movement speed at which the print module does not discharge in the area not for printing Bottom Layer Speed Printing speed for the bottom-most layer. Slower speed will ensure better fixation and stability Retract Speed The speed for pulling filament backwards. Refer to the function introduction in the next chapter for more about retraction Hint: Cooperation of retraction speed and other print speeds will affect feeding stability directly in printing. A print speed slightly faster than the retraction speed would prevent material squeeze from interrupt P 40


41 11.4 Supports Raft & Brim Raft This function allows users to increase strip type Raft on bottom of object for large object to be less susceptible to levelness of the print bed and print warpage during long print jobs P 41

42 Brim Brim function allows users to enlarge the range of contact with bottom area of print bed in printing relatively elongated object to prevent swing due to print from influencing print quality P 42


43 Supports The support pillar structure printed in response to object characteristics is usually used to support suspended object and object without force bearing area on bottom, and may be removed after print Hint: There are three modes for users to use Low supports Standard High Low supports is applicable to most print objects, and is an appropriate print solution due to easy peeling characteristic 11.5 Retraction P 43

44 Retract Length In printing object, before large movement of print module, print filament will be drawn back, such that slight negative pressure occurs in print nozzle, preventing material from adhering to the object while moving, improving surface quality of print object Activate Threshold Such setting will allow users to set up retraction mechanism activation style. For setup mode, users usually specify the minimal print module movement distance for retraction mechanism activation Lifting height for extruder withdrawal After retraction, the print module will be elevated slightly with such setup value. Such action prevents material from adhering to the object, and makes a more orderly final print stop point. However, it should be noted that excessively large elevation will extend print preparation time for the next print layer, and portions of angles may results cooling and difficult to bond conditions between layers Add Extra Filament after Travel < Retraction Material compensation may be used to improve upon holes or poor extrusion due to excessive extruder withdrawal 11.6 Extrusion Ratio Extrusion volume can be adjusted for the shell or infill. Default setting is 100%. This value can be reduced to reduce the amount of extruded filament which result in thinner lines. Raising the setting would increase the amount of extruded material, the level of saturation, and thicker lines Shell Extrusion Ratio Extrusion range: 80% to 200%. Increasing shell extrusion will result in a thicker shell, while reduced shell extrusion will generate a thinner shell. To obtain a thicker shell, the user may adjust layer height and engraving layers, the percentage of shell extrusion ratio can be reduced to reduce sample redundancy. P 44


45 Infill Extrusion Ratio Extrusion range: 80% to 200%. Increasing infill extrusion ratio will cause the infill lines to be more compact, while reducing infill extrusion ratio would generate thinner lines. To create a better-stuffed and sturdier product, the user may adjust layer height and shell thickness as well as reduce the percentage of infill extrusion ratio to improve the quality of the finished product. Hint: Recommended infill extrusion ratio is 90% to 110%. 12. XYZware Color Mode The multi-color printing described in this chapter is used in combination with specific models. Users can adjust the color mixing ratio based on their color preferences in XYZware. During the printing process, there may be a difference between the color mixing ratio displayed by XYZware and the actual object due to the room temperature and the residual colors from the previous print, which is normal. We suggest you use the LOAD FILAMENT function and perform printing until the residual colors are discharged. Before using the Color Mode, make sure: A. XYZware has been updated to the applicable version: or later B. Model: da Vinci Junior 2.0 Mix (hereafter referred to as da Vinci Jr. 2.0 Mix) P 45


46 12.1 Printer Settings Note: In "Settings", you can set the printer model or preview the colors of printing modules 1 and 2. The actual result depends on the color of the filament loaded in the printer User Interface and Toolbar Multi-color Mode -Set different colors for models from different file sources P 46
47 2 Mixer Mode -Set different color blocks according to height. Each block may contain one color or a set of gradient colors 3 Add a Color Node -Add multiple color nodes to make the object more colorful 4 Delete a Color Node 5 Start Color 6 Lock color (the same as above) 7 Object Color Height -The size of color presented on the object 8 Object View 9 Multi-color Tool Bar -Mix colors using ratios defined by the software. Color gradient is not supported in this mode Mixer Mode In the Mixer Mode, you can perform gradient multi-color printing on a single object by following the steps below. Step 1: import the object file (*.STL) Step 2: confirm the height of the object. Select "Mixer Mode" on the top toolbar to add a color node according to the height (the height is 62mm in this example as shown in the figure below) P 47
 Step 3: add a color node and adjust its height and color.")

48 Add a color node according to the height of the object Note: the height of the object can be accessed by using the "Info" button on the left toolbar (Z-Axis corresponds to the height of the object) Step 3: add a color node and adjust its height and color. You can also set multiple nodes. XYZware will show the color gradient of the object. The actual result depends on the color of the filament loaded. You need to make color adjustments according to the height of the imported object The print area and gradient effect on the object <The actual object> P 48


49 12.4 Multi-color Mode da Vinci Jr. 2.0 Mix also supports standard multi-color printing. Select "Multi-color Mode" on the top toolbar, and the software will create a palette for the user according to the color ratio. You can only choose one color for each object. Color gradient is not supported in this mode. P 49


50 12.5 Blending Zone To print the model in multiple colors at one time, please check the "Enable Blending Zone" box. To print the model in monochromatic color scheme, please uncheck the box. Once the Palette function is enabled, the machine will build filament separation walls and the printable area will be 14 x 15 x 15 cm (W x D x H). Note: For more information on dual-color printing, refer to the following sections: 4.2 Dual-color Printing 5.5 Info 8.4 Auto-arrange the Print Files P 50
XYZware User Manual. XYZware User Manual P 1
 XYZware User Manual P 1 Announcement Limitation of Liability Clause Although it is our intention to produce a manual and product functions that are correct and stable, in no event shall XYZprinting be
ENG. XYZscan User Manual P 1
 ENG XYZscan User Manual P 1 Declaration Limitation of Liability Clause Although we try to ensure that the manual and product functions are correct and stable, in no event shall XYZprinting be liable for
XYZscan User Manual ENG. XYZscan User Manual P 1
 ENG XYZscan User Manual P 1 Declaration Limitation of Liability Clause Although we try to ensure that the manual and product functions are correct and stable, in no event shall XYZprinting be liable for
ideamaker Manual
 ideamaker Manual Using ideamaker... 2 1 Basic information... 2 1.1 What is ideamaker?... 2 1.2 Where to download ideamaker?... 2 2 Install ideamaker... 3 3 Let s Print!... 6 4 How to use ideamaker?...
CURA WANHAO EDITION USER MANUEL
 CURA WANHAO EDITION USER MANUEL 1.1 Cura Overview We recommend that new users start with Cura as it includes a slicing engine. Host software we recommend to use Repitator. There is separate introduction
Slicer"CURA" User Instructions for Olivetti 3D DESK
 Slicer"CURA" User Instructions for Olivetti 3D DESK 1 Cura Install - 1 Click Next 2 Cura Install - 2 Check all components. Then click Install 3 Cura Install - 3 Click Next 4 Cura Install - 4 The Wizard
User Manual for Mini 3D Printer
 User Manual for Mini 3D Printer Copyright@iNSTONE 3D Content Content... 1 Technical Parameters...2 Packing List... 3 Installation... 4 Instructions...5 I.Printing... 5 II. Taking down the finished printing
Slicer"CURA" User Instructions for Olivetti S2 3D Printer
 Slicer"CURA" User Instructions for Olivetti S2 3D Printer 1 Cura Install - 1 Click Next 2 Cura Install - 2 Check all components. Then click Install 3 Cura Install - 3 Click Next 4 Cura Install - 4 The
Using Cura for the first time
 Cura User manual Using Cura for the first time Initial startup When you start Cura you will be greeted by the following wizard: This wizard will guide you through your initial checkup and calibration of
CURA WANHAO EDITION USER MANUEL
 CURA WANHAO EDITION USER MANUEL 1.1 Cura Overview We recommend that new users start with Cura as it includes a slicing engine. Host software we recommend to use Repitator. There is separate introduction
Content. 1. Unpacking Component Description Hardware Installation Software Application...5. (1) Software Installation.
 Software Installation.") WWW.BIQU.EQUIPMENT Content 1. Unpacking 1 2. Component Description.2 3. Hardware Installation...3 4. Software Application...5 (1) Software Installation.5 (2) Slicing Operation...7 Appendix...... 8 5. Automatic
WWW.BIQU.EQUIPMENT Content 1. Unpacking 1 2. Component Description.2 3. Hardware Installation...3 4. Software Application...5 (1) Software Installation.5 (2) Slicing Operation...7 Appendix...... 8 5. Automatic
Lulzbot Taz Workflow Computation + Construction Lab Iowa State University
 Lulzbot Taz Workflow Computation + Construction Lab Iowa State University 3D Printing on the Lulzbot Taz - Guidelines - The following steps that will guide the user on how to 3D print using the Lulzbot
Ultimaker 2+ / 3. Guide for. General Information. Self-service 3d printing at the AOC. Ultimaker 2+ UItimaker 3
 Guide for Ultimaker 2+ / 3 Self-service 3d printing at the AOC General Information Location:, 1232 Sullivan (see page 9 for full list of Ultimakers on campus) Access: You can walk-in or reserve the Ultimakers
OPERATION MANUAL MIMAKI ENGINEERING CO., LTD.
 OPERATION MANUAL MIMAKI ENGINEERING CO., LTD. http://www.mimaki.co.jp/ E-mail:traiding@mimaki.co.jp D200674 About FineCut for CorelDRAW Thank you very much for purchasing a product of Mimaki. FineCut,
TM Quick Start Guide
 TM Quick Start Guide Contacting Pazzles By Phone In the US: 866-729-9537 International: +1-208-922-3558 Phone Hours: Mon - Fri, 9am - 5pm Mountain Time By Email Customer Service: Technical Support: Sales:
User Manual Creatr HS
 1 Leapfrog BV Dear customer, Congratulations with the purchase of your very own Leapfrog Creatr HS! We would like to help you get started so you can make your first 3D print on the Creatr HS and many more.
Table of Contents CONTENTS
 Table of Contents CONTENTS Introduction... 2 Contact TKI... 2 Printer Features & Definitions... 3 Software Parameter Setup... 8 Setting Up A Printer Profile in Cura... 8 Printing Settings... 13 Printing
Quick Start Guide. Simplify3D. Zeemanlaan MV IJsselstein The Netherlands
 Quick Start Guide Simplify3D www.felixprinters.com/support support@felixprinters.com Zeemanlaan 15 3401 MV IJsselstein The Netherlands 1 Introduction Introduction Simplify3D is software to control your
LAB 1A: Intro to SolidWorks: 2D -> 3D Brackets
 LAB 1A: Intro to SolidWorks: 2D -> 3D Brackets Set units Create Sketch Add relations Linear patterns Mirror Fillet Extrude Extrude cut First, set units. click Option on top of main menu Open Document Properties
HD-01e High Definition Easy Scope
 HD-01e High Definition Easy Scope Easy SKIN & HAIR ANALYSER USER S MANUAL Version 2, April of 2017 0 USER S MANUAL Congratulations on your purchase of this High Definition UVC (USB Video Class) Easy Scope
SKF TKTI. Thermal Camera Software. Instructions for use
 SKF TKTI Thermal Camera Software Instructions for use Table of contents 1. Introduction...4 1.1 Installing and starting the Software... 5 2. Usage Notes...6 3. Image Properties...7 3.1 Loading images
3D Printing Instructions MANTIS CHENG
 3D Printing Instructions MANTIS CHENG CHAPTER 1 How to Print on Thing-O-Matic Our Makerbot Thing-O-Matic (TOM) 3D printer is now several years old. It is not running the latest firmware. It doesn t work
USER MANUAL TABLE OF CONTENT
 USER MANUAL TABLE OF CONTENT A Precautions 2 B Check List 3 C Component Diagram 4 D LCD control Menu and its Function 5 E Technical Specifications 6 F Hardware Installation on Printer 7 G Software installation
Monaco ColorWorks User Guide
 Monaco ColorWorks User Guide Monaco ColorWorks User Guide Printed in the U.S.A. 2003 Monaco Systems, Inc. All rights reserved. This document contains proprietary information of Monaco Systems, Inc. No
Video Tutorials Included on DVD
 Instruction Manual Video Tutorials Included on DVD With Instruction Manual, view the instructional movies providing supplementary information about cutwork creation. Please visit us at http://solutions.brother.com
Silhouette Connect Layout... 4 The Preview Window... 5 Undo/Redo... 5 Navigational Zoom Tools... 5 Cut Options... 6
 user s manual Table of Contents Introduction... 3 Sending Designs to Silhouette Connect... 3 Sending a Design to Silhouette Connect from Adobe Illustrator... 3 Sending a Design to Silhouette Connect from
UM DALI getting started guide. Document information
 Rev. 2 6 March 2013 User manual Document information Info Content Keywords LPC111x, LPC1343, ARM, Cortex M0/M3, DALI, USB, lighting control, USB to DALI interface. Abstract This user manual explains how
Daan Speth, October Slic3r settings
 Slic3r settings Daan Speth, October 2016 Slic3r is slicing software that can turn a 3D model saved as STL file into a gcode file, containing instructions for the 3D printer. After starting slic3r a startup
ENGINEERING CO., LTD.
 Software RIP RasterLinkPro5 IP Reference Guide For UJF Series For JF Series For JFX Series This guide explains about features of RasterLinkPro5 IP for the UV Inkjet printer UJF Series, JF Series and JFX
Lesson 4 Extrusions OBJECTIVES. Extrusions
 Lesson 4 Extrusions Figure 4.1 Clamp OBJECTIVES Create a feature using an Extruded protrusion Understand Setup and Environment settings Define and set a Material type Create and use Datum features Sketch
House Design Tutorial
 Chapter 2: House Design Tutorial This House Design Tutorial shows you how to get started on a design project. The tutorials that follow continue with the same plan. When you are finished, you will have
House Design Tutorial
 House Design Tutorial This House Design Tutorial shows you how to get started on a design project. The tutorials that follow continue with the same plan. When you are finished, you will have created a
Front View Side View Top View
 Instructions: Below is a detailed instructional guide to producing a functioning Brace assembly from the provided CAD files. Sizing guide Measurements for brace sizing are best taken using a flexible measuring
Roland VersaWorks. Creating Profiles with VersaWorks 3
 Roland VersaWorks Creating Profiles with VersaWorks 3 Profiling a Media with Roland VersaWorks This document describes the procedure for creating media profiles in VersaWorks. VersaWorks provides profiling
Combo Scanner. User Manual
 Combo Scanner User Manual I. Unpack the Combo Scanner Backlight Holder Combo Scanner Business card Fixture Photo/Business Card Holder User Manual Quick Installation Guide Note This Combo Scanner supports
UM DALI getting started guide. Document information
 Rev. 1 6 March 2012 User manual Document information Info Keywords Abstract Content LPC111x, LPC1343, ARM, Cortex M0/M3, DALI, USB, lighting control, USB to DALI interface. This user manual explains how
< Then click on this icon on the vertical tool bar that pops up on the left side.
 Pipe Cavity Tutorial Introduction The CADMAX Solid Master Tutorial is a great way to learn about the benefits of feature-based parametric solid modeling with CADMAX. We have assembled several typical parts
RAZER GOLIATHUS CHROMA
 RAZER GOLIATHUS CHROMA MASTER GUIDE The Razer Goliathus Chroma soft gaming mouse mat is now Powered by Razer Chroma. Featuring multi-color lighting with inter-device color synchronization, the bestselling
Installation & User Manual Micro-Image Capture 7
 Installation & User Manual Micro-Image Capture 7 Ver1.2016 Product Warranty Quality Assurance Every Micro-Image Capture system passes quality assurance tests including focus, resolution quality and mechanical
House Design Tutorial
 Chapter 2: House Design Tutorial This House Design Tutorial shows you how to get started on a design project. The tutorials that follow continue with the same plan. When you are finished, you will have
ISCapture User Guide. advanced CCD imaging. Opticstar
 advanced CCD imaging Opticstar I We always check the accuracy of the information in our promotional material. However, due to the continuous process of product development and improvement it is possible
Digital Portable Overhead Document Camera LV-1010
 Digital Portable Overhead Document Camera LV-1010 Instruction Manual 1 Content I Product Introduction 1.1 Product appearance..3 1.2 Main functions and features of the product.3 1.3 Production specifications.4
DPM Kit DK-1. Using the DPM Kit
 DPM Kit DK-1 Using the DPM Kit To ensure safe usage with a full understanding of this product's performance, please be sure to read through this manual completely. Store this manual in a safe place where
CamFi TM. CamFi User Guide. CamFi Remote Camera Controller. CamFi Limited Copyright 2015 CamFi. All Rights Reserved.
 CamFi TM CamFi User Guide CamFi Remote Camera Controller CamFi Limited Copyright 2015 CamFi. All Rights Reserved. Contents Chapter 1:CamFi at glance 1 Packaging List 1 CamFi Overview 1 Chapter 2:Getting
For rapid-prototyping and production of low volume, low cost plastic objects.
 3D Printer Standard Operating Procedure Jonathan M. Cabot 10 January 2016 For rapid-prototyping and production of low volume, low cost plastic objects. 1.0 Material Requirements 1.1 Equipment needed for
Intro to 3D Printing. Anatomy of the Printer. Intro to 3D Printing & Certification imagine create learn grow
 Intro to 3D Printing 3D printing is a process of additive manufacture, this is where layers upon layers of material are built up to create a three dimensional object from a digital design. The 3D printer
Afinia H480 Training
 Afinia H480 Training By: David Cardarelli Version 2.2 Procedures 1. Note the time, and power the machine on using the rear power switch 2. On the PC, select the Afinia 3D software 3. Navigate to the 3D
Nikon View DX for Macintosh
 Contents Browser Software for Nikon D1 Digital Cameras Nikon View DX for Macintosh Reference Manual Overview Setting up the Camera as a Drive Mounting the Camera Camera Drive Settings Unmounting the Camera
Quick Start Guide. Setup and Scanning. Try the Additional Features. English
 English Quick Start Guide Be sure to install the software programs before connecting the scanner to the computer! Setup and Scanning Check the Package Contents p.3 Install the Software Windows Macintosh
House Design Tutorial
 House Design Tutorial This House Design Tutorial shows you how to get started on a design project. The tutorials that follow continue with the same plan. When you are finished, you will have created a
Advance Steel. Tutorial
 Advance Steel Tutorial Table of contents About this tutorial... 7 How to use this guide...9 Lesson 1: Creating a building grid...10 Step 1: Creating an axis group in the X direction...10 Step 2: Creating
3D Printing with Ultimaker2, User Guide
 February 25, 2015 3D Printing with Ultimaker2, User Guide University of Victoria, (BDSL) Biomedical Systems Design Laboratory 1 Cleaning and Leveling the Build- Plate Step 1: Use screwdriver to remove
User Manual Of Einscan-Pro. Brief Introduction
 User Manual Of Einscan-Pro Brief Introduction 1. PC Configuration 2. Software interface 3. Calibration 4. Fix Scan 5. Handheld HD Scan 6. Handheld Rapid Scan 7.FAQ PC Configuration System Requirement:Before
The Epson RGB Printing Guide Adobe Photoshop CS4 Lightroom 2 NX Capture 2 Version. Tuesday, 25 August 2009
 The Epson RGB Printing Guide Adobe Photoshop CS4 Lightroom 2 NX Capture 2 Version 1.2 1 Contents Introduction Colour Management Nikon Capture NX 2 Lightroom 2 Resolution Workflow Steps Setting up Photoshop
Quick Start Guide. Setup and Scanning. Try the Additional Features. English
 English Quick Start Guide Be sure to install the software programs before connecting the scanner to the computer! Setup and Scanning Check the Package Contents p.3 Install the Software Windows Macintosh
House Design Tutorial
 Chapter 2: House Design Tutorial This House Design Tutorial shows you how to get started on a design project. The tutorials that follow continue with the same plan. When we are finished, we will have created
MINIMUM SYSTEM REQUIREMENTS
 Quick Start Guide Copyright 2000-2012 Frontline Test Equipment, Inc. All rights reserved. You may not reproduce, transmit, or store on magnetic media any part of this publication in any way without prior
Table of Contents. Lesson 1 Getting Started
 NX Lesson 1 Getting Started Pre-reqs/Technical Skills Basic computer use Expectations Read lesson material Implement steps in software while reading through lesson material Complete quiz on Blackboard
User Manual of Alpha 1s for Mac
 User Manual of Alpha 1s for Mac Version... 4 System Requirements... 4 Software Operation... 4 Access... 4 Install... 5 Connect to/disconnect from Robot... 5 Connect:... 5 Disconnect:... 5 Edit Actions...
ARCHICAD Introduction Tutorial
 Starting a New Project ARCHICAD Introduction Tutorial 1. Double-click the Archicad Icon from the desktop 2. Click on the Grey Warning/Information box when it appears on the screen. 3. Click on the Create
Magic Wand Portable Scanner with Auto-Feed Dock. PDSDK-ST470-VP-BX2 User Manual
 Magic Wand Portable Scanner with Auto-Feed Dock PDSDK-ST470-VP-BX2 User Manual Table of Contents 1. KEY FEATURES... 2 2. FUNCTIONAL PARTS... 2 3. EXPLANATION OF THE STATUS ICONS... 4 4. GETTING STARTED...
Diane Burton, STEM Outreach.
 123D Design Tutorial: LED decoration Before using these instructions, it is very helpful to watch this video screencast of the CAD drawing actually being done in the software. Click this link for the video
Vinyl Cutter Instruction Manual
 Vinyl Cutter Instruction Manual 1 Product Inventory Inventory Here is a list of items you will receive with your vinyl cutter: Product components (Fig.1-4): 1x Cutter head unit complete with motor, plastic
3D Printable Dubrovnik Style Chess Set
 3D Printable Dubrovnik Style Chess Set Table of Contents Print Settings...1 PLA...1 Woodfil PLA...2 Supports...4 Print Settings These print settings were used to print the pieces seen in the photographs
Optika ISview. Image acquisition and processing software. Instruction Manual
 Optika ISview Image acquisition and processing software Instruction Manual Key to the Instruction Manual IS is shortened name used for OptikaISview Square brackets are used to indicate items such as menu
Printer Software Guide
 Printer Software Guide (For Canon CP Printer Solution Disk Version 4) Macintosh 1 Contents Safety Precautions...3 Read This First...4 About the Manuals...4 Printing Flow Diagram...5 Printing...7 Starting
PROJECTS PHOTOFRAME KEEPSAKE
 PROJECTS PHOTOFRAME KEEPSAKE Photoframe keepsake COPYRIGHT Copyright 1998-2015. Wilcom Pty Ltd, Wilcom International Pty Ltd. All Rights reserved. All title and copyrights in and to Digitizer Embroidery
Quick Start Guide. Setup and Scanning. Try the Additional Features. English
 English Quick Start Guide Be sure to install the software programs before connecting the scanner to the computer! Setup and Scanning Check the Package Contents p.3 Install the Software Windows Macintosh
S100 Webcam. User s Manual
 S100 Webcam User s Manual Kodak and the Kodak trade dress are trademarks of Eastman Kodak Company used under license. 2009 Sakar International, Inc. All rights reserved. WINDOWS and the WINDOWS logo are
by Ultimaker 3 Professional 3D printing made accessible
 Ultimaker 3 Professional 3D printing made accessible Complete design freedom Reliable dual extrusion with water soluble support High uptime and fast changeovers with swappable print cores Cohesive 3D printing
User Guide of ISCapture
 User Guide of ISCapture For Windows2000/XP/Vista(32bit/64bit)/Win7(32bit/64bit) Xintu Photonics Co., Ltd. Version: 2.6 I All the users of Xintu please kindly note that the information and references in
TAZ Lulzbot 3D Printer Standard Operating Procedure [Updated December 21, 2016]
![TAZ Lulzbot 3D Printer Standard Operating Procedure [Updated December 21, 2016]](/thumbs/80/81491041.jpg "TAZ Lulzbot 3D Printer Standard Operating Procedure [Updated December 21, 2016]") TAZ 3 Lulzbot 3D Printer Location of Machine: Composites Lab, RFM 1218 Location of SOP and Machine Operating & Safety Manual: Composites Lab website under resources; Composites Lab TRACS site; and Hardcopy
TAZ 3 Lulzbot 3D Printer Location of Machine: Composites Lab, RFM 1218 Location of SOP and Machine Operating & Safety Manual: Composites Lab website under resources; Composites Lab TRACS site; and Hardcopy
Investment Casting with PolyCast
 Application Note Investment Casting with PolyCast 1. Overview PolyCast is an entirely new 3D printing filament designed specifically for investment casting applications. This document provides the basic
RAZER RAIJU TOURNAMENT EDITION
 RAZER RAIJU TOURNAMENT EDITION MASTER GUIDE The Razer Raiju Tournament Edition is the first Bluetooth and wired controller to have a mobile configuration app, enabling control from remapping multi-function
PrintrBot NinjaFlex Extruder Upgrade
 PrintrBot NinjaFlex Extruder Upgrade Created by Ruiz Brothers Last updated on 2015-11-08 06:00:17 PM EST Guide Contents Guide Contents Overview Get the Gear Head Extruder 3D Printing 3D Printing with NinjaFlex
Generations Automatic Stand-Alone Lace By Bernie Griffith Generations Software
 We are going to create an open Italian lace. Generations software products provide advanced image processing features allowing for the creation of stand-alone lace with just a few simple techniques. A
CHAPTER1: QUICK START...3 CAMERA INSTALLATION... 3 SOFTWARE AND DRIVER INSTALLATION... 3 START TCAPTURE...4 TCAPTURE PARAMETER SETTINGS... 5 CHAPTER2:
 Image acquisition, managing and processing software TCapture Instruction Manual Key to the Instruction Manual TC is shortened name used for TCapture. Help Refer to [Help] >> [About TCapture] menu for software
LAB TEST. Fujitsu fi-5120c. Fujitsu fi-5120c. Buyers Laboratory Inc. Lab Test Report. 25 PPM / 50 IPM* Duplex Sheet-Fed Workgroup Document Scanner
 June 2007 Fujitsu fi-5120c Buyers Laboratory Inc. Lab Test Report A Comprehensive BLI Laboratory Evaluation Fujitsu fi-5120c 25 PPM / 50 IPM* Duplex Sheet-Fed Workgroup Document Scanner Reliability...
Line 6 GearBox Version 2.0 Release Notes
 Line 6 GearBox Version 2.0 Release Notes System Requirements... 1 Supported Line 6 Hardware... 1 Windows System Requirements... 1 Mac System Requirements... 1 What s New in GearBox 2.0... 2 Key new features...
icolor 500 Digital Color + White Transfer Media
 icolor 500 Digital Color + White Transfer Media Printer User Manual 1 Table of Contents icolor 500 Model Summary Page 3 Installing Consumables Page 4 8 Printer Software Installation Instructions Page 9
Printer Software Guide
 Printer Software Guide (For Canon Compact Photo Printer Solution Disk Version 6) Windows 1 Contents Safety Precautions...3 Read This First...4 About the Manuals...4 Printing Flow Diagram...5 Printing...6
Creo Revolve Tutorial
 Creo Revolve Tutorial Setup 1. Open Creo Parametric Note: Refer back to the Creo Extrude Tutorial for references and screen shots of the Creo layout 2. Set Working Directory a. From the Model Tree navigate
2500 Series All-In-One
 2500 Series All-In-One Getting Started December 2006 www.lexmark.com Lexmark and Lexmark with diamond design are trademarks of Lexmark International, Inc., registered in the United States and/or other
CLUTCH Product Manual
 CLUTCH Product Manual SOFTWARE INSTALLATION 1 Download Software Installer From: http://download.fnatic.com 2 Run the Installer 3 Accept Pop ups If you are prompted by any pop ups during the installation,,
SolidWorks Part I - Basic Tools SDC. Includes. Parts, Assemblies and Drawings. Paul Tran CSWE, CSWI
 SolidWorks 2015 Part I - Basic Tools Includes CSWA Preparation Material Parts, Assemblies and Drawings Paul Tran CSWE, CSWI SDC PUBLICATIONS Better Textbooks. Lower Prices. www.sdcpublications.com Powered
EinScan-SE. Desktop 3D Scanner. User Manual
 EinScan-SE Desktop 3D Scanner User Manual Catalog 1. 2. 3. 4. 5. 6. 7. 8. 1.1. 1.2. 1.3. 1.1. 1.2. 1.1. 1.2. 1.3. 1.1. 1.2. Device List and Specification... 2 Device List... 3 Specification Parameter...
Create A Mug. Skills Learned. Settings Sketching 3-D Features. Revolve Offset Plane Sweep Fillet Decal* Offset Arc
 Create A Mug Skills Learned Settings Sketching 3-D Features Slice Line Tool Offset Arc Revolve Offset Plane Sweep Fillet Decal* Tutorial: Creating A Custom Mug There are somethings in this world that have
LumaSpec 800S User Manual
 LumaSpec 800S User Manual Worldwide distribution VERSION 09112014 Prior Scientific, Ltd Cambridge, UK Prior Scientific, Inc Rockland, MA. USA Prior Scientific, GmbH Jena, Germany Prior Scientific KK Tokyo,
Field Device Manager Express
 Honeywell Process Solutions Field Device Manager Express Software Installation User's Guide EP-FDM-02430X R430 June 2012 Release 430 Honeywell Notices and Trademarks Copyright 2010 by Honeywell International
Module 1G: Creating a Circle-Based Cylindrical Sheet-metal Lateral Piece with an Overlaying Lateral Edge Seam And Dove-Tail Seams on the Top Edge
 Inventor (10) Module 1G: 1G- 1 Module 1G: Creating a Circle-Based Cylindrical Sheet-metal Lateral Piece with an Overlaying Lateral Edge Seam And Dove-Tail Seams on the Top Edge In Module 1A, we have explored
F400 QUICK-START GUIDE
 F400 QUICK-START GUIDE PLEASE READ THIS DOCUMENT BEFORE OPERATING YOUR PRINTER Revision 10-1/31/18 Page 1 Table of Contents 1. Introduction... 3 2. What s in the Box... 3 3. Unboxing Your F400... 4 4.
Photoshop Elements Hints by Steve Miller
 2015 Elements 13 A brief tutorial for basic photo file processing To begin, click on the Elements 13 icon, click on Photo Editor in the first box that appears. We will not be discussing the Organizer portion
The screen pictures shown in this manual may differ depending on the type of computer or camera used.
 Operating Manual Thank you for purchasing the PENTAX Digital Camera. This is the manual for PENTAX PHOTO Browser 3 and PENTAX PHOTO Laboratory 3 software for your Windows PC or Macintosh for enjoying images
Visioneer OneTouch Scanner. Installation Guide FOR WINDOWS
 Visioneer OneTouch Scanner Installation Guide FOR WINDOWS TABLE OF CONTENTS i TABLE OF CONTENTS Getting Started with your new Scanner....................... 1 Step 1: Installing the Scanner Software.......................
BYOE: A Method for Creating CAD-based, Two-sided Molded Prototype Parts
 Paper ID #18086 BYOE: A Method for Creating CAD-based, Two-sided Molded Prototype Parts Dr. Christopher P. Pung, Grand Valley State University Dr. Pung has interests in experiential learning, design processes
Nikon Firmware Update for Coolpix 950 Version 1.3
 Nikon Firmware Update for Coolpix 950 Version 1.3 Notes: 1. It is most important that you follow the supplied directions; failure to follow all of the steps may result in your camera being disabled. 2.
Module 2: Radial-Line Sheet-Metal 3D Modeling and 2D Pattern Development: Right Cone (Regular, Frustum, and Truncated)
") Inventor (5) Module 2: 2-1 Module 2: Radial-Line Sheet-Metal 3D Modeling and 2D Pattern Development: Right Cone (Regular, Frustum, and Truncated) In this tutorial, we will learn how to build a 3D model
Inventor (5) Module 2: 2-1 Module 2: Radial-Line Sheet-Metal 3D Modeling and 2D Pattern Development: Right Cone (Regular, Frustum, and Truncated) In this tutorial, we will learn how to build a 3D model
S101v2 Webcam with adjustable focus
 S101v2 Webcam with adjustable focus User Manual Kodak and the Kodak trade dress are trademarks of Eastman Kodak Company used under license. 2010 Sakar International, Inc. All rights reserved. WINDOWS and