Sweet Nothings ipad Carrier Bag
|
|
|
- Jean Jefferson
- 6 years ago
- Views:
Transcription

1 Sweet Nothings ipad Carrier Bag (Click here for printer friendly instructions) Hi Everyone, I am so happy to be here to share this tutorial today. My name is Julie Dueck and you might know me from The Intrepid Thread. This is the second time I have been invited to share with you and I am so honored to be here. Course Materials: From Sweet Nothings by Zoe Pearn
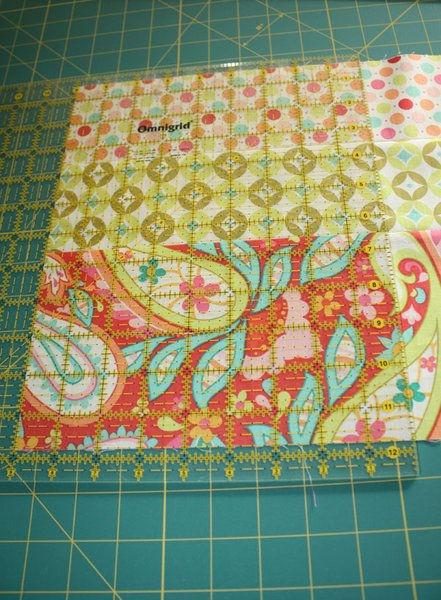
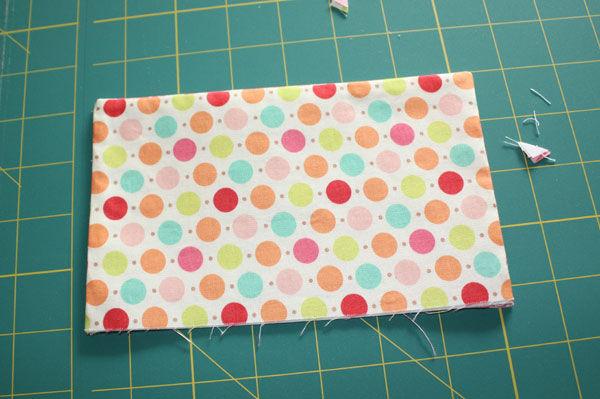
2 1/4 yd C5005SN-Multi Sweet Dots Cotton 1/4 yd C5002SN-Pink Sweet Swirls Cotton 1/4 yd C5000SN-Red Sweet Main Cotton 1/2 yd C5003SN-Green Sweet Diamonds Cotton 1/4 yd D5001-Cream Dreamy- Sweet Floral Dreamy 1/2 yd Fusible Fleece (this is normally inches wide otherwise see instructions for piece sizes) 1-20" by 11" piece of medium weight fusible interfacing 2- Swivel hooks 2-1 inch "D" rings 1- Magnetic Snap 1 1/2" wide blue painters tape (Optional) Instructions: Please note: All seams are 1/4" unless otherwise noted. 1. Cut two 9" by 11" pieces of Cream Dreamy Cut two 9" by 11" pieces of Green Sweet Diamonds Cut one 9" by 11" piece of Pink Sweet Swirls

3 2. Cut one 4 1/2" by 7 1/2" piece of Multi Sweet Dots Cotton Cut one 4 1/2" by 7 1/2" piece of Pink Sweet Swirls

4 3. Cut one 5" by 4" piece of Multi Sweet Dots Cotton

5 4. Cut one 3" by Width of Fabric (WOF) piece of Multi Sweet Dots Cotton Cut one 3 1/2" by WOF of Green Sweet Diamonds (I am sorry if this is confusing but they are 1/2 inch different)

6 5. Cut one 5 1/2" by WOF piece of Red Sweet Main

7 6. Cut one 4" by WOF of Green Sweet Diamonds
8 7. Cut three 9" by 11" pieces of fusible fleece Cut one 4" by WOF piece of fusible fleece

9 8. Cut one 9" by 11" piece of interfacing Cut one 4 1/2" by 7 1/2" piece of interfacing (Keep your scraps of interfacing we will use a couple of them as well)

10 9. Let's start the bag already! Shoulder strap first... With your 4" by WOF strip of Green Diamonds and your 4" by WOF of fusible fleece. Apply fleece to fabric according to manufacturer s directions.

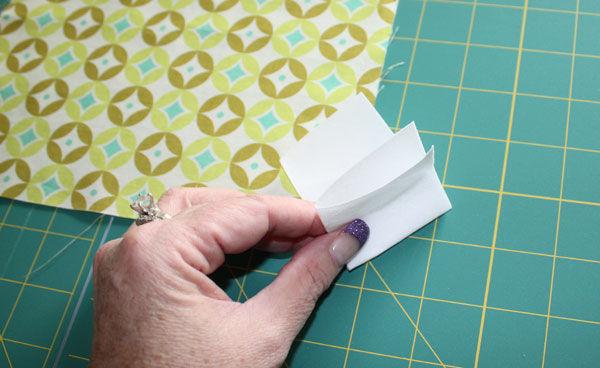
11 10. Fold the strap in half meeting the two long edges and press. (Don't let the purple nails mesmerize you like they do me...)

12 11. Open up the strap and meet both long edges at the center line you just created by pressing. Then press again. (Are you staring at the nails? Come on admit it!)

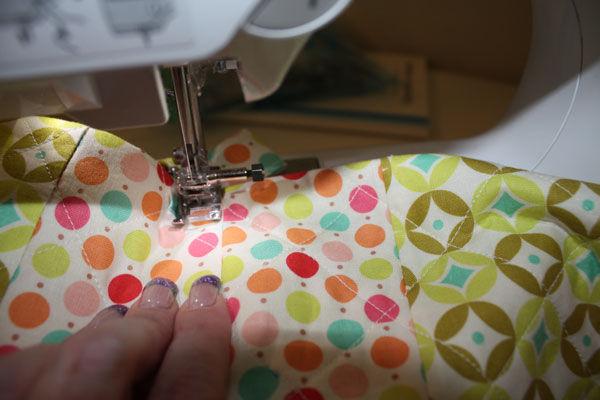
13 12. Fold the strap in half again encasing the edges in the center of the strap and press again. Top stitch down the open edge of the strap approximately 1/8" from the edge. Tip: When top stitching lengthen your stitches, this will help your stitching to look nicer.


14 13. Repeat the top stitching on the folded side of the strap. It will look like this when you are done...
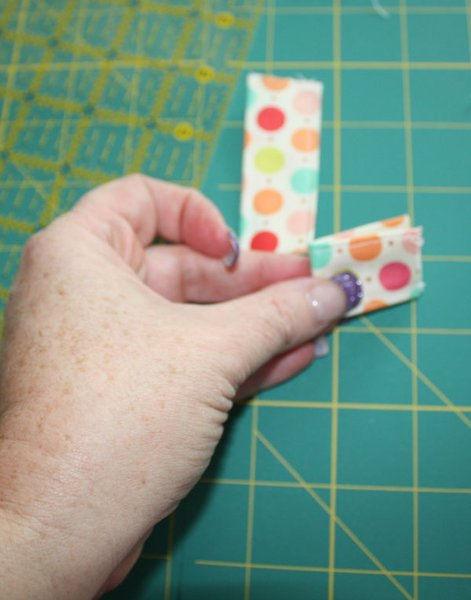
 After top stitching cut the piece in half creating two 2 1/2\" straps.")
15 14. Repeat steps for the 4" by 5" Multi Dots fabric piece (there is no need for fusible fleece of interfacing on this piece) After top stitching cut the piece in half creating two 2 1/2" straps. Lay these and the shoulder strap aside for later.

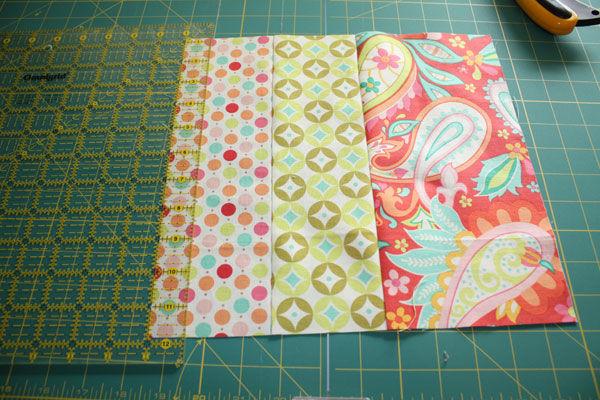
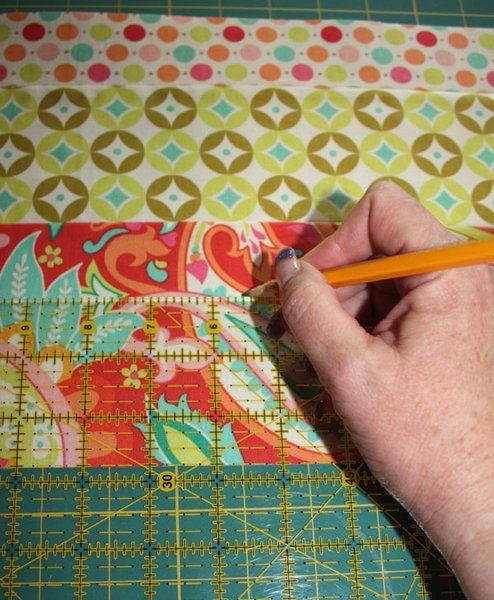
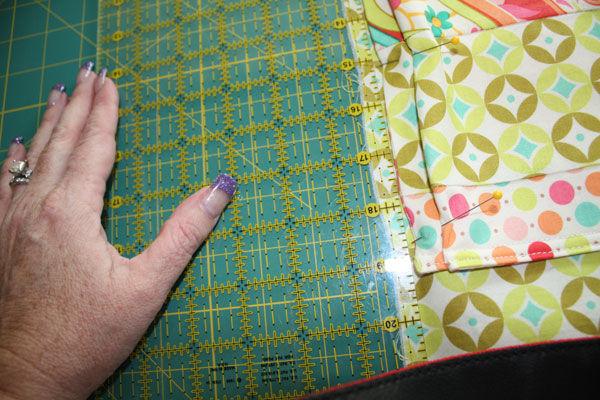
16 15. Sew your three remaining WOF strips in this order.

17 When you are done it will look like this...

18 16. From this sewn together strip cut two 9" pieces and one 11" piece.
19

20 17. On just your 11" piece from the last step cut 1" from the top and the bottom.
21
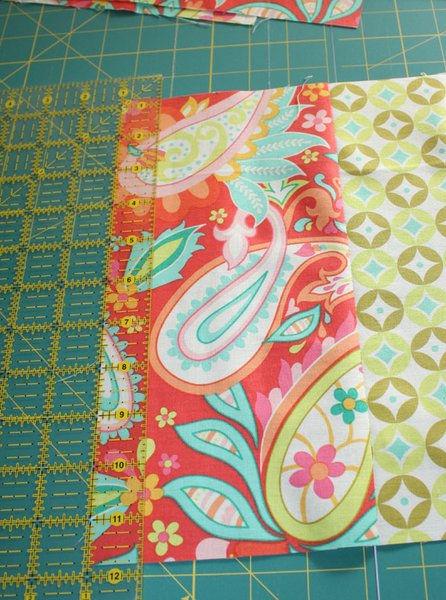
22

23 18. Apply the 9" by 11" fusible fleece pieces to the 9" wide by 11" long strip pieces according to manufacturer s directions.

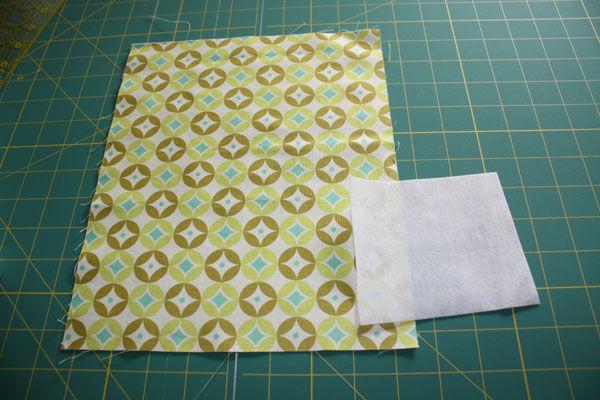
24 19. While you are at the ironing board apply the fusible interfacing to the 9" long by 11" wide piece.
 and a clear ruler with a 45 degree angle on it. 20.")
25 The next few steps are optional. I love the way it looks when a bag is quilted so I am going to show you my favorite super easy way to quilt a bag. Grab your painters tape (this might have to be wrested from your hubbie's fingers...ask me how I know) and a clear ruler with a 45 degree angle on it. 20. Place the ruler on the edge of one of your 9" wide by 11" long pieces at the top left (as you face it) corner. Put the point of the corner at the 1 1/2" mark on the ruler and line the 45 degree line up with the edge.


26 21. Lay a piece of painters tape along the edge of the ruler.

27 22. Measure over 1 1/2" from the first piece of tape and place another piece of tape along the ruler. Continue until you reach the opposite corner.

28 23. We are going to quilt this by sewing down both sides of each of the pieces of tape. The super thing about this is you don't have to put a walking foot on because the fusible fleece is secure and won't shift from the pressure of the sewing foot on it. So it is super fast and painless. Don't worry about back stitching the stitching will be sewn over when we make the seams. And we don't have to worry about what the back looks like because it will be encased in the bag and never seen again. Just zip zip through the machine... ready... go!


29 Here is what it looks like when you are done with this step.

30 24. Carefully remove the tape but don't crumple it (I stick it to the side of my table) we are going to use it again. Starting from the bottom left corner this time repeat steps Remove the tape again, saving it. Repeat steps for the other 9" by 11" piece that is like this one. When you are done they will look like this:
 fold them in half twice to")
31 26. Find your interfacing scraps. Using two pieces that are approximately 4" x 4" (they don't have to be perfect) fold them in half twice to make a small square. Then sew down one side of the square to hold them together.
32


33 27. On one 9" by 11" piece of the Green Diamond fabric measure up from the bottom 1 3/4" and 4 1/2 from either side (this should be the center) and mark a small dot with a pencil (this will not show but if you prefer to use some sort of erasable marker of course you may).

34 28. Magnetic Snaps come with washers, they are circles with a hole in the center and two slits. Take you washer and place it over the dot you made in step 27 and mark the two slits with a pencil. Then, using sharp scissors, cut the slits open.


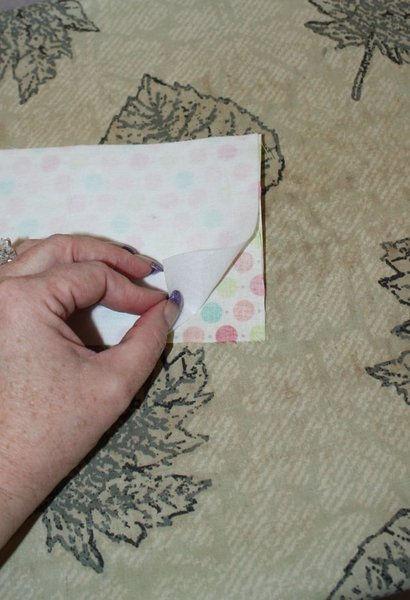
35 29. Make marks in the center of one of your interfacing squares and cut the same way you did in step 28.


36 30. Press one half of your snap through the slits in your fabric then through the slits in the interfacing.


37 31. Place the washer over the snap prongs and bend the prongs down with a pair of pliers.

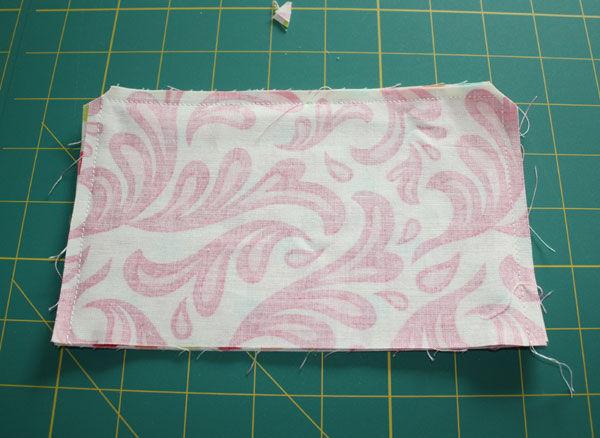
38 Ta Da! (Don't get confused in the subsequent photos; I decided to switch this half of the snap for the other half... just the way I like my snaps to go)
 measure 2 3/4\" from the bottom and 5 1/2\" from each edge and make")
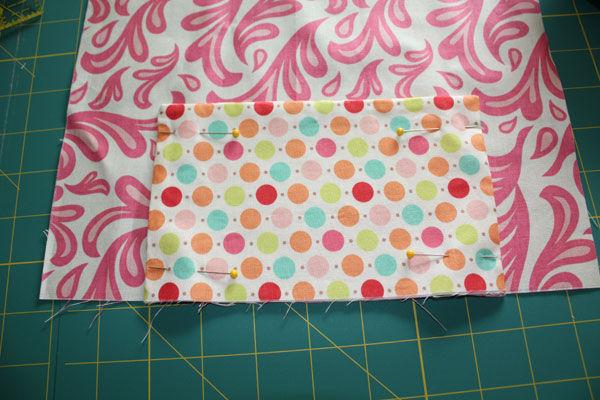
39 32. While we are doing snaps let's go ahead and put the other half on as well. On your 9" long by 11" wide strip piece (the one with the interfacing on the back) measure 2 3/4" from the bottom and 5 1/2" from each edge and make your dot. Then follow steps to finish. Set this piece aside until later.
40

41 33. Take your green snap piece and one of the quilted pieces and place them right sides together.

42 34. Starting at the top corner sew down one long side across the bottom and up the other long side, leave the top open.
. Then press.")
43 35. Trim the sewn corners and flip right side out (I like to use a chop stick to get the corners pointy). Then press.

44 This is your flap, lay it aside for now.

45 36. Place your Dreamy 9" by 11" pieces right sides together and sew in a U shape just as you did with the flap, leaving the top open. No need to turn or press. This will be the lining for the ipad pocket...nice and soft to keep it from getting scratched. TIP: Dreamy has a slight stretch to it. If you find it hard to sew you might want to switch to a ball point needle in your machine.

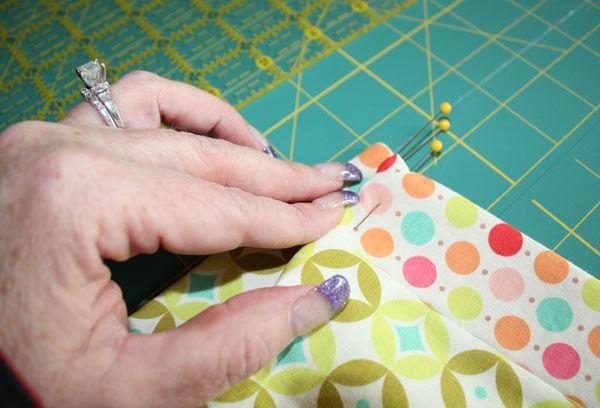
46 (sorry, not a lot of pictures of this step) 37. Now we will make the interior pocket. Apply the fusible interfacing 4 1/2" by 7 1/2" piece to one of the 4 1/2" by 7 1/2" fabric rectangles.
47

48 38. Place the two 4 1/2" by 7 1/2" rectangles right side together and sew from the bottom corner up one short side, across the top, and down the other short side. Leave the bottom open.

49 39. Trim sewn corners. Turn right side out and press.
50

51 40. Measure to the center of the pocket (should be about 3 1/2") and place a pin in the top to mark the center. 41. On your pink and white vine fabric piece measure across the 11" side to 5 1/2" and about 4 1/2" up from the bottom and mark with a pin.

52 42. Match up the bottom edges and the pins on the two pieces and pin the sides in place.

53
 with a piece of painter's tape or disappearing marker and stitch down the center of the pocket the same way you did the")
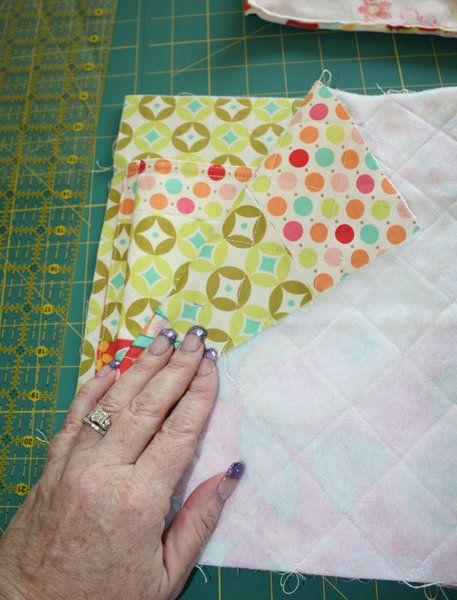
54 43. Top stitch close to the edge of the pocket (no need to sew the bottom) on both sides. I like to back stitch twice at the top of pockets to make them very secure. 44. Mark the center of the pocket (3 1/2") with a piece of painter's tape or disappearing marker and stitch down the center of the pocket the same way you did the sides.

55 Here you can see how I reinforced the top by back stitching a couple times.

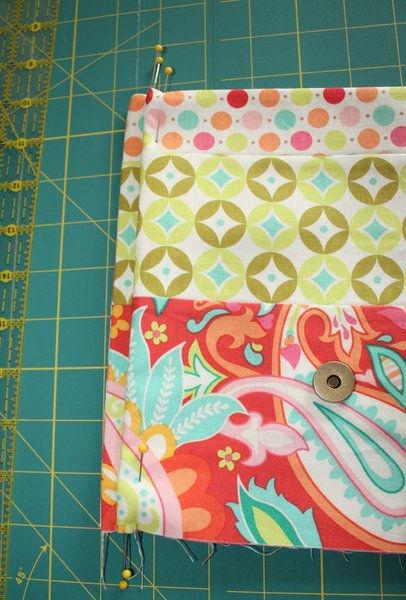
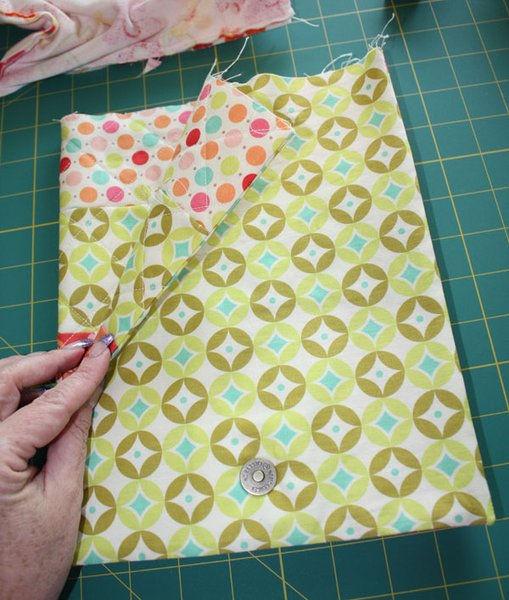
56 45. Place your pink and white vine piece and your 9" long by 11" wide strip piece right sides together and sew up one side across the top and down the other side, leave the bottom open.

57 46. Trim corners. Turn right side out and press.


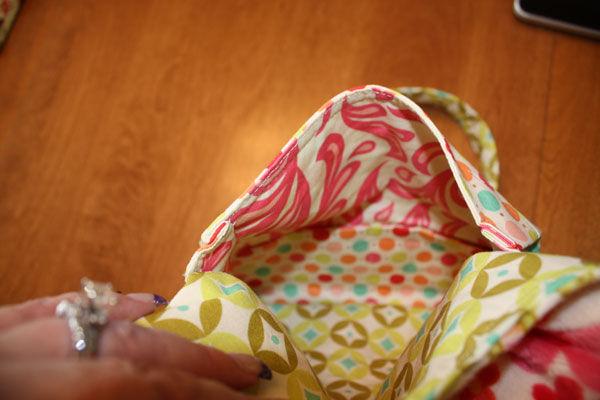
58 47. Now we are going to make the pleats on the pocket. On the outside of the pocket piece measure 1 1/2 inches from each side and place pins in the top and bottom to mark it.

59 48. Measure 1/2" from both edges and mark with pins the same way as step 47.

60 49. Bring the pins at 1 1/2" over the top to meet the pins at the 1/2" mark. Place another pin to hold the pleat securely in place. Do this on the top and the bottom on both sides of the pocket. Remove the marking pins.
61
62

63 50. Baste across the bottom of the pocket, slightly less then 1/4", to hold the pleats in place.

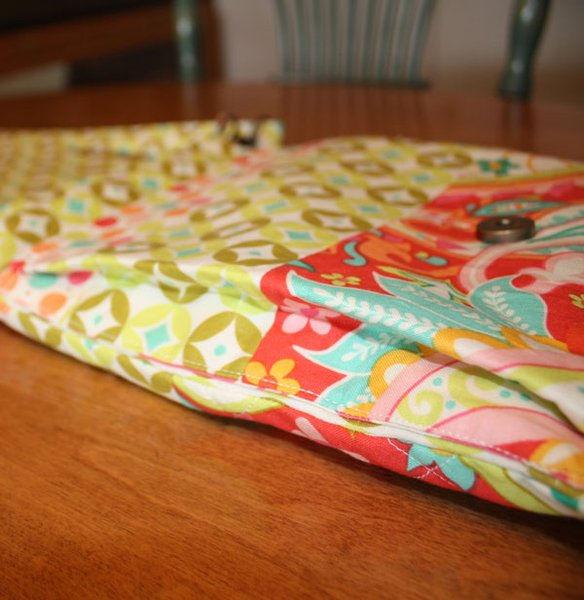
64 51. Top stitch across the top of the pocket at 1/4" then again close to the edge to finish the top of the pocket.

65 52. Apply last 9" by 11" piece of fusible fleece to the last green 9" by 11" piece. Measure 3/8" from the side of the green piece and matching the bottoms pin the pocket to the green piece. It will be slightly distorted because of the thickness but if you remove your pins when you are about 1/2" an inch from them while you are sewing it will straighten out. Top stitch close to the edge on each side of the pocket and back stitch several times at the top to reinforce. The bottom can be left open.
66

67 53. Place the pocket piece right sides together with the remaining quilted piece (the strips on the pocket and the back won't match at the sides). Sew from the top down one long side, across the bottom, and up the other long side leaving the top open. Trim sewn corner. Turn right side out and press.
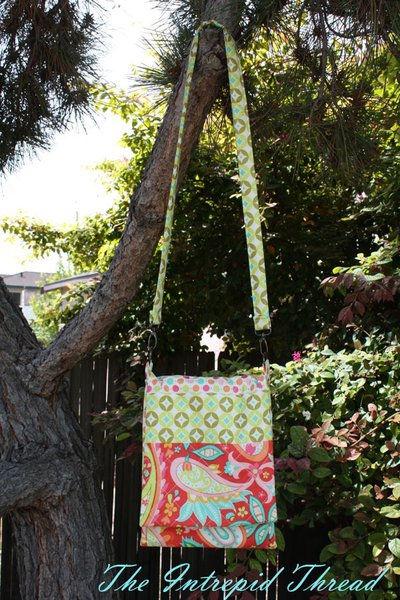
68

69 54. Grab your flap piece (the one with the other half of the snap on it) and place it right side together with the back. Put about three pins in it to hold it in place.
70

71 55. Slide your bag inside the lining (Dreamy).
.")
72 56. Find your two small strap pieces and fold them in half. Slip them down between your lining and your bag centering them over the side seams. Here you can see I had gotten too excited and forged ahead without putting the D ring straps on, so I had to frog (you know... rippit, rippit).
73
 leave a 5 inch opening for turning. I like to put two pins on either side of the opening so I don't forget to stop there.")
74 57. Match up the tops of the bag, the lining, and the D ring straps and pin all the way around, as you come to the three pins that are holding your flap on remove them and replace them on the outside of the lining. Where the front (pocket side is) leave a 5 inch opening for turning. I like to put two pins on either side of the opening so I don't forget to stop there. Sew all the way around the top leaving the opening. This is a good place to use your free arm. Just take it slowly.

75 58. Turn the bag right side out. It will be a little strange but you will figure it out. Tuck the Dreamy down inside the bag and press.


76 59. At the opening turn the edges in 1/4" and pin.
 I could flip the D rings to the inside and hide")
77 Here I am going to show you how my husband's engineering brain has rubbed off on me :) I put the D ring straps half inside the flap of the bag. So that if I decided to detach the strap and use the bag as just a case (say in carry-on luggage) I could flip the D rings to the inside and hide them.


78 60. Top stitch close to the edge of top of the bag and again 1/4" inch away, catching in the open edge. When you come to the flap continue the top stitching close to the seam (I have pictures showing what to do when you come to the flap).
79

80 Yeah, almost done!

81 60. Find your shoulder strap. Measure how long you want it. I wanted mine to be able to be worn across my chest so I made my strap really long. You can make yours hand bag length or shoulder length if you want. Add three inches to the length you decide on. Cut, then zig-zag stitch across the ends (this might not be necessary, since we have fusible on it might not ravel but I like to be cautious).

82 61. Slide a swivel clip onto each end. Turn the edge over 1/4" and sew down approximately 1" up the strap. You might want to raise the clearance on your presser foot for this because it is pretty thick.

83

84 62. Slide your D rings on to the straps and squeeze them closed. Then clip on your straps.

85 All done! Here are a couple gratuitous glamour shots so you can see how it all comes together.

86
87
88

89 They say that necessity is the mother of invention. That was true in this case. I dislike having to carry around anything more than absolutely necessary. I have been looking for months for a handbag that was also an ipad carrier. I found bags that would fit ipads but I didn't want my "purse stuff" rubbing up against the ipad possibly scratching it as I was carrying it around. I also didn't want to have to carry a purse and an ipad case. That is how this bag design was born. It has a nice poochy pocket for "purse stuff" and a nice cooshy soft pocket for the ipad so it doesn't get scratched. The purse stuff is not held up tight to the ipad by a flat pocket either making it that much safer for my precious :) I hope you enjoy this tutorial as much as I enjoyed bringing it to you. Yours, Julie
90
Cut 1 lightweight interfacing
 1 2 A note on interfacing for this bag: This pattern is intended to produce a slouchy bag, so you will want to look carefully at your fabrics before you decide on which interfacing and stabilisers to use.
Velocity FABRIC REQUIREMENTS. Fabric A AVG ½ yds. Fabric B PE-413 ⅝ yd. Fabric C PE-433 ½ yd. Fabric D SE-606 ⅔ yd.
 Velocity HANDBAG DESIGNED BY AGF STUDIO FABRICS DESIGNED BY AVG-8900 Steps Above Moonbow PE-43 CAVIAR PE-433 SNOW SE-606 Shadow FABRIC REQUIREMENTS Fabric A AVG-8900 ½ yds. Fabric B PE-43 ⅝ yd. Fabric
Harbor FABRIC REQUIREMENTS. Fabric A CTL FQ. Fabric B CTL ⅝ yd. Fabric C PE-440 ⅝ yd.. From Faux Tan Leather.
 Harbor HANDBAG DESIGNED BY AGF STUDIO FABRIC REQUIREMENTS FABRICS DESIGNED BY Fabric A CTL-49904 1 FQ. Fabric B CTL-59903 ⅝ yd. Fabric C PE-440 ⅝ yd.. Additional Materials Faux Tan Leather Two (2) 1 1/2
Locked FABRIC REQUIREMENTS
 Locked HANDBAG DESIGNED BY PAT BRAVO FABRICS DESIGNED BY ART-43103 MAHOGANY BLOCKS ART-43101 PYROGRAPHY SINOPIA Blue Denim PE-436 Creme DE LA CREME Faux Light tan Leather FABRIC REQUIREMENTS Fabric A ART-43103
Big Pocket Baby Clutch Tutorial The pattern pieces all include a 3/8'' seam allowance.
 Big Pocket Baby Clutch Tutorial The pattern pieces all include a 3/8'' seam allowance. You will need: 3-4 fat quarters of fabric (depending on how many different fabrics you want to use). More fabric will
All seam allowances are 1/2 unless otherwise noted. All pattern pieces include the seam allowance. Please read all instructions before beginning.
 This small bag will allow you to try out several fun bag-making techniques; adding a metal twist lock, using piping in a bag, making darts, and adding elastic pockets. Use your favorite print and combine
What you will need: 9 x 12 piece of fabric (interior pocket) 9 x 8.5 piece of fabric (bottom of zipper pocket) 4 x 9 piece of fabric (top of zipper
 9 x 8.5 piece of fabric (bottom of zipper pocket) 4 x 9 piece of fabric (top of zipper") What you will need: 9 x 12 piece of fabric (interior pocket) 9 x 8.5 piece of fabric (bottom of zipper pocket) 4 x 9 piece of fabric (top of zipper pocket) 6 x 9 piece of fabric (zipper pocket lining)
What you will need: 9 x 12 piece of fabric (interior pocket) 9 x 8.5 piece of fabric (bottom of zipper pocket) 4 x 9 piece of fabric (top of zipper pocket) 6 x 9 piece of fabric (zipper pocket lining)
Escape Mini Bags Finished size: 8" x 10" x 2" Makes 2 Bags
 TM Escape Mini Bags Finished size: 8" x 10" x 2" Makes 2 Bags SUPPLIES NEEDED 2-1 Yard Cottons (Escape Brown Floral and ) 2 - ¼ Yard Cottons (Escape Green Floral) 3 8 yd. Pellon 987F Fusible Fleece 1 ½
"Fiskars Unzipped" Shoulder Bag
 "Fiskars Unzipped" Shoulder Bag By: Adrienne Hendrix http://www.burdastyle.com/techniques/fiskars-unzipped-shoulder-b I have been making purses for a while now and have been pretty successful in selling
FREE PATTERN Intrepid
 FREE PATTERN Intrepid HANDBAG DESIGNED BY FABRICS DESIGNED BY PAT BRAVO DAR-64307 DEFYING BUDS AIR DAR-64310 A PATH OF CERTAINTY PE-405 Cherry Lipgloss PE-436 Creme de la Creme PE-440 Macchiato FABRIC
Ariel Hand Bag Pattern
 Ariel Hand Bag Pattern By Aimee Larsen for HomeSpun-Threads Materials: 1 Yard inside fabric 1 Yards Outside Fabric ¼ Yard for Straps and Flap 1 Yard Heavy Fusible Interfacing 1 D-Ring & Clip Cut & Iron
Silver Lining FABRIC REQUIREMENTS. Fabric A WND-2536 ¾ yd. Fabric B WND-1532 ⅝ yd. Fabric C WND-1537 ⅓ yd. Fabric D PE-431 ¾ yd.
 Silver Lining HANDBAG DESIGNED BY AGF STUDIO FABRIC REQUIREMENTS FABRICS DESIGNED BY Fabric A WND-2536 ¾ yd. Fabric B WND-1532 ⅝ yd. Fabric C WND-1537 ⅓ yd. Fabric D PE-431 ¾ yd. Additional Materials Magnetic
featuring METROPOLITAN
 featuring METROPOLITAN FREE PATTERN COLLECTION BY AGF STUDIO FA B R I C S D ES I G N E D BY AG F S T U D I O FUS-CL-900 FUS-CL-901 BRAVE BLOOMED CITY HULA HOOPS CITY FUS-CL-904 FUS-CL-905 SUBTLE JOURNEY
london calling bag a sewing pattern by
 a sewing pattern by london calling bag This project on its own is a very big gusseted bag with a zippered top closure. But the optional details include a front pocket with Union Jack applique, buckle adjustable
World s Easiest Tote Bag!!!
 World s Easiest Tote Bag!!! Tutorial by Shruti Dandekar Finished Size : 12 x 4 x 18 An easy and quick to make Tote Bag with instructions on making the handles and a zip pocket. World s Easiest Tote Bag
Evie Carry All Trio. Tools: Needle and thread PURSE
 Evie Carry All Trio Purse Make Up Bag Sunglasses Case 9 zipper 1 spool all purpose thread SUNGLASSES CASE 1/8 yd exterior 1/8 yd 810 Tru-Grid 1/8 yd interior 1/8 yd 987 Fusible Fleece ½ dia. Circular Velcro
Bon Voyage - bag pattern -
 ~~~ Bon Voyage Bag Pattern ~~~ 2014 Geta Grama; www.romanianquiltstudio.com Bon Voyage - bag pattern - Size: 18 wide at top; 21 wide at bottom; 15'' tall (without straps); 5'' deep; two interior pockets;
a free sewing pattern by
 a free sewing pattern by 2 kitty wallet This project is a fun companion piece to my Kitty Purse pattern. It's a bi-fold wallet with the traditional slots for cards (6) and one for receipts or bills. A
Frou Frou Bag Intermediate
 Frou Frou Bag Intermediate Sewn By Sara Lawson http://www.sewsweetness.com This bag features ruffled flaps, snap closure and an adjustable strap. The small front pockets are 3-dimensional. Beautiful detailing
Canadian Quilters Association Pattern: Quilting Tools Tote Bag
 Canadian Quilters Association Pattern: Quilting Tools Tote Bag Description: * Size: 24 x 28", storage for: 6 x 24" ruler and 18 x 24" cutting mat, and all other equipment. * Easy to carry to workshops
CityCraft. Contemporary Cloth. Fabric.com. Petite Purse in Maman & Nursery Basics From Cloud9 Organic
 At just 5" square, our teeny tiny purse might seem like the perfect little girl accessory, and indeed it would be. However, the 2012 fashion runway trends are showing little purses like this on big girls
Original Recipe. Take It All Tote by Melissa Corry
 Original Recipe Take It All Tote by Melissa Corry Hi everyone!! It's Melissa from Happy Quilting {happyquiltingmelissa.blogspot.com} and I am so excited to get to share another fun-filled tutorial with
Sew a Yoga Mat Bag with Ashley Nickels
 Sew a Yoga Mat Bag with Ashley Nickels Chapter 1 - Introduction Overview Hi, I'm Ashley Nickels. I'm a sewer and a quilter. And one of my favorite things to do is design bags. And I designed this yoga
featuring FLORALIA COLLECTION AGF STUDIO
 featuring FLORALIA FREE PATTERN COLLECTION BY AGF STUDIO FA B R I C S D ES I G N E D BY AG F S T U D I O FUS-F-1000 BRAVE BLOOMED CITY FUS-F-1004 SPARKLER FLORALIA FUS-F-1008 RETRO HARMONY CITY FUS-F-1001
Kitties-To-Go Handbag
 Published on Sew4Home Kitties-To-Go Handbag Editor: Liz Johnson Wednesday, 21 February 2018 1:00 Tabby Road is a classic collection from Tula Pink that debuted well over a year ago, but has continued to
Urban Jungle Bag Advanced
 Urban Jungle Bag Advanced Designed by Sara Lawson Sewn By Sara Lawson http://sewsweetness.com This adorable bag features leather handles and accent detailing on the front and sides. With a zipper top,
So I m just going to line up my needle on the seam. And mine aren t perfect. And I don t die over it. I just do the best I can. And see you just keep
 Hi I m Jenny from the MSQC. I ve got a really fun project for you today. This is the zig zag runner. This is put together just using charm squares. You can use leftovers or a whole charm. You can make
featuring #Heartlandfabrics Brio
 featuring #Heartlandfabrics Brio Brio HANDBAG DESIGNED BY PAT BRAVO FABRICS DESIGNED BY PAT BRAVO WARM FIELD HRT-85300 BLOMMA GARDEN PASTICHE HRT-85301 REGN DROPS SUN HRT-85303 PINETRE DAYBREAK HRT-85304
OTHER TOOLS & SUPPLIES
 OTHER TOOLS & SUPPLIES - Fat Eighth of fusible fleece - 1/4 yd of fusible cotton interfacing (22 wide) - 1 yd of piping in coordinating color - (1) 1 D-Ring - (1) 1 swivel hook - (1) 8 closed-end zipper
Linda Brown, Sue Dittler, Sandy Miller, Lucy Ricardo, and Carole Thommen
 Linda Brown, Sue Dittler, Sandy Miller, Lucy Ricardo, and Carole Thommen Edited by: Sharon Reilly Teena Livsey YO-YO s especially ornament balls By: Lucy Ricardo Supply list: Scraps of fabric 1 ½ circle
Wheelchair Quilts. A guide to make fitted quilts for those in a wheelchair
 Wheelchair Quilts A guide to make fitted quilts for those in a wheelchair Table of Contents Introduction Creating a Template Fitting the Template p. 2 p. 3 p. 5 Sew Blocks or Pattern p. 8 Quilt Top Assembly
Hip Packing Holster. ¼ yd lining fabric one - 7 ½ x 24 lining one - 8 x 4 ½ (C) elastic pocket. ¼ yd fusible fleece one - 7 ½ x 24
 elastic pocket. ¼ yd fusible fleece one - 7 ½ x 24") Hip Packing Holster Read directions before starting. Seam allowances are ¼, basting is 1/8. Options are given to make slits for a belt or for a strap. Or you can do both. Make the following cuts in the
Hip Packing Holster Read directions before starting. Seam allowances are ¼, basting is 1/8. Options are given to make slits for a belt or for a strap. Or you can do both. Make the following cuts in the
The Pea Pod. baby carrier. Created by Sascha Romeo Piccoli Piselli.
 The Pea Pod baby carrier Created by Sascha Romeo Piccoli Piselli www.piccolipiselli.blogspot.com sascharomeo@rocketmail.com This baby carrier is designed to be worn on the hip. The adjustable two buckle
The Allie An in-the-hoop project
 The Allie An in-the-hoop project A wallet/coin purse for the 5x7 hoop. The Allie has 3 credit card slots in the front section which features a large flap with a snap closure. You can carry coins or other
Skylines Easy Market Bag by Abigail (Gail) Baker October 2015
 Baker October 2015") Skylines Easy Market Bag by Abigail (Gail) Baker October 2015 Market bags are very easy to make and go pretty quickly. The finished bag measures 20 inches by 20 inches - but sometimes if I am a little
Skylines Easy Market Bag by Abigail (Gail) Baker October 2015 Market bags are very easy to make and go pretty quickly. The finished bag measures 20 inches by 20 inches - but sometimes if I am a little
*All seam allowances are 1/4 unless otherwise noted. All pattern pieces include the seam allowance.
 Kelley Crossbody Bag Supplemental Instructions to Online Video Course www.craftygemini.com http://craftygemini.com/2016cgbagclub 2015 Crafty Gemini LLC. All rights reserved. *This pattern cannot be photocopied,
Double Zipper Device Sleeve with Wrist Strap
 Published on Sew4Home Double Zipper Device Sleeve with Wrist Strap Editor: Liz Johnson Thursday, 13 July 2017 1:00 We love the idea of concealing a cutting-edge electronic device inside a vintage wrapper.
Romantic Ruffle Flower Pillow Cover with Anna Griffin Fabric
 Romantic Ruffle Flower Pillow Cover with Anna Griffin Fabric The secret is fusible fleece! Size: 13 x 13 to cover a 12 pillow form Instructions and yardage are for one pillow cover. This pattern is provided
Terrie Sandelin Miniatures in Minutes
 Terrie Sandelin Miniatures in Minutes http://www.terriesandelin.com http://terriesandelin.blogspot.com/ Tumbler Foundation: Tote Bag Finished Foundation: 7" by 7" Approximate size of bag: 12" by 10" by
Original Recipe. Flying in Squares Quilt by Melissa Corry
 Original Recipe Flying in Squares Quilt by Melissa Corry Hello Moda Bake Shop fans!!! I am so excited to be back today to share a "high flying" tutorial with you all ;) I'm Melissa Corry and I normally
Matching Bags for Girls and Dolls Tutorial
 Matching Bags for Girls and Dolls Tutorial A girl can never have too many bags! This bag is such a fun bag both for girls and dolls. The girl s size bag is a purse size. The doll s bag is a tote size for
SINGER PROJECTS Sewing Machine Mat with Pockets PROJECT SKILL LEVEL:
 SINGER PROJECTS Sewing Machine Mat with Pockets This handy sewing machine mat with pockets not only helps protect your table surface, it keeps your go-to notions right at your fingertips. The four pockets
Prima Diva. .Style, function and loads of compliments That s what the Stella Sling Bag brings!!
 .Style, function and loads of compliments That s what the Stella Sling Bag brings!! Supplies: 1/2 Yard Main Print (Outside of wallet, Outside of pockets, optional strap, etc..) 5/8 Yard Accent Print (Lining
Cloth Pad Tutorial: Exposed Core, Overcast Edge
 Cloth Pad Tutorial: Exposed Core, Overcast Edge This is the first tutorial in a series of three. I ll be showing you how to sew cloth pads with overcast edges three ways: exposed core, exposed contoured
The Sunshine An in-the-hoop project
 The Sunshine An in-the-hoop project All the music I walk to is on my phone, but my new iphone 6+ is too big to fit in my pocket. This case is the perfect solution. That s my iphone 6+ peeking out of it
Blues & Jazz. Pack Designs
 Pack 12369 10 Designs Note: Some designs in this collection may have been created using unique special stitches and/or techniques. To preserve design integrity when rescaling or rotating designs in your
CAMELOT FABRICS. 3. Draw a vertical line on the pointed end of each Strap, a tiny bit longer than the diameter of your buttons.
 Other Supplies - 2 buttons in coordinating color - paper printer - basic sewing supplies - sewing machine with buttonhole foot - iron & pressing surface - scissors & fabric shears - measuring tape - fabric
MabeWithLove.WordPress.com
 Cloth Pad Tutorial: Adjustable Absorbency and Liners Hi again! In addition to our pads three ways tutorials, I m adding this adjustable absorbency pad and panty liner pattern. Like the other patterns,
Quilt-As-You-Go Pencil Case
 1 of 5 Quilt-As-You-Go Pencil Case by GillyMac Designs This project creates a colourful pencil case, using scraps of fabric sewn directing onto wadding. The pencil case in this project is not lined, but
Sewing Organiser Pattern
 Sewing Organiser Pattern Requirements: 1m Outer Fabric 1m Lining Fabric 1m Cobweb fusible web (or similar) 1m Bag Batting 1m Parlon 4 x 30cm Open ended Zip Optional extras Fat Quarter of Clear Vinyl for
This is an original pattern not intended for sale.
 Hello Moda Bake Shop Friends!! It's Melissa Corry here popping over from Happy Quilting!!! I am super excited to share with you a final Summer Of Solids Quilt tutorial!!! I love making Red, Black, and
Original Recipe. Ruby s Party Bag by Nicole Willmore. Original Recipe can be found at
 Original Recipe Ruby s Party Bag by Nicole Willmore 3 Fat Eighths (or 3-9" x 22" pieces of coordinating fabric) 1/2 yard of fast to fuse fusible interfacing or a similar stiff interfacing Pattern Pieces
Child s Purse An In-the-Hoop Project
 Child s Purse An In-the-Hoop Project Shoulder bag in two sizes, with optional quilting. You may also choose to close the bag with Velcro or with a snap or other type of closure. Files and instructions
Note: Yardage and supplies listed are for all three bags.
 Stash Pouches Finished sizes: Large 10" (25.4 cm) wide x 81/2" (21.6 cm) tall x 31/2" (8.9 cm) deep Medium 9" (22.9 cm) wide x 7" (17.8 cm) tall x 3" (7.6 cm) deep Small 8" (20.3 cm) wide x 6" (15.2 cm)
Fast Gift Wrap Sleeves in Felt & Cotton
 Published on Sew4Home Fast Gift Wrap Sleeves in Felt & Cotton Editor: Liz Johnson Thursday, 07 December 2017 1:00 Slice, stitch, tie, give. Just four steps to fast and festive (and reusable!) gift wrap
Double Layer Half Apron with Fancy Details
 Published on Sew4Home Double Layer Half Apron with Fancy Details Editor: Liz Johnson Tuesday, 18 July 2017 1:00 With this design, we've packed a whole lot of style into one half apron. To start, why settle
Evie Carry All Trio Skill level: Intermediate
 Evie Carry All Trio Skill level: Intermediate http://www.pellonprojects.com Designed by Sara Lanan Make this cute ensemble with a sunglass case, make-up bag and purse. Fabric Needed (For all three items)
Original Recipe. The Bookeeper by Kim Walus. This is my FIRST project for Moda Bake Shop and I'm really excited to share it with you.
 Original Recipe The Bookeeper by Kim Walus This is my FIRST project for Moda Bake Shop and I'm really excited to share it with you. One of my favorite things to do besides QUILTING and CRAFTING is READING!
Toddler's Laminated Cotton Project Apron
 Published on Sew4Home Toddler's Laminated Cotton Project Apron Editor: Liz Johnson Thursday, 09 January 2014 1:00 Keep your tots tidy with this adorable apron for art projects and more. We used laminated
The Katey An in-the-hoop project
 The Katey An in-the-hoop project An over-the-shoulder/cross-body purse with 3 pockets. Back pocket is zippered and full length of the purse. Middle pocket is open. Front pocket has a flap closure and includes
Original Recipe. Sunkissed Summer Squares by Maria Wallin
 Original Recipe Sunkissed Summer Squares by Maria Wallin Hi everyone! My name is Maria Wallin and I'm so excited about sharing my very first Moda Bake Shop tutorial with you all! =) I still cannot believe
retro circle purse a sewing pattern by
 a sewing pattern by retro circle purse This purse design was just kind of a crazy experiment I had to create a purse that opened out on the side instead of on the top. It s finished off with a mod-like
Original Recipe. Let s Go Trippin by Polly Monica
 Original Recipe Let s Go Trippin by Polly Monica Hello again! I m Polly from Aunt Polly s Porch blog {auntpollysporch.blogspot.com} and I m so happy to be sharing my designs again on the Moda Bake Shop!
Sleek Fabric Wallet with Zippered Coin Pouch
 Published on Sew4Home Sleek Fabric Wallet with Zippered Coin Pouch Editor: Liz Johnson Thursday, 18 February 2016 1:00 Someone told me the other day that he believed money would soon become completely
INSTRUCTIONS BFC716 QIH LEOPARD BAG
 INSTRUCTIONS BFC716 QIH LEOPARD BAG This bag can be done in many ways! You can stitch it as I did the medium size bag shown at the end of this document (with the Orange trim). For this bag I embroidered
Handy Purse Organizer by Caroline Fairbanks-Critchfield
 Handy Purse Organizer by Caroline Fairbanks-Critchfield www.sewcanshe.com This is a great little organizer. There are 13 pockets - 6 mesh, 6 fabric, and one interior zipper pocket. As you can see in the
Sew Sweetness. Oriole Bag. Sara Lawson
 Sew Sweetness Oriole Bag Sara Lawson Oriole Bag This bag comes in 2 different sizes and comes together quickly with the creative use of darts and front and back fabrics! Try your hand at using a bit of
Acrylic Ruler/Mat Tote Bag
 Acrylic Ruler/Mat Tote Bag Outside Pocket holds 12 1/2' and 16" square up rulers Inside pockets hold 6" x 24" ruler, 6" x 12" ruler, 6" x 6" ruler Plus the inside has pockets for other rulers, notions,
Soft & Stuffable Fabric Shopping Bags
 Published on Sew4Home Soft & Stuffable Fabric Shopping Bags Editor: Liz Johnson Wednesday, 03 June 2015 1:00 As more and more stores up their recycling commitment (some entire cities have banned plastic
Re-Make & Re-Use: Up-cyled Cloth Grocery Bags - Stronger, Cuter
 Published on Sew4Home Re-Make & Re-Use: Up-cyled Cloth Grocery Bags - Stronger, Cuter Editor: Liz Johnson Friday, 17 February 2012 9:00 This clever idea of how to strengthen and 'makeover' existing cloth
All seam allowances are 1/2 unless otherwise noted. All pattern pieces include the seam allowance. Please read all instructions before beginning.
 This beginner-friendly bag features an easy to install top zipper, and two topstitched pockets on the inside. Use your favorite fabric print and adorn it with the optional grosgrain ribbons! All seam allowances
2. Mark an additional 1¾ to the longer side on one side only to add seam allowance and ease.
 Appliquéd Monogram Tablet Sleeve By Sue Hausmann Thanks to Karen Hinrichs for idea and instructions!! Recently I was having lunch with my friend Karen Hinrichs and pulled out my Ipad. She was horrified
Soft & Stuffable Fabric Shopping Bags: Shop Pretty
 Published on Sew4Home Soft & Stuffable Fabric Shopping Bags: Shop Pretty Editor: Liz Johnson Wednesday, 07 June 2017 1:00 As more and more stores up their recycling commitment (some entire cities have
Frilly Jelly Bag. Bag Dimensions are 12 inches wide x 15 inches high (to base of handle), and 4 ½ inches deep.
, and 4 ½ inches deep.") Frilly Jelly Bag This frilly fun bag is another great one to use up some favourite left-over Jelly Roll Strips (or a bag worth buying a bright new jelly roll for!) Aside from the gathered jelly roll strips,
Frilly Jelly Bag This frilly fun bag is another great one to use up some favourite left-over Jelly Roll Strips (or a bag worth buying a bright new jelly roll for!) Aside from the gathered jelly roll strips,
The Quilter s Carry-All Bag Tutorial
 The Quilter s Carry-All Bag Tutorial Welcome! I ve written this tutorial for those who like more visual instructions. Please note that not all steps are represented and that there is not any size information
Today we will sew the hidden contoured core pad, the third pad pictured on the left hand side of the screen.
 Cloth Pad Tutorial: Hidden Contoured Core, Overcast Edge Welcome back again! This is the third and final tutorial in a series of three showing you how to sew cloth pads with overcast edges three ways:
Cosmetics Case with Vinyl Interior Skill Level: Intermediate
 Cosmetics Case with Vinyl Interior Skill Level: Intermediate Designed By Lindsey Rhodes Sewn By Lindsey Rhodes http://lrstitched.com Use this step by step tutorial to create a roll-up cosmetics case with
Tissue Box Cover with Pockets - Instructions
 Tissue Box Cover with Pockets - Instructions These instructions work for any size square tissue box. Supplies Needed: 14 of 54 home dec fabric - you could also use a quilting cotton but I would interface
The Lydia Bag, featuring 2018 Pantone Color of the Year: Ultra Violet
 Published on Sew4Home The Lydia Bag, featuring 2018 Pantone Color of the Year: Ultra Violet Editor: Liz Johnson Monday, 29 January 2018 1:00 Sometimes you just need something simple! This beautiful bag
Print 4 copies of A, B, and C for the front of the bag Print 4 copies of A, B, and C for the back of the bag. Piece 'C' 1" square
 Print 4 copies of A, B, and C for the front of the bag Print 4 copies of A, B, and C for the back of the bag Piece 'C' 1" square Piece 'A' 1 seam allowance 3 2 5 4 seam allowance 3 Piece 'B' 4 seam allowance
THE FLOWER FAIRIES. The Red Boot Quilt Company
 THE FLOWER FAIRIES The Red Boot Quilt Company www.theredbootquiltcompany.com THE FLOWER FAIRIES Approx. Size 62in x 61in BEFORE THE FUN BEGINS Please read all instructions before you begin. Abbreviations.
Zip Zap Mini Pouch with Side Loop Straps
 Published on Sew4Home Zip Zap Mini Pouch with Side Loop Straps Editor: Liz Johnson Wednesday, 17 February 2016 1:00 Sometimes extra-cute is exactly what you need to get your sewing creativity flowing.
Scooter Strips Wall Hanging
 Scooter Strips Wall Hanging This wall hanging is a quirky take on the traditional log cabin quilt block. It uses fabric of different widths to make the central block off-centre. Adding border strips to
Closet Hanger Safe for Travel & More
 Published on Sew4Home Closet Hanger Safe for Travel & More Editor: Liz Johnson Friday, 15 May 2015 1:00 We originally designed this clever little storage solution for the frequent travelers out there.
gothic lolita satchel
 gothic lolita satchel a sewing pattern by gothic lolita satchel sewing tutorial gothic lolita satchel This satchel was inspired by the Gothic Lolita style so popular amongst Harajuku fashionistas in Japan.
Modern Two-Tone, Fold-Over Clutch in Faux Leather
 Published on Sew4Home Modern Two-Tone, Fold-Over Clutch in Faux Leather Editor: Liz Johnson Tuesday, 18 April 2017 1:00 Two colors, two fabrics, one awesome bag. This clutch knocks-off a popular style
Sew Spoiled Designs. Weekender Travel Tote. Sew Spoiled. By Leah Williams. Sew Quick, Sew Easy,
 Sew Spoiled Designs Weekender Travel Tote By Leah Williams Sew Quick, Sew Easy, Sew Spoiled Sew Spoiled 2009 Sew Spoiled patterns content within the tutorial is copyrighted and cannot be reproduced elec-
Weighted Pincushion Organizer
 Weighted Pincushion Organizer from Sew, Mama, Sew! This sturdy pincushion has plenty of space to store pins and a wool felt strip for your needles. The hanging pocket is a perfect place for storing easily-misplaced
DIY Christmas Advent Calendar Sewing Tutorial
 DIY Christmas Advent Calendar Sewing Tutorial I love counting down the days until Christmas with my children and seeing the smiles on their faces each morning as they get to check the advent calendar to
Digital Device Sleeve
 Published on Sew4Home Digital Device Sleeve Editor: Liz Johnson Tuesday, 22 September 2015 1:00 Finding great gift ideas for guys is tough, starting with the search for the perfect fabric, which can be
THE FLOWER FAIRIES. This is a free pattern provided by The Red Boot Quilt Company 2017 STRICTLY NOT FOR RESALE OR DISTRIBUTION
 THE FLOWER FAIRIES This is a free pattern provided by The Red Boot Quilt Company 2017 STRICTLY NOT FOR RESALE OR DISTRIBUTION The Red Boot Quilt Company The Red Boot Quilt Company THE FLOWER FAIRIES Approx.
Kindle Case with Pocket 1 An In-the-Hoop Project
 Kindle Case with Pocket 1 An In-the-Hoop Project 2011, 2015 Peggy Severt, Pegboard Crafts Updated April 2015. Minor improvements. pegboard1@yahoo.com or peggy@pegboardcrafts.com http://www.pegboardcrafts.com
A SPOOKY SLEEPOVER. This is a free pattern provided by The Red Boot Quilt Company The Red Boot Quilt Company
 A SPOOKY SLEEPOVER The Red Boot Quilt Company The Red Boot Quilt Company A SPOOKY SLEEPOVER Approx. Size 38 1/2in x 57 1/2in BEFORE THE FUN BEGINS Please read all instructions before you begin. Abbreviations.
COURSE TITLE Bustle Skirt
 COURSE TITLE Bustle Skirt PRINTER FRIENDLY INSTRUCTIONS COURSE INSTRUCTOR Summer @ Sumo's Sweet Stuff Hello! My name is Sumo (or Summer, if you want to get more formal). I take up a little piece of the
Measuring Tape Neck Strap Sewing Caddy
 Published on Sew4Home Measuring Tape Neck Strap Sewing Caddy Editor: Liz Johnson Wednesday, 31 May 2017 1:00 How many of you loop a tape measure around your neck while you re sewing? I m pretty sure there
One Step Quilts - handbag and pouch
 One Step Quilts - handbag and pouch A sweet handbag and pouch pattern sewn from one yard of pre-printed fabric from Lecien. Fabric and notions: 1 yard of the One Step Quilts handbag and pouch fabric 1
Quilted Yo-Yo Tote in Metallic Linen
 Published on Sew4Home Quilted Yo-Yo Tote in Metallic Linen Editor: Liz Johnson Monday, 13 February 2017 1:00 The front of a bag is a bit like a blank slate. It s a lovely flat surface that can evolve into
Just Kisses CARRY ALONG SEWING CASE. Featuring. Finished project measures: 12 x 8-1/2 x 4
 Just Kisses CARRY ALONG SEWING CASE Designed by Heidi Kenney www.mypapercrane.com Featuring Finished project measures: 12 x 8-1/2 x 4 For questions about this pattern, please email Patterns@RobertKaufman.com.
Quick Oven Mitts. We n d y. s H a n d. a d e Q u ilts - M. Quilting and Craft Patterns Difficulty: Advanced Beginner
 Quilting and Craft Patterns Difficulty: Advanced Beginner Quick Oven Mitts Assemble a pair of fingertip oven mitts in a few hours, with a Fat Quarter of your favorite fabric. Makes a lovely and useful
Carissa is the perfect clutch for every day, not too big, not too small. Six card sl
 Carissa Clutch Carissa is the perfect clutch for every day, not too big, not too small. Six card slots, zippered pocket, wristlet strap and an optional hand strap. Finished size of bag is: Height 7 inch