Scratchbuilding a HO Semphore Signal-With Addendum. Paul Allard Dana Brown December 10, 2017 Green Mountain Division - NMRA
|
|
|
- Austin Sherman
- 5 years ago
- Views:
Transcription
1 Scratchbuilding a HO Semphore Signal-With Addendum Paul Allard Dana Brown December 10, 2017 Green Mountain Division - NMRA

2 Background Avoiding cornfield meets on obscure single track mainline. Semaphore signaling solution observed at Dave Sias Layout at Laconia NER convention, 2013


3 Double Track to Single at Lincoln With dispatcher-less operations, the train entering the tunnel doesn t know what to expect without signal protection.
4 Research MR article published March 2003 on building a working semaphore signal. Key points: making colored roundels easily mounting the light and blade assemblies adding details such as instrument case, ladders and mileage markers choosing a blade shape

5 Image of MR Article
6 Collecting Parts Brass tubing, sheet and U-channel Music wire, screws, Gallery Glass, LED lamp, switch motor mechanism and attachments Detail parts: ladder stock, relay case Misc: tools: soldering iron, solder, small drills and taps, files, nibbler, paints, air brush, modeling hand tools epoxy, solder (silver and regular), Stick-Tak
7 Key Parts List 3/32 & 5/32 brass tubing.025 brass sheet stock 1/8 U-channel.020 music wire or phosphor bronze wire ladder stock (Tomar #899) instrument case (Alexander Scale Models #3102) 603 surface mount LED with 4 leads (TTX led0603wpk) Misc connectors T-nut, push rod, brass strip
8 Basic Dimensions We chose the height based on looks on the layout. The signal mast ends up 27 tall from the ground. Prototype signal masts were 17 or higher. Original LED was chosen to be 3mm to fit 5/32 mounting tube. Much smaller 603 ditch light was used.


9 Mounting Lamp Holder 1/8 U-channel notched for lamp holder and slotted for mounting to mast use higher temperature silver solder


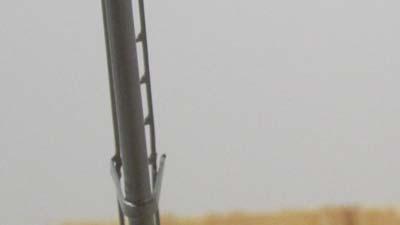
10 Lamp Holder U-Channel


11 Lamp Holder Trying 3mm LED in holder
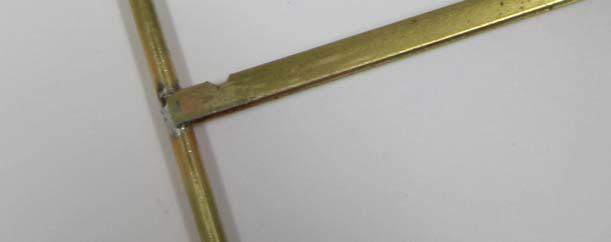
12 Adding 90 Blade Pivot Mount Make a fixture we eyeballed the alignment and missed. Cut to length and tap hole (2-56 scew without drilling)
13 Cut Pivot to Length and File Shorten pivot mount to hold screw length File face of lamp holder and pivot screw mount so that blade passes over both without interference.
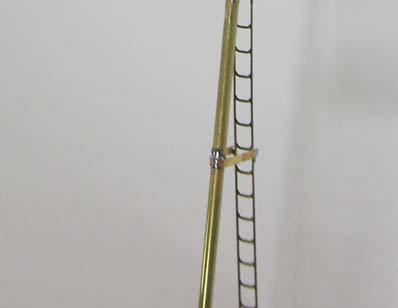
14 Blade Design Designed with Autocad or any line editing program with dimensioned lines Printed to Avery Easy Peel Address Labels 1 x 2 5/8 self sticking labels Cut out label and stick to.025 or.030 brass sheet stock. Drill holes before filing. File blade using printed sticker outline.

15 Blade Build

16 Blade Build

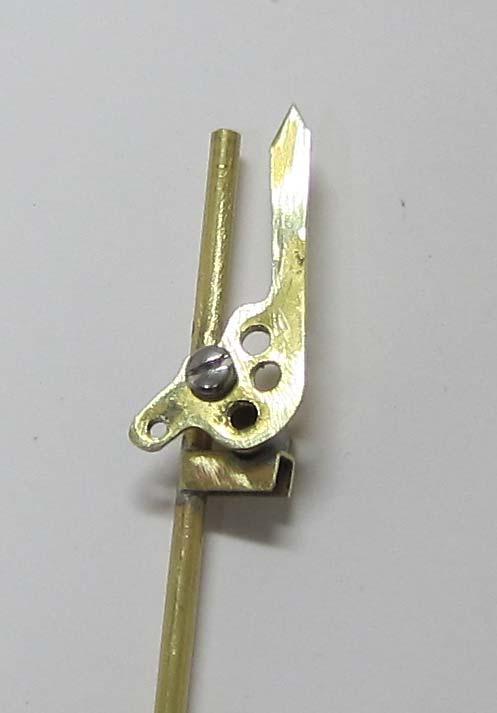
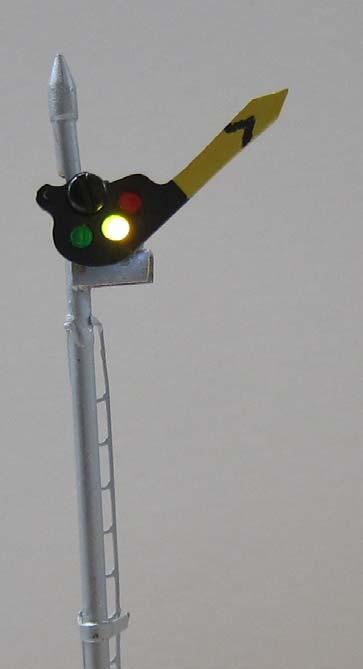
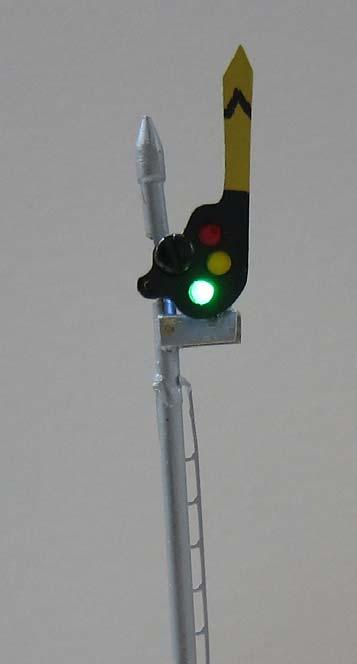
17 Blade Assembled to Mast
18 Add Side Slot for Actuator Wire File carefully to avoid bending mast mast becomes very week after the side material is removed. Remove very little metal at a time. Test end stop motion of blade each time. Bend phosphor bronze wire to engage blade. Drill.025 hole (#72 drill) in blade for wire (we moved this hole to make blade smaller and more realistic) Engage actuator wire with blade and test motion.

19 Actuator Side Slot

20 Blade with Actuator Note the moved actuator wire hole. Note finial turned from sprue stock and added to end of cut down mast. Big screw head use smaller round head and 0-80 screws instead of 2-56


21 Adding Ladder and Brace Tomar #899 brass signal ladder stock Metal straps from an etched brass ladder frame from

22 Almost Finished


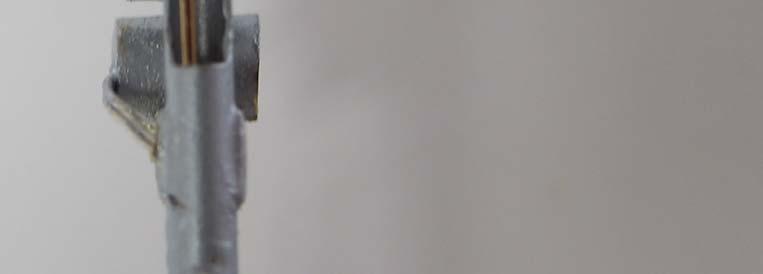
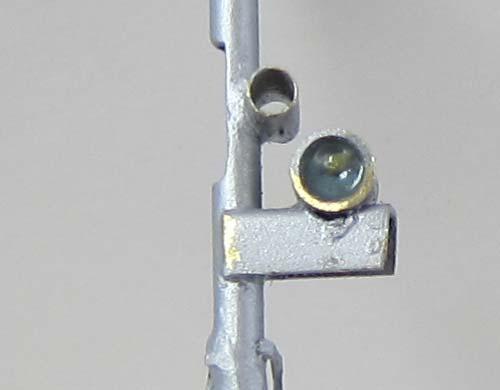
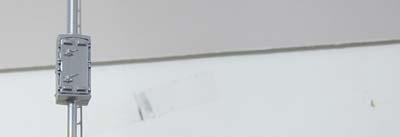
23 Modify a case by adding 3/32 hole from top to bottom and removing unwanted features. Adding Relay Case
24 Slide Case onto Mast and Paint
25 Add Lens to Lamp Holder Microscale Kristal Klear looks like thick white glue. Spread a small blob on the end of a toothpick around the perimeter of the lamp holder opening. The glue will bridge the entire opening. After drying, there will be a transparent clear lens for the light.
26 Lamp lens
27 Install Lamp Drill small hole in rear of mast 2 steps #68 hole initially Redrilled hole at 45 degree downward angle with #61 drill to fit both wires from LED through Carefully insert lamp and press in light blocking Stick-Tak putty. After testing lamp, cover putty with epoxy to provide a firm painting surface

28 Back of Lamp Details


29 Lamp Performance Testing Very bright 1K dropping resistor with 9V battery. Will test with 2K resistor to make dimmer.

30 Seal with Epoxy
31 Finishing the Blade Painted in layers (used paint from personal collection no paint recommendations) Sprayed TTX yellow (Floquil) on front of blade. Didn t mask overspray. Covered yellow blade front and sprayed black (True Scale) over the remainder of the blade and body of signal head. Touched up edge of blade with yellow where black overspray occurred Painted black chevron with micro brush by hand on blade.
32 Installing Roundels Used Gallery Glass stained glass hobby liquid 3 colors used. It moves away from the center of the lens as it dries, leaving a thinner lens in the middle. Ruby Red #16015 Sunny Yellow #16004 Kelly Green #16008 Placed blade on Saran Wrap covered block of wood Placed 1 small drop of liquid in each roundel hole and let dry for 24 hours. Added another drop of Gallery Glass to each roundel and let dry for 24 hours. Added another drop of Gallery Glass to each roundel and let dry for 24 hours
33 Blade Painting and Roundels


34 Adjusting Lamp Brightness

35 Adding Motor Control Tortoise makes a drive mechanism for semaphore signals and crossing gates about $15 plus a Tortoise motor
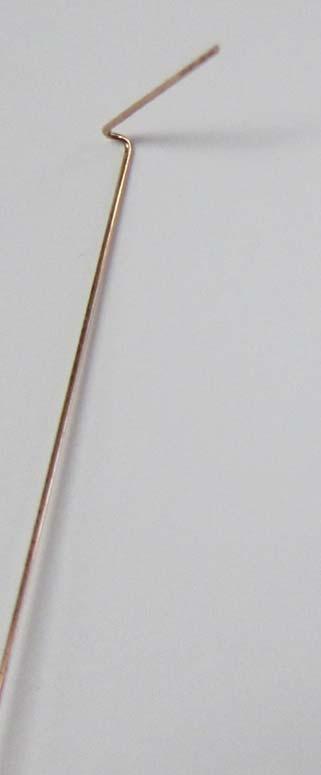
36 Scratchbuilt Tortoise Signal Drive Attach a pivot to the Tortoise body. Add a lever to the pivot and the Tortoise movable throw bar. Connect signal via airplane wire connectors. Use signal throw dimensions to determine location of actuator bar connecting hole.

37 Per MR Article Oops, doesn t work but the concept is good.
38 Drive Modifications 60 mil wire instead of 20 mil music wire. Measure end stops precisely since there are not adjustable stops on the Tortoise.
39 Mounting The Works - Finished
40 Addendum For producing multiple signals, changes were made in the design as follows: A jig was made to hold the parts in the proper alignment for soldering by one person using tools sold by Micro Mark: Solder pad: 7021M T-pins: #14318 The pivot screw for the blade was reduced from #2-56 threads to #0-80 to make the screw smaller. The pivot screw threaded holder was changed from tubing to 5/32 diameter brass rod (see photos that follow) The geometry of the blade was changed for optimal fit to the new pivot screw/mast assemblies (slight tuning change)


41 New Blade Pivot Mount Smaller screw in solid brass stock Backside view without screw
42 Bill of Materials The bill of materials and other notes used in the construction of the prototype (and follow on) signals is contained in a separate Excel spread sheet. A print out of that spread sheet follows.
43 Item Material Dimensions Comments Signal mast 3/32" brass tubing 4 1/2" long Finial 1/8" plastic rod (or scrap sprue) Turn on drill to fit into mast end and to have a decorative profile. Blade screw mount 3/32" brass tubing 1/4" long 70mil diameter hole (#50 drill) Blade structure.025" brass sheet About 3/4" x 1 1/2" material. It is easier to drill if the material is larger than needed. Cut to size after drilling holes for colored roundels. Signal lamp holder 5/32" brass tubing 1/4" long Signal lamp mounting bracket 1/8" brass U channel 3/8" long 0603 white LED (may substitute warm white) - Tony's Train Exchange Part Signal lamp number led0603w 4-5" leads built in Signal lamp mount light blocker Stick Tak (DAP Blue Stik) Adhesive Putty As needed (tiny amount) Paint surface on light blocking putty on the lamp back side Devcon 5 minute epoxy As needed small amount) Colored spectacle glass Gallery glass stained glass liquid 3 coats, less than 1 drop per coat Signal base instrument case Alexander Scale Models #3102 Signal ladder stock Tomar # /2" Strip brass for ladder to mast holder 1/16" wide by 1/32" thick (31mil or thinner) about 1" long cut to fit model 3mm LED fits into tube without the flange falling in. Used a 0603 LED instead of 3mm LED. Use Micro Kristal Klear (by Microscale) to form a clear lens on the blade end of mount. Fill back end with light blocker putty (see below). Fill back end of lamp mount after inserting LED. This holds the LED in place, allowing the wires to exit the back of the mount. Tony's Train Exchange has this. Cover back of putty light blocker with epoxy to provide a surface for paint to adhere. Also used to glue the T-nut to the tortoise switch motor. Red lens: Ruby red #16015 Yellow lens: Sunny Yellow #16004 Green lens: Kelly Green #16008 Cut off post on top and file top and bottom flush. Drill 3/32" hole through the case from the top through the bottom for the signal mast to pass through. Glue case bottom 3 3/4" from the top of mast tube. K&S Precision Sheet Metal # (1/64" x 1/16" x 12" brass strip) - sold by Walthers under part #
44 Actuating rod.020 music wire or phosphor bronze wire 6" long Tichy Train Group model #1103 Pushrod connectors Great Planes part number GPMQ3871 Used to clamp actuator wire to tortoise throw rod. T-nut for tortoise pivot #6-32 x 1/4", Everbilt: Home Depot model Tortoise slow motion switch machine Sold everywhere Throw rod for Tortoise 1/4" strip brass..016" to.030" range Sold at Lowes or mail order from Walthers Misc items: 2-56 black pan head or round head machine screw - for blade pivot 1/4" long Paul Allard changed to 0-80 round head screw to hide the screw better. #6 machine screw - pan head or round head - for tortoise arm pivot 1/4" to 3/8" long Mounting base and screws for under table tortoise actuator mechanism Miscellaneous pieces of wood and screws. Power and wiring for the lamp and tortoise Misc shop materials: silver solder (high temperature) normal solder (low temperature) black paint for blade yellow paint for blade silver paint for mast assembly Tru-Color Black (TCP-010) Floquil TTX Yellow (out of production) Floquil Old Silver (out of production) Special tools: mast hole for lamp wires to pass through at lamp holder #68 drill starter hole, followed by #61 final hole #50 drill for 2-56 screw (3/64" or #56 drill Blade screw hole for 0-80 screw) Blade screw hole tap 2-56 internal thread tap (or 0-80 tap) Blade hole for actuator wire #72 drill (.025" for.020" wire) Blade roundel holes and pivot hole 3/32" drill Metal nibbling tool For cutting excess blade material away Micro Mark sells a nibbling cutter, Item # Computer printer with label paper For making blade cutting mask pattern Staples: Avery address labels, #5260 Small tubing cutter Small metal files KS 296 (sold by Walthers as ) - down to 1/16" tubing Micro Mark #86849 with rollers instead of plastic friction block (down to 1/8" tubing)
SE5a Instrument Board part 2 - rev 1.1
 SE5a Instrument Board part 2 - rev 1.1 Fuel (Petrol) Valve This valve uses two circular name plates, eight brass screws, one black plastic base, copper wire and two black plastic risers. You can pick any
Continue gluing the remaining top parts ensuring the angled piece is glued well. Set aside and let dry. See photo below
 Radiator rev 1.1 The SE5a s radiator is one of the most recognized radiators in WW1. It is one of the components that defines the SE5a. The original SE5a has seen multiple radiator designs used during
Tortoise Switch Machines, Mounted Horizontally
 Tortoise Switch Machines, Mounted Horizontally by David King Have you ever used the Tortoise Switch Machines manufactured by Circuitron. These are a wonderful stall motor slow motion switch machine that
28 mm. 18 mm. 14 mm. 10 mm Length to fit. 7 mm. 16 mm. 7.5 mm. 18 mm 10 mm 25 mm. 3 mm.032 Brass. Wire. Figure 1: Ground Throw Components
 Modified Slanser Ground Throw Switchstand Bill Johnson of the Sunrise Division of the NMRA has demonstrated and documented the Slanser Ground Throw mechanism on several occasions. His design requires the
Citabria Pro. Aerobatic Parkflyer. by Joel Dirnberger
 Citabria Pro Aerobatic Parkflyer by Joel Dirnberger Revision C: December 21, 2004 Citabria Pro Building Instructions Length: Wingspan: Wing Area: Flying Weight: Wing Loading: Functions: Specifications:
CONCEPT MODELS INSTRUCTIONS FOR UP DC-10 WING CAR El Toro Way Stockton, CA Web Address:
 CONCEPT MODELS Web Address: http://www.con-sys.com 8810 El Toro Way Stockton, CA 95210 INSTRUCTIONS FOR UP DC-10 WING CAR 2 CONCEPT MODELS PARTS DC-10 WING CAR Item No. Part No. DESCRIPTION QTY. 1 2003-1
Slide the stock rubber tank mount caps onto the ends of the CS-1 tank mount:
 RYCA CS-1 BODY PARTS INSTALLATION GUIDE [The CS-1 installation guides should be used as supplements to the videos found on our Youtube Channel. There is no strict order to the build process, but it is
How to make a template to mount your plaque to a surface
 How to make a template to mount your plaque to a surface A piece of heavy paper 3 4 wider than your plaque on all four sides (paper grocery bag works great too) Small amount of paint (latex dries the fastest)
Tools and Tips: ( 1 )
") Tools and Tips: As you build instructions will show in my many picture manual how to assemble. You can use your own methods as you desire, my results are very good. A smooth, flat work surface is very
Tools and Tips: As you build instructions will show in my many picture manual how to assemble. You can use your own methods as you desire, my results are very good. A smooth, flat work surface is very
The Astronomical League
 The Astronomical League www.astroleague.org Library Telescope Modifications Check the collimation with the eyepiece cap provided (the one with the hole in its center) before starting on any modifications.
Nanton Grain Mill Assembly
 ( 1 ) Nanton Grain Mill Assembly Locate package for assembling storage building. These are cut from 1/8 masonite. Inspect and lightly sand edges where it will be bonded. Use white glue or CA glue to bond.
LANDING GEAR. 1. Fit landing gear into slots on bottom of fuselage.
 LANDING GEAR 1. Fit landing gear into slots on bottom of fuselage. 4. Use channel-lock pliers to press blind nuts into position (note: drilled hole should be slightly smaller than shaft of blind nut for
Tools and Tips: ( 1 )
") Tools and Tips: As you build instructions will show in my many picture manual how to assemble. You can use your own methods as you desire, my results are very good. A smooth, flat work surface is very
Tools and Tips: As you build instructions will show in my many picture manual how to assemble. You can use your own methods as you desire, my results are very good. A smooth, flat work surface is very
Captain Baxter, 3D Print instructions
 Captain Baxter, 3D Print instructions Baxter prototype printed by Shapeways and a home 3D printer Thank you for purchasing the Captain Baxter 3D print, this will instruct you on how to put this model together,
RESolution V2 Manual
 RESolution V2 Manual Note for the German Manual: Yellow Bottle thick CA Pink Bottle Med CA Blue tube 5 minute Epoxy Green tube 90 Minute Epoxy Construction of the Fuselage Step 1: Cover the plan with a
3Position the hull of the ship as
 Yamato: Step-by-step 25 The hull and stern deck c b d a b d c e e f a Rear frame b Stern deck x 2 c Stern deck x 2 d Side wall x 2 Wood glue Sandpaper (no. 400 grain) Craft knife Pliers d Side wall x 2
The Useless Machine. DIY Soldering Edition. Instruction Guide v0004
 The Useless Machine DIY Soldering Edition Instruction Guide v0004 TM For the best outcome, follow each step in order. We recommend reading this guide entirely before you get started. Tools required: Soldering
Building the Toothpick Audio CW Filter
 Building the Toothpick Audio CW Filter Introduction The toothpick is a simple variable bandpass audio filter designed to compliment the Splinter QRPp Trans-Receiver. The filter also contains an audio amplifier
Note - the nose ribs and are thinner than the main ribs. These nose ribs will use a thinner rib cap than the ribs. This is per design.
 Stabilizer rev 1.2 The SE5a stabilizer is the heartbeat of the tail and is recreated like the full scale version. All tail pieces depend on the stabilizer. It uses the steel fittings, pulleys, inspection
BRF-020 Type YCV Turbot Spoil Wagon. Building Instructions
 Tel 07747 018544 www.prmrp.com BRF-020 Type YCV Turbot Spoil Wagon Building Instructions SCALE MODEL PRODUCT FOR ADULT MODELLERS ONLY. WHITE METAL CONTAINS LEAD WASH HANDS AFTER USE. MAY CONTAIN SMALL
PS 5077 cu. ft. Boxcar with EOC device. 1:29 scale resin craftsman kit. by Burl Rice
 PS 5077 cu. ft. Boxcar with EOC device 1:29 scale resin craftsman kit by Burl Rice www.burlrice.com Bill of materials (not included): Thick/medium viscosity CA PL adhesive, or Gorilla Glue Heavy Duty Construction
Obtained from Omarshauntedtrail.com
 DaveintheGrave's Halloween Props Animated Crawling Skeleton Build a life-size skeleton torso that realistically crawls across the lawn one arm at a time. 1. Motor Base and Linkage Assembly BASE - I used
the wire, less is better. And make sure the bends on each truss wire are in line with the other. See the next photo.
 The following information and photographs are what I did to build the kit. Your methods and needs may differ from this which is fine. There is no right or wrong way if you are used to scratch building.
1. Underframe/Tank Bottom
 1. Underframe/Tank Bottom The construction process for the Class X tank cars is a little different as there is no true underframe. Instead we will use the tank bottom as part of the underframe, attaching
CVS Pharmacy kit in HO scale
 CVS Pharmacy kit in HO scale Parking lot base and cars not included This kit includes all building parts and wall-mounted signs milled in white styrene plastic, clear window glazing and pre-cut Plastruct
Modern Gas Station backdrop building kit in HO scale
 Modern Gas Station backdrop building kit in HO scale This kit includes all building parts, pumps, signs, and base milled in white styrene plastic, clear window glazing, Plastruct Ridgid Clay Tile roofing,
Hand-Laying Turn-outs. By Brad Morneau
 Hand-Laying Turn-outs By Brad Morneau 1 Index Section: Page(s) Introduction 3 Turnout basics 3 Fast-Track Templates 4 First Step: Plot the turnout 5 Drilling pilot holes 5 Lining up the Switch Machine
P.O. Box 8400 Green Bay, WI (920)
") P.O. Box 8400 Green Bay, WI 54308-8400 (920) 468-2165 Change Notice No. 112 Implemented By: KI-Pembroke Notification By: Scott Vissers Date: 03/15/10 Component Product Title: Series XXI Lateral Filing
P.O. Box 8400 Green Bay, WI 54308-8400 (920) 468-2165 Change Notice No. 112 Implemented By: KI-Pembroke Notification By: Scott Vissers Date: 03/15/10 Component Product Title: Series XXI Lateral Filing
Scratchbuild A Backwoods Water Tank Part V - Making the Frost Box and Hanging the Water Spout
 Scratchbuild A Backwoods Water Tank Part V - Making the Frost Box and Hanging the Water Spout By Dwight Ennis In this section, we're going to make the Frost Box, and we'll build the Spout Hanger Assembly
CONCEPT MODELS INSTRUCTIONS FOR THE KASGRO KRL SPECIAL DEPRESSED CENTER FLAT CARS El Toro Way Stockton, CA 95210
 CONCEPT MODELS Web Address: http://www.con-sys.com Email: concept_models@con-sys.com 8810 El Toro Way Stockton, CA 95210 INSTRUCTIONS FOR THE KASGRO KRL 204000-2 SPECIAL DEPRESSED CENTER FLAT CARS 2 CONCEPT
7mm/0Gauge BRF 025 ZUV SHARK Plough Brake. Building Instructions
 Tel 07807 225801 www.prmrp.com 7mm/0Gauge BRF 025 ZUV SHARK Plough Brake Building Instructions SCALE MODEL PRODUCT FOR ADULT MODELLERS ONLY. WHITE METAL CONTAINS LEAD WASH HANDS AFTER USE. MAY CONTAIN
Hardee s Restaurant kit in HO scale
 Hardee s Restaurant kit in HO scale Parking lot base and cars not included This kit includes all building parts milled in white styrene plastic and laser cut white acrylic, clear acrylic window glazing,
Building Tips This model can be built using the following types of adhesives:
 Page 1 Building Tips This model can be built using the following types of adhesives: Epoxy (with or without microballons) Odorless cyanoacrylate (CA) with accelerator UHU Creativ for Styrofoam (or UHU
PROJECT PLANS WOODEN GIFT BOX
 PROJECT PLANS WOODEN GIFT BOX Make the gifts you give even more special by presenting them in this one-of-a-kind gift box. In fact, the box may be valued more than whatever it contains. The box is sized
Billy Body Kit HBK5 CHECKLIST. Modular Locomotive System Instruction Manual for HBK5 Billy Body Kit. Checked
 Billy Body Kit HBK5 CHECKLIST 1 Cab body panel (folded). 1 Cab floor. 1 Cab front panel. 1 Roof. 1 Body tank support. 2 Boiler bands with M2 Long Steel Screws & Nuts fitted. 1 Brass dome. 1 Cast brass
C-180 Builder s Manual
 C-180 Builder s Manual. May 20, 2002 Last revised July 11, 2002 Copyright! 2002 Douglas Binder, Mountain Models www.mountainmodels.com sales@mountainmodels.com (719) 630-3186 1 Required Equipment! Xacto
Additional Parts List:
 THE TIME MACHINE Additional Parts List: In addition to the cast resin parts enclosed in this kit, there should also be a plastic bag containing the following items needed to complete your time machine
Instructions for Lighting an S Scale Caboose
 Instructions for Lighting an S Scale Caboose The S Scale Caboose lighting kit is adaptable for most caboose models of rolling stock including American Flyer (TM) and contains the same components as found
Taco Bell Restaurant kit in HO scale
 Taco Bell Restaurant kit in HO scale Parking lot base and cars not included This kit includes all building parts milled in white styrene plastic, clear window glazing, Plastruct tile roofing, and logo
Thank you for your purchase of the Lee Ulinger, FoamtanaS, Yak-55, or Extra 330 3D Depron foam, Aerobatic airplane.
 Thank you for your purchase of the Lee Ulinger, FoamtanaS, Yak-55, or Extra 330 3D Depron foam, Aerobatic airplane. Tools you will need to build Recommended additional items: #11 hobby knife Motor: Hacker
Cobra X Q Construction Tips Construction: Bel y pan
 Cobra X Q Construction Tips : The white plastic in this kit is high impact styrene. It can be painted with most types of coatings if light coats are applied this is necessary due to the thickness of the
DIY Lowery Inspired Embroidery Floor Stand
 DIY Lowery Inspired Embroidery Floor Stand Below find the details on how to build your own embroidery floor stand. The Lowery Floor Stand inspired this design. Note using the following instructions will
1/2a Control Line Trainer Engine: Cox Black Window.049
 Designed by Bill Osborne & Peter Justin Drawn by Heman Lee 1/2a Control Line Trainer Engine: Cox Black Window.049 This model airplane is made from foam-board that can be purchased at any art-supply store
BRF-012 Type OTA Timber Wagon. Building Instructions
 Tel 07747 018544 www.prmrp.com BRF-012 Type OTA Timber Wagon Building Instructions SCALE MODEL PRODUCT FOR ADULT MODELLERS ONLY. WHITE METAL CONTAINS LEAD WASH HANDS AFTER USE. MAY CONTAIN SMALL PARTS.
TOYOTA MOTOR EUROPE CA Products Division Tel : Fax :
 TOYOTA MOTOR EUROPE CA Products Division Tel : + 32 2 745 26 77 Fax : + 33 2 745 26 99 Ordering part numbers Comments Part Numbers Wooden floor one hatch PZ449-D3C42-11 one hatch with carpet PZ449-D3C42-01
ParkJet Builder s Manual
 ParkJet Builder s Manual Thank you for purchasing the ParkJet. The ParkJet is a profile ducted fan airplane that can be flown in a larger park. The ParkJet was initially designed by Scott Stoops and modified
Installation for Full Size Polaris Ranger Crew Doors
 Installation for Full Size Polaris Ranger Crew Doors Order of Installation: Heater Doors Wiper on to Windshield Windshield Top & Back Panel Note: Most of the steps in these instructions need to be repeated
THE APOGEE A 100-INCH AMA DURATION SAILPLANE FROM DYNAFLITE
 THE APOGEE A 100-INCH AMA DURATION SAILPLANE FROM DYNAFLITE Apogee is the intermediate sailplane designed to be competitive in AMA duration contests. Effective spoilers, rudder and full flying stabilizer
Bowser drive assembly.
 Bowser drive assembly. Since the late 90s the Bowser drive has become the de-facto drive for repowering HO trolley cars. While other available drives fit certain situations the Bowser seems to be the first
EXTREME LOAD no. TWO
 1602 - EXTREME LOAD no. TWO Kit Features: 22' 4 " x 14' x 3'-6 Oversize Load 49mm (1.9") actual height Bolt Head Details Welded Load Mounting Fins Painting Handles Tools Required: Hobby Knife Tweezers
Pump Assembly. Lloyd Matthews September 2013
 Pump Assembly Lloyd Matthews September 2013 Before proceeding with this part of the build, the author recommends that Pt. No 227 1 mm diameter Brass Wire Figure H1, is replaced with 0.8 mm straight brass
Lima XPT/HST Re-Powering Conversion
 Lima XPT/HST Re-Powering Conversion Please read through these instructions before beginning the conversion process. Non-Powered Bogie The front non-powered bogie is the starting point for this conversion.
HIGH-END TECHNOLOGY. Electric ducted fan Starfighter
 HIGH-END TECHNOLOGY RC Electric ducted fan Starfighter First we want to thank and congratulate you with your decision in buying one of our Kits. The Starfighter puts together very easily so there is not
28 ft. Ventilated (Combination) Box Car
 Box Car") 28 ft. Ventilated (Combination) Box Car Introduction This laser cut wood kit is an HO scale model of a 28 ft. Ventilated (also known as a Combination) Box Car. The model is based on the Illinois Central
28 ft. Ventilated (Combination) Box Car Introduction This laser cut wood kit is an HO scale model of a 28 ft. Ventilated (also known as a Combination) Box Car. The model is based on the Illinois Central
Building Rudy Kouhoupt s Walking-Beam Engine
 Building Rudy Kouhoupt s Walking-Beam Engine Some time ago I came across a copy of Rudy Kouhoupt s article: "Build this Walking-Beam Engine" (Popular Mechanics August 1969), and decided to try and make
Scratch Build a Water Tower
 Here s some Prototype details Photos Courtesy of Rodney Doster Water Spout and Discharge Pipe Tank Bands Here s some more Prototype details Photos Courtesy of Rodney Doster Weather Vane as a Finial Using
CA to each one. You may have to hold the end down while to glue sets or use an accelerator like I did.
 The following information and photographs are what I did to build the kit. Your methods and needs may differ from this which is fine. There is no right or wrong way if you are used to scratch building.
CONSTRUCTION. Signal base.
 This booklet is put together purely to explain how we have constructed signals using our range of signal components which in themselves were produced at the behest of Graham Warburton Signalling Guru of
Parts Identification
 We are excited to introduce the Model Aero Aqua Sport. This is an excellent sport flyer, equally at home flying from grass fields, water, or even snow! The unique V-tail gives the Aqua Sport a distinctive
La Grange, Texas MKT Depot kit in HO scale
 La Grange, Texas MKT Depot kit in HO scale This kit includes all building parts laser cut in plywood, white and clear acrylic, and laser cut self-adhesive shingles. All parts fit together but may need
FUSELAGE CONSTRUCTION
 FUSELAGE CONSTRUCTION Note: prior to building and gluing on the work surface use protective covering on your building surface. (wax paper or clear wrap) Fit the laser cut Fuselage Front and Fuselage Rear
After the glue dries, trim the trussrod ends with your cutting pliers.
 The following information and photographs are what I did to build the kit. Your methods and needs may differ from this which is fine. There is no right or wrong way if you are used to scratch building.
Instructions: PS-2CD 4000 Model Kit Revised 7/2008
 Instructions: PS-2CD 4000 Model Kit Revised 7/2008 Plastic Parts included: Body shell Parts Sprue #1 Roof, trainline, gravity outlet gates, and centersill/endsill pieces Parts Sprue #2 Underframe bolster
This tutorial will work on whatever size roses you wish to make just follow the steps based on your cutter of choice.
 In this tutorial I will show you how to make gum paste rose buds and roses without using floral wire. If possible set aside a couple of days to make these as ideally you need to dry your rose base before
(Build Instructions)
") (Build Instructions) Specifications * Wingspan: 58cm * Length: 50cm * Flying Weight: 59 grams * Channels: 3 (Rudder Elevator Throttle) * Suggested Receiver: 4Ch Micro * Motor: 8mm GearDrive * Prop: GWS
(Build Instructions) Specifications * Wingspan: 58cm * Length: 50cm * Flying Weight: 59 grams * Channels: 3 (Rudder Elevator Throttle) * Suggested Receiver: 4Ch Micro * Motor: 8mm GearDrive * Prop: GWS
Shoulder Plane. dovetailed. fine tools. Make an heirloom tool and learn the secret to creating double dovetails in metal it s easier than you think.
 fine tools dovetailed Shoulder Plane Make an heirloom tool and learn the secret to creating double dovetails in metal it s easier than you think. I ve always been fascinated by old, metal hand planes.
Precision Steel Car s 100 T Steel Coil Car
 Precision Steel Car s 100 T Steel Coil Car Precision Steel Car www.precisionsteelcar.com info@precisionsteelcar.com Paul Vernon: (513) 571-5739 Revised 4/30/2009 Contents of Kit Main Tube Side Frame 2
Modular Locomotive System Instruction Manual for HBK22 Fowler Body Kit
 Modular Locomotive System Instruction Manual for HBK22 Fowler Body Kit Roundhouse Engineering Co. Ltd. Units 6-10 Churchill Business Park. Churchill Road, Wheatley. Doncaster. DN1 2TF. England. Tel. 01302
ASSEMBLY INSTRUCTIONS
 LEGAL DISCLAIMER: Holland Computers will not be held liable for any incidental or consequential damages for breach of any expressed or implied warranty of the Arcade cabinet, nor an incidental or consequential
Application Note. Athearn RTR AC4400CW Tsunami Digital Sound Decoder Installation Notes
 Application Note Overview This application note describes how to install a TSU-AT1000 Digital Sound Decoder into an HO Athearn Ready To Roll AC4400CW. Skill Level 2: The entire installation can be completed
CARL GOLDBERG PRODUCTS, LTD.
 Eagle 400 WARNING A radio-controlled model is not a toy and is not intended for persons under 16 years old. Keep this kit out of the reach of younger children, as it contains parts that could be dangerous.
Voltage Village - Glowing House Set - Bare ConductiveBare Conductive. Step-by-Step instructions to assemble your very own Voltage Village!
 SEARCH CART NAV Voltage Village Glowing House Set Step-by-Step instructions to assemble your very own Voltage Village! INFORMATION SUGGESTED TUTORIALS In this tutorial we will show you how to assemble
Action Frame Inspection and Repair. DEFINITIONS action spread vertical height differential rake
 Action Frame Inspection and Repair DEFINITIONS action spread vertical height differential rake MAKING A FOOT PRINT mark the position of all action brackets, rails, and screws make screw hole spacing template
Berea Hardwoods Survival Ballpoint Pen
 Berea Hardwoods Co., Inc. Pencil Instructions 18745 Sheldon Road Middleburg Heights, Ohio 44130 Toll Free 1-877-736-5487 Survival Ballpoint Pen (Berea #1602/x-xxx- x) Needed: Mandrel-A Bushing-61A Drills-
Southern Pacific C-30-4/6 Bay Window Caboose N-Scale & HO-Scale
 Southern Pacific C-30-4/6 Bay Window Caboose N-Scale & HO-Scale Before Starting PREPARING BRASS The easiest way to remove the brass parts from the sheet they are produced on, is to use rail nippers. The
The Rubley Building Instructions for Assembly of the N scale kit. v1.1
 The Rubley Building Instructions for Assembly of the N scale kit. v1.1 Kit Contents: 197 ea. laser cut 1/16" acrylic parts. 1ea. adhesive backed.020 styrene part. 10 ea..060 x 1" styrene alignment pins.
ASSEMBLY INSTRUCTIONS
 LEGAL DISCLAIMER: MameRoom Designs LLC will not be held liable for any incidental or consequential damages for breach of any expressed or implied warranty of the Ultimate Arcade cabinet, nor an incidental
Introduction: The model should be assembled following the sequence of the stages of construction described in these instructions.
 Victoria Bestell-Nr. 3082/00 Introduction: The model should be assembled following the sequence of the stages of construction described in these instructions. The laser-cut components are individually
Revolution 3D-mini ARF
 Revolution 3D-mini ARF 1 Included Hardware 4 Dubro Micro Control Horns #DUB848 2.32 x 18" Linkage Wire (Music Wire) 1 1.5 x 1.25 x 1/8 Balsa Ply (for motor mount) 1 5" piece of Velcro (Optional recommended,
Tools and Tips: ( 1 )
") Tools and Tips: As you build the book will show in my many picture manual how to assemble. You can use your own methods as you desire, but these worked best for me. A smooth, flat work surface is very
Tools and Tips: As you build the book will show in my many picture manual how to assemble. You can use your own methods as you desire, but these worked best for me. A smooth, flat work surface is very
Bates 1/8 scale B-26. Parts List. Instructions
 Bates 1/8 scale B-26 Vacuform Pieces Swivel Ball 1 Cockpit Floor 1 Ball 2 Cockpit Back Wall 2 Two Flanges 3 Dash 3 Seven 0-64 x 1/4 Bolts 4 Dash Hood 4 Seven 0-64 Nuts 5 Center Console 6 Pilot Seat Fire
Shell Gas Station & Convenience Store kit in HO scale
 Shell Gas Station & Convenience Store kit in HO scale Parking lot base and cars not included This kit includes all building parts and signs milled in white and black styrene plastic, clear window glazing,
Aerospace Speciality Products
 Specifications:! Length: 18.75"/47.6 cm! Diameter: 0.98"/24.9 mm! Weight: 1.5 oz/44 gm! Streamer Recovery! Recommended Engines:!! A8-3; B4-4; B6-4; C6-5! Skill Level: Beginner This is a model rocket kit
Peter Krause ABN
 Peter Krause ABN 25 736 637 163 T/as O-Aust Kits PO Box 743 ALBANY CREEK QLD 4035 AUSTRALIA Phone +61 (0)7 3298 6283 (7.00pm to 9.30pm ONLY) Facsimile +61 (0)7 3298 6287 (24 hours) Mobile 0419 680 584
Assembly Instructions 10 X 10 Aluminum Frame Building
 Assembly Instructions 10 X 10 Aluminum Frame Building 27 97 9 8 47 36 74 52 10 10 X 10 Square Building W/ Dome Includes: The Steel Entry Door with a Dead Bolt Lock assembly and Aluminum Door Frame. Metal
Hinge Mortising Jig. One of the make it or break it parts of building a. 6 ShopNotes No. 74
 Hinge Mortising Jig A Mortise for a Hinge. Quick, clean, and accurate that s the only way to describe the mortise you get with a trim router and this hinge mortising jig. One of the make it or break it
BRF-014 Type SPA Steel Plate Wagon. Building Instructions
 Tel 07747 018544 www.prmrp.com BRF-014 Type SPA Steel Plate Wagon Building Instructions SCALE MODEL PRODUCT FOR ADULT MODELLERS ONLY. WHITE METAL CONTAINS LEAD WASH HANDS AFTER USE. MAY CONTAIN SMALL PARTS.
FABA. Installation Instructions. Conductor Bar System. Publication #FABA-03 3/1/04 Part Number: Copyright 2004 Electromotive Systems
 FABA Conductor Bar System Installation Instructions Publication #FABA-03 3/1/04 Part Number: 005-1062 Copyright 2004 Electromotive Systems 1S 100 Z Installation Instructions Contents: Basic Diagram - -
Scratch Built: Live Steam Garratt
 Scratch Built: Live Steam Garratt BY Bill Allen Woodside, CA. USA (Live Steam/Topic: Garratt build photos) (Live Steam/Topic: Garratt Photos Boiler & Cab Construction) (Live Steam/Topic: Tools & Gizmos
Thomas Scientific Swedesboro, NJ U.S.A.
 Thomas Scientific Swedesboro, NJ 08085-0099 U.S.A. Wiley Mini Mill 3383-L10 (115 V, 60 HZ) USE AND CARE OF CATALOG NUMBER: 3383-L10 Wiley Mini Mill (115 V, 60 HZ) PRELIMINARY 1. Mill has been properly
Assembly Instructions for B7971 Smart Socket
 Assembly Instructions for B7971 Smart Socket Identification and installation of the resistors, Fig1 Segment 1,R1, 22k Segment 4, R4, 22k Segment 2, R2, 27k Segment 3, R3, 27k Segment 5, R5, 27k Segment
You can print these instructions by downloading the PDF here: Boxcar Assembly PDF
 The following information and photographs are what I did to build the kit. Your methods and needs may differ from this which is fine. There is no right or wrong way if you are used to scratch building.
Athearn RTR AMD103/P42 Tsunami Digital Sound Decoder Installation Notes
 Athearn RTR AMD103/P42 Tsunami Digital Sound Decoder Installation Notes Overview This application note describes how to install a TSU-AT1000 into an Athearn HO Ready-To-Roll GE AMD103/P42. Skill Level
Tips & Tricks using Part 2
 Tips & Tricks using Part 2 Using the cobblestone mold #210...1 Making a dungeon diorama...2 Making torches...3 Making a textured door...4 Making a portcullis...5 Adding moss...6 Tips & Tricks using Bruce
Corvus Racer CC
 Corvus Racer 540 35CC Item No:L-G035008 Specifications Wing Span Length Wing Area Flying Weight Glow Gasoline Electric Radio mm mm 1200sq in (77.4sqdm) 9.9-12lbs(4.5-5.5kg) 91-1.20(2C) 1.10-1.40(4C) 20-40cc
Pacific Antenna Code Practice Oscillator Kit
 Pacific Antenna Code Practice Oscillator Kit This kit is offered to initiate the first time builder in the various techniques of mechanical and electronic kit construction. At the end of the approximately
After the glue dries, trim the trussrod ends with your cutting pliers
 The following information and photographs are what I did to build the kit. Your methods and needs may differ from this which is fine. There is no right or wrong way if you are used to scratch building.
About.com :
 http://woodworking.about.com/gi/dynamic/offsite.htm?sit...//www.popularwoodworking.com/features/fea.asp%3fid=1088 (1 of 8)1/28/2004 12:05:01 AM Modern Storage Tower The last thing I want to do when starting
Rural Shamrock Gas Station & Store kit in HO scale
 Rural Shamrock Gas Station & Store kit in HO scale Parking lot base and cars not included This kit includes all building parts and signs milled in white and black styrene plastic, clear window glazing
Lightplane 3.5 Recessed
 INSTALLATION INSTRUCTIONS Lightplane 3.5 Recessed LP3.5R Recessed Ceiling IMPORTANT SAFETY INSTRUCTIONS When installing or using this fixtures basic safety precautions must be followed. Read all instructions