Action Frame Inspection and Repair. DEFINITIONS action spread vertical height differential rake
|
|
|
- Kelley Woods
- 5 years ago
- Views:
Transcription
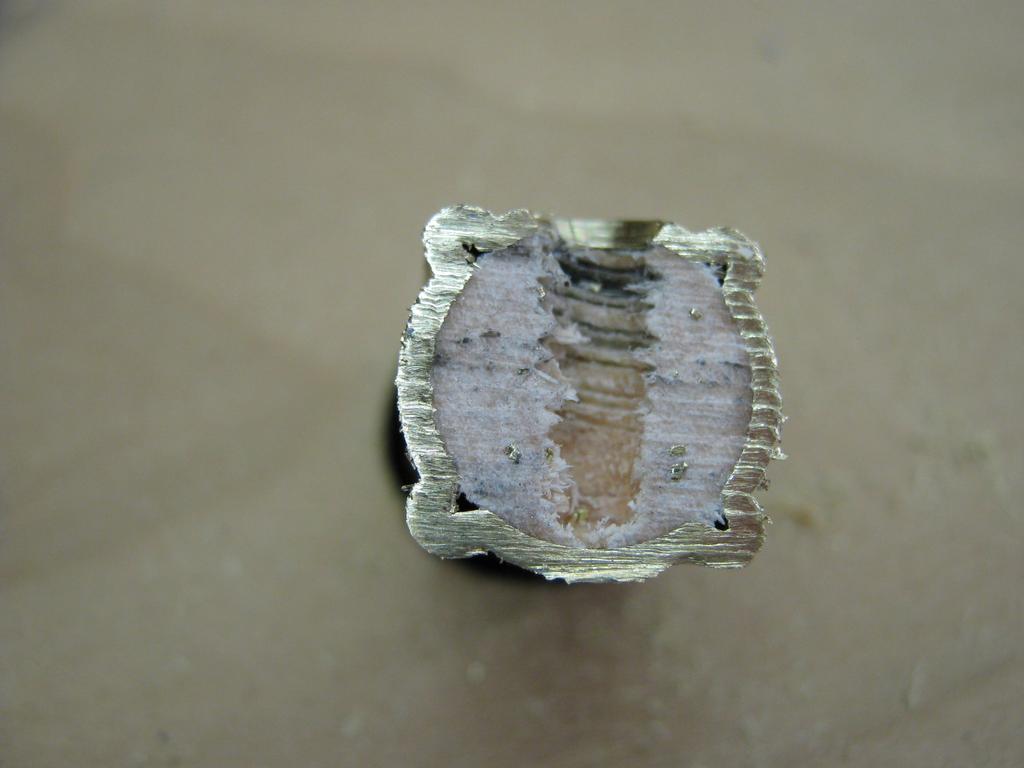
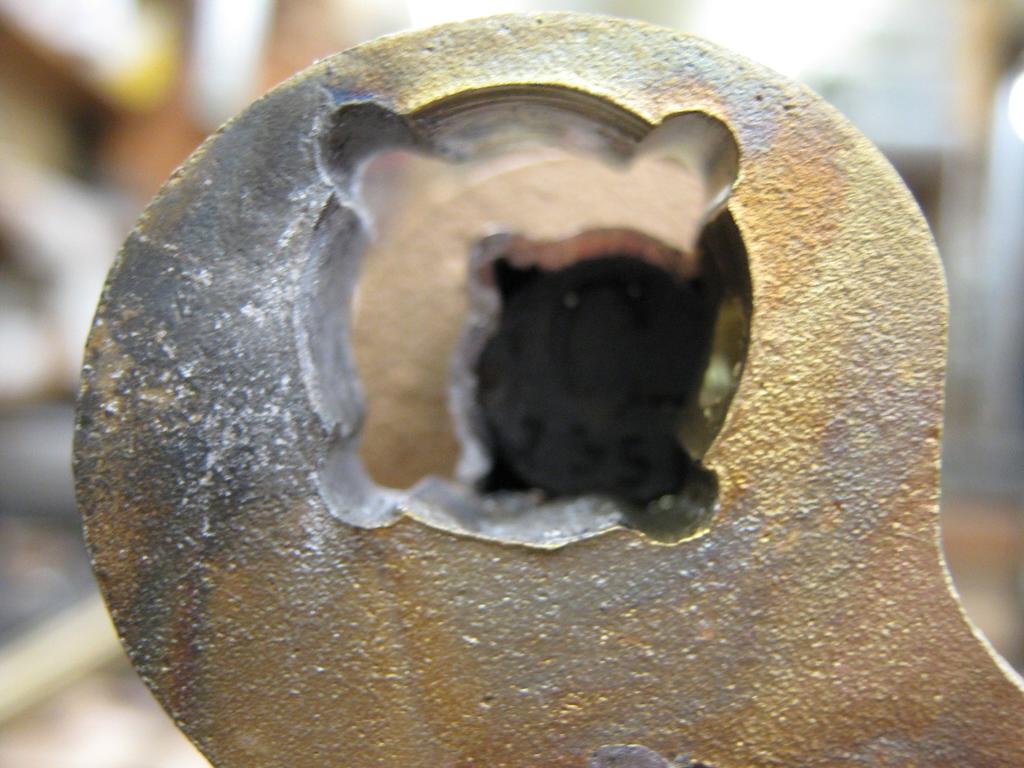
1 Action Frame Inspection and Repair DEFINITIONS action spread vertical height differential rake MAKING A FOOT PRINT mark the position of all action brackets, rails, and screws make screw hole spacing template draw measured line full length make rail tracing WHAT AND HOW TO MEASURE action spread vertical heights side spread use same flange pair at all positions MISC. put screw back where it came from start screw backwards grain line new brackets may be different long drill press table IMPORTANT POINTS flange position center pin position WHAT TO LOOK FOR Before tearing down hammer rail alignment to strings wippen and jack to hammer alignment wippen to capstan alignment are all the action parts there does it look like all the action parts are in about the right position do the action parts flop around During and after tear down line up sample hammers and wippens at 90 degrees to rails measure any misalignment check for loose flange screws bumps on back of rails check for cracks in rails, brackets, and joints check side to side alignment between rails check spread and vertical differential check for twisted rails ALIGNMENT problems with changing alignment bend action frame brackets so knuckles, jacks, let off buttons and capstans line up hammers don't line up with strings
2 shift key frame position keys don't line up with under levers move under lever assembly and re-bend damper wires need to trim off cheek block shift lever notch in key frame needs to be readjusted trap work push rods may not line up WHAT TO DO tighten rail to action bracket screws remove action parts foot print clean off "Crud Of The Ages" Scotch Brite wire tooth brush bead blast inspect frame again STRIPPED SCREWS for metal rails larger screw substitute different thread pitch center pin punch "Helicoil" or Fastenal calls theirs "Recoil" for wood rails shim holes tooth picks shoe pegs leather cut kerf and spline cross drill and plug Tightbond CA glue BRASS HAMMER BUTT MOUNTINGS Kimball repair plates change Kimball to wood flanges RESOLDERING Solder 40 % tin 60 % lead acid core 1/8 inch diameter high heat short time jewelers torch high power electric iron old fashion heat elsewhere soldering iron 4 sides to joint, one at a time and let cool do outside brackets first worst side first HAMMER SPRING RAIL warp towards hammer drill with #70 bit thin kerf saw for spring slots coat hanger wire to keep springs straight hot hide glue RAIL REPLACEMENT old rail may not be right
3 making rail positioning gauge custom molding new is current production end brackets first DOWEL REPLACEMENT heat tape locking screws and pins DRILLING RAILS let off high speed 3000 RPM hammer and wippen slow speed 300 to 500 RPM grain line rake drill at 90 degrees pre-thread long drill press table John Dewey 861 E 2900 North Rd. Penfield, IL phone jdent@hughes.net suppliers Fastenal Company, They have stores in most medium or larger towns, check your yellow pages. Let off rail locking screws: Brass #4 X 3/8 solid brass flat head slotted wood screws Let off rail drill bits Fastenal #48 part no , #50 part no "Recoil" thread inserts Heat tape: I use EASYHEAT #HB04, this is a 12 foot about 90 watt heat tape. I get it through Lowe's (a big box home improvement store) Making pre-threading tool If you are using a drill press that does not have a? inch or larger chuck capacity you will have to substitute a smaller diameter rod for the? inch steel rod I use here. 1) Take a piece of? steel rod about 4-1/2 inches long 2) Weld a piece of 5/16 inch rod about 4-1/2 inches long at right angles to the? inch rod about 1-1/2 inches from one end of the? inch rod and with the? inch rod near the center of the 5/16 rod so that you have something vaguely
 Clamp a piece of 3/8 inch or thicker scrap steel to your drill press 4) Get a drill bit that will drill a hole in the steel plate that will just let you drop in the flange screw you are going to")
4 resembling table the Christian religious cross. 3) Clamp a piece of 3/8 inch or thicker scrap steel to your drill press 4) Get a drill bit that will drill a hole in the steel plate that will just let you drop in the flange screw you are going to use 5) Adjust the drill press table height so that you can drill all the way through the steel plate but have enough room to take the bit out of the chuck and insert the? inch rod with out moving the drill press table and so the drill bit will go through the hole in the drill press table. 6) Drill a hole in the steel plate 7) Remove the drill bit and install the? rod with the cross handle you welded on nearest the chuck 8) Put the flange screw in the hole in the steel plate 9) Lower the chuck so that the? inch rod is against the screw head and hold it there. 10)Heat the end of the? inch rod near the screw head enough so that solder will flow on it 11) Solder the screw head to the? inch rod. 12) Hold the? inch rod against the screw until the solder hardens.
5
KAWAI GRAND PIANO REGULATION MANUAL
 KAWAI GRAND PIANO REGULATION MANUAL Ver 1.4 2011/7/21 Piano Laboratory Supervisor Kazuo Goka 1 Regulation Process Index 1 Tighten all Plate Screws P3 2 Strike Point, Keyframe Position P4 3 Ease Keys P5
ALL SEASON PATIO COVER
 ALL SEASON PATIO COVER 61 Where the All Season Patio Cover is to be attached to the home, create a level line showing where the top of the mounting rail is to be located. Install each section with the
Precision Steel Car s 100 T Steel Coil Car
 Precision Steel Car s 100 T Steel Coil Car Precision Steel Car www.precisionsteelcar.com info@precisionsteelcar.com Paul Vernon: (513) 571-5739 Revised 4/30/2009 Contents of Kit Main Tube Side Frame 2
GRAND PIANO HARDWARE AND ACCESSORIES
 GRAND PIANO HARDWARE AND ACCESSORIES LID SUPPORT CUP No. 938 - Solid brass. Each No. 938N - Nickel plated. Each GRAND RAIL PROP NUTS Slotted grand rail prop nuts for replacement. Solid Brass. No. 925 -
Replacing Hammer Butt Springs in the Upright Action
 Schaff Piano Supply Company Presents: Replacing Hammer Butt Springs in the Upright Action Basic Procedures By Chuck Behm Replacing Hammer Butt Springs -Rationale- In the restoration of an upright, the
A S e r v i ce Manual
 U p r ig ht Pian o R e gulatio n A S e r v i ce Manual Contents: 1. Clean the instrument... 2 2. Analyze the condition of the instrument... 3 3. Tighten all screws... 4 5. Position of wippen heel to the
INSTALLING INVISIRAIL GLASS PANELS POST INFORMATION... 2 PRE-INSTALLATION... 2
 Contents POST INFORMATION... 2 PRE-INSTALLATION... 2 STEP A1: MEASURING FOR INVISIRAIL CUSTOM GLASS PANELS (skip if using Standard Sized Panels)... 2 STEP A2: GATHER ADDITIONAL TOOLS/SUPPLIES... 2 STEP
Ford Pick Up Rear leaf Spring Kit Installation Instructions
 1948-1956 Ford Pick Up Rear leaf Spring Kit Installation Instructions 1-800-984-6259 www.totalcostinvolved.com Parts 48 inch leaf (2) springs (4) U-bolts 3/8-24 x l 1/4bolts (16) & nuts (2) 1/2-20 x 4
Vertical Hammer Replacement...
 SPURLOCK SPECIALTY TOOLS 3574 CANTELOW ROAD VACAVILLE, CA 95688 www.spurlocktools.com Vertical Hammer Replacement........ 2006 Bill Spurlock The hammer has a greater affect upon the tone of a piano than
Service Technicians Manual GRAND PIANOS MECHANISM REGULATION
 Service Technicians Manual GRAND PIANOS MECHANISM REGULATION 2008 1 Service Technicians Manual GRAND PIANOS MECHANISM REGULATION 1. General 1.1 Grand Pianos Storage Conditions at Shops and at Customers
Agricultural Mechanics and Technology Power Tool Safety Rules
 Agricultural Mechanics and Technology Power Tool Safety Rules Name: BAND SAW Use: Cutting curves, circles and irregular shapes. 1. Use clean SHARP blades. 2. The teeth should always point DOWN. 3. Adjust
BUILDING A STORM DOOR
 BUILDING A STORM DOOR BY NEAL BARRETT Illustrations by George Retseck If you're in the market for a storm door, you probably know that there are many styles and models available. However, most of them
Plastic Welding Experiences
 Plastic Welding Experiences In the past I have advocated plastic solvent welding with ABS solvent to rejoin ABS plastic parts without repainting. Solvent is inexpensive but it does takes considerable time
AWNING / PATIO COVER INSTALLATION INSTRUCTIONS
 AWNING / PATIO COVER INSTALLATION INSTRUCTIONS Before You Begin Read the installation instructions thoroughly before beginning the installation procedure. Perspective In the Awning Instructions, Back means
`48-`56 Ford Pickup Rear leaf Spring Kit Installation Instructions Tech Line:
 `48-`56 Ford Pickup Rear leaf Spring Kit Installation Instructions Tech Line: 1-855-693-1259 www.totalcostinvolved.com CHECK ALL PARTS INCLUDED IN THIS KIT TO THE PARTS LIST BEFORE INSTALLING THE KIT.
The Simple Birdhouse Ornament
 The Simple Birdhouse Ornament There are a number of techniques for constructing birdhouse Christmas ornaments and the resulting ornaments vary from simple to very ornate and complicated. It has been my
woodworkersjournal.com MATERIAL LIST
 MATERIAL LIST T x W x L 1 Legs (2) 1 1 2" x 3 1 2" x 36 7 16" 2 End Uprights (2) 1 1 2" x 3 1 2" x 32 1 2" 3 Stringers (4) 1 1 2" x 3 1 2" x 42" 4 Top Cladding, Long (2) 3/4" x 7 1 4" x 65 3 4" 5 Side
Retrofit Apron Front Farm Sink With Dual Mount Capability Installation Instructions
 For Under-Mount Installation please refer to page 14 FOR EXPERIENCED AND PROFESSIONAL INSTALLATION ONLY This installation project is designed for an advanced skill level. Disclaimer: Undermount Application
SAW-PIERCING. 79. Fig. 29. Placing new blade in saw-frame.
 SAW-PIERCING. 79 First make a full-size drawing of the hinge, then by means of transfer paper transfer the design of the butt end to the copper or brass. Then lay out the knuckles as shown in Fig. 28,
Wire Epoxy filled groove
 147 Appendix D Finger construction steps In this procedure, \Upper mask" refers to a piece of copper which has been photomasked with the resist pattern for the upper electrodes and \lower mask" refers
Standard Kit #1 (3-way switch)
") Standard Kit #1 (3-way switch) Please Read All Instructions Before Beginning. Tools you will need: Soldering Iron (35 watt preferably) Solder Wet Sponge Wire Clippers 3/8 Drill Bit 1/4 Drill Bit Variable
Standard Kit #1 (3-way switch) Please Read All Instructions Before Beginning. Tools you will need: Soldering Iron (35 watt preferably) Solder Wet Sponge Wire Clippers 3/8 Drill Bit 1/4 Drill Bit Variable
Step by Step Installation Instructions. Poly Shutters. Customer Service or visit us online at smithandnoble.com
 Step by Step Installation Instructions Poly Shutters Customer Service 800.248.8888 or visit us online at smithandnoble.com Thank you for purchasing from smith+noble. Your new window treatments have been
WPS crew Doors Installation instructions
 WPS-132-133 crew Doors Installation instructions ORDER OF INSTALLATION FOR A COMPLETE ENCLOSURE OF A CREW WPS (Weather Protection System) IS AS FOLLOWS: 1. Heater 2. Rear Thresholds - Right Hand & Left
FABA. Installation Instructions. Conductor Bar System. Publication #FABA-03 3/1/04 Part Number: Copyright 2004 Electromotive Systems
 FABA Conductor Bar System Installation Instructions Publication #FABA-03 3/1/04 Part Number: 005-1062 Copyright 2004 Electromotive Systems 1S 100 Z Installation Instructions Contents: Basic Diagram - -
Shay Drive Shafts & Universal Fabrication
 Shay Drive Shafts & Universal Fabrication Nelson Riedel Nelson@NelsonsLocomotive.com Initial: 5/22/03 Last Revised: 06/06/2004 The following describes how I machined the universal rings and drive shafts.
BX1965 Installation Instructions 2004 Chrysler Sebring Convertible
 BX1965 Installation Instructions 2004 Chrysler Sebring Convertible Serial No. The headlight assembly, front fascia, horn bracket and windshield washer reservoir are removed for baseplate installation.
WARNING. BX Ford Explorer With Adaptive Cruise Control & Eco Boost Installation Instructions
 Please read BOTH these and the General Instructions before attempting to install or operate this equipment. 1. Blue Ox towing products and accessories are intended to be installed by Blue Ox Dealers who
Note Pad Holder. Tools:
 Note Pad Holder Name: Date: Description: The note pad holder is a cold metal project that involves layout skills and sheet metal fabrication skills Materials: 3 1/8 x ¼ Aluminum Pop Rivet 18 ga. Galvanized
TOOLS REQUIRED Metal Wood Wood and Metal Screws. #16 Drill #12-24 Tap. 1/8 Drill
 DEVICES COVERED IN THIS DOCUMENT: 4700S Surface Vertical Rod Device 4700SF Fire Exit Surface Vertical Rod Device TOOLS REQUIRED Metal Wood Wood and Metal Screws Sex Bolts #7 Drill ¼ -20 Tap #16 Drill #12-24
PTC Model 4. Programmable Turntable Controller. Basic Motor Mount Kit P/N Installation Instructions
 PTC Model 4 Programmable Turntable Controller M Basic Motor Mount Kit P/N 09-820 Installation Instructions New York Railway Supply 625 Aviator Dr Fort Worth TX 76179 (817) 233-5068 http://www.nyrs.com
APPENDIX FENCE GENERAL NOTES
 APPENDIX FENCE GENERAL NOTES 1. Fabric: 9 gage, 2" mesh, knuckle top and bottom, placed on the outside of posts, single fabric width for the entire height. 2. All fencing to be standard galvanized finish.
Tools: Sharpie, Square, Vise, Hack saw, Ruler, Punch, Hammer, File. 2. Cut the stock Place stock in vise and cut with hack saw
 Purpose: MAKE CATAPULT ARM Step 1 Tools: Sharpie, Square, Vise, Hack saw, Ruler, Punch, Hammer, File Materials: Flat aluminum ½ inch stock (see picture below) Gloves required 1. Pick up the aluminum ½
Salter Industries Spiral Stair
 Salter Industries Spiral Stair The Leader in Spiral Staircases Continuous Sleeve Stair Installation Instructions TOOLS NEEDED: 1. Electric drill with hex chuck and Phillips bit 2. Drill bits 1/8", 1/4",
Lumber Smith. Assembly Manual. If you are having problems assembling the saw and need assistance, please contact us at:
 Lumber Smith Assembly Manual If you are having problems assembling the saw and need assistance, please contact us at: 804-577-7398 info@lumbersmith.com 1 Step 1 Safety Carefully read the Owners Manual.
Please read BOTH these Installation Instructions and the General Towing Instructions before attempting to install or operate this equipment.
 2005-08 Pontiac G6 GT Please read BOTH these and the General Towing Instructions before attempting to install or operate this equipment. 1. Blue Ox towing products and accessories are intended to be installed
Bumper Sign INSTALLATION INSTRUCTIONS
 Bumper Sign INSTALLATION INSTRUCTIONS BUMPERSIGN TOOL CHECKLIST SDS MAX Rotary Hammer Drill Marker/Pencil SDS MAX 1 Carbide Drill Bit Tape Measure Torque Wrench with ½ Drive Power Source Vacuum ½ Drive
How We Installed Our 3-Link Banana Bracket:
 How We Installed Our 3-Link Banana Bracket: General Description To avoid failure of your 3-link banana bracket, you will need to pay special attention to the installation. The clamp-on feature of the design
TABLE OF CONTENTS REQUIRED TOOLS
 TABLE OF CONTENTS SECTION SECTION TITLE PAGE NO. 1 2 3 4 5 Assembling Mounting Structure Installing Bicycle Supports Mounting Rack to Wall Adding Sections Customizing Rack Configuration REQUIRED TOOLS
Dura-Lock Roof System
 DLR-14 Dura-Lock Roof System Assembly and Installation Instructions Read the instructions before starting the job. They explain the steps required to produce a finished product that will meet factory specifications.
INSTALLATION INSTRUCTIONS
 INSTALLATION INSTRUCTIONS TOOLS REQUIRED Rechargeable, variable speed drill 3/8 diameter drill bit 3 Robertson bits #0, #1 and #2 Slot screwdriver Non marring hammer with 1 head Level Caulk or sealant
Frameless Inline Door With Return QCI5263
 INSTALLATION INSTRUCTIONS Frameless Inline Door With Return QCI5263 WALL MOUNT HINGES FRAMELESS DOOR / PANEL / RETURN PANEL QCI5263 REV. 0 Page 1 Certified 06/17/2016 Parts List with wall mount hinges
INSTALLATION INSTRUCTIONS
 INSTALLATION INSTRUCTIONS SOLID PHENOLIC TOILET PARTITIONS 1080 DuraLineSeries Class-A Fire Rated Includes Institutional Hardware Option.67 IMPORTANT: Storage and Handling Information on last page. Review
Telecaster Wiring Kits Please Read All Instructions Before Beginning. Tools you will need: Soldering tips: Removing Current Wiring: Step 1. Step 2.
 Telecaster Wiring Kits Please Read All Instructions Before Beginning. Tools you will need: Soldering Iron (35 watt preferably) Solder Wet Sponge Wire Clippers Wire Strippers 3/8 Drill Bit 5/32 Drill Bit
Woodline USA Woodline Spacer Fence System
 Woodline USA Woodline Spacer Fence System MADE IN THE USA Includes: (1) ¼ Spacer Fence (1) 3/8 Spacer Fence (1) ½ Spacer Fence (1) Hardware Package (1) 3 Piece Brass bar set (2) Setup Blocks Visit Us Online
Copyright 2007 MLCS 1
 Copyright 2007 MLCS 1 REFERENCE GUIDE and SPECIFICATIONS: Edge Guides: This 12 Dovetail Template comes complete with 2 Edge Guide Sets one set for Half Blind and one set for Rabbeted Half Blind Dovetails.
Installation Instructions
 Installation Instructions For Models: Model Number / Description File Name 1540 Classic Series P-Lam Toilet Partitions 1540.pdf 1 INSTALLATION INSTRUCTIONS LAMINATED PLASTIC TOILET PARTITIONS 1540 Classic
NX7 SERIES 5-1/2 HANDRAIL
 STORAGE & HANDLING The handrails are shipped unassembled. Upon receipt, immediately check all material for any damage that may have occurred in transit and verify that all of the items and quantities are
ED1300/1300F SERIES CONCEALED VERTICAL ROD DEVICE INSTALLATION INSTRUCTIONS
 ED1300/1300F SERIES CONCEALED VERTICAL ROD DEVICE INSTALLATION INSTRUCTIONS Ver.2 1300 SERIES CONCEALED VERTICAL ROD DEVICE Top Strike Latch Screws Strike Screws Release Plunger Top Latch Plunger Screws
Chapter 18. Interior Doors
 Chapter 18. Interior Doors 18.1 SWINGING DOORS 18.2 SLIDING DOORS 18.3 BIFOLD DOORS Tools needed by volunteers: Hammer Nail apron Tape measure Square Pencil Tools and equipment needed: Extension cords
HANDRAIL HEIGHT PER LOCAL CODE AUTHORITY
 WITH OPTIONAL S.S. S PLEASE READ PLEASE READ THESE INSTRUCTIONS THOROUGHLY PRIOR TO BEGINNING THE INSTALLATION! THIS INSTRUCTION SHEET IS INTENDED TO PROVIDE A SPECIFIC GUIDE TO FOLLOW FOR THE INSTALLATION
SB-WM-ART2-L-BL SB-WM-ART2-XL-BL
 SB-WM-ART2-L-BL SB-WM-ART2-XL-BL Weatherproof Universal Dual-Arm Articulating Mount for Large TVs INSTALLATION MANUAL WARNING The maximum weight of this wall mount is 150 lbs (68.04 kg). Use with heavier
INSTALLATION INSTRUCTIONS
 INSTALLATION INSTRUCTIONS HIGH PRESSUE LAMINATE (HPL) TOILET PARTITIONS 1030 TrimLineSeries 1040 DesignerSeries Includes continuous hardware option.65. IMPORTANT: Storage and Handling Information on last
Maintenance & Parts list for:
 Maintenance & Parts list for: Industrial gun GB 2 Juni 2017 This Maintenance & Parts list for industrial gun is prepared by : Winchester Europe Service V. Parbst & Søn as a comprehensive maintenance guide
CONSTRUCTION GUIDE 21ft Wide and 24ft Wide SHEEP HOUSE
 The Outside, Inside CONSTRUCTION GUIDE 21ft Wide and 24ft Wide SHEEP HOUSE Thank you for purchasing a Premier Sheep House. Please take the time to carefully read through this Construction Guide before
Cross Peen Hammer. Introduction. Lesson Objectives. Assumptions
 Introduction In this activity plan students will develop various machining and metalworking skills by building a two-piece steel hammer. This project will introduce basic operations for initial familiarization
SE5a Instrument Board part 2 - rev 1.1
 SE5a Instrument Board part 2 - rev 1.1 Fuel (Petrol) Valve This valve uses two circular name plates, eight brass screws, one black plastic base, copper wire and two black plastic risers. You can pick any
BIFOLD FUTON FRAME TRINITY ARM. Seat Rails and Slats x 1. *Note: Use 4pc of 100mm Bolts and 4pc of 60mm Bolts to attach the arms to the Stretchers.
 1A Parts in this box. 2pc with extra holes 2pc with extra holes & plastic stoppers Arms x 2 Back Rails and Slats x 1 Full Size: Slat Supports x 6 3pc are longer for the Back deck Back Side Rails x 2 Seat
How to install backchecks
 How to install backchecks Note: All pictures can be enlarged for better clarification. Revision 7 8/2009 Backchecks wear out in a piano much like brake pads in an automobile. While wear is a valid reason
Installation of Balustrade Systems
 Installation of Balustrade Systems IMPORTANT: Be sure to mark the center point of each newel post's location prior to installation to insure proper spacing. All product interfaces must use PL Premium Adhesive
Pro-Doweling Kit USER S MANUAL #840. Visit us at
 Pro-Doweling Kit USER S MANUAL #840 99 Washington Street Melrose, MA 02176 Phone 781-665-1400 Toll Free 1-800-517-8431 Visit us at www.testequipmentdepot.com Please read this manual carefully and thoroughly
Installation for Full Size Polaris Ranger Crew Doors
 Installation for Full Size Polaris Ranger Crew Doors Order of Installation: Heater Doors Wiper on to Windshield Windshield Top & Back Panel Note: Most of the steps in these instructions need to be repeated
Knock Down Patio Door Assembly Instructions Regular & Impact
 Knock Down Patio Door Assembly Instructions Regular & Impact 72 x 80 72 x 82 72 x 96 96 x 80 96 x 82 96 x 96 Impress the Weather KD Patio Door Regular & Impact Sizes 72 x 80 72 x 82 72 x 96 96 x 80 96
15 Dovetail Jig. Instruction Manual. Part # 3452
 15 Dovetail Jig Instruction Manual Part # 3452 CAUTION: Please read, understand, and follow all manufacturers instructions, guidelines and owners manuals that come with your power tools. Peachtree Woodworking
WOODWORKING GUIDE: BASIC JOINERY
 WOODWORKING GUIDE: BASIC JOINERY Close isn't really good enough. A perfect fit is what counts. When building furniture, there are many ways to construct joints. The simplest are those that use mechanical
Plans & Materials List for Handwashing Station
 Plans & Materials List for Handwashing Station Required Tools Arc Welder (mig or stick) Chop or metal band saw Grinder (bench and/or handheld) 3/8" Drill 1/8", 1/4", 5/16" Drill Bits Copper Pipe Cutter
Installation Instructions 3520WW/3520WWB Handrail
 Important 1. Acclimate materials 24 hrs before installation. Maintain temperature controlled environment after installation 2. Install in accordance with manufacturer s installation instructions. Failure
Copyright MLCS 1
 Copyright 2007. MLCS 1 WORKING WITH BOX JOINTS Box joints (AKA "Finger Joints") provide a simple, yet equally effective, alternative to dovetail joinery. In particular, they serve well for applications
ATLANTIS RAIL Contact Information
 ATLANTIS RAIL Contact Information Customer Service (800) 541-6829 (508) 732-9191 Spectrum System Installation Instructions Atlantis Rail s Spectrum System is an easy to install, universal cable railing
INSTRUCTIONS FOR HIT TEMPLATE FOR CYLINDRICAL LOCK PREPS
 1825 VIA BURTON ANAHEIM CA 92806 714-772-5202 / FAX 714-772-2302 EMAIL: MAIL@MAJORMFG.COM WEB: WWW.MAJORMFG.COM INSTRUCTIONS FOR HIT-66-110 TEMPLATE FOR CYLINDRICAL LOCK PREPS WHEN USING POWER TOOLS ALWAYS
USSC LLC 4 ONE LLC FIELD MODIFICATION INSTRUCTIONS
 1 OF 17 A 1. PURPOSE: Instructions for in field replacement of 9004 mechanical suspension top pan 2. SCOPE: 9004 mechanical suspension with legacy two point LX back frame and current LX back frame 3. PROCEDURE:
Installation Instructions
 CHEVY / GMC 16K Industry Standard Rail Custom Mounting Kit #2730 Gross Trailer Weight (Maximum)...16,000 lbs. Vertical Load Weight (Max. Pin Weight)...4,000 lbs. SYSTEM TOW CAPACITY Please note, in order
Shay Cab - Floor & Roof
 Shay Cab - Floor & Roof Nelson Riedel Nelson@NelsonsLocomotive.com Initial: 1/20/04 Last Revised: 06/06/2004 Cab Floor: A cab floor was made at the same time as the tender floor. I was unhappy with some
Using The Renner Flange Bushing Cloth Bill Spurlock
 Using The Renner Flange Bushing Cloth Bill Spurlock Renner provides superior quality bushing cloth in a variety of thickness and dimensions suitable for most piano bushing applications, such as action
Installation Instructions Kit, Base Rail Bracket Part # 31413
 Installation Instructions Kit, Base Rail Bracket Part # 31413 Dealer / Installer: Provide a copy of these Instructions to the end user of this product. These Instructions provide important operating and
DATE: January, 01, 2011 AUTHOR: Craig Macomber TOPIC: Making and operating a model onager
 DATE: January, 01, 2011 AUTHOR: Craig Macomber TOPIC: Making and operating a model onager INTRODUCTION This guide will walk you through the construction and operation of a hand held scale Roman Onager,
College of Forestry 610: Power Tools
 College of Forestry 610: Power Tools Safety Policy & Procedure Manual Section 600: Workshops and Shop Tools Effective: 01 January 2007 Revised: August 2014 PURPOSE The purpose of this section is to provide
Walk-in Configurations
 Walk-in Configurations Includes Wall-to-Open, Corners, and Corner Rounder Bars INSTALLATION INSTRUCTIONS Tools needed: Tape measure, level, pencil, #2 Phillips head screw driver or power drill with a 6"
FIXED SHOWER SCREEN For Wall Mount Hinges QCI5283
 FIXED SHOWER SCREEN For Wall Mount Hinges QCI5283 QCI5283 Page 1 Date Certified: 06/16/2016 Parts List with wall mount clamp ITEM NO. DESCRIPTION QTY. 1 FIXED GLASS PANEL 1 2 WALL MOUNT CLAMP 1 3 U-CHANNEL
Curium 19H Installation Instructions & Parts List
 Curium 19H Installation Instructions & Parts List Illustration Curium 19H Right Hand Page 1 of 15 01/07/2016 Revision 2.1 IMPORTANT This shower screen / enclosure must be installed by suitably qualified
SB-WM-ART1-M-BL. Weatherproof Universal Single-Arm Articulating Mount for Medium Displays INSTALLATION MANUAL
 SB-WM-ART1-M-BL Weatherproof Universal Single-Arm Articulating Mount for Medium Displays INSTALLATION MANUAL WARNING The maximum weight of this wall mount is 90 lbs (41 kg). Use with heavier than the maximum
Installation Instructions
 FORD 20K Industry Standard Rail Custom Mounting Kit #2738 Gross Trailer Weight (Maximum)...20,000 lbs. Vertical Load Weight (Max. Pin Weight)...5,000 lbs. SYSTEM TOW CAPACITY Please note, in order to determine
Parts list continues on Page 2 HOUSE PARTS PACKED IN HOUSE BOX PARTS IN SMALL PLASTIC BAG (HARDWARE) POST PARTS PACKED IN THIS BOX (LARGE PLASTIC BAG)
 POST PARTS PACKED IN THIS BOX (LARGE PLASTIC BAG)") Form 05-07 Instructions and Parts List MSS- Martin Safety System NOTES: () A complete system is packed in two boxes post box and house box. House box contains hardware for both post and house assembly.
Form 05-07 Instructions and Parts List MSS- Martin Safety System NOTES: () A complete system is packed in two boxes post box and house box. House box contains hardware for both post and house assembly.
Obtained from Omarshauntedtrail.com
 DaveintheGrave's Halloween Props Animated Crawling Skeleton Build a life-size skeleton torso that realistically crawls across the lawn one arm at a time. 1. Motor Base and Linkage Assembly BASE - I used
Build a Drill Press Vise
 Youth Explore Trades Skills Introduction This activity plan will develop the student s machining and metalworking skills as they fabricate a multi-piece steel vise. The project will encompass basic lathe
WARNING. BX Ford Explorer With Adaptive Cruise Control & Eco Boost Installation Instructions. Bolt Torque Specifications
 Please read BOTH these and the General Instructions before attempting to install or operate this equipment.. Blue Ox towing products and accessories are intended to be installed by Blue Ox Dealers who
INSTALLATION INSTRUCTIONS
 INSTALLATION INSTRUCTIONS LAMINATED P LASTIC TOILET PArTITIONS 1540 ClassicSeries with Options IMPORTANT: Storage and Handling Information on last page. For faster, easier installation, please review these
WEAR SAFETY GLASSES WHEN INSTALLING THIS KIT.
 INSTALLATION INSTRUCTIONS Trans4mer Mounting Systems Part No. 29753 (black) Part No. 65654 (stainless) for full size GM pickups, and Blazer, Yukon, Suburban, Tahoe As you read these instructions, you will
Installation Instructions
 DODGE 16K Industry Standard Rail Custom Mounting Kit #2728 Gross Trailer Weight (Maximum)...16,000 lbs. Vertical Load Weight (Max. Pin Weight)...4,000 lbs. SYSTEM TOW CAPACITY Please note, in order to
Installation Instructions
 CHEVY / GMC 20K Industry Standard Rail Custom Mounting Kit #2724 Gross Trailer Weight (Maximum)...20,000 lbs. Vertical Load Weight (Max. Pin Weight)...5,000 lbs. SYSTEM TOW CAPACITY Please note, in order
RESolution V2 Manual
 RESolution V2 Manual Note for the German Manual: Yellow Bottle thick CA Pink Bottle Med CA Blue tube 5 minute Epoxy Green tube 90 Minute Epoxy Construction of the Fuselage Step 1: Cover the plan with a
Track Rack. * Track Racks are not lockable
 The Track Rack s unique staggered, sliding hook design creates the greatest parking efficiency while still providing easy access to any particular bike. When adding or removing a bike to the rack, simply
Metals can be bought from suppliers in standardized forms and sizes, such as round,
 1.4 METAL CUTTING BAND SAWS: Metals can be bought from suppliers in standardized forms and sizes, such as round, rectangular or square bar stock or in the form of large sheets (plates). Bar stock normally
Bionic 4 PERIMETER, CONTINUOUS RUN X3, X7
 I NSTALLAT ION INSTRUC TIONS 6 3 /4 6 3 /4 3¾ 5 1 /2 For LP installs, ceiling opening is equal to row length + 3 /4 8 1 /2 4 3 /32 5 1 /4 Flush X7 Shown PARTS SHIPPED SEPARATELY 4 3 /32 5 1 /4 3" Regressed
Installation Instructions
 Important 1. Acclimate materials 24 hrs before installation. Maintain temperature controlled environment after installation 2. Install in accordance with manufacturer s installation instructions. Failure
Height Adjustable Benching End Panel and Utility Pole
 Height Adjustable Benching End Panel and Utility Pole Tools required: END PANEL Jig Saw Power Drill END PANEL WITH UTILITY POLE Bit Holder Long #2 Square Drive Bit 5mm Hex Drive Bit UTILITY POLE Level
Making Simple Bookbinding Equipment
 Tony Firman 20 1 2 19 Notes Tony Firman Tony Firman Bookbinding 18 3 : 2012 Tony Firman Bookbinding P.O. Box 507 Haslet, TX 76052 www.tonyfirmanbookbinding.com 4. When all the tapes have been pinned in
EPS Duct Fabrication and Installation Sheet
 EPS Duct Fabrication and Installation Sheet EPS Cooling Duct for 2014-2016 Corvette Parts Required for Fabrication: Description Quantity Templates for EPS Duct 2 Template for Front Compartment Air 1 Deflector
Standard Kit #1 (5-way switch)
") Standard Kit #1 (5-way switch) Please Read All Instructions Before Beginning. Tools you will need: Soldering Iron (35 watt preferably) Solder Wet Sponge Wire Clippers 3/8 Drill Bit 1/4 Drill Bit Variable
Standard Kit #1 (5-way switch) Please Read All Instructions Before Beginning. Tools you will need: Soldering Iron (35 watt preferably) Solder Wet Sponge Wire Clippers 3/8 Drill Bit 1/4 Drill Bit Variable
Installation Instructions. Oakmont Folding Doors
 Before You Start For quick and easy installation of your Oakmont folding door, read these instructions thoroughly. A few minutes of prior planning will make the job easier and ensure years of trouble-free
WESTERN PISTOL.22 CALIBER SINGLE SHOT. Entire pamphlet Copyrighted by JACO Designs 1972
 WESTERN PISTOL.22 CALIBER SINGLE SHOT Entire pamphlet Copyrighted by JACO Designs 1972 This pamphlet contains the plans and instructions necessary to construct the Western pistol. This pistol breaks open