Revit Content. RFA 2030 Bi Fold & Sliding Doors TWO SIDED BIFOLD DOORS 2 PANELS PATIO TWO SIDED SLIDING DOORS 3 PANELS PATIO
|
|
|
- Annice Newman
- 6 years ago
- Views:
Transcription


1 ONE SIDED BIFOLD DOORS 2 PANELS TWO SIDED BIFOLD DOORS 2 PANELS TWO SIDED SLIDING DOORS 4 PANELS PATIO TWO SIDED SLIDING DOORS 2 PANELS PATIO ONE SIDED BIFOLD DOORS 2 PANELS TWO SIDED BIFOLD DOORS 2 PANELS ONE SIDED SLIDING DOORS 2 PANELS TWO SIDED SLIDING DOORS 3 PANELS ONE SIDED BIFOLD DOORS 4 PANELS TWO SIDED BIFOLD DOORS 2 PANELS Page 1 of 8

2 Page 2 of 8


3 Page 3 of 8


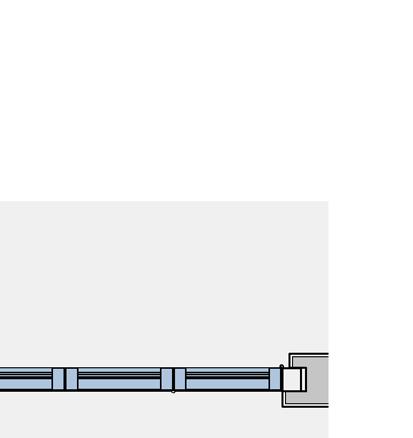
4 DIMENSIONS OVERVIEW Panel Opening Left % Render Offset Sides Exterior Frame Depth BiFold Door Plan Render Offset Sides Interior Rough Distance Sides Width Sliding Door Overlap Patio Width Offset Sliding Door Plan Patio Sliding Door Side Offset Width Sliding Door Plan Panel Frame Sides Thickness Panel Frame Top Thickness Panel Frame Sides Thickness Space Between Panel Frame Bottom Thickness Width Dimension Elevation Page 4 of 8


5 DIMENSIONS OVERVIEW Render Offset Sides Exterior Panel Glass Thickness Frame Position Frame Thickness Rough Distance Sides Frame Thickness Frame Thickness Frame Width Hinge Offset Frame Thickness Space Between Frame Upstand Sides Panel Glass Position From Exterior Frame Depth Frame Depth PLAN DETAIL 1 : 2 Guide Depth Guide Thickness Panel Opening Left % Render Offset Sides Interior Page 5 of 8


6 DIMENSIONS OVERVIEW Exterior Sill Height Interior Sill Depth Frame Depth Guide Depth Render Offset Top Exterior Rough Distance Top Guide Heght Frame Width Frame Thickness Frame Upstand Bottom Height Exterior Sill Depth Interior Sill Height Exterior Sill Drip Offset Exterior Sill Base Depth Exterior Sill Depth Exterior Sill Height Exterior Sill Drip Diameter Rough Distance Bottom Detail 1 1 : 5 Sill Height Dimension Section Bi-Fold Window & Door Section Render Offset Top Interior Rough Distance Bottom Guide Offset Guide Height Guide Depth Frame Depth Detail 2 1 : 5 Detail 3 1 : 5 Page 6 of 8


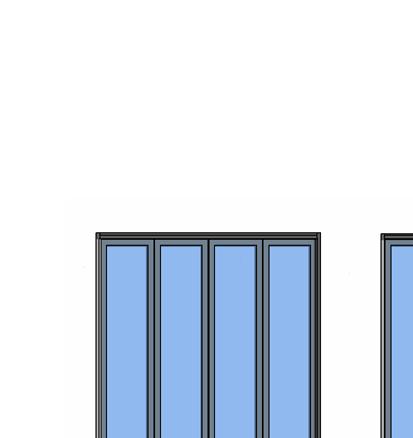
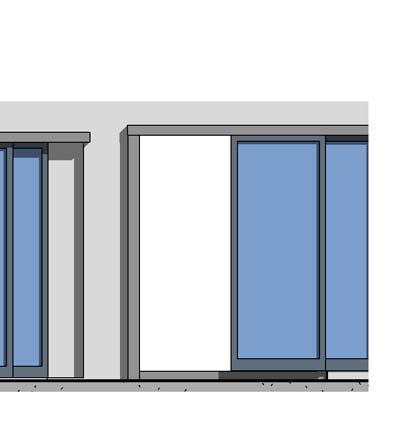
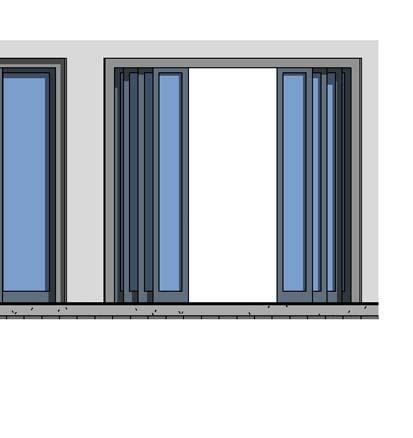
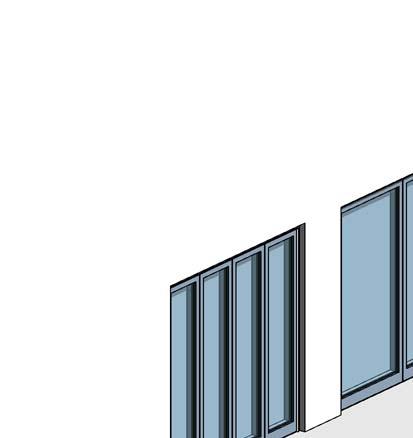
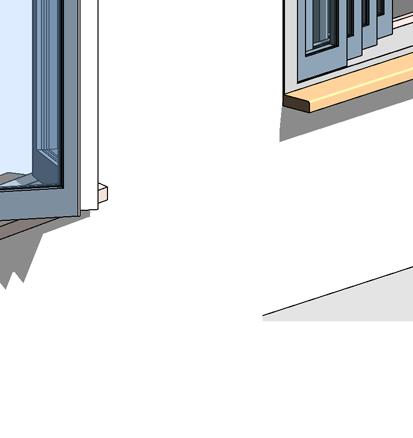
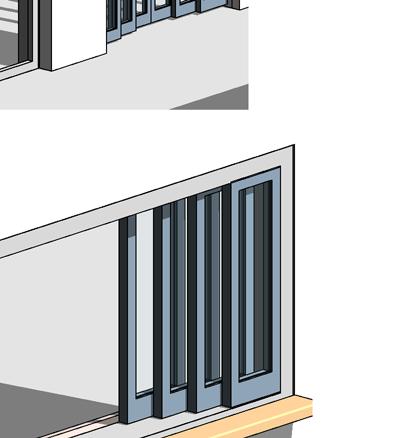
 Fig 1 Fig 2 2 PANELS ON ONE SIDE 2 PANELS ON EACH SIDE Fig 3 Fig 4 3 PANELS ON EACH SIDE 4 PANELS ON EACH")
7 How To Create Double & Single Bi Fold Doors Dimensions To Open & Close the Doors, both Bi Fold Doors have a swing parameter which are:- 1 PANNEL OPENING LEFT % 2 PANEL OPENING RIGHT % 3 PANEL COUNT LEFT 4 PANEL COUNT RIGHT The parameter PANNEL OPENING LEFT % is for the left Bi-fold doors as shown in the Fig 1below which has a PANEL COUNT LEFT of 2. To create Double Bi-fold doors adjust the parameter PANEL COUNT RIGHT, the result of right swing Bi-fold doors appears as shown in Fig 2 To create single Bi-fold doors on the right or left is simple, Just adjust the panel count to zero on the doors on one side that you dont want, and increase the panel count on the opposite side to your specification. Fig 3 & 4 show the panel count left & right increasing in the panels on both sides. To Make Bi-Fold Window & Door, adjust the parameter SILL HEIGHT in the instance properties, and control visibilty of the interior and exterior sill with the tick boxs in the Graphics as shown in Fig 5 (PLEASE REFER TO DIMENSIONS OVERVIEW ) Fig 1 Fig 2 2 PANELS ON ONE SIDE 2 PANELS ON EACH SIDE Fig 3 Fig 4 3 PANELS ON EACH SIDE 4 PANELS ON EACH SIDE Fig 5 BI FOLD WINDOW DOOR Page 7 of 8


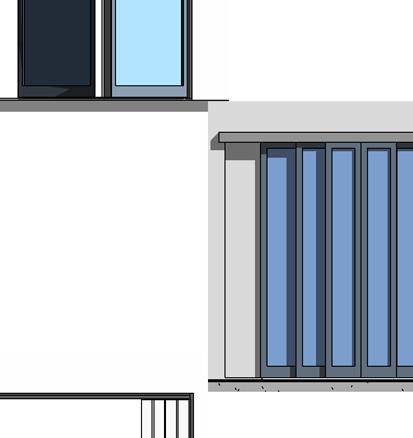
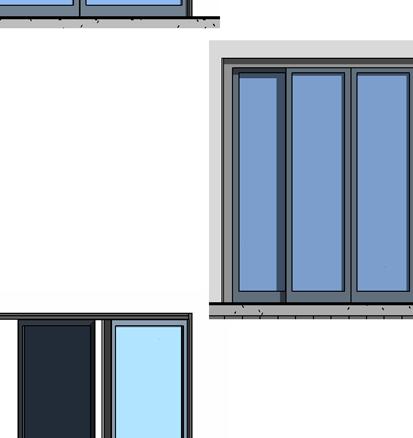
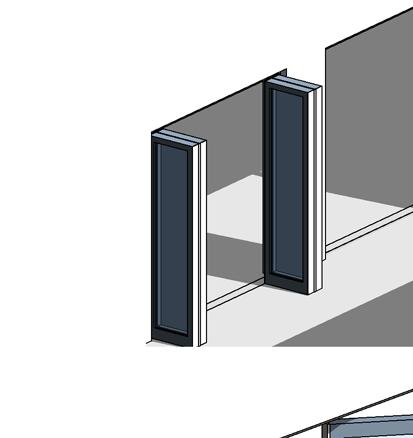
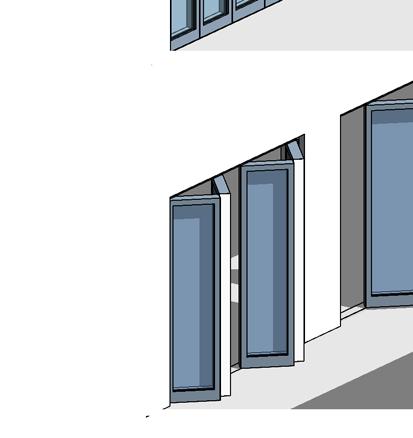
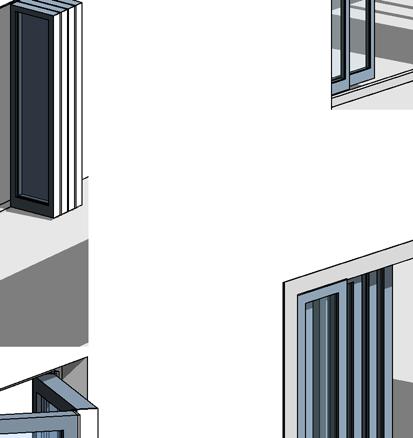
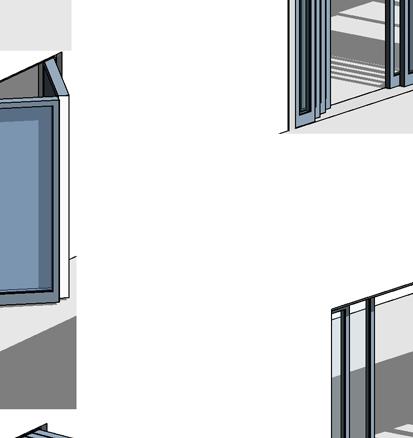
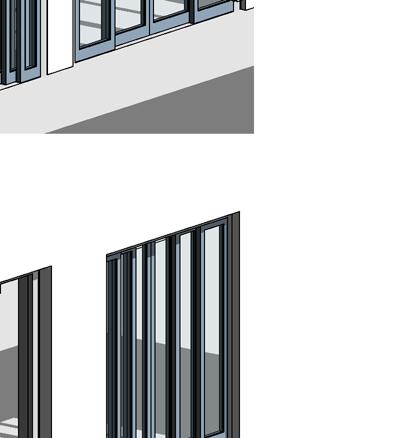
 Fig 6 Fig 7 SLIDING DOORS 1 PANEL ONE SIDE SLIDING")
8 How To Create Double & Single Sliding Doors Dimensions The Sliding Doors have Parameters which are:- 1 PANNEL OPENING LEFT % 2 PANEL OPENING RIGHT % 3 SLIDING DOOR COUNT 4 DOUBLE SLIDING DOOR To create Sliding Doors, unselect the parameter BIFOLD DOORS, so it is not checked, the result will be a Sliding door. To create Double Sliding Doors select the parameter DOUBLE SLIDING DOOR as shown in FIG 7 To create Single Sliding Doors simply unselect the parameter DOUBLE SLIDING DOOR FIG 6 To Make Sliding Door Window, adjust the parameter SILL HEIGHT in the instance properties (PLEASE REFER TO DIMENSIONS OVERVIEW ) Fig 6 Fig 7 SLIDING DOORS 1 PANEL ONE SIDE SLIDING DOORS 2 PANELS PATIO Fig 8 SLIDING DOORS 2 PANELS Page 8 of 8
9 Instance Parameters Symbol Lines Graphics To Create Symbol Lines select the parameters in the instance properties box SYMBOL LINES the result will be Fig 14 & 15 All Symbol Lines will appear in Elevation Only To have symbol lines adjusted to your local standards, showing the opposite side In elevation, adjust the parameter SYMBOL LINES HINGE SIDE the result will show the symbol lines flipped in elevation on the opposite side To switch of the symbol lines simply unselect the SYMBOL LINES parameter under Graphics, all Symbol lines will turn off. Frame Position Dimensions To adjust the frame position within the wall, the parameter is called FRAME POSITION The frame position adjusts the frame within the wall If the parameter is set to zero, then the frame will be centre line of the wall. If the parameter is set more than zero, than the result will be the frame moving towards the exterior If the parameter is set less than zero, than the result will be the frame moving towards the interior If the Frame Visibility is switched off and you want the sliding door centre of the wall, there are two options to adjust. The first is the FRAME POSITION, and the second is the PANEL OFFSET TOWARDS INTERIOR. This parameter will only adjust the doors when Behold is not activated Sill Height Dimensions To adjust the frame position within the wall, the parameter is called SILL HEIGHT The Sill Height adjusts the frame to create a Behold or a Sliding window If the parameter is set to zero, then the frame will be flush with the floor. If the parameter is set more than zero, than the result will be the frame up If the parameter is set less than zero, than the result will be the frame moving down Type Parameters Bi Fold Doors Graphics To adjust the Behold Doors to Sliding Door, the parameter is called BIFOLD DOORS If the parameter BIFOLD DOORS is selected the result will be Behold Doors The parameters which will adjust the BiFold Doors as well as the width and height are: BIFOLD PANEL COUNT LEFT & BIFOLD PANEL COUNT RIGHT, these parameters can be adjusted from zero to ten panels. The panel width will be automatically adjusted. You can adjust to any specific requirements. Have equal panels on each side or different counts of panel on each side. If the parameter BIFOLD DOORS is unselected the result will be Sliding Door panels without a frame. These will a have a void cutting the wall. To adjust the position within the wall, as stated earlier, you can adjust the Frame Position Parameter, or Panel Offset Towards Interior Parameter The Parameters to adjust the panel count is SLIDING DOOR COUNT. Please note you cannot adjust the panel count like the Behold Doors. If you want Sliding Doors only on one side then will need to adjust the Parameter Called DOUBLE SLIDING DOORS. This will Make the Panels show on one side and adjust the width of the panels automatically. To Open and Close the doors, this can be controlled separately for the two different sides. The parameters control both the Sliding Doors and the Bi Fold Doors. The Parameters are called PANEL OPENING RIGHT & PANEL OPENING LEFT Patio Graphics To adjust to a Patio can be only adjusted when Bi Fold Door is unselected and the Sliding Door is activated as a result. the parameter is called PATIO If the parameter PATIO is selected the result will be the first panel will become fixed panels The parameters which will adjust the Sliding Doors The voids cutting the wall will disappear. and the frame will adjust to the depth of the Panel thickness x SLIDING DOOR COUNT. To adjust the panel position within the wall, as stated earlier, you can adjust the Frame Position Parameter, or Panel Offset Towards Interior Parameter The Parameters to adjust the panel count is SLIDING DOOR COUNT. The parameter DOUBLE SLIDING DOORS will adjust to Double or Single panel patio similar to the sliding door. To Adjust the width of the first twofixed panels, The parameter is called PATIO WIDTH OFFSET.


10 REVISION 1 Our new Revised family now has the advanced option to have Symbol Lines Plan 3D as well as Symbol Lines 2D for the BiFold Doors. These options can be adjusted within the instance parameters under the Graphics Menu The 2D SYMBOL LINES Can only be viewed in Plan & Elevation, the 3D SYMBOL LINES Show in all views
Chapter 18. Interior Doors
 Chapter 18. Interior Doors 18.1 SWINGING DOORS 18.2 SLIDING DOORS 18.3 BIFOLD DOORS Tools needed by volunteers: Hammer Nail apron Tape measure Square Pencil Tools and equipment needed: Extension cords
Entry Level Assessment Blueprint Carpentry
 Entry Level Assessment Blueprint Test Code: 4115 / Version: 01 Specific Competencies and Skills Tested in this Assessment: Safety Demonstrate safe material handling practices Display comprehension of workplace/job-site
Chapter 3. Wall Layout
 Chapter 3. Wall Layout 3.1 LAYING OUT EXTERIOR WALLS 3.2 CUTTING EXTERIOR WALL PLATES 3.3 MARKING WINDOW AND DOOR LOCATIONS ON EXTERIOR WALL PLATES 3.4 MARKING STUDS ON EXTERIOR WALL PLATES 3.5 LAYING
Fold-A-Way Patio Door ASSEMBLY & INSTALLATION GUIDE
 Fold-A-Way Patio Door ASSEMBLY & INSTALLATION GUIDE This instruction guide provides the minimum recommended procedures to correctly prepare the rough opening, install a fold-a-way patio door unit and apply
Autodesk. AutoCAD Architecture Fundamentals. Elise Moss SDC PUBLICATIONS. Schroff Development Corporation
 Autodesk AutoCAD Architecture 2008 Fundamentals Elise Moss SDC PUBLICATIONS Schroff Development Corporation www.schroff.com www.schroff-europe.com Lesson 3 Floor Plans The floor plan is central to any
Autodesk AutoCAD Architecture 2015 Fundamentals
 Autodesk AutoCAD Architecture 2015 Fundamentals Elise Moss SDC P U B L I C AT I O N S Authorized Author Better Textbooks. Lower Prices. www.sdcpublications.com Powered by TCPDF (www.tcpdf.org) Visit the
Chapter 3. Wall Layout
 GFCAHFH March 15, 2018 Construction Manual Version 18.0 Chapter 3. Wall Layout 3.1 LAYING OUT EXTERIOR WALLS 3.2 CUTTING EXTERIOR WALL PLATES 3.3 MARKING WINDOW AND DOOR LOCATIONS ON EXTERIOR WALL PLATES
General Information... Elevation Notes... Elevation Notes Transom... Light Cut Information... Clear Opening Design Data Table 1 & 2 Panel...
 TABLE OF CONTENTS General Information..................................... Elevation Notes......................................... Elevation Notes Transom................................. Light Cut Information....................................
Parveneer Positive Pressure Fire Rated Frames Double rabbet with T stop for 20 minutes
 Section P/J Page 1 Double rabbet with T stop for 20 minutes Smoke seals are installed in the frame, not the door Section P/J Page 2 Throated jamb with T stop for 20 minutes Smoke seals are installed in
western series 9500 f loor load The Volume Program window systems westernwindowsystems.com bi fold installation instructions
 series 9500 f loor load bi fold The Volume Program Note: This is a bottom hung product. Provide adequate structure at threshold. Continuous threshold support is required. Right Jamb Head Deflection (+0.12
Grand Garden Chalet 6X3 Assembly Manual
 Revision #8 November 1, 2009 Grand Garden Chalet 6X3 Assembly Manual Thank you for purchasing a Grand Garden Chalet. Please take the time to identify all the parts prior to assembly. Please use Safety
Installation Guide. for E-Series/Eagle Clad Hinged Inswing French Door
 Installation Guide for E-Series/Eagle Clad Hinged Inswing French Door Thank you for choosing Andersen. Instructions are for typical, new wood-framed wall construction with weather protection in place.
House Design Tutorial
 House Design Tutorial This House Design Tutorial shows you how to get started on a design project. The tutorials that follow continue with the same plan. When you are finished, you will have created a
Steel Reinforced Joining Thank you for choosing Andersen. Please leave this guide with building owner.
 Steel Reinforced Joining (Horizontal/Vertical) for Andersen 400 Series Woodwright & Tilt-Wash Double-Hung, Picture, and Transom Windows and 400 Series Double-Hung Half Circle and Flexiframe Specialty Windows
Non-Reinforced Joining Guide (2-Way Horizontal and Vertical Joining) for Andersen 200 Series Tilt-Wash Double-Hung and Transom Windows
 for Andersen 200 Series Tilt-Wash Double-Hung and Transom Windows") (2-Way Horizontal and Vertical Joining) for Andersen 200 Series Tilt-Wash Double-Hung and Transom Windows Congratulations! You have just purchased one of the many fine Andersen products. Proper assembly,
(2-Way Horizontal and Vertical Joining) for Andersen 200 Series Tilt-Wash Double-Hung and Transom Windows Congratulations! You have just purchased one of the many fine Andersen products. Proper assembly,
INSTALLATION INSTRUCTIONS. Deluxe Continuous Hinge Inline Door & Panel Shower Enclosure QCI5230
 INSTALLATION INSTRUCTIONS Deluxe Continuous Hinge Inline Door & Panel Shower Enclosure QCI5230 QCI5230 Rev 0 6 shower new QCI5230 Rev 0 Page 2 Certified 06/20/2016 Parts List A. Curb (w/ weep holes) (1)
Technical Guide M. MMultiSlide Doors. Technical Guide M1
 Technical Guide M MultiSlide Doors M Technical Guide M1 Loewen MultiSlide MultiSlide doors provide large dramatic openings for the transition from indoor and outdoor living spaces. With an easy, smooth
RETRACTABLE SCREEN ASSEMBLY AND INSTALLATION INSTRUCTIONS. SINGLE OUTSWING (Retro) / (Full-Size) STEP 1: REVIEW & CHECK FIG.
 / (Full-Size) STEP 1: REVIEW & CHECK FIG.") STEP 1: REVIEW & CHECK ) CONFIRM DOOR HEIGHT & WIDTH You have purchased a SINGLE Retractable Screen for an INSWING door. HEIGHT: This unit is available in two sizes: Retro and Full-Size. Please make sure
STEP 1: REVIEW & CHECK ) CONFIRM DOOR HEIGHT & WIDTH You have purchased a SINGLE Retractable Screen for an INSWING door. HEIGHT: This unit is available in two sizes: Retro and Full-Size. Please make sure
Unit 9. Wall and Ceiling Framing
 Unit 9 Wall and Ceiling Framing Wall construction Wall framing includes the assembly of horizontal and vertical members that make up exterior walls and interior partitions. Theses walls support the ceilings
Before installation, check your local and state requirements for this type of install.
 1 Remove Packaging & Inspect Your Patio Door Remove shipping materials such as corner covers or pads. 2 Inspect Rough Opening Verify that the width and height of the patio door are each 1/2" to 3/4" smaller
Non-Reinforced Joining Guide (1-Way Vertical or Horizontal) for Andersen 200 Series Tilt-Wash Double-Hung Windows and Complementary Products
 for Andersen 200 Series Tilt-Wash Double-Hung Windows and Complementary Products") (1-Way Vertical or Horizontal) for Andersen 200 Series Tilt-Wash Double-Hung Windows and Complementary Products Non-Reinforced Joining Guide Congratulations! You have just purchased one of the many fine
(1-Way Vertical or Horizontal) for Andersen 200 Series Tilt-Wash Double-Hung Windows and Complementary Products Non-Reinforced Joining Guide Congratulations! You have just purchased one of the many fine
Chapter 23. Garage Construction
 Chapter 23. Garage Construction 23.1 ESTABLISHING CHALK LINES 23.2 MEASURING AND CUTTING WALL PLATES 23.3 MARKING WINDOW & DOOR LOCATIONS ON EXTERIOR WALL PLATES 23.4 MARKING STUDS ON EXTERIOR WALL PLATES
Building an Elevated Garden Bed & Hydroponic Table
 Building an Elevated Garden Bed & Hydroponic Table Materials: Lumber (2x4, 2x6, 1x4), Exterior Grade Wood Screws (2 1/2 & 1 5/8 ) and Hardware Cloth (enough to cover a 24 x48 area) Tools: Cordless Drill
Mulling & Transom General Installation Instructions
 1. Overview: This document outlines general recommended instructions for combining Fleetwood s window and door products in the field. Additional detailed information on mulling and transoms is also available
CROSS SECTIONS OF PATIO DOORS
 CROSS SECTIONS OF PATIO DOORS MOUNTING OPTIONS FOR A SINGLE DREAMSCREEN OPTION A Attach the housing to a 1 x 2 rectangular aluminum tube that is attached to the stile (frame) of the fixed patio door panel.
Grand Garden Chalet 6X3 Assembly Manual
 Revision #11 June 15, 2010 Grand Garden Chalet 6X3 Assembly Manual Thank you for purchasing a Grand Garden Chalet. Please take the time to identify all the parts prior to assembly. Please use Safety Eyewear
RV Entry Door OEM INSTALLATION MANUAL
 RV Entry Door OEM INSTLLTION MNUL TBLE OF CONTENTS Introduction 2 Safety 2 Resources Required 2 Installation 3 Exterior Frame Installation - Towable and Motorized 3 Interior Frame and Hinge Installation
Lend-A-Hand OEM INSTALLATION MANUAL
 Lend--Hand OEM INSTLLTION MNUL TBLE OF CONTENTS Introduction 2 Safety 2 Resources Required 2 Preparation 3 Installation 4 Installing the ssist Handle Door 4 Interior Frame and Hinge Installation - Motorized
INSTALLATION INSTRUCTIONS IMPERVIA SLIDING PATIO DOOR WITH FINS
 2008 Pella Corporation Part Number: 803V0101 INSTALLATION INSTRUCTIONS IMPERVIA SLIDING PATIO DOOR WITH FINS Installation Instructions for Typical Wood Frame Construction. These instructions were developed
STACKING MULTI-SLIDE DOOR SYSTEM INSTALLATION INSTRUCTIONS
 STACKING MULTI-SLIDE DOOR SYSTEM INSTALLATION INSTRUCTIONS 1290363 Revision 1 12/16 Page 1 Weather Shield Mfg., Inc. NOTICE CAUTION! Failure to install and maintain our product according to these instructions
STAIRCASES STAIRCASES I DOORS I WINDOWS
 STAIRCASES I DOORS I WINDOWS STAIRCASES Stair production at ARU Grupp and supported by ARU Joinery is based on 12 years of experience combined with world-class software solutions and CNC technology. _
MULTISLIDE DOORS INSTALLATION GUIDE & SITE PREPARATION
 MULTISLIDE DOORS INSTALLATION GUIDE & SITE PREPARATION TOOLS AND SUPPLIES 1 TOOLS CHECK LIST 1. laser level 2. hammer 3. pry bars 4. ladders 5. utility knife 6. screw gun 7. applicator foam gun 8. "j"
Design Considera ons & Installa on Guidance
 Design Considera ons & Installa on Guidance LiteSpace Interior Aluminum Framing provides a slim profile for glass walls and office fronts. It is designed to be cut to length on project sites for finished,
Contemporary 3 Panel Classic 5 Panel French Panel
 Contemporary 3 Panel Classic 5 Panel French Panel (X) Operating / Lock Panel Left (O) Fixed Panel Right Note : Glazing Beads For All Panel Face To The Exterior 2 Panel XO Left Is Shown Above Opposite =
HOW TO BUILD A 12X8 SHED
 HOW TO BUILD A 12X8 SHED With Illustrations, Drawings & Step By Step Details Note: This is a sample plan from RyanShedPlans. All other plans in our collection goes indepth with more details, more instructions,
City of Manteca Boarding Requirements
 City of Manteca Boarding Requirements There should be no boarding above the first floor unless entry is possible without use of a ladder, and the opening is large enough for a person to easily pass through.
CUSTOMER TECHNICAL MEMO # 79
 CUSTOMER TECHNICAL MEMO # 79 Subject: Date: 7/8/09 Commercial Sliding Door, View-max Sliding Window & Double Hung Technical Manual Amendments From: Product Development Please be advised there have been
With Illustrations, Drawings & Step By Step Details. Click Here To Download 12,000 Shed Plans. 1 P a g e H O W B U I L D S H E D.
 With Illustrations, Drawings & Step By Step Details Click Here To Download 12,000 Shed Plans 1 P a g e H O W B U I L D S H E D. C O M Table of Contents OVERVIEW... 3 MATERIALS & CUTTING LISTS... 4 DRAWINGS,
Read guide from beginning to end before starting installation. Read all warnings and cautions during unit installation.
 Installation Guide for E-Series/Eagle High-Performance Mullion Windows with LVL Reinforcement and Installed Using Type B Clips Thank you for choosing Andersen. Instructions are for typical, new wood-framed
ASS 70 FD folding / sliding door. Installation Guide
 ASS 70 FD folding / sliding door Installation Guide IMPORTANT! These doors should be fitted by competent and trained installers. Please read these instructions thoroughly before beginning the installation.
for Andersen Frenchwood Hinged and Outswing Patio Doors, Sidelights, and Transoms
 for Andersen Frenchwood Hinged and Outswing Patio Doors, Sidelights, and Transoms Congratulations! You have just purchased one of the many fine Andersen products. Proper assembly, installation and maintenance
Curtain Wall Installation Guide
 Curtain Wall Installation Guide Curtain Wall Installation Guide 1 IMPORTANT NOTICES! Important Notices & Information Manufacturer s Notes: The building envelope must be correctly prepared with weather
SovereignSeries. SovereignSeries
 2 SovereignSeries Overview 21 Awning and Casement Windows 22 Sliding and Stacking Windows and Doors 32 inged Doors 50 Bi-fold and Inline Bi-fold Windows and Doors 62 SovereignSeries 2 SovereignSeries
House Design Tutorial
 Chapter 2: House Design Tutorial This House Design Tutorial shows you how to get started on a design project. The tutorials that follow continue with the same plan. When you are finished, you will have
Installation Guidelines. Next Dimension. Single Hung / Single Hung Fixed / Double Hung / Sliding Window / Fixed Window
 Installation Guidelines Next Dimension Single Hung / Single Hung Fixed / Double Hung / Sliding Window / Fixed Window Windsor Windows & Doors Windsor Windows & Doors 900 S. 19 th St. 2210 Stafford St. Extn
VINYL WINDOWS (new construction or replacement) page 2. VINYL PATIO DOORS pages WOOD CLAD WINDOWS (new construction).page 5 WOOD CLAD WINDOWS
 page 2. VINYL PATIO DOORS pages WOOD CLAD WINDOWS (new construction).page 5 WOOD CLAD WINDOWS") RECOMMENDED INSTALLATION INSTRUCTIONS Please choose the appropriate instructions for the product(s) you are using. Read the instructions thoroughly before beginning the installation process. All instructions
RECOMMENDED INSTALLATION INSTRUCTIONS Please choose the appropriate instructions for the product(s) you are using. Read the instructions thoroughly before beginning the installation process. All instructions
Sun Windows General Information New Construction Hinged Door Installation Instructions
 A G H F H H A. Apply Weather Resistive Barrier B. Apply Bottom Flashing Tape C. Install Sill Pan End Caps & Pan D. Caulk Sides & Top Nailing Surface, Set Door, Fasten E. Apply Side Flashing Tape F. Apply
6X3 Patio Garden Shed Assembly Manual
 Thank you for purchasing a 6x3 Patio Garden Shed. Please take the time to identify all the parts prior to assembly. Revision #4 July 6th, 2016 6X3 Patio Garden Shed Assembly Manual Please use Safety Eyewear
Heavy Wall Applied Stop Tube Frame and Door Installation
 INSTALLATION INSTRUCTIONS Heavy Wall Applied Stop Tube Frame and Door Installation Read all instructions before beginning installation. These instructions are provided to help prevent installation problems
Features and Benefits
 Table of Contents a. Features & Benefits b. Colors & Louvers c. Stiles d. Panel Configurations e. Frame Styles f. General Product Specifications ions g. Tilt Rods h. Divider Rails i. Hinges j. Track Shutters
Grand Garden Chalet 6X3 Assembly Manual - Costco
 Revision #16 March 22nd, 2013 Grand Garden Chalet 6X3 Assembly Manual - Costco Thank you for purchasing a Grand Garden Chalet. Please take the time to identify all the parts prior to assembly. Please use
INSTALLATION INSTRUCTIONS for Wood/Clad Wood Windows without Exterior Trim or Nailing Fin (JII025) ImpOrTaNT INFOrmaTION & GlOssary.
 ImpOrTaNT INFOrmaTION & GlOssary.") for Wood/Clad Wood Windows without Exterior Trim or Nailing Fin (JII025) Thank you for selecting JELD -WEN products. Attached are JELD-WEN s recommended installation instructions for metal clad wood windows
for Wood/Clad Wood Windows without Exterior Trim or Nailing Fin (JII025) Thank you for selecting JELD -WEN products. Attached are JELD-WEN s recommended installation instructions for metal clad wood windows
INSTALLATION INSTRUCTIONS VENETIAN 84" SLIDING SHOWER DOOR SYSTEM (180º INSTALLATION)
") INSTALLATION INSTRUCTIONS VENETIAN 84" SLIDING SHOWER DO SYSTEM (180º INSTALLATION) 28539 Industry Drive, Valencia, CA 91355 Toll Free Phone: (877) 728-3874 Toll Free Fax: (888) 440-9567 Phone: (661) 775-1675
INSTALLATION INSTRUCTIONS VENETIAN 84" SLIDING SHOWER DO SYSTEM (180º INSTALLATION) 28539 Industry Drive, Valencia, CA 91355 Toll Free Phone: (877) 728-3874 Toll Free Fax: (888) 440-9567 Phone: (661) 775-1675
Transom Joining. for Andersen Elliptical Windows over Perma-Shield Gliding Patio Door
 Transom Joining for Andersen Elliptical Windows over Perma-Shield Gliding Patio Door INSTALLER: Please leave this guide with the building owner to file for future reference. Congratulations! You have just
RECOMMENDED INSTALLATION PROCEDURE LEVEL 3
 Step 1. Install Sill Flashing Product: 9" or 12" RainBuster #440 SubZero Flashing Tape 1.A Flashing Length = (Rough Opening Width) + 12" 1.B Install sill flashing flush with the sill of the rough opening.
New York City College of Technology Division of Continuing Education. Building Information Modeling with Revit Day 6 extras. Core Stairs & Elevators
 New York City College of Technology Division of Continuing Education Building Information Modeling with Day 6 extras Core s & s Professor Paul C. King, RA, AIA, ARA Prof.Paul.King@Gmail.com http://professorpaulking.wordpress.com/
AutoCAD Architecture 2018 Fundamentals
 Elise Moss Autodesk AutoCAD Architecture 2018 Fundamentals SDC P U B L I C AT I O N S Better Textbooks. Lower Prices. www.sdcpublications.com Powered by TCPDF (www.tcpdf.org) Visit the following websites
Chapter 9. Windows and Exterior Doors
 Chapter 9. Windows and Exterior Doors 9.1 INSTALLING WINDOWS 9.2 INSTALLING EXTERIOR HOUSE DOORS 9.3 INSTALLING SHED DOOR 9.4 INSTALLING EGRESS COMPONENTS Tools needed by volunteers: Hammer Nail apron
Entry Level Assessment Blueprint Carpentry
 Entry Level Assessment Blueprint Carpentry Test Code: 4215 / Version: 01 Specific Competencies and Skills Tested in this Assessment: Safety Demonstrate safe material handling practices Display comprehension
2300 BI-FOLD INSTALLATION GUIDE
 2300 BI-FOLD INSTALLATION GUIDE INSTALLATION INSTRUCTIONS OF MAIN FRAME Header #8 x 2½ zinc coated screws 2 1 2 Jamb Jamb 1 1 3 #8 x 2½ zinc coated screws 4 1 4 3 #8 x 2½ zinc coated screws 5 Threshold
Steel Reinforced Joining Guide (Horizontal / Vertical)
") (Horizontal / Vertical) for Andersen Patio Door and/or Elliptical Top Window Combinations Congratulations! You have just purchased one of the many fine Andersen products. Proper assembly, installation
(Horizontal / Vertical) for Andersen Patio Door and/or Elliptical Top Window Combinations Congratulations! You have just purchased one of the many fine Andersen products. Proper assembly, installation
6400, 8400 and 9400 Series Sliding Patio Door
 Contemporary 3 Panel Classic 5 Panel French Panel 6400, 8400 and 9400 Series Sliding Patio Door (O) Fixed Panel Left (X) Operating / Mullion Panel Right (X) Operating / Lock Panel Left (O) Fixed Panel
House Design Tutorial
 House Design Tutorial This House Design Tutorial shows you how to get started on a design project. The tutorials that follow continue with the same plan. When you are finished, you will have created a
PlanSwift 3D Viewer Plugin User Guide
 PlanSwift 3D Viewer Plugin User Guide UPDATED ON 7/13/2018 PlanSwift Authored by: Dave Hansen 1 Table of Contents Overview... 3 Purchasing and Installation... 4 Purchasing Plugins... 4 Installation and
Materials. Description Quantity/Size Material Foundation Drainage material. 1.4 cu. yd. Compactible gravel
 This 8 12-ft. shed features a simple gable roof, double doors, and side and rear windows for natural lighting. With full-height walls and doors, there's ample room for storing large items or creating a
House Design Tutorial
 Chapter 2: House Design Tutorial This House Design Tutorial shows you how to get started on a design project. The tutorials that follow continue with the same plan. When you are finished, you will have
INSTALLATION SHOP DRAWINGS FOR MINNEAPOLIS, MN
 MINNEAPOLIS, MN 2-0- 2-- General Notes Abbreviations Deviations from Architectural Specifications Deviations from Architectural Drawings ALUM. = ALUMINUM B.O. = BY OTHERS CONT. = CONTINUOUS. = CLEARANCE
2018 Technical Drawing Specifications Resource A guide to support VCE Visual Communication Design Study Design
 2018 Technical Drawing Specifications Resource A guide to support VCE Visual Communication Design Study Design 2018 22 VICTORIAN CURRICULUM AND ASSESSMENT AUTHORITY 1 Contents A guide to support VCE Visual
Dear Contractor, I am glad that you are interested in our window rebate program.
 Dear Contractor, I am glad that you are interested in our window rebate program. I have included three documents with this letter. One is our form to indicate your intention to participate in the program.
PREHUNG INTERIOR DOOR INSTALLATION
 PREHUNG INTERIOR DOOR INSTALLATION Although prehung door units cost a little more, homeowners and builders alike often find the convenience and finished product well worth the difference in price. Prehung
4. Partially open the operating panel and tilt the top toward the interior of the door (Figure 4). Lift the panel off the sill and set it aside.
. Lift the panel off the sill and set it aside.") Effective Date: 10/1/2017 Tools Needed Kit Contents Hardware Kit Safety Glasses Cordless drill Phillips screw bit Two-step drill bit (3/8-1/8 ) utility knife Interior Mullion Exterior Mullion Cover clamps
Effective Date: 10/1/2017 Tools Needed Kit Contents Hardware Kit Safety Glasses Cordless drill Phillips screw bit Two-step drill bit (3/8-1/8 ) utility knife Interior Mullion Exterior Mullion Cover clamps
8x12 SpaceMaker Garden Shed Assembly Manual
 8x12 SpaceMaker Garden Shed Assembly Manual Version #6 Revised June / 2007 Thank you for purchasing a 8x12 SpaceMaker Garden Shed. Please take the time to identify all the parts prior to assembly. Safety
Chapter 9. Windows and Exterior Doors
 Chapter 9. Windows and Exterior Doors 9.1 INSTALLING WINDOWS 9.2 INSTALLING EXTERIOR HOUSE DOORS 9.3 INSTALLING SHED DOOR 9.4 INSTALLING BASEMENT EGRESS COMPONENTS Tools needed by volunteers: Hammer Nail
Non-Reinforced Joining Guide (Horizontal/Vertical)
") Non-Reinforced Joining Guide (Horizontal/Vertical) for Andersen Casement, Awning, and Picture Windows Congratulations! You have just purchased one of the many fine Andersen products. Proper assembly, installation
Non-Reinforced Joining Guide (Horizontal/Vertical) for Andersen Casement, Awning, and Picture Windows Congratulations! You have just purchased one of the many fine Andersen products. Proper assembly, installation
Wood Duck Nest Box Design & Assembly Directions
 Wood Duck Nest Box Design & Assembly Directions Instructions, Illustrations & Photos Courtesy of MWDI and Scott Jasion, Harford County Chapter, Ducks Unlimited Side door opening design for easy mounting
FRAMED PANEL / DOOR / PANEL CONTINUOUS HINGE SHOWER ENCLOSURE INSTALLATION INSTRUCTIONS
 FRAMED / DOOR / CONTINUOUS HINGE SHOWER ENCLOSURE INSTALLATION INSTRUCTIONS QCI5229 Rev 0 6 INSTALLATION NOTES: Unpack your unit carefully and inspect for freight damage. Lay out and identify all parts
Lift & Slide W6400. (rev )
") Copyright 2010 Pacific Architectural Millwork All rights reserved. No part of this manual may be reproduced or transmitted in any form or by any means without permission by Pacific Architectural Millwork.
Copyright 2010 Pacific Architectural Millwork All rights reserved. No part of this manual may be reproduced or transmitted in any form or by any means without permission by Pacific Architectural Millwork.
House Design Tutorial
 Chapter 2: House Design Tutorial This House Design Tutorial shows you how to get started on a design project. The tutorials that follow continue with the same plan. When we are finished, we will have created
C-Series & S-Series Classic Frame with Transom (Single or Pair)
") 1. TOOLS REQUIRED Tape measure 6' magnetic level 3' magnetic level Safety Glasses Screw gun #2 Screwdriver tip #3 Screwdriver tip Philips Head screwdriver (Used to move frame on wall using oval slots on
1. TOOLS REQUIRED Tape measure 6' magnetic level 3' magnetic level Safety Glasses Screw gun #2 Screwdriver tip #3 Screwdriver tip Philips Head screwdriver (Used to move frame on wall using oval slots on
Glass Fireplace Enclosure
 Glass Fireplace Enclosure Residential R e t r e a t Architectural header with 9-panel Prairie door design Cabinet doors with premium hinge Hidden damper control Easy-grip handles Matte black or Bronze
Installation Materials Required: Tools Required: 6" self-adhesive flashing. Shims. 3-foot level 6-foot level Tape measure 1/8" drill bit
 installation instructions for CUSTOM WOOD & FIBERGLASS EXTERIOR FOLDING DOOR SYSTEMs (JII101) Thank you for selecting JELD-WEN products. Attached are JELD-WEN s recommended installation instructions for
Versatrim Side-Snap Frame
 Versatrim Side-Snap Frame net door width finished opening width rough opening width (finished opening width plus 1 1/2") Figure 1 Cross section of strike and hinge jambs The rough opening width is equal
Premium Single Dutch Doors Assembly & Installation Instructions
 Premium Single Dutch Doors Assembly & Installation Instructions Premium Single Dutch Door Instructions General Notes; -Read the entire instructions before you begin. -Wear appropriate safety gear when
BUILDING THE BASIC SHED. Step A: Build the Foundation & Floor Frame
 BUILDING THE BASIC SHED Step A: Build the Foundation & Floor Frame 1. Excavate the building site and add a 4" layer of compactible gravel. If desired, add an extension to the base for the optional wood
INSTALLATION INSTRUCTIONS for Vinyl Windows with Integral Nailing Fin (JII001) IMPORTANT INFORMATION & GLOSSARY ROUGH OPENINGS
 IMPORTANT INFORMATION & GLOSSARY ROUGH OPENINGS") Thank you for selecting JELD-WEN products. Attached are JELD-WEN s recommended installation instructions for Vinyl windows with an integral nailing fin. While the use of these installation instructions
Thank you for selecting JELD-WEN products. Attached are JELD-WEN s recommended installation instructions for Vinyl windows with an integral nailing fin. While the use of these installation instructions
A = 4-1/2 B = 1/4 C = 5/16. Pin Dia. Use with C-11, C-12, C-13, C-19 Use with C-10, C-12, C-13, C dia. A = 4-1/3 A = /16 1-5/8
 B C-10 Dia. Pin C-11 Dia. Pin C-12 Dia. Pin Bi-fold Pins & Associated Parts A A = 4- B = C = A = 4-1/6 B = C = A = 4- B = C = C Pin Dia. C-11, C-12, C-13, C-19 C-10, C-12, C-13, C-16 C-13 Dia. Cap C-16
E-Z BUILD SHED BUILDING GUIDE 10' 10' 10' 12' 10' 14' 10' 16' 10' 20'
 E-Z BUILD SHED BUILDING GUIDE 12' 14' 16' 20' North American softwood dimensional lumber sizes: NOMINAL in in 1 4 1 6 2 4 2 6 ACTUAL in in ¾ 3½ ¾ 5½ 1½ 3½ 1½ 5½ Shown with rollup door Construct your own
With Illustrations, Blueprints & Step By Step Details Brought To You By ShedPlansz.Com Click Here To Get More Shed Plans
 12 X 8 Shed Plans With Illustrations, Blueprints & Step By Step Details Brought To You By ShedPlansz.Com Click Here To Get More Shed Plans Blueprints And Diagrams Instructions For Building The Shed
Installation Guide for Andersen Frenchwood Patio Door Sidelights and Transoms
 for Andersen Frenchwood Patio Door Sidelights and Transoms Congratulations! You have just purchased one of the many fine Andersen products. Proper assembly, installation and maintenance are essential if
Installation Guidelines For ALUMINUM M-SERIES 3 PANEL SLIDING DOOR
 www.quakerwindows.comv www.quakercommercialwindows.com PO Box 128 504 Highway 63 South Freeburg, MO 65035 800-347-0438 573-469-4151 (fax) Installation Guidelines For ALUMINUM M-SERIES 3 PANEL SLIDING DOOR
CRL JACKSON 900 SERIES
 INSTALLATION INSTRUCTIONS CRL JACKSON 900 SERIES FLOOR MOUNTED DOOR CLOSERS CENTER HUNG AND OFFSET crlaurence.com crlaurence.com MODEL No. 990 crlaurence.com Phone: (800) 421-6144 Fax: (800) 262-3299 crlaurence.com
How to fit an Internal Door
 How to fit an Internal Door How to fit an Internal Door The following instructions are for installing a internal door only. If you have any queries please contact Cheshire Mouldings technical helpline
KEY FEATURES HARDWARE ICON BI-FOLD OPERATOR
 ICON BI-FOLD OPERATOR This swivel bi-fold operator throws locking bolts into the frame at top and bottom of the panel. Optional key-locking (separately installed) is available. Having an operator handle
UNIVERSITY SERIES Fixed, Projected and Casement Steel Windows
 Fixed, Projected and Casement Steel Windows Hope's University Series steel window profiles were designed for projects requiring historic replication of exterior putty glazed steel windows. The fixed and
Awning and Casement Window
 Awning and Casement Window Please also see: Options Full Lifetime Warranty Overview All Series Casement and Awning windows are available in both standard and custom sizes to match virtually any design,
Midterm Exam_STUDY GUIDE_70 questions
 Class: Date: CADD 2 Midterm Exam_STUDY GUIDE_70 questions Multiple Choice Identify the choice that best completes the statement or answers the question. 2. 3. 4. 5. 6. 7. 8. 9. 10. 1. Producing computer
Block Frame Inovo Patio Door/Transom/Sidelite Field Mulling Instructions. simonton.com/installation. If mulling sidelites, skip to Step 5.
 Effective Date: 10/1/17 Tools Needed Kit Contents Safety Glasses Cordless Drill Phillips Screw Bit Two-step Drill Bit (3/8-1/8 ) Utility Knife Interior Mullion Exterior Mullion Cover Hardware Kit Clamps
Aluminum Clad Wood Window 1/2 Reinforced Field Mulling and Stacking Supplement
 Aluminum Clad Wood Window 1/2 Reinforced Field Mulling and Stacking Supplement 1 Aluminum Clad Wood Window 1/2 Reinforced Field Mulling and Stacking Supplement The following instructions are a supplement
FIRE RATED DOOR AND FRAME GENERAL REQUIREMENTS
 FIRE RATED DOOR AND FRAME GENERAL REQUIREMENTS These requirements apply to all fire rated doors, frames, and windows. Requirements for the installation of these assemblies are included in the Standard
NEW CONSTRUCTION PATIO DOOR INSTALLATION INSTRUCTIONS (WITH NAILING FLANGE)
") NEW CONSTRUCTION PATIO DOOR INSTALLATION INSTRUCTIONS (WITH NAILING FLANGE) Slim Line & Classic French Style Patio Doors Materials included: (2) #10 x 2-1/2" Phillips Pan head keeper s (2) 3/8" Hole plugs
NEW CONSTRUCTION PATIO DOOR INSTALLATION INSTRUCTIONS (WITH NAILING FLANGE) Slim Line & Classic French Style Patio Doors Materials included: (2) #10 x 2-1/2" Phillips Pan head keeper s (2) 3/8" Hole plugs