Premium Single Dutch Doors Assembly & Installation Instructions
|
|
|
- Hubert Atkinson
- 5 years ago
- Views:
Transcription


1 Premium Single Dutch Doors Assembly & Installation Instructions
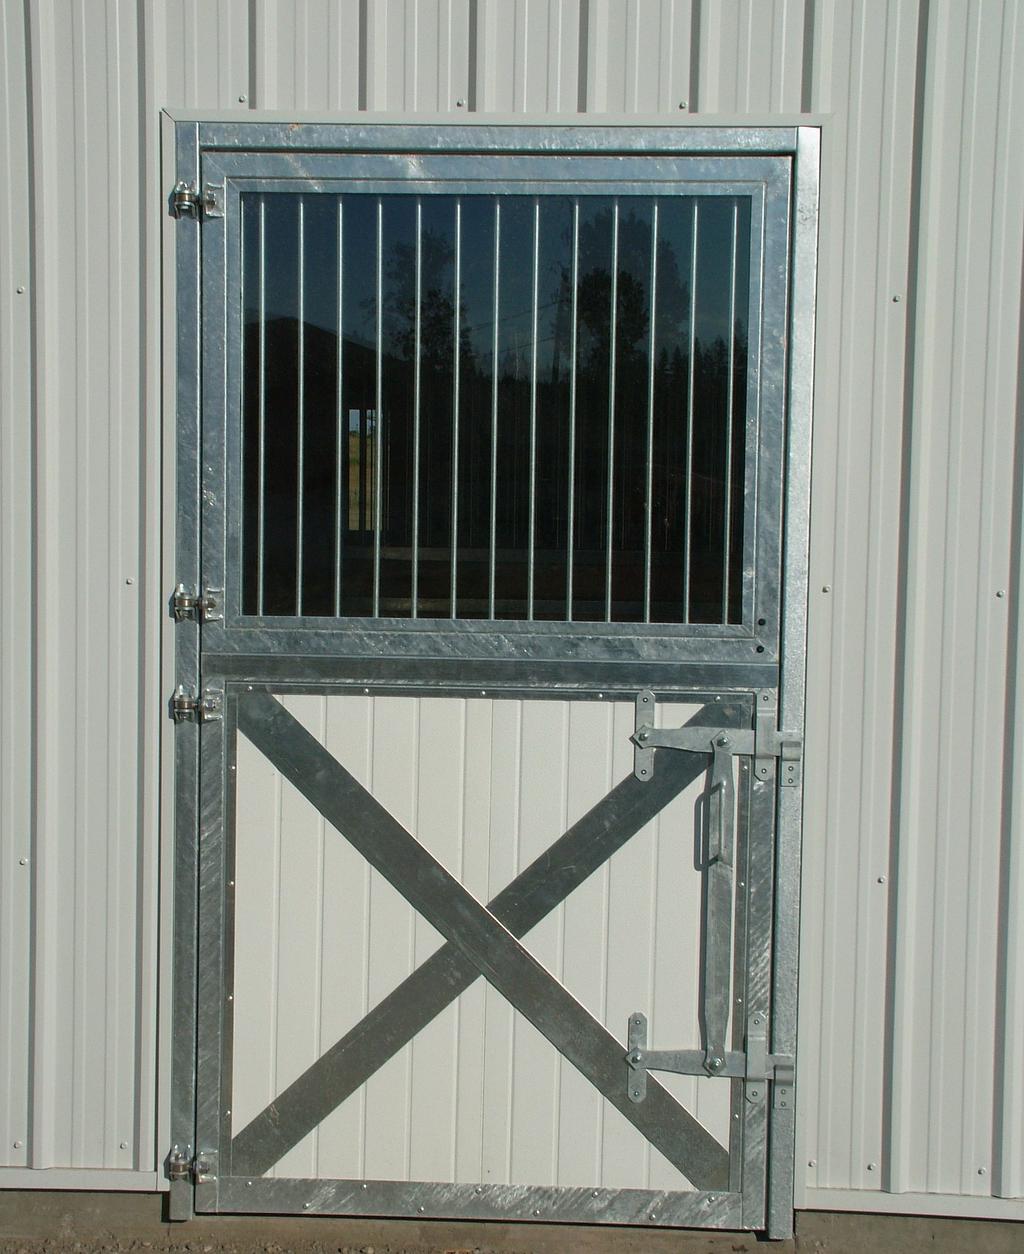
2 Premium Single Dutch Door Instructions General Notes; -Read the entire instructions before you begin. -Wear appropriate safety gear when using saws, and drills. This may include, but is not limited to, safety glasses, hearing protection and work gloves. ** Steel may have sharp edges and can cut** - Get help moving parts and building the door, as some pieces are heavy and awkward to handle. - These instructions are for a Standard Size Premium Single Dutch Door. On some custom doors, some steps are not applicable, dimensions, and in some cases quantities may be different than those shown. When assembling a Custom Door, please verify dimensions and quantities highlighted with an asterisk *. - The Wood called out in this Document is standard nominal dimensional lumber. For example 2 x 6 standard lumber has an actual size of 1-1/2 x 5-1/2. Tools What You Need - Circular Saw - Blade for above to cut 2 x 6 lumber - Drill - 1/4 Drill bit for above - 9/32 Drill bit for above - 3/8 Hex Screw Driver Bit for above - Robertson #3 Screw Driver Bit for above - 9/16 socket w/ 3/8 drive ratchet - Hammer - Level System Fencing Limited 2 of 15 Premium Single Dutch Door Instructions
 - Cedar Shims FASTENER LIST System Fencing Limited 3 of 15 Premium Single Dutch Door")
3 - Tape Measure Wood Vertical Wood - 9* x 2 x 6 x 8 * (Door Insert) - 1* x 2 x 2 x 8 * (Door Insert) or Horizontal Wood - 9* x 2 x 6 x 8 * (Door Insert) - Cedar Shims FASTENER LIST System Fencing Limited 3 of 15 Premium Single Dutch Door Instructions
4 ROUGH OPENING System Fencing Limited 4 of 15 Premium Single Dutch Door Instructions


5 STEP 1 The FRAME ASSEMBLY comes as in three pieces and is bolted together on site. Layout the top, left and right sides. The Use the 3/8 bolts and washers provided to bolt frame together. System Fencing Limited 5 of 15 Premium Single Dutch Door Instructions
6 STEP 2 Tip up FRAME ASSEMBLY, and center in the rough opening. Level up the frame using shims, and (13x), 1/4 x 3 Hex Head Lag Bolts (BB), make sure the frame is level in both directions. System Fencing Limited 6 of 15 Premium Single Dutch Door Instructions
7 STEP 3 Locate the DOOR FRAMES and measure and record the following Dimensions; INSIDE DOOR HEIGHT= (from the bottom of the DOOR up to the screw head) INSIDE DOOR WIDTH= (between the screw heads). System Fencing Limited 7 of 15 Premium Single Dutch Door Instructions
8 STEP 4 -VERTICALWOOD Use the measurements taken to cut the wood to the desired length. The 2 x 6 s are to be cut to a length of the INSIDE DOOR HEIGHT minus the width of a 2 x 2 (1-1/2 ). The 2 x 2 should be cut to a length of the INSIDE DOOR WIDTH. It may be necessary to rip a 2 x 6 to fill the INSIDE DOOR WIDTH. HORIZONTAL WOOD (Optional) Use the measurements taken to cut the wood to the desired length. The 2 x 6 s are to be cut 1/8 shorter than the INSIDE DOOR WIDTH. System Fencing Limited 8 of 15 Premium Single Dutch Door Instructions
9 STEP 5 Locate CROSS BUCKS and the COLORED INSERT (if required). Carefully lay the CROSS BUCKS on the COLORED INSERT (colored side up) and slide them into the DOOR FRAME. ** If CROSS BUCKS or COLORED INSERTS are used on the other side as well, slide them in at this time below these, with the colored side down and the CROSS BUCKS at the bottom. STEP 6 System Fencing Limited 9 of 15 Premium Single Dutch Door Instructions
10 Slide the cut wood into the DOOR FRAME below the COLORED INSERT. ** If CROSS BUCKS or COLORED INSERTS are used on the other side as well, slide the cut wood into the DOOR FRAME between the 2 COLORED INSERTS. STEP 7 Install #12 x 1-1/4 Philips Truss Head Screws (AA) through the holes in the DOOR FRAME. Carefully mark the CROSS BUCKS and (5x) 3/16 hole just through the CROSSBUCK and the COLORED INSERT and install (5x) #12x 1-1/4 Philips Truss Head Screws (AA). Flip the door over and install #12 x 1-1/4 Philips Truss Head Screws (AA) in the remaining holes. System Fencing Limited 10 of 15 Premium Single Dutch Door Instructions


11 The top door panel locate the hole in the bottom of the door. There will be a stainless steel pin ¾ in diameter and a 3/8 machined pin. Insert the ¾ pin up in the door. Insert the machined pin into the ¾ pin so the pin. Go to the next step, if when you get the door installed the ¾ pin hits on the door you may need to turn the pin around. System Fencing Limited 11 of 15 Premium Single Dutch Door Instructions

12

13 System Fencing Limited 13 of 15 Premium Single Dutch Door Instructions
14 STEP 9 Add SILL ANGLE to the UPPER DOOR. Line up Inside of SILL ANGLE with the outside of the DOOR so that when the UPPER DOOR closes on the LOWER DOOR the SILL ANGLE closes flush against the LOWER DOOR. Fasten it with 5x, #12x 1-1/4 Philips Truss Head Screws (AA) Or self drilling screws if installing a door with a window on top. System Fencing Limited 14 of 15 Premium Single Dutch Door Instructions
15
RUN-IN SHED INSTRUCTIONS
 RUN-IN SHED INSTRUCTIONS 14321 5th Line Nassagaweya, Rockwood, ON, N0B 2K0 Phone 519-856-9959 ~ Fax 519-856-4141 Toll Free 1-800-461-3362 ~ Email sales@systemhorse.com Website www.systemfence.com RUN-IN
Installation Instructions - Model V4JSD 1
 Installation Instructions - Model V4JSD 1 Support Assemblies: Parts list: (Note see enclosed cut sheet for quantities and dimensional information) A vertical structural member (1 ½ x 1 ½ modular frame)
SINGLE TRACK BYPASS (patent pending) barn door hardware
 barn door hardware") SINGLE TRACK BYPASS (patent pending) barn door hardware Installation Manual What is included in your kit: Part number Part name Quantity 1 Inner door hanger 2 2 Outer door hanger 2 3 5/16 x 1.5 lag bolts
SINGLE TRACK BYPASS (patent pending) barn door hardware Installation Manual What is included in your kit: Part number Part name Quantity 1 Inner door hanger 2 2 Outer door hanger 2 3 5/16 x 1.5 lag bolts
Shetland Stalls Installation Instructions
 Shetland Stalls Installation Instructions RAMM Horse Fencing and Stalls 13150 Airport Hwy. Swanton, OH 43558-9615 1-800-434-8456 Rev. 1/9/18 Before you start Kit can accommodate up to 12 wide stall front
Track Rack. * Track Racks are not lockable
 The Track Rack s unique staggered, sliding hook design creates the greatest parking efficiency while still providing easy access to any particular bike. When adding or removing a bike to the rack, simply
Locker Pedestal Installation Instructions
 Locker Pedestal Installation Instructions LK-PED-INST-0314r1 Parts List Single Pedestal Back to Back Pedestal Horizontal Support Tube TS-169 Post Flange TS-190 Post Cap Fasteners Provided: #8 x ¾ round
Fortress Al Posts must always be secured to the deck framing. Fortress Al Posts should never be attached to only the deck boards.
 Installation Instructions for Fortress Railing Traditional Panels with s and Posts It is the responsibility of the installer to meet all code and safety requirements, and to obtain all required building
Retractable Screen Installation Instructions For Vinyl and Aluminum Clad and Wood In-Swing Hinged Doors (See separate instructions for sliding doors)
") Retractable Screen Installation Instructions For Vinyl and Aluminum Clad and Wood In-Swing Hinged Doors (See separate instructions for sliding doors) IMPORTANT: Please read before you begin. Table of Contents
Retractable Screen Installation Instructions For Vinyl and Aluminum Clad and Wood In-Swing Hinged Doors (See separate instructions for sliding doors) IMPORTANT: Please read before you begin. Table of Contents
10x10 Trellis Pergola
 0x0 Trellis Pergola ASSEMBLY GUIDE Ver.0-7 Table of Contents PAGE Introduction & Overview...................................................... Pergola Materials Overview..............................................................
Chapter 1. Beam and Sill Plates
 Chapter 1. Beam and Sill Plates 1.1 ESTABLISHING SQUARE SILL PLATE CHALK LINES 1.2 INSTALLING TREATED SILL PLATES 1.3 INSTALLING LAMINATE BEAM Tools needed by volunteers: Hammer Nail apron Tape measure
INS T A L L A TIO N INS T R U C TIO N S HORSESHOE W/ BAR HANGER
 INS T A L L A TIO N INS T R U C TIO N S HORSESHOE W/ BAR HANGER 6-1/2" 5" 2-7/16" 3-7/16" Ø2-7/8" 4-7/8" 11" 2" 3/16" 1/2" HORSESHOE W/ BAR S P ECIFICATIONS PARTS AND TOOLS Tools Needed Tape Measure Pencil
FRAMELESS DOOR / PANEL WITH WALL MOUNT HINGES QCI5274
 FRAMELESS DOOR / PANEL WITH WALL MOUNT HINGES QCI5274 QCI0274 QCI5274 REV. Rev. 1 0 Page Page 1 1 Date Certified: Certified 06/16/2016 10/01/10 Parts List with wall mount hinges ITEM NO. Part # DESCRIPTION
Required Tools: Suggested Additional Tools: 1 Cordless Drill with Robertson Bits 1 Ratchet Wrench 1 7/16 or 11mm socket 1 7/16 or 11mm Gear Wrench
 Thank you for your recent purchase of a Cabinets by Hayley garage cabinet system. You are about to experience the best made cabinets that you can purchase. Cabinets by Hayley are designed for beauty and
Leveling Foot RB210. Leg Extender RLT66
 Landing for Right & Left Turn R342 ITEMS # 0254049, 0254061, 0254072, 0254076, 0016567, 0254099, 0254110, 0054116, 0254117, 0254126, 0254140, 0254150, 0254156 CUSTOM ACCESS RAMP SYSTEM MODELS # R100, R242,
TABLE OF CONTENTS REQUIRED TOOLS
 TABLE OF CONTENTS SECTION SECTION TITLE PAGE NO. 1 2 3 4 5 Assembling Mounting Structure Installing Bicycle Supports Mounting Rack to Wall Adding Sections Customizing Rack Configuration REQUIRED TOOLS
INSTALLATION INSTRUCTIONS INS T A L L A TIO N INS T R U C TIO N S THE MAVERICK HANGER R H
 INS T A L L A TIO N INS T R U C TIO N S THE MAVERICK HANGER 10.6.2016 PARTS INSTALLATION SPECIFICATIONS AND TOOLS INSTRUCTIONS 2-1/4" 2-7/8 11-3/8" 1/4" 2-1/8 PARTS INSTALLATION AND INSTRUCTIONS TOOLS
Heavy-Duty Bypass Track System
 Heavy-Duty Bypass Track System Please Note: This track system must be installed with the screws going into a solid surface such as studs or a header. Due to the spacing of the holes on these Brackets,
SwingSafe Swing-Away Mailbox Support Diagram
 SwingSafe Swing-Away Mailbox Support Diagram Wood Mounting Plates Top Arm (B) Muffler Clamps (A) Carriage Bolts and Nuts Bottom Arm 4-Foot U-Channel Post USPS Recommended 42-44 Height Ground Slope Hex
Frameless Inline Door QCI5250
 INSTALLATION INSTRUCTIONS Frameless Inline Door QCI5250 FRAMELESS PANEL / DOOR / PANEL QCI0249 REV. 3 Page 1 Certified 10/12/12 Parts List with pivot hinges *Quantities may vary. QCI0249 REV. 3 Page 2
1. TOOLS + MATERIALS REQUIRED
 R INSTALLATION INSTRUCTIONS PRODUCT: BALDUR + ODEN CONFIGURATION: BI-PARTING DOOR MOUNT: TOP MOUNT Product is covered by U.S. patents. For more information visit www.krownlab.com. TOOLS + MATERIALS REQUIRED
LOFT DOOR HANGER BARN DOORS & HARDWARE. Hardware Installation Instructions. Page
 LOFT DOOR HANGER Page 1 Specifications 2 7/16" 3/8" 1-1/2 1-3/4 Ø3 3 7/8" 11-1/16 Page 2 Parts and Tools Tools Needed Tape Measure Pencil Drill with 1/8, 1/4 and 3/8 bits, 1 spade bit and Phillips bit
RLP Flat Track Hardware sliding door hardware/ barn door track
 Page 1 of 9 Installation Suggestions for: RLP Flat Track Hardware sliding door hardware/ barn door track Read these instructions to end before starting installation or ordering hardware. Reclaimed Lumber
10x10 Trellis Pergola
 0x0 Trellis Pergola ASSEMBLY GUIDE Ver.-007 Table of Contents PAGE 0x0 Trellis Pergola Introduction & Overview...................................................... Pergola Materials Overview..............................................................
C-Series & S-Series Classic Frame with Transom (Single or Pair)
") 1. TOOLS REQUIRED Tape measure 6' magnetic level 3' magnetic level Safety Glasses Screw gun #2 Screwdriver tip #3 Screwdriver tip Philips Head screwdriver (Used to move frame on wall using oval slots on
1. TOOLS REQUIRED Tape measure 6' magnetic level 3' magnetic level Safety Glasses Screw gun #2 Screwdriver tip #3 Screwdriver tip Philips Head screwdriver (Used to move frame on wall using oval slots on
INSTALLATION INSTRUCTIONS CONTOURED LIGHT BAR APPLICATION: CHEVY EQUINOX/ GMC TERRAIN PART NUMBERS: ,
 INSTALLATION INSTRUCTIONS CONTOURED LIGHT BAR APPLICATION: 2010-2014 CHEVY EQUINOX/ GMC TERRAIN PART NUMBERS: 32-21020, 32-21025 ITEM QUANTITY DESCRIPTION TOOLS NEEDED 1 1 CONTOUR BAR TORQUE WRENCH 2 1
A-935 RODA WALL MOUNT HINGES
 INSTALLATION INSTRUCTIONS A-935 RODA WALL MOUNT HINGES NEED INSTALLATION HELP? Call 1-800-45-BASCO (452-2726) Monday - Friday 8:00 A.M. - 4:30 P.M. Eastern Time FRAMELESS DOOR / PANEL CELESTA QCI0274 REV.
Continuous Handrail Kit Installation Instructions
 Continuous Handrail Kit Installation Instructions ALUMINUM RAILING SYSTEM Canadian Version Wall Application (see page 2) Railing Application (see page 7) Wall anchors not provided Hardware included: 1x
Deck Mount Installation with Bench
 Deck Mount Installation with Bench 1. Mark track with square. 2. Cut tracks with saw. 3. Drill ¼ hole (if needed.) 4. Countersink track. 5. Countersink all track 6. File all track ends. ends. 7. Lay out
Grand Garden Chalet 6X3 Assembly Manual - Costco
 Revision #16 March 22nd, 2013 Grand Garden Chalet 6X3 Assembly Manual - Costco Thank you for purchasing a Grand Garden Chalet. Please take the time to identify all the parts prior to assembly. Please use
WAREHOUSE HANGER INSTALLATION INSTRUCTIONS R H INS T A L L A TIO N INS T R U C TIO N S
 INS T A L L A TIO N INS T R U C TIO N S WAREHOUSE HANGER NOTE: Due to the size and weight of the Warehouse Hanger it is recommended that this Hanger be installed on 3 4 or wider doors. 10.11.2016 2-3/16"
Grand Garden Chalet 6X3 Assembly Manual
 Revision #11 June 15, 2010 Grand Garden Chalet 6X3 Assembly Manual Thank you for purchasing a Grand Garden Chalet. Please take the time to identify all the parts prior to assembly. Please use Safety Eyewear
How To Install Windows: Nail-Fin Application
 How To Install Windows: Nail-Fin Application Required Tools & Materials: Materials: 1 3/4" galvanized roofing nails. Nails must penetrate at least 1" into framing For mulled and/or DP50 or above units:
INSTALLATION INSTRUCTIONS INS T A L L A TIO N INS T R U C TIO N S ROD IRON SCROLL HANGER R H
 INS T A L L A TIO N INS T R U C TIO N S ROD IRON SCROLL HANGER 10.5.2016 2-1- 3/16" 11/16" 8" 8 O 2-7/8 Ø2-7/8" 3-1/2 3-1/2" 12-9/16 12-9/16" PLEASE NOTE: These instructions are specific to a particular
Model T o r s i o n, S t a n d a r d L i f t
 Model 6600 T o r s i o n, S t a n d a r d L i f t Residential and Light Commercial Table Of Contents Pre-Installation 2 Important Safety Instructions 2 Removing an Existing Door 2 Preparing the Opening
Frameless Inline Door QCI5248
 INSTALLATION INSTRUCTIONS Frameless Inline Door QCI5248 FRAMELESS PANEL / DOOR / PANEL QCI5248 REV. 0 Page 1 Certified 06/16/2016 Parts List with glass to glass hinges *Quantities may vary. **Support Bar
ATLANTIS RAIL Contact Information
 ATLANTIS RAIL Contact Information Customer Service (800) 541-6829 (508) 732-9191 Spectrum System Installation Instructions Atlantis Rail s Spectrum System is an easy to install, universal cable railing
Frameless Inline Door With Return QCI5263
 INSTALLATION INSTRUCTIONS Frameless Inline Door With Return QCI5263 WALL MOUNT HINGES FRAMELESS DOOR / PANEL / RETURN PANEL QCI5263 REV. 0 Page 1 Certified 06/17/2016 Parts List with wall mount hinges
PRODUCT: LOKI INSTALLATION INSTRUCTIONS. Product is covered by U.S. patents. For more information visit
 R INSTALLATION INSTRUCTIONS PRODUCT: LOKI CONFIGURATION: SINGLE DOOR MOUNT: GLASS MOUNT Product is covered by U.S. patents. For more information visit www.krownlab.com . TOOLS + MATERIALS REQUIRED TOOLS
INS T A L L A TIO N INS T R U C TIO N S. Ceiling Mount Track System
 Ceiling Mount Track System 10.26.2016 Specifications Ceiling Post: Unassembled 2-7/8 Assembled 1-11/16 7/8 7-9/16 5-7/8 3/8 2 Tubes 1/2 2-3/8 5 Parts and Tools Tools Needed Tape Measure Pencil Drill with
Gambrel Barn Construction Manual 8x8 through 16x24 Units
 Gambrel Barn Construction Manual 8x8 through 16x24 Units Tools Needed: Cordless drill (12V or higher) #2 square drive bit Hammer 6 step ladder Tape measure Square utility knife w/ blade & hook blade Little
Bulkhead Model Number and
 Bulkhead Model Number 96141-3-01 and 96142-3-01 Installing your ProMaster bulkhead is very clear cut following these instructions. Before cutting or drilling in the floor, verify the location of you gas
6' Wide Premium Greenhouse Benches
 6' Wide Premium Greenhouse Benches Premium Greenhouse Bench with Stationary Top 2015 FarmTek All Rights Reserved. Reproduction is prohibited without permission. STK# DIMENSIONS 112416S6X08 6' W x 3' H
4x6 Barn/Gable Coop With Wheels
 4x6 Barn/Gable Coop With Wheels Tools Needed: -Cordless Drill (12V or higher) -#2 Square Drive Bit -Hammer -Tape Measure -Speed Square Little Cottage Co. PO Box 455 Berlin, OH 44610 330-893-4212 www.cottagekits.com
INSTALLATION INSTRUCTIONS VENETIAN 84" SLIDING SHOWER DOOR SYSTEM (180º INSTALLATION)
") INSTALLATION INSTRUCTIONS VENETIAN 84" SLIDING SHOWER DO SYSTEM (180º INSTALLATION) 28539 Industry Drive, Valencia, CA 91355 Toll Free Phone: (877) 728-3874 Toll Free Fax: (888) 440-9567 Phone: (661) 775-1675
INSTALLATION INSTRUCTIONS VENETIAN 84" SLIDING SHOWER DO SYSTEM (180º INSTALLATION) 28539 Industry Drive, Valencia, CA 91355 Toll Free Phone: (877) 728-3874 Toll Free Fax: (888) 440-9567 Phone: (661) 775-1675
CONTENTS TOOL LIST U P S I D E I N N O V A T I O N S, L L C RAMP AND STEP SYSTEM ASSEMBLY INSTRUCTIONS. Revised: June 2013
 U P S I D E I N N O V A T I O N S, L L C RAMP AND STEP SYSTEM ASSEMBLY INSTRUCTIONS TOOL LIST Required Tools: - Reciprocating Saw with Metal Cutting Blade - Drill - 7/16 Drill Bit for Metal Drilling -
Rolling Curtain door Manual
 Rolling Curtain door Manual Installation Maintenance parts Model 944 PHONE 800 448 8979 FAX 800 236 8722 website www.tracrite.com EMAIL tr@tracrite.com ADDRESS 216 Wilburn Road Sun Prairie, WI 53590 This
Wood Duck Nest Box Design & Assembly Directions
 Wood Duck Nest Box Design & Assembly Directions Instructions, Illustrations & Photos Courtesy of MWDI and Scott Jasion, Harford County Chapter, Ducks Unlimited Side door opening design for easy mounting
Model 44, Double Flush
 Model 44, Double Flush T o r s i o n, R e a r M o u n t L o w H e a d r o o m Residential and Light Commercial Quick Start Guide Table Of Contents Pre-Installation 2 Important Safety Instructions 2 Door
Gardman Lean-to Greenhouse Assembly Instructions
 Page 1 Gardman Lean-to Greenhouse Assembly Instructions Our Help Line provides support and advice to customers of Summer Garden Buildings after ordering. For advice before you buy you can phone us free
96 (Standard Length)
") Setbacks 96 (Standard Length) Bike Files may be lined up end to end to fill the available space. A 36 aisle should be left between the ends of bikes in racks facing one another. 36 aisle 50 Installation
Setbacks 96 (Standard Length) Bike Files may be lined up end to end to fill the available space. A 36 aisle should be left between the ends of bikes in racks facing one another. 36 aisle 50 Installation
Oceanside Outdoor Vinyl Shower Kit (3 x 3 Enclosure)
") Oceanside Outdoor Vinyl Shower Kit ( x Enclosure) A B ASSEMBLY GUIDE REQUIRED FOR INSTALLATION (A) Zippity Post Extension for In-Ground Installation (Sold as 4-Packs) (B) Zippity Galvanized Steel Surface
Oceanside Outdoor Vinyl Shower Kit ( x Enclosure) A B ASSEMBLY GUIDE REQUIRED FOR INSTALLATION (A) Zippity Post Extension for In-Ground Installation (Sold as 4-Packs) (B) Zippity Galvanized Steel Surface
BIKE FILE (301)
") B IK E F I L E High Efficiency The Bike File is our most space efficient u-lock compatible product. Sturdy sliding hangers allow nine bikes to be securely stored in an eight-foot section while allowing
B IK E F I L E High Efficiency The Bike File is our most space efficient u-lock compatible product. Sturdy sliding hangers allow nine bikes to be securely stored in an eight-foot section while allowing
FIXED PANEL SLIDER QCI5241
 INSTALLATION INSTRUCTIONS FIXED PANEL SLIDER QCI5241 FRAMELESS PANEL / DOOR / PANEL FRAMELESS DOOR / PANEL QCI5241 REV. 0 Page 1 Certified 06/16/2016 Parts List *Quantities may vary QCI5241 REV. 0 Page
YUKON PATIO COVER INSTALLATION INSTRUCTIONS
 YUKON PATIO COVER INSTALLATION INSTRUCTIONS Before You Begin: Consult your local building department for any required permits You may be required to obtain a building permit for this structure. Contact
FIXED SHOWER SCREEN For Wall Mount Hinges QCI5283
 FIXED SHOWER SCREEN For Wall Mount Hinges QCI5283 QCI5283 Page 1 Date Certified: 06/16/2016 Parts List with wall mount clamp ITEM NO. DESCRIPTION QTY. 1 FIXED GLASS PANEL 1 2 WALL MOUNT CLAMP 1 3 U-CHANNEL
Qwik-Fence Installation Instructions
 Qwik-Fence Installation Instructions 1 Tools Required The following installation instructions should be used as a guide for installing Folding Guard Qwik-Fence Partitions. Good common sense and appropriate
AFCO-Rail Post INSTALLATION INSTRUCTIONS AFCO-RAIL POST
 AFCO-Rail Post INSTALLATION INSTRUCTIONS TOOLS REQUIRED: Drill Bits (for the appropriate fastener) Drill (with adjustable clutch, recommended) Level String Line Tape Measure Tools to install fasteners
Titan Series Awning Assembly and Installation Instructions
 Titan Series Awning Assembly and Installation Instructions Be sure to use safety glasses when assembling and installing the awning. Some metal parts may have sharp edges. Use work gloves to handle them.
Grand Garden Chalet 6X3 Assembly Manual
 Revision #8 November 1, 2009 Grand Garden Chalet 6X3 Assembly Manual Thank you for purchasing a Grand Garden Chalet. Please take the time to identify all the parts prior to assembly. Please use Safety
Greenhouse Assembly Instructions
 Greenhouse Assembly Instructions Our Help Line provides support and advice to customers of Summer Garden Buildings after ordering. For advice before you buy you can phone us free 7 days a week on 0800
DekPro Prestige Aluminum Rail System Level Railing Installation Instructions
 ing Installation Guide Please read all instructions completely before starting any installation of DekPro Prestige Railing Systems. SAFETY: Always be safe and follow all instructions when using power tools
4x4 Barn/Gable Coop with Run Manual
 Manual Tools Needed: -Cordless Drill (12V or higher) -#2 Square Drive Bit -Hammer -Tape Measure -Speed Square Little Cottage Co. PO Box 455 Berlin, OH 44610 330-893-4212 www.cottagekits.com 2008-2009 Little
UNIVERSAL ASSEMBLY INSTRUCTIONS FOR VERSATUBE GARAGE BUILDINGS
 UNIVERSAL ASSEMBLY INSTRUCTIONS FOR VERSATUBE GARAGE BUILDINGS SINGLE DOOR GARAGE AVAILABLE IN 12, 20, 24 AND 30 WIDTHS DOUBLE DOOR GARAGE AVAILABLE IN 24 AND 30 WIDTHS Our unique assembly process quickly
Eraser Conveyor Belt Cleaning System IWARNING Always obey all applicable safety rules. Be sure all power to the conveyor has been disconnected and con
 INSTALLATION GUIDE LIB-CP-REA-03-01 Rev. 10 Eraser Conveyor Belt Cleaning System ARGONICS Eraser Conveyor Belt Cleaning System IWARNING Always obey all applicable safety rules. Be sure all power to the
Stainless Steel 95C34 Series
 Stainless Steel 95C34 Series Toilet Partition Installation Manual PHONE: FAX: 866-317-2786 ATTENTION DO NOT MIX FASTENER PACKS EACH FASTENER PACK HAS THE NECESSARY BOLTS, BARRELS AND SCREWS TO INSTALL
Nicros-EasyWall INSTALLATION MANUAL
 Nicros-EasyWall INSTALLATION MANUAL Thank you for purchasing a Nicros-EasyWall climbing wall panel system. Nicros- EasyWall is the best simple-to-install climbing wall product available. While NICROS,
The Festival Assembly Instructions
 The Festival Assembly Instructions Toll Free: 866.768.8465 Hours: 9-5 Monday-Friday EST www.homeplacestructures.com Package ships as shown CONTACT INFORMATION: HomePlace Structures 301 Commerce Drive New
SB-WM-ART2-L-BL SB-WM-ART2-XL-BL
 SB-WM-ART2-L-BL SB-WM-ART2-XL-BL Weatherproof Universal Dual-Arm Articulating Mount for Large TVs INSTALLATION MANUAL WARNING The maximum weight of this wall mount is 150 lbs (68.04 kg). Use with heavier
Models 8000 / 8100 / 8200
 Models 8000 / 8100 / 8200 T o r s i o n, C u t D o w n Residential and Light Commercial Installation Instructions And Owner s Manual Table Of Contents Pre-Installation 2 Important Safety Instructions 2
NX8 SERIES 6-1/4 HANDRAIL W/ VINYL HANDGRIP
 6-1/4 HANDRAIL W/ VINYL HANDGRIP TYPICAL ASSEMBLY 5 2 BUTT JOINT 12 10 9 1 8 11 6 3 7 4 BUTT JOINT COMPONENT LIST 1 LEFT RETURN 7 UPPER IMPACT ABSORBER 2 RIGHT RETURN 8 LOWER IMPACT ABSORBER 3 OUTSIDE
DOCK WEDGE - STANDARD
 DOCK WEDGE - STANDARD INSTALLATION INSTRUCTIONS WOOD HEADER READ ALL INSTRUCTIONS BEFORE INSTALLING SEAL. SUPER SEAL MFG. LTD. WILL NOT BE HELD RESPONSIBLE FOR IMPROPER INSTALLATION OF ANCHORING DEVICES,
Post & Rail. Includes: Crossbuck, 2-Rail, 3-Rail and 4-Rail POST SUPPORT OPTIONS
 Post & Rail Includes: Crossbuck, 2-Rail, 3-Rail and 4-Rail STAGGER RAIL ENDS FOR GREATER STRENGTH ALLOW 1-1/2" GAP ON HINGE SIDE OF GATE AND 1-1/4" ON LATCH SIDE OF GATE HARDWARE DIG HOLES 30" MINIMUM
43107 Rhino Jerry Can Holder Rhino Jerry Can Holder - Horizontal
 Important: Please read these instructions carefully prior to installation. Check the contents of kit before commencing fitment and report any discrepancies. Clean the alloy tray prior to installation.
NX7 SERIES 5-1/2 HANDRAIL
 STORAGE & HANDLING The handrails are shipped unassembled. Upon receipt, immediately check all material for any damage that may have occurred in transit and verify that all of the items and quantities are
6' Wide Premium Greenhouse Benches
 6' Wide Premium Greenhouse Benches Premium Greenhouse Bench with Rolling Top 2015 FarmTek All Rights Reserved. Reproduction is prohibited without permission. STK# DIMENSIONS 112416R6X08 6' W x 3' H x 8'
Series----SP3600A SHOWER DOOR
 Series----SP3600A SHOWER DOOR INSTALLATION INSTRUCTIONS Please read these instructions carefully to familiarize yourself with the required tools, materials, and installation sequences. The Exploded Diagram
END FRAMES. End frames built using pressure treated 2x4 (1 1/2" x 3 1/2") 36" 34" 7/16" pilot hole. 5 1/2" x 1/2" lag bolt 8" wheel 23"
 36 34 7/16 pilot hole. 5 1/2 x 1/2 lag bolt 8 wheel 23") END FRAMES End frames built using pressure treated 2x4 (1 1/2" x 3 1/2") 23" 17 1/2" (B) (B) Measure from the bottom of your stone to 1" below the lip to get your measurement. 17 1/2"(B) 36" 34" 1/2" flat
END FRAMES End frames built using pressure treated 2x4 (1 1/2" x 3 1/2") 23" 17 1/2" (B) (B) Measure from the bottom of your stone to 1" below the lip to get your measurement. 17 1/2"(B) 36" 34" 1/2" flat
Clearview Railing System Installation Instructions
 Clearview Railing System Installation Instructions Disclaimer: AGS Stainless, Inc. has its Clearview Railing Systems designed by a professional engineer to meet the requirements of the latest national
TOOLS REQUIRED Metal Wood Wood and Metal Screws. #16 Drill #12-24 Tap. 1/8 Drill
 DEVICES COVERED IN THIS DOCUMENT: 4700S Surface Vertical Rod Device 4700SF Fire Exit Surface Vertical Rod Device TOOLS REQUIRED Metal Wood Wood and Metal Screws Sex Bolts #7 Drill ¼ -20 Tap #16 Drill #12-24
Mira Premium Series Bi-Parting French Sliding Patio Door Installation Instructions
 PREMIUM SERIES W I N D O W S Mira Premium Series Bi-Parting French Sliding Recommended Tools & Accessories Tape Measure Level (3 or longer) Hammer Power Screwdriver Load bearing Shims Flashing (recommended)
PRODUCT: BALDUR + ODEN
 R INSTALLATION INSTRUCTIONS PRODUCT: BALDUR + ODEN CONFIGURATION: SINGLE DOOR MOUNT: GLASS MOUNT Product is covered by U.S. patents. For more information visit www.krownlab.com . TOOLS + MATERIALS REQUIRED
Model 7100 Series. T o r s i o n, R e a r M o u n t L o w H e a d r o o m
 Model 7100 Series T o r s i o n, R e a r M o u n t L o w H e a d r o o m Residential and Light Commercial Quick Start Guide Table Of Contents Pre-Installation 2 Important Safety Instructions 2 Door Section
Independent Containment System (ICS)
") Installing the Independent Containment System (ICS) Complete these instructions to install the Independent Containment System (ICS). Prerequisites This installation requires a team of at least two people.
Installing the Independent Containment System (ICS) Complete these instructions to install the Independent Containment System (ICS). Prerequisites This installation requires a team of at least two people.
OWNER S MANUAL. Safety. Please read this owner s manual before use and keep it at hand for reference. Warranty
 Please read this owner s manual before use and keep it at hand for reference. OWNER S MANUAL Safety Important safety instructions for using the INCRA Miter5000 Before using the INCRA Miter5000, read and
INSTALLATION INSTRUCTIONS
 INSTALLATION INSTRUCTIONS R5 STEP BOARD APPLICATION: 2009-2017 Dodge Ram 1500 Quad / Crew Cab 2010-2017 Dodge Ram 2500/3500 Crew Cab PART NUMBER: 28-51040, 28-51045, 28-51050, 28-51055 ITEM QUANTITY DESCRIPTION
UNIT No FRAMELESS PIVOT SHOWER DOOR
 INSTALLATION INSTRUCTIONS UNIT No. 3600 FRAMELESS PIVOT SHOWER DOOR NEED INSTALLATION HELP? Call 1-800-45-BASCO (452-2726) Monday - Friday 8:00 A.M. - 4:30 P.M. Eastern Time QCI0020 Rev. 3 Page 1 of 8
Assembly Instructions
 Unite Panel System Hinge Door July 2016 #12 x / slotted hex washer head bolt Figure 1 threshold bracket frame Detail F threshold bracket threshold bracket (installed) #12 x / slotted hex washer head bolt
Model 44, Double Flush
 Model 44, Double Flush T o r s i o n, S t a n d a r d L i f t Residential and Light Commercial Installation Instructions And Owner s Manual DEFINITION OF LIGHT COMMERCIAL: 1. Door Heights less than or
Frameless Inline Door QCI5254
 INSTALLATION INSTRUCTIONS Frameless Inline Door QCI5254 FRAMELESS DOOR / PANEL QCI5254 REV. 0 Page 1 Cer fied 06/16/2016 Parts List with wall mount hinges *Quanes may vary QCI5254 REV. 0 Page 2 Cer fied
SECTION 19: Endwood Fusion Welded Gate Installation Guide
 SECTION 19: Endwood Fusion Welded Gate Installation Guide ASSEMBLY AND INSTALLATION FOR: Fusion Welded Gates Gate Frame with Full Size Pickets Privacy & Board on Board California & Shadowbox Gate width
TS-20KD-1010 LOW PROFILE CARGO SCALE INSTALLATION GUIDE
 TS-20KD-1010 LOW PROFILE CARGO SCALE INSTALLATION GUIDE Triner Scale & Mfg. Co., Inc. 8411 Hacks Cross Rd. Olive Branch, MS 38654 Phone: 800-238-0152 Fax: 662-809-2386 Description The Triner Scale Model
INSTALLATION INSTRUCTIONS
 INSTALLATION INSTRUCTIONS SOLID PHENOLIC TOILET PARTITIONS 1080 DuraLineSeries Class-A Fire Rated Includes Institutional Hardware Option.67 IMPORTANT: Storage and Handling Information on last page. Review
ROCKWELL. Two Panel Door. Half X Door. Double X Door. Z Combination Door
 ROCKWELL 4 in 1 DOOR Choose between four door styles with this Door Kit. Our versatile Rockwell Door Kit is very easy to assemble. All materials and hardware needed to assemble any of the four styles are
MITCHELL WREATH RINGS NO-HAMMER ASSEMBLY INSTRUCTIONS
 MITCHELL WREATH RINGS NO-HAMMER ASSEMBLY INSTRUCTIONS METAL STAND WITH WOOD STAND WITH PAGE 2 OF 10 MASTER PARTS LIST HEAD ASSEMBLY LINKAGE ASSEMBLY HOOK LEVER ASSEMBLY FOOT PEDAL ASSEMBLY ALL FASTENERS
ULTRA WINDOW & DOOR EXPANDERS AND RECEIVERS INSTALLATION INSTRUCTIONS
 ULTRA WINDOW & DOOR S AND RECEIVERS INSTALLATION INSTRUCTIONS! CAUTION: *REMEMBER SAFETY FIRST* Proper Eye and! Hearing Protection must always be worn during installation of all window and door products.
Installation Instructions for Vista Air Vertically Folding Walls
 Installation Instructions for Vista Air Vertically Folding Walls Use these instructions in conjunction with your shop drawings to see the specifics that are particular to the model you are installing.
K-KR4Z - Kona INSTRUCTION MANUAL KK002
 K-KR4Z - Kona INSTRUCTION MANUAL 07.10 KK002 Please keep this manual and product code number for future reference and replacement parts ordering if necessary. CURVED GLASS SLIDING SHOWER DOOR CURVED GLASS
Melamine Plastic Laminate. Toilet Partition Installation Manual
 Melamine Plastic Laminate Toilet Partition Installation Manual PHONE: FAX: 1-866-317-2786 ATTENTION DO NOT MIX FASTENER PACKS EACH FASTENER PACK HAS THE NECESSARY BOLTS, BARRELS AND SCREWS TO INSTALL THE
CXT PRO RAILING INSTALLATION INSTRUCTIONS For Installations Using Aluminum and Glass Balusters Sold Separately
 CXT PRO RAILING INSTALLATION INSTRUCTIONS For Installations Using Aluminum and Glass Balusters Sold Separately CCRR-0171 PFS AA-652 Drill/power screwdriver Assorted drill bits Hammer Miter or circular
Fortress Fe Posts must always be secured to the deck framing. Fortress Fe Posts should never be attached to only the deck boards.
 Installation Instructions for FortressCable V-Series Cable Stair Panel System with UB-05 With ngle dapter and Fe Posts It is the responsibility of the installer to meet all code and safety requirements,