Floorplanner Editor Manual
|
|
|
- Tracy Townsend
- 5 years ago
- Views:
Transcription


1 Editor Manual
2 Floorplanner Editor Manual 1 Overview 2 Canvas a 2D view b View Settings 3 3D view a Orbital and walkthrough mode b How to navigate c Adding cameras d Scenery image e Create a render 4 Sidebar 5 Floor menu 6 Build: a Walls and Rooms b Surfaces c Doors and Windows d Structures e Tekst f Lines g Dimension lines h Room types i Symbols j Tape measure k Background Drawing l Dimension settings m Mirror / Rotate plan 7 Decorate tools: a Colors b Materials 8 Furniture a Furniture b Categories c Collections 9 Project actions a Export 2D b Export 3D c Embed d Collaborate e Download 10 Keyboard shortcuts 11 More Help page 2 of 50

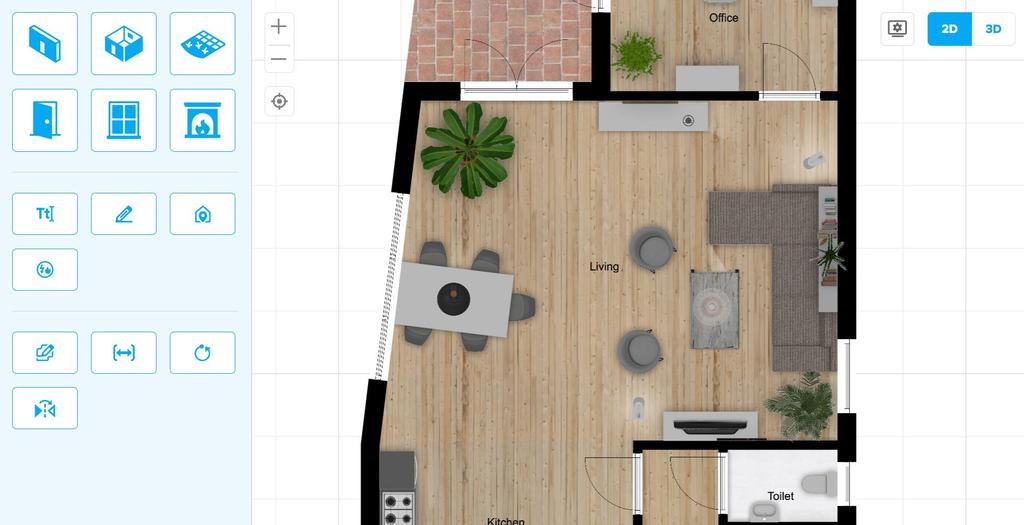
3 1 Overview Below you see the floorplan editor. In this tool you draw your floorplan, add doors, windows, and other architectural elements. You can label your rooms and add furniture. Sidebar Zoom Floor menu Camera view Canvas Undo / Redo Save Actions Exit to Dashboard 2D / 3D view View settings Display style page 3 of 50


4 2a Canvas, 2D view In your canvas you draw walls, rooms, lines etc. Other items can be dragged and dropped. Main navigation To pan, click and drag your left mouse button on an empty space in the canvas, or on empty spot on a surface. Use your mousewheel to zoom in and out. Selecting and deselecting Click on objects to select them. This will activate the sidebar, and sometimes give some handlers and buttons in the canvas. Click anywhere in the canvas to deselect, 2D View settings See this page Interactive Snapping When drawing or dragging items you will often snap to other items in your canvas. Hold S to temporarily disable snap. or press esc keyboard. on your page 4 of 50


5 2b Canvas, View settings There are several options you have to change the appearance of your plan in 2D and the amount of information you want to display. Set 2D view: Black and white All surfaces appear in white. All furniture as black and white outlines Colored outline All surfaces appear in plain color. All furniture as black and white outlines Toggle any elements on or off. Set units to Meter or Feet Material and shadows All surfaces appear in seleced materials. All furniture in their real materials. Walls and furniture have a light dropshadow. Lights cast light. page 5 of 50


 Camera in walkthrough")
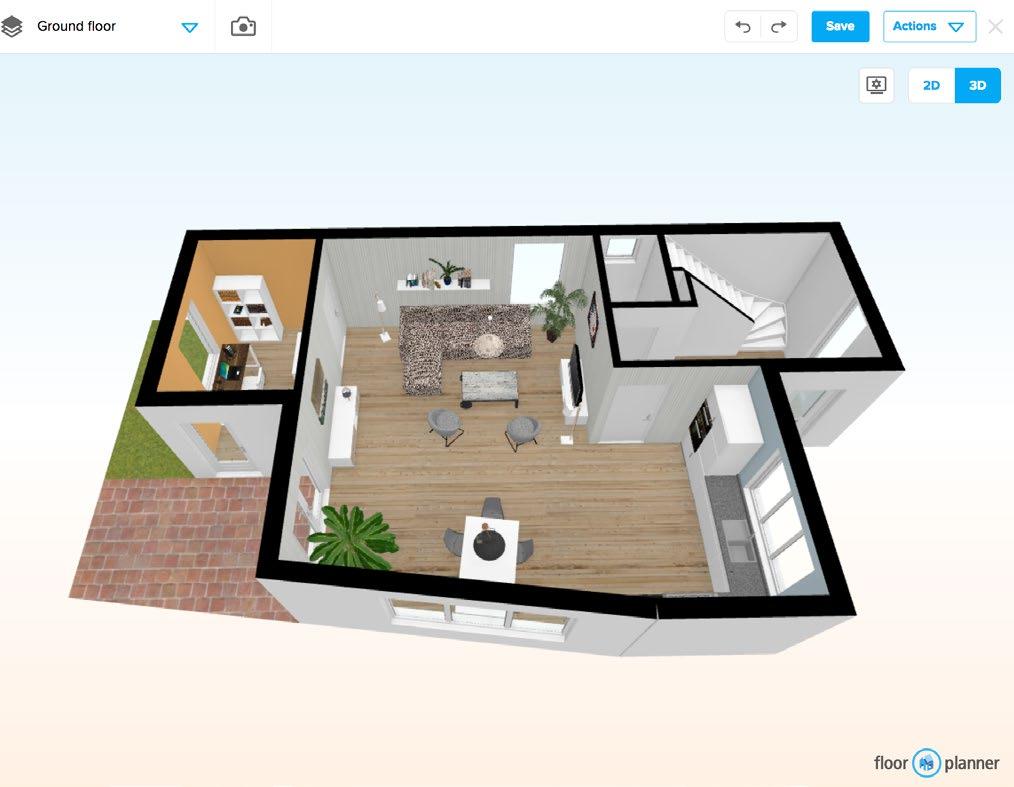
6 3a 3D View: Orbital and walkthrough In floorplanner you can get view the plan in 3D Camera in orbital mode Switch from 2D to 3D view Click the camera or 3D button to go to the 3D view mode. Here you can view your plan from above (orbital mode) or from eye-level (walkthrough mode) Camera in walkthrough mode page 6 of 50


7 3b 3D view: How to navigate Once you re in the camera (or 3D) mode, here s how you can change you camera position. This button places you camera to the center of the room on eye-level. Double-click on a surface moves your camera to that position You reset your view to top-view orbitla by pressing this button: Tip: you can also use to shift the camera position to the front, back, right, or left. 3D View settings Hide walls, doors and windows above a chosen height. Display the camera frame applied for renders Show/Hide automatically generated ceilings Tip: if you have different wall heights this can give problems. Better use custom surfaces with an elevation in that case. page 7 of 50


8 3c 3D view: Adding cameras Per floor you can add multiple cameras. This way you can save different views. Furthermore you can easily jump from viewpoint to viewpoint. You can use them for a flythrough presentation of your house. In the side bar you can handle the active camera rename your camera Switch to next/previous camera Create a new camera with the current view. Click the dropdown to see all the cameras you have in the active floor. Click the play button to start the fly-through presentation. This button will also show up in the viewmode of your project. remove active camera Update the last changes to the current camera Drag your active camera up or down to change the order. Change the camera height and vertical angle Change the camera field of view. page 8 of 50


9 3d 3D view: Scenery image For each camera you can upload a scenery image. This will show up outside your windows. Click on Add image in the bottom of the sidebar It has to be a.jpg image. Best is to use images in a 16:9 ratio, on a high resolution page 9 of 50


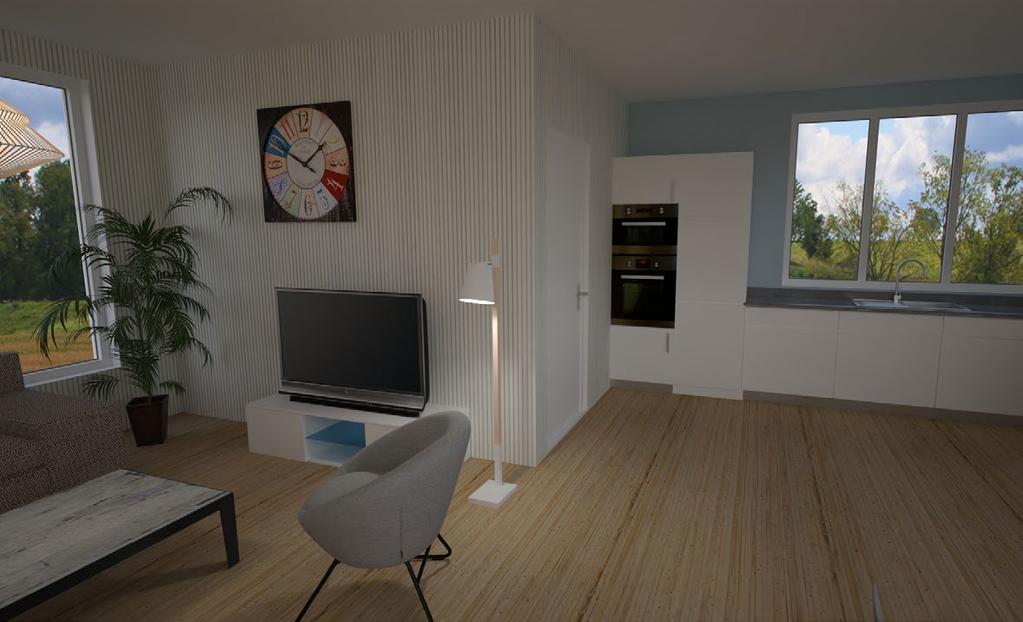
10 3d 3D view: Create a render With a camera you can create a photorealistic image. There are several render quality levels you can get., depending on which level your project is. The export levels are: for free accounts for pro accounts coming soon coming soon SD render 960 x 540 pixels HD render 1920 x 1080 pixels page 10 of 50


11 4 The Sidebar: Build, Decorate, Furnish The sidebar is the main area where all the tools can be found to create and detail your floorplan and interior design. There are 3 tabs, or modes: Build, Decorate and Furnish Build Decorate Furnish Draw walls Draw rooms Surfaces Doors Windows Structures Find colors or materials, and apply them to a room, wall or surface. Search through our libraries of items by category or use our premade style collections. Tekst Lines or Dimension lines Room labels Symbols and Icons Light Tape Measure Background drawing Dimension settings Rotate / Mirror plan page 11 of 50


12 4 The Sidebar for selected objects (wall) When you ve selected an item, for instance a wall segment, the sidebar will show info about this item. In build mode, you can edit the wall size properties. Switching the side bar to decorate mode will show the colors or materials applied to this wall segment. Clicking on the furnish icon will show wall related furniture. You can drag and drop these on your wall. page 12 of 50


13 5 The Floor menu Buildings usually have multiple floors. Each floorplanner project represents one house or another kind of property. The floor menu is the place where you can add and manage your floors. Floor name Change the default wall height for all walls in this floor. This applies to all walls you draw in this floor and all walls you ve drawn in each design in this floor. Remove floor and all designs in it. Remove floor and all designs in it. Add a new floor You can start a floor from scratch or you can duplicate a floor you already drew in this project. Move floor up or down Design name Show version history of this design. Did you break anything in your last save? Then you can use this to retrieve an earlier version. You can add a design and create duplicates of a floor layout. This way you can play with the interior syle or interior layout in each floor like in the example below. See also the chapter on furniture collections Add a new design. Each floor can have multiple designs, variants in the interior design or floor layout. You can start a design from scratch or you can duplicate a design you already drew in this project. interior in urban style interior in industrial style interior in contemporary style page 13 of 50

 Repeat this to any corner of your room.")


14 6a Build: Walls and Rooms In floorplanner you can draw your floorplan by drawing wall by wall, or room by room. A space enclosed by walls becomes a room, and is given a room surface automatically. Draw Wall by Wall 1) Click the draw room icon and setup your wall thickness and height. 3) Repeat this to any corner of your room. Tip: guidelines will help you find the end of a room or vertical or horizontal direction 4) Close the room by starting on the starting point. A room surface will appear. 2) Click in the canvas and drag your mouse in the direction you want your wall. Release where you want your wall to end or type in your desired length and press Enter. NB: Keep in mind that wall thickness affects the wall length when going around a corner. Tip: the blue circle indicates your wall thickness. You can also use this tool to draw separate wall segments. page 14 of 50


 Click in your canvas and drag your mouse towards")
 You can click the inner dimensions to set the")
15 6a Build: Walls and Rooms You can draw quicker room by room. Draw Room 1) Click the draw room icon and setup your wall thickness and height. 3) Release your mouse. You ll get automatic dimensions showing the interior room dimensions and exterior dimensions. 2) Click in your canvas and drag your mouse towards the direction and size you want your room to be. 4) You can click the inner dimensions to set the exact room size. Click the arrows to indicate which wall should move. page 15 of 50


 Move your")

 Release the corner wherever you want.")


16 6a Build: Walls and Rooms Walls are very interactive elements. You can adjust your room shape by splitting and dragging walls or wall corners. In a few examples we explain the basic functionality. Create an alcove 1) Click on a wall segment, and press this icon to split the wall Create a wall on an angle 1) Move your mouse over a wall corner, click and drag it to change the wall angle. 2) Click a bit further on a wall segment, and press this icon to split the wall again 2) Release the corner wherever you want. 3) Now you can click and drag the new wall segment in the middle. Release your mouse to form your alcove. Tip: the blue arrow indicates the distance to the opposite wall. While you are dragging, you can type in the size this distance should have, and confirm by ENTER. That s a quick way to get an exact dimension. Create a curved wall 1) Click a wall segment. Then click the curve icon and move your mouse to curve the wall. 2) Release your mouse when your satisfied with the curve. Tip: to uncurve the wall, click the curve icon again and move your mouse. The wall will snap to a straight line. page 16 of 50


 If the space is not enclosed anymore by this action, the floor will disappear.")
17 6a Build: Walls and Rooms Draw wall from point 1) click on a wall segment where you want to start a wall. Then click the third icon. Removing a wall segment 1) Click on a wall segment, and press the fourth icon to remove the segment. 2) Move your mouse to where you want your wall to end and click again. 2) If the space is not enclosed anymore by this action, the floor will disappear. If two rooms are connected this way, the two separate floors merge into one. page 17 of 50

 Click on the thickest wall segment that creates a jump.")
18 6a Build: Walls and Rooms When working with different wall thicknesses, you may encounter situations when the wall inside a room jumps due to this thickness difference. To solve this, we ve introduced an option to move the wall perpendicular to the axis. Move wall across axis 1) Click on the thickest wall segment that creates a jump. 3) Then hit Escape or click the cross to exit the wall menu. Your change will be applied. 2) Move the slider called move wall across axis page 18 of 50

 First draw the exterior walls of your")
 After setting the correct slope for the exterior")


19 6a Build: Walls and Rooms: Wall corners: create sloped walls Drawing sloped walls is done by adjusting the height of wall corners 4) View 3D to see the result Drawing room 1) First draw the exterior walls of your floor plan. 5) After setting the correct slope for the exterior walls, use the wall by wall tool to create your inner rooms. 2) Click in the canvas and drag your mouse in the direction you want your wall. Tip: Start and end each room on an exterior walls if possible. The walls you draw will inherit the wall height at the point where you connect with the exterior walls. 3) Repeat this to any corner of your room. Tip: guidelines will help you find the end of a room or vertical or horizontal direction 4) View 3D to see the result page 19 of 50


 To finish your surface, on the first point or press ESC on your")
 Click the surface room icon and choose your")


20 6b Build: Surfaces To create a surface without walls, we have a surface tool. You can create surface shapes for various purposes. For instance for outdoor spaces, for areas within your room, to create sloped surfaces like roofs or to create a hole in a floor (for downward stairs). 3) To finish your surface, on the first point or press ESC on your keyboard. Draw a surface shape 1) Click the surface room icon and choose your surface type you want to draw (optional) 2) Click and drag on each place in the canvas where you want a surface corner. 4) You can drag edges and corners to reshape your surface, or drag the white dots to create a curved edge. Tip: To have an exact edge length, type in the desired size and hit ENTER. 5) Click on a surface edge to add a corner. Click on a corner to remove or edit the height. page 20 of 50


21 6b Build: Surfaces: sloped and elevated surfaces Surfaces are drawn by default on floor level. In some cases you want a surface at a higher level, or a sloped surface. For instance for gardens, for custom ceilings or roofs. Elevated surface Click the surface shap you drew. Use the raise slider in the sidebar to raise the entire surface to the desired height. Sloped surface Click the surface shap you drew. Then click on each corner that should have an elevation and move the raise slider in the sidebar. Click 3D to check out how it looks Click 3D to check out how it looks Tip: divide your sloped surfaces in parts to make sure the 3D geometry will display correctly. Use separate rectangles or triangles next to each other for each section that has a slope. page 21 of 50
22 6b Build: Surfaces: cutouts With surfaces you can create a hole in the floor to have for instance a staircase coming up from the floor below. more will follow page 22 of 50


23 6b Build: Surfaces: sloped ceilings Follow these steps to create a sloped ceiling in your room with a correct ceiling surface. 2 Lower the wall corners where necessary. 1 Draw a room, split the walls where they should start to go downwards. 3 Check the 3D view: you see that the automatic ceilings is showing up incorrectly. Check this option off in the 3D view settings. We ll draw them manually. page 23 of 50


24 6b Build: Surfaces: sloped ceilings 4 Draw the first sloped ceiling surface. Click the corners that should be low, and set the elevation. 6 Now we ll create the ceiling surface manually. Draw a surface covering the entire room. Select it and give it an elevation at your wall level. Do this for the high corners too. 7 Click the camera icon or 3D icon. 5 Draw the second sloped ceiling surface. Click the corners and raise them to the desired height. page 24 of 50

 From the list, drag and drop your door or")
 Click on the doors or windows")


 Set the width, height and raise from the")
25 6c Build: Doors and Windows Doors and windows are placed on a wall, and can be modified in size. They work in the same way. 3) From the list, drag and drop your door or window onto a wall. Adding doors 1) Click on the doors or windows icon 2) You can view the list of doors or windows in 2D top view or 3D view. 4) Click the door or window to adjust the wall side, hinge side and an option to duplicate and remove. 5) Set the width, height and raise from the floor in the side bar. You can also pick a color for the window frame door frame and door. page 25 of 50

 From the list, drag and drop your element into")
 Click on the structures icon")

26 6d Build: Structures The structures library has a selection of objects that can be used as architectural elements in your plan. 3) From the list, drag and drop your element into your plan. Adding structures 1) Click on the structures icon 2) You can view the list of structures in 2D top view or 3D view. 4) Click the item to adjust the dimensions, rotate or mirror the object. page 26 of 50


27 6d Build: Structures 5) Check in 3D or camera view your plan. In this example we used several elements from the structures set: Folding stairs Ceiling beam Wood stove Tip: the Structures is just a selection. We have much more achitectural items in our furniture library divided in categories and subcategories. Search the architecture collections on for instance staircase or fireplace and you will get a lot more results. page 27 of 50

 Your text label appears directly in your plan and you can type and format your label in the sidebar.")
28 6e Build: Text Label You can use a text label to add comments, or extra information toe a plan. Text can be colored, rotated etc. In the example we ll show where you can use text labels 1) Click on the text label icon combine text label with a line to add a remark somewhere. 2) Your text label appears directly in your plan and you can type and format your label in the sidebar. Use a rotated text label with a dashdotted line to indicate the height of a sloping ceiling. page 28 of 50
 Click on the line icon or hit l 2) You can setup the line appearence the side bar.")

29 6f Build: Lines You draw lines to indicate something in your plan. In an example we ll show where you can use lines 1) Click on the line icon or hit l 2) You can setup the line appearence the side bar. Click, drag and release in your canvas to draw your line. Tip: type in the length you want your line to be while you are dragging your mouse, and hit Enter to confirm. 3) Select a line to remove it with the trash bin, or change its appearance in the side bar. Use a dashdotted line to indicate the height of a sloping ceiling. page 29 of 50

30 6g Build: Dimension lines Floorplanner generates autmotic dimensions around your walls. This will give you direct cntroll over the size of your rooms, but also decrease the time you need for getting a dimensioned floorplan. Mostly the auto generated dimensions will suffice. But sometimes you miss one or you want to alter the automatic densions lines. You can change the room size by clicking on a dimension line and typing the size you need. Use one of the arrow buttons to indicate which wall to move. For adding a custom dimension line, see the next page. If you re done with your plan, and you just want to change some of the auto generated dimension lines, then you can convert them all to custom dimension lines. See page 35 Inner wall dimensions Exterior wall dimensions page 30 of 50
 Click on the line icon or hit l In the example we show where you can use custom dimension lines to supplement te automated dimension lines.")
 Select Dimension in the side bar 3) Draw a dimension line by click, drag and release in your canvas.")
31 6g Build: Custom Dimension lines You draw custom dimension lines if the automatic dimension lines don t show up where you want them to. 1) Click on the line icon or hit l In the example we show where you can use custom dimension lines to supplement te automated dimension lines. Dimensions of rooms that don t appear as auto-dimensions, can be drawn as a custom dimension line. 2) Select Dimension in the side bar 3) Draw a dimension line by click, drag and release in your canvas. Tip: type in the length you want your line to be while you are dragging your mouse, and hit Enter to confirm. Some dimension lines like this one, you would want to merge. First convert your generated dimensions to separate dimension. (see page...) Then you can delete one and modify the other. page 31 of 50

32 6g Build: Custom dimension lines You can change custom dimension lines after you draw them. Edit a custom dimension line 1) Click on the dimension line you want to change. Select the dimension value to edit. Tip: You can distinguish a custom dimension line from a generated dimension line by the blue dots on either side and the presence of a trashbin. 2) Type in the size you want the dimension line to be. Then click on one of the arrows buttons to move one of the arrowhead to it s new position. 3) Your dimension is altered. You can also use the blue dots to move the line. page 32 of 50


 Click on the roomtypes icon 2)")

 From the list, drag and drop your roomtypes onto")
 You can set the size of roomtypes to make")
33 6h Build: Roomtypes A floorplan with roomtypes assigned to each space is better readable. These roomtypes can also help you to find furniture for each room. 4) Apply as many room types as you need. Applying room types 1) Click on the roomtypes icon 2) You can select a set of room types. Tip: with a Pro account you can create your own set of room types that you frequently need. 3) From the list, drag and drop your roomtypes onto the room surfaces. 5) You can set the size of roomtypes to make readability even better. 6) If you select a surface you ll find that you can remove a room type in the side bar. page 33 of 50


 Click on the icon 2) Select the")
 From the list, drag and drop")
34 6i Build: Icons and Symbols We have a library of symbols for electric plans, plumbing plans etc, and also a set of icons to make legends, create emergency plans or other purposes like wayfinding. 1) Click on the icon 2) Select the set of icons you need. 3) From the list, drag and drop your icon into your plan. page 34 of 50


35 6j: Build: Tape Measure To measure a distance of anything in your plan, use the tape measure. 1) Click on the icon 2) Click and drag anywhere in your plan to measure a distance. Tip: hold s to disable snapping page 35 of 50


36 6k: Build: Background image If you have an image of your floorplan already, you can upload it and trace it to draw your floorplan quicker and more accurate. 1) Click on the furniture tab 4) First rotate the image if necessary so most of the walls are horizontal and vertical. Set your units to meter or feet in the view settings. Click Set scale to scale your drawing. 2) Click upload to your drawing 3) Navigate to your file and upload it. It has to be a PNG JPG or PDF image. You ll see these options: 5) Zoom in to something in your plan of which you know the distance. Click on both sides of this element to draw a line and enter the distance and press OK. page 36 of 50


37 6k: Build: Backdrop image 6) Now your background is scaled. Zoom out to start tracing. 7) Click the room tool and set your wall thickness to correspond to the wall thickness of your exterior walls. Then start out by tracing the exterior walls. Proceed after that with your interior walls. page 37 of 50


 You can change the size and appearance of your dimensions")
 You can toggle this switch on and off to see which")
38 6l: Build: Dimension Settings Floorplanner generates autmotic dimensions around your walls. D 1) Click on the Dimension settings icon 5) Now you can select and remove or modify the dimensions without affecting your rooms. 2) You can change the size and appearance of your dimensions in the top. 3) You can toggle this switch on and off to see which dimensions are auto-generated. 4) Convert your generated dimensions to custom dimensions with the blue button page 38 of 50


39 6m: Build: Mirror or Rotate entire plan At any time you can rotate or mirror your entire plan. 1) Click on the Rotate icon 2) Use the slider or text input stepper to rotate your plan. 3) Use the toggles in the bottom to mirror the entire plan vertically or horizontally. page 39 of 50


40 7a Decorate: Colors Make your floorplan alive! You can apply colors or materials to rooms, surfaces and walls. Apply colors 1) Click the paintbrush icon to open the decorate mode and choose Paint. Pick your own color Click on the button and enter or paste a RGB hexcode to generate a custom color. You can drag and drop that on a room, wall or surface. Find colors by picking a hue, then drag a teint of the list below and drop it on a room, wall or surface. NB: for rooms and surfaces, colors will only show in 2D when the material view is set on in the 2D view settings. page 40 of 50

 Select one of the icons to choose a material category: Wood Carpet Stone Tiles Wallpaper Outdoor materials")
41 7b Decorate: Materials Apply materials 1) Choose Materials 4) Drag the material and drop it on top of a room or surface. To color a wall: you hold it over a wall segment. Then drop it on either of the circles appearing next to it. 2) Select one of the icons to choose a material category: Wood Carpet Stone Tiles Wallpaper Outdoor materials 3) Scroll through the list, or do a search on the selected category. page 41 of 50

 Click on the furniture tab 2) Specify a search, like table or glass 3) To narrow your")
 Drag and drop an item into your plan.")
42 8a: Furniture library We have a huge library of furniture items in floorplanner. You can find the items you need by doing a search, or by selecting a category to refine and sub category to refine your search. 1) Click on the furniture tab 2) Specify a search, like table or glass 3) To narrow your search findings, select a category, and subcategory, or just scroll through the list. 4) Drag and drop an item into your plan. 5) After you select this item, you can find related items in the sidebar, or click to edit the dimensions. page 42 of 50
 Just click on mulitple items after each other to make a temporary group. 2) Hold Shift and drag a rectangle around the items you want to add.")
43 8b: Selecting Furniture You can select multiple pieces of furniture to perform quick actions on all of them. There are 2 ways 1) Just click on mulitple items after each other to make a temporary group. 2) Hold Shift and drag a rectangle around the items you want to add. Now you can delete, or duplicate this group, or move it by dragging the rectangle, or rotate them with the slider. page 43 of 50
44 9 Project Actions When your floorplan is ready, there are several ways you can present or share it with others. These can be found under the Actions button. 1) Click on action button. a: Export to 2D or 3D b: Share a link to your floorplan, embed it in a website, or make it private c: Collaborate on your plan with someone else d: Download your plan as a.fml file e: Get a list of products that you used in your plan. page 44 of 50
45 9 a: Project Actions: Export 2D You can export your plan to a 2D plan. Exports will be sent to an address. Available formats are JPG, PNG or PDF. The export will show as your current view 2D settings. page 45 of 50

46 9 b: Project Actions: Export 3D You can export your plan to a 3D plan. Exports will be sent to an address. Available formats are JPG, PNG or PDF. The export will show as in your current view 3D settings. page 46 of 50


47 9 c: Project Actions: Share You can share your plan in a Viewer or as a Spaceplanner. Share in a viewer as a separate page or embedded in a website. Someone can view each floor in 2D and 3D and zoom in and out, but can t add any furniture, modify or save anything. To share the project in a viewer it must be set to public Share in a Spaceplanner: Let someone play around with the plan and furnish it with a limited set of furniture. A link to the plan is sent by chat or by . The original plan is not changed when a user saves a layout, the user receives a copy by . (no need for a floorplanner account) page 47 of 50

48 9 d: Project Actions: Collaborate The Collaborate option lets you give someone else the option to edit your project for 14 days. He or she gets full controll over the project in the editor, without need of a floorplanner account. Any changes saved will be saved to the original project. page 48 of 50
49 10: Keyboard shortcuts Learn to use these shortcuts to speed up your drawing. Some shortcuts are essential for drawing. Function Key(s) Mode Function Key(s) Mode Exit mode esc Drawing or selected item Draw wall w In 2D view Delete items del or backspace While item is selected Draw room r In 2D view Disable snap s Hold while drawing or moving stuff Draw surface f In 2D view Move around In Camera or 3D view Add text t In 2D view Move item 1 step While item is selected Draw dimension d In 2D view Rectangle select shift Click and drag mouse in canvas Draw line l In 2D view Hide/show drawing b While tracing background image Tape measure m In 2D view Tip: Get accustomed to hold 1 hand on your mouse, keep the other on your keyboard. Also, typing in values is usually quicker than using the sliders. page 49 of 50

50 11: More help If you are still in need of some guidence using floorplanner: We also have a series of Youtube movies with which you can learn how to use floorplanner. Go to youtube.com/floorplanner Any questions still unanswered? Try our contact form: floorplanner.com/contact page 50 of 50
Floorplanner Drawing Manual
 Floorplanner Floorplanner Drawing Manual Drawing Manual Floorplanner lets you easily create interactive floorplans and publish them online. This manual explains the floorplanner drawing tool. For details
House Design Tutorial
 House Design Tutorial This House Design Tutorial shows you how to get started on a design project. The tutorials that follow continue with the same plan. When you are finished, you will have created a
House Design Tutorial
 Chapter 2: House Design Tutorial This House Design Tutorial shows you how to get started on a design project. The tutorials that follow continue with the same plan. When you are finished, you will have
House Design Tutorial
 Chapter 2: House Design Tutorial This House Design Tutorial shows you how to get started on a design project. The tutorials that follow continue with the same plan. When we are finished, we will have created
House Design Tutorial
 Chapter 2: House Design Tutorial This House Design Tutorial shows you how to get started on a design project. The tutorials that follow continue with the same plan. When you are finished, you will have
House Design Tutorial
 House Design Tutorial This House Design Tutorial shows you how to get started on a design project. The tutorials that follow continue with the same plan. When you are finished, you will have created a
EG1003 Help and How To s: Revit Tutorial
 EG1003 Help and How To s: Revit Tutorial Completion of this tutorial is required for Milestone 1. Include screenshots of it in your Milestone 1 presentation. Downloading Revit: Before beginning the tutorial,
Kitchen and Bath Design Tutorial
 Kitchen and Bath Design Tutorial This tutorial continues where the Interior Design Tutorial left off. You should save this tutorial using a new name to archive your previous work. The tools and techniques
Getting Started. with Easy Blue Print
 Getting Started with Easy Blue Print User Interface Overview Easy Blue Print is a simple drawing program that will allow you to create professional-looking 2D floor plan drawings. This guide covers the
Kitchen and Bath Design Tutorial
 Kitchen and Bath Design Tutorial This tutorial continues where the Interior Design Tutorial left off. You should save this tutorial using a new name to archive your previous work. The tools and techniques
Chief Architect X3 Training Series. Layers and Layer Sets
 Chief Architect X3 Training Series Layers and Layer Sets Save time while creating more detailed plans Why do you need Layers? Setting up Layer Lets Adding items to layers Layers and Layout Pages Layer
Roof Tutorial Wall Specification
 Roof Tutorial The majority of Roof Tutorial describes some common roof styles that can be created using settings in the Wall Specification dialog and can be completed independent of the other tutorials.
Sketch-Up Guide for Woodworkers
 W Enjoy this selection from Sketch-Up Guide for Woodworkers In just seconds, you can enjoy this ebook of Sketch-Up Guide for Woodworkers. SketchUp Guide for BUY NOW! Google See how our magazine makes you
ARCHICAD Introduction Tutorial
 Starting a New Project ARCHICAD Introduction Tutorial 1. Double-click the Archicad Icon from the desktop 2. Click on the Grey Warning/Information box when it appears on the screen. 3. Click on the Create
Training Guide 1 Basic Construction Overview. (v1.1)
") Training Guide 1 Basic Construction Overview (v1.1) Contents Training Guide 1 Basic Construction Overview... 1 Creating a new project... 3 Entering Measurements... 6 Adding the Walls... 10 Inserting Doors
Training Guide 1 Basic Construction Overview (v1.1) Contents Training Guide 1 Basic Construction Overview... 1 Creating a new project... 3 Entering Measurements... 6 Adding the Walls... 10 Inserting Doors
Kitchen and Bath Design Tutorial
 Kitchen and Bath Design Tutorial This tutorial continues where the Interior Design Tutorial left off. You should save this tutorial using a new name to archive your previous work. The tools and techniques
Learning Guide. ASR Automated Systems Research Inc. # Douglas Crescent, Langley, BC. V3A 4B6. Fax:
 Learning Guide ASR Automated Systems Research Inc. #1 20461 Douglas Crescent, Langley, BC. V3A 4B6 Toll free: 1-800-818-2051 e-mail: support@asrsoft.com Fax: 604-539-1334 www.asrsoft.com Copyright 1991-2013
AreaSketch Pro Overview for ClickForms Users
 AreaSketch Pro Overview for ClickForms Users Designed for Real Property Specialist Designed specifically for field professionals required to draw an accurate sketch and calculate the area and perimeter
ACI Sketch. Copyright October 2008, ACI All Rights Reserved. 24 Old Kings Road North Palm Coast, FL appraiserschoice.com
 ACI Sketch Copyright October 2008, ACI All Rights Reserved 24 Old Kings Road North Palm Coast, FL 32137 appraiserschoice.com 800.234.8727 ACI Sketch Contents Getting Started 1 Working with the Grid 2 Unit
S206E Lecture 6, 5/18/2016, Rhino 3D Architectural Modeling an overview
 Copyright 2016, Chiu-Shui Chan. All Rights Reserved. S206E057 Spring 2016 This tutorial is to introduce a basic understanding on how to apply visual projection techniques of generating a 3D model based
Architecture 2012 Fundamentals
 Autodesk Revit Architecture 2012 Fundamentals Supplemental Files SDC PUBLICATIONS Schroff Development Corporation Better Textbooks. Lower Prices. www.sdcpublications.com Tutorial files on enclosed CD Visit
SMALL OFFICE TUTORIAL
 SMALL OFFICE TUTORIAL in this lesson you will get a down and dirty overview of the functionality of Revit Architecture. The very basics of creating walls, doors, windows, roofs, annotations and dimensioning.
ARCHLine.XP Interior Windows. Learning Interior. Learning material for the basics of ARCHLine.XP Interior. ARCHLine.
 ARCHLine.XP Interior 2010 Windows Learning Interior Learning material for the basics of ARCHLine.XP Interior ARCHLine.XP Interior Information in this document is subject to change without notice and does
A Quick Spin on Autodesk Revit Building
 11/28/2005-3:00 pm - 4:30 pm Room:Americas Seminar [Lab] (Dolphin) Walt Disney World Swan and Dolphin Resort Orlando, Florida A Quick Spin on Autodesk Revit Building Amy Fietkau - Autodesk and John Jansen;
BIM - ARCHITECTUAL IMPORTING A SCANNED PLAN
 BIM - ARCHITECTUAL IMPORTING A SCANNED PLAN INTRODUCTION In this section, we will demonstrate importing a plan created in another application. One of the most common starting points for a project is from
Introduction to Autodesk Inventor for F1 in Schools (Australian Version)
") Introduction to Autodesk Inventor for F1 in Schools (Australian Version) F1 in Schools race car In this course you will be introduced to Autodesk Inventor, which is the centerpiece of Autodesk s Digital
Introduction to Autodesk Inventor for F1 in Schools (Australian Version) F1 in Schools race car In this course you will be introduced to Autodesk Inventor, which is the centerpiece of Autodesk s Digital
User Manual for HoloStudio M4 2.5 with HoloMonitor M4. Phase Holographic Imaging
 User Manual for HoloStudio M4 2.5 with HoloMonitor M4 Phase Holographic Imaging 1 2 HoloStudio M4 2.5 Software instruction manual 2013 Phase Holographic Imaging AB 3 Contact us: Phase Holographic Imaging
Deck Tutorial. Decks and Porches. Drawing Decks
 Deck Tutorial The Deck Tutorial continues where the Landscaping Tutorial left off, and explains how to create a deck off the back of the house and connect it to the terrain with an exterior staircase.
Deck Tutorial. Chapter 8: Decks and Porches
 Chapter 8: Deck Tutorial Now we ll continue where the Landscaping Tutorial left off and create a deck off the back of the house, connecting it to the terrain with an exterior staircase. You may want to
Cricut Design Space App for ipad User Manual
 Cricut Design Space App for ipad User Manual Cricut Explore design-and-cut system From inspiration to creation in just a few taps! Cricut Design Space App for ipad 1. ipad Setup A. Setting up the app B.
Ornamental Pro 2004 Instruction Manual (Drawing Basics)
") Ornamental Pro 2004 Instruction Manual (Drawing Basics) http://www.ornametalpro.com/support/techsupport.htm Introduction Ornamental Pro has hundreds of functions that you can use to create your drawings.
Ornamental Pro 2004 Instruction Manual (Drawing Basics) http://www.ornametalpro.com/support/techsupport.htm Introduction Ornamental Pro has hundreds of functions that you can use to create your drawings.
Deck Tutorial. Chapter 6: Decks and Porches
 Chapter 6: Deck Tutorial Now we ll continue where the Landscaping Tutorial left off and create a deck off the back of the house, connecting it to the terrain with an exterior staircase. You may want to
New Sketch Editing/Adding
 New Sketch Editing/Adding 1. 2. 3. 4. 5. 6. 1. This button will bring the entire sketch to view in the window, which is the Default display. This is used to return to a view of the entire sketch after
MODEL SETUP FOR RENOVATION PROJECTS INSTRUCTIONS AND TUTORIALS
 MODEL SETUP FOR RENOVATION PROJECTS INSTRUCTIONS AND TUTORIALS WHAT S INSIDE INTRODUCTION 1 PART ONE LAYERS AND CLASSES FOR RENOVATION PROJECT 1 OVERVIEW 1 SETTING UP LAYERS AND CLASSES 1 CREATING OBJECT
Photoshop CS6 automatically places a crop box and handles around the image. Click and drag the handles to resize the crop box.
 CROPPING IMAGES In Photoshop CS6 One of the great new features in Photoshop CS6 is the improved and enhanced Crop Tool. If you ve been using earlier versions of Photoshop to crop your photos, you ll find
ACAD-BAU TUTORIAL For BricsCAD platform
 ACAD-BAU TUTORIAL WWW.ARHINOVA.SI For BricsCAD platform August 06 WORKSPACE ACAD-BAU RIBBON ACAD-BAU CONTROL BAR F ACAD-BAU PALETTES BASIC SETTINGS Use New command and open the template called ACB_International.DWT.
EPS to Rhino Tutorial.
 EPS to Rhino Tutorial. In This tutorial, I will go through my process of modeling one of the houses from our list. It is important to begin by doing some research on the house selected even if you have
Drawing with precision
 Drawing with precision Welcome to Corel DESIGNER, a comprehensive vector-based drawing application for creating technical graphics. Precision is essential in creating technical graphics. This tutorial
Autodesk Medical Center
 Autodesk Medical Center Page 1 Contents Autodesk Medical Center... 1 Revit Projects... 3 Exercise 1 Create a new project file... 3 Datum Elements... 4 Exercise 2 Add Grids... 5 Exercise 3 Edit Levels...
Deck Tutorial. Decks and Porches. Drawing Decks
 Deck Tutorial The Deck Tutorial continues where the Landscaping Tutorial left off, and explains how to create a deck off the back of the house and connect it to the terrain with an exterior staircase.
Creating Photo Borders With Photoshop Brushes
 Creating Photo Borders With Photoshop Brushes Written by Steve Patterson. In this Photoshop photo effects tutorial, we ll learn how to create interesting photo border effects using Photoshop s brushes.
Materials Tutorial. Chapter 6: Setting Materials Defaults
 Setting Materials Defaults Chapter 6: Materials Tutorial Materials display on the surfaces of objects in 3D views and can make a 3D view appear highly realistic. When applied to most objects, material
33-2 Satellite Takeoff Tutorial--Flat Roof Satellite Takeoff Tutorial--Flat Roof
 33-2 Satellite Takeoff Tutorial--Flat Roof Satellite Takeoff Tutorial--Flat Roof A RoofLogic Digitizer license upgrades RoofCAD so that you have the ability to digitize paper plans, electronic plans and
CAD Tutorial. CAD Detail Windows. In this tutorial you ll learn about: CAD Detail Windows Exploding and Modifying a CAD Block
 CAD Tutorial In this tutorial you ll learn about: CAD Detail Windows Exploding and Modifying a CAD Block Creating a New CAD Block CAD Detail from View Creating a Plot Plan CAD Detail Windows CAD Details
Vectorworks / MiniCAD Tutorials
 Vectorworks / MiniCAD Tutorials Tutorial 1: Construct a simple model of a little house Tutorial 2: Construct a 4 view Orthographic drawing of the Model These tutorials are available as Adobe Acrobat 4
Deck Tutorial. Chapter 8: Decks and Porches
 Decks and Porches Chapter 8: Deck Tutorial Now we ll continue where the Landscaping Tutorial left off and create a deck off the back of the house, connecting it to the terrain with an exterior staircase.
1. Reference Guide and Glossary
 1. Reference Guide and Glossary Design Panel New Click the New Icon at any time to create a new project from scratch. Projects Browse, select, and cut projects from the Projects Tab. This includes your
12. Creating a Product Mockup in Perspective
 12. Creating a Product Mockup in Perspective Lesson overview In this lesson, you ll learn how to do the following: Understand perspective drawing. Use grid presets. Adjust the perspective grid. Draw and
AutoCAD 2D. Table of Contents. Lesson 1 Getting Started
 AutoCAD 2D Lesson 1 Getting Started Pre-reqs/Technical Skills Basic computer use Expectations Read lesson material Implement steps in software while reading through lesson material Complete quiz on Blackboard
Apex v5 Assessor Introductory Tutorial
 Apex v5 Assessor Introductory Tutorial Apex v5 Assessor Apex v5 Assessor includes some minor User Interface updates from the v4 program but attempts have been made to simplify the UI for streamlined work
Materials Tutorial. Setting Materials Defaults
 Materials Tutorial Materials display on the surfaces of objects in 3D views and can make a 3D view appear highly realistic. When applied to most objects, material quantities will also be calculated in
COURSE UNIT 3. Plan Creation. Messerli EliteCAD Version
 Messerli EliteCAD Version 13 27.09.2013 COURSE UNIT 3 Plan Creation Switzerland: Austria: Germany: Messerli Informatik AG Messerli Informatik GmbH Messerli Informatik GmbH Pfadackerstrasse 6 Hamoderstraße
PlanSwift 3D Viewer Plugin User Guide
 PlanSwift 3D Viewer Plugin User Guide UPDATED ON 7/13/2018 PlanSwift Authored by: Dave Hansen 1 Table of Contents Overview... 3 Purchasing and Installation... 4 Purchasing Plugins... 4 Installation and
digitization station DIGITAL SCRAPBOOKING 120 West 14th Street
 digitization station DIGITAL SCRAPBOOKING 120 West 14th Street www.nvcl.ca techconnect@cnv.org DIGITAL SCRAPBOOKING With MyMemories Suite 6 The MyMemories Digital Scrapbooking software allows you to create
Kitchen and Bath Design Tutorial
 Adding Cabinets Chapter 5: Kitchen and Bath Design Tutorial This tutorial continues where the Materials Tutorial left off. You should save this tutorial using a new name to archive your previous work.
PRODIM CT 3.0 MANUAL the complete solution
 PRODIM CT 3.0 MANUAL the complete solution We measure it all! General information Copyright All rights reserved. Apart from the legally laid down exceptions, no part of this publication may be reproduced,
Getting Started with. Vectorworks Architect
 Getting Started with Vectorworks Architect Table of Contents Introduction...2 Section 1: Program Installation and Setup...6 Installing the Vectorworks Architect Program...6 Exercise 1: Launching the Program
MODEL SETUP FOR RENOVATION PROJECTS: INSTRUCTIONS AND TUTORIALS
 MODEL SETUP FOR RENOVATION PROJECTS: INSTRUCTIONS AND TUTORIALS TABLE OF CONTENTS INTRODUCTION 1 PART ONE LAYERS AND CLASSES FOR RENOVATION PROJECT 2 OVERVIEW 2 SETTING UP LAYERS AND CLASSES 2 CREATING
Rendering a perspective drawing using Adobe Photoshop
 Rendering a perspective drawing using Adobe Photoshop This hand-out will take you through the steps to render a perspective line drawing using Adobe Photoshop. The first important element in this process
7.0 - MAKING A PEN FIXTURE FOR ENGRAVING PENS
 7.0 - MAKING A PEN FIXTURE FOR ENGRAVING PENS Material required: Acrylic, 9 by 9 by ¼ Difficulty Level: Advanced Engraving wood (or painted metal) pens is a task particularly well suited for laser engraving.
Customized Foam for Tools
 Table of contents Make sure that you have the latest version before using this document. o o o o o o o Overview of services offered and steps to follow (p.3) 1. Service : Cutting of foam for tools 2. Service
Template: Quilter Title Overview: Traditional Application
 Template: Quilter Title Overview: Traditional Application Subject Launching Topic Quilter Open Steps BERNINA Embroidery Software. Select Steps the Quilter icon in the Applications Toolbox to launch Quilter.
Materials Tutorial. Chapter 6: Setting Materials Defaults
 Setting Materials Defaults Chapter 6: Materials Tutorial Materials display on the surfaces of objects in 3D views and can make a 3D view appear highly realistic. When applied to most objects, material
Autodesk University Project Navigator to the Rescue in AutoCAD Architecture: Fix Standard Mismatches in a Project
 Autodesk University Project Navigator to the Rescue in AutoCAD Architecture: Fix Standard Mismatches in a Project Good afternoon. Thank you for choosing the class Project Navigator to the Rescue in AutoCAD
BlopHome Help. How to get started. 1 of 5. If you are not logged in blophome
 How to get started New If you are not logged in blophome Open 1 of 5 My site How to get started New If you are logged in blophome Open 1 of 5 My site How to get started 2 of 5 With one click move and modify
QUICKSTART COURSE - MODULE 1 PART 2
 QUICKSTART COURSE - MODULE 1 PART 2 copyright 2011 by Eric Bobrow, all rights reserved For more information about the QuickStart Course, visit http://www.acbestpractices.com/quickstart Hello, this is Eric
2809 CAD TRAINING: Part 1 Sketching and Making 3D Parts. Contents
 Contents Getting Started... 2 Lesson 1:... 3 Lesson 2:... 13 Lesson 3:... 19 Lesson 4:... 23 Lesson 5:... 25 Final Project:... 28 Getting Started Get Autodesk Inventor Go to http://students.autodesk.com/
GETTING STARTED MAKING A NEW DOCUMENT
 Accessed with permission from http://web.ics.purdue.edu/~agenad/help/photoshop.html GETTING STARTED MAKING A NEW DOCUMENT To get a new document started, simply choose new from the File menu. You'll get
Guidance on Using Scanning Software: Part 5. Epson Scan
 Guidance on Using Scanning Software: Part 5. Epson Scan Version of 4/29/2012 Epson Scan comes with Epson scanners and has simple manual adjustments, but requires vigilance to control the default settings
Introduction. The basics
 Introduction Lines has a powerful level editor that can be used to make new levels for the game. You can then share those levels on the Workshop for others to play. What will you create? To open the level
Inventor-Parts-Tutorial By: Dor Ashur
 Inventor-Parts-Tutorial By: Dor Ashur For Assignment: http://www.maelabs.ucsd.edu/mae3/assignments/cad/inventor_parts.pdf Open Autodesk Inventor: Start-> All Programs -> Autodesk -> Autodesk Inventor 2010
BERNINA Embroidery Software 6 for the Garment-Maker
 BERNINA Embroidery Software 6 for the Garment-Maker BERNINA Embroidery software makes garment-making and embellishing fast and easy using basic tools in the software. Scanning You may choose to use the
Advance Steel. Tutorial
 Advance Steel Tutorial Table of contents About this tutorial... 7 How to use this guide...9 Lesson 1: Creating a building grid...10 Step 1: Creating an axis group in the X direction...10 Step 2: Creating
Overview. The Game Idea
 Page 1 of 19 Overview Even though GameMaker:Studio is easy to use, getting the hang of it can be a bit difficult at first, especially if you have had no prior experience of programming. This tutorial is
AutoCAD 2018 Fundamentals
 Autodesk AutoCAD 2018 Fundamentals Elise Moss SDC PUBLICATIONS Better Textbooks. Lower Prices. www.sdcpublications.com Powered by TCPDF (www.tcpdf.org) Visit the following websites to learn more about
1 Best Practices Course Week 12 Part 2 copyright 2012 by Eric Bobrow. BEST PRACTICES COURSE WEEK 12 PART 2 Program Planning Areas and Lists of Spaces
 BEST PRACTICES COURSE WEEK 12 PART 2 Program Planning Areas and Lists of Spaces Hello, this is Eric Bobrow. And in this lesson, we'll take a look at how you can create a site survey drawing in ArchiCAD
Advance Concrete. Tutorial
 Advance Concrete Tutorial Table of contents About this tutorial... 9 How to use this guide... 10 Lesson 1: Creating a building grid... 11 Step 1: Create a default building grid... 11 Step 2: Set the distances
Landscaping Tutorial. Adding a Driveway Adding Library Objects to Your Plan
 Landscaping Tutorial This tutorial describes how to use Home Designer Pro s Terrain Tools. In it, you will learn how to add elevation information to your terrain, how to create terrain features, and how
Room 2D/3D Diagram Demo
 Room 2D/3D Diagram Demo PART 1) Basic Room Layout (2D) 1) Open the Crash Zone or Crime Zone diagram program. 2) Click on to open the CZ Point Cloud tool. 3) Click on 3D/Cloud Preferences. a) Set the Cloud
THE BEGINNERS GUIDE TO ELITECAD. EliteCAD12AR. Messerli EliteCAD Version
 Messerli EliteCAD Version 12 25.06.2012 THE BEGINNERS GUIDE TO ELITECAD EliteCAD12AR Austria Messerli Informatik GmbH Hamoderstraße 4 4020 Linz info@messerli.at Tel: +43 732 341 574 CAD Hotline: +43 1
Ribbon (Panels) + Options Bar + Contextual Tabs (tools based on selection)
 + Options Bar + Contextual Tabs (tools based on selection)") Week 11 Revit, Basics Building Information Modeling (BIM) - Parametric 3D Model File Types: Projects RVT (template = RTE) Families - RFA (template = RFT), "Symbols" Layout Workspace - Elevation Markers
Week 11 Revit, Basics Building Information Modeling (BIM) - Parametric 3D Model File Types: Projects RVT (template = RTE) Families - RFA (template = RFT), "Symbols" Layout Workspace - Elevation Markers
SolidWorks Tutorial 1. Axis
 SolidWorks Tutorial 1 Axis Axis This first exercise provides an introduction to SolidWorks software. First, we will design and draw a simple part: an axis with different diameters. You will learn how to
Evaluation Chapter by CADArtifex
 The premium provider of learning products and solutions www.cadartifex.com EVALUATION CHAPTER 2 Drawing Sketches with SOLIDWORKS In this chapter: Invoking the Part Modeling Environment Invoking the Sketching
Introduction to 3D Printing. Activity 1: Design a keychain using computer-aided design software
 Introduction to 3D Printing Activity 1: Design a keychain using computer-aided design software 1 In this activity we ll design a keychain name tag and learn the fundamentals of computer-aided design, the
ADOBE PHOTOSHOP CS 3 QUICK REFERENCE
 ADOBE PHOTOSHOP CS 3 QUICK REFERENCE INTRODUCTION Adobe PhotoShop CS 3 is a powerful software environment for editing, manipulating and creating images and other graphics. This reference guide provides
Apple Photos Quick Start Guide
 Apple Photos Quick Start Guide Photos is Apple s replacement for iphoto. It is a photograph organizational tool that allows users to view and make basic changes to photos, create slideshows, albums, photo
Chief Architect New Feature List
 SYSTEM / PERFORMANCE Chief Architect Premier X4 is available in 64 bit and 32 bit versions. The 64 bit version is more efficient in managing memory and you will see better performance on larger plan files
How to Create Website Banners
 How to Create Website Banners In the following instructions you will be creating banners in Adobe Photoshop Elements 6.0, using different images and fonts. The instructions will consist of finding images,
Annex IV - Stencyl Tutorial
 Annex IV - Stencyl Tutorial This short, hands-on tutorial will walk you through the steps needed to create a simple platformer using premade content, so that you can become familiar with the main parts
REVIT - RENDERING & DRAWINGS
 TUTORIAL L-15: REVIT - RENDERING & DRAWINGS This Tutorial explains how to complete renderings and drawings of the bridge project within the School of Architecture model built during previous tutorials.
Copyrights and Trademarks
 Mobile Copyrights and Trademarks Autodesk SketchBook Mobile (2.0) 2012 Autodesk, Inc. All Rights Reserved. Except as otherwise permitted by Autodesk, Inc., this publication, or parts thereof, may not be
Table of Contents. Lesson 1 Getting Started
 NX Lesson 1 Getting Started Pre-reqs/Technical Skills Basic computer use Expectations Read lesson material Implement steps in software while reading through lesson material Complete quiz on Blackboard
USING BRUSHES TO CREATE A POSTER
 11 USING BRUSHES TO CREATE A POSTER Lesson overview In this lesson, you ll learn how to do the following: Use four brush types: Calligraphic, Art, Bristle, and Pattern. Apply brushes to paths. Paint and
Adobe Photoshop CC 2018 Tutorial
 Adobe Photoshop CC 2018 Tutorial GETTING STARTED Adobe Photoshop CC 2018 is a popular image editing software that provides a work environment consistent with Adobe Illustrator, Adobe InDesign, Adobe Photoshop,
GEO/EVS 425/525 Unit 2 Composing a Map in Final Form
 GEO/EVS 425/525 Unit 2 Composing a Map in Final Form The Map Composer is the main mechanism by which the final drafts of images are sent to the printer. Its use requires that images be readable within
Landscaping Tutorial. Chapter 5:
 Chapter 5: Landscaping Tutorial This tutorial was written to help you learn how to use Home Designer Landscape and Deck s Terrain tools. In this tutorial, you will learn how to add elevation information
Getting Started Guide
 SOLIDWORKS Getting Started Guide SOLIDWORKS Electrical FIRST Robotics Edition Alexander Ouellet 1/2/2015 Table of Contents INTRODUCTION... 1 What is SOLIDWORKS Electrical?... Error! Bookmark not defined.
Tiling. 1. Overlapping tiles with fixed number of tiles. Tutorial
 Tutorial Tiling Software version: Asanti 3.0 Document version: April 3, 2017 This tutorial demonstrates how to use tiling within Asanti. Download the Asanti Sample Files via the Asanti Client (Help > Asanti