EG1003 Help and How To s: Revit Tutorial
|
|
|
- Merilyn Williamson
- 5 years ago
- Views:
Transcription
1 EG1003 Help and How To s: Revit Tutorial Completion of this tutorial is required for Milestone 1. Include screenshots of it in your Milestone 1 presentation. Downloading Revit: Before beginning the tutorial, please download the student version of Revit 2019 on your computer from the Autodesk website ( This version is free, and you should use your NYU to create an Autodesk account. Follow the steps on the page to download Revit. Helpful Mouse Tips: To zoom in and out, scroll with your mouse. To select an object, click the object or click and drag over the object (like in AutoCAD). To select multiple objects, click on one, hold Ctrl, then click the rest of the objects you would like to select. To pan around your view, click and hold your mouse s scroller and move your mouse. In your 3D view, to pan and rotate at the same time, hold Shift, then click and hold your mouse s scroller and move your mouse.
2 2 Table of Contents 1. Introduction Setting Levels/Getting Started Views Building Modifying Objects & Changing Properties Electrical Plan Plumbing Plan Revit to STL... 27

3 3 1. Introduction Open Revit. Under the home page, there is a column on the left side labeled Projects. Select Architectural Template. Each template is for a different type of design. For example, if you want to design a plumbing system, you would open a Mechanical Template. We will be working in the Architectural Template for most of the project. This is your home screen for a project. On the left, there is a column called Properties and below it is a column called Project Browser. At the top of this window is the tool bar. These are where all your tools and properties will be when building your structure.

4 4 2. Setting Levels/Getting Started The most important part of setting up is defining the levels of your project (the story heights for the building). Go to the Project Browser column on the left and double click on East under Elevations. This will open a window that shows the view of the East side of your project. You can switch between any view by double clicking on the level or elevation name. A new window of that view will open (don t worry your first window isn t gone, it s just behind your new view).
 in the toolbar under Datum. For a shortcut, you can also type LL and your cursor will automatically be ready to draw a new level.")
5 5 When your window opens, double click on the current height and name of the existing levels to change them. Remember to check your units when you are typing in numbers! To add a new level, click Level (the black and white circle icon) in the toolbar under Datum. For a shortcut, you can also type LL and your cursor will automatically be ready to draw a new level. To delete a level, just click on it and press Delete on your keyboard. Once you have set your levels, you can start building. Add a new level Adjust current level
6 6 3. Views If you would like to view all your views at once, click the View tab in the toolbar, go to the Windows subtab, and click Tile Views (the icon with one rectangle on top of the other). You can also just type WT on your keyboard as a shortcut. To view your 3D model, go to the View tab in the toolbar, under the Create subtab, and click 3D View (the house icon). When you select one object in your project, it is selected in ALL windows. If you have all windows open at once and select an object, it will be highlighted in each window. This is helpful in locating or viewing certain objects placement. Along the bottom of your window is a toolbar with various symbols. Hover over each symbol to figure out what each one does. The most important functions in this toolbar are the three symbols highlighted below. The first highlighted symbol is the Visual Style of your drawing. The Wireframe view is the most useful style to work in because you can see through all your objects. The second two highlighted symbols work hand in hand. If you would like to hide certain objects while you are drawing, right click on it and click Hide in View. You can also select objects and then click Temporary Hide/Isolate (the glasses symbol) to hide an object. Hiding an element means only hiding the object you selected. Hiding a category means hiding every object that is in the same category as the object you selected (ex: hiding all furniture). The Reveal Hidden Elements function (the lightbulb symbol), when clicked, shows everything that you have hidden in pink, along with your existing structure (like the upside down in Stranger Things!). These two functions are helpful when you want to build on the interior of your structure, but your walls are blocking your vantage point.
7 7

8 8 4. Building In the Project Browser column, go back to Level 1 under Floor Plans. You should always be building from the ground up, so start at Level 1. To start, select the Wall function under Build in the Architecture tab of the toolbar. Build an Architectural Wall. When you click on the function, a new tab called Modify should appear on the far right of the toolbar. This happens for any new structure you select under Build. Click what type of line or shape you would like to draw and draw it on your view. You should probably use the Rectangle tool to build your walls. If you made a mistake in the length of your walls in your initial drawing, you can always double click on the dimension in blue and change it manually by typing in the correct value. Once you are done modifying the wall, press the Esc key.
9 9 After you have created walls for your structure (just on Level 1), you can add floors, ceilings, doors, and windows. Just click on the structure you would like to add and place it on your structure. For floors and ceilings, you will need to provide a boundary that your floor or ceiling will follow. This boundary is the perimeter of your building that you created when you build your walls. Click Floor, and under the Modify tab, it will prompt you to pick a line type to draw your boundary with. Boundary Line should already be automatically selected. Simply click on your walls that you created, then click the green check mark.

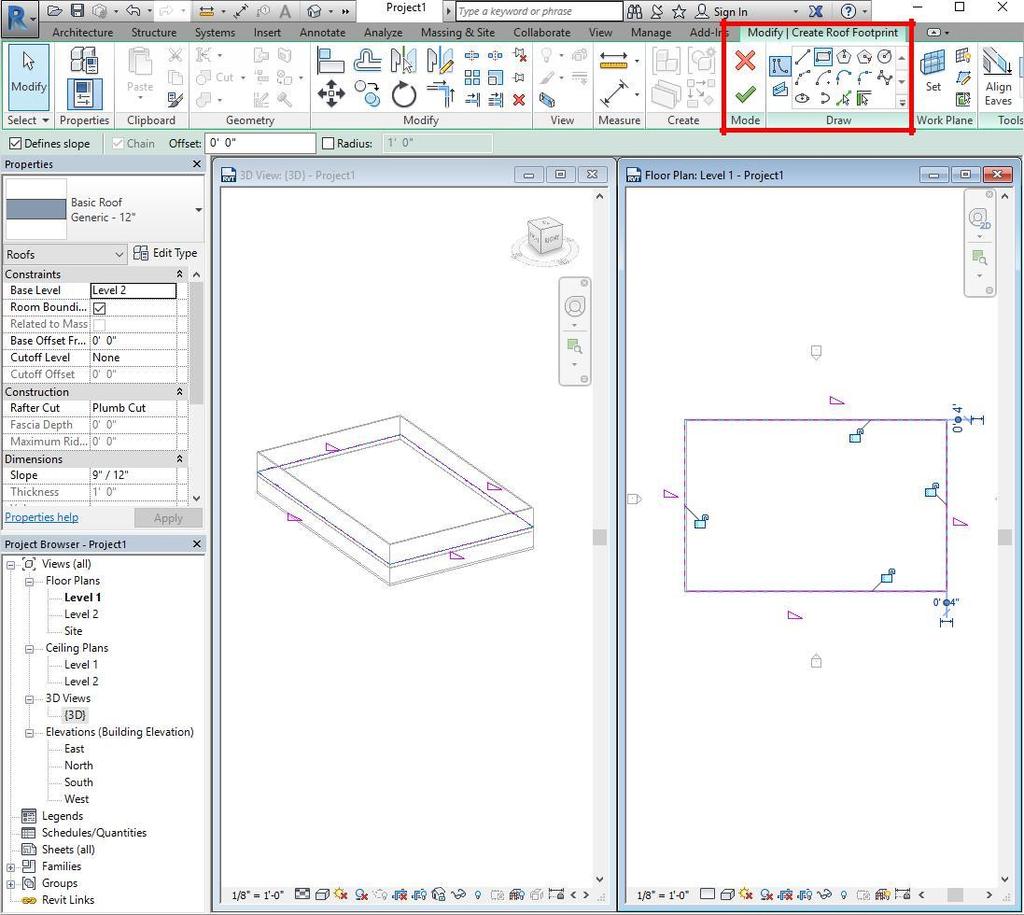
10 10 The procedure for ceilings is almost the exact same. Stay in Level 1 under Floor Plans. After clicking Ceiling under the Architecture tab, it will prompt you to create an Automatic Ceiling or Sketch Ceiling. If you have a simple wall design (such as a single rectangle), you can use an automatic ceiling. If you have a more complex wall design shape, click Sketch Ceiling. The procedure to sketch your ceiling boundary is the same as the floor boundary. When creating the ceiling, a warning might show that says None of the created elements are visible in Floor Plan: Level 1 View. If you ignore this message and go to the 3D view, you can see that the ceiling was created but the view settings were just preventing you from seeing the ceiling in the Floor Plans view. Just ignore the message and move on. NOTE: Do not create your roof until you are completely done with your project and that is the final piece missing. This includes adding stairs, furniture, doors, and windows before creating the roof and ceiling. To insert a roof onto your building, stay in the Level 1 Floor Plan and click Roof in the Architecture tab and draw its footprint around the walls (same as a boundary). Revit will ask if you would like to move the roof you are about to create to the next level (Level 2), so click Yes. After drawing your roof footprint and clicking the green check mark, Revit will ask you if you would like to attach the highlighted walls to the roof. Click Yes. NOTE: You must create ceilings and floors before you build your roof.
11 11

12 12 If you would like to change the height of the roof, you can change the first number in the Slope dimension under the Properties tab. To install stairs, go to the level that you would like your stairs to start on. For this example, we will be starting on Level 1, building stairs up to Level 2. Double click on Level 1 under Floor Plans in the Project Browser column. Select the Stair command in the Architecture tab of the toolbar. Once you ve placed your stairs on Level 1, click the green check mark and navigate to your 3D view. Your stairs are visible but are coming right out of your floor on Level 2. NOTE: To do this next step, you must build a floor on your second level. Double click on the ceiling you created on your first floor (this can be easily done in the 3D View but may be hard to locate in your Level 1 plan view). You should now be in the modify mode for your ceiling.

13 13 Using the compass in the top right of your screen, click on TOP to get an overhead view of your stairs. In the Modify Edit Boundary tab of the toolbar, click the rectangle icon and draw a rectangle around your stairs, so that you make a cut or gap in your floor. Click the green check and do the same procedure for the ceiling. When you ve finished, your stairs should look like this.


14 14 NOTE: This is a 3D view, with one wall temporarily hidden so that you can see inside the building. You can modify your stairs length, height, and other dimensions by double clicking them.

15 15 5. Modifying Objects & Changing Properties When you select an object, its specific properties show up in the Properties column on the left. For example, if you click on a door that is in your structure, the Properties toolbar will show the type of door along with other details. If you would like to change something about the door you are using, click Edit Type. Here you can change dimensions, color, material, and more. If you would like a completely different door (this procedure also applies to windows, walls, columns, etc.), you must go through the process of loading a family. Click Door under the Architecture tab. Under the Modify tab on the toolbar is a command called Load Family. Click it and this window should appear:


16 Navigate through the folders to find which object you would like to load into your project. Once you have clicked it and approved, click Open. Revit will ask you which type/dimensions you want. Select the one you want and click OK. Now when you click the Door command, you will have multiple doors to choose from. If you click the drop down menu under Properties, you will see all of the options you have, including the families you downloaded. 16
17 If you would like to import an object such as a door, chair, tractor, or tree (anything you want!) that is not stored in your computer s Revit family folders that come with the program, simply go to a website called BimObject on a browser. In BimObject, companies upload specifications for objects that they create/manufacture to this website for engineers and architects to use in their designs. Simply make an account on the website and download the files for Revit. You should use your NYU and information to sign-up for an account on the website. After logging in, download the file of the item that you ve picked, and click the Revit version from this pop up: 17


18 18 Open the file for which you just have downloaded off BimObject. You will then be taken back to Revit and the following dialogue appears. Click Upgrade the model. Your file will open, and you should see the object you selected on BimObject as if it were its own model that you can change, just like your building. Go to its 3D view. If you do not see your object and only see a box, that is because each object once downloaded is hidden by a box. Click the box and press delete. You should now see your object. Click Load into Project and you will be able to place it wherever you d like. To find this object and other objects you have loaded into your project, go to the Architecture tab, click Component, and in the Properties panel, if you click the dropdown for the object, all your imported objects should be there. Helpful tip: if you are trying to rotate an object or component, click it so that it is highlighted.


19 19 6. Electrical Plan When creating an electrical plan in Revit, you should make copies of the Floor Plans for which you intend to make an electrical plan. To do this, you right-click on the desired level under Floor Plans in the Project Browser. Then select Duplicate View and Duplicate. After the new Floor Plan is created, right-click Level 1 Copy 1 under Floor Plans in the Project Brower and rename it to Electrical 1. First, it must be noted that in order to add ceiling lights to a level, there needs to be a ceiling on that level. Also, the ceiling has to be a GWB on Mtl. Stud ceiling. You can change this property of the ceiling by selecting the ceiling in the 3D View and changing it in the Properties panel.

20 20 Then, go back to the Electrical 1 floor plan and go to the Properties tab. Change the Range: Base Level from None to Level 1 and change the Underlay Orientation to Look up. Next, you must insert all the desired electrical fixtures in the Electrical 1 floor plan, such as lights and switches. To do this, go to the Insert tab and select the following: Lights: Load Family Lighting MEP Internal/External Switches: Load Family Electrical MEP Electric Power Terminals To insert the switch, under the Project Browser, navigate to Families Lighting Devices Switch. Then drag and drop the switch into the electrical floor plan. It is important to note that the switch needs to be placed on a wall.

21 21 Then, on the Project Browser panel, select the light you want to drag and drop into the floor plan. If you want to place the light on the wall, drag it onto the wall and it will automatically snap on. If you want to add the light onto the ceiling, you need to click Placement then Place on Face. If you followed all the previous instructions correctly, you can now place the light onto the ceiling. Finally, you need to connect all the electrical components with a wire. To do so, go under the Systems tab and select Wire. Once the wire is selected, you can connect all the fixtures by selecting the purple circle with the x through it on the electrical floor plan. Each electrical fixture should have one and you should connect all the points with the wire.
22 Below is a complete electrical plan with all the lights connected to one switch: 22


23 23 7. Plumbing Plan In order to add a plumbing plan to your building, you need to Link your architectural Revit file to a mechanical Revit file. First, save your current file, the original Architectural Template that you ve been working on. Completely close that project (make sure there are no hidden windows of the Architectural Template open) and go back to the homepage where you can choose to start a new project. Start a new Mechanical Template using the toolbar at the top left of the window. A new project will open, and if you look at the Project Browser panel, you ll notice that you still have floor plans and ceiling plans, but they are now labeled 1 Mech, 2 Mech, etc. We will now Link our original Revit model into our new project. Go to the Insert tab on your toolbar and click Link Revit. Select your original project and open it. (Make sure it is not open in any other windows. It will not link if it is open. Remember to use the command WT to see all the windows you have open.)
 must be reinserted in the mechanical template.")
24 24 To create a plumbing plan, make sure you are working under Plumbing and not HVAC. You can insert plumbing fixtures using the same Load Family function you used to insert furniture and lighting. All plumbing fixtures (toilets, sinks, showers, etc.) must be reinserted in the mechanical template. Simply inserting plumbing fixtures over the original file as linking a file does not allow proper access to the fixture. When inserting the fixtures, they should snap into place over the original fixture. Make sure you are inserting MEP plumbing fixtures, not Architectural. Now you must connect all the plumbing fixtures with pipes. To create a pipe, go to Systems and select Pipe.


25 25 Change the diameter of the pipe to 6 and Offset to 0. Also make sure that the system type is set to Sanitary. This can be changed in the Properties panel under the Mechanical section. Create a sanitary pipe by clicking from one corner of the building to the street.
26 26 Select the plumbing fixture you inserted earlier that you would like to connect to the sanitary pipe. Each of the plumbing fixtures has an out pipe option. Select the out option. This will autogenerate a pipe. Change the pipe diameter to the desired size and select Inherit Elevation under Placement Tools in the top toolbar. Connect the out pipe from the plumbing fixture to the sanitary pipe running through the wall. A successful plumbing connection looks like this: Repeat this process for the remaining plumbing fixtures.

27 27 8. Revit to STL When using Revit 2017, the STL Exporter add-in can be used and downloaded using the following link: Win64. Models made on Revit 2019 Student Edition will not be able to convert floor plans using the STL converter and you will have to redraw on Revit 2017 or Fusion. In Revit 2017, to export a floorplan from a Revit file to a STL file, open your Architectural model. Go to the Add-Ins tab, in the STL Exporter Panel, and select STL Exporter for Revit. The following window will appear:
28 Change the units to millimeters, but do not change anything else in the window. Switch from the General tab to the Categories tab. This tab is used to select the items you would like to include in your STL file. Only select floor and walls. Including objects like furniture and stairs will result in a failed print. Click Save. 28
Autodesk Medical Center
 Autodesk Medical Center Page 1 Contents Autodesk Medical Center... 1 Revit Projects... 3 Exercise 1 Create a new project file... 3 Datum Elements... 4 Exercise 2 Add Grids... 5 Exercise 3 Edit Levels...
Autodesk Revit MEP Plumbing: Mystery Solved
 Plamen Hristov Capital Engineering Consultants, Inc The plumbing portion of Revit MEP has the undeserved reputation of not ready yet." We will dispel that notion in this hands-on lab where you will have
Revit Architecture Student Workbook
 Revit Architecture Student Workbook Building Information Modeling with Revit Architecture Contents Introduction... 5 Unit 1... 9 Theory: CAD Versus BIM... 9 Revit Architecture: Introduction, Interface,
SMALL OFFICE TUTORIAL
 SMALL OFFICE TUTORIAL in this lesson you will get a down and dirty overview of the functionality of Revit Architecture. The very basics of creating walls, doors, windows, roofs, annotations and dimensioning.
Revit Structure 2013 Basics
 Revit Structure 2013 Basics Framing and Documentation Elise Moss Supplemental Files SDC P U B L I C AT I O N S Schroff Development Corporation Better Textbooks. Lower Prices. www.sdcpublications.com Tutorial
Floorplanner Editor Manual
 Editor Manual Floorplanner Editor Manual 1 Overview 2 Canvas a 2D view b View Settings 3 3D view a Orbital and walkthrough mode b How to navigate c Adding cameras d Scenery image e Create a render 4 Sidebar
Revit Structure 2014 Basics
 Revit Structure 2014 Basics Framing and Documentation Elise Moss Authorized Author SDC P U B L I C AT I O N S Better Textbooks. Lower Prices. www.sdcpublications.com Powered by TCPDF (www.tcpdf.org) Visit
Revit Structure 2012 Basics:
 SUPPLEMENTAL FILES ON CD Revit Structure 2012 Basics: Framing and Documentation Elise Moss autodesk authorized publisher SDC PUBLICATIONS www.sdcpublications.com Schroff Development Corporation Structural
A Quick Spin on Autodesk Revit Building
 11/28/2005-3:00 pm - 4:30 pm Room:Americas Seminar [Lab] (Dolphin) Walt Disney World Swan and Dolphin Resort Orlando, Florida A Quick Spin on Autodesk Revit Building Amy Fietkau - Autodesk and John Jansen;
REVIT - RENDERING & DRAWINGS
 TUTORIAL L-15: REVIT - RENDERING & DRAWINGS This Tutorial explains how to complete renderings and drawings of the bridge project within the School of Architecture model built during previous tutorials.
Getting Started with. Vectorworks Architect
 Getting Started with Vectorworks Architect Table of Contents Introduction...2 Section 1: Program Installation and Setup...6 Installing the Vectorworks Architect Program...6 Exercise 1: Launching the Program
2809 CAD TRAINING: Part 1 Sketching and Making 3D Parts. Contents
 Contents Getting Started... 2 Lesson 1:... 3 Lesson 2:... 13 Lesson 3:... 19 Lesson 4:... 23 Lesson 5:... 25 Final Project:... 28 Getting Started Get Autodesk Inventor Go to http://students.autodesk.com/
Getting Started. with Easy Blue Print
 Getting Started with Easy Blue Print User Interface Overview Easy Blue Print is a simple drawing program that will allow you to create professional-looking 2D floor plan drawings. This guide covers the
Drawing 8e CAD#11: View Tutorial 8e: Circles, Arcs, Ellipses, Rotate, Explode, & More Dimensions Objective: Design a wing of the Guggenheim Museum.
 Page 1 of 6 Introduction The drawing used for this tutorial comes from Clark R. and M.Pause, "Precedents in Architecture", VNR 1985, page 135. Stephen Peter of the University of South Wales developed the
House Design Tutorial
 House Design Tutorial This House Design Tutorial shows you how to get started on a design project. The tutorials that follow continue with the same plan. When you are finished, you will have created a
House Design Tutorial
 Chapter 2: House Design Tutorial This House Design Tutorial shows you how to get started on a design project. The tutorials that follow continue with the same plan. When you are finished, you will have
1. Creating geometry based on sketches 2. Using sketch lines as reference 3. Using sketches to drive changes in geometry
 4.1: Modeling 3D Modeling is a key process of getting your ideas from a concept to a read- for- manufacture state, making it core foundation of the product development process. In Fusion 360, there are
House Design Tutorial
 Chapter 2: House Design Tutorial This House Design Tutorial shows you how to get started on a design project. The tutorials that follow continue with the same plan. When you are finished, you will have
Kitchen and Bath Design Tutorial
 Adding Cabinets Chapter 5: Kitchen and Bath Design Tutorial This tutorial continues where the Materials Tutorial left off. You should save this tutorial using a new name to archive your previous work.
House Design Tutorial
 House Design Tutorial This House Design Tutorial shows you how to get started on a design project. The tutorials that follow continue with the same plan. When you are finished, you will have created a
Architecture 2012 Fundamentals
 Autodesk Revit Architecture 2012 Fundamentals Supplemental Files SDC PUBLICATIONS Schroff Development Corporation Better Textbooks. Lower Prices. www.sdcpublications.com Tutorial files on enclosed CD Visit
HVAC in AutoCAD MEP: New and Improved. David Butts Gannett Fleming MP3724-L. Learning Objectives. At the end of this class, you will be able to:
 David Butts Gannett Fleming MP3724-L In the Building Information Modeling (BIM) world, there are still many users who have AutoCAD MEP but aren't ready to make the move to Autodesk Revit for a variety
Training Guide 1 Basic Construction Overview. (v1.1)
") Training Guide 1 Basic Construction Overview (v1.1) Contents Training Guide 1 Basic Construction Overview... 1 Creating a new project... 3 Entering Measurements... 6 Adding the Walls... 10 Inserting Doors
Training Guide 1 Basic Construction Overview (v1.1) Contents Training Guide 1 Basic Construction Overview... 1 Creating a new project... 3 Entering Measurements... 6 Adding the Walls... 10 Inserting Doors
Modeling an Airframe Tutorial
 EAA SOLIDWORKS University p 1/11 Difficulty: Intermediate Time: 1 hour As an Intermediate Tutorial, it is assumed that you have completed the Quick Start Tutorial and know how to sketch in 2D and 3D. If
Making Your World with the Aurora Toolset
 Making Your World with the Aurora Toolset The goal of this tutorial is to build a very simple module to ensure that you've picked up the necessary skills for the other tutorials. After completing this
CAD Tutorial. CAD Detail Windows. In this tutorial you ll learn about: CAD Detail Windows Exploding and Modifying a CAD Block
 CAD Tutorial In this tutorial you ll learn about: CAD Detail Windows Exploding and Modifying a CAD Block Creating a New CAD Block CAD Detail from View Creating a Plot Plan CAD Detail Windows CAD Details
Kitchen and Bath Design Tutorial
 Kitchen and Bath Design Tutorial This tutorial continues where the Interior Design Tutorial left off. You should save this tutorial using a new name to archive your previous work. The tools and techniques
Toothbrush Holder. A drawing of the sheet metal part will also be created.
 Prerequisite Knowledge Previous knowledge of the following commands is required to complete this lesson; Sketch (Line, Centerline, Circle, Add Relations, Smart Dimension,), Extrude Boss/Base, and Edit
Introduction to Revit Constructing Architect education 1 st semester.
 Introduction to Revit 2013-15 Constructing Architect education 1 st semester. Revit Architecture 2013/14/15 - VIA Common House Introduction... 4 GENERAL INFORMATION CONCERNING THE AUTODESK REVIT PROGRAMMES...
SAVING, LOADING AND REUSING LAYER STYLES
 SAVING, LOADING AND REUSING LAYER STYLES In this Photoshop tutorial, we re going to learn how to save, load and reuse layer styles! Layer styles are a great way to create fun and interesting photo effects
Kitchen and Bath Design Tutorial
 Kitchen and Bath Design Tutorial This tutorial continues where the Interior Design Tutorial left off. You should save this tutorial using a new name to archive your previous work. The tools and techniques
House Design Tutorial
 Chapter 2: House Design Tutorial This House Design Tutorial shows you how to get started on a design project. The tutorials that follow continue with the same plan. When we are finished, we will have created
Walls. Section. Walls. When you finish this section, you should understand the following:
 GOLDMC03_132283433X 8/24/06 2:23 PM Page 123 Section 3 Walls When you finish this section, you should understand the following: How to place a wall object. How to change walls by dynamically pulling on
Floorplanner Drawing Manual
 Floorplanner Floorplanner Drawing Manual Drawing Manual Floorplanner lets you easily create interactive floorplans and publish them online. This manual explains the floorplanner drawing tool. For details
Chief Architect X3 Training Series. Layers and Layer Sets
 Chief Architect X3 Training Series Layers and Layer Sets Save time while creating more detailed plans Why do you need Layers? Setting up Layer Lets Adding items to layers Layers and Layout Pages Layer
DESIGN AND MODELLING OF ORPHAN HOME
 DESIGN AND MODELLING OF ORPHAN HOME B.T.Shyamala 1,M.Manoj Kumar 2 1 Asst Professor,CIVIL, Dr.KV Subba Reddy College Of Engineering For Women,Kurnool,Andhrapradesh,India. 2 Asst Professor,CIVIL, Dr.KV
Autodesk. AutoCAD Architecture Fundamentals. Elise Moss SDC PUBLICATIONS. Schroff Development Corporation
 Autodesk AutoCAD Architecture 2008 Fundamentals Elise Moss SDC PUBLICATIONS Schroff Development Corporation www.schroff.com www.schroff-europe.com Lesson 3 Floor Plans The floor plan is central to any
Zooming in on Architectural Desktop Layouts Alexander L. Wood
 December 2-5, 2003 MGM Grand Hotel Las Vegas Alexander L. Wood Code BD41-3L Take advantage of both AutoCAD and Autodesk Architectural Desktop Layout features. We'll look at the basics of setting up AutoCAD
Kitchen and Bath Design Tutorial
 Kitchen and Bath Design Tutorial This tutorial continues where the Interior Design Tutorial left off. You should save this tutorial using a new name to archive your previous work. The tools and techniques
After completing this lesson, you will be able to:
 LEARNING OBJECTIVES After completing this lesson, you will be able to: 1. Create a Circle using 6 different methods. 2. Create a Rectangle with width, chamfers, fillets and rotation. 3. Set Grids and Increment
Ribbon (Panels) + Options Bar + Contextual Tabs (tools based on selection)
 + Options Bar + Contextual Tabs (tools based on selection)") Week 11 Revit, Basics Building Information Modeling (BIM) - Parametric 3D Model File Types: Projects RVT (template = RTE) Families - RFA (template = RFT), "Symbols" Layout Workspace - Elevation Markers
Week 11 Revit, Basics Building Information Modeling (BIM) - Parametric 3D Model File Types: Projects RVT (template = RTE) Families - RFA (template = RFT), "Symbols" Layout Workspace - Elevation Markers
Release Notes - Fixes in Tekla Structures 2016i PR1
 Release Notes - Fixes in Tekla Structures 2016i PR1, you can now set the to either or. is modified., the ID of the connection plate is not changed anymore when the connection now uses normal rebar groups
ACAD-BAU TUTORIAL For BricsCAD platform
 ACAD-BAU TUTORIAL WWW.ARHINOVA.SI For BricsCAD platform August 06 WORKSPACE ACAD-BAU RIBBON ACAD-BAU CONTROL BAR F ACAD-BAU PALETTES BASIC SETTINGS Use New command and open the template called ACB_International.DWT.
Release Notes - Fixes in Tekla Structures 2016i SP1
 Release Notes - Fixes in Tekla Structures 2016i SP1 is modified., the ID of the connection plate is not changed anymore when the connection now uses normal rebar groups instead of tapered groups., the
AutoCAD Architecture 2018 Fundamentals
 Elise Moss Autodesk AutoCAD Architecture 2018 Fundamentals SDC P U B L I C AT I O N S Better Textbooks. Lower Prices. www.sdcpublications.com Powered by TCPDF (www.tcpdf.org) Visit the following websites
Engineering Technology
 Engineering Technology Introduction to Parametric Modelling Engineering Technology 1 See Saw Exercise Part 1 Base Commands used New Part This lesson includes Sketching, Extruded Boss/Base, Hole Wizard,
Lesson 6 2D Sketch Panel Tools
 Lesson 6 2D Sketch Panel Tools Inventor s Sketch Tool Bar contains tools for creating the basic geometry to create features and parts. On the surface, the Geometry tools look fairly standard: line, circle,
ARCHICAD Introduction Tutorial
 Starting a New Project ARCHICAD Introduction Tutorial 1. Double-click the Archicad Icon from the desktop 2. Click on the Grey Warning/Information box when it appears on the screen. 3. Click on the Create
Materials Tutorial. Setting Materials Defaults
 Materials Tutorial Materials display on the surfaces of objects in 3D views and can make a 3D view appear highly realistic. When applied to most objects, material quantities will also be calculated in
Autodesk Architectural Desktop Functionality for the Autodesk Building Systems User
 11/28/2005-1:00 pm - 2:30 pm Room:N. Hemispheres (Salon A1) (Dolphin) Walt Disney World Swan and Dolphin Resort Orlando, Florida Autodesk Architectural Desktop Functionality for the Autodesk Building Systems
Materials Tutorial. Chapter 6: Setting Materials Defaults
 Setting Materials Defaults Chapter 6: Materials Tutorial Materials display on the surfaces of objects in 3D views and can make a 3D view appear highly realistic. When applied to most objects, material
84 part video tutorial training course. The course is 100% free with no catches or exclusions. You don
 Please Note: If you're new to Revit, you may be interested in my " Beginner's Guide to Revit Architecture " 84 part video tutorial training course. The course is 100% free with no catches or exclusions.
Autodesk AutoCAD Architecture 2015 Fundamentals
 Autodesk AutoCAD Architecture 2015 Fundamentals Elise Moss SDC P U B L I C AT I O N S Authorized Author Better Textbooks. Lower Prices. www.sdcpublications.com Powered by TCPDF (www.tcpdf.org) Visit the
Learning Guide. ASR Automated Systems Research Inc. # Douglas Crescent, Langley, BC. V3A 4B6. Fax:
 Learning Guide ASR Automated Systems Research Inc. #1 20461 Douglas Crescent, Langley, BC. V3A 4B6 Toll free: 1-800-818-2051 e-mail: support@asrsoft.com Fax: 604-539-1334 www.asrsoft.com Copyright 1991-2013
The original photo. The final result.
 giving a photo painted edges In this Adobe Photoshop tutorial, we re going to combine a couple of different effects. First, we ll give the photo easy-tocreate painted edges, and then we ll make it look
Turn A Photo Into A Collage Of Polaroids With Photoshop
 http://www.photoshopessentials.com/photo-effects/polaroids/ Turn A Photo Into A Collage Of Polaroids With Photoshop Written by Steve Patterson. In this Photoshop Effects tutorial, we ll learn how to take
Getting Started with. Vectorworks Architect
 Getting Started with Vectorworks Architect Table of Contents Introduction...2 Section 1: Program Installation and Setup...6 Installing the Vectorworks Architect Program...6 Exercise 1: Launching the Program
AutoCAD 2D. Table of Contents. Lesson 1 Getting Started
 AutoCAD 2D Lesson 1 Getting Started Pre-reqs/Technical Skills Basic computer use Expectations Read lesson material Implement steps in software while reading through lesson material Complete quiz on Blackboard
CAD Orientation (Mechanical and Architectural CAD)
") Design and Drafting Description This is an introductory computer aided design (CAD) activity designed to give students the foundational skills required to complete future lessons. Students will learn all
Design and Drafting Description This is an introductory computer aided design (CAD) activity designed to give students the foundational skills required to complete future lessons. Students will learn all
Creo Parametric Primer
 PTC Creo Parametric - Primer Student and Academic Editions 02 Helpful hints are enclosed in red brackets or round bubbles like this one! Creo Parametric Primer THIS VERSION OF THE CREO PRIMER HAS BEEN
Inventor-Parts-Tutorial By: Dor Ashur
 Inventor-Parts-Tutorial By: Dor Ashur For Assignment: http://www.maelabs.ucsd.edu/mae3/assignments/cad/inventor_parts.pdf Open Autodesk Inventor: Start-> All Programs -> Autodesk -> Autodesk Inventor 2010
33-2 Satellite Takeoff Tutorial--Flat Roof Satellite Takeoff Tutorial--Flat Roof
 33-2 Satellite Takeoff Tutorial--Flat Roof Satellite Takeoff Tutorial--Flat Roof A RoofLogic Digitizer license upgrades RoofCAD so that you have the ability to digitize paper plans, electronic plans and
Ceilings and I n t e r i o r s
 C H A P T E R 9 Ceilings and I n t e r i o r s Now that the exterior shell is up and the rooms are basically laid out, it s time to start considering the interiors. As it stands, you have a bunch of rooms
Autodesk University Project Navigator to the Rescue in AutoCAD Architecture: Fix Standard Mismatches in a Project
 Autodesk University Project Navigator to the Rescue in AutoCAD Architecture: Fix Standard Mismatches in a Project Good afternoon. Thank you for choosing the class Project Navigator to the Rescue in AutoCAD
Materials Tutorial. Chapter 6: Setting Materials Defaults
 Setting Materials Defaults Chapter 6: Materials Tutorial Materials display on the surfaces of objects in 3D views and can make a 3D view appear highly realistic. When applied to most objects, material
Making an Architectural Drawing Template
 C h a p t e r 8 Addendum: Architectural Making an Architectural Drawing Template In this chapter, you will learn the following to World Class standards:! Starting from Scratch for the Last time! Creating
SolidWorks Tutorial 1. Axis
 SolidWorks Tutorial 1 Axis Axis This first exercise provides an introduction to SolidWorks software. First, we will design and draw a simple part: an axis with different diameters. You will learn how to
Introduction to Autodesk Inventor for F1 in Schools (Australian Version)
") Introduction to Autodesk Inventor for F1 in Schools (Australian Version) F1 in Schools race car In this course you will be introduced to Autodesk Inventor, which is the centerpiece of Autodesk s Digital
Introduction to Autodesk Inventor for F1 in Schools (Australian Version) F1 in Schools race car In this course you will be introduced to Autodesk Inventor, which is the centerpiece of Autodesk s Digital
Advance Concrete. Tutorial
 Advance Concrete Tutorial Table of contents About this tutorial... 9 How to use this guide... 10 Lesson 1: Creating a building grid... 11 Step 1: Create a default building grid... 11 Step 2: Set the distances
Learning Objectives. Description. Your AU Experts: Gabriel Hernandez Applied Software. David Ronson Applied Software
 MSF21377 The Optimal Revit to Fab Workflow Gabriel Hernandez Applied Software David Ronson Applied Software Learning Objectives Design to Fabrication workflows General modification of Fabrication parts
FUSION 360: SKETCHING FOR MAKERS
 FUSION 360: SKETCHING FOR MAKERS LaDeana Dockery 2017 MAKEICT Wichita, KS 1 Table of Contents Interface... 1 File Operations... 1 Opening Existing Models... 1 Mouse Navigation... 1 Preferences... 2 Navigation
Autodesk Revit : Burning CDs That Even Your Contractor Can Use
 December 2-5, 2003 MGM Grand Hotel Las Vegas Autodesk Revit : Burning CDs That Even Your Contractor Can Use Speaker: Assistants: Paul Francis Loreto, AAC, OAA, MRAIC Clyne Curtis Peter Funk Course ID:
AutoCAD Lab 1 Basics and Drawing Fundamentals. EGS 1007 Engineering Concepts and Methods
 AutoCAD Lab 1 Basics and Drawing Fundamentals EGS 1007 Engineering Concepts and Methods Will the Computer Ever REPLACE Pencil and Paper Drawings? Maybe someday When a computer becomes as light, small,
Landscaping Tutorial. Chapter 5:
 Chapter 5: Landscaping Tutorial This tutorial was written to help you learn how to use Home Designer Landscape and Deck s Terrain tools. In this tutorial, you will learn how to add elevation information
12. Creating a Product Mockup in Perspective
 12. Creating a Product Mockup in Perspective Lesson overview In this lesson, you ll learn how to do the following: Understand perspective drawing. Use grid presets. Adjust the perspective grid. Draw and
When you complete this assignment you will:
 Objjectiives When you complete this assignment you will: 1. Set-up menus and drawing for designing modeling problems. 2. become familiar with the Sketch menu tools and commands. 3. Produce a three-dimensional
Getting Started Guide
 SOLIDWORKS Getting Started Guide SOLIDWORKS Electrical FIRST Robotics Edition Alexander Ouellet 1/2/2015 Table of Contents INTRODUCTION... 1 What is SOLIDWORKS Electrical?... Error! Bookmark not defined.
Modeling Basic Mechanical Components #1 Tie-Wrap Clip
 Modeling Basic Mechanical Components #1 Tie-Wrap Clip This tutorial is about modeling simple and basic mechanical components with 3D Mechanical CAD programs, specifically one called Alibre Xpress, a freely
Version 9 Tutorial and User Guide
 Version 9 Tutorial and User Guide 800-989-4243 214-340-9436 support@vertigraph.com www.vertigraph.com 1 Table of Contents A. Overview... 4 B. About the SiteWorx/OS Window... 4 C. File Types Raster, Vector
Creating Photo Borders With Photoshop Brushes
 Creating Photo Borders With Photoshop Brushes Written by Steve Patterson. In this Photoshop photo effects tutorial, we ll learn how to create interesting photo border effects using Photoshop s brushes.
BIM. e Submission Guideline Structural. Annex 1a. Recommended Process Revit 2010
 BIM e Submission Guideline Structural Annex 1a Recommended Process Revit 2010 Building and Construction Authority 5 Maxwell Road #16-00 Tower Block MND Complex Singapore 069110 www.bca.gov.sg Revision
Cube in a cube Fusion 360 tutorial
 Cube in a cube Fusion 360 tutorial n Before using these instructions, it is helpful to watch this video screencast of the CAD drawing actually being done in the software. Click to link to the video tutorial.
AreaSketch Pro Overview for ClickForms Users
 AreaSketch Pro Overview for ClickForms Users Designed for Real Property Specialist Designed specifically for field professionals required to draw an accurate sketch and calculate the area and perimeter
Autodesk Revit Building. Getting Started with
 Autodesk Revit Building Getting Started with Autodesk Revit Building April 2006 Copyright 2006 Autodesk, Inc. All Rights Reserved This publication, or parts thereof, may not be reproduced in any form,
Scribble Maps Tutorial
 Scribble Maps Tutorial Go to the homepage of Scribble Maps here: h t t p : / / w w w. s c r i b b l e m a p s. c o m / Getting to know the Interface Scribble Maps is a free online mapping application with
Block References and Attributes
 CHAPTER 11 Block References and Attributes PROJECT EXERCISE 11A This project exercise provides point-by-point instructions for creating the objects shown in Figure P11A 1. In this exercise, you will apply
Principles and Applications of Microfluidic Devices AutoCAD Design Lab - COMSOL import ready
 Principles and Applications of Microfluidic Devices AutoCAD Design Lab - COMSOL import ready Part I. Introduction AutoCAD is a computer drawing package that can allow you to define physical structures
Basic 2D drawing skills in AutoCAD 2017
 Basic 2D drawing skills in AutoCAD 2017 This Tutorial is going to teach you the basic functions of AutoCAD and make you more efficient with the program. Follow all the steps so you can learn all the skills.
Deck Tutorial. Chapter 8: Decks and Porches
 Decks and Porches Chapter 8: Deck Tutorial Now we ll continue where the Landscaping Tutorial left off and create a deck off the back of the house, connecting it to the terrain with an exterior staircase.
AutoCAD Civil 3D 2009 ESSENTIALS
 AutoCAD Civil 3D 2009 ESSENTIALS SDC PUBLICATIONS Schroff Development Corporation www.schroff.com Better Textbooks. Lower Prices. Alignments and Profiles Section 2: Profiles In this section you learn how
COPYRIGHTED MATERIAL. Welcome to the Civil 3D Environment
 Welcome to the Civil 3D Environment Chapter 1 To paraphrase, Civil 3D isn t your father s AutoCAD. If you re just getting into the Civil 3D environment, want to learn how to get around in models, and would
Interference? Verify and Analyze This!
 11/30/2005-3:00 pm - 4:30 pm Room:N. Hemispheres (Salon A2) (Dolphin) Walt Disney World Swan and Dolphin Resort Orlando, Florida David Butts - CADRE Systems Inc. ME34-1 In Autodesk Building Systems you
Appliqué with CutWork
 Appliqué with CutWork Method 1: Creating Appliqué from a Placement Line Open BERNINA Embroidery Software. Click on File> Open. Select the Appliqué Flowers, provided with the lesson. Click on Open. Select
Assignment 5 CAD Mechanical Part 1
 Assignment 5 CAD Mechanical Part 1 Objectives In this assignment you will apply polyline, offset, copy, move, and rotated dimension commands, as well as skills learned in earlier assignments. Getting Started
Tas Engineering Training Workbook 1
 Tas Engineering Training Workbook 1 Tas 3D Modeller Tas Manager Your Tas Manager contains two main folders: a Tas folder and a Tas Data folder. See the directory-tree on the left-hand side above. If you
The Revolve Feature and Assembly Modeling
 The Revolve Feature and Assembly Modeling PTC Clock Page 52 PTC Contents Introduction... 54 The Revolve Feature... 55 Creating a revolved feature...57 Creating face details... 58 Using Text... 61 Assembling
7.0 - MAKING A PEN FIXTURE FOR ENGRAVING PENS
 7.0 - MAKING A PEN FIXTURE FOR ENGRAVING PENS Material required: Acrylic, 9 by 9 by ¼ Difficulty Level: Advanced Engraving wood (or painted metal) pens is a task particularly well suited for laser engraving.
I Read Banned Books Poster File Tip Sheet. The Basics
 I Read Banned Books Poster File Tip Sheet The Basics Open the poster file using photo editing software that can support PSD files, such as Adobe Photoshop, Photoshop Elements, or GIMP, a free photo editor
Autodesk Revit MEP 2014
 ISI ACADEMY Autodesk Revit MEP 2014 Getting Started Starting Revit Starting Revit for the First Time Opening a Project File Identifying the User Interface Components Managing User Interface Components