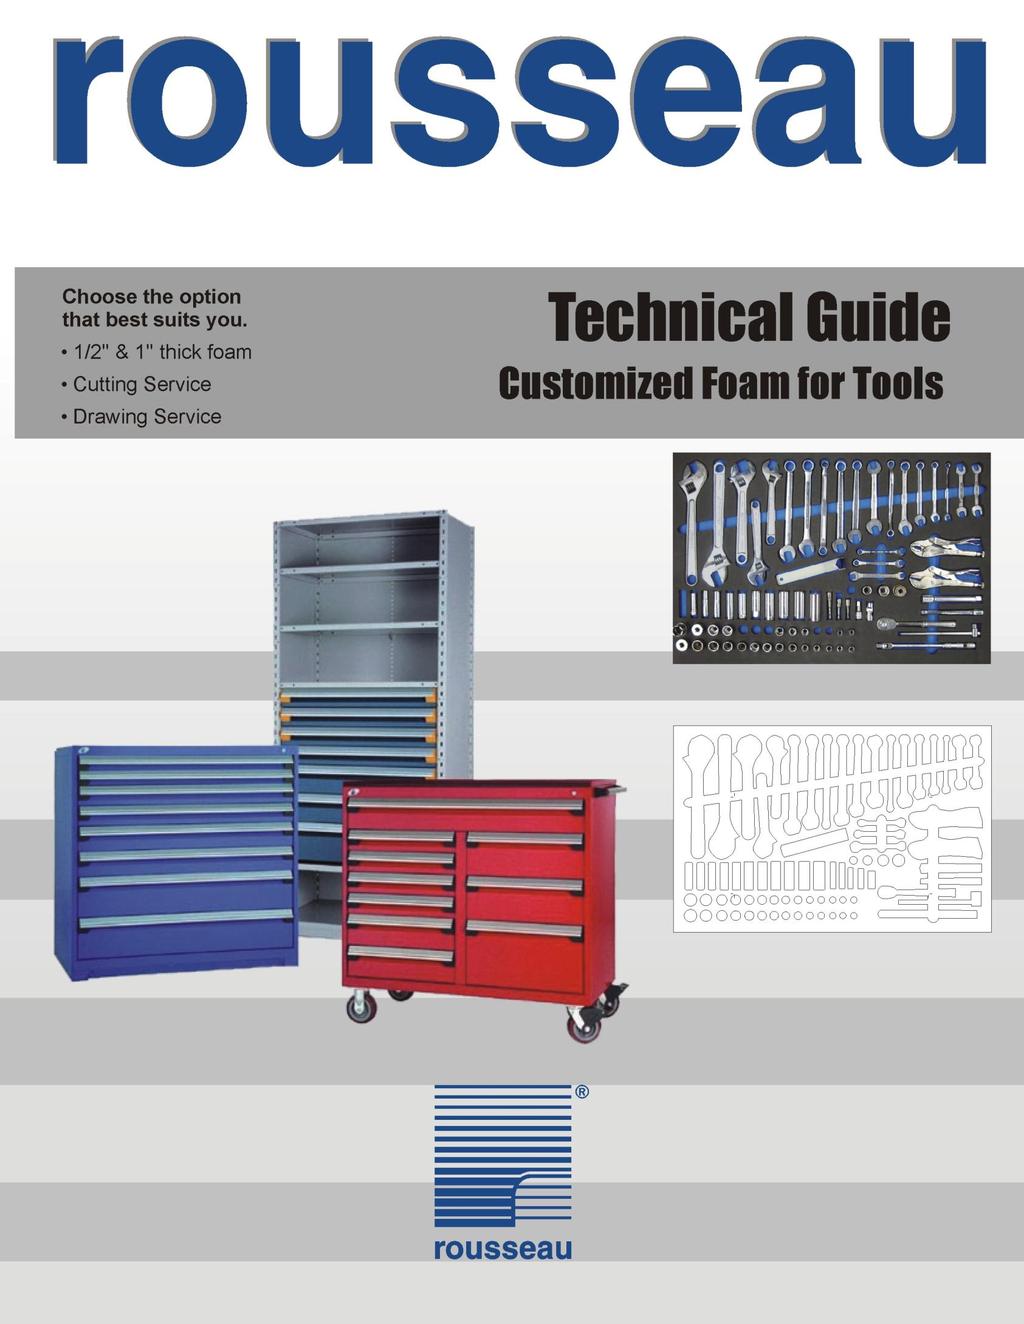
Customized Foam for Tools
|
|
|
- Shon Dickerson
- 6 years ago
- Views:
Transcription
1
2 Table of contents Make sure that you have the latest version before using this document. o o o o o o o Overview of services offered and steps to follow (p.3) 1. Service : Cutting of foam for tools 2. Service : Drawings for cutting foam for tools Foam part numbers and sizes (p.4) 1. Foam for tools to be cut for drawer RF31 / RF32 2. Foam for collets to be cut for drawer RF31 / RF32 3. Foam for tools to be cut for drawer WS40 4. Foam for tools to be cut for drawer RK03 for tech caddy 5. Foam for collets to be cut for drawer RK03 for tech caddy 6. Foam for tools to be cut for shelf RK00 for tech caddy 7. Foam for collets to be cut for shelf RK00 for tech caddy Procedures and criteria for taking photos (p.6) 1. Preparing the cardboard 2. Placing the tools 3. Taking the photo Recommendations for drawing software (p.8) 1. Types of software programs Procedure for a drawing not produced with INKSCAPE (p.9) 1. Opening and creating a file 2. Creating a photo to scale 3. Tool drawings 4. Adding elements for an ergonomic grip on tools 5. Verifying the space around the tools 6. Verifying the space between tools 7. Exporting and verifying the drawings INTERNET links Vector imaging software (p.16) 1. Primary Internet links 2. Secondary Internet links Tutorial INKSCAPE vector imaging software (p.17) 1. Opening and creating a file 2. Viewing function 3. Creating a photo to scale 4. Tool drawings 5. Verifying the space around the tools 6. Adding elements for an ergonomic grip on tools 7. Verifying the space between tools 8. Exporting and verifying the drawings rousseaumtetal.com Page 2/39 R58-NO09A
3 Overview of services offered and steps to be followed 1. Service : Cutting of foam for tools 2. Service : Drawings for taking photos A drawing respecting the specified criteria as outlined in this technical document must be submitted to Rousseau or have been previously produced by Rousseau, based on whether the client has chosen to have Rousseau produce the drawing or not. Here are the steps to be followed: 1.1. If you are providing the drawing. a. Follow the same steps as presented below for the drawing service, but produce the drawing on your own. b. Forward your photo and the drawing to your customer service representative so that it may be validated before cutting the foam. c. Rousseau will cut the foam inserts If the drawing is produced by Rousseau (following customer approval as noted in point 2.8 hereafter) : a. Rousseau will cut the foam inserts. A photo respecting the criteria as specified in this technical document must be submitted to Rousseau. Here are the steps to follow to correctly take your photo : 2.1. Identify the nominal dimensions of the drawer. Example : RF = 30" x 27" Determine the real dimensions of the foam. According to the dimensions table presented in technical document R58. Example : RG = 25 1/2" x 23 1/2" Cut the cardboard according to the foam dimensions Place the tools on the cardboard. Be sure to respect the minimum spaces required between and around tools (as specified in this technical document) Take a photo with the tools in place. For tools 1'' or more in height, it is preferable to draw the outline of the tool as precisely as possible and to take the photo of the cardboard without the tool in place Forward your photo to your customer service representative so that it may be verified before a drawing is produced One of our technicians will produce a technical drawing as per the photo submitted Approve the drawing. The drawing will be sent to you via by your customer service representative. rousseaumtetal.com Page 3/39 R58-NO09A
4 Foam part numbers and sizes 1. Foam for tools to be cut for drawer RF31 / RF32 which includes: 1.1. Black ½'' thick adhesive foam for cutting 1.2. Blue ¼'' thick foam NOT cut Part numbers For drawer RF31/32 Real dimensions of foam RG '' W x 21'' D 19 ½'' W x 17 ½'' D RG '' W x 24'' D 19 ½'' W x 20 ½'' D RG '' W x 27'' D 19 ½'' W x 23 ½'' D RG '' W x 21'' D 25 ½'' W x 17 ½'' D RG '' W x 24'' D 25 ½'' W x 20 ½'' D RG '' W x 27'' D 25 ½'' W x 23 ½'' D RG '' W x 18'' D 31 ½'' W x 14 ½'' D RG '' W x 24'' D 31 ½'' W x 20 ½'' D RG '' W x 27'' D 31 ½'' W x 23 ½'' D RG '' W x 18'' D 37 ½'' W x 14 ½'' D RG '' W x 24'' D 37 ½'' W x 20 ½'' D RG '' W x 18'' D 43 ½'' W x 14 ½'' D RG '' W x 24'' D 43 ½'' W x 20 ½'' D RG '' W x 27'' D 43 ½'' W x 23 ½'' D RG '' W x 24'' D 55 ½'' W x 20 ½'' D RG '' W x 27'' D 55 ½'' W x 23 ½'' D 2. Foam for collets to be cut for drawer RF31 / RF32 which includes: 2.1. Black 1'' thick foam for cutting Part numbers For drawer RF31/32 Real dimensions of foam RG ''W x 21''D 25 ½''W x 17 ½''D RG ''W x 24''D 25 ½''W x 20 ½''D RG ''W x 27''D 25 ½''W x 23 ½''D RG ''W x 18''D 31 ½''W x 14 ½''D RG ''W x 24''D 31 ½''W x 20 ½''D 3. Foam for tools to be cut for drawer WS40 which includes: 3.1. Black ½'' thick adhesive foam for cutting 3.2. Blue ¼'' thick foam NOT cut Part numbers For drawer WS40 Real dimensions of foam WS4C ''W x 21''D 14 7/8''W x 18 7/8''D 4. Foam for tools to be cut for drawer RK03 for tech caddy which includes: 4.1. Black ½'' thick adhesive foam for cutting 4.2. Blue ¼'' thick foam NOT cut Part number For drawer RK03 Real dimensions of foam RK ''W x 18''D 20 11/16''W x 13 3/16''D 5. Foam for collets to be cut for drawer RK03 for tech caddy which includes: 5.1. Black 1'' thick adhesive foam for cutting Part number For drawer RK03 Real dimensions of foam RK ''W x 18''D 20 11/16''W x 13 3/16''D 6. Foam for tools to be cut for shelf RK00 for tech caddy which includes: 6.1. Black ½'' thick adhesive foam for cutting 6.2. Blue ¼'' thick foam NOT cut Part number For shelf RK00 Real dimensions of foam RK ''W x 18''D 22 5/16''W x 15 3/16''D rousseaumtetal.com Page 4/39 R58-NO09A
5 7. Foam for collets to be cut for shelf RK00 for tech caddy which includes: 7.1. Black 1'' thick adhesive foam for cutting Part number For drawer RK03 Real dimensions of foam RK ''W x 18''D 20 11/16''W x 13 3/16''D 8. Service : Cutting of foam RG Rate according to number of tools to cut RG Service : Drawings for foam RG57 & RG Flat rate (all sizes) RG Rate according to number of tools to be drawn RG58-01 rousseaumtetal.com Page 5/39 R58-NO09A

6 Procedures and criteria for taking photos ATTENTION : The quality and the preciseness of the cut on the foam inserts will be the direct reflection of how well the procedures established and outlined here were followed. 1. Preparing the cardboard 1.1. Cut a piece of cardboard to the same dimensions as the foam insert to be cut. Refer to the ''Foam part numbers and sizes'' section Draw a line to serve as a margin on all sides at 1'' from the sides of the cardboard. 2. Tool layout 2.1. Layout the different tools on the cardboard and remember to leave the minimum space required between tools : /2'' thick foam = 1 /4'' to 3/8'' spacing '' thick foam = 3/8'' to 1/2'' Do not place a tool that sits higher than 1'' on the cardboard For tools that are more than 1'' high, trace the contour of the tools directly on the cardboard using a fine tipped permenant marker. This will avoid the problem of perspective with the tools in the photo once taken and in turn make producing the drawing much easier. Be very precise when tracing the tools! 2.3. It is also possible to trace the contour of all the tools and take a photo of all the outlines. However, keep in mind that this will take more time. 3. Taking the photo 3.1. Adjust the camera in order to have the highest resolution possible Position yourself over the cardboard. The camera objective should be positioned directly over the center of the cardboard and in such a way as to tightly frame the entire cardboard surface. rousseaumtetal.com Page 6/39 R58-NO09A

7 3.3. Troubleshooting : If the cardboard does not seem to be rectangular on the camera screen, this indicates that your objective is not centered over the cardboard. This give the cardboard a slight trapezoid appearance. You must correct the position of your objective in order to produce a photo that can be used. It is not recommended to try and retouch the photo on your computer because this will distort the tools. Simply reposition your objective. Side view Aeriel view 3.4. Before packing away your tools and the cardboard, it is very important to ensure that the photo can be used by importing it into the drawing software. rousseaumtetal.com Page 7/39 R58-NO09A
8 Recommendations for the drawing software 1. Types of software 1.1. It is recommended to use a vector graphics editor such as CorelDraw or Adobe Illustrator in order to correctly draw the outline of the tools If you are not familiar with these programs, it is possible to produce a drawing using a similar vector graphics editor such as INKSCAPE. This is an open source program available from the Internet. Inkscape is a program that has similar capacities to those of Illustrator, Freehand, CorelDraw or Xara X. Inkscape is a powerful program that is easy to use, it conforms to all of the standards set for this type of program. It is very easy to learn. Using this technical document, in less than 3 hours, it will be possible for you to master the basic functions of the program and to produce your first tool drawing in order for the foam to be cut. rousseaumtetal.com Page 8/39 R58-NO09A
 that will be used to cut the foam inserts. 1.4.")
9 Procedure for a drawing not produced with INKSCAPE 1. Opening and creating a file 1.1. Open the program and it will automatically create a new document Save the document in the program's standard format on your hard drive Import and insert your tool photo (JPG) that will be used to cut the foam inserts Adjust the format of the page in order to ensure that the page is large enough for the foam. Adjust the dimensions to allow for approx. 2'' extra in width and height according to the foam dimensions. The format size is not the foam. The page format is only used as the work space for the drawing of the tools. Therefore, you must ensure to place the elements on the formatted page. 2. Creating a photo to scale Note : Before beginning to draw the tools, you must adjust the proportions of the photo in function with the real dimensions of the tools. To do this, follow the steps as outlined below Draw a rectangle of any size. The rectangle should not be filled-in but should have a line around the contour Adjust the dimensions of the rectangle. The rectangle dimensions should be equal to those of the foam inserts to be cut (see pages 4 & 5) Please ensure that all measurements are expressed in inches Place the rectangle on the page because when you export the image at the end of the process, the program will not recognize anything that is not on the page. The page corresponds with the work space and not with the foam. The previously drawn rectangle represents the foam Place the photo in the background and the rectangle in the foreground Select the photo and move it in order to place the lower left corner directly on the lower left corner of the rectangle Ensure that the photo is still selected and adjust the dimensions Tip : Positioning It is possible to place an object in the foreground by simply using the ''CUT & PASTE'' function. Use the CTRL+X (CUT) and CTRL+V (PASTE) keys. using the points that appear in each corner. You will most likely have to reposition the lower left corner on the rectangle. Move the photo (position and dimensions) until the cardboard in the photo is equal to the dimensions of the rectangle. rousseaumtetal.com Page 9/39 R58-NO09A
10 2.8. If the cardboard does not appear to have the same shape as the rectangle and looks more like a trapezoid, it is preferable to take another photo. Be sure, when taking the new photo, that your camera objective is placed directly over the center of the cardboard, this will help avoid the trapezoid shape. It is not recommended to attempt to retouch the photo on the computer because it will warp the image of the tools. You must reposition the camera objective, ensuring that it is centered directly over the cardboard. Side view Aeriel view 2.9. Save the document. rousseaumtetal.com Page 10/39 R58-NO09A
11 3. Tool drawings 3.1. It is recommended to trace the outline of the tool in a general way. It is not always useful to recreate all of the details of a given tool It is recommended to activate the ''GRID'' function from the ''VIEW'' menu. This will provide you with a vertical and horizontal reference for the tools It is important to draw the tools with a black outline and with a 1 or 2 pixel thickness The exactness of your drawing will be reproduced by the machine that cuts the foam. For example: a curved line comprised of a series of straight lines will be cut as a series of straight lines. Therefore, it would be better to trace a curved line. Second example: an unfinished line will be cut as an unfinished line on the foam When you have finished drawing the tools, it may be appropriate to slightly enlarge each tool contour. This will allow for a bit of extra room around each tool. This may also help to compensate for any small errors or imprecisions on the drawing. It is not obligatory to use this function because in some cases, it might be preferable to have a tighter fit around some tools. There is a function on most of these types of software programs that will allow you to enlarge a shape by pushing the contour out (OUTSET). It is recommended to leave the photo under the drawing in order to see how much you have to enlarge the tool contour Save the document. rousseaumtetal.com Page 11/39 R58-NO09A

12 4. Verifying the space around the tools 4.1. Select the first rectangle you created which surrounds the entire tool layout Copy the rectangle and use CTRL+C (COPY) followed by CTRL+V (PASTE) It is recommended to change the colour of the outline on the rectangle. ATTENTION : It is important to respect the minimum requirements for spacing around tools: Keep a 1'' border around the entire rectangle that has the same dimensions as the foam Select the new rectangle and adjust the dimensions. The new rectangle should be 2'' less wide and 2'' less high than the original in order to create a 1'' margin around the enture tool layout You must be sure that the units of measurement are in inches Center the new rectangle (the smaller one) on top of the first rectangle (the larger one) Now, simply ensure that there are no tools sitting outside the smaller rectangle. If there are, reposition them. Delete the photo of the tools before doing this Save your document. rousseaumtetal.com Page 12/39 R58-NO09A
13 5. Adding elements for an ergonomic grip on tools 5.1. Target the tools on which you want to add ergonomic grips Draw a circle. Adjust the dimensions of the circle. For example, a circle with a 1'' diameter You must be sure that the units of measurement are in inches Place the circle on the correct tool on the drawing You can add as many circles as you wish by selecting the first circle and using command CTRL+C (COPY) followed by CTRL+V (PASTE). Tip : Ergonomics It is recommended to consider adding ergonomic grips around the tools in order to facilitate handling. You can simply add 1'' semi-circles on each side of the tool. Tip Astuce : Lining : Aligner the circles les cercles up Use Pour the aligner ''ALIGN deux AND cercles, DISTRIBUTE utiliser la OBJECTS'' commande function ''ALIGNER to correctly ET position the circles in relation to each other. DISTRIBUER'' démontré au point Tip : Copy several circles To repeat the same circle layout on a new tool, it is possible to copy both circles at the same time. Copying both circles allows you to keep the same spacing. Select the first circle and hold the ''SHIFT'' key while you then select the second circle. Then use the CTRL+C (COPY) and CTRL+V (PASTE) functions to place the circles on the next tool. rousseaumtetal.com Page 13/39 R58-NO09A
14 ATTENTION : Ergonomic grips not always required Adding ergonomic grips around tools can be very useful in certain cases however, one must be careful because they may not be useful in every case. In fact, they may even get in the way in some cases. Example no.1 : A tool that is more than 1'' high placed on a cut foam insert ½'' high. In this case, seeing as the tool is higher than the foam insert, it is easy to grip without the help of an ergonomic grip. Example no.3 : A tool with a lot of space around it. In certain cases, using foam inserts is to visually facilitate locating tools (5S application).in these situations, some people will prefer to leave extra space around the tools. In these cases, it may not be necessary or useful to add ergonomic grips. Example no.2 : A tool like a pair of pliers A shape with an empty section due to the shape of the tool allows for easy handling without having to add ergonomic grips. Tip : Alternative ergonomic grip Another method for adding an ergonomic grip is to draw a rectangular shape with rounded ends which passes through the entire series of tools. To do this, draw a rectangle and adjust the dimensions to those required. It is possible to round the ends of the rectangle. You may want to pivot the rectangle in order to place is correctly through your series of tools. rousseaumtetal.com Page 14/39 R58-NO09A
15 6. Verifying the space between the tools 6.1. Draw a circle. Adjust the dimensions of the circle. A circle with a 0.375'' diameter for example Please ensure that the units of measurement are in inches Once the circle has been drawn, ensure that it is in the foreground It is recommended to fill the circle in with a colour Select the circle and place it over the drawings of your tools. The circle corresponds to the minimum spacing required between tools, use it to verify your spacing. ATTENTION : It is important to respect the minimum spacing requirements around the tools : ½'' thick foam : 1/4'' to 3/8'' 1'' thick foam : 3/8'' to 1/2'' 7. Exporting and verifying the drawings 7.1. Save this document in the program's standard format on your hard drive if not already done Save the drawing in a ''PDF'' file Open the ''PDF'' file with a program that allows you to view this type of file (ex : Acrobat Reader) and ensure that the file is the same as your original drawing and is not missing any lines or tools Print the drawing from your drawing program or from Acrobat Reader. The goal of doing this is to simply verify the dimensions of a couple of the tools on the drawing If you do not have access to a large scale printer, it is often possible to print a section of the drawing on a standard size piece of paper It is recommended to print and verify several different types of tools. Please note that the scale should be 1: If printing from Acrobat Reader : Open the file Select a drawing zone (draw a selection rectangle) Print the selected drawing zone. Check the appropriate option in the print menu Send your drawing in a ''PDF'' file as well as the original ''JPG'' photo to your Rousseau customer service representative. ATTENTION : Your file must be named according to the following models Project name or number drawer dimensions(wwddhh) sequential numbers ( , etc.) Example no1 : MLBodyShop Example no2 : DSHIndustries MLBodyShop DSHIndustries MLBodyShop DSHIndustries DSHIndustries Example no3 : Project18A Project18A rousseaumtetal.com Page 15/39 R58-NO09A
16 INTERNET links - INKSCAPE vector imaging software 1. Primary Internet links : 1.1. Home page for INKSCAPE (English version) (French version) 1.2. Software download page (English version) (French version) 2. Secondary Internet links : 2.1. Complete software tutorial (English version) (French version) 2.2. Other software tutorials* (tutorial dedicated to specific program funtions) Note : The tutorial presented in this technical document is sufficient for learning how to draw tools in INKSCAPE. The links published here for other tutorials will assist you in perfecting your skills with the program for drawings other than for tools. rousseaumtetal.com Page 16/39 R58-NO09A
 on your hard drive. 1.3.")
17 Tutorial - INKSCAPE vector imaging software 1. Opening and creating a file 1.1. Open the program and it will automatically create a new document Save the document in the program's standard format (.svg) on your hard drive From the ''FILE'' menu, select the option to ''IMPORT'' and insert the photo (JPG) of your tools to be cut out on your foam inserts. rousseaumtetal.com Page 17/39 R58-NO09A

18 1.4. From the ''FILE'' drop-down menu, select ''DOCUMENT PROPERTIES'' to adjust the page format in order to ensure that it is big enough to accommodate the foam. Adjust the dimensions by allowing approx. 2'' more in width and height than the dimensions of the foam. The page format is not the foam. It is simply the work space for the tool layout. Therefore, you must place your items on the page format. rousseaumtetal.com Page 18/39 R58-NO09A


19 2. Viewing function 2.1. The '''ZOOM'' function is located on the left side of the Tip : Keyboard short-cuts screen in the tools bar. a. F3 = ''ZOOM'' function 2.2. Once the '''ZOOM'' button has been clicked, another tool b. ''-'' = zoom out bar will appear on the upper portion of the screen with other c. ''+'' = zoom in functions such as '''ZOOM-'', '''ZOOM+'' and '''ZOOM TO d. ''4'' = zoom selection in window FIT SELECTION IN WINDOW''. It is recommended to be as e. ''5'' = zoom page familiar with these functions as possible, while drawing the tools it helps to be zoomed in to achieve more precision in your drawing Using the '''ZOOM'' function, adjust the zoom to be the same size as the photo. Tip: Short-cuts with the mouse a. Right click to zoom out b. Left click to zoom in c. Left click and hold the button down. Choose a section and let go. This allows you to zoom inside the selected window. d. Roller ball on the mouse allows you to move vertically. e. Side button (on left) on an ergonomic mouse allows for both vertical and horizontal movements. 3. Creating a photo to scale Note : Before beginning to draw the tools, you must adjust the proportions of the photo in function with the real dimensions of the tools. To do this, follow the steps as outlined below Draw a rectangle of any size on the page. The '''RECTANGLE'' function is located on the left side of the screen on the tool bar under the '''ZOOM'' option. Click on the drawing zone, hold the left button on the mouse and drag the mouse to create a rectangle. Once finished, release the mouse button Your rectangle may have rounded corners. Activate the '''RECTANGLE'' function. Adjust the following parametres on the upper tool bar. Change all of the values to be equal to ''0'' Select the rectange with the '''SELECT AND TRANSFORM'' arrow. On the upper tool bar, adjust the dimenstions of the rectangle by changing the values in the fields that have appeared on the top of the screen. The rectangle dimensions must be equeal to those of the foam to be cut. (W=width and H = height). See information on pages 4 & 5. Ex: 3.4. Please ensure that they program is running in inches. It is normally in pixels (px) by default. rousseaumtetal.com Page 19/39 R58-NO09A

20 3.5. By default, your rectangle may have be a colour that has no contour. If this is the case, click on the rectangle with the ''SELECT AND TRANSFORM'' arrow at the top of the left hand side tool bar. Once the rectangle has been selected, right click by placing the mouse above the contour of the rectangle in order to make the scroll down menu appear. Select the '''FILL AND STROKE'' option. Right click on the mouse 3.6. In the ''FILL AND STROKE'' menu, there are three tabs. Click the ''FILL'' tab. Click on the ''X'' in order to select the ''no paint'' option. rousseaumtetal.com Page 20/39 R58-NO09A


21 3.7. In the ''FILL AND STROKE'' menu, click on the ''STROKE PAINT'' tab, click the to assign a contour colour to the rectangle. From the ''RGB'' tab and in the circled fields, type the same values as shown on the image below which will give you the colour red. You must also ensure that the ''BLUR'' and ''OPACITY'' values are repectively set at 0 and 100 as shown in the image below In the ''FILL AND STROKE'' menu, click on the ''STROKE STYLE'' tab. Assign a ''4,000 px'' value for the contour width and select the ''MITRE JOIN'' pointed contour Place the rectangle on the page because when you export the file at the end of the process, the program will not recognize anything outside the page. Use the ''SELECT AND TRANSFORM'' arrow to click the object to be moved and hold the left button on the mouse to move the object. rousseaumtetal.com Page 21/39 R58-NO09A
 and CTRL+V (PASTE) functions. b. The ''Pos 1'' or ''HOME'' keys allow you to place an object in the foreground.")
22 3.10. Place the photo in the background and the rectangle in the foreground by using the option with allows you to adjust the position of the item selected. This option is located in the upper tool bar. Tip : Positioning a. It is possible to place an object in the foreground by simply using the CTRL+X (CUT) and CTRL+V (PASTE) functions. b. The ''Pos 1'' or ''HOME'' keys allow you to place an object in the foreground Select the photo with the ''SELECT AND TRANSFORM'' arrow. Move the photo and align the bottom left corner of the the cardboard in the photo with the corresponding corner of the rectangle Ensure that the photo is still selected and adjust the dimensions using the points that appear on the four corners of the photo. You will most likely have to reposition the lower left corner of the photo on the rectangle. Manipulate the photo (position and dimensions) until the cardboard in the photo has dimensions equal to those of the rectangle. See the final result on the following page. rousseaumtetal.com Page 22/39 R58-NO09A
23 3.13. If the cardboard does not appear to have the same shape as the rectangle and looks more like a trapezoid, it is preferable to take another photo. Be sure, when taking the new photo, that your camera objective is placed directly over the center of the cardboard, this will help avoid the trapezoid shape. It is not recommended to try and retouch the photo on your computer because this will distort the tools. Side view Aeriel view Save the document. rousseaumtetal.com Page 23/39 R58-NO09A
24 4. Drawing tools 4.1. Two different tools can be used for drawing the contour of your tools The ''LINES'' function located on the tool bar on the left side of the screen This function allows you to draw straight lines by click two points on the photo By holding the mouse button, you can draw curves that are more or less precise. This option is not the most recommended To continue and existing line from the end of another, ensure that you have selected the existing line with the ''SELECT AND TRANSFORM'' arrow. Then, as when starting a new line, you must reclick the end of the other line. Now you simply determine where the end of the new line will be. Tip : Trace and outline (global) It is recommended to trace the contour of a tool in a very general way. It is not always useful to recreate each and every detail on the tool. Tip : Aligning the shapes It is recommended to activate the ''GRID'' function from the ''VIEW'' menu. This gives you reference points for vertical and horizontal alignment of your tools. ATTENTION : It is important to draw all of the tools with a black outline with a medium width outliner set at either 1 or 2 pixels. To adjust the outline, you must adjust the parameters in the ''FILL AND STROKE'' menu. See step 3.5. rousseaumtetal.com Page 24/39 R58-NO09A

25 The ''BEZIER'' function is also located on the left side tool bar. This function allows you to alternate between drawing lines and curves. It is a little more complex to use but the results are much more interesting. It is recommended to learn how to use this function. In addition, the cutting machine for the foam inserts reproduces these lines exactly as you draw them. This means that if a shape is represented by a series of small straight lines created by using the ''LINES'' function, the machine will cut the curve with a series of small straight lines. If the curve is perfect, the machine will cut a perfectly curved line. Tip : Trace an outline (quality) The exactness of the drawing will be reproduced as it is by the cutting machine for the foam inserts. For example: a curved line comprised of a series of small straight lines will be reproduced as such on the foam. Therefore, it would be more appropriate to trace a curved line. Example no. 2: an unfinished line will be cut as an unfinished line on the foam As with the ''LINES'' function, the ''BEZIER'' function allows you to draw straight lines by clicking two different points on the photo. However, as long as the line and the ''BEZIER'' function are selected, is is possible to continue with a new line which will automatically be attached to the first line without having to reclick on the point where the proceeding line ended. The function remains in action until unselected To finish a group of lines, simply double click at the same time as creating the last segment and indicating the last point of the line for the item you are drawing. It is also possible to end the function by hitting ''ENTER'' on the keyboard The ''DELETE'' key on the keyboard allows you to delete the last segment of line while the line and the ''BEZIER'' tool remain selected. rousseaumtetal.com Page 25/39 R58-NO09A
26 The ''BEZIER'' tool also allows you to draw curved lines. To use this function, simply hold the left button on the mouse while clicking to indicate the end of a line. You will see two collinear opposite handles. It will be possible to pull the line into the desired curve without changing the start and end points. Simply let go of the mouse button once the desired curve has been created After the first curve, the program will automatically propose a way in which you can continue with a new tangent curve that is complementary to the first (image on left side). If you accept the second curve, the function falls back to the line mode (image on right side) To create a new curve, simply click on a point where you'd like to start the new line and pull the line while holding the left button on the mouse as you did for the first curved drawn in prevous point. rousseaumtetal.com Page 26/39 R58-NO09A

27 If you do not wish to continue in curve mode after the first curve or if the second curve that is automatically suggest is not what you want, simply click on the drawing with the left button on the mouse. It is possible to end this function by hitting the ''ENTER'' key on the keyboard. This will automatically put and end to the line. It will then be possible to start a new line from the existing line. If you have exited the ''BEZIER'' function, ensure that you have selected the existing line with the ''SELECT AND TRANSFORM'' arrow and then select the ''BEZIER'' function (right image). Click on the last node of the previous line to continue the line To close a shape, click on the original departure point of the shape. rousseaumtetal.com Page 27/39 R58-NO09A
 Curve tangent to ending point If you have exited the ''BEZIER'' function, ensure that you have selected the existing line with the ''SELECT")
28 It is possible to modify a shape after it has been created. Double-click on the image. Once you do that, the nodes for the shape will appear and you can then change the shape. Initial unfinished shape Desired shape (curve shown in red) Curve tangent to ending point If you have exited the ''BEZIER'' function, ensure that you have selected the existing line with the ''SELECT AND TRANSFORM'' arrow and then select the ''BEZIER'' function. After having clicked to indicate the starting point of the new curve, click on the point where the curve end whicle holding the left button on the mouse and dragging in the same direction as the line segment on which you just attached the curve. End The result is a curve tangent to the original point. End point Point de départ Result : Curve tangent to the end point rousseaumtetal.com Page 28/39 R58-NO09A


29 4.2. It is possible to modify a shape after it has been created. Double-click on the image. Once you do that, the nodes for the shape will appear and you can then change the shape It is possible to move a node. To do this, first double-click on the line using the ''SELECT AND TRANSFORM'' arrow. Then, click for the first time on the node to be moved in order to select it. Finally, while holding the left button of the mouse on the node that was selected, you can move it. Keep in mind that you must select only one node at a time otherwise the nodes selected will all move at the same time. When you move a node, the two lines that are attached to it will remain straight lines It is possible to modify an existing curved line (left side image) or to change a straight line into a curved line (right side image). To do this, first double-click on the line with the ''SELECT AND TRANSFORM'' arrow. Then, while holding the left button on the mouse down and above the line to be modified, you move the line. rousseaumtetal.com Page 29/39 R58-NO09A


30 It is possible to change the curve on a line by pulling the at different spots along the line until you reach the shape you are looking for. To do this, simply double-click on the line using the ''SELECT AND TRANSFORM'' arrow and pull It is possible to change a curved line into a straight line. To do this, first double-click on the line using the ''SELECT AND TRANSFORM'' arrow. Then, select the segment of the line that you wish to change and use the ''LINE'' conversion option in the upper tool bar There are many other editing options available, all of which are located on the upper tool bar. It is recommended to explore the options. rousseaumtetal.com Page 30/39 R58-NO09A

31 It is possible to delete a node on an existing line. To do this, first double-click on the line using the ''SELECT AND TRANSFORM'' arrow. Then click on the node you want to delete and hit the ''DELETE'' key on your keyboard or click on the ''- '' symbol that you see circled in the image on the right side here below It is possible to add another node to an existing line. To do this, first double-click on the line using the ''SELECT AND TRANSFORM'' arrow. Then, double-click on the line at the spot where you wish to add the node and a new node will appear. The shape can be modified from this node. It is also possible to click once on the line (once you have selected it) and then to click on the ''+'' symbol Save the document. rousseaumtetal.com Page 31/39 R58-NO09A


32 4.4. Once the drawing of the tools is completed, it may be appropriate to enlarge each tool outline. This will provide a little bit of extra space around each tool. It may also compensate for any small errors on the drawing. It is not required to use this option in each and every situation, it may be preferable that the tools have a tighter fit in the foam To do this, you must first click on the line using the ''SELECT AND TRANSFORM'' arrow. Then, from the ''PATH'' menu, select the ''OUTSET'' option. There is a shortcut for this operation : ''CTRL+)''. However, this shortcut may not work on all computers. This function allows you to blow up a tool outline. It is possible to repeat the function as many times as needed until the desired shape is achieved. It is recommended to leave the photo under the drawing in order to see how much room you have on the layout Save the document. rousseaumtetal.com Page 32/39 R58-NO09A

33 ATTENTION : It is important to respect 5. Verifying the space around the tools the minimum requirements for spacing 5.1. Select the first rectangle you created which surrounds the around tools: entire tool layout by using the ''SELECT AND Keep a 1'' border around the entire TRANSFORM'' arrow. rectangle that has the same dimensions 5.2. Copy the rectangle by using CTRL+C (COPY) followed by as the foam. CTRL+V (PASTE) It is recommended to change the colour of the outline on the rectangle by using the ''FILL AND STROKE'' function. Select the rectangle using the ''SELECT AND TRANSFORM'' arrow. Once the rectangle has been selected, position the mouse above the outline of the rectangle and click with the right button on the mouse, a drop down menu will appear. Select the ''FILL AND STROKE'' option Double-click on the new rectangle with the ''SELECT AND TRANSFORM'' arrow. In the upper tool bar, adjust the dimensions of the rectangle by changing the numbers in the provided fields. The new rectangle should be 2'' less wide and 2'' less high than the original in order to create a 1'' margin around the entire tool layout (W=width and H=height). Ex: 5.5. You must be sure that the units of measurement are in inches. By default they are expressed in pixels (px) Center the new rectangle (the smaller one) over the first rectangle (the larger one) Select the smaller rectangle using the ''SELECT AND TRANSFORM'' arrow Hit and hold the ''SHIFT'' key and select the larger rectangle with the ''SELECT AND TRANSFORM'' arrow Click on the ''ALIGN AND DISTRIBUTE'' option located in the upper tool bar In the ''ALIGN AND DISTRIBUTE'' menu, align the rectangles RELATIVE TO ''LAST SELECTED'' and then select ''CENTER ON VERTICAL AXIS'' ON HORIZONTAL AXIS''. The two rectangles should now be centered. followed by ''CENTER rousseaumtetal.com Page 33/39 R58-NO09A

34 5.7. Now you must ensure that no part of the tool outlines are sitting outside of the smaller rectangle. If any are, you must reposition the affected tool outlines. Delete the photo of the tools first: Select the photo with the ''SELECT AND TRANSFORM'' arrow and hit the ''DELETE'' key Save the document. rousseaumtetal.com Page 34/39 R58-NO09A
35 6. Adding elements for an ergonomic grip on tools 6.1. Target the tools on which you want to add ergonomic grips Draw a circle with the ''CIRCLE'' function. Click on the circle using the ''SELECT AND TRANSFORM'' arrow. In the upper tool bar, adjust the dimensions of the circle by changing the numbers in the fields provided. For example, a circle with a 1'' diameter, type 1'' in the ''W'' field for the width and 1'' in the ''H'' field for the height. Tip : Ergonomics It is recommended to consider adding ergonomic grips around the tools in order to facilitate handling. You can simply add 1'' semi-circles on each side of the tool You must be sure that the units of measurement are in inches. By default they will be expressed in pixels (px) Place the circle on the correct tool on the drawing You can add as many circles as you wish by selecting the first circle with the ''SELECT AND TRANSFORM'' arrow and using command CTRL+C (COPY) followed by CTRL+V (PASTE). Tip Astuce : Lining : Aligner the circles cercles up Use Pour the aligner ''ALIGN deux AND cercles, DISTRIBUTE utiliser la OBJECTS'' commande ''ALIGNER function to ET correctly position the circles in relation to each other. As DISTRIBUER'' démontré au point shown in point Tip : Copy several circles To repeat the same circle layout on a new tool, it is possible to copy both circles at the same time. Copying both circles allows you to keep the same spacing. Select the first circle and hold the ''SHIFT'' key while you then select the second circle. Then use the CTRL+C (COPY) and CTRL+V (PASTE) functions to place the circles on the next tool. Tip : Straight angle movements Move a circle at a straight angle by holding the CTRL key while moving it. rousseaumtetal.com Page 35/39 R58-NO09A
36 ATTENTION : Ergonomic grips not always required Adding ergonomic grips around tools can be very useful in certain cases however, one must be careful because they may not be useful in every case. In fact, they may even get in the way in some cases. Example no.1 : A tool that is more than 1'' high placed on a cut foam insert ½'' high. In this case, seeing as the tool is higher than the foam insert, it is easy to grip without the help of an ergonomic grip. Example no.3 : A tool with a lot of space around it. In certain cases, using foam inserts is to visually facilitate locating tools (5S application).in these situations, some people will prefer to leave extra space around the tools. In these cases, it may not be necessary or useful to add ergonomic grips. Example no.2 : A tool like a pair of pliers A shape with an empty section due to the shape of the tool allows for easy handling without having to add ergonomic grips. Tip : Alternative ergonomic grip Another method for adding an ergonomic grip is to draw a rectangular shape with rounded ends which passes through the entire series of tools. To do this, draw a rectangle and adjust the dimensions to those required. By clicking on the rectangle with the ''RECTANGLE'' function, it will go into edit mode and it will be possible to round the ends starting from the corner with the small circle. You can simply slide the small circle along the horizontal or vertical and the corner will round. To pivot the rounded rectangle, select it with the ''SELECT AND TRANSFORM'' arrow and click on the rectangle twice, the rotation arrows will appear. Simply pivot your object using the arrows. rousseaumtetal.com Page 36/39 R58-NO09A

37 7. Verifying the space between the tools 7.1. Draw a circle with the ''CIRCLE'' function. Click on the circle using the ''SELECT AND TRANSFORM'' arrow. In the upper tool bar, adjust the dimensions of the circle by changing the numbers in the fields provided. For example, a circle with a 0.375'' diameter, type 0.375'' in the ''W'' field for the width and 0.375'' in the ''H'' field for the height. ATTENTION : It is important to respect the minimum spacing requirements around the tools : ½'' thick foam : 1/4'' to 3/8'' 1'' thick foam : 3/8'' to 1/2'' 7.2. Please ensure that the units of measurement are in inches. By default they appear in pixels (px) Once you have drawn the circle, you must ensure that it is in the foreground (please refer to point 3.10). rousseaumtetal.com Page 37/39 R58-NO09A
38 7.4. It is recommended to fill the circle with a colour from the ''FILL AND STROKE'' menu. Select the circle with the ''SELECT AND TRANSFORM'' arrow. Once you have done this, place the mouse above the circle contour, click on the right button on the mouse and you will see the drop-down menu appear. Select the ''FILL AND STROKE'' option. All that remains if for you to select a colour Use the ''SELECT AND TRANSFORM'' arrow to move the circle over the tool drawings. Seeing as the circle corresponds to the minimum spacing requirements, it is easy for you to verify the spacing that you have. If needed, move certain tools and reverify the spacing. rousseaumtetal.com Page 38/39 R58-NO09A
39 8. Exporting and verifying the drawings 8.1. Save this document in the program''s standard format (.svg) on your hard drive if not already done Save the drawing in a ''PDF'' file Open the ''PDF'' file with a program that allows you to view this type of file (ex : Acrobat Reader) and ensure that the file is the same as your original drawing and is not missing any lines or tools Print the drawing from your drawing program or from Acrobat Reader. The goal of doing this is to simply verify the dimensions of a couple of the tools on the drawing If you do not have access to a large scale printer, it is often possible to print a section of the drawing on a standard size piece of paper It is recommended to print and verify several different types of tools. Please note that the scale should be 1: If printing from Acrobat Reader : Open the file Select a drawing zone (draw a selection rectangle) Print the selected drawing zone. Check the appropriate option in the print menu Send your drawing in a ''PDF'' as well as the original ''JPG'' photo to your Rousseau customer service representative. ATTENTION : Your file must be named according to the following models Project name or number drawer dimensions(wwddhh) sequential numbers ( , etc.) Example no1 : MLBodyShop Example no2 : DSHIndustries MLBodyShop DSHIndustries MLBodyShop DSHIndustries DSHIndustries Example no3 : Project18A Project18A rousseaumtetal.com Page 39/39 R58-NO09A
ILLUSTRATOR BASICS FOR SCULPTURE STUDENTS. Vector Drawing for Planning, Patterns, CNC Milling, Laser Cutting, etc.
 ILLUSTRATOR BASICS FOR SCULPTURE STUDENTS Vector Drawing for Planning, Patterns, CNC Milling, Laser Cutting, etc. WELCOME TO THE ILLUSTRATOR TUTORIAL FOR SCULPTURE DUMMIES! This tutorial sets you up for
Getting Started. with Easy Blue Print
 Getting Started with Easy Blue Print User Interface Overview Easy Blue Print is a simple drawing program that will allow you to create professional-looking 2D floor plan drawings. This guide covers the
SHAPE CLUSTER PHOTO DISPLAY
 SHAPE CLUSTER PHOTO DISPLAY In this Photoshop tutorial, we ll learn how to display a single photo as a cluster of shapes, similar to larger wall cluster displays where several photos, usually in different
CONTENT INTRODUCTION BASIC CONCEPTS Creating an element of a black-and white line drawing DRAWING STROKES...
 USER MANUAL CONTENT INTRODUCTION... 3 1 BASIC CONCEPTS... 3 2 QUICK START... 7 2.1 Creating an element of a black-and white line drawing... 7 3 DRAWING STROKES... 15 3.1 Creating a group of strokes...
Silhouette Connect Layout... 4 The Preview Window... 5 Undo/Redo... 5 Navigational Zoom Tools... 5 Cut Options... 6
 user s manual Table of Contents Introduction... 3 Sending Designs to Silhouette Connect... 3 Sending a Design to Silhouette Connect from Adobe Illustrator... 3 Sending a Design to Silhouette Connect from
How to Resize or Crop Digital Images Using Photoshop Elements For Your SchoolWeb Site
 How to Resize or Crop Digital Images Using Photoshop Elements For Your SchoolWeb Site Monica Mais 416 338-4260 monica.mais@tdsb.on.ca Sal Lopiccolo 416 397-3530 sal.lopiccolo@tdsb.on.ca How Pixels and
Rendering a perspective drawing using Adobe Photoshop
 Rendering a perspective drawing using Adobe Photoshop This hand-out will take you through the steps to render a perspective line drawing using Adobe Photoshop. The first important element in this process
User Guide. Version 1.4. Copyright Favor Software. Revised:
 User Guide Version 1.4 Copyright 2009-2012 Favor Software Revised: 2012.02.06 Table of Contents Introduction... 4 Installation on Windows... 5 Installation on Macintosh... 6 Registering Intwined Pattern
Toothbrush Holder. A drawing of the sheet metal part will also be created.
 Prerequisite Knowledge Previous knowledge of the following commands is required to complete this lesson; Sketch (Line, Centerline, Circle, Add Relations, Smart Dimension,), Extrude Boss/Base, and Edit
Chapter 6 Title Blocks
 Chapter 6 Title Blocks In previous exercises, every drawing started by creating a number of layers. This is time consuming and unnecessary. In this exercise, we will start a drawing by defining layers
User Guide. Version 1.2. Copyright Favor Software. Revised:
 User Guide Version 1.2 Copyright 2009-2010 Favor Software Revised: 2010.05.18 Table of Contents Introduction...4 Installation on Windows...5 Installation on Macintosh...6 Registering Intwined Pattern Studio...7
The Revolve Feature and Assembly Modeling
 The Revolve Feature and Assembly Modeling PTC Clock Page 52 PTC Contents Introduction... 54 The Revolve Feature... 55 Creating a revolved feature...57 Creating face details... 58 Using Text... 61 Assembling
Part 1- Fundamental Functions
 Part 1- Fundamental Functions Note: Alt+Tab will allow you to move between programs in the docker. Shift+Tab removes right pallets Tab removes all pallets Ctrl+1= centers art board Ctrl + 0= fill window
Welcome to Corel DESIGNER, a comprehensive vector-based package for technical graphic users and technical illustrators.
 Workspace tour Welcome to Corel DESIGNER, a comprehensive vector-based package for technical graphic users and technical illustrators. This tutorial will help you become familiar with the terminology and
Constructing a Wedge Die
 1-(800) 877-2745 www.ashlar-vellum.com Using Graphite TM Copyright 2008 Ashlar Incorporated. All rights reserved. C6CAWD0809. Ashlar-Vellum Graphite This exercise introduces the third dimension. Discover
Managing images with NewZapp
 Managing images with NewZapp This guide is for anyone using the NewZapp Fixed editor as opposed to the Drag and Drop editor. The Image Manager is where images are uploaded and stored in your NewZapp account
Adobe Photoshop CS5 Tutorial
 Adobe Photoshop CS5 Tutorial GETTING STARTED Adobe Photoshop CS5 is a popular image editing software that provides a work environment consistent with Adobe Illustrator, Adobe InDesign, Adobe Photoshop
Creating Photo Borders With Photoshop Brushes
 Creating Photo Borders With Photoshop Brushes Written by Steve Patterson. In this Photoshop photo effects tutorial, we ll learn how to create interesting photo border effects using Photoshop s brushes.
SolidWorks Tutorial 1. Axis
 SolidWorks Tutorial 1 Axis Axis This first exercise provides an introduction to SolidWorks software. First, we will design and draw a simple part: an axis with different diameters. You will learn how to
Sketch-Up Guide for Woodworkers
 W Enjoy this selection from Sketch-Up Guide for Woodworkers In just seconds, you can enjoy this ebook of Sketch-Up Guide for Woodworkers. SketchUp Guide for BUY NOW! Google See how our magazine makes you
Converting your patterns into a digital PDF By: BurdaStyle
 Converting your patterns into a digital PDF By: BurdaStyle http://www.burdastyle.com/techniques/converting-your-patterns-into-a-digital-pdf Here is a great way for you to be able to share your patterns
Preparing your artwork for clear Zipper Pulls using Illustrator
 Preparing your artwork for clear Zipper Pulls using Illustrator This tutorial contains everything you need to know about creating your own, printed clear acrylic zipper pulls. Including how to format your
Adobe Photoshop CC 2018 Tutorial
 Adobe Photoshop CC 2018 Tutorial GETTING STARTED Adobe Photoshop CC 2018 is a popular image editing software that provides a work environment consistent with Adobe Illustrator, Adobe InDesign, Adobe Photoshop,
Adobe Illustrator CS6
 Adobe Illustrator CS6 Table of Contents Image Formats 3 ai (Adobe Illustrator) 3 eps (Encapsulated PostScript) 3 PDF (Portable Document Format) 3 JPEG or JPG (Joint Photographic Experts Group) 3 Vectors
c) Save the document as taller3p1_tunombre
 Save the document as taller3p1_tunombre") WORKSHOP# 3 DRAW WITH INKSCAPE Preparing the page 1. Enter Inkscape and from the File menu, go to Document Properties. 2. Prepare a page with the following characteristics: a) Format A4 (millimeters as
WORKSHOP# 3 DRAW WITH INKSCAPE Preparing the page 1. Enter Inkscape and from the File menu, go to Document Properties. 2. Prepare a page with the following characteristics: a) Format A4 (millimeters as
Drawing with precision
 Drawing with precision Welcome to Corel DESIGNER, a comprehensive vector-based drawing application for creating technical graphics. Precision is essential in creating technical graphics. This tutorial
REVIT - RENDERING & DRAWINGS
 TUTORIAL L-15: REVIT - RENDERING & DRAWINGS This Tutorial explains how to complete renderings and drawings of the bridge project within the School of Architecture model built during previous tutorials.
Module 1C: Adding Dovetail Seams to Curved Edges on A Flat Sheet-Metal Piece
 1 Module 1C: Adding Dovetail Seams to Curved Edges on A Flat Sheet-Metal Piece In this Module, we will explore the method of adding dovetail seams to curved edges such as the circumferential edge of a
Modeling an Airframe Tutorial
 EAA SOLIDWORKS University p 1/11 Difficulty: Intermediate Time: 1 hour As an Intermediate Tutorial, it is assumed that you have completed the Quick Start Tutorial and know how to sketch in 2D and 3D. If
Part 8: The Front Cover
 Part 8: The Front Cover 4 Earpiece cuts and housing Lens cut and housing Microphone cut and housing The front cover is similar to the back cover in that it is a shelled protrusion with screw posts extruding
Line Drawing to Vector Image for Complete Beginners
 Line Drawing to Vector Image for Complete Beginners Copying a Drawing into Illustrator C6 and simplifying it Open a line drawing (scanned or a digital photo) in Photoshop. The drawing is likely to be quite
Architecture 2012 Fundamentals
 Autodesk Revit Architecture 2012 Fundamentals Supplemental Files SDC PUBLICATIONS Schroff Development Corporation Better Textbooks. Lower Prices. www.sdcpublications.com Tutorial files on enclosed CD Visit
AutoCAD 2D. Table of Contents. Lesson 1 Getting Started
 AutoCAD 2D Lesson 1 Getting Started Pre-reqs/Technical Skills Basic computer use Expectations Read lesson material Implement steps in software while reading through lesson material Complete quiz on Blackboard
New Sketch Editing/Adding
 New Sketch Editing/Adding 1. 2. 3. 4. 5. 6. 1. This button will bring the entire sketch to view in the window, which is the Default display. This is used to return to a view of the entire sketch after
EPS to Rhino Tutorial.
 EPS to Rhino Tutorial. In This tutorial, I will go through my process of modeling one of the houses from our list. It is important to begin by doing some research on the house selected even if you have
Photoshop 1. click Create.
 Photoshop 1 Step 1: Create a new file Open Adobe Photoshop. Create a new file: File->New On the right side, create a new file of size 600x600 pixels at a resolution of 300 pixels per inch. Name the file
Table of Contents. Lesson 1 Getting Started
 NX Lesson 1 Getting Started Pre-reqs/Technical Skills Basic computer use Expectations Read lesson material Implement steps in software while reading through lesson material Complete quiz on Blackboard
Key Terms. Where is it Located Start > All Programs > Adobe Design Premium CS5> Adobe Photoshop CS5. Description
 Adobe Adobe Creative Suite (CS) is collection of video editing, graphic design, and web developing applications made by Adobe Systems. It includes Photoshop, InDesign, and Acrobat among other programs.
Apex v5 Assessor Introductory Tutorial
 Apex v5 Assessor Introductory Tutorial Apex v5 Assessor Apex v5 Assessor includes some minor User Interface updates from the v4 program but attempts have been made to simplify the UI for streamlined work
OzE Field Modules. OzE School. Quick reference pages OzE Main Opening Screen OzE Process Data OzE Order Entry OzE Preview School Promotion Checklist
 1 OzE Field Modules OzE School Quick reference pages OzE Main Opening Screen OzE Process Data OzE Order Entry OzE Preview School Promotion Checklist OzESchool System Features Field unit for preparing all
Advance Steel. Tutorial
 Advance Steel Tutorial Table of contents About this tutorial... 7 How to use this guide...9 Lesson 1: Creating a building grid...10 Step 1: Creating an axis group in the X direction...10 Step 2: Creating
Quilt Pro 6 Lesson Quilt in a Quilt
 Quilt Pro 6 Lesson Quilt in a Quilt Quilt in a Quilt The Inner Quilt This quilt is a very complex design. We will cover a unique technique not covered in the manual. While any one can master the techniques
Overview of Photoshop Elements workspace
 Overview of Photoshop Elements workspace When you open Photoshop Elements, the Welcome screen offers you two options (Figure 1): The Organize button opens the Organizer. In the Organizer you organize and
SMALL OFFICE TUTORIAL
 SMALL OFFICE TUTORIAL in this lesson you will get a down and dirty overview of the functionality of Revit Architecture. The very basics of creating walls, doors, windows, roofs, annotations and dimensioning.
Learning Guide. ASR Automated Systems Research Inc. # Douglas Crescent, Langley, BC. V3A 4B6. Fax:
 Learning Guide ASR Automated Systems Research Inc. #1 20461 Douglas Crescent, Langley, BC. V3A 4B6 Toll free: 1-800-818-2051 e-mail: support@asrsoft.com Fax: 604-539-1334 www.asrsoft.com Copyright 1991-2013
ARCHICAD Introduction Tutorial
 Starting a New Project ARCHICAD Introduction Tutorial 1. Double-click the Archicad Icon from the desktop 2. Click on the Grey Warning/Information box when it appears on the screen. 3. Click on the Create
COPYRIGHT NATIONAL DESIGN ACADEMY
 National Design Academy How 2 Guide Use SketchUp with LayOut COPYRIGHT NATIONAL DESIGN ACADEMY Use SketchUp with LayOut In order to be able to produce accurate scale drawings in SketchUp, you must use
Lesson 6 2D Sketch Panel Tools
 Lesson 6 2D Sketch Panel Tools Inventor s Sketch Tool Bar contains tools for creating the basic geometry to create features and parts. On the surface, the Geometry tools look fairly standard: line, circle,
Creative Cut-Outs. 1Go to File>New>Blank File to create a new document and enter. Projects EXTRAS: GET MORE ONLINE!
 ALL IMAGES MIKE RODRIGUEZ Creative Cut-Outs By Mike Rodriguez Are you interested in applying some of your rapidly developing layer skills? In the May/June issue, we covered the basics of layers (Layers
GEO/EVS 425/525 Unit 2 Composing a Map in Final Form
 GEO/EVS 425/525 Unit 2 Composing a Map in Final Form The Map Composer is the main mechanism by which the final drafts of images are sent to the printer. Its use requires that images be readable within
PRODIM CT 3.0 MANUAL the complete solution
 PRODIM CT 3.0 MANUAL the complete solution We measure it all! General information Copyright All rights reserved. Apart from the legally laid down exceptions, no part of this publication may be reproduced,
Introduction to Sheet Metal Features SolidWorks 2009
 SolidWorks 2009 Table of Contents Introduction to Sheet Metal Features Base Flange Method Magazine File.. 3 Envelopment & Development of Surfaces.. 14 Development of Transition Pieces.. 23 Conversion to
Adobe Photoshop Notes. Adobe Photoshop CS3
 Adobe Photoshop Notes Adobe Photoshop CS3 Page 2 Introduction These notes have been put together for basic and advanced methods, features and language. I have also created notes on other Adobe products.
12. Creating a Product Mockup in Perspective
 12. Creating a Product Mockup in Perspective Lesson overview In this lesson, you ll learn how to do the following: Understand perspective drawing. Use grid presets. Adjust the perspective grid. Draw and
with MultiMedia CD Randy H. Shih Jack Zecher SDC PUBLICATIONS Schroff Development Corporation
 with MultiMedia CD Randy H. Shih Jack Zecher SDC PUBLICATIONS Schroff Development Corporation WWW.SCHROFF.COM Lesson 1 Geometric Construction Basics AutoCAD LT 2002 Tutorial 1-1 1-2 AutoCAD LT 2002 Tutorial
DeltaCad and Your Cylinder (Shepherd s) Sundial Carl Sabanski
 Sundial Carl Sabanski") 1 The Sundial Primer created by In the instruction set SONNE and Your Cylinder Shepherd s Sundial we went through the process of designing a cylinder sundial with SONNE and saving it as a dxf file. In
1 The Sundial Primer created by In the instruction set SONNE and Your Cylinder Shepherd s Sundial we went through the process of designing a cylinder sundial with SONNE and saving it as a dxf file. In
Vectorworks / MiniCAD Tutorials
 Vectorworks / MiniCAD Tutorials Tutorial 1: Construct a simple model of a little house Tutorial 2: Construct a 4 view Orthographic drawing of the Model These tutorials are available as Adobe Acrobat 4
Ornamental Pro 2004 Instruction Manual (Drawing Basics)
") Ornamental Pro 2004 Instruction Manual (Drawing Basics) http://www.ornametalpro.com/support/techsupport.htm Introduction Ornamental Pro has hundreds of functions that you can use to create your drawings.
Ornamental Pro 2004 Instruction Manual (Drawing Basics) http://www.ornametalpro.com/support/techsupport.htm Introduction Ornamental Pro has hundreds of functions that you can use to create your drawings.
House Design Tutorial
 Chapter 2: House Design Tutorial This House Design Tutorial shows you how to get started on a design project. The tutorials that follow continue with the same plan. When we are finished, we will have created
GETTING STARTED MAKING A NEW DOCUMENT
 Accessed with permission from http://web.ics.purdue.edu/~agenad/help/photoshop.html GETTING STARTED MAKING A NEW DOCUMENT To get a new document started, simply choose new from the File menu. You'll get
Digital Photography 1
 Digital Photography 1 Photoshop Lesson 3 Resizing and transforming images Name Date Create a new image 1. Choose File > New. 2. In the New dialog box, type a name for the image. 3. Choose document size
Photoshop Elements Hints by Steve Miller
 2015 Elements 13 A brief tutorial for basic photo file processing To begin, click on the Elements 13 icon, click on Photo Editor in the first box that appears. We will not be discussing the Organizer portion
Photoshop CC 2018 Essential Skills
 Photoshop CC 2018 Essential Skills Adobe Photoshop Creative Cloud 2018 University Information Technology Services Learning Technology, Training, Audiovisual and Outreach Copyright 2018 KSU Division of
11 Advanced Layer Techniques
 11 Advanced Layer Techniques After you ve learned basic layer techniques, you can create more complex effects in your artwork using layer masks, path groups, filters, adjustment layers, and more style
House Design Tutorial
 House Design Tutorial This House Design Tutorial shows you how to get started on a design project. The tutorials that follow continue with the same plan. When you are finished, you will have created a
Chapter 4: Draw with the Pencil and Brush
 Page 1 of 15 Chapter 4: Draw with the Pencil and Brush Tools In Illustrator, you create and edit drawings by defining anchor points and the paths between them. Before you start drawing lines and curves,
After completing this lesson, you will be able to:
 LEARNING OBJECTIVES After completing this lesson, you will be able to: 1. Create a Circle using 6 different methods. 2. Create a Rectangle with width, chamfers, fillets and rotation. 3. Set Grids and Increment
Diane Burton, STEM Outreach.
 123D Design Tutorial: LED decoration Before using these instructions, it is very helpful to watch this video screencast of the CAD drawing actually being done in the software. Click this link for the video
GIMP (GNU Image Manipulation Program) MANUAL
 MANUAL") Selection Tools Icon Tool Name Function Select Rectangle Select Ellipse Select Hand-drawn area (lasso tool) Select Contiguous Region (magic wand) Selects a rectangular area, drawn from upper left (or lower
Selection Tools Icon Tool Name Function Select Rectangle Select Ellipse Select Hand-drawn area (lasso tool) Select Contiguous Region (magic wand) Selects a rectangular area, drawn from upper left (or lower
User Guide V10 SP1 Addendum
 Alibre Design User Guide V10 SP1 Addendum Copyrights Information in this document is subject to change without notice. The software described in this document is furnished under a license agreement or
FILE ASSEMBLY GUIDE. ~ File Assembly Guidelines ~
 To reduce your costs in prepress and turn-around time for proofs, Standard Printing Company recommends using the following information as a guide for correct file assembly: Acceptable File Formats QuarkXpress
CREATE A BURNT EDGE EFFECT
 CREATE A BURNT EDGE EFFECT One of the all-time classic effects in Photoshop is the burnt edge, and there s lots of different ways to create it, but in this Adobe Photoshop tutorial, we re going to look
7.0 - MAKING A PEN FIXTURE FOR ENGRAVING PENS
 7.0 - MAKING A PEN FIXTURE FOR ENGRAVING PENS Material required: Acrylic, 9 by 9 by ¼ Difficulty Level: Advanced Engraving wood (or painted metal) pens is a task particularly well suited for laser engraving.
for Solidworks TRAINING GUIDE LESSON-9-CAD
 for Solidworks TRAINING GUIDE LESSON-9-CAD Mastercam for SolidWorks Training Guide Objectives You will create the geometry for SolidWorks-Lesson-9 using SolidWorks 3D CAD software. You will be working
LESSON 02: GET STRONGER FOR PS USERS COMPANION BOOK. Digital Scrapbook Academy. February 2018: Lesson 02 Get Stronger for Photoshop Users
 Digital Scrapbook Academy February 2018: Lesson 02 LESSON 02: GET STRONGER FOR PS USERS COMPANION BOOK Page 1 of 19 Table of Contents Table of Contents 2 Welcome to Lesson 02 for Photoshop Users 4 1: Add
Using Photoshop Elements
 Using Photoshop Elements Created By: Rick Williams August 2004 Table of Contents Photoshop Element Tools...Page 1 Tool Descriptions... Page 3 Starting Photoshop Elements... Page 7 Resizing an Image...
By Washan Najat Nawi
 By Washan Najat Nawi how to get started how to use the interface how to modify images with basic editing skills Adobe Photoshop: is a popular image-editing software. Two general usage of Photoshop Creating
Exploring Photoshop Tutorial
 Exploring Photoshop Tutorial Objective: In this tutorial we will create a poster composed of three distinct elements: a Bokeh, an image and title text. The Bokeh is an effect which is sometimes seen in
ACI Sketch. Copyright October 2008, ACI All Rights Reserved. 24 Old Kings Road North Palm Coast, FL appraiserschoice.com
 ACI Sketch Copyright October 2008, ACI All Rights Reserved 24 Old Kings Road North Palm Coast, FL 32137 appraiserschoice.com 800.234.8727 ACI Sketch Contents Getting Started 1 Working with the Grid 2 Unit
Quilt-Pro 6. Creating a Panel Quilt
 QP6 Lessons posted Page 1 Creating a Panel Quilt Quilt-Pro 6 I have seen some really beautiful fabric panels that would look absolutely gorgeous in a quilt. Panel quilts can be made quickly or can be as
House Design Tutorial
 House Design Tutorial This House Design Tutorial shows you how to get started on a design project. The tutorials that follow continue with the same plan. When you are finished, you will have created a
The ideal K-12 science microscope solution. User Guide. for use with the Nova5000
 The ideal K-12 science microscope solution User Guide for use with the Nova5000 NovaScope User Guide Information in this document is subject to change without notice. 2009 Fourier Systems Ltd. All rights
AutoCAD Tutorial First Level. 2D Fundamentals. Randy H. Shih SDC. Better Textbooks. Lower Prices.
 AutoCAD 2018 Tutorial First Level 2D Fundamentals Randy H. Shih SDC PUBLICATIONS Better Textbooks. Lower Prices. www.sdcpublications.com Powered by TCPDF (www.tcpdf.org) Visit the following websites to
PHOTOSHOP. Introduction to Adobe Photoshop
 PHOTOSHOP You will; 1. Learn about some of Photoshop s Tools. 2. Learn how Layers work. 3. Learn how the Auto Adjustments in Photoshop work. 4. Learn how to adjust Colours. 5. Learn how to measure Colours.
PHOTOSHOP PUZZLE EFFECT
 PHOTOSHOP PUZZLE EFFECT In this Photoshop tutorial, we re going to look at how to easily create a puzzle effect, allowing us to turn any photo into a jigsaw puzzle! Or at least, we ll be creating the illusion
Module 1G: Creating a Circle-Based Cylindrical Sheet-metal Lateral Piece with an Overlaying Lateral Edge Seam And Dove-Tail Seams on the Top Edge
 Inventor (10) Module 1G: 1G- 1 Module 1G: Creating a Circle-Based Cylindrical Sheet-metal Lateral Piece with an Overlaying Lateral Edge Seam And Dove-Tail Seams on the Top Edge In Module 1A, we have explored
Star Defender. Section 1
 Star Defender Section 1 For the first full Construct 2 game, you're going to create a space shooter game called Star Defender. In this game, you'll create a space ship that will be able to destroy the
Training Guide 1 Basic Construction Overview. (v1.1)
") Training Guide 1 Basic Construction Overview (v1.1) Contents Training Guide 1 Basic Construction Overview... 1 Creating a new project... 3 Entering Measurements... 6 Adding the Walls... 10 Inserting Doors
Training Guide 1 Basic Construction Overview (v1.1) Contents Training Guide 1 Basic Construction Overview... 1 Creating a new project... 3 Entering Measurements... 6 Adding the Walls... 10 Inserting Doors
Cube in a cube Fusion 360 tutorial
 Cube in a cube Fusion 360 tutorial n Before using these instructions, it is helpful to watch this video screencast of the CAD drawing actually being done in the software. Click to link to the video tutorial.
How to Create Animated Vector Icons in Adobe Illustrator and Photoshop
 How to Create Animated Vector Icons in Adobe Illustrator and Photoshop by Mary Winkler (Illustrator CC) What You'll Be Creating Animating vector icons and designs is made easy with Adobe Illustrator and
Module 2: Radial-Line Sheet-Metal 3D Modeling and 2D Pattern Development: Right Cone (Regular, Frustum, and Truncated)
") Inventor (5) Module 2: 2-1 Module 2: Radial-Line Sheet-Metal 3D Modeling and 2D Pattern Development: Right Cone (Regular, Frustum, and Truncated) In this tutorial, we will learn how to build a 3D model
Inventor (5) Module 2: 2-1 Module 2: Radial-Line Sheet-Metal 3D Modeling and 2D Pattern Development: Right Cone (Regular, Frustum, and Truncated) In this tutorial, we will learn how to build a 3D model
House Design Tutorial
 Chapter 2: House Design Tutorial This House Design Tutorial shows you how to get started on a design project. The tutorials that follow continue with the same plan. When you are finished, you will have
Floorplanner Drawing Manual
 Floorplanner Floorplanner Drawing Manual Drawing Manual Floorplanner lets you easily create interactive floorplans and publish them online. This manual explains the floorplanner drawing tool. For details
Recitation 2 Introduction to Photoshop
 Recitation 2 Introduction to Photoshop What is Adobe Photoshop? Adobe Photoshop is a tool for creating digital graphics either by starting with a scanned photograph or artwork or by creating the graphics
Photoshop CC Editing Images
 Photoshop CC Editing Images Rotate a Canvas A canvas can be rotated 90 degrees Clockwise, 90 degrees Counter Clockwise, or rotated 180 degrees. Navigate to the Image Menu, select Image Rotation and then
Digital Arts I - Course Outline
 Points Course Possible Hours Course Overview 4 Lesson 1: Start the Course Identify computer requirements. Learn how to move through the course. Switch between windows. Lesson 2: Set Up Your Computer Find
Adding Fireworks To A Photo With Photoshop
 Adding Fireworks To A Photo With Photoshop Written by Steve Patterson. In this Photoshop Effects tutorial, we re going to learn how to add fireworks to a photo. What you ll need is a photo of fireworks
DeltaCad and Your Horizontal Altitude Sundial Carl Sabanski
 1 The Sundial Primer created by In the instruction set SONNE and Your Horizontal Altitude Sundial we went through the process of designing a horizontal altitude sundial with SONNE and saving it as a dxf
Drawing 1: Tools and Techniques in Corel Draw
 Drawing 1: Tools and Techniques in Corel Draw Introduction: what this assignment is about Drawing is an essential skill for Earth Science graduates, who typically produce maps, cross-sections and other