Joto 5 in 1 MugPress Manual Model No.: E-HP-JMP-51
|
|
|
- Ethan Clark
- 5 years ago
- Views:
Transcription
1 Joto 5 in 1 MugPress Manual Model No.: E-HP-JMP-51 OPERATOR S MANUAL VERSION 2 TM Bringing images to life TM
2 Safety Instructions 2


3 Safety Maintenance


4
 Turn Individual Mug Elements on.")
 To start the mug press, press ok. Use the arrow keys to swtich between fahrenheit or Celsius. 2.")
 After choosing Fahrenheit or Celsius, Use the arrow keys to set the Press Temperatue. 2.")

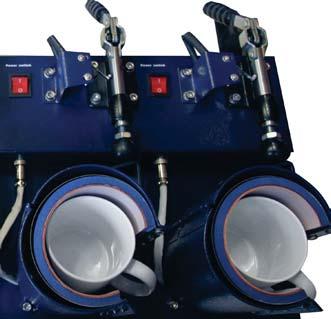
5 1.) Turn the Main Power Switch on. The Main Power Switch is at the back of the mug press. 2.) Turn Individual Mug Elements on. Note - To conserve power and to prolong mug element life, only turn on the elements you need to use. Main Power Switch 1.) To start the mug press, press ok. Use the arrow keys to swtich between fahrenheit or Celsius. 2.) Press ok to save your selection and to move to the next step 1.) After choosing Fahrenheit or Celsius, Use the arrow keys to set the Press Temperatue. 2.) Press ok again to save your settings and to move to the next step. Note: This mug press should not be set to exceed 200C or 400F. Setting the press 1.) After choosing your press temperature, use the arrow keys to set your press time 2.) Once the press time is choosen, press the ok button to save your settings Note: The press will not heat up until you have set both the press temperature, and press time values, and pushed ok to save your settings. 5
6 1.) Turn on the Main Power Switch 2.) Turn on the individual power switches for the mug elements you wish to use 3.) Set the appropriate Press Temperature, and Time. 4.) Tape your imaged transfer/sublimation paper to your mug with heat tape. 5.) Set the pressure. To do this, place a blank mug into the mug element. Adjust pressure so that the mug cannot be moved once press is closed). Turn pressure knob counter-clockwise to tighten and clockwise to loosen. 6.) Wait until current temperature is the same as set temperature. Once the mug press is at temperature, place mug into the press. Close the mug press. 7.) Timer will start counting down. The press will beep when the set time has lapsed. When mug press beeps, open mug press and take out mug. Note: Ensure the timer starts immediately after closing the press. If it does not, take the bottle out & wait for the temperature to go up to the set temp. 8a.) For sublimation, peel immediately and dunk into warm-cold water 8b.) For Hard Surface Papers, Dunk in warm water-cold water. Then wait until the mug is cold before peeling. 1.) Turn on the Main Power Switch 2.) Turn on the individual power switches for the mug elements you wish to use 3.) Set the appropriate Press Temperature, and Time. 4.) Tape your imaged transfer/sublimation paper to your mug with heat tape. 5.) Place the green heat shield in your press. 6.) Set the pressure. To do this, place a blank water bottle into the mug element. and heat shield cannot be moved once press is closed). Turn pressure knob counter-clockwise to tighten and clockwise to loosen. 7.) Wait until current temperature is the same as set temperature. Once the mug press is at temperature, place mug into the press. Close the mug press. Note: Ensure the timer starts immediately after closing the press. If it does not, take the bottle out & wait for the temperature to go up to the set temp. 8.) Timer will start counting down. The press will beep when the set time has lapsed. When mug press beeps, open mug press and take out mug. 9a.) For sublimation, peel immediately and dunk into warm-cold water 9b.) For Hard Surface Papers, Dunk in warm water-cold water. Then wait until the mug is cold before peeling. 6

7 2. Machine Dimension: 820 x 365 x 285mm 5. Voltage: 220V/1Phase; 110V/1Phase 6. Power: 1.5KW 7. Recommend Setting: 30~280s; 180~200 C Time Range: 0~450s Maximum Temp: 200 C 9. Gross Weight: 29kg Note: Temperature is in Celsius. This mug press should not be set to exceed 200C. Setting the 7
8 Maintenance Please switch off the machine and unplug the power cord when the machine is not in use. To prolong the life of the heat elements and to conserve power, please turn off any individual mug elements not in use. Mug elements will wear out over time. When they wear out, you will need to replace them with new ones. The rated life expectancy of an mug element is approximately mugs. Elements may wear out earlier due to other factors: 1.) No mug is in the press when on and the press is closed 2.) Physical abuse 3.) Environmental factors 2) The mug element will start to cool down to room temperature, if heat press stays unused for more than 30 minutes. Temperature: 180C Time: seconds Temperature: 180C Time: 240 seconds Temperature: 160C Time: seconds Temperature: 180C Time: seconds Temperature: 180C Time: 240 seconds Stainless Steel Water Bottles Temperature: 160C Time: seconds 8
 With the Mug Press open, unscrew the six screws that hold the mug element in place. 5.")
9 1.) Ensure both the individual power switch and the main power switch is off 2.) Unplug the mug press if it is still plugged in. 3.) Detach the mug element cord from the mug press. Unscrew the ring that holds the cord in place before detaching. See below diagram for detailed instructions 4.) With the Mug Press open, unscrew the six screws that hold the mug element in place. 5.) Gently slide the mug element out of the mug press. Please be careful not to damage the cord or the mug press. 6.) Gently slide the new mug element into the mug press 7.) Re-screw the 6 screws to keep the mug element from moving 8.) Connect the new mug element cord to the mug press. Ensure that the pattern on the cord matches the socket on the mug press. Mug Element Cord and ring 6 screws that hold mug element in place 9
: Thermocouple 618T: Digital Controller")
10 K 0 : Power Switch K11-K15: Individual Limit FU:Fuse EH 1 EH 2 :Heating Pipe K1-K5: Individual Power Switch C1-C5: Buzzer A(B): Thermocouple 618T: Digital Controller 10
11 Serial No. Part Name Qty 1 Machine Body 1 2 Cover Plate 1 3 Rubber Foot 4 4 Transformer 1 5 Digital Controller 1 6 Solid State Relay 1 7 Power Switch 5 8 Heater Installation Holder 5 9 Mug Heater 5 10 Fuse 1 11 Power Cord 1 12 Main Power Switch 1 13 Micro Switch 1 14 Speeding Clip 5 15 Clip Position Limiter
12 TM Bringing images to life TM
3D Printing with the Lulzbot 4 Alyssa Schwartz on 7/2/2018
 3D Printing with the Lulzbot 4 Alyssa Schwartz on 7/2/2018 1. Find or Design your Object. This can come from almost any source, but needs to be in a.stl file format. a. Thingiverse.com b. https://3dprint.nih.gov/
Self-Feeder Soldering Station DSF76D-IW. Operation Manual
 Self-Feeder Soldering Station DSF76D-IW Operation Manual Thank you for purchasing the Self-Feeder Lead Free Soldering Station. Please read this manual before operating the unit. Store this manual in a
AM33 LP-P Natural Gas Conversion Manual For Outdoor Use Only
 AM33 LP-P Natural Gas Conversion Manual For Outdoor Use Only 1 4 6 2 3 5 Part No. Qty Description 1 RCOZZ00339A 1 Main Burner Valve & Manifold Assembly with Valves (NG) 2 RCOZZ00340A 1 Side Burner Assembly
FLEXRISE2 VERSION. 2 LEG / 2 MOTOR ELECTRIC TABLE BASE (36 to 72 ) **PATENT PENDING**
 **PATENT PENDING**") FLEXRISE2 2 LEG / 2 MOTOR ELECTRIC TABLE BASE (36 to 72 ) VERSION A INSTRUCTION MANUAL CONTENTS: FLEX-MU-2L3S-C3672-K4# FEET-ADJ-UNV-2430# **PATENT PENDING** MAX Load 265 lbs (120 KG) Equally Divided MAX
FLEXRISE2 2 LEG / 2 MOTOR ELECTRIC TABLE BASE (36 to 72 ) VERSION A INSTRUCTION MANUAL CONTENTS: FLEX-MU-2L3S-C3672-K4# FEET-ADJ-UNV-2430# **PATENT PENDING** MAX Load 265 lbs (120 KG) Equally Divided MAX
HQ Hideaway. Installation and Operation Version 2.2, April 2015 Part # QT40100
 HQ Hideaway Installation and Operation Version 2.2, April 2015 Part # QT40100 Copyright 2015 Handi Quilter, Inc. All rights reserved. Printed in the U.S.A. Table of Contents Page Overview 3 To install
Lockformer / 16 Gauge Speednotch
 Lockformer / 16 Gauge Speednotch INSTALLATION PRELIMINARY: After uncrating, locate unit, with or without base skid, to area of operation. Unbind foot switch cord and cylinder hoses and remove gauge pin
H2-50 Hydrogen Generator Field Update
 This field update is intended to provide extra protection in the event the H2 generation cell fractures or cracks. Please add the additional parts to your H2-50 as soon as possible. Please take a digital
VERTEX FASTENERS PANELTACKER. Serial #
 VERTEX FASTENERS PANELTACKER www.vertexfasteners.com Model # Serial # 1 Table of Contents Description of Equipment 2 Operation Instruction..3 Maintenance..5 Recommended Spare Parts List.6 Troubleshooting
30DC Speed Lathe Manual
 30DC Speed Lathe Manual The Crozier Model 30DC Speed Lathe is our most popular model. It has many standard features not found on any other machine in its class or price range. Standard Features 3/4 HP
Please read carefuly before using. Aerobic Lateral Trainer ASSEMBLY MANUAL H901
 Please read carefuly before using. Aerobic Lateral Trainer ASSEMBLY MANUAL H901 TABLE OF CONTENTS 1 IMPORTANT SAFETY INFORMATION 2 Important Safety Precautions 2 Weight Limit Capacities 2 Warning 2 2
APES HD-7700 Version Operator s Training Manual
 APES-14-77 HD-7700 Version Operator s Training Manual Issue A1 09/03 P/N 900599 Performance Design Inc. 2350 East Braniff St. Boise Idaho 83716 This manual contains very important safety information and
INSTRUCTIONS FOR INSTALLATION AND SERVICE OF ZF3000 EXTERNAL BLIND
 R INSTRUCTIONS FOR INSTALLATION AND SERVICE OF ZF3000 EXTERNAL BLIND Before starting installation of the external blind, please read the following instructions. During transportation and storage, the
Daily Maintenance. 2. Insert bobbin cases in to rotary hooks. Make sure bobbin thread is not over 2 inches long. Close bobbin case covers.
 Rotary hook 1. Open bobbin case covers and remove bobbin cases. Use brush to remove lint build up in and around rotary hooks. Compressed air may also be used. Daily Maintenance Cle aning Oiling Rotary
Paramount MYT Tripod User Guide
 Paramount MYT Tripod User Guide Revision 1.1 December, 2014 Software Bisque, Inc. All rights reserved. Table of Contents MYT Tripod Setup and Use... 3 Height Adjustments... 3 Top Plate Adjustment... 7
installation instructions
 installation instructions Easi-Plan WC Frame 820mm with Dual Flush Cistern ref: EPWC-05-1005 Easi-Plan WC Frame 980mm with Dual Flush Cistern ref: EPWC-05-1505 EASI-PLAN installation instructions Parts
Installing the 3 Indexer: PRS Standard Tools
 888-680-4466 ShopBotTools.com Installing the 3 Indexer: PRS Standard Tools Copyright 2016 ShopBot Tools, Inc. page 1 Copyright 2016 ShopBot Tools, Inc. page 2 Table of Contents Route Cable into Box...5
RADIO ANTI TWO-BLOCK SYSTEM
 BB-550 TM RADIO ANTI TWO-BLOCK SYSTEM INSTALLATION MANUAL GREER Company 1918 East Glenwood Place, Santa Ana, CA 92705 Tel: (714) 259-9702 FAX (714) 259-7626 BB-550 TM Radio Anti Two-Block System PN W250000
How to operate TBC-50
 How to operate TBC-50 1. An example (Cutting length : 70mm, Cutting quantity : 120 pcs) Turn on the POWER SW. Set cutting length 70mm. (Press the following buttons in order.) Button "0" has a double functions
Mini Cooper Lock Actuator
 2001-2006 Mini Cooper Lock Actuator Replacement This guide is on how to remove the lock actuator from the cars door. Written By: Jem ifixit CC BY-NC-SA www.ifixit.com Page 1 of 13 INTRODUCTION In order
Customers should turn off the machine with the power cable and USB data cable pulled down from it when installing or removing extruder.
 INSTALLATION &REMOVAL of the EXTURDER Customers should turn off the machine with the power cable and USB data cable pulled down from it when installing or removing extruder. I.How to disassemble the extruder
Technical Information
 SPRING CYLINDER DISASSEMBLY The purpose of this document is to provide the service technician a fundamental understanding of the rammer foot disassembly procedure. It is recommended only authorized service
BELT & DISC SANDER MODEL No. CS6-9C Part No OPERATING & MAINTENANCE INSTRUCTIONS
 BELT & DISC SANDER MODEL No. CS6-9C Part No. 6500420 OPERATING & MAINTENANCE INSTRUCTIONS 1000 PARTS DIAGRAM - 2 - - 15 - PARTS LIST No. Description Part No. No. Description Part No. 1 Rubber pad HTCS6901
EllisSaw.com. EllisSaw.com P.O. Box Verona, WI
 P.O. Box 9019 Verona, WI 9-019 GENERAL OPERATING & SAFETY INSTRUCTIONS * READ INSTRUCTIONS BEFORE USE * CAUTION: Disconnect power supply cord from power source when doing repair work or changing belt.
Swift M2252DGL Series Microscope Use and Care Manual
 Swift M2252DGL Series Microscope Use and Care Manual SWIFT OPTICAL Enduring Quality and Technical Excellence 1 Swift Series M2252DGL Microscope The M2252DGL Series is ideal for elementary to high school
Recipro Saw MODEL JR3020. WARNING: For your personal safety, READ and UNDERSTAND before using. SAVE THESE INSTRUCTIONS FOR FUTURE REFERENCE.
 ENGLISH Recipro Saw MODEL JR3020 002479 DOUBLE INSULATION I N S T R U C T I O N M A N U A L WARNING: For your personal safety, READ and UNDERSTAND before using. SAVE THESE INSTRUCTIONS FOR FUTURE REFERENCE.
 GENERAL OPERATIONAL PRECAUTIONS WARNING! When using electric tools, basic safety precautions should always be followed to reduce the risk of fire, electric shock and personal injury, including the following.
AutoSeal FD 1506 Plus / FE 1506 Plus
 AutoSeal FD 1506 Plus / FE 1506 Plus FK / FL SERIES 06/2018 OPERATOR MANUAL FIRST EDITION TABLE OF CONTENTS DESCRIPTION 1 UNPACKING AND SET-UP 2 CONTROL PANEL 3 OPERATION 3 FOLD PLATE ADJUSTMENT 4 SETTING
Repair Parts List RANGE MODEL NUMBER JGS8750ADS. When requesting service or ordering parts, always provide the following information:
 Repair Parts List RANGE MODEL NUMBER JGS8750ADS When requesting service or ordering parts, always provide the following information: - Product Type - Part Number - Model Number - Part Description 2005
Tube Facing Tool.
 www.swagelok.com Tube Facing Tool This manual contains important information for the safe and effective operation of the Swagelok TF72 series tube facing tool. Users should read and understand its contents
Tapping Screw (W/Flange) 46 Cord Armor 47 Tube (D) 48 Cord. 45 Cord Clip. Tapping Screw (W/Flange) 10 Gear Cover Ass'y. 12 Socket (B) Ass'y
 46 Cord Armor 47 Tube (D) 48 Cord. 45 Cord Clip. Tapping Screw (W/Flange) 10 Gear Cover Ass'y. 12 Socket (B) Ass'y") W8VB The exploded assembly drawing should be used only for authoized service center. W8VB Item No. Part time 1 Magnetic Hex. Socket 2 Sub Stopper 3 O-Ring (S-16) 4 Locator (A) 5 Lock Sleeve (A) 6 O-Ring
W8VB The exploded assembly drawing should be used only for authoized service center. W8VB Item No. Part time 1 Magnetic Hex. Socket 2 Sub Stopper 3 O-Ring (S-16) 4 Locator (A) 5 Lock Sleeve (A) 6 O-Ring
SWIFT SERIES M2252DGL MICROSCOPE
 SWIFT SERIES M2252DGL MICROSCOPE The M2252DGL Series is ideal for elementary to high school classrooms. Built to withstand student use, this series has locked-on eyepieces, objectives, illuminator housing
XI. Rotary Attachment Setups
 XI. Rotary Attachment Setups 1) Turn off the laser. 2) Put the rotary attachment onto the engraving table. Ensure the two screw holes on right side of rotary attachment match the two corresponding holes
RPS /02 Effective for models with serial numbers beginning with "G".
 Instruction Sheet B2000 Cyclone Bender RPS-0097 0/02 Effective for models with serial numbers beginning with "G". IMPORTANT RECEIVING INSTRUCTIONS Visually inspect all components for shipping damage. If
Operation Manual Panel Mounting Gas Pressure Regulators
 687 Technology Way Napa, CA 94558 Phone: (707) 259-0102 FAX: (707) 259-0117 www.aptech-online.com Table of Contents: A. General information... 1 B. Panel Mount Nut - AP/AZ/AK/SL Model Regulators... 1 C.
Perfmaster Sprint
 Perfmaster Sprint 01-2016 CONTENTS CARE AND MAINTENANCE 1 SAFETY PROCEDURES 1 SPECIFICATIONS 1 COMPONENT IDENTIFICATION 2 MACHINE CONTROLS 3 MAIN POWER 3 SPEED CONTROL 3 EMERGENCY STOP 3 DELIVERY TRAY
2004-(Z Series) HDILA Lamp Replacement Procedure Quick Step Guide
 HDILA Lamp Replacement Procedure Quick Step Guide") 2004-(Z Series) HDILA Lamp Replacement Procedure Quick Step Guide How To Determine If The Lamp Requires Replacement? After 30 seconds of turning on the TV The POWER LED and LAMP LED rapidly blink together
2004-(Z Series) HDILA Lamp Replacement Procedure Quick Step Guide How To Determine If The Lamp Requires Replacement? After 30 seconds of turning on the TV The POWER LED and LAMP LED rapidly blink together
Basic steps to time the Gammill quilting machine s rotary sewing hook
 Basic steps to time the Gammill quilting machine s rotary sewing hook 1.) Turn the machine off and unplug it. 2.) With the needle bar in the raised position, remove the bobbin and bobbin case. 3.) Remove
25000 Series Lo-T TM Butterfly Control Valve Instructions
 November 2001 25000 Series Lo-T TM Butterfly Control Valve Instructions Instruction No. 25.1:IM PRELIMINARY STEPS Before installation, note the flow direction arrow on the valve body. The flow should enter
Repair Parts List REFRIGERATOR MODEL NUMBER MANUFACTURING NUMBER P W
 REFRIGERATOR Repair Parts List MODEL NUMBER 85288 MANUFACTURING NUMBER P1109012W When requesting service or ordering parts, always provide the following information: - Product Type - Part Number - Model
TAKE-A-LABEL Power Dr. Nunica, MI Phone (616) Fax (616)
 Fax (616)") OPERATIONS MANUAL MODEL TAL-3100C CONTINUOUS DUTY TAMP- LABELER TAKE-A-LABEL 16900 Power Dr. Nunica, MI 49448 Phone (616) 837-9300 Fax (616) 837-9301 http://www.take-a-label.com E-Mail: sales@take-a-label.com
OPERATIONS MANUAL MODEL TAL-3100C CONTINUOUS DUTY TAMP- LABELER TAKE-A-LABEL 16900 Power Dr. Nunica, MI 49448 Phone (616) 837-9300 Fax (616) 837-9301 http://www.take-a-label.com E-Mail: sales@take-a-label.com
Installation and Assembly - Universal Articulating Swivel Double-Arm for 42" - 60" Plasma Screens
 Installation and Assembly - Universal Articulating Swivel Double-Arm for 42" - 60" Plasma Screens Models: PLAV 70-UNL, PLAV 70-UNL-S PLAV 70-UNLP, PLAV 70-UNLP-S R This product is UL Listed. It must be
AutoSeal FD 2006IL / FE 2006IL
 AutoSeal FD 2006IL / FE 2006IL FI / FJ Series 06/2018 OPERATOR MANUAL First Edition TABLE OF CONTENTS DESCRIPTION 1 SPECIFICATIONS 1 UNPACKING 1 SETUP 2 Sealer Alignment Base Setup 2 Sealer Setup 2-4
User s Manual SOLDERING STATION
 User s Manual SOLDERING STATION ASE-1111 Thank you for choosing AKTAKOM soldering station. www.tmatlantic.com Please note the following safety notes to avoid malfunctions, damage or physical injury: Persons
elemento In general 2 Weights 2 Parts of the Elemento... 2 Mounting the Elemento.. 3 Placing the power cable... 4 Placing the controls...
 elemento In general 2 Weights 2 Parts of the Elemento..... 2 Mounting the Elemento.. 3 Placing the power cable... 4 Placing the controls.... 4 Attaching the brace..5 Placing the arm 6 Adjusting the force..
Slitter/E-Prom Upgrade for Duplo CC-228
 This Service Bulletin covers the upgrade of the Post Card Slitter and E-Prom for the Duplo CC-228 machines at Staples locations nationwide. Be sure to review and follow ALL of these instructions. Failure
END MILL RE-SHARPENER EMG-413
 END MILL RE-SHARPENER EMG-413 OPERATING INSTRUCTIONS -TABLE OF CONTENTS- A.SAFETY INSTRUCTIONS -------- 1 B.NAMES OF COMPONENTS ----- 2 C.OPERATIONS ------------------------ 3 D.REPLACING THE WHEEL --------
ABM International, Inc.
 ABM International, Inc. Lightning Stitch required 1 1.0: Parts List head and motor assembly (Qty. 1) Reel stand (Qty. 1) Needle bar frame clamp (Qty. 1) Motor drive (Qty. 1) 2 Cable harness with bracket
Technical description
 STAHLWILLE Standard Manoskop 721 Service Manoskop 730 List of contents Technical description... 27 ã=important safety points... 30 Operation... 32 Maintenance... 42 Cleaning the Manoskop... 47 Accessories...
OPERATOR S MANUAL DRILLING MACHINE WITH ELECTROMAGNETIC BASE
 OPERATOR S MANUAL DRILLING MACHINE WITH ELECTROMAGNETIC BASE UNIT 30 NEWHALLHEY BUSINESS PARK, NEWHALLHEY RD, RAWTENSTALL, ROSSENDALE, LANCASHIRE BB4 6HR Tel. +44 1706 229490, fax. +44 1706 830496 www.jeiuk.com
Auto Feed Screwdriver
 ENGLISH Auto Feed Screwdriver MODEL 6833 MODEL 6834 MODEL 6836 002607 DOUBLE INSULATION I N S T R U C T I O N M A N U A L WARNING: For your personal safety, READ and UNDERSTAND before using. SAVE THESE
!When using electrical equipment, basic safety precautions should always be followed, including the following: AIR FOIL CLUSTER CP5371
 AIR FOIL CLUSTER CP5371 Drawing: 762252XX Rev: B Sheet: 1 of 5 Eng: CLD Date Drawn: 01/30/17 TYPICAL FIXTURE 2-3/4" MOUNTING HOLE CENTERS ARM 700 ARM COVER CENTER PLATE STRUCTURAL MOUNTING 50-1/4" CP5371
Dremel 3D Printer Digital Fabrication Lab College of Design, Iowa State University
 Dremel 3D Printer Digital Fabrication Lab College of Design, Iowa State University 3D Printing - The following steps will guide the user on how to transfer digital work from a design software to setting
FD 2002IL AutoSeal System
 FD 2002IL AutoSeal System 4/2017 OPERATOR MANUAL FIRST EDITION TABLE OF CONTENTS DESCRIPTION 1 SPECIFICATIONS 1 UNPACKING 1 SETUP 2 Sealer Alignment Base Setup 2 Sealer Setup 2-4 Printer Alignment Base
SEQUIN DEVICE INSTALLATION MANUAL HCR
 SEQUIN DEVICE INSTALLATION MANUAL For qualified personal only HCR Happy Industrial Co. Ver. 1.1 Contents 1. List of required parts 2. Machine program version 3. Machine setting 4. Installation 3-1.Machine
Installation and Assembly - Universal Articulating Swivel Double-Arm for 42" - 60" Plasma Screens
 Installation and Assembly - Universal Articulating Swivel Double-Arm for 42" - 60" Plasma Screens Models: PLAV 70-UNL, PLAV 70-UNL-S PLAV 70-UNLP, PLAV 70-UNLP-S R This product is UL Listed. It must be
Scratch Assay Device for Wound Healing Studies
 Scratch Assay Device for Wound Healing Studies By Team Cell Scratcher: Hannah Morgan, Charles Merchant, and Zachariah Cribbin 1 Quick Start Guide 2 Comments: _ Table of Contents Cover Page 1 1.0 Quick
Automatic Screwdriver Model W 4YD. Handling instructions
 Automatic Screwdriver Model W 4YD Handling instructions Note: Before using this Electric Power Tool, carefully read through these HANDLING INSTRUCTIONS to ensure efficient, safe operation. It is recommended
Swift M2250 Series Microscope Care and Use Manual
 Swift M2250 Series Microscope Care and Use Manual SWIFT OPTICAL Enduring Quality and Technical Excellence. Swift Series M2250 Microscope The M2250 Series is ideal for elementary to high school classrooms.
The wick in your heater needs replacing if, after repeated cleanings, any of the following conditions still exist:
 WICK REPLACEMENT The wick in your heater needs replacing if, after repeated cleanings, any of the following conditions still exist: Slow to light, hard movement of the wick adjuster knob, kerosene odor
SOLDERING TESTER TM-200. Thank you for buying Soldering Tester TM-200. Please read this Owner's Operation Manual before using your soldering tester.
 OPERATION MANUAL SOLDERING TESTER TM-200 WARNING Read this Owner's Operation Manual before using your soldering tester. Failure to follow the warning and instructions in this manual could result in serious
DELUXE AIR PRESSURE CASTING MACHINE MODEL # S
 DELUXE AIR PRESSURE CASTING MACHINE MODEL # S INSTALLATION 99-002-D4AP 99-002-D4AP-A MAINTENANCE The points to look for in order to obtain a long and trouble free operation are: a. See that the oil fog
TRAKFAST REPAIR MANUAL DANGER TOOL DISASSEMBLY ALWAYS TAKE THE FOLLOWING PRECAUTIONS BEFORE ANY SERVICE OR ROUTING MAINTENANCE IS PERFORMED:
 DANGER ALWAYS TAKE THE FOLLOWING PRECAUTIONS BEFORE ANY SERVICE OR ROUTING MAINTENANCE IS PERFORMED: REMOVE FASTENERS REMOVE FUEL CELL REMOVE BATTERY REMOVE THE MAGAZINE ASSEMBLY Loosen and remove knob
The Instructions should be read, prior to commencing the installation, failure to follow these instructions will void your warranty.
 Low Voltage System The Platinum Low Voltage lighting system can power up to 120 candle pods depending on the length of cables used during the installation this can reduce the number of pods to 24 per outlet
USER'S MANUAL DMR-4350
 USER'S MANUAL DIGITAL MULTIMETER DMR-4350 CIRCUIT-TEST ELECTRONICS www.circuittest.com TABLE OF CONTENTS SAFETY Safety Information...................................... 2 Safety Symbols........................................
Astro-Physics Inc. 400QMD Lubrication/Maintenance Guide
 Astro-Physics Inc. 400QMD Lubrication/Maintenance Guide The following guidelines should be followed to lubricate the three main parts of the 400QMD mount. The QMD stands for Quartz Micro-Drive controller.
The Derby Magic Company Track Assembly Instructions, revision E page 1 of 12
 The Derby Magic Company Track Assembly Instructions, revision E page 1 of 12 Thank you for purchasing a Derby Magic Pinewood Derby Track. To assemble your track, start with the stand. The parts of the
Removing outter components
 Y Axis Motor Replacement Replacing the Y axis motor is a process that requires the individual to be somewhat mechanically inclined and can follow detailed instructions. If any of the following steps are
installation instructions WC Frame 1180mm with Dual Flush Cistern
 installation instructions WC Frame 1180mm with Dual Flush Cistern (C,D,E) K F/G N L M 12 13 14 16 1 2 11 A 5 6 Q O Y 3 C 10 E D B P,Z,AA R T V S 4 U 2 No. Part no. Description Quantity A WC Frame with
Orion m Series Welding System User Manual
 Orion m Series Welding System User Manual Table of Contents Chapter 1: Setup and Assembly... p.5 What is in the Box... p.5 Darkening Lens & Power Supply Setup... p.5 Microscope Arm Setup... p.6 Microscope
Power Planer 1900B/N1900B/1902
 Power Planer 1900B N1900B 1902 SPECIFICATIONS Model 1900B/N1900B/1902 Planing width... 82 mm Planing depth... 1 mm Shiplapping depth... 9 mm No load speed (min -1 )...16,000 Overall length... 290 mm Net
Quill Stop V2 Installation Guide 11/16/2014
 Thank you for purchasing the Quill Stop for the Sieg X3 (Grizzly G0463) and SX3 (Grizzly G0619) mills. Your feedback is always appreciated. Please email questions and comments to gregpriest@cox.net. What
AUC Cell Assembly Torque Stand. User Manual
 AUC Cell Assembly Torque Stand User Manual WARRANTY Spin Analytical Inc., warrants this product to be defect free in both material and workmanship for 90 days from the date of shipment. Labor services
AutoSeal FD 2002/FD 2032 FE 2002/FE 2032 OPERATOR MANUAL FIRST EDITION
 AutoSeal FD 2002/FD 2032 FE 2002/FE 2032 10/2012 OPERATOR MANUAL FIRST EDITION TABLE OF CONTENTS SUBJECT PAGE DESCRIPTION 1 SPECIFICATIONS 1 UNPACKING 2 2000/2032 Components 2 Optional Conveyor Components
Cat. No. H8861 Model: RCL-S-STAT
 -AAA Cat. No. H8861 Model: RCL-S-STAT INSTALLATION AND OPERATION INSTRUCTIONS IF YOU CANNOT READ OR UNDERSTAND THESE INSTALLATION INSTRUCTIONS DO NOT ATTEMPT TO INSTALL OR OPERATE INTRODUCTION This remote
PORTABLE HALOGEN WORK LIGHT OWNER S MANUAL
 PORTABLE HALOGEN WORK LIGHT OWNER S MANUAL L-9001 (29278) L-9002 (29276) WARNING: Read carefully and understand all ASSEMBLY AND OPERATION INSTRUCTIONS before operating. Failure to follow the safety rules
Pole Conversion System For safe and efficient conversion of non-lowering light poles.
 Conversion System USER GUIDE: OVERVIEW The Swivelpole Conversion Tool clamps onto the existing non-lowering pole and safely supports the pole during a cold cut with the Ratchet Pipe Cutter, eliminating
BRM * This item is for consumer use only and it is not meant for commercial use.
 BRM 10 * This item is for consumer use only and it is not meant for commercial use. OWNER S MANUAL General Information Safety Before you undertake any exercise program, please be sure to consult with your
Owners Manual AGBAY Double Blade Levelers
 Owners Manual AGBAY Double Blade Levelers (20 Agbay & 12 Agbay Jr. ) Made in USA Lower Blade Adjustment Knob Stainless Adjustment Rod Stainless Steel Blades Upper blade frame Lower blade frame Scale for
Replacing a Wheel on the Pinch Wheel assembly
 14140 NE 200th St - Woodinville, WA. 98072 - PH: (425) 398-8282 - Fax: (425) 398-8383 Replacing a Wheel on the Pinch Wheel assembly Determine which pinch wheel assembly your plotter or cutter has. See
LU6X-130 Instructions and Parts List (including LU6X Basic) Operating Instructions
 Operating Instructions") LORTONE LU6X-130 Item # 061-092 LU6X Basic Item # 061-090 LU6X-130 Instructions and Parts List (including LU6X Basic) Operating Instructions Introduction The LU6X is one the most versatile pieces of equipment
LORTONE LU6X-130 Item # 061-092 LU6X Basic Item # 061-090 LU6X-130 Instructions and Parts List (including LU6X Basic) Operating Instructions Introduction The LU6X is one the most versatile pieces of equipment
FLEX2 VERSION ALLFLEX 2 LEG / 3 SECTION HEIGHT ADJUSTABLE DESK **PATENT PENDING**
 FLEX2 ALLFLEX 2 LEG / 3 SECTON HEGHT ADJUSTABLE DESK VERSON A NSTRUCTON MANUAL CONTENTS: FLEX-MU-2L3S-C3672-K4# FEET-ADJ-UNV-2430# V1 **PATENT PENDNG** MAX Load 265 lbs (120 KG) Equally Divided MAX Load
PLATE JOINER 4 INCH. ASSEMBLY and OPERATING INSTRUCTIONS. Distributed Exclusively by Harbor Freight Tools
 PLATE JOINER 4 INCH 38437 ASSEMBLY and OPERATING INSTRUCTIONS Distributed Exclusively by Harbor Freight Tools 3491 Mission Oaks Blvd., Camarillo, CA 93011 Copyright 1998 by Harbor Freight Tools. All rights
SeeMeCNC Guides. Step 2. REV2 Rostock Max v3 Base Assembly. Second edition Rostock Max v3 assembly guide. Written By: JJ Johnson
 SeeMeCNC Guides Step 2. REV2 Rostock Max v3 Base Assembly Second edition Rostock Max v3 assembly guide. Written By: JJ Johnson INTRODUCTION This assembly guide will walk you though the steps of assembly
Olympus Time-lapse Microscope Basic operation
 Olympus Time-lapse Microscope Basic operation To start up the microscope 1. Switch on the Olympus UCB. (label as ) 1 Power Switch 2 2. Switch on the MT10. (label as ) Power Switch Page 1 of 18 3 3. Switch
Replacing the build plate clamps
 Repair manual Replacing the build plate clamps Instructions The build plate clamps hold the glass plate in place on the heated bed. There are two fixed in place at the back of the heated bed and two at
Pneumatic Drill / / Technical Specification
 CS UNITEC Pneumatic Drill 2 2502 0010 / 2 2502 0030 2 2506 0010 / 2 2506 0030 Technical Specification Model with Lever Throttle Model with Twist Throttle with Selfresetting 2 2502 0010 2 2502 0030 2 2506
18 GAUGE ELECTRIC METAL SHEAR
 241-9895 18 GAUGE ELECTRIC METAL SHEAR Operator s Manual SAVE THIS MANUAL You will need this manual for safety instructions, operating procedures and warranty. Put it and the original sales receipt in
The Derby Magic Company Track Assembly Instructions, revision F page 1 of 13
 The Derby Magic Company Track Assembly Instructions, revision F page 1 of 13 Thank you for purchasing a Derby Magic Pinewood Derby Track. To assemble your track, start with the stand. The parts of the
OM FL400. Reflected Light Fluorescence Microscope. Instruction Manual. Please read instructions carefully before using microscope.
 OM FL400 Reflected Light Fluorescence Microscope Instruction Manual Please read instructions carefully before using microscope. Contents Safety ---------------------------------------------- 2 Parts List
Dynamic Nanospray Probe (NSI-1) Installation Guide
 Installation Guide") Dynamic Nanospray Probe (NSI-1) Installation Guide This guide describes how to install the NSI-1 dynamic nanospray probe (see Figure 1) onto a TSQ Series or LTQ Series mass spectrometer and provides general
Dynamic Nanospray Probe (NSI-1) Installation Guide This guide describes how to install the NSI-1 dynamic nanospray probe (see Figure 1) onto a TSQ Series or LTQ Series mass spectrometer and provides general
iphone 4S Dismantling Instructions
 iphone 4S Dismantling Instructions These instructions will show you how to open the iphone to replace the digitizer, LCD screen and other internal parts. Opening your iphone will void your warrantee, and
Virutex.com. Virutex Edge Banders Operating Manual Model EB-10
 PHONE: 212-989-9868 800-868-9663 FX: 212-989-1777 VIRUTEX@OL.COM WWW.VIRUTEX.COM Virutex Edge Banders Operating Manual Model EB-10 1- Initial set up 2- Learn the machine ( do not turn the machine on )
Fig. 2 DORMA-Glas Stand/Issue 02/03 Seite/Page 1/7
 FSW Installation instructions Track rail 75 x 72 mm 1. Ceiling substructure and installation of the track rail (Fig. 1): The track rail must be bolted over its entire length (including the stacking track
OPERATING INSTRUCTIONS for. Gold-Print TM. Model SPR-10 Screen and Stencil Printer
 OPERATING INSTRUCTIONS for Gold-Print TM Model SPR-10 Screen and Stencil Printer TABLE OF CONTENTS INSTALLATION...3 Z ADJUSTMENTS...3 X, Y & Ø ADJUSTMENTS...4 CIRCUIT BOARD POSITIONING...5 ILLUSTRATIONS...6
Tuff Tread. 502 W. Montgomery STE 120 Willis, TX PH: (800) FAX: (888)
 FAX: (888)") Motor Brush Holder Assembly Installation Instructions Never use a sanding stone or comm stone on the commutator of a Noramco Fitness Treadmill motor. The commutator of a motor that has been properly broken
Motor Brush Holder Assembly Installation Instructions Never use a sanding stone or comm stone on the commutator of a Noramco Fitness Treadmill motor. The commutator of a motor that has been properly broken
Installing a 3 Indexer: Desktop Tools
 888-680-4466 ShopBotTools.com Installing a 3 Indexer: Desktop Tools built after October, 2012 Copyright 2016 ShopBot Tools, Inc. page 1 Copyright 2016 ShopBot Tools, Inc. page 2 Table of Contents Overview...5
BULLETIN # B
 Page 1 of 9 BULLETIN # B-18-2002 From: Parts and Service Division Date: February 14, 2002 To: All Authorized Service Agencies SUBJECT: Convection Oven Controller Troubleshooting MODELS AFFECTED: All Garland
FBX-PA-2AC. Third edition : April No
 FBX-PA-2AC Third edition : April 2006 No. 060058 INTRODUCTION Thank you very much for purchasing Kansai Special FBX series. Read and study this Instruction Manual carefully before you start any of the
4700/4800 Series. Time Stamp. Handling Manual
 4700/4800 Series Time Stamp Handling Manual Proprietary Notice This document contains proprietary information and such information may not be reproduced in whole or part without the written permission
Duplo 660 Guillotine Paper Cutter Installation / Operation Manual
 Duplo 660 Guillotine Paper Cutter Installation / Operation Manual 1 2 Contents PARTS LIST:... 5 TOOL KIT LIST:...5 INSTALLING THE SIDE TABLES:... 6 TABLE SQUARING:... 7 OPERATING PROCEDURE:...8 TO ADJUST