STEVE MILLS. A guide on how to build a Philosopher s Kiln
|
|
|
- Cameron Sutton
- 6 years ago
- Views:
Transcription

1 STEVE MILLS A guide on how to build a Philosopher s Kiln

2 Table of Contents Introduction History Construction Door Construction Additional Information Materials and Tools List Plans Firing Construction Modifications Photos Acknowledgements Additional Reading BEFORE WE START If you are contemplating building a fuel burning kiln, there are several things that you need to take into consideration: Where are you going to build it? Is it a heavily populated area? How close are your neighbours? Have you told them about your plans in detail and are they agreeable? If it is not your land have you asked the owners permission? Do you need planning permission? Is it a clean air zone? Does what you plan to do contravene any local by-laws? Have you checked with the fire department? Are you in an area which has dry seasons with a consequent fire risk? This may all seem basic stuff, but it all needs to be carefully checked out, after all this is something we are enthusiastic about, and a wrong or thoughtless action can create a lot of bad feeling, and potentially wreck anyone else s chances of doing something similar in the future. Potters are generally very environmentally aware, so the idea of us building a fuel burning kiln, and perhaps creating a fair amount of smoke in the process, makes us vulnerable among other things to the charge of having double standards. We do need to tread very carefully. Make sure that this is your mantra!
3 INTRODUCTION There have been several books produced on the subject of building fuel-burning kilns. Many of them assume that the reader wishes to build a fairly large kiln, requiring a reasonable sized workforce to construct, and possibly a team of several people to fire. This approach ignores the large number of people who wish to build a kiln of moderate size in their own backyard or garden, able to be built and fired by one or maybe two people. It is towards these people; the small scale potters/builders, that my efforts are directed. Perhaps selfishly I have always wanted to plough my own furrow, and for me this approach particularly applies to this subject. I feel that the only way to achieve a rapport with the tools and equipment that one uses is to be fully involved in their construction and eventual use. After all, we are all aware of the awful effects of committee design, and this applies to both building and firing kilns. Over the years I have been involved with many different sorts of fuel burning kilns, starting with gas, which I was involved with right at the beginning of my career. I would probably have stayed in that simple groove had I not, by accident, become involved in a BBC2 TV project, reconstructing an Iron Age Village. As the pottery expert, I had to help the inhabitants find a way of firing the pots they were making for everyday use, and so I was pitched headfirst into the, then mainly unexplored, mysteries of primitive firing. By the end of the project I was hooked and have spent the subsequent years exploring small scale effective firing techniques. The kilns that I will be describing here are to be looked upon as a starting point for your own journey. Building and then modifying these projects to suit your own needs is one approach, but perhaps it is better to read and observe, and then, coming to your own conclusions, build something which is perhaps radically different. If at that the end of all this, you come to the conclusion that building a good kiln is not rocket science, but something anyone can do, then I will have achieved my objective.


4 A BIT OF HISTORY The Double Cross-Draught Kiln I have always known this type of kiln as a Philosopher s Kiln, as firing it is a comparatively relaxed affair, allowing time for observation, discussion, and enjoyment of the process. This project began from a design more normally associated with Raku kilns. The utter simplicity of it is its greatest strength, and lends it to considerable personal modification. This was first assembled by a group of us at one of the Playing With Fire weekend courses I ran with Lexa Lawrance, using common house bricks, and was christened the 40 minute kiln because that was exactly how long it took 5 of us to build it. This first incarnation (left) had far too small a firebox (10.12 cu ft, 7.59 cu ft pot chamber), and consequently got very choked very quickly. We persevered with the firing however, and although we never got an indicated temperature above 950 degrees Centigrade, we found on opening it that we had obtained heatwork far in excess of that, which was very encouraging. The next version (right) which I built, was a much bigger effort all round, with the firebox almost half as big again (13.78 cu ft, with a cu ft pot chamber), and although it fired very well, there were still some problems with choking. One other version with these proportions was built in Gloucestershire. This one incorporated 5 mouseholes, 3 on one side and 2 on the other, the idea being to promote the burning of the embers. This was an improvement, but I felt the firebox was still too small. The next version was built in a friend s garden, her husband having (wisely) given her a pile of bricks for Christmas. As we had fewer bricks to play with than normal, this version was shorter overall, but much deeper in the firebox. The proportions were: firebox cu ft, pot chamber 7.59 cu ft. This kiln turned out to have almost ideal proportions; it fired easily and economically, and I found the depth of the pot chamber could be increased if need be without compromising its performance.


5 During 2003/4 this kiln was developed further still; initially in September 2003 with the addition of a metal chimney. This version was constructed, fired, and dismantled for a two day festival called Potfest in Frome, Somerset, UK, and the addition of a metal chimney reduced the building time. With 5 volunteers and myself it was built in 3 hours, and prepared and packed with bisque in 2 hours. We started firing at 14.40, and by had cone 12 down and all shut down and sealed. The results were excellent and all the participants had good pots out of it. This kiln was rebuilt on the car park at Bath Potters Supplies, Radstock, Nr. Bath, UK, but with further important modifications; the addition of a perforated floor to the firebox, the closing of what had been the primary air opening at the front, and the removal of the mouseholes on either side. This meant that all the air had to come into the firebox through the floor and consequently through the embers promoting much better combustion of them and as a result greater pre-heating potential. I used to think that I had got about as far as I could go with this kiln, WRONG! There is a lot of life left in this design, and as recent experience has shown me, lots of room for improvement and/or modification.


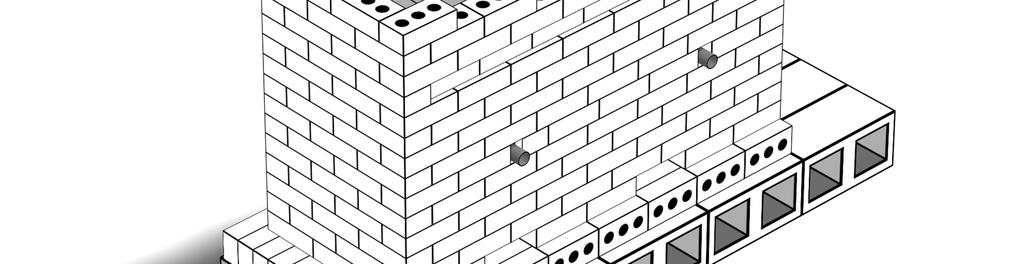
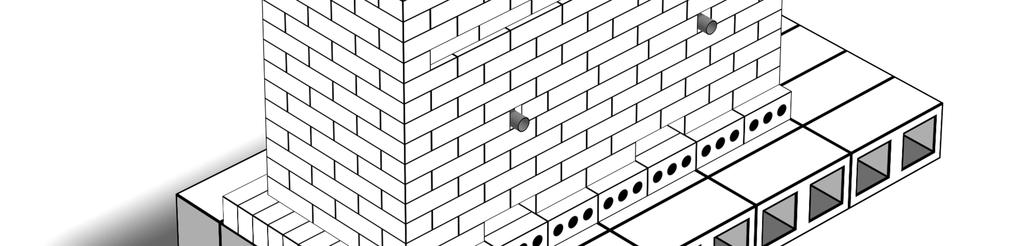
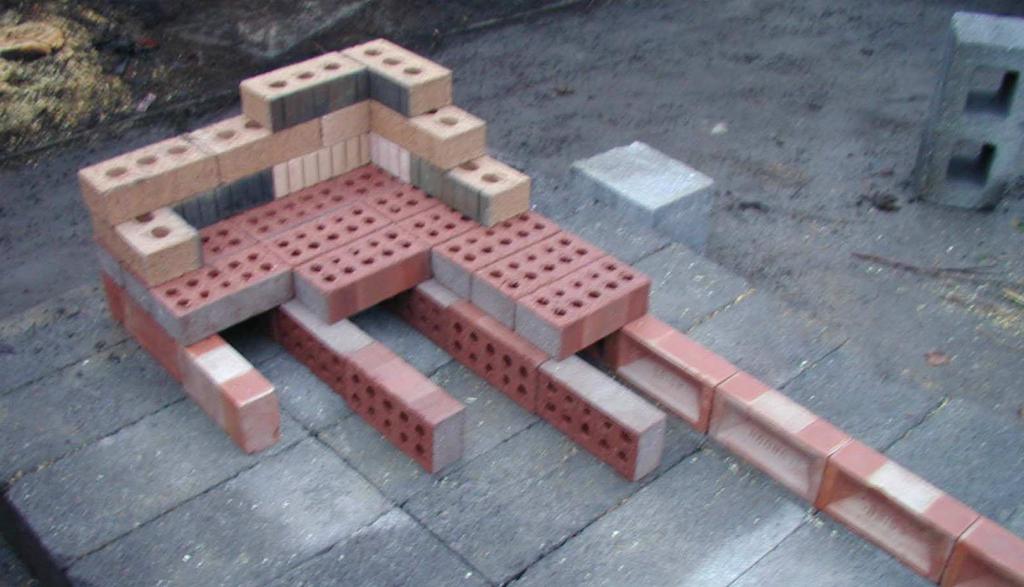
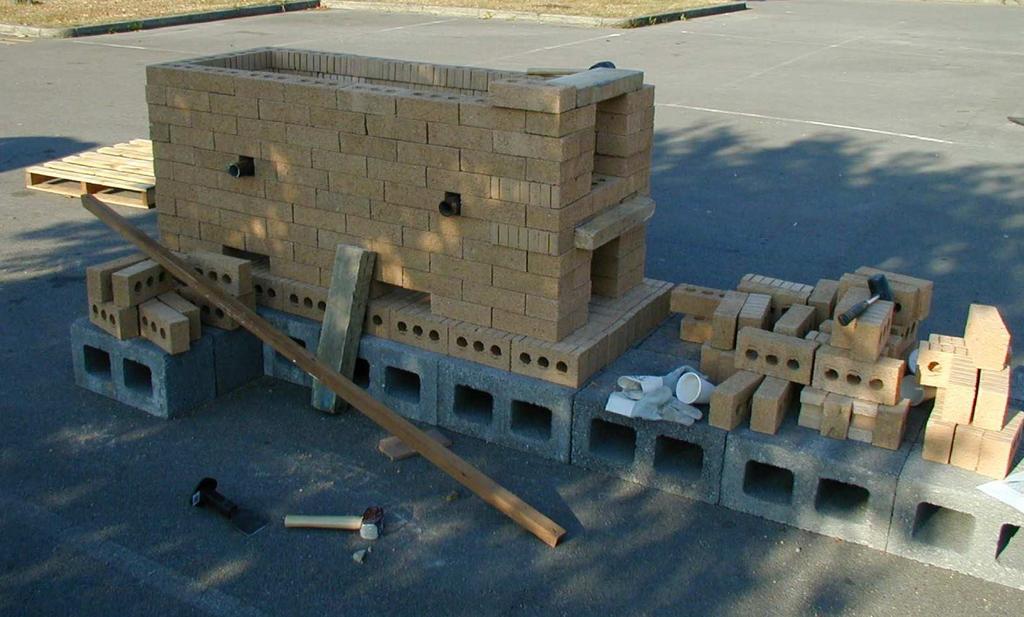
6 CONSTRUCTION On this page, rather than give detailed step by step instructions, I have chosen to illustrate various stages in the building of this sort of kiln, showing variations of each type, with comments alongside. Here are the beginnings of two versions of the same basic form. The top one employs 2 mouseholes on each side for secondary air to enter, primary air coming in through the ground level hole in the front. In the lower picture the firebox floor is made up of perforated bricks, which is the only entry for air. Although there is the same hole at the front of this kiln, it is purely for post firing cleaning out, and is blocked up during firing. The advantage of the perforated floor is that it positively encourages combustion of the embers over the entire floor thereby giving much better pre heating and consequently even better fuel economy. The 2 inner lines of bricks supporting the floor are also perforated to encourage air cross flow. The outer lines are plain house bricks. It s worth noting that the mouseholes are on one side, and the primary air entry at the front. Here you can see the 3 channels which are the primary air entries in this design. The channels extend right through to the other end to provide enough for full combustion (see the notes on proportions at the end of this section). During firing one or more entries can be closed at either end to help vary the atmosphere inside.

.")

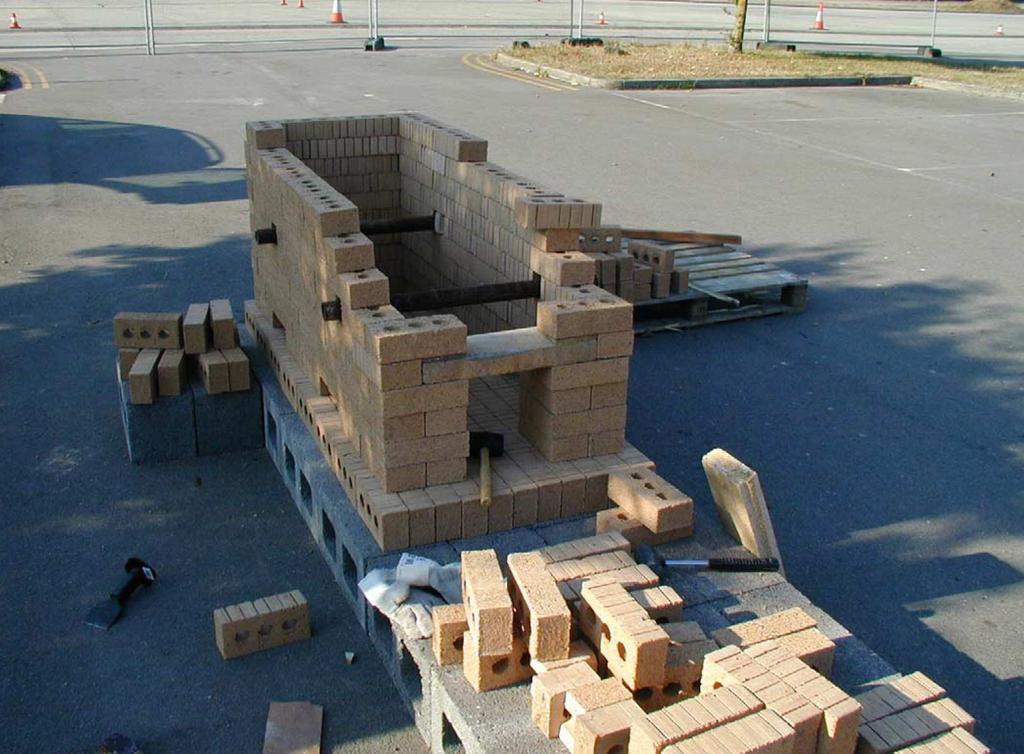
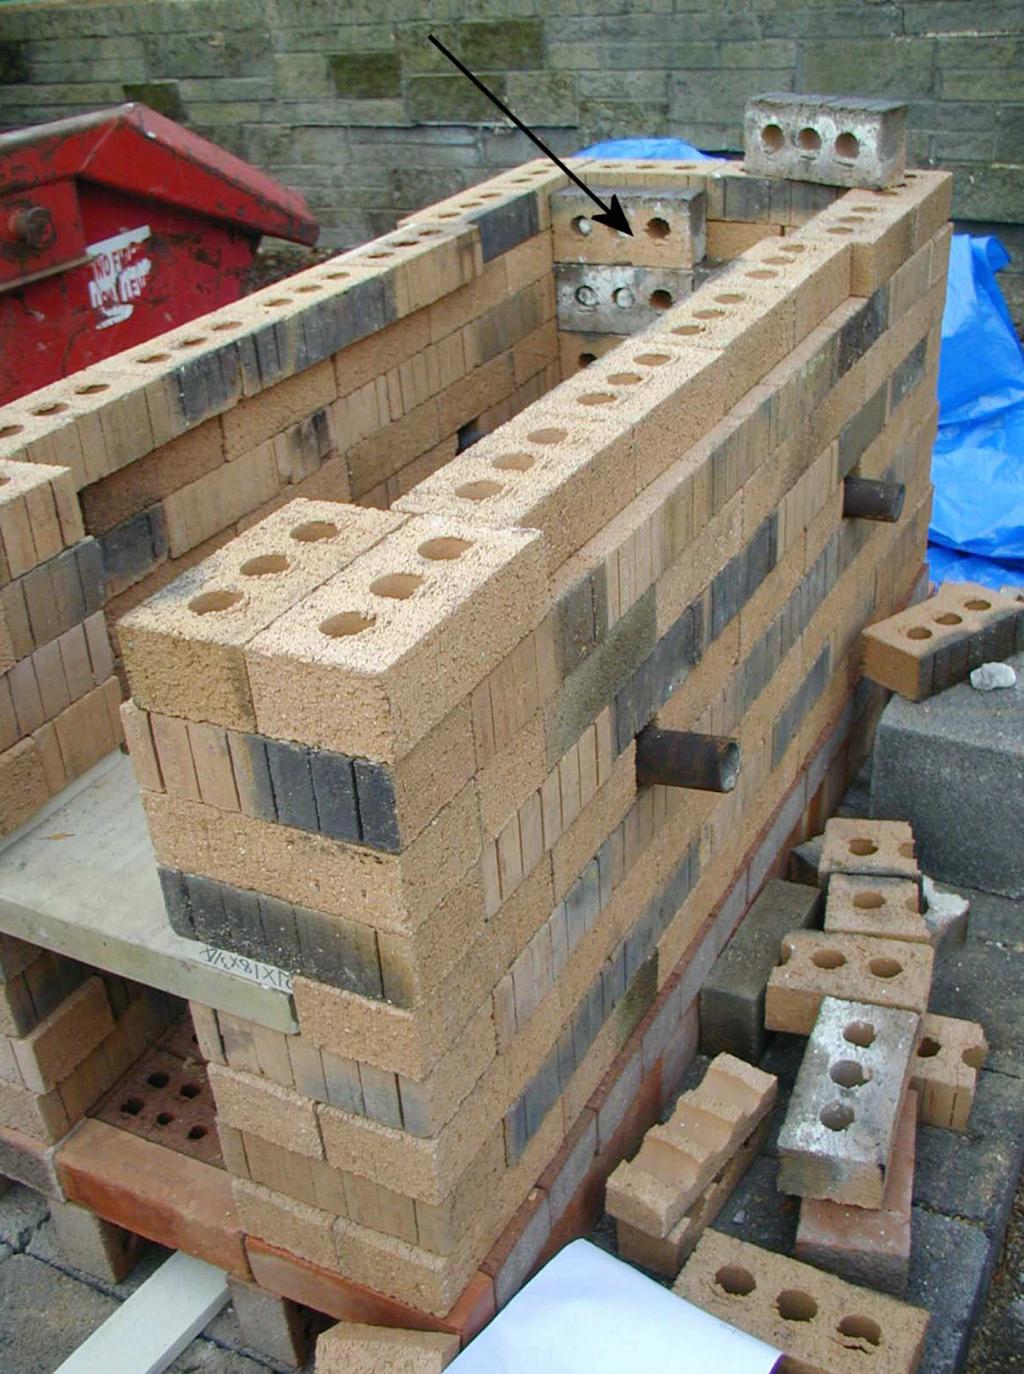
7 The upper hole here is for stoking. The lintel is made from thick kiln shelf. I have used cast fire brick pieces before, but they lack strength and are short lived. On the subject of stoking, one problem with a long firebox is that fuel needs to be thrown to the back in the latter stages of a firing. This has a punishing effect on the back wall, and has led in the past to bricks being knocked out of it during a firing. The solution is an inner replaceable loose brick wall which I call the thump wall, just visible on the right (marked with the arrow). Note also the ends of the two fire bars protruding from the wall on the right. The theory behind this is explained in the chapter on firing. This has now reached the stage where the firebox is complete and the pot chamber and base of the chimney can be built. Notice that the last layer of bricks has been corbelled in to support the pot chamber base shelves. Notice also the gap at the end of the shelves to allow fire entry from the firebox. In this case it is about nine inches deep and the width of the kiln. As you will have also seen, the pot chamber base shelves are quite thick. This is needed to provide strong support for the wares packed in it, and also to give some degree of insulation as heat can be rapidly lost downwards. In some builds I have done the only shelves available were Silicon Carbide which are very thin, therefore it was necessary to make up a sandwich of two layers of shelves with Ceramic Fibre in between to achieve the required insulation.


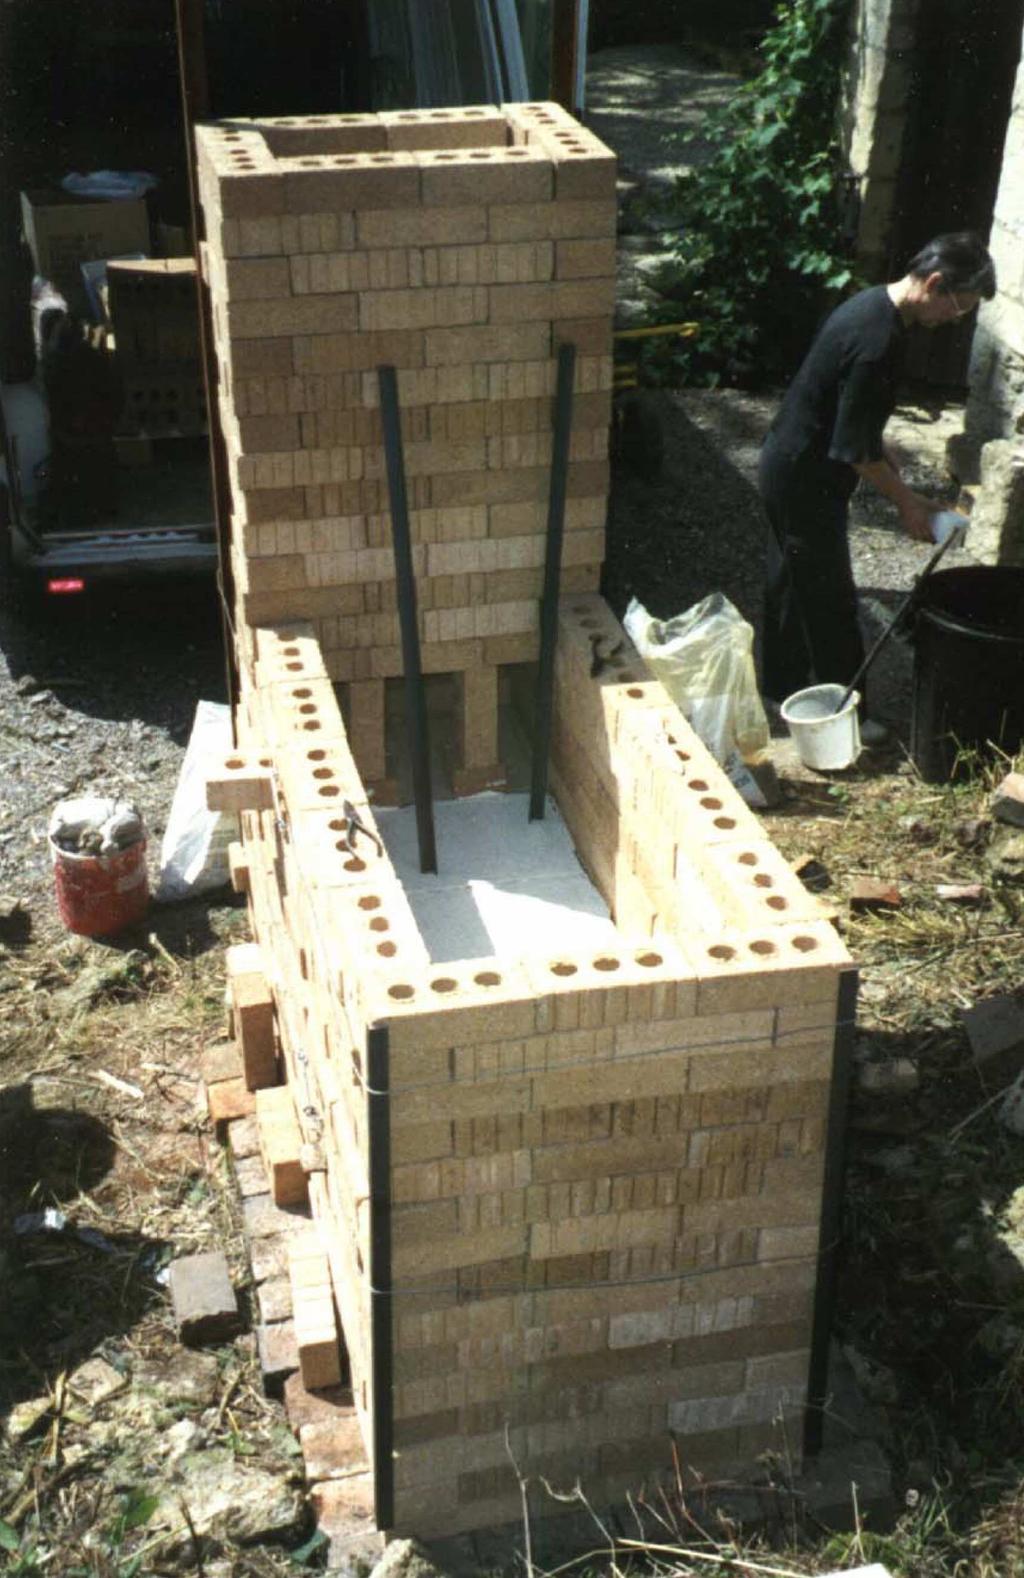
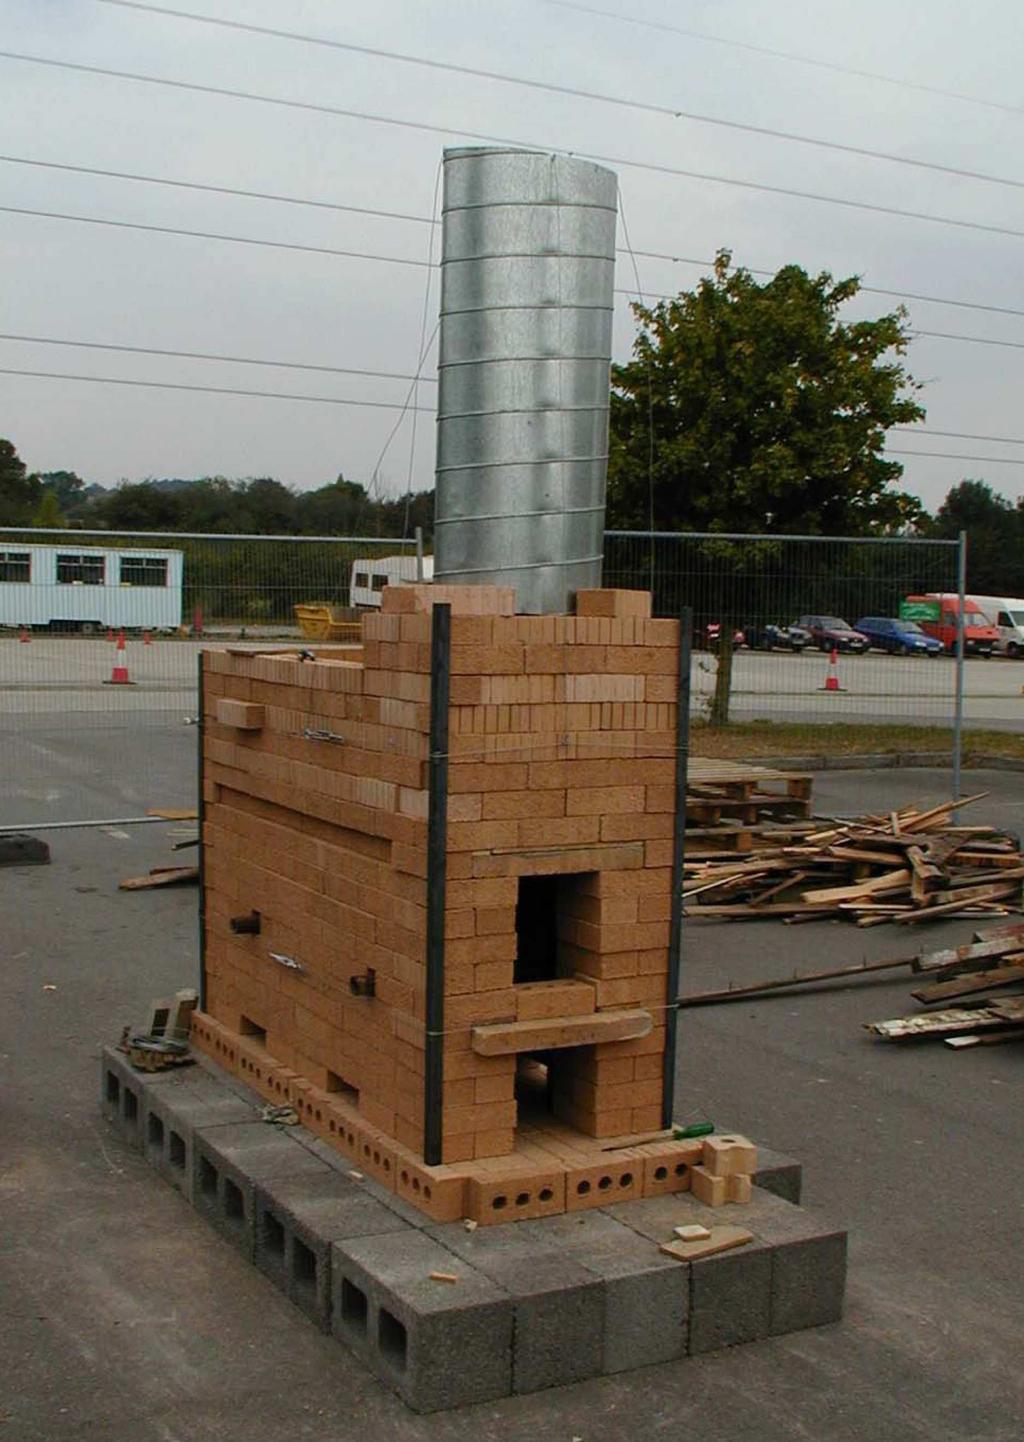
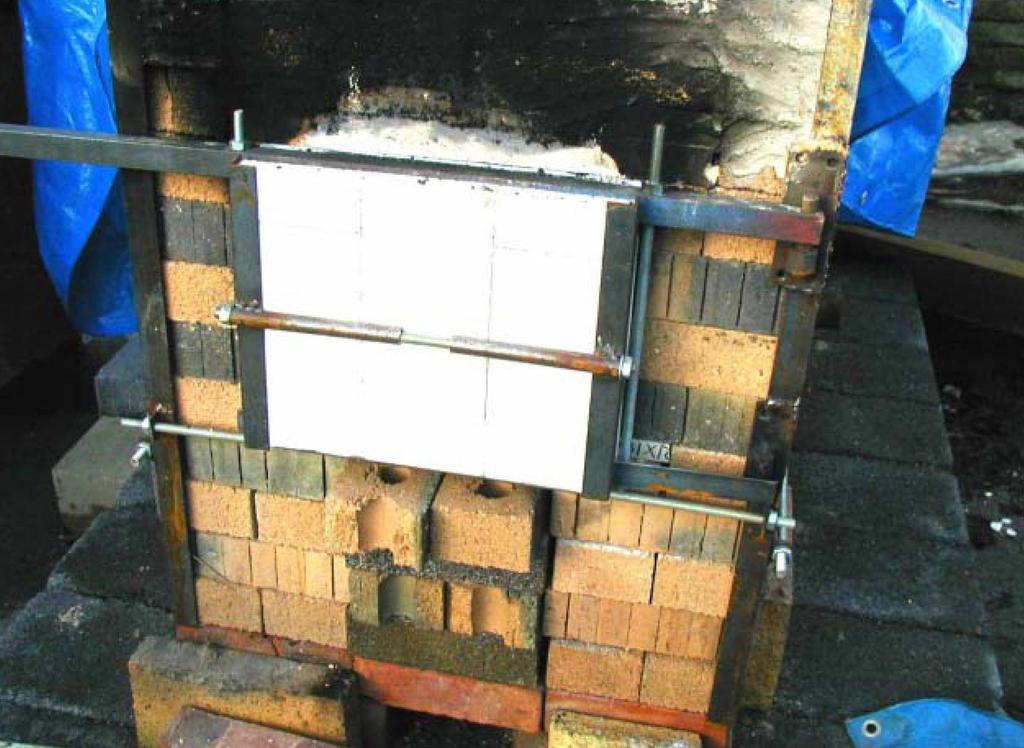
8 The pot chamber and base of the chimney are now started, and you can see the two support bricks for the chamber side of the chimney. Unless you can use pre fired and shrunk bricks for this, spacers will need to be inserted after the first firing to level things out again, as their shrinkage is considerable. The mug of coffee is not part of the kiln, but it is of course an essential part of the process! So here we are with the kiln virtually finished and the chimney built. The top one, built of brick, has the advantage that its height can be adjusted up or down during the firing while you fine tune its performance. In fact all the chimneys are approximately the same height and internal diameter/dimensions, these were originally arrived at more by happy accident than careful calculation! However in Additional Information at the end of this chapter their proportions are explained. The advantage of the removable chimney is that it is much easier to wrap the whole kiln up against the elements without it in place. It is now important to tie the whole structure up with angle iron at all corners bound together with fencing wire and barrel tensioners (turnbuckles). I have found it useful to insert half sections of steel tubing on the corners to ease the stretching process of the fencing wire (see drawing above left). You will see 2 tensioners (turnbuckles) on the left-hand side of the kiln, roughly in the middle.


9 DOOR CONSTRUCTION There are as many solutions to how you approach making a firebox door as there are days in a year! The easy solution is an old kiln shelf held in place with a piece of metal and lowered onto a brick column when stoking (see below left). The problem with that is it is very easy to drop it in the flurry of stoking, and they don t bounce! The solution I have arrived at with the latest build involves 4 bits of angle iron 3 threaded rods 2 gate hinge pins 2 bits of tube 4 insulating fire bricks The fire bricks have slots cut in them for the angle iron to sit in, and the hinge pins just go through two plain holes in the ends of the angle iron. A simple catch could be made to hold it shut. This one stays shut without needing one, more by luck than intent.


10 The last thing I do is to make up a mixture of equal parts of scrap clay, sand, and sawdust. Initially this is used to fill up any cracks or unevenness in the joints between the bricks. It can also be used as an insulating layer on the outside of the kiln. You can see some evidence of its use in the last picture on the right. I also use it as a seal between the pot chamber and the thick shelves that make up its lid. The cover for the pot chamber is as you can see made up with kiln shelves. As this is not load bearing almost any refractory slab able to take high temperatures can be used, though if they are thin, some form of insulation should be added. The cheapest is a thick layer of equal parts of clay, sand, and sawdust. The easiest is Ceramic Fibre, preferably the Body Soluble type, though you should always wear a respirator and gloves when handling Fibre what ever type it is! It is a good bet that if you can find a buff coloured house brick, then it will fire to a much higher temperature than common red brick will. This is certainly the case where I live near Bristol in the UK. Just north of that city there are extensive clay fields of a highly refractory clay from which are made the bricks which I use for my kilns. They are not as heavy and dense as hard fire brick, but they are very cheap and work very well for me thank you! Note: In nearly all the kilns of this type I have built I have used brick locally available to me, the dimensions of which are 9 X 41/2 X 3 inches. All the plans etc. in this book are based on these measurements. This does not necessarily apply where you are, as I found out (the hard way) recently when building one of these in a different part of the UK. Here, some of the local brick I used were smaller, not by much, but enough to alter the basic proportions of the kiln the wrong way, and I noticed a bit late in the day! So let your watchword be: Beware of local variations!

11 ADDITIONAL INFORMATION Although the design of this kiln was not calculated in this fashion, examination of its proportions will show that it conforms to several of the principles laid down by Fred Olsen in his excellent kiln book. In chapter 3: Principles of Design - Principal 3 the ground rule for the grate/flue areas for wood fired kilns is a ratio of 10 to 1; the area of the grate being ten times that of the area of the flue, however he modifies this rule to 7 to 1 as a result of experience as this makes the kiln much easier to fire: it allows for a more forgiving firing technique, fires faster when needed, adjusts for altitude, and allows for adjustability in altering flues, chimney height and dampering. Thus the grate area of this kiln is 1134 square inches which gives us a flue area of 162. In Principle 6 he asserts for natural draft kilns there should be three feet of chimney to every foot of downward pull, plus 1 foot of chimney to every three feet of horizontal pull. In this kiln we have approximately 18 inches of downward pull which gives us 4 foot 6 inches of flue, and 45 inches of horizontal pull which theoretically adds another 15 inches. Since the calculation for height of chimney starts at the point at which the gases leave the pot chamber you can see that the proportions are just about right at a total of 6 feet. Where there is some deviation from Fred s Principles is in the latest incarnation of this kiln. Going back to Principal 3 he states that the inlet and exit areas should be identical, in this case 162 inches In the case of the Potfest and previous kilns, that balance was correct as all primary air entered the kiln through a right sized hole just below the stoke hole. In the latest version where all primary air comes in through the firebox floor, the combined area of the three vents at either end of the kiln only totals 135 square inches. Nonetheless it fires very efficiently and does not seem to miss those 27 inches! However as the kiln is entirely constructed of dry laid bricks, with nary a spot of mortar or any other joint sealant, I suspect that the missing 27 inches are more than compensated for by a lot of small gaps in the brickwork! You may notice in all variations in this kiln, that there is no damper. It was accidentally omitted in the first version, but wasn t missed, and I have rarely found the need for it since. Any adjustment needed such as reduction, or slowing down the firing process can be very effectively achieved by controlling the primary air and or by under or over stoking. Sealing the kiln after the firing is done by closing off the primary air and putting a lid on the chimney. In the case of a metal chimney this is removed first and the base is sealed with a spare kiln shelf.
12 MATERIALS & TOOLS LIST Materials 27 hollow concrete blocks (see note at end of list) 360 fire bricks or similar 56 perforated bricks (firebox floor) 20 common house bricks 4 pieces angle iron 51 by 1 ½ inches (130 by 3.8 cm) 2 pieces thick kiln shelf 12 by 6 by 2 inches (30 by 15 by 5 cm) or fairly close to those dimensions, plus odd scraps of kiln shelf for packing out 1 coil medium grade galvanised fencing wire 4 galvanised turnbuckles 4 pieces 2 by 1 inch tube, halved (10 by 5 cm), 8 pieces in all 2 pieces heavy duty steel scaffold tube 30 inches long (76 cm) 6 heavy duty kiln shelves 18 by 18 by 2 inches (45 by 45 by 5 cm) 1 length of steel tube (preferably stainless) 48 by 14 inches (122 by 35 cm). Flattened into an oval approximately 9 inches (23 cm) wide on its narrowest dimension for the chimney Scrap clay Sand Sawdust Materials for firebox door 4 pieces of angle iron, one the same length as the width of the kiln, the other 2/3 of that, 2 pieces the height of the firebox door hole plus about 2 inches (5 cm) 3 threaded rods, 1 X 12 inches (30 cm) long the other 2 about 15 inches (47cm) long 2 gate hinge pins 2 bits of tube 4 insulating fire bricks The 2 pieces of tube are welded to the 2 shortest lengths of angle iron. This is the only bit of welding involved in the making of this kiln. Note hollow concrete blocks make sense as the foundation for a kiln; any rising moisture from the ground beneath is dispersed by airflow through them, and should the kiln be built on a vulnerable surface such as Tarmac they prevent that from degradation through heat! These are the tools that I have found useful while building this sort of kiln. Tools Heavy Duty Gloves Rubber Mallet Bolster Chisel Lump hammer (4 pound) Angle Grinder and stone cutting Blades Spirit Level Two pairs strong Pliers Heavy duty Wire Cutters 48 x 2 x 2 inch piece of Straight Timber (120 cm x 5cm x 5cm) 3 litres thick Batt Wash A coarse Brush


13 KILN PLANS


14 Stage 1 Stage 2


15 Stage 3 Stage 4

16 Stage 5


17 Stage 6

18 THE FIRING AND FIREBOX DESIGN In any fuel burning kiln, there is one overriding rule and that is; the hotter the firebox the more efficient and effective the firing. To achieve this end there have been many differing approaches, but in the end they all boil down to one of two designs. These two basic types are the standard firebox, and the Bourry box. In the former you have a longish firebox leading into the pot chamber, divided horizontally by a row of fire bars. The fuel is loaded onto the bars, and the space below forms the ash pit. In its simplest form, this is basically an inefficient design. There is too much space beneath the bars, allowing cold air to enter the kiln, even with a good bed of embers, and with the air being drawn in over them, it will have relatively little effect on the fuel above it which makes retaining heat in that area very difficult. Also because the fire bars are in a horizontal plane leading to the pot chamber, fuel resting on them cannot burn efficiently because the flames are travelling along its length and preventing air from reaching the rest of it. The Bourry box design is much more efficient, but it does demand that all the fuel used is of the same length, there is little allowance for variation. As this kiln is designed to use waste, recycled, or scrap timber for fuel, what you can get is what you use, there is little choice. To overcome these two problems I use my own version of the standard firebox in the kilns I build. Instead of a row of fire bars I have just two, the first a quarter of the way into the box, and the second the same distance from the other end of the firebox. With this arrangement fuel is thrown in so that it either tilts forwards off the front bar, or tilts back from the back bar. With the fuel tilted at an angle to the direction of air flow, air reaches it comfortably, and is prevented from going through the firebox without touching anything because the fuel is in the way. Consequently the fuel is able to get the proper pre-heat from the embers, and also burns along a broad front without obstruction. This means optimal release of heat from a small quantity of fuel.

19 In the case of a long narrow firebox such as in a small low ceilinged Anagama or tube kiln, where you have a firebox which is wide rather than deep, the technique is to angle the fuel across it, almost from side to side, to create the same broad front of flames. Again this achieves the same aim of maximising the effective combustion of a given quantity of fuel. With any firing there is an initial warming up period, gently building heat within the entire structure. For this I tend to use largish lumps of timber which burn steadily and unspectacularly. Once warmed through, I can start using thinner timber, always in small quantities, gradually increasing the rate of temperature rise until I see evidence of red heat in the pot chamber. At this point I change to very thin timber in small quantities, stoking quite frequently, the objective being to raise the firebox temperature to the point where the fuel explodes into flame rather than catching fire. Note At all times it is essential to monitor the amount of fuel that is fed into the firebox. Too much and you get great clouds of smoke, a clear indication that there is too much in there and it cannot burn properly. There is always an initial burst of smoke as you stoke, but if you ve got your quantities right this should clear relatively quickly be followed by a short period of cleaner burning followed by an absolutely clean burn. When you get to this point open the door and check how much there is left unburnt if any, maybe throw one or perhaps two small bits in, or maybe not, either way be watchful and try to guess what the kiln needs. Take notes if necessary, and if you can employ a pyrometer and thermocouple to aid your deductions so much the better. You will notice that the temperature fluctuates quite strongly; this is normal, what you are aiming to do is to get the end point temperature when you have to re-stoke a little bit higher each time, and maintain or exceed it after the next stoke. This won t always work; the condition of the fuel has an enormous bearing on the efficiency of the firing. Fuel must be very dry, and well seasoned to perform properly. This is one of the advantages of using scrap timber such as building site reclaim, palettes, old floorboards etc. is that you know they are seasoned, and all you have to do is make sure they are thoroughly dry. Damp timber won t burn properly, resulting in an increasing ember bed, which instead of burning efficiently eventually clogs the firebox and can stagnate the firing. The partial answer is to rake out the excess and introduce really dry fuel into the firebox. The real answer is to be prepared with lots of really dry wood, stacked so that it can continue to dry (open stacking) in a covered store. But then if you are going down this wood firing road you will realize that a proper wood store is as important as the kiln. Not too little Not too much But just right! This may sound a bit cosmic, but I have always maintained that the kiln will tell you what it wants, all you have to do is learn the language, and the old kiln firing saw more is less applies in full measure at all times.


20 SUPPLEMENT: BUILDING IN A DAMPER I decided to build a damper into later variations of this kiln, largely because it simplified the process of shutting it down at the end of the firing. I have never felt the need to use it to control atmosphere. The pictures here are from an earthenware firing version, and have been used because they are the clearest illustrations I have of the mechanics of it. The clamps are simple W pieces made up by welding two bits of angle iron together thus: The rods holding them together are obtainable from any Builder s Merchants or DIY Store. I have used kiln shelving of two different thicknesses; the thinner for the damper plate, the other cut into strips to make the casing around it. I have positioned the damper so that the plate projects over the kiln body, as any other placement means it is at exactly the right height for kiln stokers to crack their heads on it!!


 in")
21 AN ALTERNATIVE DOOR The chief advantage of this alternative is that when opened, hot face of the door is directed away from the operator. Hopefully the accompanying diagram is selfexplanatory. The U shaped frame the door is suspended in is made from square section tube. The door frame is made from angle iron, with four small pieces of the same material as retainers to keep the contents in place. I have not shown any means for keeping the door shut, as that will depend on local conditions! I suggest that the clips retain only the backing board (B) in place, and that the fibre (A) is cemented on top of that to prevent heat degradation (C)
22

23
24
25
26
27

28 Like I said: they don t bounce!
29

30
31 ACKNOWLEDGEMENTS A number of good friends have had a part in helping me put this together from proof reading to recommending things to put in or take out. So thank you to Lucy, Mike, Nikki, and Wes, and above all to my Wife Kate for being patient! Bath Potter s Supplies - Suppliers of raw materials, tools, kilns, glazes, clays and casting slips. Craft Fair - Details of crafters, suppliers, craft guilds, organisations and forthcoming craft events. Top Pot Supplies - Family run mail order pottery supply business. Northern Kilns - Range of hobbyist and industrial kilns. Comartie Kilns - Commercial and industrial kiln design and builders. Potfest - Pottery markets in the UK, putting Public and Potters together.. Digital Fire - Ceramic chemistry software specialists. Wali Hawes - An Unconfined potter, sideways thinker and pyromantic Steve Mills The author s website
32 Backyard Kilns Photos and text copyright Steve Mills Illustrations by Cameron Kerr ABOUT THE AUTHOR Steve Mills, who has died at the age of 78, was a Bath potter whose enthusiasm and encyclopedic knowledge of his craft took him around the world building his own design of kilns in the ten years since he retired from a business supplying pottery materials. Steve Mills' designs for wood-fired kilns are now operating on four continents. All have been constructed and fired by one person in a day, a simple, efficient solution he was happy to share freely. He was internationally recognised as an authority on kiln construction and a range of pottery glazes he made from wood ash. ADDENDUM I was asked by Steve to update his drawings and this guide with the hope that it would replace the existing version of Backyard Kilns distributed from his website on CD. He was very keen to create an e-book version and for me to include stage by stage kiln building illustrations; much like the ones you get with plastic bricks. Sadly Steve was unable to do any of this. However, we think it fitting that Backyard Kilns be part of his legacy, accessible to all, for free. That's "free" as in beer. If you wish to reproduce any part of this, you may do so provided you fully acknowledge its origin and its Author together with what you choose to reproduce.
Brick Kiln. Types of Kilns. There are two basic types of kilns: (1) Continuous kilns and (2) Intermittent kilns.
 Continuous kilns and (2) Intermittent kilns.") Brick Kiln A kilnis a thermally insulated chamber, or oven, in which a controlled temperature regime is produced. Uses include the hardening, burning or drying materials. Kilns are also used for the firing
Brick Kiln A kilnis a thermally insulated chamber, or oven, in which a controlled temperature regime is produced. Uses include the hardening, burning or drying materials. Kilns are also used for the firing
Joe Finch Clay Kiln. Method: Make catenary arch former (65cm wide, 65cm high and 85cm long)
") Joe Finch Clay Kiln As with any kiln care must be taken in the construction, sighting and firing of this kiln. For the first firing (if you are firing to biscuit or glaze) you must take the first 700c
Joe Finch Clay Kiln As with any kiln care must be taken in the construction, sighting and firing of this kiln. For the first firing (if you are firing to biscuit or glaze) you must take the first 700c
ART INTRO TO CERAMICS
 1 of 7 2/7/2009 8:49 PM ART 186 - INTRO TO CERAMICS KILNS - HISTORY AND BASIC DESIGNS PIT KILNS The earliest kilns were certainly no more than the hearths used by primitive peoples for cooking, warmth,
ASSEMBLING YOUR L&L EASY-FIRE KILN
 TABLE OF CONTENTS TOOLS NEED FOR THE JOB............ 1 UNPACKING........................... 2 Inspect for visible damage.......................... 2 Remove Top from Carton........................... 2
1 SELECT suitable material. It takes time to cut a cab. Don t waste it on rubbish.
 7 July 09 CUTTING A STANDARD CABOCHON A Standard Cabochon or CAB is an oval or round stone with one flat side and the other side having an even curved dome shape. Top of Cab It will have a narrow bevel
Kittec -CBG Gas. U s e r s M a n u a l
 Kittec -CBG Gas U s e r s M a n u a l Contents Page Table of contents 1 About this Users Manual 2 Use of the kiln 2 Safety 2 Safety tips 3 Installation and Operation 4 Storage and transport 4 Installation
The Norton Priory Medieval Tile Kiln Project Sarah Tyrer
 The Norton Priory Medieval Tile Kiln Project Sarah Tyrer The Norton Priory Medieval Tile Kiln Project proposes to rebuild and fire a replica medieval tile kiln in the grounds of Norton Priory, near Runcorn
UNIT 6 HAND CONSTRUCTION WITH STONEWARE
 Refer to requirements Unit 6 on page 2 Requirements: Basic Information: Hand Construction with Stoneware: (1) Stoneware is more or less vitreous depending on the temperature to which it is fired. (2) Hobbyist
Kiln Posts Durable high alumina posts for use up to cone 10. We suggest using three posts per shelf.
 Kiln Shelves Please note that kiln shelves are fragile. If you live within the lower mainland, we suggest you pick them up in person. If long-distance shipping is necessary, kiln shelves do best if packed
LOADING THE KILN. Leave a 1 inch space between abutting shelves in the centre so that you can see from top to bottom.
 LOADING THE KILN BISQUE FIRING: User program 2. Firing schedule is in the front of the glaze book. Make sure there are 2 half shelves or a full shelf in the bottom of the kiln set on 1 posts.place three
ASSEMBLY INSTRUCTIONS FOR L&L DURA-FIRE KILNS
 TABLE OF CONTENTS TOOLS NEED FOR THE JOB................. 1 UNPACKING............................... 2 Inspect for visible damage............................ 2 Contents of the shipment............................
Never fill any required clearance space with insulation or any other building materials surrounding the chimney.
 INSTALLATION AND MAINTENANCE INSTRUCTIONS 1700ºF Air-Cooled Temp/Guard Chimney Sizes 8-16 Listing No. MH8251 Tested to UL103/ULC-S604 A MAJOR CAUSE OF RELATED FIRES IS FAILURE TO MAINTAIN REQUIRED CLEARANCE
How to repair a wall or ceiling FREE
 How to repair a wall or ceiling FREE How to repair a wall or ceiling This guide shows how to repair walls and ceilings throughout the guide we only refer to walls but the same principles apply to ceiling
GROWING BETTER THROUGH DESIGN. 6ft Lean-To LEAN-TO. Assembly Instructions 04/02
 GROWING BETTER THROUGH DESIGN 6ft Lean-To LEAN-TO Assembly Instructions 04/02 6ft Lean-To Greenhouse Base Plan Introduction/Tools/Contents / / Contents This is a copy of our Lean-To greenhouse base plan.
DIY secondary glazing
 DIY secondary glazing A practical guide for sash windows around Dartmoor: beat the draughts, keep cosy and cut your bills! 10 homes in Ashburton were recently assessed, to see how they could save energy
Notice: New Catalog in Development. (Please scroll down to view the old version)
") Notice: New Catalog in Development (Please scroll down to view the old version) Change Search Info ETA.This version of the Greenbarn catalog has served us well for many years, but it is quite "long in
Notice: New Catalog in Development (Please scroll down to view the old version) Change Search Info ETA.This version of the Greenbarn catalog has served us well for many years, but it is quite "long in
SERVICE MANUAL. For the Vermont Castings. Please place picture here. MODELS: 2181 (Small) 2183 (Large) 2184 (Extra Large)
 2183 (Large) 2184 (Extra Large)") SERVICE MANUAL For the Vermont Castings Please place picture here. 1990-1993 DUTCHWEST CONVECTION HEATERS MODELS: 2181 (Small) 2183 (Large) 2184 (Extra Large) HISTORY OF CHANGES 1990 1993 DUTCHWEST CONVECTION
SERVICE MANUAL For the Vermont Castings Please place picture here. 1990-1993 DUTCHWEST CONVECTION HEATERS MODELS: 2181 (Small) 2183 (Large) 2184 (Extra Large) HISTORY OF CHANGES 1990 1993 DUTCHWEST CONVECTION
 America s leading woodworking authority To download these plans, you will need Adobe Reader installed on your computer. If you want to get a free copy, visit: http://adobe.com/ reader. Having trouble downloading
MANHOLES PART I: GENERAL. A. Precast Concrete Manholes
 MANHOLES PART I: GENERAL A. Precast Concrete Manholes 1) Manholes shall be made of precast concrete sections of which the top section shall be eccentric or flat slab top. The bottom section shall be a
 SUPREME WALL GARDEN ASSEMBLY INSTRUCTIONS 24/08/16 www.hallsgreenhouses.com Please refer to website for the most up to date instructions. SAFETY WARNING 1. Always wear protective glasses, shoes, gloves
CURTAINS SUPPLEMENTARY NOTES SIMPLYFURNISHINGS.COMLTD
 TEACHYourself SOFT FURNISHINGS CURTAINS SUPPLEMENTARY NOTES SIMPLYFURNISHINGS.COMLTD Copyright 2000 CURTAINS SUPPLEMENTARY NOTES INTRODUCTION This supplementary section has been produced for use in junction
Exterra Installation Guide
 Exterra Installation Guide Installing the foam padding Please review this installation guide before you begin installing the floor. If you have any questions, please call us at 800-428-5306 any time Monday
About.com :
 http://woodworking.about.com/gi/dynamic/offsite.htm?sit...//www.popularwoodworking.com/features/fea.asp%3fid=1088 (1 of 8)1/28/2004 12:05:01 AM Modern Storage Tower The last thing I want to do when starting
Kitchen Step Stool. Premium Plan. In this plan you ll find: America s leading woodworking authority
 America s leading woodworking authority Premium Plan In this plan you ll find: Step-by-step construction instruction. A complete bill of materials. Construction drawings and related photos. Tips to help
Insulating Aluminium Windows
 Insulating Aluminium Windows The Problem Aluminium windows are great for low maintenance, but they re absolutely terrible for letting heat in and out, with the frames being very thermally conductive as
PREMIUM CONCRETE COUNTERTOP MIX INSTALLATION INSTRUCTIONS
 PREMIUM CONCRETE COUNTERTOP MIX INSTALLATION INSTRUCTIONS High Strength Fast Setting Pourable Helpful Items: TCC Materials February 09 Version 2.0 Tools Required: Concrete mixer or ½ drill (600 RPM or
G. Building the Cab, Cab Roof and Cab Boiler Extension Page 14 and Backhead.
 G. Building the Cab, Cab Roof and Cab Boiler Extension Page 14 and Backhead. Cab. In order to ensure that the cab and tender would actually look right, as what often appears on a drawing is not always
Xenon 05 Installation Instructions & Parts List
 Xenon 05 Installation Instructions & Parts List Illustration Xenon 05, H1 Handle Left Hand: Open Out 26/05/2016 Revision 2.1 Page 1 of 19 IMPORTANT This shower screen / enclosure must be installed by suitably
GE Monogram. Installation. Instructions. 36" Vent Hood. Model ZV750. Call anywhere in the US and Canada -
 at :: rangehoods. com GE Monogram Instructions Model ZV750 GE Monogram at:: rangehoods. com is a division of CAUTION WARNING Before you begin Read these instructions completely and carefully. IMPORTANT:
15 Dovetail Jig. Instruction Manual. Part # 3452
 15 Dovetail Jig Instruction Manual Part # 3452 CAUTION: Please read, understand, and follow all manufacturers instructions, guidelines and owners manuals that come with your power tools. Peachtree Woodworking
Artificial Grass. Fitting Guide
 Artificial Grass Fitting Guide Quick Start Artificial grass is quick and easy to fit, we have a quick-start guide below or continue on for a more in depth how-to guide. We recommend you have a quick read
Curium 19H Installation Instructions & Parts List
 Curium 19H Installation Instructions & Parts List Illustration Curium 19H Right Hand Page 1 of 15 01/07/2016 Revision 2.1 IMPORTANT This shower screen / enclosure must be installed by suitably qualified
Gallium 03 Installation Instructions & Parts List
 Gallium 03 Installation Instructions & Parts List Illustration Gallium 03, H1 Handle Left Hand: Open Out 04/05/2016 Revision 1.1 Page 1 of 19 IMPORTANT This shower screen / enclosure must be installed
Dubnium 11 Installation Instructions & Parts List
 Dubnium 11 Installation Instructions & Parts List Illustration Dubnium, H1 Handle Right Hand: Open Out Page 1 of 25 IMPORTANT This shower screen / enclosure must be installed by suitably qualified individuals.
Greenhouse Assembly Instructions
 Greenhouse Assembly Instructions Our Help Line provides support and advice to customers of Summer Garden Buildings after ordering. For advice before you buy you can phone us free 7 days a week on 0800
DTU Animal Cart Programme
 DTU Animal Cart Programme TECHNICAL 25 LIGHT STEEL AND WOOD DONKEY CART RELEASE Development Technology Unit, Department of Engineering, University of Warwick, Coventry, CV4 7AL UK, tel: +44 (0)203 523523
HOW TO CREATE AN OPENING IN BRICKWORK.
 HOW TO CREATE AN OPENING IN BRICKWORK. Most load bearing walls are made from brick or block. But do not assume if a wall is made from a wood frame and plasterboard that it is non load bearing as modern
ASS 70 FD folding/sliding door installation guide
 ASS 70 FD folding/sliding door installation guide 2 Preparation IMPORTANT These doors should be fitted by competent and trained installers. Please read these instructions thoroughly before beginning the
PrimitiveFire.com Bowdrill Fire Manual
 PrimitiveFire.com Bowdrill Fire Manual This manual contains in-depth instructions for making bowdrill fires quickly and efficiently. Please note that 95% of the effort that goes into making a bowdrill
Installation Guide. Capped Cellular PVC Fencing. Table of Contents. Storage and Handling Tools Needed Fence Layout and Locating Posts
 Capped Cellular PVC Fencing Installation Guide Table of Contents Storage and Handling Tools Needed Fence Layout and Locating Posts Installation instructions 4 x 4 Over Sleeve Post - 3.5 Rail Privacy Shadowbox
Technical Documentation Lift Advanced
 Technical Documentation Lift Advanced 1 1 Introduction... 4 2 Basic Information... 5 2.1 Hinge Recommendations... 5 Lift Advanced HF... 5 Lift Advanced HK... 5 2.2 Usage of Aluminium Fronts... 5 19mm Aluminium
Gardman Lean-to Greenhouse Assembly Instructions
 Page 1 Gardman Lean-to Greenhouse Assembly Instructions Our Help Line provides support and advice to customers of Summer Garden Buildings after ordering. For advice before you buy you can phone us free
INSTALLATION GUIDE DUOFUSE SLAT WALL SYSTEM
 06/2013 ENG 1 INSTALLATION GUIDE DUOFUSE SLAT WALL SYSTEM The Duofuse wood composite slat wall system is much more durable than wooden fences, and correct installation is necessary to enjoy the fences
Columbia Laminate Installation Instructions
 Columbia Laminate Installation Instructions 1. General Uniclic is a revolutionary system for installing laminated flooring without using glue. Uniclic uses an ingenious form of tongue and groove to click
Building and installing dividing walls, by Tobias Sternberg
 Building and installing dividing walls, by Tobias Sternberg This instruction sets out to show one way to build and install simple dividing walls for studio spaces. I have written it as clearly as possible.
INSTALLATION INSTRUCTIONS FOR ELKALAMINATE. IN ORDER TO OBTAIN A GOOD RESULT, WE ADVISE TO FOLLOW ALL GIVEN INSTRUCTIONS CAREFULLY.
 INSTALLATION INSTRUCTIONS FOR ELKALAMINATE. IN ORDER TO OBTAIN A GOOD RESULT, WE ADVISE TO FOLLOW ALL GIVEN INSTRUCTIONS CAREFULLY. PREPARATION Let the planks acclimatize for 48 hours in the unopened packaging
Basic Vocabulary Clay Mold Ceramics Pottery Earthenware
 Clay Introduction Basic Vocabulary Clay: Particles of decomposed rock combined with water to create a plastic malleable body which is then fired in a kiln to fuse the particles back into a stone-like state.
DIY! How to Make Your Own. Trip Line Detonator for Use With Big Blast Target InflatorÔ
 IMPORTANT To ensure the templates print the correct size make certain that Scale or Scaling in your PDF printing program is set to Off or None. Trip Line Detonator for Use With Big Blast Target InflatorÔ
Yew Cottage 87, Main Street. Elevations
 Modern County/Historic County East Yorkshire/East Riding YORKSHIRE VERNACULAR BUILDINGS STUDY GROUP Parish/Township West Cowick Name of Building Yew Cottage 87, Main Street National Grid Ref SE 6521 2151
16ft Polytunnel Assembly Instructions
 CONTENTS Section Page 1. FOUNDATION TUBES: Option A Ground Anchor Plates 3 2. FOUNDATION TUBES: Option B Concreted Foundation Tubes 5 3. STEEL FRAME ASSEMBLY & INSTALLATION 6 4. CROP BARS 8 5. TIMBER END
Joshua Woodsman
 CONSTRUCTION GUIDE of one of our design Please Note This electronic document is protected by the identifier against unauthorized dissemination on the Internet. Before building any structure make sure you
By Jamie Bright All Rights Reserved
 By Jamie Bright All Rights Reserved Concrete Garden Ornaments let s be honest, we all love them! From a typical garden gnome to a graceful Roman statue, there is a huge range of different garden ornaments
Bulle Clock Serial Number 57561
 Page 1 Restored Bulle Clock Bulle Clock Serial Number 57561 Page 2 Restored Bulle Clock Clock Restoration pictures by kind permission of the owner. The clock as delivered. It came without a case and the
Extendable Large Dovetail Jig
 Extendable Large Dovetail Jig Instruction Manual Part # 3458 CAUTION: Please read, understand, and follow all manufacturers instructions, guidelines and owners manuals that come with your power tools.
Product Features. How to use polymorph
 Specification: Density(g/cm3 25 C) : Approximately 1.10 Extensible and reusable, the melting point is 60-63 and can be shaped in low temperature. Will be released to CO2 and H2O during 6-12 months. When
HOW TO PULL STRINGER
 Devardi Glass And The Hothead Torch. :*:. Tutorial Series. :*:. HOW TO PULL STRINGER How To Pull Stringer Inside and Outside Of The Flame TUTORIAL OVERVIEW In this tutorial you will learn two ways to pull
E N G L I S H GARDEN SHED. Assembly Instructions. Suitable for Models WITH VARYING DEPTHS
 GARDEN SHED Assembly Instructions Suitable for Models 6' Wide 8' Wide 0' Wide WITH VARYING DEPTHS GI0003 November 0 INSTALLATION ADVICE It's Not That Difficult! The construction of your shed isn't as complicated
GENERAL NOTES: Page 1 of 9
 Laminating A Zia Into A Turning Blank by W. H. Kloepping, Jan. 2009 This describes how a zia (the New Mexico state symbol) can be laminated into a turning blank. Materials needed: Square Turning Block
CertainTeed INSTALLATION GUIDE SIMTEK FENCE PRODUCTS. Fence Installation Guide 3', 4' & 6' High
 CertainTeed INSTALLATION GUIDE SIMTEK FENCE PRODUCTS Fence Installation Guide 3', 4' & 6' High INSTALLATION GUIDE These instructions are designed to assist both professional installers and do-it-yourselfers
Instructions For Installing A Pig Fence
 Instructions For Installing A Pig Fence A Multi-wire Fence on a Single Line of Posts Height: 18 Inches Polywire for seasonally removable fences Aluminum wire for permanent fences These pages provide the
Palladian/ Keystone Models 202/204 Maintenance Kit
 Palladian/ Keystone Models 202/204 Maintenance Kit Please read all of the instructions before you begin. Confirm that you have all the necessary tools and parts required. Allow about one hour to complete
Curium 19.4H Installation Instructions & Parts List
 Curium 19.4H Installation Instructions & Parts List Illustration Curium 19.4H Right Hand Page 1 of 21 30/06/2016 Revision 1.0 IMPORTANT This shower screen / enclosure must be installed by suitably qualified
Instructables Butcher Block Top
 Instructables Butcher Block Top Project Overview: This project requires basic woodworking skills and access to woodworking machines. Woodworking machines have sharp cutting edges and are NOT forgiving.
Easyfix. Easyglaze. Superglaze. Filmglaze
 Easyfix Easyglaze Superglaze Filmglaze Magnetglaze Magnetglaze Pro TUBEWAY (SALES) LTD are proud to offer six effective secondary double glazing systems to the general public. Each system is available
Playaway Swiss Cottage Assembly Instructions
 Playaway Swiss Cottage Assembly Instructions English SS288C IMPORTANT SAFETY INFORMATION Adult assembly is required. Checks and maintenance needs to be carried out on the main parts (fixings etc.) at regular
ASS 70 FD folding / sliding door. Installation Guide
 ASS 70 FD folding / sliding door Installation Guide IMPORTANT! These doors should be fitted by competent and trained installers. Please read these instructions thoroughly before beginning the installation.
External Cedar Hot Tub
 External Cedar Hot Tub *** IMPORTANT *** Watch Assembly Video in conjunction with this manual. YouTube Link: www.alpinespas.co.nz/assembly INSTRUCTIONS Before beginning assembly, carefully read the following
129 KITCHEN BASE CABINET 480
 129 KITCHEN BASE CABINET 480 There are two sorts of kitchen cabinets: base cabinets, which sit on the floor, and wall cabinets. Base cabinets provide both storage space and work surfaces. They often house
Perfect Hinges. Pick the. for Your Boxes. Selecting just the right hinges to fit each special box can be a daunting task.
 Pick the Perfect Hinges for Your Boxes The right choice will help you design and build better boxes by Doug Stowe Selecting just the right hinges to fit each special box can be a daunting task. There are
FRAMELESS GLASS FENCING DIY GUIDE
 FRAMELESS GLASS FENCING SITE MEASURE 1. Planning is the first step of any successful project. 2. We have a large range of sizes to allow for varying site requirements. 3. Simply decide where you would
Elara NanoEdge Fixed Frame Screen User Guide
 Elara NanoEdge Fixed Frame Screen User Guide INTRODUCTION INTRODUCTION WARNING This product may contain sharp edges, please handle with care. Protective gloves are recommended. A minimum of two people
Original Gallery System
 GAllery System Art Displays Original Gallery System a Gallery System product Here s everything you need to know to get started with your Gallery System Art Hanging System GS getting started To install
CERAMICS 1 Midterm Study Guide
 CERAMICS 1 Midterm Study Guide SEMESTER 1 The exam is broken into 3 specific areas with a collection of questions that involves the following areas: TYPES and STAGES of CLAY, CONSTRUCTION, and FIRING These
IMPORTANT!!! ASSEMBLY ASSEMBLY INSTRUCTIONS. (Internal Dimensions)
") ASSEMBLY ASSEMBLY INSTRUCTIONS (Internal Dimensions) Ent Spec Edition Ltr v-0- Overall dimensions including base: 7. L x 9 W x 0 H cms 97.5" L x 7" W x 8.7" H IMPORTANT!!! Please read these instructions
ASSEMBLY ASSEMBLY INSTRUCTIONS (Internal Dimensions) Ent Spec Edition Ltr v-0- Overall dimensions including base: 7. L x 9 W x 0 H cms 97.5" L x 7" W x 8.7" H IMPORTANT!!! Please read these instructions
PRODUCT DESCRIPTION Camille Gents Wardrobe H183 x W96.5 x D52cm
 PRODUCT DESCRIPTION Camille Gents Wardrobe H183 x W96.5 x D52cm DEAR CUSTOMER Thank you for purchasing your new piece of furniture from Dunelm. We put a lot of effort in the design and construction of
Heavy Wall Applied Stop Tube Frame and Door Installation
 INSTALLATION INSTRUCTIONS Heavy Wall Applied Stop Tube Frame and Door Installation Read all instructions before beginning installation. These instructions are provided to help prevent installation problems
Extrusion. Process. The photo below shows a typical thermoplastic extruder.
 Extrusion This process can be compared to squeezing toothpaste from a tube. It is a continuous process used to produce both solid and hollow products that have a constant cross-section. E.g. window frames,
Lumber Smith. Assembly Manual. If you are having problems assembling the saw and need assistance, please contact us at:
 Lumber Smith Assembly Manual If you are having problems assembling the saw and need assistance, please contact us at: 804-577-7398 info@lumbersmith.com 1 Step 1 Safety Carefully read the Owners Manual.
Zenterra TM Installation Guide
 Zenterra TM Installation Guide Installing the foam padding Please review this installation guide before you begin installing the floor. If you have any questions, please call us at 800-428-5306 any time
Making a 1911 frame from scratch the easy way. 7 parts make up the frame in a 1911 pistol,
 Making a 1911 frame from scratch the easy way. 7 parts make up the frame in a 1911 pistol, The rails and fire control block- needs to be as strong as a standard one piece frame The grip sides (2 off) -
Radon 07 Installation Instructions & Parts List
 Radon 07 Installation Instructions & Parts List Illustration Radon 07, H1 Handle Right Hand: Open Out 14/06/2016 Revision 1.1 Page 1 of 21 IMPORTANT This shower screen / enclosure must be installed by
12ft Ultra Polytunnel Assembly Instructions
 CONTENTS Section Page 1. FOUNDATION TUBES: Option A Hammered-In Foundation Tubes 3 2. FOUNDATION TUBES: Option B Ground Anchor Plates 4 3. FOUNDATION TUBES: Option C Concreted Foundation Tubes 5 4. STEEL
BONDED ABRASIVE PRIMER
 BONDED ABRASIVE PRIMER Basic information on the terminology and use of bonded abrasive products. Property of: KASCO ABRASIVES Coldwater, Michigan 1-800-367-729 Fax 517-279-7265 1 GENERAL BONDED ABRASIVES
Smoker. Written By: Feitan
 Smoker Smoking meat has been around for hundreds of years. Now with this simple smoker one can bring back to life the ancient methods of preserving meats and adding the smoky flavor. Written By: Feitan
Building Instructions
 Building Instructions Tools Required Tape measure Straight edge Pencil/pen Jigsaw Table Saw Circular Saw Electric drill 1 Hole saw bit Saw horses/table Protractor Staple gun Caulk gun Paint brush Wrenches
U1500E Gas Fireplace
 Model U1500E-NG U1500E-LP Fuel Type Natural Gas Propane Minimum Supply Pressure 5 W.C. (1.25 kpa) 11 W.C. (2.73 kpa) Manifold Pressure - High 3.5 W.C. (0.87 kpa) 10 W.C. (2.48 kpa) Manifold Pressure -
Wrapped Rose. Materials are: 18" piece of 1/4" mild steel rod 1.25" disk of 3/32" thick steel plate. Tools for this project include:
 Wrapped Rose In a wrapped rose, the petals and stem are all made from a single round rod. The calyx and leaves are formed separately. Gordon Williams showed me how to make a wrapped rose, and introduced
Almost Heaven Saunas THE AUTHENTIC SAUNA EXPERIENCE. Worthington Sauna Installation & Owner s Manual
 Almost Heaven Saunas THE AUTHENTIC SAUNA EXPERIENCE Worthington Sauna Installation & Owner s Manual Read this entire manual through to the end before proceeding with the assembly. ELECTRICAL REQUIREMENTS
COFFEE TABLE WITH RECESSED TRAY
 COFFEE TABLE WITH RECESSED TRAY Why not treat your guests to a tray laid with delicacies and then remove it from sight in your new coffee table. There's no easier way to show that you are a thoughtful
(a) Work gloves may be cloth, leather palm, or all leather; (b) Welding gloves are gauntlet-type gloves with high
 Work gloves may be cloth, leather palm, or all leather; (b) Welding gloves are gauntlet-type gloves with high") Figure 16-1 cuffs (a) Work gloves may be cloth, leather palm, or all leather; (b) Welding gloves are gauntlet-type gloves with high Figure 16-2 Welding boots should have smooth toes to prevent sparks from
Figure 16-1 cuffs (a) Work gloves may be cloth, leather palm, or all leather; (b) Welding gloves are gauntlet-type gloves with high Figure 16-2 Welding boots should have smooth toes to prevent sparks from
Furnace build report
 Furnace build report Cheap and Free Rick is the president of the Metro Detroit Metalworking Club. A few weeks ago we spent the better part of a Sunday over at C&F Rick s house while some aluminum casting
Hand drilling a shallow tube-well and fitting a simple Bailer-bucket in Zimbabwe
 Hand drilling a shallow tube-well and fitting a simple Bailer-bucket in Zimbabwe Peter Morgan A publication by Aquamor-Zimbabwe. March 2014 Introduction The construction of the lighter duty, simple hand
ASSEMBLY INSTRUCTIONS GG77. BASE SIZE: 2.190m x 2.020m
 ASSEMBLY INSTRUCTIONS GG77 BASE SIZE: 2.190m x 2.020m CONGRATULATIONS ON PURCHASING A DURATUF GUARDIAN SHED. BEFORE YOU BEGIN THE ASSEMBLY PLEASE NOTE SOME IMPORTANT POINTS: BEFORE YOU START: Read all
ULTIMATE ROUTER TABLE PLANS. By Dan Phalen
 ULTIMATE ROUTER TABLE PLANS By Dan Phalen January 2017 Ultimate Router Table Plans. Copyright 2012-2017 by Daniel Phalen. Published by Creston Hall Publishing Company. All rights reserved. No part of this
Project: Smoker Overview: Smoking meat has been around for. Materials: 3/4 plywood, 7-48 of 1/2 dowel,
 Project: Smoker Overview: Smoking meat has been around for hundreds of years. Now with this simple smoker one can bring back to life the ancient methods of preserving meats and adding the smoky flavor.
The Queen Quilter Professional Quilters Kit Frame
 The Queen Quilter Professional Quilters Kit Frame Assembly Instructions Table of Contents: Before you begin......................... Pg. 2 Wood parts............................. Pg. 3 Hardware..............................
Create with Clay: THE BASICS
 Create with Clay: THE BASICS Where do you get ceramic supplies? Your local ceramic supply store will be your best bet. They will have everything you need and are much cheaper than art supply stores that
LE7000 Provincial Built-in (Zero Clearance) Kit Instructions.
 Kit Instructions.") LE7000 Provincial Built-in (Zero Clearance) Kit Instructions. LE7000 Provincial ZC Kit contains: Part No. Quantity Description Picture 503259 4 Self Threading Screw 13mm 503459 6 Self Threading Screw Timbertites
LE7000 Provincial Built-in (Zero Clearance) Kit Instructions. LE7000 Provincial ZC Kit contains: Part No. Quantity Description Picture 503259 4 Self Threading Screw 13mm 503459 6 Self Threading Screw Timbertites
Practical Scrap Metal Small Arms Vol.10 By Professor Parabellum
 Practical Scrap Metal Small Arms Vol.10 By Professor Parabellum Introduction The 9mm submachine gun design described here is extremely basic and can be put together using very limited tools and materials.
INSUL-FLUE is used to reduce the danger of radiant heat from smoke pipe, flue pipe, gas vents, etc. igniting combustibles.
 INSUL-FLUE OWNER S MANUAL (6 inch) High Heat Resistant Thimble and Insulating Sleeve for Smoke Pipe When Passing Through Any Combustible Wall September 1993, Revision A INTRODUCTION CONGRATULATIONS ON