Directions for the 25' Jr Batting Cage & Frame
|
|
|
- Randall Jefferson
- 5 years ago
- Views:
Transcription
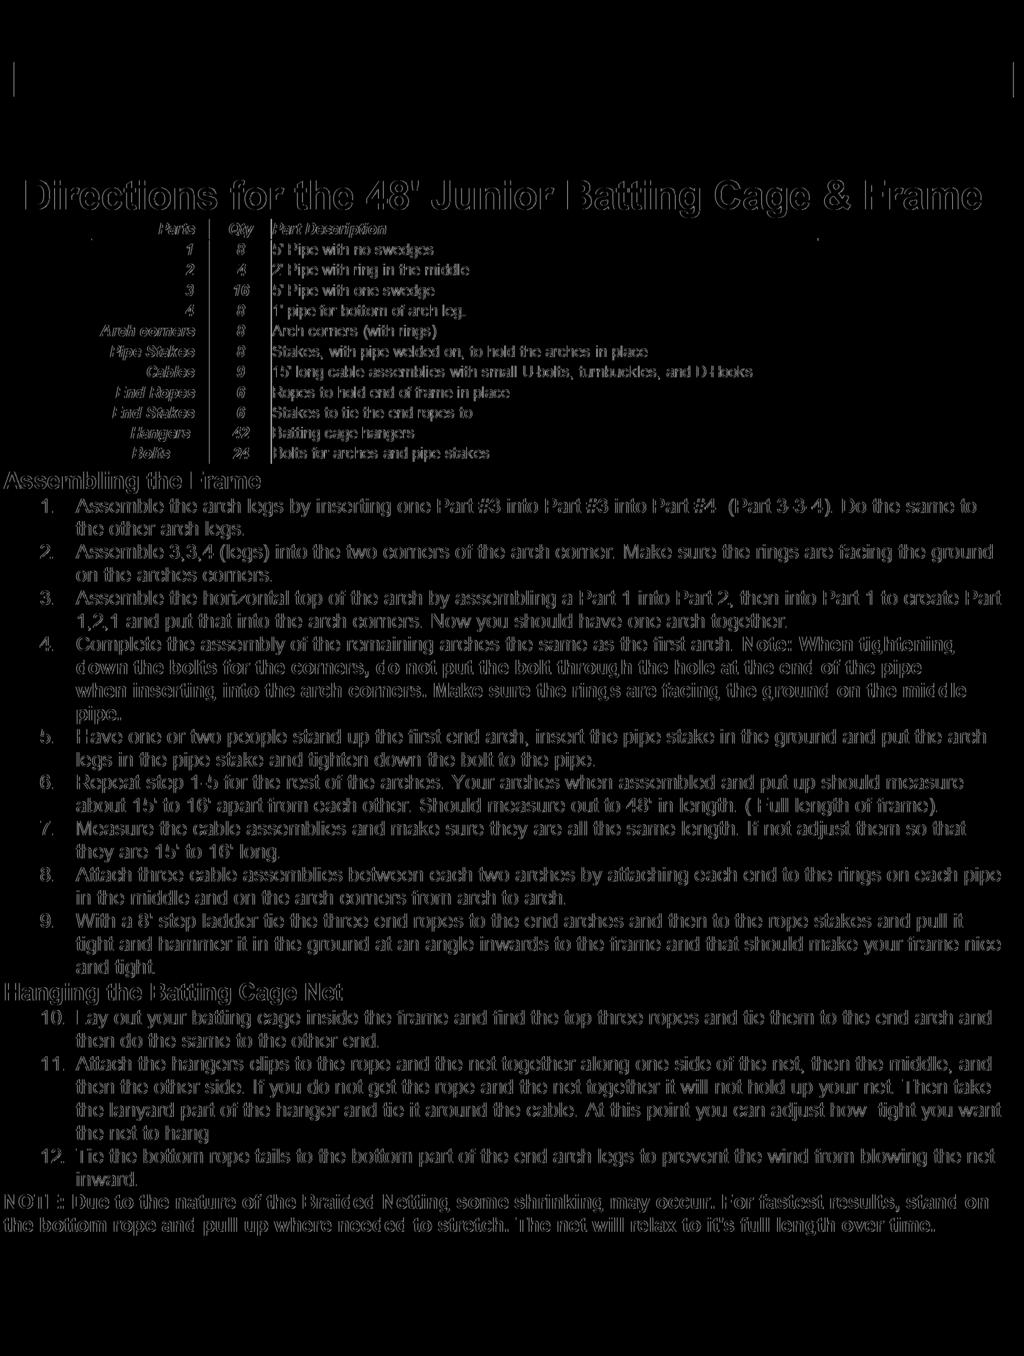
1 Directions for the 25' Jr Batting Cage & Frame Parts Qty Part Description 1 6 Upper corners of the arch (with hex bolts) 2 6 Bent pipe for arch feet 3 6 Pipe with no swedge (2 per horizontal arch) 4 12 Pipe with swedge at one end (2 for each arch leg) 5 3 Pipe with swedge at both ends and a ring welded in the middle (middle of horizontal arch)e Pipe Stakes 6 Stakes, with pipe welded on, to hold the arches in place Cables 6 Cable assemblies with small U-bolts, turnbuckles, and D-Hooks End Ropes 6 Ropes to hold end of frame in place End Stakes 6 Stakes to tie the end ropes to Hangers 25 Batting cage hangers Hex bolts 12 Hex bolts for arches and pipe stakes (additional hexbolts included) Assembling the Frame 1. Assemble the arch legs by attaching two Part #4's to one Part #2 (Part 4-4-2) 2. Assemble arch horizontal top by attaching Part #3 to Part #5 to Part #3 (Part 3-5-3) 3. Attach arch corners to the legs (Parts 4-4-2) and to the horizontal top (Part 3-5-3). Make sure that the rings on the corners and the ring on Part #5 will be facing the ground when the arch is standing upright. Note: When tightening down the hex bolts for the corners, do not put the hex bolt through the hole at the end of the pipe when inserting into the arch corners. Make sure the rings are facing the ground on the middle pipe. 4. Complete the assembly of the remaining arches the same as the first arch. 5. Tie three of the End Ropes to the rings on Part on the two end arches. 6. Lay out three cable assemblies between each of the arches. Take the hangers off of the two outside cable ends and adjust them to be all the same length as the middle cable (25' Cage 13' & 35' Cage 18'). 7. Hook the hanger on one end of the cable to the corner ring on the end arch and attach the other end with the D-Clip to the second arch's corner ring. Continue the same procedure for the rest of the rings and leave the arches on the ground with the top of each subsequent arch facing away from the first arch. 8. Have one or two people stand up the first end arch and then insert the three End Rope stakes into the ground and tie the end ropes to the stakes so that the arch is vertical. 9. Stand up each sequential arch until all four of the arches are standing. Make sure the cables are taunt and the arch locations are satisfactory to you. 10. Move each arch foot about 6 inches and insert the Pipe Stakes into the ground and then insert the arch pole into the pipe stake and tighten the pole in place with the provided hex bolts. Hanging the Batting Cage Net 11. Attach the batting cage hangers around the top ropes of the net and the netting together, about 4 ft apart. 12. Lift up one side of the net and attach all the hangers to the cable on that side of the frame. Then attach the hangers on the middle rope to the middle cable; and lastly attach the hangers to the other side cable. 13. Tie the top net ropes to the horizontal part of the frame and the bottom net ropes to the arch feet. NOTE: Due to the nature of the Braided Netting some shrinking may occur. For fastest results, stand on the bottom rope and pull up where needed to stretch. The net will relax to it's full length over time.
2
3 Directions for the 35' Junior Batting Cage & Frame Parts Qty Part Description 1 6 Pipe with no swedge (2 per horizontal arch) 2 3 Pipe with swedge at both ends and a ring welded in the middle (middle of horizontal arch) 3 12 Pipe with swedge at one end (2 for each arch leg) 4 6 Bent pipe for arch feet Arch Corners 6 Upper corners of the arch (with rings) Pipe Stakes 6 Stakes, with pipe welded on, to hold the arches in place Cables 6 Cable assemblies with small U-bolts, turnbuckles, and D-Hooks End Ropes 6 Ropes to hold end of frame in place End Stakes 6 Stakes to tie the end ropes to Hangers 25 Batting cage hangers Eyebolts 12 Eyebolts for arches and pipe stakes (additional eyebolts included) Assembling the Frame 1 Assemble the arch legs by attaching two Part #3's to one Part #4 (Part 3-3-4) 2 Assemble arch horizontal top by attaching Part #1 to Part #2 to Part #1 (Part 1-2-1) 3 Attach arch corners to the legs (Parts 3-3-4) and to the horizontal top (Part 1-2-1). Make sure that the rings on the corners and the ring on Part #2 will be facing the ground when the arch is standing upright. 4 Complete the assembly of the remaining arches the same as the first arch. 5 Tie three of the End Ropes to the rings on Part on the two end arches. 6 Lay out three cable assemblies between each of the arches. Take the D-clips off of the two outside cable ends and adjust them to be all the same length as the middle cable (with the D-Clip still on it). 7 Hook the D-Clip on one end of the cable to the corner ring on the end arch and attach the other end with the D-Clip to the second arch's corner ring. Continue the same procedure for the rest of the rings and leave the arches on the ground with the top of each subsequent arch facing away from the first arch. 8 Have one or two people stand up the first end arch and then insert the three End Rope stakes into the ground and tie the end ropes to the stakes so that the arch is vertical. 9 Stand up each sequential arch until all four of the arches are standing. Make sure the cables are taunt and the arch locations are satisfactory to you. 10 Move each arch foot about 6 inches and insert the Pipe Stakes into the ground and then insert the arch pole into the pipe stake and tighten the pole in place with the provided eyebolts. Hanging the Batting Cage Net 11 Attach the batting cage hangers around the top ropes of the net and the netting together, about 4 ft apart. 12 Lift up one side of the net and attach all the hangers to the cable on that side of the frame. Then attach the hangers on the middle rope to the middle cable; and lastly attach the hangers to the other side cable. 13 Tie the top net ropes to the horizontal part of the frame and the bottom net ropes to the arch feet.

4

5
6
Open shipping crate and separate all of the different parts. Over The Top Shelters LLC
 ASSEMBLY INSTRUCTIONS FOR MODEL SH122110GN and SH122110GY Open shipping crate and separate all of the different parts. Count each part and match up with parts list. Shortages or damaged parts should be
INSTALLATION INSTRUCTIONS
 INSTALLATION INSTRUCTIONS 12' High x 14' Wide x 70' Deep Batting Cage Please take a moment to unpack your shipment and ensure that you re not missing any items. Your batting cage kit comes with the following:
INSTALLATION INSTRUCTIONS
 INSTALLATION INSTRUCTIONS 12 High x 14 Wide x 55 Deep Batting Cage Please take a moment to unpack your shipment and ensure that you re not missing any items. Your batting cage kit comes with the following:
INSTALLATION INSTRUCTIONS
 INSTLLTION INSTRUTIONS For 12' Tall x 14' Wide x 35' Deep atting age Your batting cage frame kit comes with the following: (4) Three-Way orner Fittings (2) Four-Way orner Fittings (6) Ground Sleeves (20)
MARQUEE INSTALLATION HANDBOOK. Curved Structures
 MARQUEE INSTALLATION HANDBOOK Curved Structures 12m Curved Roof Beam Assembly Instructions Ensure there are no overhead or underground obstructions or services before starting to assemble frame. Square
Assembly Instructions
 18' W x 10' H or 12' H Peak Style Frame Assembly Assembly Instructions Before you start: 2+ individuals recommended for assembly, approximate time 3 hours. Recommended tools: Power Drill, Safety Glasses,
20 x 20 / 3.35M x 6M EVENT CANOPY Assembly Manual
 0 x 0 / 3.35M x 6M EVENT CANOPY Assembly Manual -0700803 Parts: (8) PCS PIPE (9) PCS PIPE (8) PCS 3 PIPE (8) PCS PIPE SWEDGED () PCS 5 PIPE () PCS 5A PIPE (6) 3WAY FITTING A (6) PCS WAY FITTING B (8) FOOT
Desk/Wall-Mount Rack
 Desk/Wall-Mount Rack Patent(s) Pending Installation Instructions Post P/N: 119-1752 119-1781 119-1782 119-4014 Frame P/N: 119-1591 119-1754 119-1755 Kit Contents (2) Frames (4) Posts Assembly Hardware
Thanks for shopping with Improvements! 8 ft. Retractable Window Awning Item # (Fits windows/doors from 73 to 96 wide)
") Thanks for shopping with Improvements! 8 ft. Retractable Window Awning Item #511412 (Fits windows/doors from 73 to 96 wide) Note: Read these instructions carefully before assembling. Find a clean, smooth
Thanks for shopping with Improvements! 8 ft. Retractable Window Awning Item #511412 (Fits windows/doors from 73 to 96 wide) Note: Read these instructions carefully before assembling. Find a clean, smooth
12x24x10 Run-In Shed #51451
 12x24x10 Run-In Shed #51451 Please read instructions completely before assembly ATTENTION: BOLTS ARE NOT NEED- ED OR INCLUDED FOR EVERY CONNECTION BUT MAY BE PURCHASED BY CALL- ING THE NUMBER BELOW Description
NON-ELECTRIC DOG FENCES
 NON-ELECTRIC DOG FENCES Thank you! Thank you for ordering your non-electric dog fence kit from Pet Playgrounds. In less than a day you will have your very own personal dog park installed on your property.
10 PVC Tree Instructions
 10 PVC Tree Instructions Bill of materials Item QTY Material Description 1 1 Standard Hook Head 2 1 Metal 1 1/4" 5 way cross Parts for PVC Base 3 50 3/4 Spears Snap-on tee(2 Extra) 4 4 3/4 Dura Snap-on
Free Standing Frame and Canopy
 Patriot Docks Free Standing Frame and Canopy Required Tools: Cordless Drill, 3/8 drill bit, 17mm wrench, 18mm wrench, 6mm hex key (included), 8mm hex key (included) Helpful Tips: Assembling and installing
TABLE OF CONTENTS REQUIRED TOOLS
 TABLE OF CONTENTS SECTION SECTION TITLE PAGE NO. 1 2 3 4 5 Assembling Mounting Structure Installing Bicycle Supports Mounting Rack to Wall Adding Sections Customizing Rack Configuration REQUIRED TOOLS
ASSEMBLY INSTRUCTIONS 10 X14 HIGGINS HARDTOP GAZEBO ITEM# L-GZ212PST-4
 3811110 ASSEMBLY INSTRUCTIONS 10 X14 HIGGINS HARDTOP GAZEBO ITEM# L-GZ212PST-4 Parts List Square pole A 4 Round pole B 4 Short arch bar C 4 Long arch bar D 6 Long beam 1 E1 2 Long beam 2 E2 2 Long beam
Track Rack. * Track Racks are not lockable
 The Track Rack s unique staggered, sliding hook design creates the greatest parking efficiency while still providing easy access to any particular bike. When adding or removing a bike to the rack, simply
Sunrise Deck Assembly Instructions for Kingston Left
 Sunrise Deck Assembly Instructions for Kingston Left It s easiest to build the deck frame first like it will be lying on its back and then after all 4 legs and horizontals are in place, tip the deck toward
HAPPY CHICKEN TRACTOR
 HAPPY CHICKEN TRACTOR www.thelittlechickenfactory.com Consumer Assembly Instructions 2014 Six-foot unit Picture of six-foot unit shade/rain cover not shown NEW HANDLE INSERT INTO FRAME HOLES WHILE ASSEMBLING
Manual for Shelter W3,5xL8,0xH3,8m
 Manual for Shelter W3,5xL8,0xH3,8m 22-11-2016 Congratulations on your purchase of our instant shelter. This unit is a combination of excellent manufacturing and design. It is comprised of a rigid frame
411 West Congress St., Maple Lake, MN Toll Free
 411 West Congress St., Maple Lake, MN 55358 Toll Free 877-466-8837 www.wavearmor.net Post Attachments (22926 & 21951) to Wave Port - Assembly Instructions: Attach any post attachments to a Wave Port while
SECTION CHAIN LINK FENCING AND GATES AND SOFTBALL BACKSTOP
 1 1 1 0 1 0 1 0 1 SECTION 1 1 CHAIN LINK FENCING AND GATES AND SOFTBALL BACKSTOP BASED ON DFD MASTER SPECIFICATION DATED /01/ P A R T 1 - G E N E R A L SCOPE The work under this section shall consist of
22'W x 13'H Peak Style Shelter Frame Assembly Instructions
 22'W x 13'H Peak Style Shelter Frame Assembly Instructions Recommended Tools Please read instructions COMPLETELY before assembly. This shelter MUST be securely anchored. THIS IS A TEMPORARY STRUCTURE AND
Baseball Backstopper System
 D 8 7 6 5 4 3 2 1 Baseball Backstopper System Cable Design - 4 Poles Layout Form Project Name: Zip Code: A2/A1 = D C B1/A2 = B2/A1 = C A2 POLE A1 POLE B A2/B2 = B1/A1 = B B2 POLE B1 POLE A Please fill
Congratulations! Your dog is going to love you!
 DIY INSTRUCTIONS Congratulations! Your dog is going to love you! Thank you for ordering your non-electric dog fence kit from Pet Playgrounds. In less than a day you will have your very own personal dog
12'W x 10'H RoundTop Frame Assembly Please read and understand instructions completely before assembly.
 12'W x 10'H RoundTop Frame Assembly Please read and understand instructions completely before assembly. Layout out frame parts as shown and match up items with quantity to make sure no parts are missing.
Original Gallery System
 GAllery System Art Displays Original Gallery System a Gallery System product Here s everything you need to know to get started with your Gallery System Art Hanging System GS getting started To install
Mast and Antennas for Field Day & Emergencies
 Mast and Antennas for Field Day & Emergencies John A. Allocca, WB2LUA, July 2005 This is a 27 feet 1.5 diameter portable guyed mast with a 28 feet diameter footprint. It breaks down into four 6 feet sections
Shannon s CCR Spiral Tree
 Shannon s CCR Spiral Tree http://www.shannonclaus.com Disclaimer: I take no responsibility for design failures or injuries related to this design. This document is created for informational purposes only
INSTALLATION INSTRUCTIONS CHAIN-LINK FENCE AND GATE
 INSTALLATION INSTRUCTIONS CHAIN-LINK FENCE AND GATE 1 BEFORE YOU START, IT S IMPORTANT TO CHECK......That fence footings do not exceed legally established property lines. If uncertain, refer to real estate
Hoop House Construction Plans
 Kerr Center for Sustainable Agriculture (918) 647-9123 24456 Kerr Rd. Poteau, OK 74953-5215 Copyright 2017 Published Fall 2017 www.kerrcenter.com Hoop House Construction Plans This document explains how
Assembly Instructions. Table of Contents
 HQ Little Foot Assembly Instructions Back of Handi Quilter, Inc. 501 North 400 West North Salt Lake, UT 84054 1-877-697-8458 Front of 2015 Handi Quilter, Inc. www.handiquilter.com Printed in the United
Auto Light Dep Greenhouse
 Humboldt Light Dep LLC Auto Light Dep Greenhouse Instruction Manual James Defenbaugh 16 Thank you for choosing Humboldt Light Dep for you Auto Light Dep Greenhouse needs. I have successfully built and
User Instructions Multiline Otter Scoreboard Caddy Assembly
 List of parts: User Instructions Multiline Otter Scoreboard Caddy Assembly Single Caddy Double Caddy 1 1 Base assembly with attached wheels 2 4 1 1 2 4 4 8 10 20 12 Uprights (60 or 74 aluminum extrusion)
ASSEMBLY INSTRUCTIONS FOR 2B3004 DELUXE EURO CLUB SOCCER GOAL
 Most Kwik Goal products carry a Lifetime Guarantee. For details or claims, visit kwikgoal.com or contact customer service at 1-800-531-4252. ASSEMBLY INSTRUCTIONS FOR 2B3004 DELUXE EURO CLUB SOCCER GOAL
Installation Fence Guide Kodiak Iron. Exceptional Fencing Extraodinary Customer Service
 Installation Fence Guide Kodiak Iron Exceptional Fencing Extraodinary Customer Service Kodiak Fence System Installation Guide Thank you for the purchasing the Kodiak Fence System. Fence installation is
Assembly & Operating Instructions Ironmaster IM1500
 Assembly & Operating Instructions Ironmaster IM1500 The IM1500 half cage is designed for barbell training with spotting capabilities. The IM1500 is designed to be used in conjunction with Ironmaster products,
Assembly Instructions for a Double Climbing Frame
 Assembly Instructions for a Double Climbing Frame Step 1: Lay out both bases with 8ft of spacing between them (See Diagram Below) Once you are happy with the position of each base, remove bases and follow
Queen Wingback Bed King Wingback Bed
 Parts and Hardware List A. Side Rails with Attachment Hooks 2 pcs B. Foot Rail 1 pc C. Head Rail 1 pc D. Center Support Slat 1 pc E. Leg Supports 3 pcs F. Support Slats 4 pcs G. Flat Washers 8 pcs H. Lock
1. Layout. Step 1. Step 2. Step 3. Fig. 1
 1-3/8 Panel Clamp Tools You Will Need: Tape Measure, Mason s String, Stakes, Hole Digger, Shovel, Level, Wheelbarrow, Wrenches or Adjustable Wrench, Hacksaw, Pliers, Cutting Pliers, Fence Stretcher and
50 W ide. Future Trac G able E nd. Installation Instructions AIGE
 G able E nd W ide TopTec Products, LLC 7601 Highway 221 Moore, SC 29369 Phone: (800) 845-2830 Fax: (800) 921-77 e-mail: sales@toptecproducts.com www.toptecproducts.com AIGE 2003915 General Information
ETX Powered Loudspeaker Accessories
 ETX Powered Loudspeaker Accessories ETX-BRKT10, ETX-BRKT12, ETX-BRKT15, ETX-TCA-S, ETX-TCA-L, and ETX-BRKT35 en Installation Guide en 3 Table of contents 1 Safety 4 2 Installation 6 2.1 Wall mount bracket
BLADE N BULLET BLIND Cabela s Item Number:
 BLADE N BULLET BLIND Cabela s Item Number: 466353 Visit cabelas.com or call 1-800-237-4444 for assistance. TABLE OF CONTENTS 2 3 4-13 Table of Contents Package Contents Instructions for Use Visit cabelas.com
43107 Rhino Jerry Can Holder Rhino Jerry Can Holder - Horizontal
 Important: Please read these instructions carefully prior to installation. Check the contents of kit before commencing fitment and report any discrepancies. Clean the alloy tray prior to installation.
10 x 20 / 3.35M x 6M Carport Assembly Manual
 0 x 0 / 3.35M x 6M Carport Assembly Manual -0700800 Parts: (8) PCS PIPE (9) PCS PIPE (8) PCS 3 PIPE 3WAY FITTING (6) 4WAY FITTING (6) COVER (8) FOOT PADS BOLTS & NUTS BALL BUNGEES Step : Organize Pipes
Hardware and Components:
 Hardware and Components: (A) 4X 5/16 x 1 Carriage Bolt (B) 2X 5/16 x 2-1/4 Carriage Bolt (C) 2X 5/16 x 3-1/4 Hex Bolt (D) 2X 5/16 x 3/4 Hex Bolt (E) 2X 5/16 x 1-1/4 Hex Bolt (F) 5/16 x 2-1/4 Hex Bolt (G)
Garage-in-a-Box SUV/Truck 13' x 20' x 12' Peak Style Shelter Assembly Instructions
 Garage-in-a-Box SUV/Truck 13' x 20' x 12' Peak Style Shelter Assembly Instructions Description Model # Garage-in-a-Box SUV/Truck 13' x 20' x 12' - Green 62694 Recommended Tools Please read instructions
Sit Down Table Assembly Instructions
 Sit Down Table Assembly Instructions Parts that come with your sit down table A B C D E F G H I J K L M N Extension leaf Table with cutout for machine Two table legs One table leg with long support One
12'W x 20'L x 10'H Run-in-Shed Assembly Instructions
 12'W x 20'L x 10'H Run-in-Shed Assembly Instructions Description Model # 12'W x 20'L x 10'H Run-In-Shed 51351 Recommended Tools Please read instructions COMPLETELY before assembly. This shelter MUST be
BABY WOLF LOOM. Assembly Instructions for Knocked-Down Looms
 BABY WOLF LOOM Assembly Instructions for Knocked-Down Looms BEFORE YOU BEGIN Please read through the directions before beginning to assemble your loom. Unpack the loom parts carefully. Do not throw away
Real Life Ninja Complete Starter Pack (14ft. Warped Wall) Assembly Instructions
 Assembly Instructions") MATERIALS: 3 - Main Sections (Only 2 Sections for 10 ) 8 3 deck screws for joining sections inside of 2 Rock Wall Panels (with pre-installed t-nuts. Top panel comes with ladder mounting block preinstalled.)
MATERIALS: 3 - Main Sections (Only 2 Sections for 10 ) 8 3 deck screws for joining sections inside of 2 Rock Wall Panels (with pre-installed t-nuts. Top panel comes with ladder mounting block preinstalled.)
mila-wall (Series100) General Operating Instructions page 1 of 15
 General Operating Instructions page 1 of 15") mila-wall (Series100) General Operating Instructions page 1 of 15 Step #1: Before setting up walls, lower adjustable leveling feet on each panel approximately 1". This will allow access to the threaded
mila-wall (Series100) General Operating Instructions page 1 of 15 Step #1: Before setting up walls, lower adjustable leveling feet on each panel approximately 1". This will allow access to the threaded
Assembly Instructions
 8' x 6' x 6'6" Professional Growers Greenhouse Assembly Instructions Description Model # 8' x 6' x 6'6" Professional Growers Greenhouse PGG68 350351 Please read instructions COMPLETELY before assembly.
6a. Eight Steps to Chain-Link Fence Installation
 6a. Eight Steps to Chain-Link Fence Installation Before You Start You will need the following tools to install your chain-link fence: Post hole digger Wheelbarrow, shovel and hoe for mixing concrete Tape
ASSEMBLY INSTRUCTIONS TF Tent Flooring System. 125 Taylor Parkway Archbold, Ohio Phone: (419) Fax: (419)
 Fax: (419)") 125 Taylor Parkway Archbold, Ohio 43502 Phone: (419) 445-8915 Fax: (419) 445-0367 www.biljax.com TF-2100 Tent Flooring System ASSEMBLY INSTRUCTIONS ALL DRAWINGS ARE FOR ILLUSTRATION ONLY Revision: 1 1/21/16
125 Taylor Parkway Archbold, Ohio 43502 Phone: (419) 445-8915 Fax: (419) 445-0367 www.biljax.com TF-2100 Tent Flooring System ASSEMBLY INSTRUCTIONS ALL DRAWINGS ARE FOR ILLUSTRATION ONLY Revision: 1 1/21/16
Thank you for purchasing our product! *Please read these instructions and follow them step by step.*
 07/07/08.rev1 PAGE 1 OF 11 601AL VERTICAL 60120VL LIFT W/CHAIN DRIVE WINCH Thank you for purchasing our product! *Please read these instructions and follow them step by step.* Step 1. Separate and group
PORTA TRAK OWNERS MANUAL
 PORTA TRAK OWNERS MANUAL Table of Contents: I. Rail and Frame Parts List Please read the instructions thoroughly before setting up the Porta Trak. Carefully follow how to spring the bed step by step. II.
Hardware and Components:
 Hardware and Components: (A) 5/16 x 2 Hex Bolt (B) 5/16 x 2-1/4 Hex Bolt (C) 5/16 x 2-1/2 Hex Bolt (D) 4X 5/16 x 3/4 Hex Bolt (E) 4X 5/16 x 1-1/4 Hex Bolt (F) 11X 5/16 Flat Washer (G) 12X 5/16 Nylock Nut
ATTENTION!! WHEN YOU SEE A WARNING! BE SURE TO HEED THE MESSAGE! THE INFORMATION CONTAINED IN THESE MESSAGES CAN SAVE YOUR LIFE!!
 The KINGPIN BLIND This X-Stand product(s) has been tested to rigid industry standards. Safe operation and use of this X-Stand product(s) is the responsibility of the user(s). Please read and follow all
Hoop House Plans By Steve Robinson
 Hoop House Plans By Steve Robinson This Ebook is Shareware It is meant to be shared by farmers alike. I give you permission to share this EBook to as many people as you like. It can not be sold, but it
Yard Master Pro Series 150"/180" Models Indoor/Outdoor Portable Projection Screen User s Guide
 Yard Master Pro Series 150"/180" Models Indoor/Outdoor Portable Projection Screen User s Guide Thank you for choosing the Yard Master Pro portable projection screen! Please read through this user guide
Page 1. Step 3: Unfold your DreamHouse into 2 panels. Shown Above. Step 1: Remove your DreamHouse from the pack.
 Set up Instructions Step 1: Remove your DreamHouse from the pack. Step 2: Allow your DreamHouse to spring open. Step 3: Unfold your DreamHouse into 2 panels. Shown Above. Step 4: Unzip the easiest accessible
INSTRUCTIONS FOR SETTING UP A SEPTAYOME OR OCTAYOME
 INSTRUCTIONS FOR SETTING UP A SEPTAYOME OR OCTAYOME Tools Required Two 9/6" box wrenches /4, 5/6" and /2 wrench or socket Cordless screw drill 3/32 & /8 drill bit Six foot and Eight foot ladder Small step
NOTE: Top section pole (Q) is packed INSIDE bottom section pole (S)
 is packed INSIDE bottom section pole (S)") Form 0905-0 Instructions and Parts List TM- Mini Castle (modified) MARTIN SAFETY SYSTEM NOTES: () A complete system is packed in two boxes post box and house box. House box contains hardware for both post
Form 0905-0 Instructions and Parts List TM- Mini Castle (modified) MARTIN SAFETY SYSTEM NOTES: () A complete system is packed in two boxes post box and house box. House box contains hardware for both post
Classic Roll Tarp. Installation Instructions. Attention Dealers: Please give this owners manual to the customer when the product is delivered.
 Serving the Truck & Trailer Industry Since 1944 Classic Roll Tarp Attention Dealers: Please give this owners manual to the customer when the product is delivered. Call 800-535-9545 www.aeroindustries.com
Strata. urniture. Addison Instructions. Parts in the Arm Box: Parts in the Body Box: Watch our assembly videos at
 1A Watch our assembly videos at www.strataf.com/videos.html Parts in the Arm Box: Arm - Outside View Arm - Inside View Corbels x 4 1B Parts in the Body Box: Back Deck x 1 Seat Deck x 1 Back Panel x 1 with
Ferris Wheel. By: Peter Schonefeld. WHEEL (A,B) - Make 2 PAGE 1 OF 6 THE3DOODLER.COM/COMMUNITY. Westbury Tasmania, Australia
 - Make 2 PAGE 1 OF 6 THE3DOODLER.COM/COMMUNITY. Westbury Tasmania, Australia") PAGE OF 6 WHEEL (A,B) - Make 2 9 4 2 20 5 3 6 4 3 7 8 8 9 5 0 2 6 7 PAGE 2 OF 6. Draw the TOP here but do not fill the center ring until is in place under uprights UPRIGHT (C,D) - Make 2 2. For the left
PAGE OF 6 WHEEL (A,B) - Make 2 9 4 2 20 5 3 6 4 3 7 8 8 9 5 0 2 6 7 PAGE 2 OF 6. Draw the TOP here but do not fill the center ring until is in place under uprights UPRIGHT (C,D) - Make 2 2. For the left
The Queen Quilter Professional Quilters Kit Frame
 The Queen Quilter Professional Quilters Kit Frame Assembly Instructions Table of Contents: Before you begin......................... Pg. 2 Wood parts............................. Pg. 3 Hardware..............................
Low/High Tunnel Greenhouse Plans
 Low/High Tunnel Greenhouse Plans Tools Needed (See the complete list of Greenhouse Tools) Hacksaw or Reciprocating Saw Socket Wrench, Adjustable Wrench or Nut Drivers Electric Drill with Drill Bits Sledge
Independent Containment System (ICS)
") Installing the Independent Containment System (ICS) Complete these instructions to install the Independent Containment System (ICS). Prerequisites This installation requires a team of at least two people.
Installing the Independent Containment System (ICS) Complete these instructions to install the Independent Containment System (ICS). Prerequisites This installation requires a team of at least two people.
Assembly instructions for EZ Hang Deluxe
 Assembly instructions for EZ Hang Deluxe EZ Hang Chairs is pleased that you have chosen our EZ Hang Deluxe. While utmost care is taken in the choice of materials and the highest standards are used in manufacturing,
Moo-Tel Calf Hutch CLEARSPAN ANIMAL HOUSING W x 12 L W x 18 L W x 24 L
 Moo-Tel Calf Hutch Photo may show a different but similar model. 2008 ClearSpan All Rights Reserved. Reproduction is prohibited without permission. STK# DIMENSIONS 102852 14 W x 12 L 102853 14 W x 18 L
Strata. urniture Watch our assembly videos at Denali Arms. Parts in the Arm Box: Hardware in this Box:
 1A Denali Arms Watch our assembly videos at www.strataf.com/videos.html Parts in the Arm Box: Arm - Outside View Arm - Inside View 1B Hardware in this Box: (80mm) x 8 Barrel Nuts x 8 x 8 Wood Buttons x
Assembly Instructions for a Double Climbing Frame
 Assembly Instructions for a Double Climbing Frame Step A: Lay out both bases with 8ft of spacing between them (See Diagram X) Once you are happy with the position of each base, remove bases and follow
Strata. urniture. Adriana Instructions. Parts in the Arm Box: Parts in the Body Box: Watch our assembly videos at
 1A Watch our assembly videos at www.strataf.com/videos Parts in the Arm Box: Arm - Outside View Arm - Inside View 1B Parts in the Body Box: Back Deck x 1 Seat Deck x 1 with the Feet attached Back Panel
MODULAR TRACKER SOLAR
 SOLAR MODULAR TRACKER INSTALLATION INSTRUCTIONS Congratulations on purchasing a DH Solar Tracker! The DH Solar Tracker moves throughout the day with the use of a timed controller. Tracking throughout the
Copyright Black Box Corporation. All rights reserved Park Drive Lawrence, PA Fax
 Copyright 2003. Black Box Corporation. All rights reserved. 1000 Park Drive Lawrence, PA 15055-1018 724-746-5500 Fax 724-746-0746 JULY 2003 RM3010A RM315-R2 RM323-R2 RM329 RM451 RM457 RM3020A RM316 RM324-R2
11 x 20 ALL SEASON GARAGE / 3.35M x 6M Carport Assembly Manual
 x 0 ALL SEASON GARAGE / 3.35M x 6M Carport Assembly Manual Parts: (8) PCS PIPE (9) PCS PIPE (8) PCS 3 PIPE (4) PCS 4 PIPE 3WAY FITTING (6) 4WAY FITTING (6) COVER 0 LONG SIDEWALLS () ENDWALL () (8) FOOT
Setup. The Faraday Cage is available in two types of configurations. Cage for mounting to a full perimeter enclosure on series tables.
 Faraday CageSetup, 2017 Setup The Faraday Cage is available in two types of configurations. Cage for mounting to a full perimeter enclosure on 63-500 series tables. Cage with a base plate for use on a
Installation Instructions
 Column & Beam Units with Debris Netting Installation Instructions Laminated Wood Systems, Inc. Seward, Nebraska 800-949-3526 2015 LWS, INC. AVR-NET INSTALL 05-12-16 AVR Installation Notes 1 Safety The
Constable Oak Extension Dining Table
 Constable Oak Extension Dining Table Assembly Instructions - Please keep for future reference 176/0325 Dimensions Width - 160/ 200cm Depth - 90cm Height - 75cm Important - Please read these instructions
Charisma SEG Slim Profile Light Box - XSL Series
 Page - Assemble the Frame First start by assembling corners. There are three (3) brackets per corner. All extrusion sections are numbered to identify which pieces go together, with, 2 with 2, etc. Insert
RED HANGING LOUNGER Instruction Manual
 RD HANGING LOUNGR 272-8010 Instruction Manual Assembly Instructions for Hanging Lounger, KU 272-8010 hank you for purchasing the Hanging Lounger. We hope it provides years of enjoyment. lease read and
IMPORTANT GOAL SAFETY INSTRUCTIONS READ CAREFULLY
 IMPORTANT GOAL SAFETY INSTRUCTIONS READ CAREFULLY 1. Check for structural integrity and proper connecting hardware before every use. Replace damaged or missing parts or fasteners immediately. 2. Safety/Warning
ASSEMBLY GUIDE. Mia Narrow Bookcase
 ASSEMBLY GUIDE Mia Narrow Bookcase Components: Upon unpacking your bookcase from it s delivery box, you should have the pieces shown. Follow the steps on the next pages to assemble your new bookcase. Step
Page 1. Step 1: Remove your SpringHouse from the pack. Step 3: Unfold your SpringHouse into 2 panels. Step 2: Allow your SpringHouse to spring open.
 Set up Instructions Step 1: Remove your SpringHouse from the pack. Step 2: Allow your SpringHouse to spring open. Step 3: Unfold your SpringHouse into 2 panels. Step 4: Unzip the easiest accessible doorway
Classic Roll Tarp. Installation Instructions. Attention Dealers: Please give this owners manual to the customer when the product is delivered.
 Serving the Truck & Trailer Industry Since 1944 Classic Roll Tarp Attention Dealers: Please give this owners manual to the customer when the product is delivered. Call 800-535-9545 www.aeroindustries.com
EKX Full-Range Loudspeaker Accessories
 EKX Full-Range Loudspeaker Accessories EKX-BRKT12, EKX-BRKT15, and EKX-TCA en Installation Note en 3 Table of contents 1 Safety 4 1.1 Safety point 6 2 Installation 7 2.1 Wall mount bracket 7 2.2 Truss
AUTO STABILIZING AND LEVELLING SYSTEM
 Installation Manual Make sure the caravan is parked in a safe place. Make sure the caravan brake is on. Remove all 4 corner steady legs from the caravan. Remove the corner steady legs by removing the 3
Instructions and Parts List DR-12N Martin House
 Form 36-99 Instructions and Parts List DR-N Martin House Note: It is necessary to install a post before house is put up, but the house can be assembled at any time. House parts Check parts against this
Storage Master. Shed Row. Poly Buildings
 Storage Master Shed Row Poly Buildings Instructions Manual Building #104598 2005 ClearSpan All rights reserved. Reproduction prohibited without permission. Rev: 24 February 2005 2 PARTS IDENTIFICATION
WEIGHT ADJUSTABLE ESPREE. Model 2ESP-WA-C48- Model 2ESP-WA-C60- 2ESP-WA Rev B 8/17 ASSEMBLY AND OPERATION
 WEIGHT ADJUSTABLE ESPREE PNEUMATIC TABLE BASE 2ESP-WA Rev B 8/17 Model 2ESP-WA-C48- Model 2ESP-WA-C60- = SLV, BLK or WHT ASSEMBLY AND OPERATION PARTS AND TOOLS PLEASE REVIEW these instructions before beginning
6' x 8' x 6'6" Quad-Vent Greenhouse-in-a-Box Assembly Instructions
 6' x 8' x 6'6" Quad-Vent Greenhouse-in-a-Box Assembly Instructions Description Model # 6' x 8' x 6'6" Quad-Vent Greenhouse-in-a-Box 70652 Recommended Tools Please read instructions COMPLETELY before assembly.
ASSEMBLY INSTRUCTIONS FOR 2B3001 DELUXE EUROPEAN CLUB GOAL
 Most Kwik Goal products carry a Lifetime Guarantee. For details or claims, visit kwikgoal.com or contact customer service at 1-800-531-4252. ASSEMBLY INSTRUCTIONS FOR 2B3001 DELUXE EUROPEAN CLUB GOAL 1.
flex Installation multiflex
 flex Installation Manual12m multiflex Table of Contents Page# Bolts........................................................................ 3 General Information.........................................................
Pickup Box Utility Rack Package Installation (Instruction ID: )
") 017 Chevrolet Colorado Pickup - WD (VIN S) Canyon, Colorado Accessory Installation Manual N America Document ID: 3966961 Pickup Box Utility Rack Package Installation (Instruction ID:3144879) Installation
017 Chevrolet Colorado Pickup - WD (VIN S) Canyon, Colorado Accessory Installation Manual N America Document ID: 3966961 Pickup Box Utility Rack Package Installation (Instruction ID:3144879) Installation
ULTRA SPACE SAVER Installation Instructions
 Installation Instructions The Ultra Space Saver has several steps for installation. Note that the single and double sided setups and parts are different. Make sure you follow the instructions according
SHELTER ASSEMBLY MANUAL Model # 3085GL-17P
 SHELTER ASSEMBLY MANUAL Model # 3085GL-17P Strongly ask to remove snow from the roof immediately. Do not leave any snow load on the roof. Keep both sides and two ends on the ground clear all the times.
BISON GOOSENECK FOOTBALL 1 PAIR OF GOAL POSTS
 Instruction Manual BISON GOOSENECK FOOTBALL 1 PAIR OF GOAL POSTS Customer Service (800) 247-7668 P A R T S L I S T Item Qty Description Item Qty Description A 2 GOOSENECK POLE I 4 UPRIGHTS B 2 BAND CLAMP
Hip Roof Canopy Instructions
 Hip Roof Canopy Instructions - PUT SAFETY FIRST. NOT COMPLYING WITH THE PROCEDURES AND PRECAUTIONS OUTLINED IN THIS MANUAL MAY RESULT IN PERSONAL INJURY AND WILL INVALIDATE THE WARRANTY.. Before attempting
CEILING-MOUNTED MONORAIL ANCHOR TRACK SYSTEM Assembly and Operation Instruction Manual
 CEILING-MOUNTED MONORAIL ANCHOR TRACK SYSTEM Assembly and Operation Instruction Manual This manual is for various mounting types and plain and trussed track profiles. ISO 9001:2008 Registered Manual 103-0075