MANUAL FOR PROFESSIONAL USE
|
|
|
- Chad Price
- 5 years ago
- Views:
Transcription
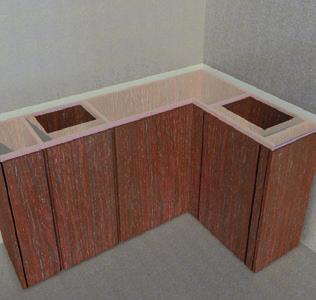
1 Silestone MANUAL FOR PROFESSIONAL USE Una vida authentica comienza en nuestro hogar, espacio emocional de nuestras experiencias. La dimension humana y por lo tanto sensorial, es la piedra angular que convierte una casa en nuestro hogar. Es una forma de vivir que se va construyendo con el tiempo, es el resultado de nuestras acciones y decisiones, de nuestras experiencias. YEAR ANNIVERSARY 25 YEAR WARRANTY
2

.")
3 Fabrication Where more than one slab is required to make the kitchen worktop, check that the slabs match in colour and appearance by putting them together. To do this, the information on the specifications label for each slab should be used. It is extremely important to keep the Reference Number for the slab, so as to be able to track its traceability in future, and to submit a claim in the event of receiving faulty material. Cutting The cutting table should be solid and robust. It should also be perfectly flat and level. Check that the surface where the slab is going to rest on the cutting table is in good condition (i.e. that it is not covered in cuts in any one area, which might lead to the material moving about while being cut). The cutting disk must be in perfect condition (no missing parts, or worn disks, etc.). Rate of advance: For 2 cm slabs: between 3 and 3.5 m/min. For 3 cm slabs: between 2.5 and 3 m/min. Water flow: Direct plenty of water to the leading edge of the disk as it cuts into the material.


.")

4 To cut a Silestone slab or one for ECO by Cosentino, the first cut should be made along the length of the slab, and the second on the width, as shown in the diagram. Cut the 3cm slabs in two stages, as shown in the diagram. First, you should cut through half of the thickness of the slab, with the second cut going through the whole of the slab. The cutting disk should be perfectly aligned with the cutting direction. Rotational speed: 2500 rpm for 20 cm radius disk; 3500 rpm for 15 cm radius disk. Precautions Do not place outdoors or in places with UV lighting. Over the years the colour and shade of Silestone products may suffer from the effect of the sun's rays. Do not use water repellents or sealants to bring out the lustre. Once it has been installed, the sheen on Silestone and ECO by Cosentino is the natural lustre of the product itself. Sealants and water repellents provide an artificial, ephemeral shine. Do not use chlorine-based products such as dichloramine (present in paint stripper). Do not use paint strippers, caustic soda or any products with a ph of more than 10. The surface of the material should not be re-polished, either on floors or on a worktop. If bleach or solvent is used, it should be diluted with water and never le in permanent contact with the product. Do not use degreasing agents such as those used in oven cleaners. Bleach and solvent can continue to affect the product 12 hours later. Keep Silestone and ECO by Cosentino separate from sources of heat (deep-fat fryers, etc.). We always recommend placing hot objects on top of hot pads or tablemats. Do not sell products That are not originals and identified with the brand Silestone
5 Bullnose and half bullnose edges Polishing edges with manual water polishing machine Polishing edges with an automatic edging machine. Straight edges The diamond generators should be in good condition without any deformities to achieve the right profile. 6-motor machine: Sandpaper grits 60, 120, 220, 400, 800, motor machine: Sandpaper grits 120, 220, 220, 400, 600, 800, 1500, Speed*: Approximately cm/min. Pressure: Between 2 and 3 bar. Polishing Suede look edges The polished abrasives must be in good condition. The cutting table and the piece being worked on should be well secured to prevent any movement during polishing. The polishing machine should turn at less than 4000 r.p.m. The water flow must be high and properly directed towards the polishing area to keep the material cool and prevent it from burning. Grind using a diamond disk. Move the polishing machine gently over the material without pressing against it. When polishing, rather than remaining in the same position on the edge, the machine should be kept in constant motion. Use diamond resin sandpapers. Use the following sequence of grits: 50, 100, 200, 400, 800, 1500, Polishing by hand 6-motor machine: Sandpaper grits 60, 120, 220, 400, 800, motor machine: Sandpaper grits 60, 120, 220, 400, 600, 800, 1500, Speed*: Approximately cm/min. Pressure: Between 2 and 3 bar. *for dark colours, the speed should be Polishing with an automatic edging machine Use abrasives for SUEDE finishes. These can be obtained from any store or dealer authorised by Cosentino, S.A. The polishing should be done with water. Ensure that the manual polishing machine has a continuous supply of water so that the product is kept cool. The sequence of grit size that should be used is as follows: 36, 36, 46, 46, 60, 120, 220, 400, 600. For 36, 46, 60, 120 disks the rpm must be between For 220, 400, 600 disks the rpm must be between IMPORTANT: Do not apply pressure as it breaks the teeth and is dangerous. The pressure of the heads on the edge should be as low as possible to prevent the teeth on the special abrasives from breaking. For such purpose, a back pressure should also be used to all but cancel out the pressure of the heads, as shown in the chart. The trays with the concentric coupling screw are used for straight edges, whether it is polished or leather finish. The trays with and off-centre screw are used for special edges. IMPORTANT: Do not apply pressure as it breaks the teeth and is dangerous.
6 Guide to good practice Always pay attention to the safety and prevention measures set out in the Guide to Good Practice for working with Silestone and ECO by Cosentino products manufactured by Cosentino. Use cutting machines and tools with a "wet method" (using water). Dust emissions can be reduced and controlled using wet working methods that avoid sending particles into the atmosphere. Wash your hands and face carefully after handling the product. Do not eat, drink or smoke while using it. Cosentino does not accept responsibility for any damage caused as a result of failing to observe the instructions in this manual, or the precautions it contains. All claims must be accompanied by the serial number of the slab(s) used to make the worktop. The serial number is printed on the label that is stuck to the slab. Technical data It has been observed that the finish is better if eccentric cutter heads are used. The first 4 cutter heads will have a rotational speed of 1500 r.p.m. The last 4 cutter heads will have a rotational speed of 1500 r.p.m. Pressures for all cutter heads should be the same: 1.2 bar of pressure and 1 bar of back pressure. NB: It should be borne in mind that these values have been obtained using a COMANDULLI machine. In other machines, attention should be paid to their machining and functional features; however, the operating principle should always be borne in mind (namely, that the brushes are not flattened against the edge being w orked on). For this reason, we need to regulate the machine to achieve optimum pressure, bearing in mind the pressures required by our particular machine, or where it is positioned.
7 Abrasives positioning chart Straight Edge Pressure Grain Speed Pressure Counterpressure 1st position cm/min 2nd position cm/min 3rd position cm/min 4th position cm/min 5th position cm/min 6th position cm/min Abrasives positioning chart Special Edge Pressure Grain Speed Pressure Counterpressure 1st position Common Abrasive cm/min 2nd position Common Abrasive cm/min 3rd position cm/min 4th position cm/min 5th position cm/min 6th position cm/min
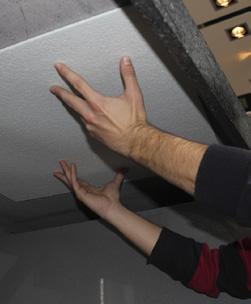
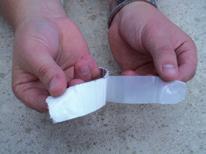
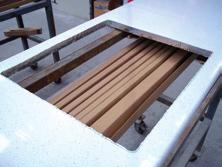
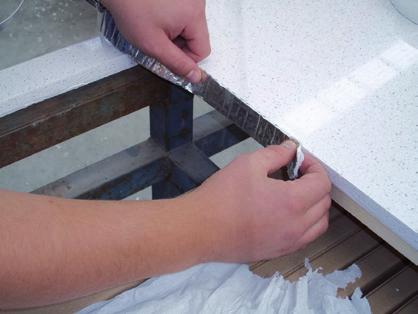
8 Installation Step 1 Step 2 Step 3 The gap between the worktop and the hob hould be as large as possible. Do not let the elements for fixing the hob in place press against the worktop (inasmuch as this is possible). The radius of the holes at the corners Should never be less than 4 mm. This can be achieved by using an 8mm drill. Where possible, the radius should be larger than 4 mm. For unit or column cut outs, a radius should likewise be left at the corners. Do not cross cuts at the holes or the Units or columns, these should be rounded off. Step 4 Step 5 Step 6 Ensure that the base units supporting the Worktop are level by adjusting the legs on the units. Special attention should be paid to worktops with reinforced joints (2+2 or mitre), which should be fitted with reinforcements at the places indicated in the drawing, so that the worktop rests on the walls of the kitchen units properly. The corner should be levelled off and properly supported. Check that the front of the kitchen unit in the area around the sink is solid enough and there is no possibility of bowing. Stick heat sink tape in all areas in direct contact with heat. Remove the adhesive Tape and stick the insulating tape on the edge of the worktop cut out in the area around the hob. Check that the seal runs all the way round the hob. This should not be removed at any time. Place the insulating tape in position and use silicone to stick it to the underside of the worktop, just above the dishwasher and washing machine. Step 7 Step 8 Step 9 Use Juntax pigments, solumastic and olorsil silicones, to achieve smooth, even joints in the worktop. Contact your distributor to obtain a supply. Silestone y ECO by Cosentino cannot be fitted between walls, furniture, etc. Allow for a 3mm expansion gap on either side. Use COLORSIL. Supply your customer with a Cleanpack (Care kit) to ensure correct use of the worktop.


9 1 2 3 NO YES

10 Maintenance Grease stains: Apply a small quantity of Q-Action (or similar) to the stain and gently scrub with a so scouring pad (like Scotch-Brite) until it disappears. Rinse immediately with water and dry. Silicone and putty stains: Use a knife and CleanColorsil or a solvent (that does not contain dichloromethane) and gentlyscrub with a so scouring pad (like Scotch-Brite). Then rinse with plenty of water and dry. We recommend that the marks are removed at the time of installation. LIMESCALE (glass marks): Pour an anti-limescale product (like Viakal or similar) onto the surface and leave to act for 1 min. Rinse with plenty of water and dry. Difficult stains: For difficult stains, pour Q-Action (or similar) onto the affected area leaving it to act for 2 mins then gently scrub with a so scouring pad (like Scotch-Brite). Rinse with plenty of water and dry.
11 Technical advice report The recommendations and proposals in this document should only be used as guidelines for the implementation of the organisational, technical measures and individual habits. Under no circumstances should the specified legal obligations in terms of the health and safety be substituted for national legislation including risk assessments, planning corrective actions, specific technical advice reports, training and information, preventative medicine etc, which correspond to the health and safety departments of the companies or their external consultants in this area.
12 COSENTINO HEADQUARTERS Ctra. Baza a Huércal - Overa, km 59 / Cantoria - Almería (Spain) Tel.: / Fax: / info@cosentino.com / * ** YEAR 25 WARRANTY * To check terms and conditions please go to ** To obtain more information about colours with NSF certificate please visit
SILESTONE TRAINING MANUAL
 SILESTONE TRAINING MANUAL MANUFACTURING WITH MACHINERY PREPARING THE WORK 2. Ensure enough material is available prior to beginning. 1. Check the slab before cutting it in order to find possible defects
QUARTZ FABRICATION MANUAL
 QUARTZ FABRICATION MANUAL Quartz Fabrication Manual Rev. 1 Page 1 of 26 TABLE OF CONTENTS Product Description. 3 Slab Inspection.. 4 Fabrication Equipment.. 6 FABRICATION TIPS Cutting The Slab. 7 General
Rev. 05/16 01 ACRYLIC INSTALLATION GUIDE
 Rev. 05/16 01 ACRYLIC INSTALLATION GUIDE Contents 1.0 Inspection 3 2.0 Storage 3 3.0 Handling 3 4.0 Planning & Preparation 3 5.0 Panels 4 6.0 Accessories 4 7.0 Tools & Fixings 4 8.0 Fitting Tips 5 9.0
EZYSTONE WORKSURFACES
 EZYSTONE WORKSURFACES Installation & Maintenance Instructions 1. Tools Required Worktop Edge Finishing Kit Pack 1-100mm Velcro Backing Pad Pack 2-100mm Diamond Dry Cut Velcro Discs (100 Grit Yellow) (200
RECOMMENED TOOLS FOR MACHINING COUNTERTOPS
 Fabrication Manual RECOMMENED TOOLS FOR MACHINING COUNTERTOPS 1. Blades a) Segmented blade for porcelain. 4. Polishing Discs a) Silicon Carbide velcro discs for dry use. Grit 60, 120, 220, 400. 2. Grinding
METHOD STATEMENT. Sika FloorJoint S
 METHOD STATEMENT Table of Contents 1 SCOPE 3 2 PRODUCT 3 2.1 3 3 SUBSTRATE REQUIREMENTS 3 4 Preparation of the Substrate 3 4.1 Mapping of the joint panels on the floor for the saw cuts 3 4.2 Execution
PROCESSING GUIDE OLTRELUCE
 PROCESSING GUIDE OLTRELUCE Version I October 2012 Revised information on products, product availability and processing guidelines is regularly updated on the AGC Glass Europe website www.yourglass.com
Solid Laminate Worktops Installation and Aftercare Instructions
 Solid Laminate Worktops Installation and Aftercare Instructions Introduction: Their solid composition makes solid laminate, also called compact laminate, worktops easy to install and maintain. A solid
CUTTING. The direction of the slabs 01. Planning cut-outs CUTTING WITH A DISC CUTTER 02. Making cut-outs with a disc cutter 04
 CONTENTS 1. INTRODUCTION 01 The direction of the slabs 01 Planning cut-outs 01 2. CUTTING WITH A DISC CUTTER 02 3. MAKING CUT-OUTS 04 Making cut-outs with a disc cutter 04 Tips when using a CNC router
Laying and maintenance of cement tiles
 Laying and maintenance of cement tiles David&Goliath cement tiles are manufactured under licence in the Far East, according to our standards and specifications concerning colour and dimensional stability;
Installation Site Preparation - Site Preparation
 S c u l p t u r e s Bespoke Single Door / Bespoke Frameless Hinged Door + Inline Panel Instruction Manual Truelife Consumer Guarantee Please make sure the purchaser/end user completes and returns the Guarantee
INSTALLATION INSTRUCTIONS FOR STANDING SHOWER CABIN OWNER'S MANUAL PLEASE READ INSTRUCTIONS BEFORE PROCEEDING Packing List. Door (pc) 2. Hinge (2pc) 3
 2. Hinge (2pc) 3") VIGO INDUSTRIES INSTALLATION GUIDE FOR SHOWER ENCLOSURE ()! SAFETY PRECAUTIONS This Installation Guide uses the following symbols to indicate important information. Always observe the instructions indicated
VIGO INDUSTRIES INSTALLATION GUIDE FOR SHOWER ENCLOSURE ()! SAFETY PRECAUTIONS This Installation Guide uses the following symbols to indicate important information. Always observe the instructions indicated
Guidelines for working with
 Guidelines for working with 1. Sawing Circular Saws When using circular saws, only the circular saw blades that are not set are suitable for cutting PARAPAN. Hardened metal saw blades that have the greatest
PANELS EXCEPTIONAL QUALITY. Our Soho collection is a range of extremely durable UV lacquered high gloss panels.
 S O H O HIGH GLOSS SOHO HIGH GLOSS The brilliance of a high gloss finish is a great foundation for creating a captivating environment infused with liveliness and energy. The Soho décor collection allows
Optima 450 LED Edge-Lit Single-Sided Light Box. Installation Instructions INSTALLATION INSTRUCTIONS. Figure 1. Tools you ll need
 Installation Instructions Optima 450 LED Edge-Lit Single-Sided Light Box Figure 1 INSTALLATION INSTRUCTIONS Before you begin These instructions illustrate the Stylmark Optima 450 LED Edge-Lit Single-Sided
#70 grit sand Putty knives, sized as needed #1 fine gray sand Corner tools Milestone acrylic liquid
 Countertops Supplies Tools White and/or gray Milestone cement 12 inch steel trowel #70 grit sand Putty knives, sized as needed #1 fine gray sand Corner tools Milestone acrylic liquid Hock Universal tints
Retrofit Apron Front Farm Sink With Dual Mount Capability Installation Instructions
 For Under-Mount Installation please refer to page 14 FOR EXPERIENCED AND PROFESSIONAL INSTALLATION ONLY This installation project is designed for an advanced skill level. Disclaimer: Undermount Application
Reliable solutions with optimised performance
 Reliable solutions with optimised performance 3M innovation provides quality you can count on in a full line of premium engineered abrasives and convenient all-purpose abrasive products for use in stock
SHIPLOCK CLADDING PRODUCT GUIDE INSTALLATION TECHNICAL SPECIFICATIONS CARE & MAINTENANCE
 SHIPLOCK CLADDING PRODUCT GUIDE INSTALLATION TECHNICAL SPECIFICATIONS CARE & MAINTENANCE SHIPLOCK CLADDING CN-04E / CN-04W / CN-W008 Prior to the installation of any form of Cladding, it is recommended
Sketchpaint. Ideal for turning any smooth surface into a whiteboard. Ready to use in 5 days
 Sketchpaint Ideal for turning any smooth surface into a whiteboard SketchPaint - A whiteboard straight out of a tin! White Gloss or Transparent Finish Simple application Tin size available: 3m² or 6m²
1 SELECT suitable material. It takes time to cut a cab. Don t waste it on rubbish.
 7 July 09 CUTTING A STANDARD CABOCHON A Standard Cabochon or CAB is an oval or round stone with one flat side and the other side having an even curved dome shape. Top of Cab It will have a narrow bevel
Wall Profiles 2 Pozi Screwdriver. Wall Profile Covers 4 Sealant. Large Panel and Thin Panel Assemblies Sealant Gun
 Decem Sliding Door (Corner Fitting) Instruction Manual DXT Important Information Toughened glass is completely safe for use in our shower enclosures and bath screens; providing our products are installed
Titan Installation Instructions
 Titan Installation Instructions Introduction: This manual was written to cover the fabrication and installation of sink bowls and tub and shower surrounds in residential and commercial applications. As
Installation instructions for co-extruded louver-board profiles
 Installation instructions for co-extruded louver-board profiles www.silvadec.com / info@silvadec.com / tel.:+33 (0)2.97.45.09.00 TO BE READ CAREFULLY BEFORE INSTALLATION Before starting installation on
Hinge Door + Inline Panel + Return Panel
 Hinge Door + Inline Panel + Return Panel Instruction Manual DXL2HDR + DXL2HR + DXR Important Information Toughened glass is completely safe for use in our shower enclosures and bath screens; providing
Hinge Door + Side Panel
 Hinge Door + Side Panel Instruction Manual KL+ KR Important Information Toughened glass is completely safe for use in our shower enclosures and bath screens; providing our products are installed according
INSTALLATION INSTRUCTIONS FOR REPLACEMENT FORGENT WOOD GLASTRA WINDOWS RECOMMENDATIONS FOR COMMON INSTALLATION OF ALL REPLACEMENT WINDOWS.
 INSTALLATION INSTRUCTIONS FOR REPLACEMENT FORGENT WOOD GLASTRA WINDOWS RECOMMENDATIONS FOR COMMON INSTALLATION OF ALL REPLACEMENT WINDOWS. Installer: DO NOT DISCARD Please leave the Installation Guide
All aspects of the installation of maia are also covered in a DVD that is available to view on-line at
 41405015530 41405015730 41405016130 41405015930 41405015520 41405015720 41405016120 41405015920 41405016520 41405016530 B All aspects of the installation of maia are also covered in a DVD that is available
SILESTONE TRAINING MANUAL
 SILESTONE TRAINING MANUAL TEMPLATING THE COUNTERTOPS templating the countertops The key to customer satisfaction is the appropriate coordination between templating, manufacturing and installation. This
Installation Guide 1
 1 2 Contents Before you begin Storage & preparation Tools & materials you may need Getting started Sink & cooktop cut-outs Cabinet Joins for 20mm benchtops Joining & installation of 20mm benchtops Joining
Splashback Installation Instructions
 Splashback Installation Instructions What is Akril? Akril is an Australian made environmentally friendly, highly engineered polymer, enhanced with colour. Quite simply, it offers a new source of design
PolyCarb has good resistance to many chemicals. Some chemicals may harm the PolyCarb sheets. Contact us when in doubt about any chemical.
 Polycarbonate Panels This manual provides the basic information for working with and installing PolyCarb sheets. Due to their hollow core, prior preparation is needed before the actual installation, with
Bathroom Installation Manual
 Bathroom Installation Manual MAKING SPACE MORE VALUABLE May 2016 1 2 Contents page 1. Introduction Page 4 2. Tools required / key Page 5 3. Fittings Page 6 4. 600 cistern unit Page 7 5. 600 vanity unit
Calia cm Extending Dining Table, Oak Stock number:
 Stock number: 836 03005 H76 W85 L160-240cm Thank you for purchasing the Calia 160-240cm Extending Dining Table, Oak. Please read the instructions and warnings carefully before use, to ensure safe and satisfactory
Esthec. Terrace. Manual for Assembly and Installation
 Esthec Terrace Manual for Assembly and Installation 0 Table of Content 1. Introduction... 2 2. Factsheet... 3 3. Part-description... 4 3.1 Esthec Terrace profile... 4 3.2 3.3 Esthec Terrace side-profile...
CITI RANGE - ASSEMBLY INSTRUCTION MANUAL. PRODUCT DESCRIPTION: CORNER WORKSTATION - SINGLE - 1 PERSON (1800 x 1500 x 750)
") CITI RANGE - ASSEMBLY INSTRUCTION MANUAL PRODUCT DESCRIPTION: CORNER WORKSTATION - SINGLE - 1 PERSON (1800 x 1500 x 750) CODE/S: CTWS1815S CITI RANGE - ASSEMBLY INSTRUCTION MANUAL IMPORTANT Please read
CITI RANGE - ASSEMBLY INSTRUCTION MANUAL PRODUCT DESCRIPTION: CORNER WORKSTATION - SINGLE - 1 PERSON (1800 x 1500 x 750) CODE/S: CTWS1815S CITI RANGE - ASSEMBLY INSTRUCTION MANUAL IMPORTANT Please read
MIRAGE-X / BELLA. Shower Door Installation Instructions
 MIRAGE-X / BELLA Shower Door Installation Instructions IMPORTANT DreamLine reserves the right to alter, modify or redesign products at any time without prior notice. For the latest up-to-date technical
multipanel Installation (panels) CONTENTS
 CONTENTS") multipanel Installation (panels) The following is an installation guide for fitting multipanel to walls, tiles, plaster, chipboard or concrete. A separate guide is available for fitting multipanel shower
multipanel Installation (panels) The following is an installation guide for fitting multipanel to walls, tiles, plaster, chipboard or concrete. A separate guide is available for fitting multipanel shower
BUILDING A GOAL WALL DO IT YOURSELF! INSTRUCTIONS FOR A GOAL WALL
 INSTRUCTIONS FOR A In just a few steps, we show you how to build your own goal wall and paint it perfectly. COMPILED BY 1 PREPARING Purchase the materials from the enclosed list. The DIY store should be
Curium 19H Installation Instructions & Parts List
 Curium 19H Installation Instructions & Parts List Illustration Curium 19H Right Hand Page 1 of 15 01/07/2016 Revision 2.1 IMPORTANT This shower screen / enclosure must be installed by suitably qualified
I N S TA L L AT I O N & M A I N T E N A N C E G U I D E
 I N S TA L L AT I O N & M A I N T E N A N C E G U I D E E N V I R O B U I L D. C O M + 4 4 ( 0 ) 2 0 8 0 8 8 4 8 8 8 Version 3.2 EnviroBuild 2018 C O N T E N T S Storage & Handling 03 Tools 04 Calculating
Contents. pages 20-24: Installing Edge sinks into. custom laminate countertops page 8: Installing Edge sinks into postform laminate countertops
 Contents pages 2-8: Installing Edge sinks into custom laminate countertops page 8: Installing Edge sinks into postform laminate countertops pages 9-14: Installing Acrylic sinks into custom laminate countertops
Profiles for floors of same height Proclassic Proclassic F
 PROFILPAS S.P.A. VIA EINSTEIN, 38 35010 CADONEGHE (PADOVA) ITALY TEL. +39 (0)49 8878411 +39 (0)49 8878412 FAX. +39 (0)49-706692 EMAIL: INFO@PROFILPAS.COM Profiles for floors of same height Proclassic Proclassic
Install Instructions. SCR-48N Crash Rail. Please read these instructions thoroughly prior to beginning the SCR-48N Crash Rail installation!
 Please read these instructions thoroughly prior to beginning the installation! This instruction sheet is intended to provide a specific guide to follow for the installation of this. Contained within is
IMPORTANT READ ALL INSTRUCTIONS CAREFULLY BEFORE STARTING THE INSTALLATION
 SAPPHIRE ALCOVE SHOWER INSTALLATION GUIDE IMPORTANT READ ALL INSTRUCTIONS CAREFULLY BEFORE STARTING THE INSTALLATION SHOWER WALL TOP RAIL DOOR RETAINER DOOR RETAINER DOOR ASSEMBLY DOOR SILL SHOWER TRAY
Quality Marine Equipment Since Antifouling Paint For Metal Under The Waterline SPRAY. Application Instructions.
 Quality Marine Equipment Since 1981 Antifouling Paint For Metal Under The Waterline SPRAY Application Instructions www.antifoulingpaint.net Thank you for selecting Velox Plus Antifouling Paint to protect
QWALL 5.2 (2 Back Panels)
") QWALL 5. ( Back Panels) SHOWER ACRYLIC WALL INSTALLATION INSTRUCTIONS IMPORTANT DreamLine TM reserves the right to alter, modify or redesign products at any time without prior notice. For the latest up-to-date
QWALL 5. ( Back Panels) SHOWER ACRYLIC WALL INSTALLATION INSTRUCTIONS IMPORTANT DreamLine TM reserves the right to alter, modify or redesign products at any time without prior notice. For the latest up-to-date
SlipGrip Data Sheet & Installation Guide
 SlipGrip Data Sheet & Installation Guide Stair Treads Landing Covers Flat Sheets 9/2015 SlipGrip Technical Data Description SlipGrip products are high performance safety stair treads, landing covers and
INSTALLING YOUR UNICLIC FLOOR - Small planks / 3 sizes
 INSTALLING YOUR UNICLIC FLOOR - Small planks / 3 sizes 1) General The panels must be rotated on both short and long edges to fit into one another. This can be performed by inserting either the tongue into
clean care Polish quartz care
 Clean Care Polish quartz care AKEMI QUARTZ CARE LINE: THE PROFESSIONAL CARE FOR ENGINEERED QUARTZ STONE Ever since its foundation in 1933 the Nuremberg based chemical company AKEMI has been producing speciality
31 / 39 / 59 Basin 31 / 39 / 59 Basin Frame Introduction Parts supplied - basin frame
 31 / 39 / 59 Basin US-WF0813SCW / US-WF1003SCW / US-WF1503SCW 31 / 39 / 59 Basin Frame US-WF80X81C / US-WF100X81C / US-WF150X81C Installation Instructions Introduction Parts supplied - basin frame All
CONTENTS. General Introduction 1. Selected Bench Top Commissions 2. Selected Supplementary Commissions 7. Warranties 8. Cornice Mouldings 11
 CONTENTS General Introduction 1 Selected Bench Top Commissions 2 Selected Supplementary Commissions 7 Warranties 8 Cornice Mouldings 11 Durability Guaranteed with The WOODSMITHS Bench Tops The WOODSMITHS
Durabrac Gable Bracket Installation Guide
 Durabrac Gable Bracket Installation Guide Durabrac vinyl gable brackets are manufactured from high quality natural white vinyl with UV inhibitors. There are currently six styles and three sizes to choose
Product Care & Maintenance Guide
 Product Care & Maintenance Guide To prolong the life and beauty of your new cabinetry, please read and follow these product care and maintenance instructions. While 6 Square takes great care in building
Linda Barker Collection Heritage Collection Classic Collection INSTALLATION GUIDE
 Linda Barker Collection Heritage Collection Classic Collection INSTALLATION GUIDE Ruler Pencil Masking tape Measuring tape Silicone sealant & silicone gun Power drill & screwdriver High-grab adhesive Jig
Maintenance and other important non-personal injury and non-material damage instructions or statements that should be observed.
 VIGO INDUSTRIES INSTALLATION GUIDE FOR SHOWER ENCLOSURE ()! SAFETY PRECAUTIONS This Installation Guide uses the following symbols to indicate important information. Always observe the instructions indicated
LUXAR Anti reflective coated glass Handling Procedures for LUXAR
 LUXAR Anti reflective coated glass Handling Procedures for LUXAR - 1-29.03.99 Table of contents 0. Introduction of LUXAR 1. Transportation / Packing 2. Storage 3. Handling / Cutting 4. Treatment 5. Washing
CORNER ENTRY ENCLOSURE
 CORNER ENTRY ENCLOSURE SUPREME INSTALLATION INSTRUCTIONS IMPORTANT - Please read before installation Please read these instructions carefully before starting installation and keep in a safe place for future
GENERAL FITTING INSTRUCTIONS FITTED
 G07V1.1 U K GENERAL FITTING INSTRUCTIONS FITTED Important : Unpack the units carefully ensuring not to scratch them with the knife blade. Inspect every item carefully before installation as no claim for
Fiddes Premier Water-based Floor Lacquers
 FLOOR FINISHES Fiddes Premier Water-based Floor Lacquers PREMIER HP FLOOR LACQUER Fiddes Premier HP Floor Lacquer is a high performance, water based, 1 component self cross linking 100% Polyurethane floor
Lisbon Side Table Light oak Diameter 45cm Height:50cm
 Lisbon Side Table Light oak Diameter 5cm Height:50cm DEAR CUSTOMER Thank you for purchasing your new piece of furniture from Dunelm. We put a lot of effort in the design and construction of our products
Before you Begin... 3 Storage and preparation... 3 Tools & Materials You may Need... 4
 Installation Guide Installation Guide Contents INTRODUCTION... 2 Before you Begin... 3 Storage and preparation... 3 Tools & Materials You may Need... 4 Adhering your Think Solid benchtop to your cabinets
TORLYS LEATHER PLANK INSTALLATION INSTRUCTIONS
 ENGLISH INSTRUCTIONS TORLYS LEATHER PLANK INSTALLATION INSTRUCTIONS Dear Customer, You have chosen a high quality TORLYS Leather floor, well suited for all residential application except bathrooms and
APRON FRONT STAINLESS STEEL SINK Installation & Care Instructions
 Installation & Care Instructions FOR MODEL NUMBERS CA231132 CA231232 CA231235 CA231SB32 CA231SB35 CA231232 CA231132 RECOMMENDED TOOLS Tape Measure Safety Glasses Painter s Tape BEFORE YOU START CA231SB32
Curium 19.4H Installation Instructions & Parts List
 Curium 19.4H Installation Instructions & Parts List Illustration Curium 19.4H Right Hand Page 1 of 21 30/06/2016 Revision 1.0 IMPORTANT This shower screen / enclosure must be installed by suitably qualified
Solutions. Installation Instructions. Ref Description Illustration Qty. A Shower Tray* mm Radius Curved Panel* Universal. Curved Quad Panel*
 Solutions Parts Supplied Installation Instructions Ref Description Illustration ty Shower Tray* *Shape of tray may vary from illustration B 550mm Radius Curved Panel* *If your tray is uadrant you will
An adjacent sauna must be well insulated and located to leave a gap of at least 10 cm (4 ) for air to circulate between the sauna and the steam room.
 for air to circulate between the sauna and the steam room.") Please read through these instructions carefully before starting assembly or installation work. There must be no form of heating in the steam room, apart from the steam itself. The ambient temperature
Please read through these instructions carefully before starting assembly or installation work. There must be no form of heating in the steam room, apart from the steam itself. The ambient temperature
VALENCIA RONDO DOOR WITH RETURN
 VALENCIA RONDO DOOR WITH RETURN INSTALLATION GUIDE SEALANT REQUIRED TO COMPLETE THIS INSTALLATION: ( not supplied) Sika Silaflex NG To seal the WHITE shower door and returns to the shower tray. Usage:
VALENCIA CORNER DOOR WITH RETURN
 VALENCIA CORNER DOOR WITH RETURN INSTALLATION GUIDE SEALANT REQUIRED TO COMPLETE THIS INSTALLATION: ( not supplied) Sika Silaflex NG To seal the WHITE shower door and returns to the shower tray. Usage:
General Installation Instructions
 General Installation Instructions Good web sites to check out that may assist you are: For gluing engineered boards over timber chipboard/particle board/ yellow tongue: https://www.youtube.com/watch?v=bpyfr373tl8
DUROPAL by wodego. The Duropal Guide. wodego A Pfleidrer Company TO GOOD WORKTOPS
 DUROPAL by wodego www.topclasscarpentry.com The Duropal Guide TO GOOD WORKTOPS wodego A Pfleidrer Company DUROPAL GUIDE Duropal guide to good worktops While cabinets are examined for quality, door styles
INSTALLATION GUIDE VERSION 11/14
 INSTALLATION GUIDE VERSION 11/14 In this guide we will demonstrate effective techniques and methods for installing EDGE stainless steel sinks seamlessly in both laminate and solid surface. These techniques
Dubnium 11 Installation Instructions & Parts List
 Dubnium 11 Installation Instructions & Parts List Illustration Dubnium, H1 Handle Right Hand: Open Out Page 1 of 25 IMPORTANT This shower screen / enclosure must be installed by suitably qualified individuals.
Radon 07 Installation Instructions & Parts List
 Radon 07 Installation Instructions & Parts List Illustration Radon 07, H1 Handle Right Hand: Open Out 14/06/2016 Revision 1.1 Page 1 of 21 IMPORTANT This shower screen / enclosure must be installed by
B A T H R O O M G L A S S
 mistley B A T H R O O M G L A S S vaug16 Page 2 Thank you for purchasing this Trinity shower screen. Please study these instructions carefully before assembly and installation and check all supplied parts
Slider Door Installation Instructions
 Slider Door Installation Instructions IMPORTANT: If installing a Slider Door and Side Panel only; ie. a corner installation, please refer to alternative fixing details on the document reverse. 2 YEAR GUARANTEE
INSTALLATION INSTRUCTIONS FOR FORGENT SLIDING PATIO DOORS RECOMMENDATIONS FOR COMMON INSTALLATION OF SLIDING PATIO DOORS.
 INSTALLATION INSTRUCTIONS FOR FORGENT SLIDING PATIO DOORS RECOMMENDATIONS FOR COMMON INSTALLATION OF SLIDING PATIO DOORS. Installer: DO NOT DISCARD Please leave the Installation Guide with the home owner
Cleaning Procedure INTRODUCTION:
 Cleaning Procedure INTRODUCTION: Many elements can contaminate the surface of a vehicle s paint film, such as waxes, grease, polishes, road film, tar and general dirt. Pre-cleaning to remove any existing
CLASSIC RANGE PLUS RANGE PHOTO WALL. Pre-installation check-list
 CLASSIC RANGE PLUS RANGE PHOTO WALL The following is an installation guide for fitting Multipanel CLASSIC RANGE, PLUS RANGE, PHOTO WALL Jig saw or Hand saw Measuring Tape Ruler Pencil High-grab adhesive
Hinge Door + One Inline Panel
 inge Door + One Inline Panel Instruction Manual KLD + KL Important Information Toughened glass is completely safe for use in our shower enclosures and bath screens; providing our products are installed
HALLMARK DECKING INSTALLATION MANUAL
 HALLMARK DECKING INSTALLATION MANUAL CARE AND MAINTENANCE Congratulations on the purchase of your Hallmark composite decking. To ensure that you keep your low maintenance decking looking its best we recommend
NATURA PRO Product Information Leaflet 1
 NATURA PRO Product Information Leaflet 1 1. Product composition NATURA PRO sheets consist of the following: Portland cement Mineral fillers Organic reinforcing fibers Additives Semi-transparent water-based
Bi-fold Door Installation Instructions
 Bi-fold Door Installation Instructions IMPORTANT: If installing a Pivot Door and Side Panel, ie. a corner installation, please refer to alternative fixing details on the document reverse. 2 YEAR GUARANTEE
BRUSH APPLICATION INSTRUCTIONS
 QUALITY MARINE EQUIPMENT SINCE 1981 Antifouling Paint For Metal Under The Waterline BRUSH APPLICATION INSTRUCTIONS www.antifoulingpaint.net TABLE OF CONTENTS Humidity & Drying Metal Surfaces... 1 Coverage
QWALL 4 ACRYLIC SHOWER WALL INSTALLATION INSTRUCTIONS
 QWALL 4 ACRYLIC SHOWER WALL INSTALLATION INSTRUCTIONS IMPORTANT DreamLine TM reserves the right to alter, modify or redesign products at any time without prior notice. For the latest up-to-date technical
Installation Instructions
 www.marlite.com Effective Date 03/01/2018 ARTIZAN FRP, SYMMETRIX FRP, ENVUE FRP, STANDARD FRP Installation Instructions Statements expressed in this technical bulletin are recommendations for the application
Bona Abrasives. High-performance abrasives for a perfect surface finish
 High-performance abrasives for a perfect surface finish High-performance abrasives for a perfect surface finish in any environment High-performance abrasives for a perfect surface finish Bona Abrasives
PRODUCT DESCRIPTION. Lucy Coffee Table White H46XW85XD55
 PRODUCT DESCRIPTION Lucy Coffee Table White 30564562 H46XW85XD55 1 DEAR CUSTOMER Thank you for purchasing your new piece of furniture from Dunelm. We put a lot of effort in the design and construction
INSTALLATION AND CUSTOMER CARE INFORMATION FOR SC FREESTANDING STERILIZATION CENTERS
 INSTALLATION AND CUSTOMER CARE INFORMATION FOR SC144-200 FREESTANDING STERILIZATION CENTERS General Information: Many Artizan Design Free-standing Sterilization Centers are custom designed and built to
ClicWall. Decorative wall covering
 ClicWall Decorative wall covering ClicWall Installation guide Overview 1. Product description... 3 2. Dimensions and weight... 3 3. Transport... 3 4. Storage and installation conditions... 3 5. Installation
Bath Screen. IN00351(rev C)
") IN00351(rev C) Bath Screen Instruction suitable for both Right and Left Hand fixing variations. Instruction suitable for Square, Sail, Oval and Radius Designs. Before You Start Check that the bath has
IN00351(rev C) Bath Screen Instruction suitable for both Right and Left Hand fixing variations. Instruction suitable for Square, Sail, Oval and Radius Designs. Before You Start Check that the bath has
Flexicryl Splashback Installation Guide Easy DIY Add a Pop of Colour!
 Flexicryl Splashback Installation Guide Easy DIY Add a Pop of Colour! Product Information - 4mm High Gloss Flexicryl Splashback Panels - Hard-co-extruded surface for hygienic clean sustaining daily use
INSTRUCTION MANUAL WOODY. By HAY
 INSTRUCTION MANUAL WOODY By HAY INTRODUCTION Woody was originally designed for inventory use, but after much demand this ladder-inspired shelving system was soon put into commercial production. Woody
FRAMED PANEL / DOOR / PANEL CONTINUOUS HINGE SHOWER ENCLOSURE INSTALLATION INSTRUCTIONS
 FRAMED / DOOR / CONTINUOUS HINGE SHOWER ENCLOSURE INSTALLATION INSTRUCTIONS QCI5229 Rev 0 6 INSTALLATION NOTES: Unpack your unit carefully and inspect for freight damage. Lay out and identify all parts
Kent Angle Frame Tree Pit
 Kent Angle Frame Tree Pit Kent Angle Frame Tree Pit KATP1000/10 Specify: Kent Angle Frame Tree Pit KAFTP1000/100/10; 1000mm x 1000mm x 10mm; 100mm deep; Grade 316L Stainless Steel. Kent Stainless tree
solid surfaces for every room Mirostone fabrication and installation guidelines solid surface February 2018
 solid surfaces for every room fabrication and installation guidelines February 2018 solid surface fabrication and installation guidelines It is a condition of the limited warranty that the following supplementary
FROM THE O BRIEN GROUP
 euroedge FROM THE O BRIEN GROUP new euroedge Creating the appearance of a solid surface with seamless pattern and colour Achieve the impression of a solid surface benchtop with the more economic option
Working with Resin Models
 Working with Resin Models This article will run through the basic techniques and methods required to get the most out of preparing, cleaning up and assembling Forge World s resin kits. If you need extra
FLEX 28 / 32 / 42 x 72
 FLEX 28 / 32 / 42 x 72 SHOWER DOOR INSTALLATION INSTRUCTIONS IMPORTANT DreamLine reserves the right to alter, modify or redesign products at any time without prior notice. For the latest up-to-date technical
Gallium 03 Installation Instructions & Parts List
 Gallium 03 Installation Instructions & Parts List Illustration Gallium 03, H1 Handle Left Hand: Open Out 04/05/2016 Revision 1.1 Page 1 of 19 IMPORTANT This shower screen / enclosure must be installed