Storyist is a creative writing application for Mac OS X 10.9 Mavericks or later. Designed specifically for novelists and screenwriters, it provides:
|
|
|
- Adele Hoover
- 5 years ago
- Views:
Transcription
1 Welcome to Storyist Product Overview Storyist is a creative writing application for Mac OS X 10.9 Mavericks or later. Designed specifically for novelists and screenwriters, it provides: A word processor with a page layout view and support for headers, footers, and style sheets. An outliner. A storyboard with support for index cards and photos. Customizable story sheets. A project manager with fast, project-wide search capabilities. Benefits Produces submission-ready manuscripts and scripts. Storyist comes with several project templates that provide style sheets for industry-standard formatting. You don t have to set the margins, font, line spacing, or anything else; just start typing, and you can produce a submission-ready manuscript or script. But if you want to change the format, you can. Like most creative writing applications, Storyist provides a full complement of word processing tools, including spelling and grammar checking. But unlike some of the competing packages, Storyist also provides a page layout view and support for headers, footers, and style sheets so there is no need to export your finished draft to another word processor for final formatting. Provides a high-level view of your story. The storyboarding tools in Storyist allow you to sketch out a story using photographs and index cards and then refine it with customizable plot, character, and setting sheets. For writers who prefer a more traditional approach, Storyist provides an outliner for working with story elements in outline form. Keeps all your writing organized and accessible. The Project view lets you see your story elements at a glance and allows you to create and arrange them. The search field lets you quickly find what you re looking for anywhere in your project and return to your writing. Features at a Glance Designed with novelists and screenwriters in mind, Storyist includes a number of story development power tools: 1
2 The Storyboard. Sometimes you want to put a face to a name. Storyist lets you cast your novel or screenplay with images from your photo collection or from the web. You can also view, edit, and arrange your scenes and plot points using virtual index cards on a cork board. And Storyist automatically transfers your storyboard information to story sheets for in-depth development. The Outliner. A flexible outlining tool lets you display and edit not only your section or scene summaries, but also your plot, character, and setting notes. Customizable story sheets. Story sheets are editable forms tailored for novel writing and screenwriting. You use them to record information about various aspects of your story, such as a character s age or a description of a setting. Storyist comes with story sheets for plot, character, setting, and section/scene. And story sheets are customizable, so you can capture the information you want to capture. Project-wide search. As you develop your story, your page count grows, and so does your collection of notes about your story plot, character, and setting notes. Wouldn t it be nice to be able to quickly find what you ve written when you need it? With Storyist, you can. The search field, visible at all times in the toolbar, helps you quickly find the information you are looking for. Full-screen Editing. Want to remove the distractions and focus on your writing? The full-screen editing mode puts the whole screen at your disposal, turning your computer into a dedicated writing environment. Wiki linking. Your notes become much more valuable when you can describe the relationships between them with links. Using a simple Wiki syntax, you can quickly create links to any item in your project, and even create the items themselves. And when you do, Storyist maintains your links for you. If you change the title of a notebook entry, the titles of any links to it update automatically. If you move a plot point to a new section, plot point links in your Section Sheets adjust accordingly. Smart text. In screenplay mode, Storyist collects your scene introductions, locations, times, character names, and transitions as you type and auto-completes them for you when you need them. Quick styles. Tab and Return key shortcuts make changing between standard novel or screenplay elements as simple as typing a key or two. And with key equivalents for all of the styles in your style sheet, you can focus on writing, not formatting. Installing Storyist Installing the Storyist application and license is quick and easy. 2
3 Installing the Storyist Application To install Storyist: 1. Locate the file named Storyist.dmg or Storyist-<x.y.z>.dmg (where x.y.z is the current version number). You can download this file from the Storyist Website at 2. Double-click the file. This causes the operating system to decompress the file and make it available (mount it) in the Finder. 3. Drag the Storyist icon to the folder of your choosing. Many people put their application icons in the Applications folder, but you can put it anywhere you want. Installing Your License Code When you purchase Storyist at the Storyist online store, you receive a license code via that allows you to continue to use Storyist past the trial period. When you purchase Storyist through one of our partners, you receive your license code in the box. To install your license code: 1. Install Storyist (see Installing the Storyist Application, above). 2. Launch Storyist. 3. When the Trial dialog appears, click the Enter License Code button. 4. Enter your name. If you purchased Storyist from the online store, make sure you enter your name exactly as it appears in your registration Enter your license code. 6. Click OK. Checking for Updates Storyist can use your Internet connection (when active) to check automatically for updated versions. Automatically updating your software is recommended for all users, because it allows you to keep current with the latest features. To enable automatic update checking: 1. From the main menu, choose Storyist > Preferences. The Preferences window appears. 2. Click the General icon. 3. Click the Check for updates pop-up menu and choose the frequency for checking. You have the option of sending your system information to Storyist Support when you check for updates. By sending your system information, you encourage better support for your system configuration in future releases. The information sent is anonymous and is not associated with your name or any other personal information. To see the type of information that is sent, click the Learn More 3
4 button. 4

5 The User Interface at a Glance The Storyist main window consist of four parts: 1. The Project View Displays the files and folders associated with your project. 2. The Main View Provides an area for editing project items. The Main view can be configured to display items as text, outlines, or storyboards. It can also be split so you can see multiple project items at the same time. 3. The Inspector Provides setup and formatting controls for selected items. 4. The Toolbar Provides buttons for setting up the Storyist window, adding items to the project, and a context-sensitive status bar. Project View Storyist Main Window A Storyist project can contain text files, story sheets, folders, images, and bookmarks. The Project View located to the left of the main window helps you organize and access these items quickly. To hide the Project View, choose View > Hide Project View. To display it again, choose View > Show Project View. 5
6 Main View The Main view, located to the right of the Project view, has two components: 1. The navigation bar The button strip at the top of the view. 2. The editing area The area in the middle of the view, which you can set up to be a text view, an outline view, or a storyboard view. The Main view can be split both horizontally and vertically so that you can see multiple project items at once. For more information on splitting views, please see the section titled Splitting Views. Navigation Bar Much like a web browser, the navigation bar lets you switch between recently viewed pages. It also controls whether the content of the view is displayed using the Text view, the Outline view, or the Storyboard view. Navigation Bar The navigation bar contains the following buttons: Back Button Returns you to the previous item in your viewing history. Forward Button Takes you to the next item in your viewing history. Item Pop-up Menu Pops up the list of items in your project. Outline Pop-up Menu Pops up the outline of your text file, allowing you to navigate to sections of your text. View as Text Button Switches the editing area to the Text view. View as Outline Button Switches the editing area to the Outline view. View as Storyboard Button Switches the editing area to the Storyboard view. Text View The Text view is where you ll do most of your writing. It displays your text files and story sheets in text form. 6
7 Text View To view your story elements in the Text view, navigate to the element you want to view, and do one of the following: Choose View > as Text. Click the View as Text button (the first button on the right) in the Navigation bar. For more information on the Text View, please see the chapter titled Working with Text. Outline View The outline view provides traditional outlining tools that let you quickly capture your ideas and work with them at a high level. 7
8 Outline View To view your story elements in the Outline view, navigate to the element you want to view, and do one of the following: Choose View > as Outline. Click the View as Outline button (the second button showing three staggered horizontal lines) in the Navigation bar. For more information on the Outline view, please see the chapter titled Working with Outlines. Storyboard View The storyboard view gives you a high-level overview of your text files, folders, and story elements (characters, plot points, and settings) by displaying them as index cards or photographs on a corkboard or collage. 8
. Headings and groups are shown as items on corkboard.")
9 To view your story elements in the Storyboard view, do one of the following: Choose View > as Storyboard. Click the View as Storyboard button in the Navigation bar (the right-most button). Headings and groups are shown as items on corkboard. Corkboard Body text and individual story elements are shown in a collage. 9
10 Collage For more information on the Storyboard view, please see Working with Storyboards. Toolbar The Storyist toolbar provides buttons for setting up the Storyist window and a status bar that shows information about the current cursor selection. The default toolbar configuration is shown below. Toolbar Starting from the left, these are the Toolbar icons: View Provides a quick way to show or hide the Project view or the project trash. It also lets you split the editor either horizontally or vertically. 10

11 Add Provides a quick way to add text files, story sheets or folders to your project. Inspector Opens or closes the Inspector. Template Chooser When you create a new document, Storyist displays a dialog to allow you to choose a template for your project. Workspaces Window Template Chooser The Workspaces window lets you create and quickly switch between snapshots of your project views and windows. To view the Workspaces window, choose Window > Workspaces > Manage Workspaces 11

12 Inspector View Workspaces Window The Inspector view allows you to quickly view and edit settings and formatting information. To open the Inspector view, do either one of the following: From the toolbar, click the Inspector button. From the main menu, choose View > Show Inspector. Each type of project item has its own inspector. The project and text inspectors are shown below. 12

13 Versions Window Inspector Views The Versions window gives you a quick overview of the older versions of your project and allows you to: Save a version (backup) of the project. Remove selected versions from the versions repository. Restore the project state from a previous version. Open a copy of a previous version for viewing. To view the Versions Window, choose File > Show Previous Versions. Note: The Versions Window is not available until you ve saved your project. 13


14 Versions Window Versions are stored on your Mac, and if you've enabled Time Machine, on your backup drive. Fonts Window You can use the Mac OS X Fonts window to change font attributes such as typeface, size, color, underlining, and strikethrough. To view the Fonts window, choose Format > Font > Show Fonts. Fonts Window 14

15 Colors Window You can use the Mac OS X Colors window to change text color. To view the Colors window, do one of the following: Choose Format > Font > Show Colors Open the Inspector, select the Text Inspector tab, and click the color well in the Size and Color section. Colors Window 15


16 Preferences Window General Preferences Pane The General Preferences Pane lets you specify which template to use for new documents. General Preferences Pane Text Editing Preferences Pane The Text Editing Preferences pane lets you specify: The behavior of the Tab and Return keys. Storyist can use these keys as shortcut keys to make changing styles as simple as typing a key or two. Small snippets of text you can insert in your text files using the tab key. 16

 and which text tools appear in the Edit > Tools")
17 Text Editing Preferences Pane Plugins Preferences Pane The Plugins Preferences pane lets you specify which format converters are used for specific file types (for example, RTF files) and which text tools appear in the Edit > Tools menu. 17

18 Plugins Preferences Pane Appearance Preferences Pane The Appearance Preferences pane lets you customize the fonts, colors, and icons used in the application.. Appearance Preferences Pane Keyboard Shortcuts and Shortcut Menus Many of the Storyist menu commands described in this user s guide can be performed from the keyboard. To see a list of the available shortcuts, open Storyist and choose Help > Storyist Help, and click on the Keyboard Shortcuts link. Some menu commands are also available from shortcut menus. To bring up a Shortcut menu, right-click or control-click an object or some selected text. 18
19 Getting Started Creating a New Project from a Template A Storyist project contains your text files, story sheets, folders and images. When you launch Storyist or create a new project using the File > New Project command, the template chooser appears, allowing you to select a document template. Project templates provide: Style sheets (formatting information) Placeholder manuscripts and story elements Introductory text for various project types. Storyist comes with several built-in templates that you can use as starting points for a new project: Novel, Screenplay, Stage Play, and Blank. The Novel Template This template provides a starting point for a novel manuscript and includes: A manuscript with style definitions that make it easy to format your novel in a standard format. The placeholder text includes a brief introduction to manuscript formatting to give you a sense of what the formatting looks like. A title page to include with your manuscript submissions. Several example character and setting story sheets that you can use or replace as needed. If you want to write a novel and aren t sure which template to use, select the Novel template. The Screenplay Template This template provides a starting point for a featurelength screenplay, and can be modified for playwriting. It includes: A script with style definitions that make it easy to format your screenplay in a standard format. A title page to include with your submissions. If you want to write a script or screenplay and aren t sure which template to use, choose this one. The Stage Play Template This template provides a starting point for a stage play. It includes: Style definitions that make it easy to format your stage play in a standard format. 19
20 A brief introduction to stage play formatting to give you a sense of what the formatting looks like. A title page to include with your script submissions. Example front matter to include with your script submissions. Blank This template provides a starting point for a project of any type. It includes empty folders to hold text files and images. To add text files, story sheets, or additional folders to the project, click the Add button. You might want to designate a particular template to be used every time you create a new document. To set a default template: 1. Open the Preferences window by choosing Storyist > Preferences. 2. Click the General preference pane, if it is not already selected. 3. Click the Choose button and click the template you want to set as the default. Importing Existing Work Storyist can import files written in other word processors if the files are stored in one of the following formats: Rich Text Format (.rtf) Storyist imports text, formatting information, headers, footers, and style sheets. Use this format if possible. Rich Text with Attachments (.rtfd) Storyist imports text, images, and formatting information. Microsoft Word (.doc) Storyist imports text and formatting information. Microsoft Word (.docx) Storyist imports text and formatting information. Open Document Text (.odt) Storyist imports text and formatting information. HTML (.html) Storyist imports text and formatting information. Text Only (.txt) Storyist imports text information. Final Draft Converter Format (.fcf) This format is used by Final Draft, a screenplay formatter published by Final Draft, Inc. Storyist imports text and screenplay element information. Final Draft XML Format (.fdx) This format is the default file format for Final Draft version 8. Storyist imports script text, script notes, and screenplay element information. Scrivener Format (.scriv) Storyist import text and formatting information, comments, index card summaries, and project structure. Fountain Format (.fountain) Fountain is a markup syntax for writing screenplays in plain text. Storyist imports formatted script text, comments, and index card information. 20
21 Note: While some word processors do not store their files natively in the above formats, most do allow you to export your file into them. Refer to the word processor s manual for details. To import a manuscript or script into a new project: 1. Choose File > Open. 2. Select a file in one of the formats listed above. 3. Click OK. To import a file into an existing project: 1. Choose File > Import. 2. Select a file in one of the formats listed above. 3. Click the Import button. Note: You can also import a file simply by dragging to the Project view (on the left of the window) or to a folder in the Main view. Getting Around Your manuscript (or script) and notes are available from the Project view located at the left of the main window. To view an item listed in the Project view, simply click it. Much like a Web browser, Storyist remembers which pages you have viewed and in what order. You can navigate through them using any of these methods: 1. Click the Forward or Back button in the Navigation bar in the Main view until you see the page you are looking for. 2. Click the Navigation bar pop-up menu and select the page you are looking for. 3. Choose View > Go Forward or View > Go Back until you see the page you are looking for. 21
22 Working with Text Editing and Formatting Text Changing Text Appearance and Size You can change text appearance and size using the Format > Font menu, the Fonts window, or the Inspector. The Format > Font menu offers basic formatting commands like Bold, Italic, and Underline that control the font weight and style, as well as commands to make text bigger or smaller. Most commands in this menu are assigned shortcut keys and can be invoked from the keyboard. The Fonts window offers more precise control over font family, typeface, and size selection. In addition, it offers controls for changing text color and adding underlining, strikethrough, and shadow. To open the Fonts window, choose Format > Font > Show Fonts. The typeface you select determines the font weight and style. For instance, selecting the Oblique typeface in the Helvetica family provides italicized Helvetica. Similarly, selecting the Bold Oblique typeface provides a Helvetica font that is both bold and italic. The Inspector s Format pane offers control over font family, typeface, size, and color selection. To open the Format pane in the Inspector, choose View > Inspector > Format. Note: In some parts of the user interface, text appearance and size is determined by the program and are instead controlled by the Appearance tab of the Preferences window. Examples include the summary field in story sheets, text in the Outline view, and text in index cards. Changing Text Alignment and Spacing You can change the text alignment and spacing by using the Format > Text menu, or by using the Inspector. The Format > Text menu offers the frequently used alignment commands Align Left, Center, Align Right, and Justify, as well as commands for copying Ruler settings. Like the Format > Font menu, most commands are assigned shortcut keys and can be invoked from the keyboard. 22
23 To change text alignment by using the Format menu: 1. Click your cursor in the text that you want to format. 2. From the main menu, choose Format > Text. 3. Choose Align Left, Center, Justify, or Align Right. To change text alignment using the Inspector: 1. Open the Inspector. 2. Select the Format pane. 3. Select the Spacing section of the Format pane. 4. Click the Align Left, Center, Align Right, or Justify segment of the Alignment button, as appropriate. Editing Tab Stops You can edit tab stops using the Ruler or the Inspector. To edit tab stops using the Ruler: 1. Choose View > Show Rulers. The rulers appear, showing the indentation and tab stop settings for the current selection. 2. To change existing tab stop locations, drag them to the desired position. 3. To add additional tab stops, click the location in the ruler where you want the tab stop to appear. To edit tab stops using the Inspector: 1. Open the Inspector. 2. Select the Format pane. 3. Select the Tabs section of the Format pane. To change existing tab stops, double-click the desired stop and enter a new value. To add additional tab stops, click the Add button (+), double-click the new stop, and enter the desired value. You can choose the type of the tab stop (left, center, right, or decimal) by selecting the corresponding value in the Alignment column. You can also set a default tab interval. Tabs after the last tab specified in Tab Stops are placed this distance from the previous tab. A value of zero causes tabs after the last tab specified in Tab Stops to move to the next line. 23
24 Note: By default, Storyist uses the first-line indent formatting property to indent paragraphs automatically and uses the Tab key to change styles. If you would like to use the Tab key to to manually indent paragraphs: 1. Edit the appropriate body text style so that the first-line indent field has a value of zero. 2. Add the appropriate tab stop to your styles, as described above. 3. Open the Preferences window. 4. Select the Text Editing pane. 5. Uncheck the "Enable Tab key shortcuts" checkbox. Setting Page Margins The Margins section of the Format pane of the Inspector allows you to set page margins and specify that page margins be mirrored (used when laying out facing pages of a book to be printed). To set page margins: 1. Open the Inspector and select the Margins section in the Format pane. 2. Make the desired top, bottom, left, and right margin changes. You can choose View > Show Page Guides to see where the margins are located. Note: You can enter margin values in inches, centimeters, points, or picas, using the abbreviations in, cm, pt, or pc. When you specify Mirror Pages, Storyist lays out the pages so that the first (odd) page is on the right, as it is in a bound book. To specify mirrored pages: 1. Open the Inspector and select the Margins section in the Format pane. 2. Click the Mirror Pages checkbox. Editing Headers and Footers Editing headers and footers is as simple as placing the cursor in the header or footer area and typing your text. To edit the text of a header or footer: 1. Click in the header or footer you want to edit. You can choose View > Show Page Guides to see where the header and footer areas are located. 2. Type your desired text. All standard formatting features including styles are available in headers and footers. To insert page numbers in your headers or footers: 24
25 1. Place the insertion point at the location where you want to insert a page number. 2. Choose Edit > Insert > Page Number Note: If you type a number in the header instead of inserting an auto incrementing page number field as described above, that number will appear in the header or footer on all pages. You can change the location of the headers and footers from the Headers & Footers section of the Format pane of the Inspector. To specify that adjacent pages have different headers and/or footers: 1. Open the Inspector and select the Format pane. 2. Locate the Headers & Footers section. 3. Click the Left and right headers are different checkbox or the Left and right footers are different checkbox, as appropriate. To adjust header or footer spacing: 1. Open the Inspector and select the Format pane. 2. Locate the Headers & Footers section. 3. Make the desired header and footer spacing changes. You can use the Show Page Guides command in the View menu to see where the margins are located. Using Keyboard Shortcuts Once you become comfortable with the menu commands, you might want to use keyboard shortcuts for some commands instead. A full listing of keyboard shortcuts can be displayed in a Help Viewer window. To see them, choose Help > Storyist Help, and click the Keyboard Shortcuts link. Creating and Applying Styles A style is a collection of character and text formatting settings. Each Storyist template provides a group of styles, called a style sheet, which can be used to format your document quickly and consistently. Note: Storyist provides support for what are commonly known as paragraph styles; that is, styles that apply to an entire paragraph. Changing the Style of Selected Text There are several ways to change the style of text. First, select the text you want to change. Then, do one of the following: 25
26 1. Open the Format pane of the Inspector and select the style you want to apply from the list of styles. 2. From the main menu, choose Format > Style > Apply Style and choose the style you want to apply. 3. Control-click or right-click the selected text, choose Style > Apply Style from the pop-up menu, and select the style you want to apply. Creating a Style There are two ways to create a new style. To use the first method: 1. Select some text containing the style you want to base your new style on. 2. Open the Inspector and select the Format pane. 3. Click the disclosure (triangle) button of the selected style. A menu appears. 4. Choose Create New Style From Selection. A dialog box appears. 5. Type the name for the new style and optionally click Apply this new style on creation to apply the style to the selected text. 6. Click OK. To use the second method: 1. Select the text containing the style you want to base your new style on. 2. From the main menu, choose Format > Style > Create New Style From Selection and follow steps 5 and 6 above. Deleting a Style There are two ways to delete a style. To use the first method: 1. Open the Inspector and select the Format pane. 2. Click the disclosure (triangle) button of the style you want to delete. A menu appears. 3. Choose Delete Style. 4. If the style you have chosen is in use in the document, a dialog appears, asking you to choose a replacement style to apply to the affected text. To use the second method for deleting a style: 1. From the main menu, choose Format > Style > Delete Style > <style name>. If the style you have chosen is in use in the document, a dialog appears, asking you to choose a replacement style to apply to the affected text. Renaming a Style To rename a style: 1. Open the Inspector and select the Format pane. 2. Click the disclosure (triangle) button of the style you want to rename. A pull-down menu appears. 26
27 3. Choose Edit Style. A dialog box appears. 4. Type the new name in the Style Name field. 5. Click OK. Modifying Styles To modify a style: 1. Open the Inspector and select the Format pane. 2. Click the disclosure (triangle) button of the style you want to edit. A menu appears. 3. Choose Edit Style. A dialog appears, allowing you to edit the following properties: Style, Font, Spacing, Tabs, and Pagination. Style Properties Style Name The name of the style. Based on The parent style of the style. Styles inherit the formatting properties of their parents. Next Style The style applied to a paragraph that is created when you press the Return key at the end of a paragraph. Outline Level The outline or heading level for the style. This value controls the outline level in the project view and in the outline view. Tab Style The style that is applied when you press the Tab key at the start of an empty paragraph. Font Properties Family The general name given to a collection of related fonts (that is, the font family). Examples of family names include Courier, Times New Roman, and Arial. Typeface The name given to a specific font, which together with the family name specifies a font. Example typefaces include Regular, Bold, and Oblique. Size The point size of the font. Color The text or foreground color of the font. Underline The underlining setting for the font. Available values are None, Single, and Double. Transform The text transform for the text with this style. Available values are: None Text displays as it is typed. 27
28 All Caps Text displays using capital letters. For example, Chapter 1 is displayed as CHAPTER 1. All Lowercase Text displays using lowercase letters. For example, Chapter 1 is displayed as chapter 1. Capitalized Words Text displays words with initial capitalization. For example, book the first is displayed as Book The First. Spacing Properties The spacing properties define the alignment, indentation, and space between paragraphs. Text Alignment Controls whether paragraph text is displayed left aligned, centered, right aligned, or justified. Left Indent Sets the text indentation from the left margin of all lines of a paragraph except the first line. Right Indent Sets the text indentation from the right margin. Note that positive values indicate offsets from the left margin, while negative values indicate offsets from the right margin. First Line Indent Sets the text indentation of the first line of a paragraph from the left margin. Before Paragraph Sets the space before the paragraph. After Paragraph Sets the space after the paragraph. Line Spacing Controls the amount of space between lines in a paragraph. Available values are: Single Lines are single-spaced. 1.5 Lines Lines are spaced by one and a half times the single-spaced values. Double Lines are double-spaced; that is, the spacing is twice the value of the single-spaced text. At Least Lines are spaced by at least the amount indicated in the text field that follows the pop-up menu. If the height of one or more characters in a line exceeds this minimum value, the space between the lines increases to accommodate the tallest character. Exactly Lines are spaced by exactly the amount indicated in the text field that follows the pop-up menu. If the height of one or more characters in a line exceeds this minimum value, the following line may overwrite portions of the character. Multiple Lines are spaced by a multiple of the amount indicated in the text field that follows the pop-up menu. For example, setting the pop-up menu to this value and entering 2.5 in the following text field causes the 28
29 lines to be spaced by two and a half times the amount of single-spaced text. Note: The spacing values display in the default measurement units for your Mac. You can change the default measurement units from the System Preferences window. Tab Properties Default Sets the default tab interval. Tabs after the last tab specified in Tab Stops are placed this distance from the previous tab. Note A value of zero causes tabs after the last tab specified in Tab Stops to move to the next line. Stops Defines the position and type of the tab stops. Tab types are: Left Specifies a left-aligned tab stop. Center Specifies a center-aligned tab stop. Right Specifies a right-aligned tab stop. Decimal Specifies a tab stop aligned on a decimal point. Pagination Properties The pagination properties define how text is laid out on the page. Paginate As Specifies the pagination mode of the style. Values other than Normal are used only in screenplay formatting and override the other pagination options. Paragraph starts on a new page A page break occurs before paragraphs having this style. Keep with next paragraph A paragraph displays on the same page as the paragraph that follows it. This option is useful for headings. Avoid widow and orphan lines Paragraphs that have a single line at the top of a page (a widow) or the bottom of a page (an orphan) move to the next page. Importing Styles from Another Document Storyist can import styles from other Storyist documents or from RTF files that include styles. To import styles from another document: 1. Choose Format > Style > Import Styles. An Open dialog appears. 2. Select the file containing the styles you want to import and click Open. A list of styles available in the selected file appears. 3. Select the styles you want to import. 29
30 4. If you want to overwrite styles in your project with styles of the same name in the import file, check Replace duplicate styles. If you don t check this option, styles with the same name are imported with a unique name. Note that while many RTF files contain styles, some (those created by TextEdit, for example) do not. Working with Links One of the most helpful features that Storyist provides is the ability to create links. You can link from your Storyist project to locations on the Web so you can have quick access to external information, or you can create links within your project to connect internal elements to each other. Creating an Internal Link To create an internal link: 1. Place the insertion point at the location in the text where you want to insert a link. 2. From the main menu, choose Edit > Insert > Link. A dialog box appears. 3. From the Link To: pull-down menu at the top of the box, choose Story Element. The Title box appears. 4. Select the element you want to link to. 5. If you want Storyist to update the link text when the element title changes, click the checkbox labeled Keep display value in sync with title. If you want to provide link text different from the element title, deselect the option and enter your link text in the Display field. 6. Click Insert. The selected text turns blue, with an underline, indicating that the link has been created. Creating an External Link To create an external link (to a Web page): 1. Place the insertion point at the location in the text where you want to insert a link. 2. Choose Insert > Link from the Edit menu. The Link To pop-up menu appears. 3. Choose Web Page. 4. Enter the Web page URL and the link text you want to display. 5. Click the Insert button. You can also create a link from the keyboard using a simplified Wiki link syntax: 1. Place the insertion point at the location in your text where you want the link to appear. 2. Type two open brackets ( [[ ). 30
31 3. Type the title or name of the story element you want to link to (or the URL of the Web page). 4. If you want the link text to be something other than the title or URL, type a character followed by the link text. 5. Type two close brackets ( ]] ). The brackets and title are replaced with your link. Editing a Link To edit a link using the menu: 1. Select the text of the link you want to edit. 2. Choose Insert > Link from the Edit menu. A dialog appears. 3. Edit the link information as described in Creating an Internal Link or Creating an External Link, as appropriate. 4. Click Insert. The new link text appears on your screen. To edit a link using the context menu: 1. Control-click the link you want to edit. A context menu appears. 2. Choose Edit Link. A dialog box appears. 3. Enter the new link information. 4. Click Insert. The edited link appears in the text. To edit the title of a link using the keyboard: 1. Insert your cursor either directly before or directly after the link you want to edit. 2. Use the arrow keys to move into the title of the link. Notice that a blue focus ring appears around the link and that the underline is gone. 3. Type the new link title. Removing a Link To remove a link (without deleting the underlying text): 1. Control-click the link you want to remove. 2. From the Shortcut menu, choose Remove Link. Adding Elements to the Outline You can add new elements (chapters, sections, or scenes) to your text at any time. These new additions automatically generate new index cards in the storyboard and new entries in the outline. To add an outline element to the text: 1. Place the insertion point at the point where you want to insert a new element. 31
32 2. Press the Return key. 3. Apply the style that corresponds to the element you want to add (for example, Chapter Title or Scene Heading). See the section titled Creating and Applying Styles for more information on styles. Adding and Displaying Comments As you are writing, you might want to make notes (comments) on specific paragraphs or sentences for later revision. To add a comment to a text location: 1. Place the cursor before or after the text you want to comment on. 2. Choose Edit > Insert > Comment. 3. A comment window (a small window resembling a sticky note) appears. Type your comment into the window. To close the comment window, press the Escape (esc) key or click in an area outside the comment window. A comment icon appears to indicate that a comment is attached to the current location. To edit the comment, click the comment icon. The comment window appears, allowing you to modify the comment text. Bookmarking Frequently Viewed Text Locations If you frequently access the same location in your file (for example, a scene that needs revising), you can bookmark it so that you can get back to it quickly in the future. To create a bookmark: 1. Place the cursor in the text at the location you want to create a bookmark. 2. Choose Edit > Insert > Bookmark. 3. A newly created bookmark appears in the Project view. Type a label to identify the bookmark. To return to a bookmarked location: 1. Expand the Bookmark folder in the Project view. 2. Click the bookmark item representing the desired location. The bookmarked location is displayed in the Main view. 32
33 Working with Story Sheets About Story Sheets Story sheets are customizable forms tailored for novel writing and screenwriting. They help you keep relevant information about story elements (such as plot, character, and setting) readily accessible while you are writing. You can use the story sheets to record information such as a character s physical description, details about a setting, or notes about what happens in a particular section of your story. About Section/Scene Sheets A section/scene sheet is a story sheet that contains your notes on a section of your manuscript or a scene in your screenplay. The Synopsis Area The Synopsis area holds your summary of the section. The Section Details Area The Section Details area contains context-sensitive fields to record section-specific details. There are three standard fields: POV Character This character field identifies the point-of-view character (or characters) in the section. Try this: Place the cursor in the POV character field and type Pro. Notice that Storyist auto-completes the character named Protagonist. Now type a new character name and press return. Notice that Storyist has created a new character and set up a link to the character s page. Setting This is a setting field for tracking the location(s) in which the section takes place. Conflict This is a text field for a brief note on the central conflict occurring in the section. You can add new fields or replace the existing ones. For more information, see Editing a Field. The Section Notes Area The Section Notes field holds any additional notes on the section you want to make. 33
34 About Character Sheets A character sheet is a story sheet used to organize notes on a character. The sheet has four sections: The Summary Area This summary section is used for entering a high-level summary of the character. This summary is displayed in the sheet itself and also in the Outline view and in the Storyboard view. The Physical Description Area This section provides context-sensitive fields for you to describe the physical aspects of the character. You can add or replace fields by clicking the field name and selecting from the menu that pops up. The Character Development Points Area Many writers like to track a character s arc through the story. This section allows you to specify the points along the arc where your characters learn and grow (or not). To create a new character development point, click the character icon and select Add Character Point. When you know where in your manuscript this arc occurs, right-click the section link to assign it to the appropriate section. The Notes Area The Notes section can be used to record additional character information. About Plot Sheets A plot sheet is a story sheet for notes on a plot point. It has four sections: The Summary Area This sheet, like all story sheets, has a section for entering a high-level summary of the story element. This summary is displayed in the sheet itself and also in the Outline view and in the Storyboard view. The Section Area This area allows you to assign a plot point to the section sheet for the section of the manuscript where the plot point occurs. Depending on your writing style, you may want to assign the plot point to a section as you are writing, or wait until you ve fleshed out your various plot threads to make the assignment. In either case, you can assign the plot point to a section by control-clicking or right-clicking the Unassigned link and selecting the appropriate section. 34
35 The Plot Point Details Area This section provides context-sensitive fields for you to describe the details of the plot point. You can add or replace fields by clicking the field name and selecting from the menu that pops up. The Notes Area The notes section can be used to record additional plot notes. About Setting Sheets As with other story sheets, a setting sheet has several sections: The Summary Area This summary is displayed in the sheet itself and also in the Outline view and in the Storyboard view. The Setting Details Area The Setting Details section allows you to record specific details about the setting. Feel free to edit the fields to suit your needs. Note that any fields in the setting sheet are also available in the storyboard. The Notes Area The Notes section can be used to record additional setting notes. Customizing Story Sheet Fields Each story sheet provides a set of default fields you can use to record information about story element. In a character story sheet, for example, the default fields are Age, Gender, Eye Color, Hair Color, and Build. Want to customize the default set? You can add, rename, and delete fields. You can even add your own fields to a story sheet to track the information you want to track. Adding a Field To add a field to a story sheet: 1. Click a field label (for example, Age: ). A menu appears. 2. Choose a field to add from the Add Field submenu. 35
36 Renaming a Field To rename a field on a story sheet: 1. Click the field name that you want to change. A pop-up menu appears. 2. Choose Rename Field. A dialog appears. 3. Enter the new field name in the Label: field. You can select a field type from the list or just leave it as Text. You can also add a comment to describe the new field. 4. Click OK. The field is renamed. Removing a Field To remove a field from a story sheet: 1. Click the field name you want to remove. A pop-up menu appears. 2. Choose Delete. The field disappears from the story sheet. (The field data remains in your project, however. If you add the field back to the sheet as described above, the data reappears). Adding a Custom Field To add a custom field to a story sheet: 1. Click an existing field name. A pop-up menu appears. 2. Choose Add Field > Custom. A dialog appears. 3. Enter the name of the new field in the Label: field and click Add Custom Field. The new field appears on your story sheet. Saving a Field List as a Template After you ve customized the fields on a story sheet, you may want to save the list as a template for other sheets of the same type. To save a field list as a template: 1. Click one of the fields in the list that you want to save as a template. A dialog box appears. 2. Click Save as Template. The next time you create a story sheet of the same type, your list of fields is used in place of the default list. The template applies only to new story sheets of the same type. Any sheets you have already customized are not affected. Adding Images to Story Sheets You can add images to your story sheets. For example, you might imagine a particular actor starring as your protagonist. Storyist allows you to import an image 36
37 of the actor into the Character sheet for that character. The image appears both on the Character sheet and on the corkboard for all the characters. To add an image to a story sheet: 1. Open the sheet to which you want to add an image. 2. Select the image you want to add in the Finder. 3. Drag the image to the image box (for example, the drama masks on the character sheet) and release the mouse. 37
38 Working with Outlines Storyist lets you work with your project items (manuscripts, scripts, notebook entries and story elements) in outline form. To edit a project item in outline form, navigate to the item, and then do one of the following: Click the View as Outline button in the navigation bar. Choose View > as Outline. Adding Outline Elements You can add items to an outline using the Action button or the keyboard. To add items to the outline using the Action button: 1. Select the outline row where you want to insert an item. 2. Click the Action button in the command bar at the bottom of the Outline view. A shortcut menu appears. 3. Choose Add from the shortcut menu, and choose the item you want to add from the submenu that appears. The item appears in the row after selected row at the outline level appropriate for the item. To add items to the outline using the keyboard: Press Command-Return to add a default body text or story element item. Press Command-Slash (/) to add a default heading or group. The default body text item is that which is specified as the body level style in the outline definition (for example, the Section style) and the default story element is that which is specified as the preferred contents of the enclosing folder. To see exactly which items will be added by the keyboard shortcuts, click the Action button and view the Add menu items. Moving Outline Elements You can rearrange your outline by simply dragging items to a new location. 38
39 Editing Outline Templates When you add an outline element to a text file (for example, a chapter to a manuscript), Storyist uses the file s outline template to determine the appropriate style to apply. This way, headings are formatted correctly when you switch back to the Text View. To edit the outline template: 1. Open the Inspector and select the File Info pane. 2. Click the Edit Outline Template button. A window appears. 3. To change a level name, double-click the name and type a new name. 4. To change the default style for this level, select a style from the list of available styles in the Default Style pop up. 5. To define a new outline level, click the Add (+) button and enter the desired properties. Note: Outline level properties are created in order: body text first, then outline levels 1-9. The Add button is only enabled if Storyist finds a style for the next outline level (that is, a style with the outline level set to the next available outline level). 39
40 Working with Storyboards Storyboards give you a visual overview of elements of your story. You can use them to View and edit your story elements (sections, scenes, plot points, characters, settings, and notebook entries) as index cards and photos on a corkboard. Specify the details of and the relationships between story elements as a collage on a virtual desktop. You might use storyboards at the start of your project to get all your ideas down and organized before you start writing, or after you ve completed a draft, to summarize and view the arc of your plot or characters. Storyist provides two types of storyboards: 1. Corkboards Used for groups or heading-level text items (like chapters or acts). A Corkboard is virtual bulletin board you can use to see the structure of your story. 2. Collages Used for individual items (like a section or a scene). A collage helps gather the items related to the section or scene you are currently working on to keep them close at hand. These items can be images, comments, or other story elements. To view a story element as a Storyboard, use the Project view to navigate to the element you want to see, and then do one of the following: Click the View as Storyboard button in the top right corner of the navigation bar. Choose View > as Storyboard from the main menu. Adding Items to a Corkboard To add a new item to a corkboard, do one of the following: Click the plus sign in the control bar at the bottom of the editor and choose the item you want to add from the submenu. Drag a file or image to the storyboard from the Finder or another application. Specifying the Layout of Corkboard Items Some writers find it useful to setup a fixed-size corkboard so that they can visualize the act breaks of their story as they are writing. For instance, if you are writing a screenplay and are planning to have approximately 60 two-minute scenes, you 40
41 might arrange your corkboard to have four rows of 15 scenes (one row for the first and third act and two rows for the second act). To specify the layout of a corkboard: 1. Click the Action button. A pop-up menu appears. 2. Choose Layout, then choose one of the following: Fit Width The corkboard lays out the items so they fit in the width of the view. If you resize the view, the storyboard automatically adjusts the layout. 3 Across The corkboard lays out the items in rows of 3 columns. 4 Across The corkboard lays out the items in rows of 4 columns. 6 Across The corkboard lays out the items in rows of 6 columns. Other Brings up a dialog that allows you to specify how many columns the storyboard should use. In the introductory example, you would enter 15. Adding Items to a Collage Adding items to a collage is a simple as dragging them from the Project view to the collage. You can arrange the items in the collage by dragging them to the desired location. Adding Section and Scene Sheets to a Collage When you drag section or scene sheets to the collage for a section or scene, Storyist displays a dialog offering to attach the sheet to the section or scene. If you choose to attach a sheet to a section or scene, Storyist transfers the title and synopsis from the sheet to the index card and keeps the titles and summaries synchronized so that update to the title or summary of one will be reflected in the other. Attaching sheets in this manner reduces the overhead of keeping persection or per-scene notes. Choose this option if the sheet you are attaching describes the section or scene you are attaching it to. If you choose not to attach the sheet to the section or scene, Storyist will add the sheet to the storyboard, but keep the titles and summaries separate. Choose this option if you simply want to have quick access to a sheet for another section or scene. The ability to have section or scene sheets in either an attached or an unattached state enables several story development workflows: 1) Prewriting 41
42 If you have ideas for scenes, you can create sheets for them, and develop the scenes before you start writing. Then, when you understand where in the story your scenes belong, you can drag the sheets to the scene's collage and attach the sheet to the scene. Your notes are then transferred to the scene's index card. 2) Writing Once you attach a sheet to a section or scene, and any changes you make to the scene's card will be reflected in the sheet. Similarly, any changes you make to the sheet will be reflected in the scene's card, freeing you to focus on writing. 3) Revising If you later decide that a section or scene no longer meets your original goals, you can detach the sheet from the scene (by deleting it from the collage) and optionally attach it to another scene. Resizing Storyboard Items You can change the size of the items on the Storyboard using any of these three methods: 1. Drag the slider in the control bar. 2. Choose View > Zoom, and choose your option from the pop-up menu that appears. 3. Click the Action (gear) button in the control bar of the Storyboard view, and choose View > Zoom. A pop-up menu appears: Zoom In Enlarges the Storyboard items. Zoom Out Shrinks the Storyboard items. Actual Size Zooms to the largest size available for the storyboard item. Fit Width Adjusts the zoom factor so that the view fills the width of the view with one Storyboard item. Fit Page adjusts the zoom factor so that all of the selected items fit in the view. If you are working with a collage, you can also adjust the size of individual items. To resize a collage item: 1. Select the item you want to resize. 2. Click and drag one of the six resize handles that appear along the edges of the selected item. Normally, dragging a resize handle preserves the aspect ratio of an item by changing both the height and the width of the item simultaneously. Holding down 42
43 the Option key while dragging allows you to change the height and width independently. Changing the Representation of Storyboard Items By default, Storyist represents characters and settings as images and all other items as index cards. You can change the representation of an item using the Action button in the control bar. To change the representation of a item: 1. Select the item(s) you want to change. 2. Click the Action button, choose Display Selection As from the pop-up menu, and then choose one of the following representations from the submenu: Index Card Displays the selected items as index cards. Image Displays the selected items as an image. Image and Title Displays the selected items as photographs. If the item does not have a photo associated with it, Storyist uses the default image for the item type. Icon and Title Displays the selected items using the default icon representation. Comment Displays the selected items as a comment. Color Coding Index Cards To get a better visual overview of your story, you can color-code your index cards. To change the color of an index card in a storyboard: 1. Select the index cards whose color you want to change. 2. Click the Action button in the command bar in the Storyboard view, choose Color from the pop-up menu, then choose a color from the submenu. 43
44 Working with the Project View A Storyist project contains your manuscripts and scripts, and your story sheets for plot, character, and setting. It can also hold many types of ancillary information. For example, you might use it to store bits of dialog, clippings, research, or query letters. The Project View located at the left of the main window helps you organize and access these project items quickly. Adding Items to the Project There are several ways to add items to your project: Via the File > New menu. Via the Add button in the toolbar. Via the Add (+) menu at the bottom of the Project view. Note: If an item is selected in the Project view when you add a new item, Storyist will add the new item after the selected item if possible. If nothing is selected in the Project view, Storyist will add new items to the default location for the item type. Tip: If you select an item in the project view and then click the Add button in the Project view while holding the Option key, a new item of the same type as the selected item is created. Adding Outline Elements to Project Items In addition to using the Project view to add project items to the project, you can use it to add outline elements (for example, chapters, sections, and scenes) to manuscript or script project items. To add an outline element to a text file: 1. Select a text outline item (manuscript or script) in the Project view. 2. Click the Add button in the Project view. 3. Select the outline element you want to add from the menu. Note: Storyist determines whether or not to display a text item s outline in the Project view by examining the text file's outline template. You can edit the outline template by selecting the File Info pane in the inspector and clicking Edit Outline Template. 44
45 Note: By default, the Project view displays outlines for text files that have outlining enabled. If you don't want to see the text file outline in the Project view, click the Action button in the Project view and choose "Hide Text File Outlines." You can enable or disable outlining for a text file, using the "Enable outlining for this file" checkbox in the File Info pane in the inspector. Also, the list of outline elements displayed in the menu is generated from the outline template. Deleting Project Items To delete items from the project: 1. Select the items you want to delete in the Project View. 2. Click the Action (gear) button in the control bar at the bottom of the Project View. 3. Choose Delete from the pop-up menu. The items you selected are moved to the project Trash. To view the contents of the project trash, click the View button in the toolbar and choose Show Project Trash. To Empty the Project Trash, click the Empty button at the top of the trash list. Be careful with this. You can t undo this operation. Editing Project Item Preferences Storyist provides default settings for project items, but you can edit the settings to specify things like editor behavior and preferred contents of a particular folder. To edit the preferences for a project item, open the inspector and select the File Info pane. The file name and icon appear at the top. Additional preferences are displayed according to the type of item selected. These preferences are detailed below. Text File Preferences Kind A pop-up menu specifying the editor features enabled for the file. Available values are: Screenplay Used for screenplays and stage plays. When selected, this mode enables context-sensitive completion of screenplay elements like scene intros, locations, times, characters, extensions, and transitions. If you choose Screenplay mode, you can edit the available completions by clicking the Edit Completions button. 45
46 Text File Used for novels, short stories, and other prose. Context-sensitive completion of screenplay elements is disabled, but the standard completions (invoked using the ESC key) are still available. Enable outlining for this file Clicking this checkbox causes the file's outline elements (that is, the chapters and sections or scenes that make up the file) to appear in the Project and Outline views. This checkbox is checked by default for manuscripts and scripts, but disabled for notebook entries. Include body text elements Clicking this checkbox causes the file's body text sections to appear in the outline. This checkbox is checked by default for manuscripts and scripts, but disabled for others. Edit Outline Template Clicking this button brings up a dialog that lets you edit the outline template (level labels and styles) for the file. Create sheets automatically Clicking this causes Storyist to create a section or scene sheet when new sections or scenes are created. Shortcuts You can specify whether or not Storyist enables Tab and Return shortcut processing in the file. If you choose "Use the application preferences", Storyist will use the settings you specify in the application preferences (accessed from the Storyist > Preferences window). Folder Preferences Contents Specifies the preferred contents for the folder. Storyist uses this value to provide keyboard shortcuts (Command-Return and Command-Slash) for the Project view and Outline view, and to decide where to put new files if nothing is selected in the Project view. Note: Preferences for some kinds of project items are not available. For these items, choosing Edit simply displays a dialog showing the item title and kind. Searching the Project One of the benefits of having all your project-related writing in one place is that the contents are instantly searchable. To search for text in your project: 1. Click in the Search field at the top of the Project view. 2. Type the text you are looking for. Your search results appear in the Project view. To navigate to the file or story element that contains the search text, simply click a search result. 46
47 Working with Workspaces When you're writing, you probably want to arrange your windows and views to focus on the manuscript or screenplay. When you're outlining, you likely want to use the Outline view. When you're revising, you may want to see the manuscript and screenplay along with your notes. It can be cumbersome to size your views and configure the display preferences to suit your needs, so Storyist provides the ability to create workspace snapshots to quickly recall your settings. Splitting Views You can split a view horizontally or vertically. Storyist even lets you nest split views, so you can create quite complex view arrangements. To split a view, position the cursor in the view you want to split, and then choose one of the following: View > Split > Split Active View Horizontally. The active view is split so that the views are stacked one on top of the other. View > Split > Split Active View Vertically. The active view is split so that the views are arranged side by side. To close the active split view, choose View > Split > Close Active Split View. To close all split views but the currently active view, choose View > Split > Close Others. Changing the Orientation of Split Views If you want to change the orientation of a split view (that is, you want to change from a vertical split to a horizontal split or vice versa), choose Window > Workspaces > Rotate Workspace. Note: This command changes the orientation of the outer split views. Nested split views are not affected. Opening a New Project Window Sometimes it is useful to have multiple project windows open. Not only can you see multiple project documents at one time, you can take advantage of Spaces to streamline your workflow. 47
48 To open a new project window. choose File > New > Window. Creating a New Workspace When you have your windows and views arranged to your liking, you can take a snapshot for later recall. Workspace snapshots contain: A list of open windows. The split view sizes and arrangement. Display setting for each view. To create a new workspace, do one of the following: Choose Window > Workspaces > New Workspace. The Workspaces window appears with a new workspace (titled "New Workspace") enabled for renaming. Choose Window > Workspaces > Manage Workspaces. Click the Add (+) button. A new workspace appears. Managing Workspaces The Workspaces window lets you create, update, switch between, and delete workspaces. To view the Workspaces window, choose Window > Workspaces > Manage Workspaces. To add a workspace for the current project configuration, click the Add button. From time to time, you may want to update the image or settings for a workspace you use frequently. To update an existing workspace: 1. Select the workspace. 2. Click the Workspaces action (gear) button. 3. Choose Update Workspace from the menu. 48
49 Tracking Project Writing Goals Storyist lets you set word count goals for both your daily writing sessions and your entire project, and tracks your progress over time. Setting Word Count Goals To set word count goals: 1. Open the File Info Inspector by choosing View > Inspector > File Info. 2. Click on the Project icon in the Project view. The Project info appears in the inspector as shown below. 3. Click the Setup (gear) button. 4. Select the text file(s) you want to track. Storyist will track the total of all the files you select. 5. Enter a target word count for project in the Project Goal field. 6. Enter a daily word count target in the Daily Goal field. The result will look something like this: 49

50 Tracking Your Progress After you've set up your writing goals for the project, you can track your progress in several ways. Using the Calendar View The calendar view shows you at a glance which days how you're doing on your daily writing goals. Days on which you've met or exceeded your goal are shown in green. Days on which you've achieved at least eighty percent of your goal are shown in yellow. The rest are shown in red. To see the calendar view, show the Project info inspector as described in the Setting Word Count Goals section, and click the Calendar button. 50

51 Clicking on the left arrow shows the previous month. Clicking on the next arrow shows the following month. Clicking on the month name resets the calendar to the current date. Using the Graph View The graph view shows you a monthly graph of your word count. To see the graph view, show the Project info inspector as described in the Setting Word Count Goals section, and click the graph button. 51

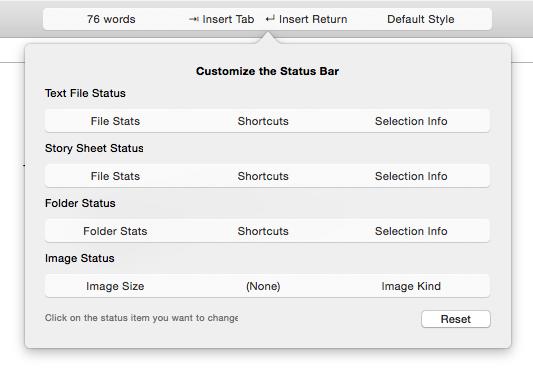
52 Using the Status Bar You can also configure the Status Bar to show both your total project word count and your progress toward that goal. To do so: 1. Choose View > Customize Status Bar. A customization window appears, allowing you to select which items you want to be visible in the status view. Note: Option+Clicking on the Status Bar also causes this customization window to appear. 2. Click the location in the Status Bars in the customization window that you want to change. A popup menu containing the customization choices appear. 3. Choose Project Progress to show a progress bar that indicates how close you are to your goal. Choose Project Word Count to show the total number of words you've written. 52
53 53
54 Saving and Backing Up Your Work About Auto Save and Versions Storyist automatically saves a copy of your work every few minutes to help minimize data loss in case of power failure or other unforeseen circumstances. If Storyist should quit unexpectedly, it will restore your project from the automatically saved copy the next time you launch the application. For newly created projects, Storyist saves your changes in a temporary location on your hard disk. After you save your new project to its permanent location, Storyist continues automatically saving your work to the location you've chosen. Storyist also begins making periodic copies of your entire project. These copies are referred to as versions. Versions are created each time you open a project and every hour while you re working on it. You can view these automatically saved versions and compare them to the current project using the Versions Browser as follows: 1. Open the project whose previous versions you want to view. 2. Choose File > Revert To > Browse All Versions. 3. Click the timeline on the right to move forward and backward in the version history. The Versions Browser is integrated with Apple's Time Machine backup software, so if you set up Time Machine, you'll be able to browse versions that are saved not only on your local machine, but on your Time Machine hard drive as well. To make efficient use of space, OS X periodically prunes the automatically created version of a project on your hard drive, keeping hourly versions for a day, daily versions for a month, and weekly versions for all previous months. OS X does not prune any versions you create manually (see below). Note: If you prefer to see a simple list of previous versions, you can use the File > Show Previous Versions command. Manually Saving a Version of Your Work You can also save a version of your work manually. You might choose to do this after completing a draft, before starting a round of revisions, or before trying a scene you are not sure you re going to keep. 54
55 To save a version manually: 1. Choose File > Save a Version. A dialog appears. 2. Enter a comment to help you identify this version. 3. Click Save a Version. Alternately: 1. Choose File > Show Previous Versions. The versions list appears. 2. Click the Save a Version button. Reverting to a Previous Version If you're not happy with the changes you ve made to your story, it is easy to return to a previously saved version: 1. Open the Versions Browser as described above. 2. Location the revision you want to restore. 3. Click Restore. Alternately: 1. Choose File > Show Previous Versions. 2. Select the version you want, and click Restore Version.. The project now contains the contents of the previous version of your project. 55

56 Exporting and Sharing Your Work Storyist can export project items to disk as individual files or it can combine them and export them as a single ebook. To export project items as either individual files or a single ebook: 1. Choose File > Export. The Export dialog appears. 2. Select the project items you want to export. 3. Choose the desired export type ("Files" or "ebook") from the Export popup button. 4. Choose the desired export format from the Format popup button. 5. Click the Next button and follow the steps for the export type you selected. These steps are detailed below in the sections titled "Exporting Individual Files" and "Exporting Project Items as a Single ebook." Exporting Individual Files Export Dialog When you choose the "Files" option in the Export popup button in the export dialog, the Format popup button presents the following file format options: Rich Text Format (.rtf) Storyist exports text, formatting information, headers, footers, and style sheets. Use this format if possible. Rich Text with Attachments(.rtfd) Storyist exports text, images, and formatting information. 56
Welcome to Storyist. The Novel Template This template provides a starting point for a novel manuscript and includes:
 Welcome to Storyist Storyist is a powerful writing environment for ipad that lets you create, revise, and review your work wherever inspiration strikes. Creating a New Project When you first launch Storyist,
Scrivener Mac: shortcut keys, ordered by cipher
 Scrivener Mac: shortcut keys, ordered by cipher Outline > Collapse All Document/Scrivenings Corkboard Outline Go To > Editor Selection Snapshots > Take Snapshot Document/Project Notes Document/Project
SCRIVENER TUTOR SCRIVENER 102 Customizing Scrivener for the Advanced Writer
 SCRIVENER TUTOR SCRIVENER 102 Customizing Scrivener for the Advanced Writer Introduction I don t have to tell you that Scrivener is an amazing writing program--you know that because you re taking this
User Guide. Version 1.4. Copyright Favor Software. Revised:
 User Guide Version 1.4 Copyright 2009-2012 Favor Software Revised: 2012.02.06 Table of Contents Introduction... 4 Installation on Windows... 5 Installation on Macintosh... 6 Registering Intwined Pattern
User Guide. Version 1.2. Copyright Favor Software. Revised:
 User Guide Version 1.2 Copyright 2009-2010 Favor Software Revised: 2010.05.18 Table of Contents Introduction...4 Installation on Windows...5 Installation on Macintosh...6 Registering Intwined Pattern Studio...7
Getting Started. with Easy Blue Print
 Getting Started with Easy Blue Print User Interface Overview Easy Blue Print is a simple drawing program that will allow you to create professional-looking 2D floor plan drawings. This guide covers the
iphoto Getting Started Get to know iphoto and learn how to import and organize your photos, and create a photo slideshow and book.
 iphoto Getting Started Get to know iphoto and learn how to import and organize your photos, and create a photo slideshow and book. 1 Contents Chapter 1 3 Welcome to iphoto 3 What You ll Learn 4 Before
12. Creating a Product Mockup in Perspective
 12. Creating a Product Mockup in Perspective Lesson overview In this lesson, you ll learn how to do the following: Understand perspective drawing. Use grid presets. Adjust the perspective grid. Draw and
Photoshop CS2. Step by Step Instructions Using Layers. Adobe. About Layers:
 About Layers: Layers allow you to work on one element of an image without disturbing the others. Think of layers as sheets of acetate stacked one on top of the other. You can see through transparent areas
7.0 - MAKING A PEN FIXTURE FOR ENGRAVING PENS
 7.0 - MAKING A PEN FIXTURE FOR ENGRAVING PENS Material required: Acrylic, 9 by 9 by ¼ Difficulty Level: Advanced Engraving wood (or painted metal) pens is a task particularly well suited for laser engraving.
VERSION 3.0 WINDOWS USER GUIDE
 VERSION 3.0 WINDOWS USER GUIDE TABLE OF CONTENTS Introduction... 5 What s New?... 5 What This Guide Is Not... 6 Getting Started... 7 Activating... 7 Activate Via the Internet... 7 Activate Via Email...
How to import and sync your Scrivener projects from your computer via Dropbox?
 SCRIVO PRO HOW TO CREATE AND SYNC SCRIVENER PROJECTS Scrivo Pro can create, import and sync Scrivener projects on your ipad or iphone. This document explains how to create and sync your Scrivener projects
Learn PowerPoint 2010
 Table of Contents Chapter 1 Introduction Introduction...4 Chapter 2 PowerPoint 2010 Basics Introduction to PowerPoint 2010 Basics...5 Start and Exit...6 PowerPoint 2010 Window...7 The Ribbon...9 The Backstage:
Third Workshop in Playwriting
 Third Workshop in Playwriting Creating the Manuscript Format Presentation Created by Pamela Jamruszka Mencher Helpful Hints in Creating Your First Draft Dialogue 1. After you ve written at least two scenarios
Ornamental Pro 2004 Instruction Manual (Drawing Basics)
") Ornamental Pro 2004 Instruction Manual (Drawing Basics) http://www.ornametalpro.com/support/techsupport.htm Introduction Ornamental Pro has hundreds of functions that you can use to create your drawings.
Ornamental Pro 2004 Instruction Manual (Drawing Basics) http://www.ornametalpro.com/support/techsupport.htm Introduction Ornamental Pro has hundreds of functions that you can use to create your drawings.
DRAFT Solid Edge ST4 Update Training Draft
 DRAFT Solid Edge ST4 Update Training Draft Presented by: Steve Webb Topics Parts List Table Titles Column Headers Headers Merging Header Rotate Cell Aspect Ratio Cell Formatting Overriding Disabled Cells
GEO/EVS 425/525 Unit 2 Composing a Map in Final Form
 GEO/EVS 425/525 Unit 2 Composing a Map in Final Form The Map Composer is the main mechanism by which the final drafts of images are sent to the printer. Its use requires that images be readable within
Scrivener Manual Windows Version Part I
 Scrivener Manual Windows Version 2013 Part I Getting Started Creating Your Scrivener Project In Scrivener, click File and then click New Project. You will have the option to choose from one of Scrivener
Nikon View DX for Macintosh
 Contents Browser Software for Nikon D1 Digital Cameras Nikon View DX for Macintosh Reference Manual Overview Setting up the Camera as a Drive Mounting the Camera Camera Drive Settings Unmounting the Camera
User Guide V10 SP1 Addendum
 Alibre Design User Guide V10 SP1 Addendum Copyrights Information in this document is subject to change without notice. The software described in this document is furnished under a license agreement or
Learning Guide. ASR Automated Systems Research Inc. # Douglas Crescent, Langley, BC. V3A 4B6. Fax:
 Learning Guide ASR Automated Systems Research Inc. #1 20461 Douglas Crescent, Langley, BC. V3A 4B6 Toll free: 1-800-818-2051 e-mail: support@asrsoft.com Fax: 604-539-1334 www.asrsoft.com Copyright 1991-2013
Toothbrush Holder. A drawing of the sheet metal part will also be created.
 Prerequisite Knowledge Previous knowledge of the following commands is required to complete this lesson; Sketch (Line, Centerline, Circle, Add Relations, Smart Dimension,), Extrude Boss/Base, and Edit
Drawing a Plan of a Paper Airplane. Open a Plan of a Paper Airplane
 Inventor 2014 Paper Airplane Drawing a Plan of a Paper Airplane In this activity, you ll create a 2D layout of a paper airplane. Please follow these directions carefully. When you have a question, reread
Scrivener Manual Windows Version Part II
 Scrivener Manual Windows Version 2013 Part II Compiling Your Project this: ebook To compile your project, click on the Compile icon at the top of the screen. The icon looks like When you click on the Compile
Introduction to Autodesk Inventor for F1 in Schools (Australian Version)
") Introduction to Autodesk Inventor for F1 in Schools (Australian Version) F1 in Schools race car In this course you will be introduced to Autodesk Inventor, which is the centerpiece of Autodesk s Digital
Introduction to Autodesk Inventor for F1 in Schools (Australian Version) F1 in Schools race car In this course you will be introduced to Autodesk Inventor, which is the centerpiece of Autodesk s Digital
Autodesk Advance Steel. Drawing Style Manager s guide
 Autodesk Advance Steel Drawing Style Manager s guide TABLE OF CONTENTS Chapter 1 Introduction... 5 Details and Detail Views... 6 Drawing Styles... 6 Drawing Style Manager... 8 Accessing the Drawing Style
Some Questions You May Be Asking 5. Getting Started In 30 Seconds 6. The Highland Philosophy 8. The Edit View: Everyday Screenwriting 9
 Table of Contents Some Questions You May Be Asking 5 Getting Started In 30 Seconds 6 The Highland Philosophy 8 The Edit View: Everyday Screenwriting 9 Live Margins 9 Bold, Italics and Underline 10 Preferences
ITEC 715: WEEK 03 IN-CLASS EXERCISE: CREATING AN INSTRUCTIONAL COMIC WITH PHOTOSHOP STEP 1: GET IMAGES STEP 2: PLAN YOUR LAYOUT
 ITEC 715: WEEK 03 IN-CLASS EXERCISE: CREATING AN Here's the finished comic you will create: INSTRUCTIONAL COMIC WITH PHOTOSHOP STEP 1: GET IMAGES If you can draw (and want to), that's fine, but it's not
SolidWorks Part I - Basic Tools SDC. Includes. Parts, Assemblies and Drawings. Paul Tran CSWE, CSWI
 SolidWorks 2015 Part I - Basic Tools Includes CSWA Preparation Material Parts, Assemblies and Drawings Paul Tran CSWE, CSWI SDC PUBLICATIONS Better Textbooks. Lower Prices. www.sdcpublications.com Powered
Getting Started Guide
 SOLIDWORKS Getting Started Guide SOLIDWORKS Electrical FIRST Robotics Edition Alexander Ouellet 1/2/2015 Table of Contents INTRODUCTION... 1 What is SOLIDWORKS Electrical?... Error! Bookmark not defined.
Advance Steel. Drawing Style Manager s guide
 Advance Steel Drawing Style Manager s guide TABLE OF CONTENTS Chapter 1 Introduction...7 Details and Detail Views...8 Drawing Styles...8 Drawing Style Manager...9 Accessing the Drawing Style Manager...9
Cricut Design Space App for ipad User Manual
 Cricut Design Space App for ipad User Manual Cricut Explore design-and-cut system From inspiration to creation in just a few taps! Cricut Design Space App for ipad 1. ipad Setup A. Setting up the app B.
Getting Started with. Vectorworks Architect
 Getting Started with Vectorworks Architect Table of Contents Introduction...2 Section 1: Program Installation and Setup...6 Installing the Vectorworks Architect Program...6 Exercise 1: Launching the Program
TECHNOTravel. For Microsoft Word & PowerPoint 2010 Student Workbook. TECHNOeBooks Project-based Computer Curriculum ebooks.
 TECHNOTravel For Microsoft Word & PowerPoint 2010 Student Workbook TECHNOeBooks Project-based Computer Curriculum ebooks www.bepublishing.com Copyright 1993 2010. TechnoKids Inc. in partnership with B.E.
User Manual. Presented by The Knit Foundry: building better tools for knitters. Copyright 2005, 2006 The Knit Foundry
 Knit Visualizer 1.2 Manual Page 1 of 46 User Manual Presented by The Knit Foundry: building better tools for knitters Knit Visualizer 1.2 Manual Page 2 of 46 WHAT IS KNIT VISUALIZER? ----------------------------------------------------------------------------------------------
Copyright Notice. Trademarks
 Copyright Notice All rights reserved. No part of this publication may be reproduced, stored in a retrieval system, or transmitted in any form or by any means, electronic, mechanical, photocopying, recording,
Apple iphoto 4 ITS Technology & Learning Services Dr. Luanne Fose Revised April 29, 2004
 Apple iphoto 4 ITS Technology & Learning Services Dr. Luanne Fose Revised April 29, 2004 Table of Contents Introduction...1 Importing Photos From Your Digital Camera...1 Importing Photos From Other Sources...2
AutoCAD 2D. Table of Contents. Lesson 1 Getting Started
 AutoCAD 2D Lesson 1 Getting Started Pre-reqs/Technical Skills Basic computer use Expectations Read lesson material Implement steps in software while reading through lesson material Complete quiz on Blackboard
Organizing and Customizing Content
 Organizing and Customizing Content JUMPSTART Session 2: Organizing and Customizing Content Welcome to this Jumpstart session on Organizing and Customizing Content. We hope you have had a chance to explore
Term Definition Introduced in: Tab(s) along the ribbon that show additional programs or features (e.g. Acrobat )
 along the ribbon that show additional programs or features (e.g. Acrobat )") 60 Minutes of Excel Secrets Key Terms Term Definition Introduced in: Tab(s) along the ribbon that show additional programs or features (e.g. Acrobat ) Add-Ins AutoCorrect Module 1 Corrects typographical,
60 Minutes of Excel Secrets Key Terms Term Definition Introduced in: Tab(s) along the ribbon that show additional programs or features (e.g. Acrobat ) Add-Ins AutoCorrect Module 1 Corrects typographical,
AutoCAD Tutorial First Level. 2D Fundamentals. Randy H. Shih SDC. Better Textbooks. Lower Prices.
 AutoCAD 2018 Tutorial First Level 2D Fundamentals Randy H. Shih SDC PUBLICATIONS Better Textbooks. Lower Prices. www.sdcpublications.com Powered by TCPDF (www.tcpdf.org) Visit the following websites to
COMPUTING CURRICULUM TOOLKIT
 COMPUTING CURRICULUM TOOLKIT Pong Tutorial Beginners Guide to Fusion 2.5 Learn the basics of Logic and Loops Use Graphics Library to add existing Objects to a game Add Scores and Lives to a game Use Collisions
Annex IV - Stencyl Tutorial
 Annex IV - Stencyl Tutorial This short, hands-on tutorial will walk you through the steps needed to create a simple platformer using premade content, so that you can become familiar with the main parts
Photoshop CC 2018 Essential Skills
 Photoshop CC 2018 Essential Skills Adobe Photoshop Creative Cloud 2018 University Information Technology Services Learning Technology, Training, Audiovisual and Outreach Copyright 2018 KSU Division of
House Design Tutorial
 House Design Tutorial This House Design Tutorial shows you how to get started on a design project. The tutorials that follow continue with the same plan. When you are finished, you will have created a
iphoto Objective Course Outline
 iphoto Objective In this class participants will learn how iphoto creates a photo center for photo organization by using rolls and albums. Participants will also learn the built-in editing tools. Participants
House Design Tutorial
 Chapter 2: House Design Tutorial This House Design Tutorial shows you how to get started on a design project. The tutorials that follow continue with the same plan. When we are finished, we will have created
ARCHICAD Introduction Tutorial
 Starting a New Project ARCHICAD Introduction Tutorial 1. Double-click the Archicad Icon from the desktop 2. Click on the Grey Warning/Information box when it appears on the screen. 3. Click on the Create
Generations Automatic Stand-Alone Lace By Bernie Griffith Generations Software
 We are going to create an open Italian lace. Generations software products provide advanced image processing features allowing for the creation of stand-alone lace with just a few simple techniques. A
The Exact Change Report Press. Page 0
 The Exact Change Report Press Page 0 The Exact Change Report Press Using the report editor to create custom reports The Report Press for Exact Change is a custom report editor that allows you to create
AutoCAD 2018 Fundamentals
 Autodesk AutoCAD 2018 Fundamentals Elise Moss SDC PUBLICATIONS Better Textbooks. Lower Prices. www.sdcpublications.com Powered by TCPDF (www.tcpdf.org) Visit the following websites to learn more about
House Design Tutorial
 House Design Tutorial This House Design Tutorial shows you how to get started on a design project. The tutorials that follow continue with the same plan. When you are finished, you will have created a
Silhouette Connect Layout... 4 The Preview Window... 5 Undo/Redo... 5 Navigational Zoom Tools... 5 Cut Options... 6
 user s manual Table of Contents Introduction... 3 Sending Designs to Silhouette Connect... 3 Sending a Design to Silhouette Connect from Adobe Illustrator... 3 Sending a Design to Silhouette Connect from
AutoCAD 2020 Fundamentals
 Autodesk AutoCAD 2020 Fundamentals ELISE MOSS Autodesk Certified Instructor SDC PUBLICATIONS Better Textbooks. Lower Prices. www.sdcpublications.com Powered by TCPDF (www.tcpdf.org) Visit the following
AP Art History Flashcards Program
 AP Art History Flashcards Program 1 AP Art History Flashcards Tutorial... 3 Getting to know the toolbar:... 4 Getting to know your editing toolbar:... 4 Adding a new card group... 5 What is the difference
PASS Sample Size Software. These options specify the characteristics of the lines, labels, and tick marks along the X and Y axes.
 Chapter 940 Introduction This section describes the options that are available for the appearance of a scatter plot. A set of all these options can be stored as a template file which can be retrieved later.
Adobe Photoshop CS5 Tutorial
 Adobe Photoshop CS5 Tutorial GETTING STARTED Adobe Photoshop CS5 is a popular image editing software that provides a work environment consistent with Adobe Illustrator, Adobe InDesign, Adobe Photoshop
Adobe Photoshop CC 2018 Tutorial
 Adobe Photoshop CC 2018 Tutorial GETTING STARTED Adobe Photoshop CC 2018 is a popular image editing software that provides a work environment consistent with Adobe Illustrator, Adobe InDesign, Adobe Photoshop,
1: INTRODUCTION TO AUTOCAD
 AutoCAD syllabus 1: INTRODUCTION TO AUTOCAD Starting AutoCAD AutoCAD Screen Components Drawing Area Command Window Navigation bar Status bar Invoking Commands in AutoCAD Keyboard Ribbon Application Menu
Subdivision Cross Sections and Quantities
 NOTES Module 11 Subdivision Cross Sections and Quantities Quantity calculation and cross section generation are required elements of subdivision design projects. After the design is completed and approved
Introduction to: Microsoft Photo Story 3. for Windows. Brevard County, Florida
 Introduction to: Microsoft Photo Story 3 for Windows Brevard County, Florida 1 Table of Contents Introduction... 3 Downloading Photo Story 3... 4 Adding Pictures to Your PC... 7 Launching Photo Story 3...
SDC. AutoCAD LT 2007 Tutorial. Randy H. Shih. Schroff Development Corporation Oregon Institute of Technology
 AutoCAD LT 2007 Tutorial Randy H. Shih Oregon Institute of Technology SDC PUBLICATIONS Schroff Development Corporation www.schroff.com www.schroff-europe.com AutoCAD LT 2007 Tutorial 1-1 Lesson 1 Geometric
Organizing artwork on layers
 3 Layer Basics Both Adobe Photoshop and Adobe ImageReady let you isolate different parts of an image on layers. Each layer can then be edited as discrete artwork, allowing unlimited flexibility in composing
House Design Tutorial
 Chapter 2: House Design Tutorial This House Design Tutorial shows you how to get started on a design project. The tutorials that follow continue with the same plan. When you are finished, you will have
Working With Drawing Views-I
 Chapter 12 Working With Drawing Views-I Learning Objectives After completing this chapter you will be able to: Generate standard three views. Generate Named Views. Generate Relative Views. Generate Predefined
Chapter 4 Adding and Formatting Pictures
 Impress Guide Chapter 4 Adding and Formatting Pictures OpenOffice.org Copyright This document is Copyright 2007 by its contributors as listed in the section titled Authors. You can distribute it and/or
AreaSketch Pro Overview for ClickForms Users
 AreaSketch Pro Overview for ClickForms Users Designed for Real Property Specialist Designed specifically for field professionals required to draw an accurate sketch and calculate the area and perimeter
DH HAIR MAKEUP. USER MANUAL updated May, ScriptE Systems, LLC
 DH HAIR MAKEUP USER MANUAL updated May, 2017 ScriptE Systems, LLC READING THIS MANUAL 4 GETTING STARTED 4 CREATE A FILE 5 NAVIGATING THROUGH WINDOWS DH HAIR MAKEUP 5 ADD CHARACTERS & CHARACTER NUMBERS
Creating Photo Borders With Photoshop Brushes
 Creating Photo Borders With Photoshop Brushes Written by Steve Patterson. In this Photoshop photo effects tutorial, we ll learn how to create interesting photo border effects using Photoshop s brushes.
Overview. The Game Idea
 Page 1 of 19 Overview Even though GameMaker:Studio is easy to use, getting the hang of it can be a bit difficult at first, especially if you have had no prior experience of programming. This tutorial is
Welcome to Corel DESIGNER, a comprehensive vector-based package for technical graphic users and technical illustrators.
 Workspace tour Welcome to Corel DESIGNER, a comprehensive vector-based package for technical graphic users and technical illustrators. This tutorial will help you become familiar with the terminology and
House Design Tutorial
 Chapter 2: House Design Tutorial This House Design Tutorial shows you how to get started on a design project. The tutorials that follow continue with the same plan. When you are finished, you will have
1 ImageBrowser Software User Guide 5.1
 1 ImageBrowser Software User Guide 5.1 Table of Contents (1/2) Chapter 1 What is ImageBrowser? Chapter 2 What Can ImageBrowser Do?... 5 Guide to the ImageBrowser Windows... 6 Downloading and Printing Images
ILLUSTRATOR BASICS FOR SCULPTURE STUDENTS. Vector Drawing for Planning, Patterns, CNC Milling, Laser Cutting, etc.
 ILLUSTRATOR BASICS FOR SCULPTURE STUDENTS Vector Drawing for Planning, Patterns, CNC Milling, Laser Cutting, etc. WELCOME TO THE ILLUSTRATOR TUTORIAL FOR SCULPTURE DUMMIES! This tutorial sets you up for
Making Standard Note Blocks and Placing the Bracket in a Drawing Border
 C h a p t e r 12 Making Standard Note Blocks and Placing the Bracket in a Drawing Border In this chapter, you will learn the following to World Class standards: Making standard mechanical notes Using the
AutoCAD Civil 3D 2009 ESSENTIALS
 AutoCAD Civil 3D 2009 ESSENTIALS SDC PUBLICATIONS Schroff Development Corporation www.schroff.com Better Textbooks. Lower Prices. Alignments and Profiles Section 2: Profiles In this section you learn how
Modeling Basic Mechanical Components #1 Tie-Wrap Clip
 Modeling Basic Mechanical Components #1 Tie-Wrap Clip This tutorial is about modeling simple and basic mechanical components with 3D Mechanical CAD programs, specifically one called Alibre Xpress, a freely
Impress Guide. Chapter 4 Adding and Formatting Pictures
 Impress Guide Chapter 4 Adding and Formatting Pictures Copyright This document is Copyright 2005 2012 by its contributors as listed below. You may distribute it and/or modify it under the terms of either
for MS CRM 2015/2016 and Dynamics 365
 e-signature - DocuSign User Guide for MS CRM 2015/2016 and Dynamics 365 e-signature DocuSign User Guide (How to work with e-signatures for MS CRM 2015/2016 and Dynamics 365) The content of this document
OOo Switch: 501 Things You Wanted to Know About Switching to OpenOffice.org from Microsoft Office
 OOo Switch: 501 Things You Wanted to Know About Switching to OpenOffice.org from Microsoft Office Tamar E. Granor Hentzenwerke Publishing ii Table of Contents Our Contract with You, The Reader Acknowledgements
06/17/02 Page 1 of 12
 Understanding the Graphical User Interface When you start AutoCAD, the AutoCAD window opens. The window is your design work space. It contains elements that you use to create your designs and to receive
ACI Sketch. Copyright October 2008, ACI All Rights Reserved. 24 Old Kings Road North Palm Coast, FL appraiserschoice.com
 ACI Sketch Copyright October 2008, ACI All Rights Reserved 24 Old Kings Road North Palm Coast, FL 32137 appraiserschoice.com 800.234.8727 ACI Sketch Contents Getting Started 1 Working with the Grid 2 Unit
Generative Drafting (ISO)
") CATIA Training Foils Generative Drafting (ISO) Version 5 Release 8 January 2002 EDU-CAT-E-GDRI-FF-V5R8 1 Table of Contents (1/2) 1. Introduction to Generative Drafting Generative Drafting Workbench Presentation
CATIA Training Foils Generative Drafting (ISO) Version 5 Release 8 January 2002 EDU-CAT-E-GDRI-FF-V5R8 1 Table of Contents (1/2) 1. Introduction to Generative Drafting Generative Drafting Workbench Presentation
COPYRIGHTED MATERIAL. Welcome to the Civil 3D Environment
 Welcome to the Civil 3D Environment Chapter 1 To paraphrase, Civil 3D isn t your father s AutoCAD. If you re just getting into the Civil 3D environment, want to learn how to get around in models, and would
Sketch PowerTab. Sketch PowerView. Starting a New Floorplan with WinSketch
 Sketch PowerView The Sketch PowerView is your complete interface for digital sketches and their resulting area calculations to transfer into your form. In the Sketch PowerView, you can even access sketches
Anchor Block Draft Tutorial
 Anchor Block Draft Tutorial In the following tutorial you will create a drawing of the anchor block shown. The tutorial covers such topics as creating: Orthographic views Section views Auxiliary views
OPERATION MANUAL MIMAKI ENGINEERING CO., LTD.
 OPERATION MANUAL MIMAKI ENGINEERING CO., LTD. http://www.mimaki.co.jp/ E-mail:traiding@mimaki.co.jp D200674 About FineCut for CorelDRAW Thank you very much for purchasing a product of Mimaki. FineCut,
Step 1: Create chapters and write your story.
 Step 1: Create chapters and write your story. NOTE: Before starting your book, please know that there is free software that can enhance your book writing and it is compatible with CatchMyStory. You may
Chapter 4: Draw with the Pencil and Brush
 Page 1 of 15 Chapter 4: Draw with the Pencil and Brush Tools In Illustrator, you create and edit drawings by defining anchor points and the paths between them. Before you start drawing lines and curves,
Impress Guide Chapter 4 Adding and Formatting Pictures
 Impress Guide Chapter 4 Adding and Formatting Pictures This PDF is designed to be read onscreen, two pages at a time. If you want to print a copy, your PDF viewer should have an option for printing two
MY BERNINA EMBROIDERY MASTERY BOOK SERIES SOFTWARE BERNINA EMBROIDERY SOFTWARE 8.1. WORKBOOK 4 Application Programs
 MY BERNINA EMBROIDERY MASTERY BOOK SERIES SOFTWARE BERNINA EMBROIDERY SOFTWARE 8.1 WORKBOOK 4 Application Programs 2017 BERNINA of America. 02/012017 Table of Contents Introduction... 3 Exercises Quilter...
AutoCAD LT 2012 Tutorial. Randy H. Shih Oregon Institute of Technology SDC PUBLICATIONS. Schroff Development Corporation
 AutoCAD LT 2012 Tutorial Randy H. Shih Oregon Institute of Technology SDC PUBLICATIONS www.sdcpublications.com Schroff Development Corporation AutoCAD LT 2012 Tutorial 1-1 Lesson 1 Geometric Construction
Table of Contents. Creating Your First Project 4. Enhancing Your Slides 8. Adding Interactivity 12. Recording a Software Simulation 19
 Table of Contents Creating Your First Project 4 Enhancing Your Slides 8 Adding Interactivity 12 Recording a Software Simulation 19 Inserting a Quiz 24 Publishing Your Course 32 More Great Features to Learn
LESSON 02: GET STRONGER FOR PS USERS COMPANION BOOK. Digital Scrapbook Academy. February 2018: Lesson 02 Get Stronger for Photoshop Users
 Digital Scrapbook Academy February 2018: Lesson 02 LESSON 02: GET STRONGER FOR PS USERS COMPANION BOOK Page 1 of 19 Table of Contents Table of Contents 2 Welcome to Lesson 02 for Photoshop Users 4 1: Add
COURSE UNIT 3. Plan Creation. Messerli EliteCAD Version
 Messerli EliteCAD Version 13 27.09.2013 COURSE UNIT 3 Plan Creation Switzerland: Austria: Germany: Messerli Informatik AG Messerli Informatik GmbH Messerli Informatik GmbH Pfadackerstrasse 6 Hamoderstraße
Autodesk Inventor Drawing Manager Tips & Tricks
 Alessandro Gasso Autodesk, Inc. MA1280 This class covers several workflows that answer the most common questions from the Inventor users about the Drawing Manager. You will learn how to add the scale value
Floorplanner Drawing Manual
 Floorplanner Floorplanner Drawing Manual Drawing Manual Floorplanner lets you easily create interactive floorplans and publish them online. This manual explains the floorplanner drawing tool. For details
1. Reference Guide and Glossary
 1. Reference Guide and Glossary Design Panel New Click the New Icon at any time to create a new project from scratch. Projects Browse, select, and cut projects from the Projects Tab. This includes your
Chapter 9 Organization Charts, Flow Diagrams, and More
 Draw Guide Chapter 9 Organization Charts, Flow Diagrams, and More This PDF is designed to be read onscreen, two pages at a time. If you want to print a copy, your PDF viewer should have an option for printing