MY BERNINA EMBROIDERY MASTERY BOOK SERIES SOFTWARE BERNINA EMBROIDERY SOFTWARE 8.1. WORKBOOK 4 Application Programs
|
|
|
- Primrose Lang
- 6 years ago
- Views:
Transcription


1 MY BERNINA EMBROIDERY MASTERY BOOK SERIES SOFTWARE BERNINA EMBROIDERY SOFTWARE 8.1 WORKBOOK 4 Application Programs 2017 BERNINA of America. 02/012017
2 Table of Contents Introduction... 3 Exercises Quilter... 4 Quilter: Block Editor... 7 Cross Stitch... 8 Embroidery Library
3 Introduction There are three additional programs within BERNINA Embroidery Software 8. Quilter and Cross Stitch are found in the Applications Toolbox while Embroidery Library is accessed through an icon in the Canvas Toolbar. Quilter In the Quilter program, you can design your own quilts, selecting among many types of quilt blocks built into the software. You can change the type of quilt layout, selecting the size of the blocks, sashing types and sizes, and type and sizes of borders. You can preview built-in fabrics and colors or you can scan your own fabrics and save them in the Quilter program. Add embroidery to the blocks if you wish to give you a preview of how the embroidery will look on your quilt. You may print blocks, appliqué patterns, yardage, and rotary cutting instructions from the Quilter program. You can also design your own quilt blocks to use in the software. Cross Stitch In the Cross Stitch program, you can design and create your own cross stitch designs. Included in the software are ten different types of cross stitches. You can automatically convert pictures to cross stitches, you can fill areas with cross stitches, or you can add stitches one by one. It is easy to change colors and types of stitches in a design with the Magic Wand tool. You can create a design and then create a stamp from that design. You can also add cross stitch lettering in the Cross Stitch program. Embroidery Library Embroidery Library is a design management system in Software 8. You can view the designs that are built into the software, that you have created within the software, or those that you have downloaded and saved on your computer. You can view designs that are on a USB stick, on a CD/ DVD, or on an external hard drive. You can quickly organize, rename, sort, delete, zip designs, or convert designs to a different formats. You can also send designs to the machine for stitching from the Embroidery Library. In addition, you can search for designs with multiple search options; such as, design name, category, number of stitches, or number of colors. 3
4 Quilter Integrated within BERNINA Embroidery Software 8 is the BERNI- NA Quilter Program. Use BERNINA Quilter to design, preview, calculate yardage and scale embroidery designs directly on your projects. Opening the Quilter Program Open a New Blank Design. In the Applications Toolbox, select Quilter. Click on Quilt Layout to open the quilt layout dialog box. Input the quilt design information: Format: Rectangular Blocks: 3 blocks across and 3 blocks down Size of blocks: Height: 6 ; Width: 6 Sash Style: Vertical on Top (choose from the drop-down choices) Check the Sash Border box Change the Width to 2 Borders: Click Add, Style-Mitered, Width-3 Click OK. Click Show All. Setting Blocks, Colors and Fabrics The Blocks To view the library, click on the Library icon if necessary. Make sure Blocks is selected in the library. Click on the + sign to open the Main Blocks list. Open the Nine Patch Stars folder by clicking on the Nine Patch Stars folder to view the block patterns in that folder. Select the Ohio Star (second row; third block over). The Paintbrush from the Edit toolbar should be selected. Click on the upper left square of the quilt to assign the block style to the quilt layout. You can individually assign the blocks or hold down the Ctrl key and click on a blank quilt square to assign the pattern to all geometrically equivalent blocks. Add the Ohio Star to the remaining 6 blocks by holding the Ctrl key and clicking in a block. The Colors and Fabrics Click on the Fabrics button in the Library to access the fabric files. Click on the + beside Benartex 2013 to preview the fabric swatches. Click on Brooklyn Heights to see the fabric collection. Click on a fabric swatch. Click To Palette at the bottom of the Library. The fabric swatch is visible at the top of the design screen in the Palette bar. BERNINA Embroidery Software must be open to access the Quilter Program You may design Rectangular, Diamond, or On Point quilt layouts. When the block size is entered in the Quilt Layout, the finished size of the quilt is updated automatically. You will find the finished size in the lower right corner of the Quilt Layout. Input the finished block size, not the cut block size since 1/4 seams are included. The Library provides over 300 quilt blocks, a wide color palette and fabrics from which to design the project. Click on the minus sign to collapse the blocks back into folders. For a larger preview of the fabric tile, hold down the Alt key and click on a swatch. 4

5 Select 7-8 fabrics to send to the Palette in this same way. Click on the Colors button to select from solid color values. Click on Light, Medium or Dark to select from the desired shade. Place 3-4 solids on the palette, by clicking To Palette. Coloring the Quilt The Paintbrush should still be selected from the Edit toolbar. Select a fabric/color from the Palette bar for the block centers (1). Click in the center of a block while holding the Ctrl key to fill all centers with the selected fabric/color. Select a fabric or color for the triangles (a). Hold the Ctrl key while clicking in one of the (a) triangles. Repeat for each (a) segment. You can click and drag a replacement fabric/color from the Palette bar to the Colors Used menu at the bottom of the screen. Select a fabric/color for the (b) triangles. Click on the periwinkle color chip in Colors Used to replace this color with your chosen fabric. Add a color/fabric to the all the off white squares and triangles (c in diagram), using the Ctrl key and clicking on the corresponding color chip in Colors Used (second color chip in Colors Used). Color sashing strips and borders using the fabric/color of your choice. If you wish to remove a color from the Palette at the top of the screen, select the Select Object tool, click on the chip and drag it to the trash can. c Adding Embroidery Click on the Embroidery Window to link to the software screen or select File> Insert Embroidery. In the Embroidery Canvas, click on Insert Embroidery. Navigate to Libraries> Embroidery> BERNINA 8 Embroidery> Decorative Accents. Select HT105; Click Open. While the design is selected, select a color from the Color Palette that will contrast with the fabrics used on the quilt block for visibility. Click on the Quilter screen to link back to the Quilter Program or select File> Save and Return. Aligning the Embroidery with the Block Position the embroidery over a block by clicking and dragging on the design. Drop the design on one of the blocks. Use the corner sizing handles to adjust the size to fit the block. For perfect centering on the block, select the embroidery and hold down the Ctrl key and click on one of the blocks. Select Align Centers. Deselect and select just the embroidery. Click on Copy. Select another block; select Paste. Add embroidery to the rest of the blocks by selecting each block and clicking on Paste. The block will have a pink outline around it when it is selected. It may be easier to select a different block than the one that was used to resize the embroidery when centering the design. If you wish to send the resized design back to the embroidery software, select one of the designs and click on the Embroidery Window. Select File> Save As and rename the file as a resized design. 5

6 Printing: Select File> Print Preview. You may print Blocks, Block Construction, Appliqué patterns, the Whole Quilt, Yardage, or Rotary Cutting Instructions. Click on Yardage and click OK. Print this sheet and bring it to the store to make it easy to buy the correct yardage. Select Close. Select File> Save As and name the file Quilter. Importing Fabrics: Scan in fabrics using a scanner and save the file as a jpg on your computer. Select File> Manage Fabrics. You can import fabrics by creating a file folder in the Quilter Program. Right click on the left side of the Fabric Library Manager. Select New Library. A dialog box opens and asks you to name the library. Type in the name, Custom and click OK. Select the newly created folder. Import fabrics by clicking on Import at the bottom of the dialog box. Select All Files from the Files of Type drop down list. Browse to the location of the scanned fabrics. Select the file to import, click Import. You can add folders to the new category by clicking on the new folder icon and naming the folder. Close the Fabric Library Manager. Quilter files are saved with the.arq extension and may only be opened from within the Quilter Program. The quilter program has its own Reference Manual found under the Help menu. It is suggested that a copy be printed for learning the more advanced options in the quilter program. A $ sign always appears in front of any created folders indicating it is a custom folder. 6


7 Quilter: Block Editor Designing the Quilt Block Select File> Manage Blocks. Right click on the left side of the Library Manager dialog box and select New Library. In the dialog box that opens, type in Custom Blocks. Click OK. Select the newly created library in the dialog box and right click in the white space on the right side of the dialog box. Select New Block. While the Untitled block is highlighted, name the block, Geometric Play. Click away from the block in the white space. Double click on the block to open the Block Editor. Editing the Block Select Edit> Block Size. Change the value to 14 and click OK. Select View> Show All. Select View and make sure Snap to Grid has a check mark in front of it. If it doesn't, add a check mark by selecting Snap to Grid. Select the Line icon. Begin in the lower left-hand corner. Click and drag a line from the lower left diagonally to the upper right. Click to set the line. Select View. Make sure Snap to Grid is deactivated and Smart Snap is activated. Draw a line from the upper left-hand corner of the block to intersect with the diagonal line, six squares down from the top line (see diagram at right). Draw a line from the lower right-hand corner to the diagonal line, five and a half squares up from the bottom line. Select the Color icon and choose a color chip from those in Block Editor. Click a section of the block to add color. Repeat the steps to fill all blocks with a different color. Click on File> Save; then File> Exit. Close the Block Library Manager by clicking on the X. Using the Block Click on Blocks in the Library. Scroll to find the Custom Block category. Click on the + sign. Select your created block to use on quilts. Add custom blocks in the same way you would add built-in blocks. Close the Quilter program. BERNINA Embroidery Software must be open to access the Quilter Program. The Library provides over 300 quilt blocks, a wide color palette and fabrics from which to design the project. Snap to Grid will force the line to snap to an intersection while Smart Snap will snap to a line not necessarily on a gridline. If the color bleeds into an adjacent area, you must reshape the line to close the area. Smart Snap and/or Snap to Grid will help keep this from happening. 7

8 Cross Stitch Integrated into the BERNINA Embroidery Software DesignerPlus 8 is the Cross Stitch program. Both automatic and manual digitizing capabilities are included. Opening the Cross Stitch Program Select New Blank Design. In the Applications Toolbox, select Cross Stitch. Select Settings> Fabric Count. Input 18 stitches per inch as the Fabric Count. Click Update; then OK. Loading & Resizing a Picture Click on the Picture tab; select Load Picture. Navigate to Pictures> BERNINA 8 Pictures> Artwork. Select A_East_006.jpg. Click on Open. While the artwork is selected, right click to open the Bitmap Properties box. Change the height and width to 80%. Press OK. Auto-Stitch Basics Select the Design tab. Select the Auto-Stitch tool; click on the artwork to open the Auto Stitch Image dialog box. Under Map Image To, select Specific Thread Chart. From the drop down menu, select Isacord 40. Under Maximum Number of Colors, place a check mark by Omit Background. Click OK. Stitches are automatically generated. Click on the Grid icon to hide the grid. Click on the Picture icon to hide the picture. Select Show All to view the design more closely. Area Fill Select the Area Fill tool; right click on the Color Bar, C1. Select a new color for the wing. Click on the wing to fill the area with the newly selected color. Repeat for the other wing. Manually Setting Stitches Select the Eraser tool and click on a black cross under the butterfly to erase the stitch. Click on the Select Object tool; draw a bounding box around the remaining row of stitches under the butterfly. Press the Delete key on the keyboard. Right click on the Stitch Bar; Full Cross is the default stitch. BERNINA Embroidery Software must be open to access the Cross Stitch program. The Cross Stitch program has its own Reference Manual and can be accessed through the Help Menu. You can change the number of crosses in the Bitmap Properties box to correspond to the number of crosses in a cross stitch graph. Count the crosses across and down and enter those in the Dimensions of Width and Height in Bitmap Properties. Left click on the Stitch type bar to open the Select Stitch dialog box. Notice there are 10 stitch types. If you right click on the Stitch type or Color bar, the dialog will remain open to do multiple selections. 8


9 Magic wand will recolor and change the stitch type. First, select a color and a stitch type from the floating boxes. Click on Magic Wand. Click on the area you wish to recolor. Some stitch types will open a dialog box. Make your selection from the dialog box; then confirm with OK. Recolor the spots within the butterfly as desired. Rubber Stamp Click on Grid to bring back the grid. Zoom in on an empty area of the workspace by selecting the Zoom Box and clicking and dragging a bounding box on an empty area. Select the Pencil. Select Full Cross from the Select Stitch box. Select a color from the Select Thread box. Create a small flower shape as shown at the right by clicking within a grid square. Select a new color for the leaves. A left click will add a stitch, a right click will delete a stitch. Click on the Zoom Out 2x icon until you can see the entire design. Select the flower by clicking on the Select Object tool and drawing a bounding box around the flower. Select the Rubber Stamp. Click on the workspace to stamp floral elements around the butterfly. Use the grid lines to equally space the stamp. To de-activate the stamp, press Esc. Zoom in on the workspace for better visibility while creating the flower. Toggle the grid on or off to use as an aid for positioning the crosses. You can also click & drag to set a continuous line of crosses. Closed and open object tools are available to create free form elements. The circle and rectangle tools make it simple to create perfect geometric shapes. Lettering Select the 1/2 Cross from the fill Stitch Types. From the Color Palette, select a thread color. Right click on the Lettering/Values tool. See notes at right. Font-Arial Style-Regular Size-72 Press OK. Click above the butterfly to begin the text. Type Fly Away ; press Enter. A dialog box will let you change the orientation of the stitch. Make your selection; then press OK. Use the Pencil tool and the Eraser tool to fine tune the individual letters or stitches if needed. You may wish to zoom in on the lettering. Saving Your Work Select File> Save As. Name the file, Cross Stitch and navigate to the desired location to save the file. Click Save. The Cross Stitch format is.arx. Close the file. Stitching the Design Open the design in the BERNINA Embroidery Software program to send the design to a machine or USB stick. Cross Stitch Lettering will be clearer if you change your settings to deactivate Clear Type Fonts. To do this, select Start, Control Panel, and then Display. Select Adjust Clear Type Fonts and turn off Clear Type; then work through the steps; then type the Cross Stitch Lettering. When you are done typing, reactivate Clear Type Font. BERNINA Embroidery Software also has a cross stitch font. Cross stitch cannot be rescaled in the embroidery program. The image must be resized prior to generating the cross stitch design. The cross stitch design must be opened in the embroidery software program to send the design to the machine. Select Files of Type>.ARX. 9
 Standard Toolbar Lesson Covers: Description of Embroidery Library Opening Designs")


10 Embroidery Library Opening the Library Select New Blank Design. Select Embroidery Library. Embroidery Library Screen There are five sections of the Embroidery Library Screen. Library Toolbox Navigation Tree Design Display including the Design Information Panel (at bottom of screen) Standard Toolbar Lesson Covers: Description of Embroidery Library Opening Designs Converting Designs Sending Designs from the Library Printing Searching Designs Navigating the Library You may find that you have to click the Embroidery icon twice first to activate the screen; then to open the Library. If the Public Embroidery folder is not visible, click on the arrow symbol in front of Embroidery Library to open the folder tree. Manage Design Toolbar MANAGE DESIGNS TOOLBOX: Opening Designs from the Library Select the Public Embroidery in the Navigation Tree. Under Group by, select None. Select Descending order. In Sort by, select Name. Select ART80. The information for this design is displayed in the Design Information Panel at the bottom of the display. Select Open Selected. This sends the design to the Embroidery Canvas to be edited or to be sent to the machine for stitching. Notice that the design opens as if opening a design the name of the design is shown on the folder. The Design Display will take a few seconds to populate. The Design Information Panel can be resized. 10
11 You may send multiple designs at once from the library to the software by holding the Ctrl key and selecting the designs. Each design is opened in a separate design folder. Switch back to Embroidery Library. Select 12440_05.ART80. Select New from Selected. This will insert the design into a file in the Embroidery Canvas and editing can be done without overwriting the original file. Converting Designs from the Library Select the Embroidery Library. The Public Embroidery in the Navigation Tree is still the selected folder. Hold the Ctrl key and select two designs from the Design Display. Click on Convert Selected Designs. The Convert Selected Designs dialog box opens. Click on Browse. Navigate to the location where you want to save the files. If you wish to create a new folder, click on Make New Folder. Name the folder, Converted Designs. Click OK. Choose the formats for conversion. Place a check mark in any three boxes. Click Convert. Click OK in the Convert dialog box. All the designs were sent to the designated location. Sending Designs to the Machine Select BERNINA 8 Embroidery in the Navigation tree. Select a design from the Design Display. Select Stitch Selected Design. The Device Selection dialog box opens so that a design can be sent to machine for stitching. The appropriate option can then be selected to send the design for stitching. Close the Device Selection dialog box. Close all the open files by clicking on the x in the Design Tab. You may wish to create a Converted Designs folder in the My Designs folder. If you wish to remove an added folder, this must be done outside the software in Windows Explorer. To see the converted files in the Embroidery Library, first select the folder; then make sure All Embroidery Files is selected under Showing. Printing Design Templates Return to the Embroidery Library. BERNINA 8 Embroidery is still selected in the Navigation Tree. 11


12 All the folders within that group of folders are displayed. Select Animals & Bugs. The Design Display shows all the designs in this folder. Select one design. Select Print Selected. Click on Preview in the Print Design dialog box. The template for this design can be printed from the Embroidery Library. Click Close. Printing a Catalog Return to the Embroidery Library. Select Celebrations & Seasons folder. Select the first design in the Design Display and hold the Shift key and select the last design. Click on Print Selected to Catalog. Choose your options in the Print Catalog Options dialog box. You may choose only Thumbnails or Thumbnails and Summary. Select Print. Click on Preview. Click Close in Print Preview. Note: If you wish to create a PDF of the designs, select PDF Creator from the drop-down in your printer s dialog box. (PDF Creator will need to be downloaded on your computer). Name the file and save it on your computer. Exporting a Design List Select Decorative Accents in the Navigation Tree. Select Export Design List. Navigate to your desired location to save the file. This may be saved as a.txt or.csv format. The.CSV format is opened by Excel. Select.CSV from the Save as Type. Click Save in the dialog box that opens. Click Ok in the Export Successful dialog box. 12


13 Finding Embroidery Designs The Embroidery Library has a powerful search that will search for designs on peripheral devices that are plugged into the computer as well as designs on your hard drive. Click on Find Embroidery Designs. The software searches your computer for designs. Be patient if you have a lot of designs. A list of designs and their location is shown in a dialog box. Check any of the folders you wish to display in your Embroidery Library. Select Add to Library at the bottom of the dialog box. These designs are added to a folder called Designs in your tree. When external devices are removed from your computer, they will not appear in the navigation tree. The Embroidery Library will find designs on your C drive that are not part of the BERNI- NA 8 Embroidery file. In addition, designs will be found on any USB stick in your computer, an external hard drive, a CD or DVD, or PCMCIA card reader. Add Folder to Library If you do not wish for the software to search your computer for designs, you can direct the software to a specific folder to add to your library. Select Add Folder to Library. A dialog box appears and you can navigate to the location to select the file you wish to add. Select the folder. Select Add to Library in the bottom of the dialog box. The selected folder appears in the Navigation tree. When an external device is no longer in the computer, there will be no designs in the Library from that device. Removing a Folder If there is a folder you wish to remove from the library, select it and click on Remove Folder from Library. If the folder was added through an external device, the device shouldn t be removed from the computer or you will get an error message if you try to remove the folder. For folders that were added from your hard drive, these can be removed at any time. They are removed from the library, not deleted. For folders that are added through File Explorer, these folders must be removed through File Explorer. 13
14 NAVIGATION TREE Navigation Tree Dynamics When the Embroidery Library is selected in the Navigation Tree, all designs that are part of your created and saved My Embroidery, your Public Embroidery (BERNINA 8 Embroidery Designs), or designs you added to the library are displayed in the Design Display. If you select My Embroidery in the Navigation Tree, only those designs that you have saved in My Designs or My Machine Files, or other folders that you have created under the umbrella My Embroidery will be displayed. To display all formats, you must select the drop-down arrow by Showing and select All Embroidery Files. BERNINA 8 Embroidery designs are found in the Public Embroidery folder as well as EMB files from Hatch Software if you have that program. Your Designs folder will show designs that you have added from other locations on your computer as long as those devices are still plugged into your computer. To display the contents of any of the folders, simply click on the arrow in front of the folder. This opens the folder structure within the main folder. You can continue to drill down to the sub-folders so you only view those designs within the sub-folders. DESIGN DISPLAY The Design Display will show the designs in the folder that you have selected from the Navigation Tree. If you click on the Showing drop-down, you can select the formats you view. There are many different formats to choose from. If you select a design in the design display, a preview dialog box (Design Information Panel) appears at the bottom or the side of the screen. This lists lots of information about the design. Choose BERNINA 8 Embroidery> Alphabets & Monograms> Notice information in the Tags & Subject categories. This will correspond to information that is listed in the Tags & Subjects categories of the Design Properties> Summary tab. If you wish to see more designs, you can hide the Navigation tree by clicking on the first icon in the Manage Design Toolbar. To access the Design Properties dialog box, return to Embroidery Canvas and select Design> Design Properties. 14

15 STANDARD TOOL BAR Icons in the Standard Tool Bar You can switch to Artwork Canvas or Embroidery Canvas from the Embroidery Library by selecting the corresponding icon. Selecting New Blank Design will open a blank file in Embroidery Canvas. Open Design will open the Open Design dialog box so you can navigate to the location to open a file. If you do not see the design you need, remember to check the type of file shown in the drop-down Files of Type. You can also open recent files from the Embroidery Library. When you select this, a dialog box shows you thumbnails of recently opened files. The Cut icon will cut a selected design from the folder; while Copy makes a copy of a selected design. Navigate to the new location and select Paste to paste the file in the newly selected folder. Built-in designs as well as created designs can be used with cut -copy-paste. Be careful about the cut command. If you accidently cut a design, a repair on the software will reestablish the original folders. MANAGE DESIGNS TOOLBAR Show Folders will show or hide the Navigation Tree. Change View will affect what is seen in the Design Display. Extra Large, Large, and Medium Icons will show a thumbnail of the design. Small Icons and List will show the name of the design. Details will give the name of the design with width, height, stitch count, color, and date created information. Tiles will show a thumbnail, the name, the format, and the size of the design in KB. Contents will show a thumbnail, the name, the author, the stitch count, the colors, and the width and height of the design. You can select how to Group the designs in the Design Display by clicking on an option from the Group By box. Grouping by name will divide the folder contents by position in the alphabet (A-H, I-P, and Q-Z) and the number of the design (0-9). 15

16 You can also group by Folder, File Type, Date Created, or Date Modified. Group by folder is useful when viewing multiple folders within a master folder. You can arrange how you view the contents of a folder by clicking on Ascending Order or Descending Order. You can sort the contents of a selected folder by clicking on Sort by. You can sort by Name, Date Created, Date Modified, Embroidery Size, Stitch Count, or Colors. You can also sort the designs when in Detail View by clicking on the column heading. You can sort by clicking on Ascending Order or Descending Order. You filter what formats are shown by clicking on the dropdown arrow by Showing. Several different filter formats are available. SEARCHING FOR DESIGNS All Software 8 Designs are tagged for searching by title (file name), author (designer s name) or keywords (folder location, technique). Select BERNINA 8 Embroidery in the Navigation Tree. In the Find box, type dog. Press Enter. Dog designs as well as designs with dog included in the name, such as Dogwood are found and displayed in the Design Display. You can do searches with multiple tags as well. To do a multiple search, type in the Find box: author: OESD colors: <9 stitches: <5,000 All designs matching those tags will appear. Select all in the Find box and delete. To add tags to your created designs, select Designs> Design Properties when you are creating the design. Select the Summary tab. Complete the information in the Summary Tab. Click OK. Save the file after adding the information. A colon must separate every field. Do not insert commas in between the fields, but do add a space in between search fields. 16
 folder. A message appears that says the zipped file will be placed on the Desktop. Select Yes.")
17 ZIPPING FILES In the Navigation tree, select BERNINA 8 Embroidery> Work & Play. Hold the Ctrl key and select the Baseball, the Basketball, Football 2, and the Soccer ball. Right click and select, Send to Compressed (zipped) folder. A message appears that says the zipped file will be placed on the Desktop. Select Yes. The folder can be found on your desktop and it can be moved to any folder through File Explorer. UNZIPPING FILES If you have just placed an unzipped folder in the Embroidery Library, close the software; then reopen to refresh the screen. Click on Embroidery Library. Navigate to the location of the zipped files. Select the zipped file. You can open, cut, copy, or delete the files. 17
Mastering Your. Embroidery Software V6.0. Owner s Workbook - Bonus
 Mastering Your Mastering Your Embroidery Software V6.0 Owner s Workbook - Bonus 1 Table of Contents Index... 2 Class 9... Class Overview... 3 Quilter... 4 Block Editor 7 Cross Stitch... 9 2 Class 9 - BERNINA
Template: Quilter Title Overview: Traditional Application
 Template: Quilter Title Overview: Traditional Application Subject Launching Topic Quilter Open Steps BERNINA Embroidery Software. Select Steps the Quilter icon in the Applications Toolbox to launch Quilter.
Appliqué with CutWork
 Appliqué with CutWork Method 1: Creating Appliqué from a Placement Line Open BERNINA Embroidery Software. Click on File> Open. Select the Appliqué Flowers, provided with the lesson. Click on Open. Select
Mastering Your. Embroidery Software V6.0. Owner s Workbook - Part 1
 Mastering Your Mastering Your Embroidery Software V6.0 Owner s Workbook - Part 1 1 Table of Contents Introduction... 3 Class 1: Getting Started... Class Overview... 4 Four Bonus programs in BERNINA Embroidery
Embroidery Software 8 Owner s Workbook 3 Advanced Features
 Embroidery Software 8 Owner s Workbook 3 Advanced Features 1 Table of Contents Introduction:... 3 Exercises Advanced Editing Features Creating Holes... 4 Color Blending... 5 Quilting Backgrounds... 7 Layouts...
Sashiko-Style Sampler
 Sashiko-Style Sampler Created by Debbi Lashbrook Sashiko, traditionally a Japanese hand embroidery technique, can be imitated using BERNINA Embroidery Software 7 and your embroidery machine. The simple,
Photoshop CS2. Step by Step Instructions Using Layers. Adobe. About Layers:
 About Layers: Layers allow you to work on one element of an image without disturbing the others. Think of layers as sheets of acetate stacked one on top of the other. You can see through transparent areas
Quilt Pro 6 Lesson Quilt in a Quilt
 Quilt Pro 6 Lesson Quilt in a Quilt Quilt in a Quilt The Inner Quilt This quilt is a very complex design. We will cover a unique technique not covered in the manual. While any one can master the techniques
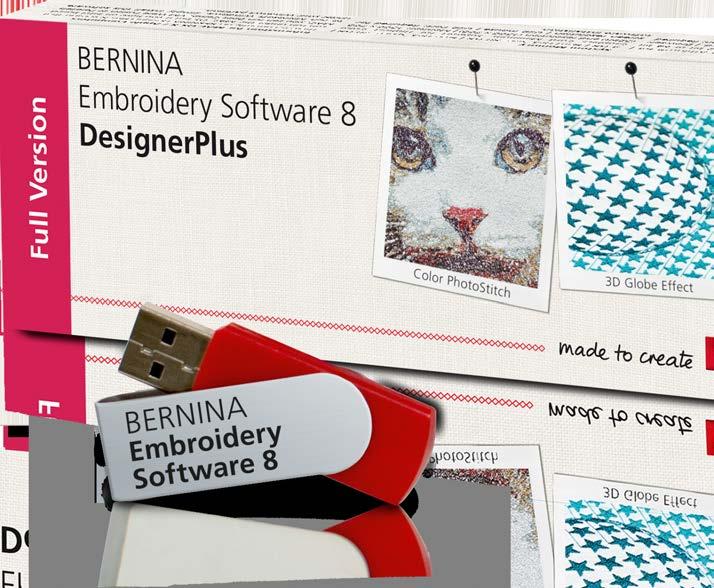
1 embroidery software for great designs
 6 finished projects BERNINA Embroidery Software 8 DesignerPlus 1 kitty photo digitised with Colour PhotoStitch 363 stars designed with 3D Globe Effect 3 easily created textures with Couching 1 embroidery
Adobe Photoshop CS2 Workshop
 COMMUNITY TECHNICAL SUPPORT Adobe Photoshop CS2 Workshop Photoshop CS2 Help For more technical assistance, open Photoshop CS2 and press the F1 key, or go to Help > Photoshop Help. Selection Tools - The
File Button 9 Font Creator 251. Gifts in the Hoop 413 Grid 53 Grouping 93. Installing Adding a shortcut 24 Checking for updates 23 Full version 17
 A Alignment Aligning multiple pieces 345 Alignment is similar to Applique position 340 Different color for alignment lines 345 Using Thumb tacks for Alignment 340 Why Straight Alignment lines 344 Applique
12. Creating a Product Mockup in Perspective
 12. Creating a Product Mockup in Perspective Lesson overview In this lesson, you ll learn how to do the following: Understand perspective drawing. Use grid presets. Adjust the perspective grid. Draw and
Cutwork With Generations Automatic Digitizing Software By Bernadette Griffith, Director of Educational Services, Notcina Corp
 In this lesson we are going to create a cutwork pattern using our scanner, an old pattern, a black felt tip marker (if necessary) and the editing tools in Generations. You will need to understand the basics
Home Screen to Get You Started
 Updated User Interface The user interface has been redesigned for faster learning and more complete designing. Its friendly new look introduces large interface elements, customizable workspace, help tips,
Key Terms. Where is it Located Start > All Programs > Adobe Design Premium CS5> Adobe Photoshop CS5. Description
 Adobe Adobe Creative Suite (CS) is collection of video editing, graphic design, and web developing applications made by Adobe Systems. It includes Photoshop, InDesign, and Acrobat among other programs.
Indigo Cocktails. Supplies. Visit bernina.com: Projects Webinars Promotions. Created by Susan Fears
 Indigo Cocktails Created by Susan Fears Use the Stitch Designer to create new stitches and edit existing ones. Sew, embroider or transfer them into the BERNINA Embroidery Software 7 to use as Pattern Runs.
digitization station DIGITAL SCRAPBOOKING 120 West 14th Street
 digitization station DIGITAL SCRAPBOOKING 120 West 14th Street www.nvcl.ca techconnect@cnv.org DIGITAL SCRAPBOOKING With MyMemories Suite 6 The MyMemories Digital Scrapbooking software allows you to create
Introduction to Parametric Modeling AEROPLANE. Design & Communication Graphics 1
 AEROPLANE Design & Communication Graphics 1 Object Analysis sheet Design & Communication Graphics 2 Aeroplane Assembly The part files for this assembly are saved in the folder titled Aeroplane. Open an
Toothbrush Holder. A drawing of the sheet metal part will also be created.
 Prerequisite Knowledge Previous knowledge of the following commands is required to complete this lesson; Sketch (Line, Centerline, Circle, Add Relations, Smart Dimension,), Extrude Boss/Base, and Edit
BERNINA Embroidery Software Version 6
 PC Software 61 PC Software 63 BERNINA Embroidery Software Version 6 Transform your most creative ideas into unique embroidery designs! New and exclusive only from BERNINA! The BERNINA Embroidery Software
Hexagons for Art and Illusion Part II Get ready Start a new project FILE New Open Faced Cube Import the hexagon block LIBRARIES
 Hexagons for Art and Illusion Part II In our last lesson, we constructed the perfect hexagon using EasyDraw. We built a six pointed star, a solid faced cube, and put the cube inside the star. This lesson
Revit Structure 2012 Basics:
 SUPPLEMENTAL FILES ON CD Revit Structure 2012 Basics: Framing and Documentation Elise Moss autodesk authorized publisher SDC PUBLICATIONS www.sdcpublications.com Schroff Development Corporation Structural
Education. Program comes with one model, Nina. Her measurements are changed to reflect your shape.
 My Label Mastery Opening Program Education Double click on the My Label icon on the screen to open My Label. The screen is divided into four main areas: 1. Drawer area, where items are selected 2. Worktable
Falling Leaves Mini Wall Hanging
 Created by Elva Mungai Seasonal Sensational Swirls Falling Leaves Mini Wall Hanging For Cork and Dry Erase Board Create a mini quilt for each season to dress up a bulletin board for your work room or sewing
Corel PHOTO-PAINT BERNINA Page 1 DL
 Corel PHOTO-PAINT 2018 BERNINA Page 1 Corel PHOTO-PAINT Corel PHOTO-PAINT is part of BERNINA Embroidery Software and gives users many tools for editing photos or bitmap artwork. Corel PHOTO- PAINT can
By Judy Hahner. Fabric Refer to Fabric Legend on page 2 for yardage and cutting instructions for blocks, borders, backing, and binding.
 By Judy Hahner OESD s Whimsical Wildflowers Collection #009 and Quilting Whimsy #006 were used to design the blocks used in this fresh, fun, and fanciful quilt. The blocks are designed for the BERNINA
Module 10. Assemblies and Corridors. Objectives
 NOTES Module 10 Assemblies and Corridors In this module, you learn to work with assemblies and corridors in AutoCAD Civil 3D. Corridor models are used to represent road designs in Civil 3D. An assembly
WORD ART - CHANGING LETTERING SPACING
 CHANGING LETTERING SIZE Enter single letters or words and use the icon to rescale the motif. When the Maintaining Proportions (lock) icon is outlined in white, the design will be resized proportionately.
Premier + Create Create Express Border Applique
 Premier + Create Create Express Border Applique Page 1 Learn to use the Create Express Border Wizard to create a beautiful applique. It s so quick and easy! You can audition your applique fabric right
Engineering Technology
 Engineering Technology Introduction to Parametric Modelling Engineering Technology 1 See Saw Exercise Part 1 Base Commands used New Part This lesson includes Sketching, Extruded Boss/Base, Hole Wizard,
Addendum 27: Personalized Meander
 Addendum 27: Personalized Meander About the Author: Lynn Mintz Photo Lynn Mintz is a Florida resident. She spends summers in New Jersey. Lynn has been quilting, embroidering and digitizing for 20 years.
Welcome to Corel DESIGNER, a comprehensive vector-based package for technical graphic users and technical illustrators.
 Workspace tour Welcome to Corel DESIGNER, a comprehensive vector-based package for technical graphic users and technical illustrators. This tutorial will help you become familiar with the terminology and
AMEEL Digitization Manual: Part 5, Phase Two Processing in Photoshop 1
 AMEEL Digitization Manual: Part 5, Phase Two Processing in Photoshop 1 Phase Two Processing: Photoshop The Phase One processing in BCS-2 produces a series of page images tightly cropped to include only
Digital Design and Communication Teaching (DiDACT) University of Sheffield Department of Landscape. Adobe Photoshop CS5 INTRODUCTION WORKSHOPS
 University of Sheffield Department of Landscape. Adobe Photoshop CS5 INTRODUCTION WORKSHOPS") Adobe INTRODUCTION WORKSHOPS WORKSHOP 1 - what is Photoshop + what does it do? Outcomes: What is Photoshop? Opening, importing and creating images. Basic knowledge of Photoshop tools. Examples of work.
Adobe INTRODUCTION WORKSHOPS WORKSHOP 1 - what is Photoshop + what does it do? Outcomes: What is Photoshop? Opening, importing and creating images. Basic knowledge of Photoshop tools. Examples of work.
Embroidery Gatherings
 Planning Machine Embroidery Digitizing and Designs Floriani FTCU Digitizing Fill stitches with a hole Or Add a hole to a Filled stitch object Create a digitizing plan It may be helpful to print a photocopy
Monogrammed Garden Flag
 BERNINA E 16 CLICK & CREATE Monogrammed Garden Flag Written by: Judy Hahner, BERNINA Educator, Multi-Needle Embroidery Specialist Stitching large appliqué embroidery just got easier using the BERNINA E
All-in-one application (Gallery/Edit/Digitize) New platform/new style interface Software starts up faster Automatic Update Trial Software (30 days)
 New platform/new style interface Software starts up faster Automatic Update Trial Software (30 days)") Legend: New/Impro ved feature in V5 Included feature DigitizerJr / MBX Software features comparison table Optional feature Capabilities Reference Digitizer Digitizer V5 Jr V5 Generals Basic Procedures
Legend: New/Impro ved feature in V5 Included feature DigitizerJr / MBX Software features comparison table Optional feature Capabilities Reference Digitizer Digitizer V5 Jr V5 Generals Basic Procedures
ARCHICAD Introduction Tutorial
 Starting a New Project ARCHICAD Introduction Tutorial 1. Double-click the Archicad Icon from the desktop 2. Click on the Grey Warning/Information box when it appears on the screen. 3. Click on the Create
Adobe Photoshop CC 2018 Tutorial
 Adobe Photoshop CC 2018 Tutorial GETTING STARTED Adobe Photoshop CC 2018 is a popular image editing software that provides a work environment consistent with Adobe Illustrator, Adobe InDesign, Adobe Photoshop,
PosterArtist Quick Guide
 PosterArtist Quick Guide Create posters in four easy steps STEP STEP STEP STEP Use Auto Design to Create Posters Simply select a poster type and a design image to automatically create high-quality posters.
9. Click Load a Picture and navigate to \Documents\Premier+\Samples\Premier+Lessons\Create.
 P a g e 1 See how to take a basic background image and make 3 different embroideries. Make a simple Quilt Design in PREMIER+ EXTRA. Create a simple sail boat embroidery, and then make it special with PREMIER+
Floral Visions Pillow
 Floral Visions Pillow Expanding Embroidery Possibilities with the BERNINA 830 & Embroidery Software 6 The BERNINA 830 has the tremendous capability of bringing ALL sewing and decorative stitches into embroidery
AEROPLANE. Create a New Folder in your chosen location called Aeroplane. The four parts that make up the project will be saved here.
 AEROPLANE Prerequisite Knowledge Previous knowledge of the following commands is required to complete this lesson. Sketching (Line, Rectangle, Arc, Add Relations, Dimensioning), Extrude, Assemblies and
FLORAL CLUTCH SEWING SUPPLIES
 creative 1.5 FLORAL CLUTCH Create this beautiful floral clutch decorated with embroideries from the PFAFF creative 1.5 sewing and embroidery machine. The Embroidery Intro PC Software makes it easy to combine
TruEmbroidery Software Program
 Page 1 Get to Know TruE Create, an Application of the TruEmbroidery Software Program By Janie Lantz TruE Create is easy yet feature-rich digitizing software with an automated Assistant, plus many manual
SCRAPENDIPITY Designs. Electric Quilt 7 Tutorial. Building a Quilt
 Electric Quilt 7 Tutorial Building a Quilt When you start Electric Quilt up, you will see this screen. Type the name of your quilt and hit OK Now we need to make sure we have the correct layout. Go to
House Design Tutorial
 House Design Tutorial This House Design Tutorial shows you how to get started on a design project. The tutorials that follow continue with the same plan. When you are finished, you will have created a
Mastering Your. Embroidery Software V6.0. Owner s Workbook - Part 2
 Mastering Your Mastering Your Embroidery Software V6.0 Owner s Workbook - Part 2 1 Table of Contents Index... 2 Class 5: Digitizing... Class Overview... 3 Digitizing Tutorial... 4 Blackwork Run... 5 Class
USER GUIDE CUSTOMIZE DESIGNS
 USER GUIDE CUSTOMIZE DESIGNS CONTENTS Customize designs... 1 General functions... 1 Design information... 3 Summary information... 4 Design details... 5 Thread colors... 6 Stitching details... 8 Thread
Digital Photography 1
 Digital Photography 1 Photoshop Lesson 3 Resizing and transforming images Name Date Create a new image 1. Choose File > New. 2. In the New dialog box, type a name for the image. 3. Choose document size
PART 0 - Introduction to Art and Stitch PLUS
 PART 0 - Introduction to Art and Stitch PLUS ArtandStitch.com User Guide for Art and Stitch PLUS Version 5 This Art and Stitch PLUS User Guide is written by Loes van der Heijden, Artistitch v.o.f., Oss,
Getting Started Guide
 SOLIDWORKS Getting Started Guide SOLIDWORKS Electrical FIRST Robotics Edition Alexander Ouellet 1/2/2015 Table of Contents INTRODUCTION... 1 What is SOLIDWORKS Electrical?... Error! Bookmark not defined.
Mastering Your. Embroidery Software V6.0. Owner s Workbook - Part 1
 Mastering Your Mastering Your Embroidery Software V6.0 Owner s Workbook - Part 1 1 Table of Contents Introduction... 3 Class 1: Getting Started... Class Overview... 4 Four Bonus programs in BERNINA Embroidery
Getting Started with. Vectorworks Architect
 Getting Started with Vectorworks Architect Table of Contents Introduction...2 Section 1: Program Installation and Setup...6 Installing the Vectorworks Architect Program...6 Exercise 1: Launching the Program
USING BRUSHES TO CREATE A POSTER
 11 USING BRUSHES TO CREATE A POSTER Lesson overview In this lesson, you ll learn how to do the following: Use four brush types: Calligraphic, Art, Bristle, and Pattern. Apply brushes to paths. Paint and
House Design Tutorial
 House Design Tutorial This House Design Tutorial shows you how to get started on a design project. The tutorials that follow continue with the same plan. When you are finished, you will have created a
Adobe Photoshop CS5 Tutorial
 Adobe Photoshop CS5 Tutorial GETTING STARTED Adobe Photoshop CS5 is a popular image editing software that provides a work environment consistent with Adobe Illustrator, Adobe InDesign, Adobe Photoshop
Generations Automatic Stand-Alone Lace By Bernie Griffith Generations Software
 We are going to create an open Italian lace. Generations software products provide advanced image processing features allowing for the creation of stand-alone lace with just a few simple techniques. A
Revit Structure 2013 Basics
 Revit Structure 2013 Basics Framing and Documentation Elise Moss Supplemental Files SDC P U B L I C AT I O N S Schroff Development Corporation Better Textbooks. Lower Prices. www.sdcpublications.com Tutorial
Organizing artwork on layers
 3 Layer Basics Both Adobe Photoshop and Adobe ImageReady let you isolate different parts of an image on layers. Each layer can then be edited as discrete artwork, allowing unlimited flexibility in composing
1. Setup Output mode. 2. Using a Fixed tile size
 Tutorial Tiling Software version: Asanti 2.0 Document version: June 23, 2015 This tutorial demonstrates how to use tiling with Asanti. Tiling can only be executed on a system where Acrobat Pro X or later
Photoshop CC Editing Images
 Photoshop CC Editing Images Rotate a Canvas A canvas can be rotated 90 degrees Clockwise, 90 degrees Counter Clockwise, or rotated 180 degrees. Navigate to the Image Menu, select Image Rotation and then
Mid_Term_Review_PhotoShop_Design Test B Name
 Mid_Term_Review_PhotoShop_Design Test B Name Multiple Choice Identify the choice that best completes the statement or answers the question. 1. Photoshop uses a mathematical process called when it changes
Quilt-Pro 6. Creating a Panel Quilt
 QP6 Lessons posted Page 1 Creating a Panel Quilt Quilt-Pro 6 I have seen some really beautiful fabric panels that would look absolutely gorgeous in a quilt. Panel quilts can be made quickly or can be as
Create styles that control the display of Civil 3D objects. Copy styles from one drawing to another drawing.
 NOTES Module 03 Settings and Styles In this module, you learn about the various settings and styles that are used in AutoCAD Civil 3D. A strong understanding of these basics leads to more efficient use
Stitch n Bloom Jacket
 Stitch n Bloom Jacket Created by Debra Rutledge This all-over floral arrangement is designed for embellishing a ready-made denim jacket, but may be easily modified to accommodate any jacket style. Supplies
IT154 Midterm Study Guide
 IT154 Midterm Study Guide These are facts about the Adobe Photoshop CS4 application. If you know these facts, you should be able to do well on your midterm. Photoshop CS4 is part of the Adobe Creative
Adobe PhotoShop Elements 3.0 Quick Start Tutorial
 Adobe PhotoShop Elements 3.0 Quick Start Tutorial Introduction When you open Photoshop Elements, you are greeted by the welcome screen which offers you several choices: 1. Product Overview Provides a quick
Getting Started with. Vectorworks Architect
 Getting Started with Vectorworks Architect Table of Contents Introduction...2 Section 1: Program Installation and Setup...6 Installing the Vectorworks Architect Program...6 Exercise 1: Launching the Program
Lettering Fabric Preparation deco 340 aurora 430E & 440QEE NAME artista 630E, 635LE & 640E
 Lettering Fabric Preparation Deco 340 Hoop a piece of firm woven fabric backed with tear-away stabilizer in the Large hoop. aurora, artista, and 8 Series Hoop a piece of firm woven fabric backed with tear-away
Adobe Photoshop CS5 Layers and Masks
 Adobe Photoshop CS5 Layers and Masks Email: training@health.ufl.edu Web Page: http://training.health.ufl.edu Adobe Photoshop CS5: Layers and Masks 2.0 Hours The workshop will cover creating and manipulating
Bold & Beautiful Table Topper
 Bold & Beautiful Table Topper Created by Elaine Cibelli Dress up the picnic table with a reversible, mitered border table topper using appliqué designs from the BERNINA Exclusive Bold & Beautiful Embroidery
1 ImageBrowser Software User Guide 5.1
 1 ImageBrowser Software User Guide 5.1 Table of Contents (1/2) Chapter 1 What is ImageBrowser? Chapter 2 What Can ImageBrowser Do?... 5 Guide to the ImageBrowser Windows... 6 Downloading and Printing Images
Ball Valve Assembly. On completion of the assembly, we will create the exploded view as shown on the right.
 Ball Valve Assembly Supplied are the main components of a ball valve. In this exercise you will assemble the valve as shown below Left. (N.B. Socket head cap screws are not supplied these will be created
Star Defender. Section 1
 Star Defender Section 1 For the first full Construct 2 game, you're going to create a space shooter game called Star Defender. In this game, you'll create a space ship that will be able to destroy the
Creating Photo Borders With Photoshop Brushes
 Creating Photo Borders With Photoshop Brushes Written by Steve Patterson. In this Photoshop photo effects tutorial, we ll learn how to create interesting photo border effects using Photoshop s brushes.
House Design Tutorial
 Chapter 2: House Design Tutorial This House Design Tutorial shows you how to get started on a design project. The tutorials that follow continue with the same plan. When you are finished, you will have
Use the and buttons on the right to go line by line, or move the slider bar in the middle for a quick canning.
 How To Use The IntelliQuilter Help System The user manual is at your fingertips at all times. Extensive help messages will explain what to do on each screen. If a help message does not fit fully in the
BERNINA Embroidery Software 6 for the Garment-Maker
 BERNINA Embroidery Software 6 for the Garment-Maker BERNINA Embroidery software makes garment-making and embellishing fast and easy using basic tools in the software. Scanning You may choose to use the
Software Club 402: Create THREAD VELVET Embroidery
 Software Club 402: Create THREAD VELVET Embroidery By Janie Lantz, Embroidery Software Specialist Create THREAD VELVET embroidery with its unique velvety plush texture, using 5D Design Creator in the 5D
Exploring Photoshop Tutorial
 Exploring Photoshop Tutorial Objective: In this tutorial we will create a poster composed of three distinct elements: a Bokeh, an image and title text. The Bokeh is an effect which is sometimes seen in
House Design Tutorial
 Chapter 2: House Design Tutorial This House Design Tutorial shows you how to get started on a design project. The tutorials that follow continue with the same plan. When you are finished, you will have
Digital Imaging - Photoshop
 Digital Imaging - Photoshop A digital image is a computer representation of a photograph. It is composed of a grid of tiny squares called pixels (picture elements). Each pixel has a position on the grid
AutoCAD Tutorial First Level. 2D Fundamentals. Randy H. Shih SDC. Better Textbooks. Lower Prices.
 AutoCAD 2018 Tutorial First Level 2D Fundamentals Randy H. Shih SDC PUBLICATIONS Better Textbooks. Lower Prices. www.sdcpublications.com Powered by TCPDF (www.tcpdf.org) Visit the following websites to
Drawing with precision
 Drawing with precision Welcome to Corel DESIGNER, a comprehensive vector-based drawing application for creating technical graphics. Precision is essential in creating technical graphics. This tutorial
BERNINA Sewing Machine Workbook 3
 my BERNINA Sewing Machine Workbook 3 Creative Options For BERNINA 880, 7 Series, 580, 570 QE, 560 (Pages 8-12: B 790, 880 only; Pages 13-15: B 880 only) 2016 BERNINA of America. Permission granted to copy
COMPUTING CURRICULUM TOOLKIT
 COMPUTING CURRICULUM TOOLKIT Pong Tutorial Beginners Guide to Fusion 2.5 Learn the basics of Logic and Loops Use Graphics Library to add existing Objects to a game Add Scores and Lives to a game Use Collisions
Revit Structure 2014 Basics
 Revit Structure 2014 Basics Framing and Documentation Elise Moss Authorized Author SDC P U B L I C AT I O N S Better Textbooks. Lower Prices. www.sdcpublications.com Powered by TCPDF (www.tcpdf.org) Visit
The Magazine for Photographers November 2016
 The Magazine for Photographers The Magazine for Photographers CONTENTS NOVEMBER 4 Panning and Zooming in Lightroom 16 Photoshop Tool Presets 23 Step by Step: Pencil Shading Effect 32 Batch Renaming 46
with MultiMedia CD Randy H. Shih Jack Zecher SDC PUBLICATIONS Schroff Development Corporation
 with MultiMedia CD Randy H. Shih Jack Zecher SDC PUBLICATIONS Schroff Development Corporation WWW.SCHROFF.COM Lesson 1 Geometric Construction Basics AutoCAD LT 2002 Tutorial 1-1 1-2 AutoCAD LT 2002 Tutorial
Copyright Notice. Trademarks
 Copyright Notice All rights reserved. No part of this publication may be reproduced, stored in a retrieval system, or transmitted in any form or by any means, electronic, mechanical, photocopying, recording,
Managing images with NewZapp
 Managing images with NewZapp This guide is for anyone using the NewZapp Fixed editor as opposed to the Drag and Drop editor. The Image Manager is where images are uploaded and stored in your NewZapp account
Photoshop CS part 2. Workshop Objective. Getting Started Quit all open applications Single click Adobe Photoshop from the Dock
 pg. 1 Photoshop CS part 2 Photoshop is the premier digital photo editor application used for photo retouching, creating web images, film/video compositing, and other pixel/vector-based imagery. Workshop
Mod Zip Bag. Supplies. Visit bernina.com: Projects Webinars Promotions. Created by Susan Fears
 Mod Zip Bag Created by Susan Fears Create this fold-over zip clutch with your favorite shaped combinations. Create elements using built-in functions on the BERNINA 880 and with a bit of imagination, you
Artistic Software for the Quilter
 By Bunny Gates Looking for a pretty table runner but can t find one that matches your room? In that case, create your own! Start by choosing a floral fabric, scanning it and bringing an image of the fabric
SDC. AutoCAD LT 2007 Tutorial. Randy H. Shih. Schroff Development Corporation Oregon Institute of Technology
 AutoCAD LT 2007 Tutorial Randy H. Shih Oregon Institute of Technology SDC PUBLICATIONS Schroff Development Corporation www.schroff.com www.schroff-europe.com AutoCAD LT 2007 Tutorial 1-1 Lesson 1 Geometric
Floriani Total Quilter User s Guide
 Floriani Total Quilter User s Guide COPYRIGHT Copyright 2016 Pulse Microsystems, Inc. All rights reserved. This User s Guide and the Floriani Total Quilter software are copyrighted by the developer of
Lesson 4 Extrusions OBJECTIVES. Extrusions
 Lesson 4 Extrusions Figure 4.1 Clamp OBJECTIVES Create a feature using an Extruded protrusion Understand Setup and Environment settings Define and set a Material type Create and use Datum features Sketch
LESSON 02: GET STRONGER FOR PS USERS COMPANION BOOK. Digital Scrapbook Academy. February 2018: Lesson 02 Get Stronger for Photoshop Users
 Digital Scrapbook Academy February 2018: Lesson 02 LESSON 02: GET STRONGER FOR PS USERS COMPANION BOOK Page 1 of 19 Table of Contents Table of Contents 2 Welcome to Lesson 02 for Photoshop Users 4 1: Add
FRENCH LINEN KITCHEN TOWEL
 PROJECTS FRENCH LINEN KITCHEN TOWEL COPYRIGHT Copyright 2016. Wilcom Pty Ltd, Wilcom International Pty Ltd. All Rights reserved. No parts of this publication or the accompanying software may be copied