Splashback Installation Instructions
|
|
|
- Jonathan Tucker
- 5 years ago
- Views:
Transcription

1 Splashback Installation Instructions
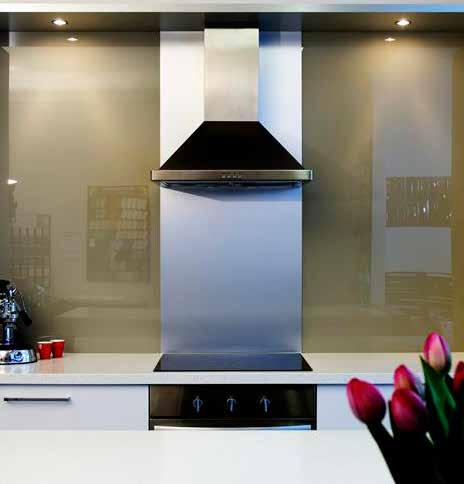
2 What is Akril? Akril is an Australian made environmentally friendly, highly engineered polymer, enhanced with colour. Quite simply, it offers a new source of design inspiration kitchen and sliding doors. Being half the weight of glass and 25 more impact resistant Akril is the logical alternative providing a safe environment for families knowing Akril will not shatter when hit with force. Induction Akril can be used directly behind induction cook tops at all times, reducing time and hassles associated with colour back glass. Electric Ceramic Cooktops Akril can be used directly behind electric and ceramic cook tops at all times when covered with cookware. An exposed cook top when turned on displaces far greater radiant heat than when covered which can potentially damage your splashback. Therefore Akril is only covered under warranty against normal wear and tear. (See Heat Tolerance section) to benchtop Akril Benchtop 50mm gap between cooktop and Akril to benchtop Gas Cooktops Akril is used behind gas cooktops when used in conjunction with a non combustible materials such as glass, tiles or stainless steel. Akril requires a minimum 150mm up stand behind the gas cooktop complying with Australian standards allowing Akril to run above the 150mm up stand giving a seamless finish. Alternatively stainless steel, glass or tiles can run all the way to the range hood. That s brilliant. Akril Benchtop 150mm up stand
3 Cutting Akril Down Akril is an Australian made environmentally friendly, highly engineered polymer, enhanced with colour. Quite simply, it offers a new source of design inspiration kitchen and sliding doors. Being half the weight of glass and 25 more impact resistant Akril is the logical alternative providing a safe environment for families knowing Akril will not shatter when hit with force. Circular Saw Always cut Akril on a flat secured surface. With quality equipment, an excellent edge finish can be achieved with Akril. The main factors in achieving the best possible outcome with a circular saw are: Panel rigidity. Clamp the sheet on both sides of the cut. Saw stability. Always use a good quality fence or guide to improve saw stability and straight-line cutting. Saw bearing quality. The price of a circular saw can be a good indication of the quality of the bearings used inside. Cheaper saws often use bushes that offer little to limit the blade s sideways float, and will begin to wear quickly. This will have a dramatic impact on cut quality. Blade selection. Always use a blade with the correct cutting geometry. Aluminum blades generally work well with Akril. Reduce the cutting depth to allow the blade to cut approximately 7mm through the Akril, preferably cutting into a sacrificial MDF board or similar. Circular Blade Geometry and Conditions Circular Blades for Akril. Akril is best cut using fine-tooth Aluminum circular blades with either a hollow ground geometry or a triple chip blade with the following geometry and conditions; Blade Diameter mm Number of Teeth Tooth Thickness 3-3.5mm Clearance Angle Cutting Angle (Rake) -5 Cutting Angle of Setting Band 2-3 Blade Speed rpm Surface Speed m/min Hole Saws Hole saws should be sharp, but the pilot drill blunt. It is recommended to drill the hole saw half way through, then turn the Akril over and finish the hole. This prevents the edge from blowing out. De-bur the edge with 100-grit sandpaper. Determine the position of the outlet on the panel and mark the centre. Now mark 20mm either side of the centre mark. Drill each hole with a 65mm hole saw. Cutting of Penetrations When measuring and marking for cut-outs around power outlet boxes etc, ensure enough clearance is given for the switch body and that the cover plates or bulkhead fittings will cover the finished cut-outs. Use an approved sealer to seal the edge and a 50mm perimeter of the painted side of any Cut Outs.
4 Heat tolerance Akril is classed as combustible material and must not be installed behind an open flame, cook tops or when the temperature exceeds 118 C. Akril Panel has been engineered with a higher heat resistance than standard Acrylic: Vicat Softening Point C Heat Distortion Point C Do not leave your hot plate unattended. Radiant heat will damage your Akril splashback. A cook top left unattended for greater than 10 minutes will cause damage to your splashback and therefore will not be covered under warranty. Akril is tested to withstand temperatures up to 100 deg for 10 minutes before failure. Splashbacks WET AREAS Akril is ideal for use as a wet area splashback. Most local bodies now require a waterproof barrier to the area immediately behind a splash zone (bathroom vanity, bath etc). In this area Akril is fully compliant with all council requirements. KITCHENS Akril makes an excellent splashback for areas behind bench tops. However, due to the differing specifications of cook tops and their ability to deflect large amounts of heat, Akril is not recommended for use as a splashback in the critical heat zone in areas immediately behind cook tops. In this application it is recommended to cut Akril to the edge of the appliance and within 200mm of the periphery of the nearest heating element. Akril is not recommended for use behind gas hobs or burners. It is recommended an non combustible material goes behind the cook top 150mm high or more complying to the appropriate Australian Standard. Akril can be used past the point of 150mm high from the bench top. Alternatively an non combustible material could be used all the way up. All installations must comply with ʻAS/NZS Gas installationsʼ.


5 What adhesive do I use? AKRIL ADHESIVE SYSTEM Akril recommend using the Bostik V60 neutral cure silicone. Only neutral cure silicones should be used, this will ensure there is no bleed through the painted finish. When used in wet areas they must be used according to instructions as detailed (see from page 25 onwards). Double-sided tape 20mm Apply approx. 6mm vertical adhesive bead 20mm appart 300mm 6mm adheasive bead 10mm appart across the width of cooktop = `COOKTOP l l hqlm Minimum 50mm gap between the front of spashback and edge of cooktop Silicon Join GENERAL SILICON SYSTEM Silicon jointing systems are acceptable for use in both wet and dry areas. In all instances standard glazing industry silicon jointing practices must be followed. Use only neutral cure silicon when joining Akril. Internal Corner External Corner Edge Cap (Supplied by Aluminum Supplier) Butt Join Internal Mitred Corner External Standoff Internal Standoff External Mitered External Butt Allow 3mm Expansion Gap Use a straight edge to press Akril Run silicone down the internal corner
6 Removing Protective Film Akril is supplied with protective film on both sides: Recycled Sticker:Akril is also supplied with a recycled sticker number 7, which should be left on the Akril for its recycled life after use. Painted Side: has a plastic film design for protection of the painted surface. Remove this film when all machining operations are complete and the panel is ready to be adhered to the wall/surface. Exposed Side: has a clear plastic film designed for protection against scratches. Remove the film completely at the very last stage by gently peeling down the sheet surface never peel at right angles to the sheet as this may pull the sheet away from the installed wall/ surface. Never attempt to cut the protective films with a knife as this may scratch the surface. Finishing the edge after cutting If the Akril edge is to be left exposed, it can be easily finished to a polished glass-like quality. A good finish left from the machining process will take considerably less time to finish. Always peel back the protective film 25mm from the edge while polishing. Remove any sanding dust between grades and polishing compounds immediately. HAND FINISHING 1. Use a 400-grit paper to remove any cutter marks from the machined edge and then progress to a 600-grit. 2. Chamfer any burrs or marks from the corners. 3. Using a soft, clean cloth and a suitable polishing compound (see page ), hand rub the edge to a polished finish. FLAME POLISHING A well-machined edge can be flame polished using a Hydrogen/ Oxygen mix. Contact an Acrylic fabricator for this service. An experienced operator can leave an excellent finish. Technical Support It is not practical to describe every possible application for Akril in this document. For Technical support please contact Akril on If the installer is required to fit any extra utilities to the Akril be sure to follow the steps in this document where machining is needed. This document is a guideline for installing Akril and will not wear any liability for waterproofing which should be installed to the current Australian Standard. For technical help please contact Akril on
Rev. 05/16 01 ACRYLIC INSTALLATION GUIDE
 Rev. 05/16 01 ACRYLIC INSTALLATION GUIDE Contents 1.0 Inspection 3 2.0 Storage 3 3.0 Handling 3 4.0 Planning & Preparation 3 5.0 Panels 4 6.0 Accessories 4 7.0 Tools & Fixings 4 8.0 Fitting Tips 5 9.0
Flexicryl Splashback Installation Guide Easy DIY Add a Pop of Colour!
 Flexicryl Splashback Installation Guide Easy DIY Add a Pop of Colour! Product Information - 4mm High Gloss Flexicryl Splashback Panels - Hard-co-extruded surface for hygienic clean sustaining daily use
Lustrolite Installation Guide
 Lustrolite Installation Guide EDITION 2 lustrolite.com Introduction Lustrolite is the superior high gloss acrylic panel featuring a high performance hard-coated surface. Ideal for heavy-duty vertical applications,
MANUFACTURE GUIDELINES
 PRE-INSTALLATION CHECKS Ensure cabinets are fitted correctly and level prior to installing the Evostone work surface. It is a condition of the Evostone 10 year limited warranty that before any fabrication
Wet Area Panelling. Linear Series
 Wet Area Panelling Linear Series LINEAR SERIES WET AREA Add a touch of class to your home or workplace with the Linear Series, WallART s line of wet area panelling. With a striking range of colours and
WET AREA PANELLING. Designer Walls. Fast
 WET AREA PANELLING Designer Walls. Fast AU/a5 WallART Brochure_ART BUNNINGS.qxp_Layout 1 7/6/18 10:16 am Page 3 LINEAR SERIES WET AREA PANELLING Add a touch of class to your SHEET COLOURS home or workplace
Splashbacks & Wall Panels in High Gloss, Satin Finish, any colour & Filler EFX
 08 8381 8880 www.ispsinnovations.com.au Splashbacks & Wall Panels in High Gloss, Satin Finish, any colour & Filler EFX Bonethane, available in any colour & EFX. A Polymer based product & coating formula,
Installation Guidelines For Quaker Window Products Aluminum flange fin sub sill & receptor system using a T mulled twin window unit.
 Installation Guidelines For Quaker Window Products Aluminum flange fin sub sill & receptor system using a T mulled twin window unit. Installer: Read these instructions completely before starting any installation.
EZYSTONE WORKSURFACES
 EZYSTONE WORKSURFACES Installation & Maintenance Instructions 1. Tools Required Worktop Edge Finishing Kit Pack 1-100mm Velcro Backing Pad Pack 2-100mm Diamond Dry Cut Velcro Discs (100 Grit Yellow) (200
Installation Guidelines For ALUMINUM M-SERIES 3 PANEL SLIDING DOOR
 www.quakerwindows.comv www.quakercommercialwindows.com PO Box 128 504 Highway 63 South Freeburg, MO 65035 800-347-0438 573-469-4151 (fax) Installation Guidelines For ALUMINUM M-SERIES 3 PANEL SLIDING DOOR
ALLORA SWING PANEL INSTALLATION INSTRUCTIONS
 ALLORA SWING PANEL INSTALLATION INSTRUCTIONS Before Installation Please check that your Allora Swing Panel is undamaged SEQUENCE OF INSTALLATION These instructions are also available from the Athena website:
Titan Installation Instructions
 Titan Installation Instructions Introduction: This manual was written to cover the fabrication and installation of sink bowls and tub and shower surrounds in residential and commercial applications. As
Installation Instructions
 Please read all instructions before installing products. STORAGE: Keep crates in the upright position. When unpacking, store panels flat in a clean dry place. BEFORE INSTALLATION: Check for damage that
PRODUCT: LOKI INSTALLATION INSTRUCTIONS. Product is covered by U.S. patents. For more information visit
 R INSTALLATION INSTRUCTIONS PRODUCT: LOKI CONFIGURATION: SINGLE DOOR MOUNT: GLASS MOUNT Product is covered by U.S. patents. For more information visit www.krownlab.com . TOOLS + MATERIALS REQUIRED TOOLS
DURACRYL WALL INDEX INTRODUCTION TOOLS AND MATERIALS REQUIRED FLAT SHOWER WALL SIDE CONTOUR SHOWER WALL CORNER CONTOUR SHOWER WALL FLAT BATH WALL
 DURACRYL WALL FLAT SHOWER WALL SIDE CONTOUR SHOWER WALL CORNER CONTOUR SHOWER WALL FLAT BATH WALL INSTALLATION GUIDE INDEX PAGES Introduction 1 Tools and materials 1 Construction requirements - timber
Before you Begin... 3 Storage and preparation... 3 Tools & Materials You may Need... 4
 Installation Guide Installation Guide Contents INTRODUCTION... 2 Before you Begin... 3 Storage and preparation... 3 Tools & Materials You may Need... 4 Adhering your Think Solid benchtop to your cabinets
Reynobond GRANDEZZA Interior aluminium composite panels Fabrication and installation guidelines
 GUIDELINES FOR REYNOBOND GRANDEZZA INTERIOR adpephoto Fotolia.com Laminex Reynobond GRANDEZZA Interior aluminium composite panels Fabrication and installation guidelines oliver-marc steffen Fotolia.com
Installation Instructions Palladium Square Edge Panels
 Please read all instructions before installing wall panels Important 1. Before installation: a. Acclimate Palladium Panels, Trim, adhesives and wall substrates to room temperature 24 hours before installation.
INSTALLATION GUIDE ECONOMICAL PVC CLADDING SHEET IDEAL FOR WALLS & CEILINGS 10 YEAR GUARANTEE
 INSTALLATION GUIDE ECONOMICAL CLADDING SHEET IDEAL FOR WALLS & CEILINGS 10 YEAR GUARANTEE Ariel Cladding Sheet offers a range of lightweight and hardwearing solid and foam panels in matt, gloss or satin
Storing, Handling, and Cleaning dekō Markerboards Storing Markerboards. Handling. Cleaning
 Storing, Handling, and Cleaning dekō Markerboards Storing Markerboards dekō markerboards must be stored inside, and stacked horizontally to avoid bowing. Do not store or transport dekō markerboards outdoors
Curium 19.4H Installation Instructions & Parts List
 Curium 19.4H Installation Instructions & Parts List Illustration Curium 19.4H Right Hand Page 1 of 21 30/06/2016 Revision 1.0 IMPORTANT This shower screen / enclosure must be installed by suitably qualified
How-to-Install. Laminate Countertops and Sheet Laminate. FREE brochure Reverso en español
 FREE brochure Reverso en español How-to-Install Laminate Countertops and Easy to install instructions provided inside Multiple colors available for unique design options Durable and easy to care for Accessory
Tools required by installer: Materials required by installer:
 Installation Guidelines For Quaker Window Products Vinyl product line (Single Hung, Double Hung, Sliding Window, Fixed Window, Casement, Awning, and Hopper) Installer: Read these instructions completely
ColorCore Laminate: Fabrication
 ColorCore Laminate: Fabrication Formica ColorCore is a high quality surfacing material. Most of the conventional tools, machines and methods used in the fabrication of normal laminates apply, but some
PolyCarb has good resistance to many chemicals. Some chemicals may harm the PolyCarb sheets. Contact us when in doubt about any chemical.
 Polycarbonate Panels This manual provides the basic information for working with and installing PolyCarb sheets. Due to their hollow core, prior preparation is needed before the actual installation, with
Dubnium 11 Installation Instructions & Parts List
 Dubnium 11 Installation Instructions & Parts List Illustration Dubnium, H1 Handle Right Hand: Open Out Page 1 of 25 IMPORTANT This shower screen / enclosure must be installed by suitably qualified individuals.
DURACRYL WALL INDEX INTRODUCTION. TOOLS AND MATERIALS REQUIRED. FLAT SHOWER WALL SIDE CONTOUR SHOWER WALL CORNER CONTOUR SHOWER WALL FLAT BATH WALL
 DURACRYL WALL FLAT SHOWER WALL SIDE CONTOUR SHOWER WALL CORNER CONTOUR SHOWER WALL FLAT BATH WALL INSTALLATION GUIDE INDEX PAGES Introduction 1 Tools and materials 1-2 Construction requirements - timber
Tape Measure Metal Clippers Screw Bit Set With Extensions
 IMPORTANT: Read through instructions thoroughly before beginning to replace any damaged material. Minor damage can be fixed with a fiberglass repair kit and color matched paint. Tools Required Tape Measure
Radon 07 Installation Instructions & Parts List
 Radon 07 Installation Instructions & Parts List Illustration Radon 07, H1 Handle Right Hand: Open Out 14/06/2016 Revision 1.1 Page 1 of 21 IMPORTANT This shower screen / enclosure must be installed by
Nanton Grain Mill Assembly
 ( 1 ) Nanton Grain Mill Assembly Locate package for assembling storage building. These are cut from 1/8 masonite. Inspect and lightly sand edges where it will be bonded. Use white glue or CA glue to bond.
Installation Guide. Pionite Decorative Surfaces One Pionite Road, Auburn, Maine PIONITE ( )
") Installation Guide A Subsidiary of Panolam Surface Systems SMPBRO00-012 6/14 Pionite decorative laminates are designed for finished interior surfaces which require high impact, wear and stain resistance
Installation Guide A Subsidiary of Panolam Surface Systems SMPBRO00-012 6/14 Pionite decorative laminates are designed for finished interior surfaces which require high impact, wear and stain resistance
Aluminum Clad Wood Window Field Mulling and Stacking Instructions
 Aluminum Clad Wood Window Field Mulling and Stacking Instructions Mulling Stacking Mulling and Stacking IMPORTANT: Please read before you begin. TABLE OF CONTENTS AND TOOL / MATERIAL REQUIREMENTS START
INSTALLATION INSTRUCTIONS. GetaCore Kitchen Worktops
 INSTALLATION INSTRUCTIONS GetaCore Kitchen Worktops INSTALLATION INSTRUCTIONS GetaCore Kitchen Worktops SAWING MILLING Before being cut, the solid surface material parts to be joined should be checked
Curium 19H Installation Instructions & Parts List
 Curium 19H Installation Instructions & Parts List Illustration Curium 19H Right Hand Page 1 of 15 01/07/2016 Revision 2.1 IMPORTANT This shower screen / enclosure must be installed by suitably qualified
Thank you for your order
 Installation Guide Thank you for your order Ph: 09-9133110 Fax: 09-9133113 5 Smales Road. East Tamaki, Manukau PO Box 58031 Greenmount, Manukau 2013 AUCKLAND // WELLINGTON // CHRISTCHURCH www.bathroomdirect.co.nz
Guidelines for working with
 Guidelines for working with 1. Sawing Circular Saws When using circular saws, only the circular saw blades that are not set are suitable for cutting PARAPAN. Hardened metal saw blades that have the greatest
Installation Guidelines for all Quaker products with nail fins New Construction nail fin installation with a Zip sheathing system.
 www.quakerwindows.com www.quakercommercialwindows.com PO Box 128 504 Highway 63 South Freeburg, MO 65035 800-347-0438 573-469-4151 (fax) Installation Guidelines for all Quaker products with nail fins New
VIEWpanel Technical Manual
 VIEWpanel Technical Manual VIEWpanel is a prefabricated panel comprising 0.21 aluminium skin (1100 alloy) both sides, apart from our lite grade, which is 0.12 aluminium skin both sides and a polyethylene
Wave Profile Installation Guide
 Wave Profile Installation Guide American Pa o Covers Plus Proudly Builds With Tools & Hardware Wave Profile Installation Guide Tape Measure Square Level Felt tipped Marker and/or grease pencil 3/8" Nut
Brick, blockwork and concrete walls are also suitable providing the surfaces are flush without excessively wide mortar joints.
 Data Sheet: (sheet 1 of 8) August 2016 1. Substrate suitability and recommended preparation All material must be installed in environmentally controlled conditions. Allow the SureProtect Pure PVC-u sheet
Installation Instructions
 www.marlite.com Effective Date 03/01/2018 ARTIZAN FRP, SYMMETRIX FRP, ENVUE FRP, STANDARD FRP Installation Instructions Statements expressed in this technical bulletin are recommendations for the application
Installation Instructions
 Aspex Digitally Printed Wall Art PL PREMIUM HEAVY DUTY ADHESIVE ASPEX WALL ART DOUBLE SIDED FOAM TAPE Installation of Aspex Digitally Printed Wall Art with Foam Tape and PL Premium Adhesive. Maximum size
September 10, 2009 Page 1 PRODUCT DESCRIPTION PRODUCT FEATURES
 September 10, 2009 Page 1 PRODUCT FEATURES BASIC USES/RELATED USES Interior decorative tile. Architectural tile for decorative wall surfaces, backsplashes and other applications. Custom architectural and
PL-91. Frameless Door with Panel. 202 Anderson Ave., Belvue, KS Phone: Fax:
 202 Anderson Ave., Belvue, KS 66407 Phone: 800-669-9867 Fax: 800-393-6699 www.onyxcollection.com 800-643-1514 www.alumaxshowerdoor.com PL-91 Frameless Door with Panel Full Showers Bench Seat Showers PL91-0318
P F E
 Pyroex Splashbacks Bench Top City Pty Ltd 46 Kitchen Road Dandenong South Vic 3175 P 0397933918 F 0397947032 E sales@benchtopcity.com.au W www.benchtopcity.com.au Duropal Pyroex Splashbacks Duropal Pyroex
INSTALLATION. GlUElEss CliCK BamBoo installation GUidE. Introduction. Tips for a successful installation
 GlUElEss CliCK BamBoo installation GUidE Introduction Thank you for purchasing a Yanchi Bamboo Floor! Our flooring combines superior technology and the highest quality materials available so that your
Installation Guide 1
 1 2 Contents Before you begin Storage & preparation Tools & materials you may need Getting started Sink & cooktop cut-outs Cabinet Joins for 20mm benchtops Joining & installation of 20mm benchtops Joining
Extruded sheet (FF) #3 Other Methods of Cutting. Technical information. This brief gives advice for:
 #3 Other Methods of Cutting. Technical information. This brief gives advice for:") Technical information Extruded sheet (FF) WARNING: This product can expose you to chemicals including Ethyl acrylate, CAS 140-88-5, which are known to the State of California to cause cancer. For more
Technical information Extruded sheet (FF) WARNING: This product can expose you to chemicals including Ethyl acrylate, CAS 140-88-5, which are known to the State of California to cause cancer. For more
Aluminum Clad Wood Window 1/2 Reinforced Field Mulling and Stacking Supplement
 Aluminum Clad Wood Window 1/2 Reinforced Field Mulling and Stacking Supplement 1 Aluminum Clad Wood Window 1/2 Reinforced Field Mulling and Stacking Supplement The following instructions are a supplement
Allora ALCOVE ENCLOSURE INSTALLATION BEFORE INSTALLATION CHECK THAT YOUR ALLORA SHOWER ENCLOSURE SYSTEM IS UNDAMAGED
 Allora ALCOVE ENCLOSURE INSTALLATION BEFORE INSTALLATION CHECK THAT YOUR ALLORA SHOWER ENCLOSURE SYSTEM IS UNDAMAGED ALCOVE SHOWER Your shower can be installed to open Left hand or Right hand by rotating
INSTALLATION INSTRUCTIONS FRAMELESS CONTINUOUS HINGE SHOWER ENCLOSURE QCI5233
 INSTALLATION INSTRUCTIONS FRAMELESS CONTINUOUS HINGE SHOWER ENCLOSURE QCI5233 QCI5233 Rev 0 Page 1 Certified 06/20/2016 INSTALLATION NOTES: Unpack your unit carefully and inspect for freight damage. Lay
Contents. pages 20-24: Installing Edge sinks into. custom laminate countertops page 8: Installing Edge sinks into postform laminate countertops
 Contents pages 2-8: Installing Edge sinks into custom laminate countertops page 8: Installing Edge sinks into postform laminate countertops pages 9-14: Installing Acrylic sinks into custom laminate countertops
REDEFINING SPLASHBACKS
 AluSplash User & Installation Manual REDEFINING SPLASHBACKS 1 Winding Drive Suite 100 Philadelphia PA 19131 855-634-2830 vitali@megasupplystore.com Important Information 01 Product Characteristics 1.
Vanity Installation Instructions
 Vanity Installation Instructions Segments of these instructions will relate to your vanity. Please read these instructions thoroughly and ensure the appropriate instructions are used during the installation
Panel Installation Instructions
 EXTREMELY IMPORTANT INFORMATION PLEASE READ ENTIRE PACKET! Warranty Is Void If Panels Not Installed According to Instructions 1. WARNINGS & SPECIAL NOTES 1.1 Keep panels 24 from Heaters and shield Radiant
675 Quick N Stall Neo Angle Framed Hinge Shower Enclosure
 INSTALLATION INSTRUCTIONS 675 Quick N Stall Neo Angle Framed Hinge Shower Enclosure Call Technical Dept @ 1-800-452-2726 QCI1003 Page 1 of 9 Certified 10/01/09 INSTALLATION NOTES: Unpack your unit carefully
ANCHOR PLATE ATTACHMENT STEEL STUD FRAMING OR FURRING CONSTRUCTION WITH ACCESS FROM PANEL SIDE ONLY
 ANCHOR PLATE ATTACHMENT STEEL STUD FRAMING OR FURRING CONSTRUCTION WITH ACCESS FROM PANEL SIDE ONLY INSTALLATION MATERIALS No. 8 Phillips Head Tek Screws Glazier's horseshoe shaped shims 1/16 inch, 1/8
Make every component count.
 Make every component count. Technical Bulletin Installation Instructions ABOUT THE MATERIAL The frame and material have been thoroughly tested for strength, durability and low maintenance, offering a never
QUARTZ FABRICATION MANUAL
 QUARTZ FABRICATION MANUAL Quartz Fabrication Manual Rev. 1 Page 1 of 26 TABLE OF CONTENTS Product Description. 3 Slab Inspection.. 4 Fabrication Equipment.. 6 FABRICATION TIPS Cutting The Slab. 7 General
Heavy Glass Frameless Shower Door With Return Panel
 202 Anderson Ave., Belvue, KS 66407 Phone: 800-669-9867 Fax: 800-393-6699 www.onyxcollection.com Heavy Glass Frameless Shower Door With Return Panel Full Showers with Return PL92-0118 R S K Parts List
300C6 CONTINUOUS HINGE SEMI-FRAMELESS DOOR KIT
 300C6 CONTINUOUS HINGE SEMI-FRAMELESS DOOR KIT LIMITED WARRANTY AND REMEDY Alumax Bath Enclosures warrants to its dealers, customers, and all subsequent purchasers and users, that the products supplied
Liniar Window. installation guide
 Liniar Window installation guide This installation guide is designed to show you the best way to fit Liniar windows, and covers all styles of window made from Liniar s lead-free 70mm PVCu profile. Not
multipanel Installation (panels) CONTENTS
 CONTENTS") multipanel Installation (panels) The following is an installation guide for fitting multipanel to walls, tiles, plaster, chipboard or concrete. A separate guide is available for fitting multipanel shower
multipanel Installation (panels) The following is an installation guide for fitting multipanel to walls, tiles, plaster, chipboard or concrete. A separate guide is available for fitting multipanel shower
Installation Instructions Palladium Wall Panels - Demountable Factory Finished Edges and Field Cut Edges
 Please read all instructions before installing Palladium Wall Panel System. 1. Before installation: a. Acclimate Palladium Panels, reveals, adhesives and wall substrates to room temperature 24 hours before
Argon 02 Installation Instructions & Parts List
 Argon 02 Installation Instructions & Parts List Illustration Argon, H1 Handle Right Hand: Open Out 16/06/2016 Revision 1.1 Page 1 of 10 IMPORTANT This shower screen / enclosure must be installed by suitably
INSTALLATION GUIDE VERSION 11/14
 INSTALLATION GUIDE VERSION 11/14 In this guide we will demonstrate effective techniques and methods for installing EDGE stainless steel sinks seamlessly in both laminate and solid surface. These techniques
CONTENTS OVERVIEW. For a complete set of CAD drawing details, please visit LaminatorsInc.com. 1 Essential Equipment. 1 Essential Supplies
 LaminatorsInc.com CONTENTS 1 Essential Equipment 1 Essential Supplies 2 Panel Preparation 4 Panel Extrusion Preparation 5 Panel Assembly 6 Wall Sheathing Preparation (Over Plywood) 6 Wall Sheathing Preparation
Wall Panel Installation
 Wall Panel Installation Special care must be taken in handling of panels with grout lines, especially in cold weather. The indented grout lines are by necessity a little thinner than other areas of the
Frameless Inline Door With Return QCI5263
 INSTALLATION INSTRUCTIONS Frameless Inline Door With Return QCI5263 WALL MOUNT HINGES FRAMELESS DOOR / PANEL / RETURN PANEL QCI5263 REV. 0 Page 1 Certified 06/17/2016 Parts List with wall mount hinges
solid surfaces for every room Mirostone fabrication and installation guidelines solid surface February 2018
 solid surfaces for every room fabrication and installation guidelines February 2018 solid surface fabrication and installation guidelines It is a condition of the limited warranty that the following supplementary
PRODUCT: BALDUR + ODEN
 R INSTALLATION INSTRUCTIONS PRODUCT: BALDUR + ODEN CONFIGURATION: SINGLE DOOR MOUNT: GLASS MOUNT Product is covered by U.S. patents. For more information visit www.krownlab.com . TOOLS + MATERIALS REQUIRED
QUARTZ. Design guide
 QUARTZ Design guide contents 3 introduction 4 benchtop support 5 span and overhang support 6 cabinet requirements 7 exposed edge profiles 8 build down edges 9 internal corners and joins 10 design considerations
COMPOSITE SIDING INSTALLATION GUIDE
 CENTURY HOME LIVING COMPOSITE SIDING INSTALLATION GUIDE Read all instructions prior to installing any siding product. Failure to install and finish this product in accordance with all local building codes,
Cleaning Procedure INTRODUCTION:
 Cleaning Procedure INTRODUCTION: Many elements can contaminate the surface of a vehicle s paint film, such as waxes, grease, polishes, road film, tar and general dirt. Pre-cleaning to remove any existing
All aspects of the installation of maia are also covered in a DVD that is available to view on-line at
 41405015530 41405015730 41405016130 41405015930 41405015520 41405015720 41405016120 41405015920 41405016520 41405016530 B All aspects of the installation of maia are also covered in a DVD that is available
Installation Instructions Stainless Steel Wall Panels
 Please read all instructions before installing wall panels. Always plan before you place! 1. Before installation: a. Acclimate Stain Steel Panels, Trim, adhesives and wall substrates to room temperature
FIXED PANEL SLIDER QCI5241
 INSTALLATION INSTRUCTIONS FIXED PANEL SLIDER QCI5241 FRAMELESS PANEL / DOOR / PANEL FRAMELESS DOOR / PANEL QCI5241 REV. 0 Page 1 Certified 06/16/2016 Parts List *Quantities may vary QCI5241 REV. 0 Page
2. Sanding the Modules Sand the entire surface of each cyc module with 60-grit sandpaper. This will provide for better paint adhesion.
 ASSEMBLY INSTRUCTIONS SYSTEM 4 BI (Built-In) Congratulations on your decision to use the world s most advanced and user-friendly cyclorama system. We have taken a great deal of care to create and ship
Gallium 03 Installation Instructions & Parts List
 Gallium 03 Installation Instructions & Parts List Illustration Gallium 03, H1 Handle Left Hand: Open Out 04/05/2016 Revision 1.1 Page 1 of 19 IMPORTANT This shower screen / enclosure must be installed
Installing 3M DI-NOC Architectural Finishes on Doors
 Installation Guide Revision C, September 2017 Introduction The purpose of this installation guide is to establish a 3M-recommended procedure for installing 3M DI-NOC Architectural Finishes (the Product
INSTALLATION INSTRUCTIONS FRAMELESS CONTINUOUS HINGE SHOWER ENCLOSURE QCI5232
 INSTALLATION INSTRUCTIONS FRAMELESS CONTINUOUS HINGE SHOWER ENCLOSURE QCI5232 QCI5232 Rev 0 Page 1 Certified 06/20/2016 INSTALLATION NOTES: Unpack your unit carefully and inspect for freight damage. Lay
GOLDEN RULES FOR EASIFIX INSTALLATION
 GOLDEN RULES FOR EASIFIX INSTALLATION Golden rules - essential guidelines that need to be considered prior to preparation of the opening and before beginning installation of glass blocks. Glass block walls
Vanity Installation Instructions
 Vanity Installation Instructions Segments of these instructions will relate to your vanity. Please read these instructions thoroughly and ensure the appropriate instructions are used during the installation
KITCHEN INSTALLATION GUIDE
 KITCHEN INSTALLATION GUIDE The step-by-step guide to installing your new kitchen right The materials and tools you ll need This brochure is your guide to preparing and installing your new kitchen. Inside
Framework joints FABRICATION - WOOD JOINTS. Corner joints. Tee joints. Worksheet 15a. Cable Educational Ltd
 FABRICATION - WOOD JOINTS The word: fabricate means to join together. Most wooden products are held together with adhesive. Adhesive works very well when the edge of a piece of wood is being glued to the
Makrolon Solid Polycarbonate Sheets
 1. General remarks Tools sheets can be machined using the standard tools commonly used for metal and woodworking. We recommend carbide-tipped tools. Above all, it is important to use sharp cutting tools
splashback product guide choose your splashback solution
 splashback product guide choose your splashback solution With your cabinets, hardware, accessories, doors, panels and benchtops installed, it s time to apply the finishing touches to your kitchen. This
KITCHEN INSTALLATION GUIDE
 KITCHEN INSTALLATION GUIDE The step-by-step guide to installing your new kitchen right This brochure is your guide to preparing and installing your new kitchen. Inside you ll find tips and ideas, clear
Solid Laminate Worktops Installation and Aftercare Instructions
 Solid Laminate Worktops Installation and Aftercare Instructions Introduction: Their solid composition makes solid laminate, also called compact laminate, worktops easy to install and maintain. A solid
Abrasive Machining Processes. N. Sinha, Mechanical Engineering Department, IIT Kanpur
 Abrasive Machining Processes N. Sinha, Mechanical Engineering Department, IIT Kanpur Introduction Abrasive machining involves material removal by the action of hard, abrasive particles. The use of abrasives
Frameless Inline Door QCI5254
 INSTALLATION INSTRUCTIONS Frameless Inline Door QCI5254 FRAMELESS DOOR / PANEL QCI5254 REV. 0 Page 1 Cer fied 06/16/2016 Parts List with wall mount hinges *Quanes may vary QCI5254 REV. 0 Page 2 Cer fied
2. Sanding the Modules Sand the entire surface of each cyc module with 60-grit sandpaper. This will provide for better paint adhesion.
 ASSEMBLY INSTRUCTIONS SYSTEM SUPER 2.5 EZ Congratulations on your decision to use the world s most advanced and user-friendly cyclorama system. We have taken a great deal of care to create and ship your
IMPORTANT READ ALL INSTRUCTIONS CAREFULLY BEFORE STARTING THE INSTALLATION
 SAPPHIRE ALCOVE SHOWER INSTALLATION GUIDE IMPORTANT READ ALL INSTRUCTIONS CAREFULLY BEFORE STARTING THE INSTALLATION SHOWER WALL TOP RAIL DOOR RETAINER DOOR RETAINER DOOR ASSEMBLY DOOR SILL SHOWER TRAY
FRAMED PANEL / DOOR / PANEL CONTINUOUS HINGE SHOWER ENCLOSURE INSTALLATION INSTRUCTIONS
 FRAMED / DOOR / CONTINUOUS HINGE SHOWER ENCLOSURE INSTALLATION INSTRUCTIONS QCI5229 Rev 0 6 INSTALLATION NOTES: Unpack your unit carefully and inspect for freight damage. Lay out and identify all parts
INSTALLATION INSTRUCTIONS for PYROCLASSIC FIRES LTD. 100mm SLOPING CEILING FLUE KIT
 INSTALLATION INSTRUCTIONS for PYROCLASSIC FIRES LTD 100mm SLOPING CEILING FLUE KIT THIS FLUE KIT HAS BEEN MANUFACTURED IN ACCORDANCE WITH AS/NZS 2918:2001 AND TESTED TO APPENDIX F WARNING: TO ENSURE SAFETY
Platinum Swing Panel Installation Instructions
 Platinum Swing Panel Installation Instructions The Standard Platinum Swing Panel is designed to fit baths with a perimeter lip no taller than 20mm. If installing onto baths without a perimeter lip an optional
Installation Instructions with 90 Degree Return Panel -- Model E-DP9. Model Semi-Frameless Door & Panel
 6//5 Model Semi-Frameless Door & Panel Installation Instructions with 90 Degree Return Panel -- Model E-DP9 IF YOU NEED REPLACEMENT PARTS OR HAVE INSTALLATION QUESTIONS, PLEASE CALL OUR CUSTOMER SERVICE
Installation Guide. brighter. lighter.
 Installation Guide brighter. lighter. storing and handling dekō markerboards Protective Film The face of each dekō markerboard is protected by high quality polyethylene film. The protective film is left
Installing your new Bevella Top. L Shaped Countertop with Joints No Finished Ends (Fits Between Four Walls)
") Installing your new Bevella Top L Shaped Countertop with Joints No Finished Ends (Fits Between Four Walls) Bevella RTI Countertops are engineered and manufactured to the highest quality standards, built
Installing your new Bevella Top L Shaped Countertop with Joints No Finished Ends (Fits Between Four Walls) Bevella RTI Countertops are engineered and manufactured to the highest quality standards, built
Cardo DOOR & RETURN SHOWER ENCLOSURE INSTALLATION PLEASE READ THESE INSTRUCTIONS CAREFULLY.
 Cardo DOOR & RETURN SHOWER ENCLOSURE INSTALLATION PLEASE READ THESE INSTRUCTIONS CAREFULLY. IT IS RECOMMENDED TO USE A TRAINED SHOWER INSTALLER FOR THIS SHOWER TO OBTAIN THE BEST INSTALLATION. D Square