Fence System Components
|
|
|
- Arthur Edwards
- 5 years ago
- Views:
Transcription
1

2 Fence System Components Line Post Interior Flat Exterior Flat Gothic Caps Section Top Rail Picket Exterior Ball New England Bottom Rail Corner Post End/Gate Post Gate 3/4" ON EACH SIDE ADJUSTABLE NYLON HINGE END/GATE POST LOCK LATCH OPPOSITE GATE DIAGONAL BRACE DROP PIN 1
3 Tools and Materials Getting Started Site plans and permits Measuring tape Hammer Wooden stakes String line Spray paint for hole centers for post and gate spacing Wooden spacer bar for post and gate spacing Assembling Fence/Gates Drop cloth Hacksaw, circular saw or chop saw with masonry blade Square Phillips #2 screwdriver Drill and drill bits - 1/8" for #8 screws - 1/4" for bullet clips and drain holes - 3/8" for lock rings 1/2" deep socket (or nut driver) for traditional picket Digging Holes Post hole digging tools - Shovel - Post hole digger - 10" auger for 4x4 posts - 12" auger for 5x5 posts Installing Post Wheelbarrow Concrete mixing tools Short length of wood, 2x4 for tamping concrete Garden hose Level Template kit with router Spiral saw Installing Bottom Rail Leveling blocks Shim stock Duct tape to seal rail ends Installing Gate(s) Wrench - 7/16" for hinge nuts Flat screwdriver to activate hinge spring Filling Post with Concrete Rubber mallet to tamp post Funnel for filling post Ladder for high fences Cleaning Up Scotch Brite-type pad Bucket and sponge Additional Tools - Installing on Wood 2" hole saw 1/2" drill bit 3/4" wrench Additional Tools - Installing on Concrete 1/2" masonry drill Core drill Additional Tools - Wall Mount Brackets 1/4" masonry drill for brick 1/4" drill bit for wood pillar Additional Tools - EZ Set Brackets 7/16" wrench 2
4 General Information (Be sure to call underground prior to digging) Concrete Requirements All posts require concrete to be poured around the post base. All hinge, latch and end posts require concrete to fill the post inside, enough to cover the rebar and gate hardware (or insertion of the aluminum gate post stiffener). Concrete must be mixed prior to pouring in hole. Concrete Usage for Posts Post Size 4x4 4x4 5x5 5x5 5x5 5x5 5x5 Fence Height 3' 4' 5' 6' 2 rail 3 rail 4 rail Solidify Posts Line or Corner Posts 100 lbs 100 lbs 140 lbs 140 lbs 140 lbs 140 lbs 140 lbs End Posts 145 lbs 155 lbs 235 lbs 240 lbs 210 lbs 230 lbs 250 lbs Gate hinge and latch posts as well as end posts can be solidified by using an aluminum gate post stiffener inside each post or by filling post with concrete and rebar. Hinge and latch posts require 2 pieces of 1/2" rebar installed in opposing corners of the post. Length to extend from bottom of hole to 12" from top of post. End posts require 2 pieces of 1/2" rebar installed in opposing corners of the post. Length to extend from bottom of hole to halfway up post. Rebar Separator Clips (for use with rebar and concrete method) Use 2 clips for each post. Position clips on the rebar 6" down from top and 6" up from bottom. Clips are located in socket gate hardware box. Alternative Fence Installations For fence systems on concrete, use steel posts. On concrete applications fence may be installed with 1-5/8" (4x4 post) or 2" (5x5 post) galvanized steel post set in hydraulic cement. EZ Set bracket bolts to post as a spacer. For wall mounting, use wall mount brackets. Gate Posts 160 lbs 175 lbs 270 lbs 285 lbs 240 lbs 260 lbs 280 lbs Note: Determine total pounds of concrete required based on number of posts required. Divide by 60 or 80 lb. bag. Figures based on 4x4 hole=10", 5x5 hole=12", both 30" deep. EZ Set Bracket Installation Instructions on Concrete Core drill hole VINYL POST into concrete EZ SET BRACKET Minimum 4" deep Post centers will remain the same as normal installation Rails will have to be cut down to fit between steel post Fill hole with hydraulic cement. Insert steel post For 4" vinyl post set 1 5/8" OD steel post For 5" vinyl post set 2" OD steel post STEEL POST Steel post should go at least halfway up the vinyl post Put EZ Set brackets together and slide over steel post Place one steel bracket on steel post below where the routed hole will be on your vinyl post Place other bracket just below the top of your steel post Slide vinyl post over steel post with EZ Set brackets Care of the Product Place vinyl fence components on a non-abrasive surface, such as a drop cloth, to avoid scratching Protect components during transportation to your installation site to avoid damage Avoid excessive force when assembling components Avoid overtightening screws Clean vinyl fence with mild detergent and a plastic scouring pad such as Scotch-Brite. For more stubborn stains, use a cleanser such as Soft-Scrub or cleaning solution listed on warranty Concrete is easily washed off when wet, but can also be removed when dry Avoid soupy concrete mix as it will make concrete weak Gates CONCRETE VINYL POST STEEL POST WITH EZ SET BRACKETS CONCRETE Specific gate hardware instructions included with individual components Gate(s) must be assembled prior to fence to accurately establish space between hinge and latch posts and height of fence Use extreme care when applying PVC cement as it dries quickly Gate requires 2" clearance under bottom rail on level ground When building gates in the field, ensure that 1/4" drain holes are drilled in bottom rail Diagonal gate bracing should always run from latch down to bottom hinge Determine gate swing direction to assist in ground clearance and positioning Steel channel not required in bottom rail of gate 3
5 Traditional Picket Fence 4 1. Getting Started Be sure to call underground prior to digging Assemble gates (if necessary) and decide where they will be located Stake out the fence line Space and mark post hole locations for gate and sections (spacer bar/template may be useful) Start at gate end post and work outward to determine proper fence height relative to ground 2. Dig Holes Dig holes 30" deep or to frost line - hole size for 5 x 5 posts = 12" - hole size for 4 x 4 posts = 10" Clean holes and check for straight walls 3. Install First Post Insert post in hole Determine rough height Fill hole around post with concrete mix (sand, gravel and cement) approximately 2" below grade Tamp concrete in hole to eliminate air pockets Level and square post 4. Install Bottom Rail Tape the ends of any rail being inserted into a post that is to be filled with concrete to prevent concrete seepage Insert rail into post Note: Pickets will attach to rail on the side with the small (1/4") holes Rail ends have been crimped to hold inside posts 5. Install Second Post Insert second post in hole Insert bottom rail in post Insert block under bottom rail to position at correct fence height Fill hole around second post with concrete mix Tamp, level and square fence Assembly may be continued by installing all bottom rails first, or one section at a time 6. Support and Secure Level and square fence To lower a post, place a wood block from corner to corner on the post and carefully tap with a mallet Never strike the PVC post without a wood support 7. Install Pickets and Rails Insert top rail in post Rail ends have been crimped to hold inside posts 8. Install Pickets For field assembly, insert hex washer head screw through large (3/4") pre-drilled hole in top rail Align pre-drilled hole in picket, tighten with 1/2" deep socket wrench or nut driver with clutchdrill (do not overtighten) Repeat for bottom rail Insert (3/4") hole plug into hole in back side of rail 9. Secure Rails Square pickets and rails Check for even picket spacing on each end of rail Top rail may be secured inside post with a #8 x 3/4" screw on each end 10. Hang Gate/Install Hardware For complete details, see gate installation instructions in hardware box Position gate between posts Allow 1" gap for hinge and 3/4" for latch and gate swing Block up gate to square with fence; rails should be level Gate hardware must be mounted to two sides of the post 11. Solidify Gate Posts It is critical that gate hinge and latch posts are solid to ensure proper gate functionality. Two methods are available: A. Concrete and rebar - Use two pieces of 1/2" rebar in each hinge, latch and end post - Rebar should extend from the bottom of the hole to 12" from the top of the post - Hold rebar in opposite corners of post with rebar separator clips - Fill post with concrete mix to cover rebar and hardware fasteners - Tamp post with a rubber mallet to eliminate air pockets - Leave gate on blocks for 72 hours to allow concrete to set B. Aluminum gate post stiffener - Slide aluminum gate stiffener inside hinge, latch or end posts with open end facing routed hole - Drive a screw through the vinyl into the aluminum stiffener at the bottom of the post to hold in place - Insert post into ground - Fill hole with concrete around outside of post 12. Install Caps Install post caps Caps may be secured with glue, silicone adhesive or #8 x 3/4" screws, caps and washers
6 Traditional Picket Fence Includes: Cape Cod, Charleston, Providence, Yorkshire LOCK TOP RAIL IN POST WITH #8 X 3/4" SCREW ATTACH TRADITIONAL PICKETS TO RAILS WITH 5/16" X 3/4" HEX WASHER HEAD SCREWS. TIGHTEN WITH 1/2" NUT DRIVER. INSERT PLUG-IN RAIL ALLOW 1" FOR HINGE AND 3/4" FOR LATCH SYSTEM DIG HOLES 30" DEEP OR TO FROST LINE 4 x 4 POST CENTERS 3" PICKET = 72" 1-1/2" PICKET = 72-1/2" 5 x 5 POST CENTERS 3" PICKET = 73" ALLOW CLEARANCE FOR GATE SWING POST HOLES 4 x 4 POSTS = 10" 5 x 5 POSTS = 12" RAILS ARE CRIMPED ON ENDS TO HOLD IN POST REBAR SEPARATOR CLIP 1/2" REBAR POST SUPPORT OPTIONS USE (2) PIECES OF 1/2" REBAR IN HINGE, LATCH AND END POSTS. POSITION REBAR IN OPPOSING CORNERS OF EACH POST WITH REBAR SEPARATOR CLIPS INSERT ALUMINUM GATE POST STIFFENER INSIDE POST FOR FASTER, CLEANER INSTALLATION 5
7 Traditional Picket Fence Danbury (straight and concave) Rothbury (straight and concave) 1. Getting Started Be sure to call underground prior to digging Assemble gates (if necessary) and decide where they will be located Stake out the fence line Space and mark post hole locations for gate and sections (spacer bar/template may be useful) Start at gate end post and work outward to determine proper fence height relative to ground 2. Dig Holes Dig holes 30" deep or to frost line - hole size for 4 x 4 posts = 10" Clean holes and check for straight walls 3. Install First Post Insert post in hole Determine rough height Fill hole around post with concrete mix (sand, gravel and cement) approximately 2" below grade Tamp concrete in hole to eliminate air pockets Level and square post 4. Install Bottom Rail Check bottom rail for drain holes Tape the ends of any rail being inserted into a post that is to be filled with concrete to prevent concrete seepage Depress bullet clip, insert rail in post Bullet clip will drop down and hold rail in post 5. Install Second Post Insert second post in hole Insert bottom rail in post Insert block under bottom rail to position at correct fence height Fill hole around second post with concrete mix Tamp, level and square fence Assembly may be continued by installing all bottom rails first, or one section at a time 6. Support and Secure Level and square fence To lower a post, place a wood block from corner to corner on the post and carefully tap with a mallet Never strike the PVC post without a wood support 7. Install Pickets Insert top rail in post with large holes facing down Insert pickets through holes in top rail Insert pickets in bottom rail. Pickets are crimped to hold in rail 8. Secure Rails Square pickets and rails Check for even picket spacing on each end of rail Top rail may be secured inside post with a #8 x 3/4" screw on each end 9. Hang Gate/Install Hardware For complete details, see gate installation instructions in hardware box Position gate between posts Allow 1" gap for hinge and 3/4" for latch and gate swing Block up gate to square with fence; rails should be level Gate hardware must be mounted to two sides of the post 10. Solidify Gate Posts It is critical that gate hinge and latch posts are solid to ensure proper gate functionality. Two methods are available: A. Concrete and rebar - Use two pieces of 1/2" rebar in each hinge, latch and end post - Rebar should extend from the bottom of the hole to 12" from the top of the post - Hold rebar in opposite corners of post with rebar separator clips - Fill post with concrete mix to cover rebar and hardware fasteners - Tamp post with a rubber mallet to eliminate air pockets - Leave gate on blocks for 72 hours to allow concrete to set B. Aluminum gate post stiffener - Slide aluminum gate stiffener inside hinge, latch or end posts with open end facing routed hole - Drive a screw through the vinyl into the aluminum stiffener at the bottom of the post to hold in place - Insert post into ground - Fill hole with concrete around outside of post 11. Install Caps Install post caps Caps may be secured with glue, silicone adhesive or #8 x 3/4" screws, caps and washers 6
8 Traditional Picket Fence Includes: Danbury (straight and concave) Rothbury (straight and concave) LOCK TOP RAIL IN POST WITH #8 X 3/4" SCREW ALLOW 1" FOR HINGE AND 3/4" FOR LATCH SYSTEM 4 x 4 POST CENTERS 3" PICKET = 96" ALLOW CLEARANCE FOR GATE SWING DIG HOLES 30" DEEP OR TO FROST LINE BOTTOM RAIL PICKETS POST HOLES 4 x 4 POSTS = 10" HOLD BOTTOM RAIL IN POSITION WITH BULLET CLIPS REBAR SEPARATOR CLIP 1/2" REBAR POST SUPPORT OPTIONS USE (2) PIECES OF 1/2" REBAR IN HINGE, LATCH AND END POSTS. POSITION REBAR IN OPPOSING CORNERS OF EACH POST WITH REBAR SEPARATOR CLIPS INSERT ALUMINUM GATE POST STIFFENER INSIDE POST FOR FASTER, CLEANER INSTALLATION 7
9 Contemporary Picket Fence 8 1. Getting Started Be sure to call underground prior to digging Assemble gates (if necessary) and decide where they will be located Stake out the fence line Space and mark post hole locations for gate and sections (spacer bar/template may be useful) Start at gate end post and work outward to determine proper fence height relative to ground 2. Dig Holes Dig holes 30" deep or to frost line - hole size for 5 x 5 posts = 12" - hole size for 4 x 4 posts = 10" Clean holes and check for straight walls 3. Install First Post Insert post in hole Determine rough height Fill hole around post with concrete mix (sand, gravel and cement) approximately 2" below grade Tamp concrete in hole to eliminate air pockets Level and square post 4. Install Bottom Rail Check bottom rail for drain holes Tape the ends of any rail being inserted into a post that is to be filled with concrete to prevent concrete seepage Depress bullet clip, insert rail in post Bullet clip will drop down and hold rail into place 5. Install Second Post Insert second post in hole Insert bottom rail in post Insert block under bottom rail to position at correct fence height Fill hole around second post with concrete mix Tamp, level and square fence Assembly may be continued by installing all bottom rails first, or one section at a time 6. Support and Secure Level and square fence To lower a post, place a wood block from corner to corner on the post and carefully tap with a mallet Never strike the PVC post without a wood support 7. Install Pickets and Rails Insert middle rail (if applicable) in post with large holes facing down Insert pickets through holes in middle rail Insert pickets in bottom rail. Temporarily remove middle rail ends from post. Insert top rail over pickets Insert middle rail and top rail in post 8. Secure Rails Square pickets and rails Check for even picket spacing on each end of rail Secure rail inside post with a #8 x 3/4" screw (do this on both ends) Level middle rail, secure rail to pickets with (2) #8 x 1-1/2" screws, snap caps and washers evenly spaced along rail 9. Hang Gate/Install Hardware For complete details, see gate installation instructions in hardware box Position gate between posts Allow 1" gap for hinge and 3/4" for latch and gate swing Block up gate to square with fence; rails should be level Gate hardware must be mounted to two sides of the post 10. Solidify Gate Posts It is critical that gate hinge and latch posts are solid to ensure proper gate functionality. Two methods are available: A. Concrete and rebar - Use two pieces of 1/2" rebar in each hinge, latch and end post - Rebar should extend from the bottom of the hole to 12" from the top of the post - Hold rebar in opposite corners of post with rebar separator clips - Fill post with concrete mix to cover rebar and hardware fasteners - Tamp post with a rubber mallet to eliminate air pockets - Leave gate on blocks for 72 hours to allow concrete to set B. Aluminum gate post stiffener - Slide aluminum gate stiffener inside hinge, latch or end posts with open end facing routed hole - Drive a screw through the vinyl into the aluminum stiffener at the bottom of the post to hold in place - Insert post into ground - Fill hole with concrete around outside of post 11. Install Caps Install post caps Caps may be secured with glue, silicone adhesive or #8 x 3/4" screws, caps and washers
10 Contemporary Picket Fence Includes: Baron, Countess, Monarch, Princeton, Victorian LOCK TOP RAIL IN POST WITH #8 X 3/4" SCREW ALLOW 1" FOR HINGE AND 3/4" FOR LATCH SYSTEM DIG HOLES 30" DEEP OR TO FROST LINE POST CENTERS 4 X 4 POSTS = 96" 5 X 5 POSTS = 97" ALLOW CLEARANCE FOR GATE SWING HOLD BOTTOM RAIL IN POSITION WITH BULLET CLIPS 4 X 4 POSTS = 10" 5 X 5 POSTS = 12" SECURE MIDDLE RAIL TO PICKETS WITH (2) #8 X 1-1/2" SCREWS, CAPS AND WASHERS REBAR SEPARATOR CLIP 1/2" REBAR POST SUPPORT OPTIONS USE (2) PIECES OF 1/2" REBAR IN HINGE, LATCH AND END POSTS. POSITION REBAR IN OPPOSING CORNERS OF EACH POST WITH REBAR SEPARATOR CLIPS INSERT ALUMINUM GATE POST STIFFENER INSIDE POST FOR FASTER, CLEANER INSTALLATION 9
11 Classic Fence Manchester (straight and concave), Canterbury (straight and swoop) Getting Started Be sure to call underground prior to digging Assemble gates (if necessary) and decide where they will be located Stake out the fence line Space and mark post hole locations for gate and sections (spacer bar/template may be useful) Start at gate end post and work outward to determine proper fence height relative to ground 2. Dig Holes Dig holes 30" deep or to frost line - hole size for 5 x 5 posts = 12" Clean holes and check for straight walls 3. Install First Post Insert post in hole Determine rough height Fill hole around post with concrete mix (sand, gravel and cement) approximately 2" below grade Tamp concrete in hole to eliminate air pockets Level and square post 4. Install Bottom Rail Tape the ends of any rail being inserted into a post that is to be filled with concrete to prevent concrete seepage Insert lock ring in each end of rail Depress lock ring tabs and insert rail in post. Tabs will recoil to hold rail in post 5. Install Second Post Insert second post in hole Insert bottom rail in post Insert block under bottom rail to position at correct fence height Fill hole around second post with concrete mix Tamp, level and square fence Assembly may be continued by installing all bottom rails first, or one section at a time 6. Support and Secure Level and square fence To lower a post, place a wood block from corner to corner on the post and carefully tap with a mallet Never strike the PVC post without a wood support 7. Install Rails & Pickets Middle and upper rails are routed with larger holes on the bottom for ease of installation and racking For Canterbury - Install middle rail. Depress bullet clip and insert rail into post. Insert short pickets into every second hole starting with the end hole. Pickets are factory crimped to hold in rail. Install top rail, and insert longer pickets into remaining holes For Manchester - Depress bullet clip and insert top rail in post. Pickets are factory crimped to hold in rail. Insert pickets through rail into bottom rail For Manchester Concave - 8 longer pickets are supplied for in-field design and cutting Field cut pickets should be cut to size and then crimped, or drill a 1/4" hole in one side, 1" from the bottom Install bullet clip in hole and insert picket into rail For Canterbury Swoop - All long pickets need to be field cut. Measure from cap and cut off crimped end. Picket lengths are: #1 #2 #3 #4 #5 #6 #7 = = = = = = = 31-7/8" 32-3/4" 33-5/8" 34-1/2" 35-3/8" 36-1/4" 37-1/8" 8. Hang Gate/Install Hardware For complete details, see gate installation instructions in hardware box Position gate between posts Allow 1" gap for hinge and 3/4" for latch and gate swing Block up gate to square with fence; rails should be level Gate hardware must be mounted to two sides of the post 9. Solidify Gate Posts It is critical that gate hinge and latch posts are solid to ensure proper gate functionality. Two methods are available: A. Concrete and rebar - Use two pieces of 1/2" rebar in each hinge, latch and end-post - Rebar should extend from the bottom for the hole to 12" from the top of the post - Hold rebar in opposite corners of post with rebar separator clips - Fill post with concrete mix to cover rebar and hardware fasteners - Tamp post with a rubber mallet to eliminate air pockets - Leave gate on blocks for 72 hours to allow concrete to set B. Aluminum gate post stiffener - Slide aluminum gate stiffener inside hinge, latch or end posts with open end facing routed hole - Drive a screw through the vinyl into the aluminum stiffener at the bottom of the post - Insert post into the ground - Fill hole with concrete around outside of post 10. Install Caps #8 #9 #10 #11 #12 #13 #14 38" 38-7/8" 39-3/4" 40-5/8" 41-1/2" 42-3/8" 43-1/2" Install post caps Caps may be secured with glue, silicone adhesive or #8 x 1-1/2" screws, caps and washers = = = = = = =
12 Classic Fence Includes: Manchester (straight and concave) Canterbury (straight and swoop) TO ACHIEVE THIS SCALLOP: HOLD TOP AND MIDDLE (CANTERBURY) RAILS IN POST WITH BULLET CLIP - CUT 2" OFF BOTTOM OF 3RD PICKET - CUT 4" OFF BOTTOM OF 4TH PICKET FOR MANCHESTER CONCAVE, FIRST FOUR AND LAST FOUR PICKETS MAY BE FIELD CUT TO FORM DESIRED DESIGN. TO HOLD PICKET IN BOTTOM RAIL, DRILL 1/4" HOLE THROUGH SIDE OF PICKET AND INSERT BULLET CLIP ALLOW 1" FOR HINGE AND 3/4" FOR LATCH SYSTEM CANTERBURY MANCHESTER CONCAVE SHOWN POST CENTERS = 96" ALLOW CLEARANCE FOR GATE SWING DIG HOLES 30" DEEP OR TO FROST LINE HOLD BOTTOM RAILS IN POST WITH LOCK RING HOLE SIZE 5 x 5 POST =12" PICKETS ARE FACTORY CRIMPED TO HOLD IN RAIL REBAR SEPARATOR CLIP 1/2" REBAR POST SUPPORT OPTIONS USE (2) PIECES OF 1/2" REBAR IN HINGE, LATCH AND END POSTS. POSITION REBAR IN OPPOSING CORNERS OF EACH POST WITH REBAR SEPARATOR CLIPS INSERT ALUMINUM GATE POST STIFFENER INSIDE POST FOR FASTER, CLEANER INSTALLATION 11
13 Classic Fence New Castle Getting Started Be sure to call underground prior to digging Assemble gates (if necessary) and decide where they will be located Stake out the fence line Space and mark post hole locations for gate and sections (spacer bar/template may be useful) Start at gate end post and work outward to determine proper fence height relative to ground 2. Dig Holes Dig holes 30" deep or to frost line - hole size for 5 x 5 posts = 12" - hole size for 4 x 4 posts = 10" Clean holes and check for straight walls 3. Install First Post Insert post in hole Determine rough height Fill hole around post with concrete mix (sand, gravel and cement) approximately 2" below grade Tamp concrete in hole to eliminate air pockets Level and square post 4. Install Bottom Rail Tape the ends of any rail being inserted into a post that is to be filled with concrete to prevent concrete seepage Depress bullet clip, insert rail in post. Bullet clip will drop down and hold rail in post 5. Install Second Post Insert second post in hole Insert bottom rail in post Insert block under bottom rail to position at correct fence height Fill hole around second post with concrete mix Tamp, level and square fence Assembly may be continued by installing all bottom rails first, or one section at a time 6. Support and Secure Level and square fence To lower a post, place a wood block from corner to corner on the post and carefully tap with a mallet Never strike the PVC post without a wood support 7. Install Rails & Pickets Middle and upper rails are routed with larger holes on the bottom for ease of installation and racking For Normandy - Install middle rail into post. Insert short pickets into every second hole starting with the second hole from the end. Pickets are factory crimped to hold in rail. Install top rail, and insert longer pickets into remaining holes For New Castle - Insert top and middle rail in post. Pickets are factory crimped to hold in rail. Insert pickets through rails into bottom rail 8. Secure Rails Square pickets and rails Check for even picket spacing on each end or rail Secure top rail inside post with a #8 x 3/4" screw (do this on both ends) Level middle rail, secure rail to pickets with (2) #8 x 1-1/2" screws, snap caps and washers evenly spaced along rail 9. Hang Gate/Install Hardware Position gate between posts Allow 1" gap for hinge and 3/4" for latch and gate swing Block up gate to square with fence; rails should be level Gate hardware must be mounted to two sides of the post For complete details, see gate installation instructions in hardware box 10. Solidify Gate Posts It is critical that gate hinge and latch posts are solid to ensure proper gate functionality. Two methods are available: A. Concrete and rebar - Use two pieces of 1/2" rebar in each hinge, latch and end-post - Rebar should extend from the bottom for the hole to 12" from the top of the post - Hold rebar in opposite corners of post with rebar separator clips - Fill post with concrete mix to cover rebar and hardware fasteners - Tamp post with a rubber mallet to eliminate air pockets - Leave gate on blocks for 72 hours to allow concrete to set B. Aluminum gate post stiffener - Slide aluminum gate stiffener inside hinge, latch or end posts with open end facing routed hole - Drive a screw through the vinyl into the aluminum stiffener at the bottom of the post - Insert post into the ground - Fill hole with concrete around outside of post 11. Install Caps Install post caps Caps may be secured with glue, silicone adhesive or #8 x 3/4" screws, caps and washers Install picket caps - may be secured with glue as needed
14 Classic Style Fence Includes: New Castle SECURE MIDDLE RAIL TO PICKETS WITH (2) #8 X 1-1/2" SCREWS, CAPS AND WASHERS ALLOW 1" FOR HINGE AND 3/4" FOR LATCH SYSTEM LOCK TOP RAIL IN POST WITH #8 X 3/4" SCREW DIG HOLES 30" DEEP OR TO FROST LINE POST CENTERS 4 X 4 POSTS = 96" 5 X 5 POSTS = 97" ALLOW CLEARANCE FOR SWING GATE 4 X 4 POSTS = 10" 5 X 5 POSTS = 12" PICKETS ARE FACTORY CRIMPED TO HOLD IN RAIL HOLD BOTTOM RAIL IN POSITION WITH BULLET CLIPS REBAR SEPARATOR CLIP 1/2" REBAR POST SUPPORT OPTIONS USE (2) PIECES OF 1/2" REBAR IN HINGE, LATCH AND END POSTS. POSITION REBAR IN OPPOSING CORNERS OF EACH POST WITH REBAR SEPARATOR CLIPS INSERT ALUMINUM GATE POST STIFFENER INSIDE POST FOR FASTER, CLEANER INSTALLATION 13
15 Semi-Private Fence Columbia Getting Started Be sure to call underground prior to digging Assemble gates (if necessary) and decide where they will be located Stake out the fence line Space and mark post hole locations for gate and sections (spacer bar/template may be useful) Start at gate end post and work outward to determine proper fence height relative to ground 2. Dig Holes Dig holes 30" deep or to frost line - hole size for 5 x 5 posts = 12" Clean holes and check for straight walls 3. Install First Post Insert post in hole Determine rough height Fill hole around post with concrete mix (sand, gravel and cement) approximately 2" below grade Tamp concrete in hole to eliminate air pockets Level and square post 4. Install Bottom Rail Tape the ends of any rail going into a post that is to be filled with concrete to prevent concrete seepage Depress bullet clip and insert bottom rail in post; clip will drop down to hold rail in post 5. Install Second Post Insert second post in hole Insert bottom rail in post Insert block under bottom rail to position at correct fence height Fill hole around second post with concrete mix Tamp, level and square fence Assembly may be continued by installing all bottom rails first, or one section at a time 6. Support and Secure Level and square fence To lower a post, place a wood block from corner to corner on the post and carefully tap with a mallet Never strike the PVC post without a wood support 7. Install Mid-Rail Insert mid-rail in first post with larger routed holes facing in the down position Insert into second post (Note: This rail floats in post. No bullet clips are required) 8. Install Pickets and Top Rail Insert all pickets through mid-rail into bottom rail Temporarily remove mid-rail ends from post and pull the section forward Insert the top rail over the pickets starting at one end and working along Insert the mid-rail and the top rail back into the posts Secure top rail inside post with a #8 x 3/4" screw 9. Hang Gate/Install Hardware For complete details, see gate installation instructions in hardware box Position gate between posts Allow 1" gap for the hinge and 3/4" for latch and gate swing Block up gate to square with fence; rails should be level Gate hardware must be mounted to two sides of the post 10. Solidify Gate Posts It is critical that gate hinge and latch posts are solid to ensure proper gate functionality. Two methods are available: A. Concrete and rebar - Use two pieces of 1/2" rebar in each hinge, latch and end-post - Rebar should extend from the bottom for the hole to 12" from the top of the post - Hold rebar in opposite corners of post with rebar separator clips - Fill post with concrete mix to cover rebar and hardware fasteners - Tamp post with a rubber mallet to eliminate air pockets - Leave gate on blocks for 72 hours to allow concrete to set B. Aluminum gate post stiffener - Slide aluminum gate stiffener inside hinge, latch or end posts with open end facing routed hole - Drive a screw through the vinyl into the aluminum stiffener at the bottom of the post - Insert post into the ground - Fill hole with concrete around outside of post 11. Install Caps Install post caps Caps may be secured with glue, silicone adhesive or #8 x 3/4" screws, caps and washers For accents, see page 30
16 Semi-Private Fence Includes: Columbia NOTE: COLUMBIA GATES HAVE BRACES ON BOTH SIDES OF GATE. THERE IS NO DIFFERENCE BETWEEN REGULAR AND OPPOSITE GATES LOCK TOP RAIL IN POST WITH #8 X 3/4" SCREW ALLOW 1" FOR HINGE AND 3/4" FOR LATCH SYSTEM DIG HOLES 30" DEEP OR TO FROST LINE POST CENTERS 5 X 5 POSTS = 96-1/8" ALLOW CLEARANCE FOR GATE SWING POST HOLES 5 X 5 posts =12" HOLD BOTTOM RAILS IN POST WITH A BULLET CLIP REBAR SEPARATOR CLIP 1/2" REBAR POST SUPPORT OPTIONS USE (2) PIECES OF 1/2" REBAR IN HINGE, LATCH AND END POSTS. POSITION REBAR IN OPPOSING CORNERS OF EACH POST WITH REBAR SEPARATOR CLIPS INSERT ALUMINUM GATE POST STIFFENER INSIDE POST FOR FASTER, CLEANER INSTALLATION EMBEDMENT DETAIL FOR OPTIONAL LINE POST STIFFENER ALUMINUM INSERT MINIMUM 48 INSERT REQUIRED TO COMPLY WITH THE HIGH VELOCITY HURRICANE ZONES SECTION R OF THE FLORIDA BUILDING CODE ALUMINUM INSERT SECTION A-A LINE POST STIFFENER ALUMINUM INSERT GROUND LEVEL TOP SOIL 48 A A FEATURING WINDBREAKER TECHNOLOGY CONCRETE 3000 P.S.I. MINIMUM 30 2 GRAVEL FILL 15
17 Semi-Private Fence Imperial Getting Started Be sure to call underground prior to digging Assemble gates (if necessary) and decide where they will be located Stake out the fence line Space and mark post hole locations for gate and sections (spacer bar/template may be useful) Start at gate end post and work outward to determine proper fence height relative to ground 2. Dig Holes Dig holes 30" deep or to frost line - hole size for 5 x 5 posts = 12" - hole size for 4 x 4 posts = 10" Clean holes and check for straight walls 3. Install First Post Insert post in hole Determine rough height Fill hole around post with concrete mix (sand, gravel and cement) approximately 2" below grade Tamp concrete in hole to eliminate air pockets Level and square post 4. Install Bottom Rail Check bottom rail for drain holes Tape the ends of any rail being inserted into a post that is to be filled with concrete to prevent concrete seepage Depress bullet clip, insert rail in post Bullet clip will drop down and hold rail in post 5. Install Second Post Insert second post in hole Insert bottom rail in post Insert block under bottom rail to position at correct fence height Fill hole around second post with concrete mix Tamp, level and square fence Fence assembly may be continued by installing all bottom rails first, or one section at a time 6. Support and Secure Level and square fence To lower a post, place a wood block from corner to corner on the post and carefully tap with a mallet Never strike the PVC post without a wood support 7. Install Pickets and Rails Insert middle rail (if applicable) in post with large holes facing down Insert pickets through holes in middle rail Insert pickets in bottom rail. Temporarily remove middle rail ends from post. Insert top rail over pickets Insert middle rail and top rail in post 8. Secure Rails Square pickets and rails Check for even picket spacing on each end of rail Secure rail inside post with a #8 x 3/4" screw (do this on both ends) Level middle rail, secure rail to pickets with (2) #8 x 1-1/2" screws, snap caps and washers evenly spaced along rail 9. Hang Gate/Install Hardware For complete details, see gate installation instructions in hardware box Position gate between posts Allow 1" gap for hinge and 3/4" for latch and gate swing Block up gate to square with fence; rails should be level Gate hardware must be mounted to two sides of the post 10. Solidify Gate Posts It is critical that gate hinge and latch posts are solid to ensure proper gate functionality. Two methods are available: A. Concrete and rebar - Use two pieces of 1/2" rebar in each hinge, latch and end post - Rebar should extend from the bottom of the hole to 12" from the top of the post - Hold rebar in opposite corners of post with rebar separator clips - Fill post with concrete mix to cover rebar and hardware fasteners - Tamp post with a rubber mallet to eliminate air pockets - Leave gate on blocks for 72 hours to allow concrete to set B. Aluminum gate post stiffener - Slide aluminum gate stiffener inside hinge, latch or end posts - Drive a screw through the vinyl into the aluminum stiffener at the bottom of the post - Insert post into the ground - Fill hole with concrete around outside of post 11. Install Caps Install post caps Caps may be secured with glue, silicone adhesive or #8 x 3/4" screws, caps and washers
18 Semi-Private Fence Includes: Imperial LOCK TOP RAIL IN POST WITH #8 X 3/4" SCREW ALLOW 1" FOR HINGE AND 3/4" FOR LATCH SYSTEM DIG HOLES 30" DEEP OR TO FROST LINE POST CENTERS 4 X 4 POSTS = 96" 5 X 5 POSTS = 97" ALLOW CLEARANCE FOR GATE SWING HOLD BOTTOM RAIL IN POSITION WITH BULLET CLIPS 4 X 4 POSTS = 10" 5 X 5 POSTS = 12" SECURE MIDDLE RAIL TO PICKETS WITH (2) #8 X 1-1/2" SCREWS, CAPS AND WASHERS REBAR SEPARATOR CLIP 1/2" REBAR POST SUPPORT OPTIONS USE (2) PIECES OF 1/2" REBAR IN HINGE, LATCH AND END POSTS. POSITION REBAR IN OPPOSING CORNERS OF EACH POST WITH REBAR SEPARATOR CLIPS INSERT ALUMINUM GATE POST STIFFENER INSIDE POST FOR FASTER, CLEANER INSTALLATION EMBEDMENT DETAIL FOR OPTIONAL LINE POST STIFFENER ALUMINUM INSERT TO COMPLY WITH THE HIGH VELOCITY HURRICANE ZONES SECTION R OF THE FLORIDA BUILDING CODE, A STEEL INSERT MUST BE ADDED TO THE TOP RAIL AND THE CENTER PICKET MUST BE ATTACHED TO THE TOP AND BOTTOM RAIL WITH (2) #8 X 1-1/2 SCREWS, CAPS, AND WASHERS SECTION A-A LINE POST STIFFENER ALUMINUM INSERT GROUND LEVEL CONCRETE 3000 P.S.I. MINIMUM ALUMINUM INSERT TOP SOIL 48 A A 30 2 FEATURING WINDBREAKER TECHNOLOGY GRAVEL FILL 17
19 Semi-Private Fence Millbrook 1. Getting Started 18 Be sure to call underground prior to digging Assemble gates (if necessary) and decide where they will be located Stake out the fence line Space and mark post hole locations for gate and sections (spacer bar/template may be useful) Start at gate end post and work outward to determine proper fence height relative to ground 2. Dig Holes Dig holes 30" deep or to frost line - hole size for 5 x 5 posts = 12" Clean holes and check for straight walls 3. Install First Post Insert post in hole Determine rough height Fill hole around post with concrete mix (sand, gravel and cement) approximately 2" below grade Tamp concrete in hole to eliminate air pockets Level and square post 4. Install Bottom Rail Tape the ends of any rail being inserted into a post that is to be filled with concrete to prevent concrete seepage Insert lock ring in each end of rail Depress lock ring tabs and insert rail in post Tabs will recoil to post and hold rail in post 5. Install Second Post Insert second post in hole Insert bottom rail in post Insert block under bottom rail to position at correct fence height Fill hole around second post with concrete mix Tamp, level and square fence Fence assembly may be continued by installing all bottom rails first, or one section at a time 6. Support and Secure Level and square fence To lower a post, place a wood block from corner to corner on the post and carefully tap with a mallet Never strike the PVC post without a wood support 7. Install Pickets and Rails Insert middle rail in post with large holes facing down Insert pickets through holes in middle rail Insert pickets in bottom rail. Temporarily remove middle rail ends from post. Insert top rail over pickets Insert middle rail and top rail in post 8. Secure Rails Square pickets and rails Check for even picket spacing on each end of rail Secure rail inside post with a #8 x 3/4" screw (do this on both ends) Level middle rail, secure rail to pickets with (2) #8 x 1-1/2" screws, snap caps and washers evenly spaced along rail 9. Hang Gate/Install Hardware For complete details, see gate installation instructions in hardware box Position gate between posts Allow 1" gap for hinge and 3/4" for latch and gate swing Block up gate to square with fence; rails should be level Gate hardware must be mounted to two sides of the post 10. Solidify Gate Posts It is critical that gate hinge and latch posts are solid to ensure proper gate functionality. Two methods are available: A. Concrete and rebar - Use two pieces of 1/2" rebar in each hinge, latch and end post - Rebar should extend from the bottom of the hole to 12" from the top of the post - Hole rebar in opposite corners of post with rebar separator clips - Fill post with concrete mix to cover rebar and hardware fasteners - Tamp post with a rubber mallet to eliminate air pockets - Leave gate on blocks for 72 hours to allow concrete to set B. Aluminum gate post stiffener - Slide aluminum gate stiffener inside hinge, latch or end posts - Drive a screw through the vinyl into the aluminum stiffener at the bottom of the post - Insert post into the ground - Fill hole with concrete around outside of post 11. Install Caps Install post caps Caps may be secured with glue, silicone adhesive or #8 x 3/4" screws, caps and washers
20 Semi-Private Fence Includes: Millbrook LOCK TOP RAIL IN POST WITH #8 X 3/4" SCREW ALLOW 1" FOR HINGE AND 3/4" FOR LATCH SYSTEM POST CENTERS 5 X 5 POSTS = 96" ALLOW CLEARANCE FOR GATE SWING HOLD TOP AND BOTTOM RAILS IN POST WITH LOCK RING DIG HOLES 30" DEEP OR TO FROST LINE POST HOLES 5 X 5 POSTS = 12" SECURE MIDDLE RAIL TO PICKETS WITH (2) #8 X 1-1/2" SCREWS, CAPS AND WASHERS REBAR SEPARATOR CLIP 1/2" REBAR POST SUPPORT OPTIONS USE (2) PIECES OF 1/2" REBAR IN HINGE, LATCH AND END POSTS. POSITION REBAR IN OPPOSING CORNERS OF EACH POST WITH REBAR SEPARATOR CLIPS INSERT ALUMINUM GATE POST STIFFENER INSIDE POST FOR FASTER, CLEANER INSTALLATION 19
21 Privacy Fence Chesterfield Getting Started Be sure to call underground prior to digging Assemble gates (if necessary) and decide where they will be located Stake out the fence line Space and mark post hole locations for gate and sections (spacer bar/template may be useful) Start at gate end post and work outward to determine proper fence height relative to ground 2. Dig Holes Dig holes 30" deep or to frost line - hole size for 5 x 5 posts = 12" Clean holes and check for straight walls 3. Install First Post Insert post in hole Determine rough height Fill hole around post with concrete mix (sand, gravel and cement) approximately 2" below grade Tamp concrete in hole to eliminate air pockets Level and square post 4. Install Bottom Rail Tape the ends of any rail going into a post that is to be filled with concrete to prevent concrete seepage Insert lock ring in both ends of bottom rail Depress lock ring tabs, insert bottom rail in post Tabs will recoil to hold rail in post 5. Install Second Post Insert second post in hole Insert bottom rail in post Insert block under bottom rail to position of correct fence height Fill hole around second post with concrete mix Tamp, level and square fence Assembly may be continued by installing all bottom rails first or one section at a time 6. Support and Secure Level and square fence To lower a post, place a wood block from corner to corner of the post and carefully tap with a mallet Never strike the PVC post without a wood support 7. Install Pickets and Rails Pickets are cut at a 5 angle to accommodate a 1' slope (last picket has tongue ripped to sit flush against post) Insert pickets in bottom rail Insert top rail over pickets Depress lock ring tabs, insert top rail in post 8. Hang Gate/Install Hardware For complete details, see gate installation instructions in hardware box Position gate between posts Allow 1" gap for hinge and 3/4" for latch and gate swing Block up gate to square with fence; rails should be level Gate hardware must be mounted to two sides of the post 9. Solidify Gate Posts It is critical that gate hinge and latch posts are solid to ensure proper gate functionality. Two methods are available: A. Concrete and rebar - Use two pieces of 1/2" rebar in each hinge, latch and end post - Rebar should extend from the bottom of the hole to 12" from the top of the post - Hold rebar in opposite corners of post with rebar separator clips - Fill post with concrete mix to cover rebar and hardware fasteners - Tamp post with a rubber mallet to eliminate air pockets - Leave gate on blocks for 72 hours to allow concrete to set B. Aluminum gate post stiffener - Slide aluminum gate stiffener inside hinge, latch or end posts with open end facing routed hole - Drive a screw through the vinyl into the aluminum stiffener at the bottom of the post to hold in place - Insert post into ground - Fill hole with concrete around outside of post 10. Install Caps Install post caps Caps may be secured with glue, silicone adhesive or #8 x 3/4" screws, caps and washers For accents, see page 30
22 Privacy Fence Includes: Chesterfield Chesterfield with CertaGrain TM Texture HOLD TOP RAILS IN POST WITH LOCK RING PICKETS FOR THIS STYLE ARE TONGUE AND GROOVE TONGUE RIPPED OFF LAST PICKET TO SIT FLUSH AGAINST POST. ALLOW 1" FOR HINGE AND 3/4" FOR LATCH SYSTEM HOLD BOTTOM RAILS IN POST WITH LOCK RING DIG HOLES 30" DEEP OR TO FROST LINE POST CENTERS 4 X 4 POSTS = 95-1/8" 5 X 5 POSTS = 96-1/8" ALLOW CLEARANCE FOR GATE SWING POST HOLES 4 X 4 POSTS = 10" 5 X 5 POSTS = 12" REBAR SEPARATOR CLIP 1/2" REBAR POST SUPPORT OPTIONS USE (2) PIECES OF 1/2" REBAR IN HINGE, LATCH AND END POSTS. POSITION REBAR IN OPPOSING CORNERS OF EACH POST WITH REBAR SEPARATOR CLIPS EMBEDMENT DETAIL FOR OPTIONAL LINE POST STIFFENER ALUMINUM INSERT INSERT ALUMINUM GATE POST STIFFENER INSIDE POST FOR FASTER, CLEANER INSTALLATION MINIMUM 48 INSERT REQUIRED TO COMPLY WITH THE HIGH VELOCITY HURRICANE ZONES SECTION R OF THE FLORIDA BUILDING CODE ALUMINUM INSERT SECTION A-A LINE POST STIFFENER ALUMINUM INSERT GROUND LEVEL TOP SOIL 48 A A FEATURING WINDBREAKER TECHNOLOGY CONCRETE 3000 P.S.I. MINIMUM 30 2 GRAVEL FILL 21
23 Privacy Fence Chesterfield with Huntington and Westminster Accents 1. Getting Started 8. Install Accents 22 Be sure to call underground prior to digging Assemble gates (if necessary) and decide where they will be located Stake out the fence line Space and mark post hole locations for gate and sections (spacer bar/template may be useful) Start at gate end post and work outward to determine proper fence height relative to ground 2. Dig Holes Dig holes 30" deep or to frost line - hole size for 5 x 5 posts = 12" Clean holes and check for straight walls 3. Install First Post Insert post in hole Determine rough height Fill hole around post with concrete mix (sand, gravel and cement) approximately 2" below grade Tamp concrete in hole to eliminate air pockets Level and square post 4. Install Bottom Rail Tape the ends of any rail being inserted into a post that is to be filled with concrete to prevent concrete seepage Insert lock ring in each end of rail Depress lock ring tabs and insert rail in post. Tabs will recoil to hold rail in post 5. Install Second Post Insert second post in hole Insert bottom rail in post Insert block under bottom rail to position at correct fence height Fill hole around second post with concrete mix Tamp, level and square fence Assembly may be continued by installing all bottom rails first, or one section at a time 6. Support and Secure Level and square fence To lower a post, place a wood block from corner to corner on the post and carefully tap with a mallet Never strike the PVC post without a wood support 7. Install Pickets and Rails Insert pickets in bottom rail Insert top rail over pickets Depress lock rings tabs, insert top rail in post Huntington - Insert top 3 x 3 rail with larger holes facing down into post by depressing bullet clips as rail is inserted - Bullet clip will drop down to hold rail in place - Insert pickets thru rail and lock into top fence section rail (Pickets are factory crimped to hold in place) - To create desired scalloped effect, longer length pickets will need to be cut and then crimped, or a bullet clip may be inserted to hold picket in rail Westminster - Insert bottom and side channels (overlap ends) into position on rail and posts - secure with #8 x 1-1/2" screws - Insert lattice into channels - Slide top channel over lattice - Insert top 3 x 3 rail into routed post holes - Secure top channel to 3 x 3 top rail with #8 x 1-1/2" screws 9. Hang Gate/Install Hardware For complete details, see gate installation instructions in hardware box Position gate between posts Allow 1" gap for hinge and 3/4" for latch and gate swing Block up gate to square with fence; rails should be level Gate hardware must be mounted to two sides of the post 10. Solidify Gate Posts It is critical that gate hinge and latch posts are solid to ensure proper gate functionality. Two methods are available: A. Concrete and rebar - Use two pieces of 1/2" rebar in each hinge, latch and end post - Rebar should extend from the bottom of the hole to 12" from the top of the post - Hold rebar in opposite corners of post with rebar separator clips - Fill post with concrete mix to cover rebar and hardware fasteners - Tamp post with a rubber mallet to eliminate air pockets - Leave gate on blocks for 72 hours to allow concrete to set B. Aluminum gate post stiffener - Slide aluminum gate stiffener inside hinge, latch or end posts with open end facing routed hole - Drive a screw through the vinyl into the aluminum stiffener at the bottom of the post to hold in place - Insert post into ground - Fill hole with concrete around outside of post 11. Install Caps Install post caps Caps may be secured with glue, silicone adhesive or #8 x 1-1/2" screws, caps and washers
24 Privacy Fence Includes: Chesterfield with Huntington Accents Chesterfield with Westminster Accents TO ACHIEVE THIS SCALLOP: - CUT 1" OFF BOTTOM OF 3RD PICKET - CUT 2" OFF BOTTOM OF 4TH PICKET HOLD TOP RAILS IN POST WITH LOCK RING PICKETS FOR THIS STYLE ARE TONGUE AND GROOVE TONGUE RIPPED OFF LAST PICKET TO SIT FLUSH AGAINST POST ALLOW 1" FOR HINGE AND 3/4" FOR LATCH SYSTEM WESTMINSTER HUNTINGTON POST CENTERS 5 X 5 POSTS = 96-1/8" ALLOW CLEARANCE FOR GATE SWING HOLD BOTTOM RAILS IN POST WITH LOCK RING DIG HOLES 30" DEEP OR TO FROST LINE POST HOLES 5 X 5 POSTS = 12" REBAR SEPARATOR CLIP 1/2" REBAR POST SUPPORT OPTIONS USE (2) PIECES OF 1/2" REBAR IN HINGE, LATCH AND END POSTS. POSITION REBAR IN OPPOSING CORNERS OF EACH POST WITH REBAR SEPARATOR CLIPS INSERT ALUMINUM GATE POST STIFFENER INSIDE POST FOR FASTER, CLEANER INSTALLATION 23
25 Privacy Fence Norfolk 1 1. Getting Started 24 Be sure to call underground prior to digging Assemble gates (if necessary) and decide where they will be located Stake out the fence line Space and mark post hole locations for gate and sections (spacer bar/template may be useful) Start at gate end post and work outward to determine proper fence height relative to ground 2. Dig Holes Dig holes 30" deep or to frost line - hole size for 5 x 5 posts = 12" Clean holes and check for straight walls 3. Install First Post Insert post in hole Determine rough height Fill hole around post with concrete mix (sand, gravel and cement) approximately 2" below grade Tamp concrete in hole to eliminate air pockets Level and square post 4. Install Bottom Rail Tape the ends of any rail going into a post that is to be filled with concrete to prevent concrete seepage Insert lock ring in both ends of bottom rail Depress lock ring tabs, insert bottom rail in post Tabs will recoil to hold rail in post 5. Install Second Post Insert second post in hole Insert bottom rail in post Insert block under bottom rail to position of correct fence height Fill hole around second post with concrete mix Tamp, level and square fence Assembly may be continued by installing all bottom rails first or one section at a time 6. Support and Secure Level and square fence To lower a post, place a wood block from corner to corner of the post and carefully tap with a mallet Never strike the PVC post without a wood support 7. Install Pickets and Rails Insert pickets in bottom rail Insert top rail over pickets Depress lock ring tabs, insert top rail in post Insert midrail into posts Secure midrail on both sides through the same picket with (2) #8 x 1-1/2" screws, snap caps and washers 8. Hang Gate/Install Hardware For complete details, see gate installation instructions in hardware box Position gate between posts Allow 1" gap for hinge and 3/4" for latch and gate swing Block up gate to square with fence; rails should be level Gate hardware must be mounted to two sides of the post 9. Solidify Gate Posts It is critical that gate hinge and latch posts are solid to ensure proper gate functionality. Two methods are available: A. Concrete and rebar - Use two pieces of 1/2" rebar in each hinge, latch and end post - Rebar should extend from the bottom of the hole to 12" from the top of the post - Hold rebar in opposite corners of post with rebar separator clips - Fill post with concrete mix to cover rebar and hardware fasteners - Tamp post with a rubber mallet to eliminate air pockets - Leave gate on blocks for 72 hours to allow concrete to sett B. Aluminum gate post stiffener - Slide aluminum gate stiffener inside hinge, latch or end posts with open end facing routed hole - Drive a screw through the vinyl into the aluminum stiffener at the bottom of the post to hold in place - Insert post into ground - Fill hole with concrete around outside of post 10. Install Caps Install post caps Caps may be secured with glue, silicone adhesive or #8 x 3/4" screws, caps and washers For accents, see page 30
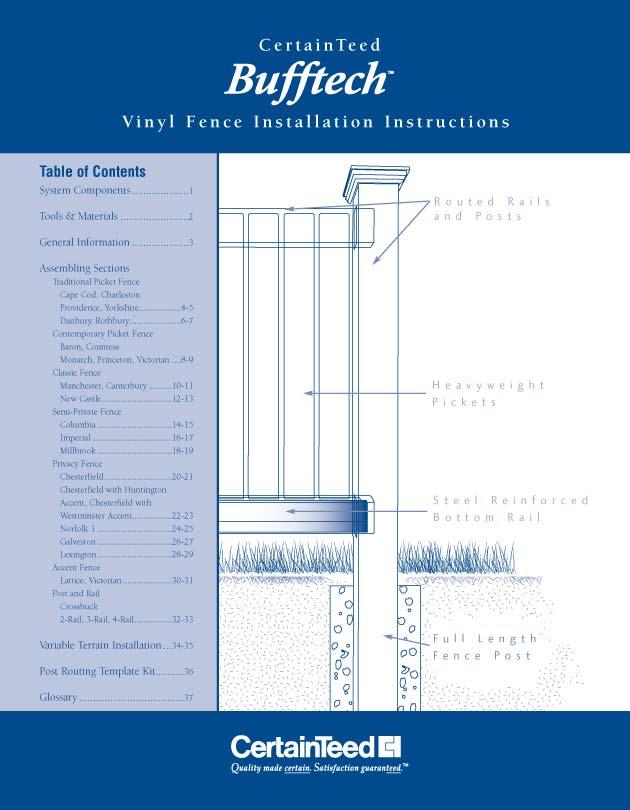
CertainTeed. Vinyl Fence Installation Guidelines. Routed Rails and Posts. Heavyweight Pickets. Steel Reinforced Bottom Rail
 CertainTeed Vinyl Fence Installation Guidelines Table of Contents System Components 1 Tools and Materials 2 General Information 3 Assembling Sections Traditional Picket Fence Cape Cod, Yorkshire 4-5 Danbury,
Vinyl Fence Installation Guideline
 Vinyl Fence Installation Guideline Routed Rails and Posts Heavyweight Pickets Steel Reinforced Bottom Rail Table of Contents Fence System Components 3 Tools and Materials 4 General Information 5 Traditional
Post & Rail Crossbuck
 Post & Rail Crossbuck 1. Getting Started 6. Crossbuck Be sure to call underground prior to digging Assemble gates (if necessary) and decide where they will be located Stake out the fence line Space and
Vinyl Fence Products. Installation Guidelines. Hyde Park with H-Post Fence
 Vinyl Fence Products Installation Guidelines Hyde Park with H-Post Fence Hyde Park with H-Post Privacy Fence 1. Getting Started Be sure to call underground prior to digging Assemble gates (if necessary)
Post & Rail. Includes: Crossbuck, 2-Rail, 3-Rail and 4-Rail POST SUPPORT OPTIONS
 Post & Rail Includes: Crossbuck, 2-Rail, 3-Rail and 4-Rail STAGGER RAIL ENDS FOR GREATER STRENGTH ALLOW 1-1/2" GAP ON HINGE SIDE OF GATE AND 1-1/4" ON LATCH SIDE OF GATE HARDWARE DIG HOLES 30" MINIMUM
Installation Guide. Capped Cellular PVC Fencing. Table of Contents. Storage and Handling Tools Needed Fence Layout and Locating Posts
 Capped Cellular PVC Fencing Installation Guide Table of Contents Storage and Handling Tools Needed Fence Layout and Locating Posts Installation instructions 4 x 4 Over Sleeve Post - 3.5 Rail Privacy Shadowbox
SHADOWBOX INSTALLATION FOR: Standard 6 H x 8 W Shadowbox Fence 5 x 5 Routed Posts Dog Ear or Straight-Edge Pickets 1.75 x 3.5 Rail
 SHADOWBOX INSTALLATION FOR: Standard 6 H x 8 W Shadowbox Fence 5 x 5 Routed Posts Dog Ear or Straight-Edge Pickets 1.75 x 3.5 Rail Storage and Handling Fence Preparation and Layout Locate and Set Posts
PRIVACY FENCE WITH SCALLOPED PICKET INSTALL INSTRUCTIONS
 PRIVACY FENCE WITH SCALLOPED PICKET INSTALL INSTRUCTIONS These instructions are to be used as general guidelines for the installation of your vinyl fence under normal installation conditions. Local conditions
PRIVACY FENCE WITH LATTICE INSTALLATION INSTRUCTIONS
 PRIVACY FENCE WITH LATTICE INSTALLATION INSTRUCTIONS These instructions are to be used as general guidelines for the installation of your vinyl fence under normal installation conditions. Local conditions
PRIVACY INSTALLATION FOR: Standard 6 H x 8 W Privacy Fence 4 x 4 Post Sleeve & Brackets Dog Ear or Straight-Edge Pickets 1.75 x 3.
 PRIVACY INSTALLATION FOR: Standard 6 H x 8 W Privacy Fence 4 x 4 Post Sleeve & Brackets Dog Ear or Straight-Edge Pickets 1.75 x 3.5 Rail Storage and Handling Fence Preparation and Layout Locate and Set
UNIVERSAL PANEL AND GATE
 PVC Fencing / Residential Style UNIVERSAL PANEL AND GATE INSTALLATION INSTRUCTIONS Fencing Without Boundaries TM 1 BEFORE YOU START, IT S IMPORTANT TO CHECK......That fence footings do not exceed legally
SEMI-PRIVACY PANEL AND GATE INSTALLATION INSTRUCTIONS
 SEMI-PRIVACY PANEL AND GATE INSTALLATION INSTRUCTIONS 1 BEFORE YOU START, IT S IMPORTANT TO CHECK: That fence or the fence post footings do not exceed your lot lines of your property. If you can locate
CertainTeed. Education & Development Program. Vinyl Fence Systems
 CertainTeed Education & Development Program Vinyl Fence Systems Become a CertainTeed The CertainTeed Selects TM Education and Development Workbook is a key element in CertainTeed s Master Craftsman education
Ranch Rail Vinyl Fence
 Ranch Rail Vinyl Fence INSTALLATION INSTRUCTIONS These instructions are to be used as general guidelines for the installation of your vinyl fence under normal installation conditions. Local conditions
CertainTeed INSTALLATION GUIDE SIMTEK FENCE PRODUCTS. Fence Installation Guide 3', 4' & 6' High
 CertainTeed INSTALLATION GUIDE SIMTEK FENCE PRODUCTS Fence Installation Guide 3', 4' & 6' High INSTALLATION GUIDE These instructions are designed to assist both professional installers and do-it-yourselfers
TRADITIONAL & SCALLOP PICKET INSTALLATION INSTRUCTIONS
 TRADITIONAL & SCALLOP PICKET 1 WHAT YOU LL NEED TO INSTALL POWER AUGER OR POST HOLE DIGGER(CLAMSHELLS) SHOVEL DIGGING BAR (OPTIONAL) BRIGHT COLORED SPRAY PAINT STRING LINE STAKES AND LEVEL CORDLESS OR
10 x 10 Flat Top Two Tone Pergola
 0 x 0 Flat Top Two Tone Pergola Models: Bordeaux ASSEMBLY GUIDE OPTIONAL ACCESSORIES Arch Kit System ( Arches) Privacy Fence Panel System ( Panels & Middle Post) Bolt Down Bracket Kit ( for Pergola) Ver.0-00
OPEN PICKET PANEL AND GATE INSTALLATION INSTRUCTIONS
 For All Your Vinyl Fencing Needs OPEN PICKET PANEL AND GATE INSTALLATION INSTRUCTIONS 1 BEFORE YOU START, IT S IMPORTANT TO CHECK: That fence or the fence post footings do not exceed your lot lines of
10x10 Trellis Pergola
 0x0 Trellis Pergola ASSEMBLY GUIDE Ver.0-7 Table of Contents PAGE Introduction & Overview...................................................... Pergola Materials Overview..............................................................
10x10 Trellis Pergola
 0x0 Trellis Pergola ASSEMBLY GUIDE Ver.-007 Table of Contents PAGE 0x0 Trellis Pergola Introduction & Overview...................................................... Pergola Materials Overview..............................................................
Installation Manual For ToddPod Outdoor Shower Enclosures
 Installation Manual For ToddPod Outdoor Shower Enclosures Contact us at 888-545-9763 or email us at office@toddpod.com with any questions during the installation process. Our service team is available
PVC Fencing Install Instructions
 PVC Fencing Install Instructions Step 1-Pounding the Galvanized Steel Posts Call your local area utility company to come mark underground lines before any digging or pounding any posts into the ground.
FENCE INSTALLATION GUIDE 8 HIGH WALLS
 FENCE INSTALLATION GUIDE 8 HIGH WALLS 1.866.648.9336 www.simtekfence.com INSTALLATION GUIDE These instructions are designed to assist both professional installers and do-it-yourselfers of SimTek decorative
Installa on Guide: Fence Distributors. YourNextFence.com
 YourNextFence.com Plan Your Fence each line by dividing the length of each line in inches by 96. Round any remainder up. 2 Calculate Materials * For standard single gates (46 1/4 opening) : (1) small Trex
ASPEN STYLE. ORNAMENTAL GATE INSTALLATION GUIDE 3 Rails, Pressed Top/Flat Bottom Model No. EGBR5842-N2P
 1 ASPEN STYLE ORNAMENTAL GATE INSTALLATION GUIDE 3 Rails, Pressed Top/Flat Bottom Model No. EGBR5842-N2P INSTALLATION VIDEO AVAILABLE AT: video01.xcelfence.com Item Description Gate installation and assembly
Vinyl Fence Installation Instructions. Privacy Fence Installation Instructions
 Privacy Fence Installation Instructions Tips Before You Start - Read this instruction sheet completely. - During fence assembly, work on a soft, non-abrasive surfaces where possible to avoid - scratching
10 x 10 Arch Top Pergola
 0 x 0 Arch Top Pergola I N S T A L L A T I O N G U I D E O P T I O N A L A C C E S S O R I E S Privacy Fence Panel System ( Panels & Middle Post Included) Bolt Down Bracket Kit (Set of ) Additional Shade
RANCH RAIL FENCE INSTALLATION INSTRUCTIONS
 1 WHAT YOU LL NEED TO INSTALL POWER AUGER OR POST HOLE DIGGER(CLAMSHELLS) SHOVEL DIGGING BAR (OPTIONAL) BRIGHT COLORED SPRAY PAINT STRING LINE STAKES AND LEVEL CORDLESS OR POWER DRILL WITH DRILL AND SCREW
FENCE INSTALLATION GUIDE 6 HIGH FENCE
 FENCE INSTALLATION GUIDE 6 HIGH FENCE 1.866.648.9336 www.simtekfence.com INSTALLATION GUIDE These instructions are designed to assist both professional installers and do-it-yourselfers of SimTek decorative
Aluminum Pre-Built Fence For Standard & Heavy-Duty Series
 ALUMFENCEA-BOM Aluminum Pre-Built Fence For Standard & Heavy-Duty Series INSTALLATION INSTRUCTIONS Read all instructions prior to installing product. Refer to manufacturers safety instructions when operating
10 x 10 Flat Top Pergola
 0 x 0 Flat Top Pergola A S S E M B L Y G U I D E Models: Venetian, Tuscany, Luxor, Acadia O P T I O N A L A C C E S S O R I E S Arch Kit System ( Arches) Privacy Fence Panel System ( Panels & Middle Post)
SECTION 19: Endwood Fusion Welded Gate Installation Guide
 SECTION 19: Endwood Fusion Welded Gate Installation Guide ASSEMBLY AND INSTALLATION FOR: Fusion Welded Gates Gate Frame with Full Size Pickets Privacy & Board on Board California & Shadowbox Gate width
ASPEN STYLE. ORNAMENTAL FENCE INSTALLATION GUIDE 3 Rails, Pressed Top/Flat Bottom Model No. NBR7958-NPF
 1 ASPEN STYLE ORNAMENTAL FENCE INSTALLATION GUIDE 3 Rails, Pressed Top/Flat Bottom Model No. NBR7958-NPF INSTALLATION VIDEO AVAILABLE AT: video01.xcelfence.com Item Description Fence installation and assembly
Installation Instructions. Tools Needed. Tape measure. Level. Shovel or Post hole digger. Concrete. Drill. Stakes. Mallet or hammer.
 Installation Guide EcoStone Fence 1330 West 400 North Orem, UT 84057 Toll Free 1.866.648.9336 Tel. 1.801.655.5236 Fax 1.801.655.5240 www.ecostonefence.com Installation Instructions Introduction. These
Before You Begin IMPORTANT. Always wear safety glasses when cutting and drilling railing or decking products.
 Before You Begin IMPORTANT Always wear safety glasses when cutting and drilling railing or decking products. HELPFUL HINTS Use carbide-tipped, multi-purpose blade for cutting. Do not lay components on
The Nantucket Legacy Arbor
 SSEMLY INSTRUTIONS The Nantucket Legacy rbor Please read through before starting assembly. IMPORTNT: HEK THE INSIDE OF YOUR POSTS FOR LL MTERILS. heck ox for These ontents In. the Keystone event of missing
Vinyl Fence and Railing
 Vinyl Fence and Railing WHY PRO ELITE & PRO GUARD VINYL? Virtually maintenance free Weather resistant Safe, strong, durable, and ideal for all climates No painting, sanding, or maintenance required Easy
PRO-RIB FENCE PANELS INSTALLATION GUIDELINES. Virtually Maintenance Free Available in 24 Colors Custom Heights Available by the Inch
 PRO-RIB FENCE PANELS INSTALLATION GUIDELINES Virtually Maintenance Free Available in 24 Colors Custom Heights Available by the Inch www.midwestmanufacturing.com Page 2 TOOLS NEEDED Measuring Tape Drill
INSTALLATION INSTRUCTIONS GUIDE
 CERTAINTEED RAILING AND DECKING INSTALLATION INSTRUCTIONS GUIDE Kingston Vinyl Railing and Vinyl Decking CONTENTS Important Information Before You Begin...3 Helpful Hints, Tips, Fire Information and Tools
Assembly Instructions
 Unite Panel System Hinge Door July 2016 #12 x / slotted hex washer head bolt Figure 1 threshold bracket frame Detail F threshold bracket threshold bracket (installed) #12 x / slotted hex washer head bolt
Windsor Arbor. Parts List: General Information: Tools required: Assembly & installation Instructions
 Windsor Arbor Assembly & installation Instructions Parts List: General Information:» Read through carefully before beginning assembly.» When assembling components, place on a clean, flat, non-abrasive
Installa on Guide: Fence Distributors. YourNextFence.com
 TM YourNextFence.com Plan Your Fence each line by dividing the length of each line in inches by 97. Round any remainder up. 2 Calculate Materials Tools Needed Stakes Circular Saw String Line Drill Marking
PRO Brake Operating Instructions
 PRO Brake Operating Instructions Tapco Products Company P R O 9 a n d P R O B r a k e s PRO Brake System PRO Cut Off Gauge Simplifies cutting. PRO Cut-Off Quickly, safely, and easily makes factory quality
DURASTALL SHOWER STALL ASSEMBLY INSTALLATION REPAIR PARTS FOR ONE OF THE FOLLOWING MODELS:
 DURASTALL SHOWER STALL ASSEMBLY INSTALLATION REPAIR PARTS FOR ONE OF THE FOLLOWING : MODEL: 80 (32 ) 140 (36 ) Cabinet (rigid corners) with Standard Base complete with Curtain and Valve assembly. MODEL:
Shetland Stalls Installation Instructions
 Shetland Stalls Installation Instructions RAMM Horse Fencing and Stalls 13150 Airport Hwy. Swanton, OH 43558-9615 1-800-434-8456 Rev. 1/9/18 Before you start Kit can accommodate up to 12 wide stall front
1. Layout. Step 1. Step 2. Step 3. Fig. 1
 1-3/8 Panel Clamp Tools You Will Need: Tape Measure, Mason s String, Stakes, Hole Digger, Shovel, Level, Wheelbarrow, Wrenches or Adjustable Wrench, Hacksaw, Pliers, Cutting Pliers, Fence Stretcher and
Oxford Stalls Installation Instructions
 Oxford Stalls Installation Instructions RAMM Horse Fencing and Stalls 13150 Airport Hwy. Swanton, OH 43558-9615 1-800-434-8456 Rev. 8/15/17 Before You Start Typical stall sizes are 10 x 10, 12 x 12 or
FENCE INSTALLATION GUIDE 3, 4, & 6 HIGH FENCE
 FENCE INSTALLATION GUIDE 3, 4, & 6 HIGH FENCE 1.866.648.9336 www.simtekfence.com INSTALLATION GUIDE These instructions are designed to assist both professional installers and do-it-yourselfers of SimTek
INSTALLATION INSTRUCTIONS FRAMELESS CONTINUOUS HINGE SHOWER ENCLOSURE QCI5233
 INSTALLATION INSTRUCTIONS FRAMELESS CONTINUOUS HINGE SHOWER ENCLOSURE QCI5233 QCI5233 Rev 0 Page 1 Certified 06/20/2016 INSTALLATION NOTES: Unpack your unit carefully and inspect for freight damage. Lay
PRO Series Brakes Operating Instructions
 PRO Series Brakes Operating Instructions Tapco Products Company PRO Brake System PRO Cut Off Gauge Simplifies cutting. PRO Cut-Off Quickly, safely, and easily makes factory quality cuts in coil stock,
Vinyl Privacy & Picket Gates
 FREEDOM-WEB Privacy & Picket s INSTALLATION INSTRUCTIONS Read all instructions prior to installing product. Refer to manufacturers safety instructions when operating any tools. To register your product,
INSTALLATION MANUAL FRONT. See pages 2 and 3 of this manual for configuration options. Level of Difficulty. Product Photo (center section only)
") INSTALLATION MANUAL FRONT Level of Difficulty Moderate Product Photo (center section only) All hardware listed below will be provided with the bumpers center section. Additional hardware will be supplied
INSTALLATION MANUAL FRONT Level of Difficulty Moderate Product Photo (center section only) All hardware listed below will be provided with the bumpers center section. Additional hardware will be supplied
YUKON PATIO COVER INSTALLATION INSTRUCTIONS
 YUKON PATIO COVER INSTALLATION INSTRUCTIONS Before You Begin: Consult your local building department for any required permits You may be required to obtain a building permit for this structure. Contact
The Nantucket Legacy Arbor
 ASSEMBLY INSTRUCTIONS 0. in 9 in 0. in 68 in 7 in in *Nantucket Legacy with Trim Kit Shown Above. Please read through before starting assembly. in 60 in 0 in 8 in IMPORTANT: CHECK THE INSIDE OF YOUR POSTS
PVC Composite Railing & Stair Kit
 FREEDOM-WEB PVC Composite Railing & Stair Kit INSTALLATION INSTRUCTIONS Read all instructions prior to installing product. Refer to manufacturers safety instructions when operating any tools. To register
Downtown Rack. Custom logo option available
 Custom logo option available Downtown Rack The Downtown Rack uses thick, square-tube construction that can t be cut with a pipe cutter. The extended width of the Downtown Rack makes for easy bike parking
Swerve Rack CUSTOM RACKS AVAILABLE
 CUSTOM RACKS AVAILABLE Swerve Rack The design of the Swerve mirrors the bike frame, thus providing superior bike support while making it easy to secure both the bike frame and wheel with a standard u-lock.
Fold-A-Way Patio Door ASSEMBLY & INSTALLATION GUIDE
 Fold-A-Way Patio Door ASSEMBLY & INSTALLATION GUIDE This instruction guide provides the minimum recommended procedures to correctly prepare the rough opening, install a fold-a-way patio door unit and apply
Double Beam Freestanding Pergola Installation Guide
 Double Beam Freestanding Pergola Installation Guide Patent Pending. Copyright 2011 USAVinyl, LLC - All Rights Reserved The information contained in these instructions are proprietary to USAVinyl, LLC and
6a. Eight Steps to Chain-Link Fence Installation
 6a. Eight Steps to Chain-Link Fence Installation Before You Start You will need the following tools to install your chain-link fence: Post hole digger Wheelbarrow, shovel and hoe for mixing concrete Tape
INSTALLATION INSTRUCTIONS IMPERVIA SLIDING PATIO DOOR WITH FINS
 2008 Pella Corporation Part Number: 803V0101 INSTALLATION INSTRUCTIONS IMPERVIA SLIDING PATIO DOOR WITH FINS Installation Instructions for Typical Wood Frame Construction. These instructions were developed
Residential Fencing Picket. Installation Guide
 Residential Fencing Picket. Installation Guide Jabiru Picket Fence White Contents Getting Started 4 Installation Tips 4 Shortening a Panel Tools Required 5 Instructions 6 3 Getting Started Congratulations
ALUMINUM FENCE. Additional freight charges may apply depending on order size. Please call for quote at
 ALUMINUM FENCE Additional freight charges may apply depending on order size. Please call for quote at 1-888-662-1788 Powder Coat Finish FORGERIGHT Fences are offered in the choice of three colors: Black,
PRODUCT: LOKI INSTALLATION INSTRUCTIONS. Product is covered by U.S. patents. For more information visit
 R INSTALLATION INSTRUCTIONS PRODUCT: LOKI CONFIGURATION: SINGLE DOOR MOUNT: GLASS MOUNT Product is covered by U.S. patents. For more information visit www.krownlab.com . TOOLS + MATERIALS REQUIRED TOOLS
Good Neighbour INSTALLATION GUIDE GOOD NEIGHBOUR FENCING BEFORE YOU START TOOLS AND HARDWARE REQUIRED
 INSTALLATION GUIDE Good Neighbour GOOD NEIGHBOUR FENCING Stratco Good Neighbour fencing is both strong and attractive. Its design allows clean and uncluttered lines to be enjoyed by neighbours on both
MODERN PERGOLA INSTALLATION GUIDE. When only the best will do.
 MODERN PERGOLA INSTALLATION GUIDE When only the best will do. TOOLS LIST Drill(s) 3/8" Magnetic Driver (s) 12" Drill Extension #2 Square Drive bit for Drill or Driver Level Tape Measure Hammer Drill if
Retractable Screen Installation Instructions For Vinyl and Aluminum Clad and Wood In-Swing Hinged Doors (See separate instructions for sliding doors)
") Retractable Screen Installation Instructions For Vinyl and Aluminum Clad and Wood In-Swing Hinged Doors (See separate instructions for sliding doors) IMPORTANT: Please read before you begin. Table of Contents
Retractable Screen Installation Instructions For Vinyl and Aluminum Clad and Wood In-Swing Hinged Doors (See separate instructions for sliding doors) IMPORTANT: Please read before you begin. Table of Contents
1/4 FRAMELESS CONTINUOUS HINGE SHOWER ENCLOSURE
 1/4 FRAMELESS CONTINUOUS HINGE SHOWER ENCLOSURE QCI5028 Rev 1 Page 1 Certified 09/19/2018 INSTALLATION NOTES: Unpack your unit carefully and inspect for freight damage. Lay out and identify all parts using
Quick Fit Installation Guide Retractable Screen - Double Door
 Quick Fit Installation Guide Retractable Screen - Double Door 1 REMOVE KIT PARTS FROM SHIPPING TUBE 2 Slide bolts 2 Rail receiver Clips 15 Mounting screws 1 Housing end cap screw 2 Handles 1 Housing end
8 x 8 Flat Top Pergola
 A S S E M B L Y G U I D E O P T I O N A L A C C E S S O R Y Bolt Down Bracket Kit Models: Mirage, Mandalay Ver 6/00 Ta b l e o f Co n t e n t s Introduction & Overview......................................................
675 Quick N Stall Neo Angle Framed Hinge Shower Enclosure
 INSTALLATION INSTRUCTIONS 675 Quick N Stall Neo Angle Framed Hinge Shower Enclosure Call Technical Dept @ 1-800-452-2726 QCI1003 Page 1 of 9 Certified 10/01/09 INSTALLATION NOTES: Unpack your unit carefully
1. TOOLS + MATERIALS REQUIRED
 R INSTALLATION INSTRUCTIONS PRODUCT: BALDUR + ODEN CONFIGURATION: BI-PARTING DOOR MOUNT: TOP MOUNT Product is covered by U.S. patents. For more information visit www.krownlab.com. TOOLS + MATERIALS REQUIRED
Rockwell 4-in-1 Sliding Door
 Rockwell 4-in-1 Sliding Door ASSEMBLY INSTRUCTIONS ROCKWELL 4-IN-1 SLIDING DOOR Recommended Tools Drill with Phillips Bit Socket Wrench with 7/16 Socket Rubber Mallet Adjustable Square ROCKWELL 4-IN-1
GOOD NEIGHBOUR FENCING INSTALLATION GUIDE GOOD NEIGHBOUR FENCING BEFORE YOU START TOOLS AND HARDWARE REQUIRED
 GOOD NEIGHBOUR FENCING Stratco Good Neighbour fencing is both strong and attractive. Its design allows clean and uncluttered lines to be enjoyed by neighbours on both sides of the fence. Good Neighbour
Quick Fit Installation Guide Retractable Screen - Single Door
 Quick Fit Installation Guide Retractable Screen - Single Door 1 REMOVE KIT PARTS FROM SHIPPING TUBE 15 Mounting screws 1 Housing end cap screw 2 Handles 1 Housing end cap 1 Bushing 1 Pull bar end cap 2
BioPrism Solid Surface
 Please read all instructions before installing products. These instructions are intended for use with InPro s standard toilet partitions, which include 58 high doors and wall panels, when deviating from
Installation manual. For setting in concrete/on base plates - Panel height 1830
 1 Aluminium fencing and drive-in gates Installation manual For setting in concrete/on base plates - Panel height 1830 Aluclos system components: U10 Connecting U-bracket 1900 mm CL18/CL18.XL Half-height
Installation Instructions for Vista Air Vertically Folding Walls
 Installation Instructions for Vista Air Vertically Folding Walls Use these instructions in conjunction with your shop drawings to see the specifics that are particular to the model you are installing.
INOVO 4-LITE SLIDING PATIO DOOR ASSEMBLY AND INSTALLATION INSTRUCTIONS
 INOVO 4-LITE SLIDING PATIO DOOR ASSEMBLY AND INSTALLATION INSTRUCTIONS IMPORTANT: READ THE INSTRUCTIONS AND FAMILIARIZE YOURSELF WITH THE DOOR PARTS AND PIECES BEFORE BEGINNING ASSEMBLY AND INSTALLATION.
VINYL CLASSIC FREESTANDING PERGOLA ASSEMBLY INSTRUCTIONS
 P a g e 1 VINYL CLASSIC FREESTANDING PERGOLA ASSEMBLY INSTRUCTIONS Shown: 8' x 12' Vinyl Classic Pergola with 12" Top and Main Runner Spacing The design of this pergola is based on all posts being installed
INSTALLATION INSTRUCTIONS FRAMELESS CONTINUOUS HINGE SHOWER ENCLOSURE QCI5232
 INSTALLATION INSTRUCTIONS FRAMELESS CONTINUOUS HINGE SHOWER ENCLOSURE QCI5232 QCI5232 Rev 0 Page 1 Certified 06/20/2016 INSTALLATION NOTES: Unpack your unit carefully and inspect for freight damage. Lay
The following instructions will guide you through the installation of your new vinyl railing stair kit.
 Installation Guide Vinyl Standard Stair Railing Tools Required Protective eye glasses Tape measure Variable speed drill/screwdriver Rotary hammer or hammer drill and masonry percussion bit recommended
Residential & Industrial Fence
 Residential & Industrial Fence Assembly Instructions CONTENTS 02: OVERVIEW & CONTENTS 03: PRODUCT SPECIFICATIONS 04: GETTING STARTED 05: WALL ATTACHMENT & LINE POST ASSEMBLY 06: CORNER POST ASSEMBLY 07:
Installation Operation Care
 Installation Operation Care Palm Beach Polysatin Shutters CONTENTS Getting Started Installation Overview...1 Unpacking...1 Tools and Materials Needed...1 Fasteners...2 Frame Assembly Assemble the Frame
Dura-Lock Roof System
 DLR-14 Dura-Lock Roof System Assembly and Installation Instructions Read the instructions before starting the job. They explain the steps required to produce a finished product that will meet factory specifications.
Tools & materials required for each application. Hammer drill Shovel. Masonry bits: Concrete mixing. 7/32", 5/16" equipment
 Installation Guide U.S. Version Tools & materials required for each application Hard Surfaces ll pplications Soft Surfaces Mitre saw with a non-ferrous metal cutting blade Post hole digger Hammer drill
Installation Manual Flat Track Series
 Manual Flat Track Series Contents Safety...1 Parts...2 Hardware.......................................... 2 Tools Required..................................... 4.............................................
Oceanside Outdoor Vinyl Shower Kit (3 x 3 Enclosure)
") Oceanside Outdoor Vinyl Shower Kit ( x Enclosure) A B ASSEMBLY GUIDE REQUIRED FOR INSTALLATION (A) Zippity Post Extension for In-Ground Installation (Sold as 4-Packs) (B) Zippity Galvanized Steel Surface
Oceanside Outdoor Vinyl Shower Kit ( x Enclosure) A B ASSEMBLY GUIDE REQUIRED FOR INSTALLATION (A) Zippity Post Extension for In-Ground Installation (Sold as 4-Packs) (B) Zippity Galvanized Steel Surface
1/4 FRAMELESS CONTINUOUS HINGE SHOWER ENCLOSURE 1400A-1700A-1800A
 1/4 FRAMELESS CONTINUOUS HINGE SHOWER ENCLOSURE 1400A-1700A-1800A F AB GLASS AND MIRROR www.fabglassandmirror.com Call: +1 888-474-2221 Fax: (614)-334-4919 Office Timing: 8:30-18:00 EST info@fabglassandmirror.com
Spiral Slide
 IMPORTANT Page 1 PLEASE READ THESE INSTRUCTIONS BEFORE COMMENCING ASSEMBLY. All equipment must be installed in accordance with these instructions. Check your shipment against Bill of Lading and Parts list.
Installation Guidelines
 Page 1 Tools You ll Need 4 ft. Carpenter s level Chalk line (to mark U channel locations) Cordless drill/nut driver Caulking gun Chop saw with a metal cutting blade on it (required to make accurate and
6 1/2 x 6 1/2 Wood Grain Flat Top Pergola
 / x / Wood Grain Flat Top Pergola A S S E M B LY G U I D E Models: Lakewood OPTIONAL ACCESSORY Bolt Down Bracket Kit V.- Ta b l e o f Co n t e n t s The PAGE Introduction & Overview.......................................................
The following instructions will guide you through the installation of your new vinyl railing.
 Installation Guide St. James Vinyl T-Rail Tools Required Protective eye glasses 3/8 x 3 Concrete Anchors/Fasteners (for Tape measure concrete installations) Variable speed drill/screwdriver Philips Driver
The Mirage Pergola ASSEMBLY GUIDE. OPTIONAL ACCESSORY Bolt Down Bracket Kit. Ver 3/2009
 ASSEMBLY GUIDE OPTIONAL ACCESSORY Bolt Down Bracket Kit Ver /009 Table of Contents PAGE Introduction & Overview...................................................... Mirage Pergola Materials Overview.....................................................
INSTALLATION INSTRUCTIONS. UNIT No. 160/760 THIN-LINE SHOWER ENCLOSURE
 INSTALLATION INSTRUCTIONS UNIT No. 160/760 THIN-LINE SHOWER ENCLOSURE QCI0011 Rev. 0 Page 1of 10 Certified 10/18/2006 MAINTENANCE: Two primary materials are used to manufacture your new Basco enclosure;
The Pergola. ShadeTree Canopy Systems Assembly Instructions. ShadeTree Deluxe or Basic Pergola supported by a vinyl free-standing support structure.
 ShadeTree Canopy Systems Assembly Instructions ShadeTree Deluxe or Basic Pergola supported by a vinyl free-standing support structure. 2012 The Pergola Dear Customer: Thank you for purchasing our ShadeTree
This instruction manual is an in-depth look and explanation of how to assemble and install the Murphy Bed properly and efficiently.
 This instruction manual is an in-depth look and explanation of how to assemble and install the Murphy Bed properly and efficiently. Don t be put off by the size of the instruction manual as the large diagrams
IMPORTANT: CHECK THE INSIDE OF THE LARGER PIECES IN YOUR BOX FOR OTHER MATERIALS PACKED INSIDE.
 ASSEMBLY GUIDE Newport Vinyl Picket Fence with Post and No-Dig Steel Pipe Anchor Kit (6 H x 7 W) 68 / in /6 in 6 in / in 7/8 in 8 / in 6 in in Ground 4 in This fence can easily be trimmed down horizontally
Dublin Stalls Installation Instructions
 Dublin Stalls Installation Instructions RAMM Horse Fencing and Stalls 13150 Airport Hwy. Swanton, OH 43558-9615 1-800-434-8456 Rev. 9/13/17 Part Identification Round Track Bracket (4) (Not Painted) Round
Manchester Vinyl Picket Gate with Posts (42 Wide x 42 Tall)
") ASSEMBLY INSTRUCTIONS Manchester Vinyl Picket Gate with Posts (4 Wide x 4 Tall) /4 in / in 4 in 6 in 45 /8 in 4 in 8 in 4 / in Gate Opening in Ground 49 / in Outside Posts This Gate is designed to be integrated
ASSEMBLY INSTRUCTIONS Manchester Vinyl Picket Gate with Posts (4 Wide x 4 Tall) /4 in / in 4 in 6 in 45 /8 in 4 in 8 in 4 / in Gate Opening in Ground 49 / in Outside Posts This Gate is designed to be integrated