INSTALLATION INSTRUCTIONS FOR WALL TUB SETS, TWO HANDLE SHOWER SETS AND WALL LAVATORY SET VALVES NUMBERED: RC & RC
|
|
|
- Clementine Hodges
- 5 years ago
- Views:
Transcription
1 P INSTALLATION INSTRUCTIONS FOR WALL TUB SETS, TWO HANDLE SHOWER SETS AND WALL LAVATORY SET VALVES NUMBERED: RC & RC 2222 Camden Court, Oak Brook, IL Telephone: 800-PHYLRICH ( ) Fax:
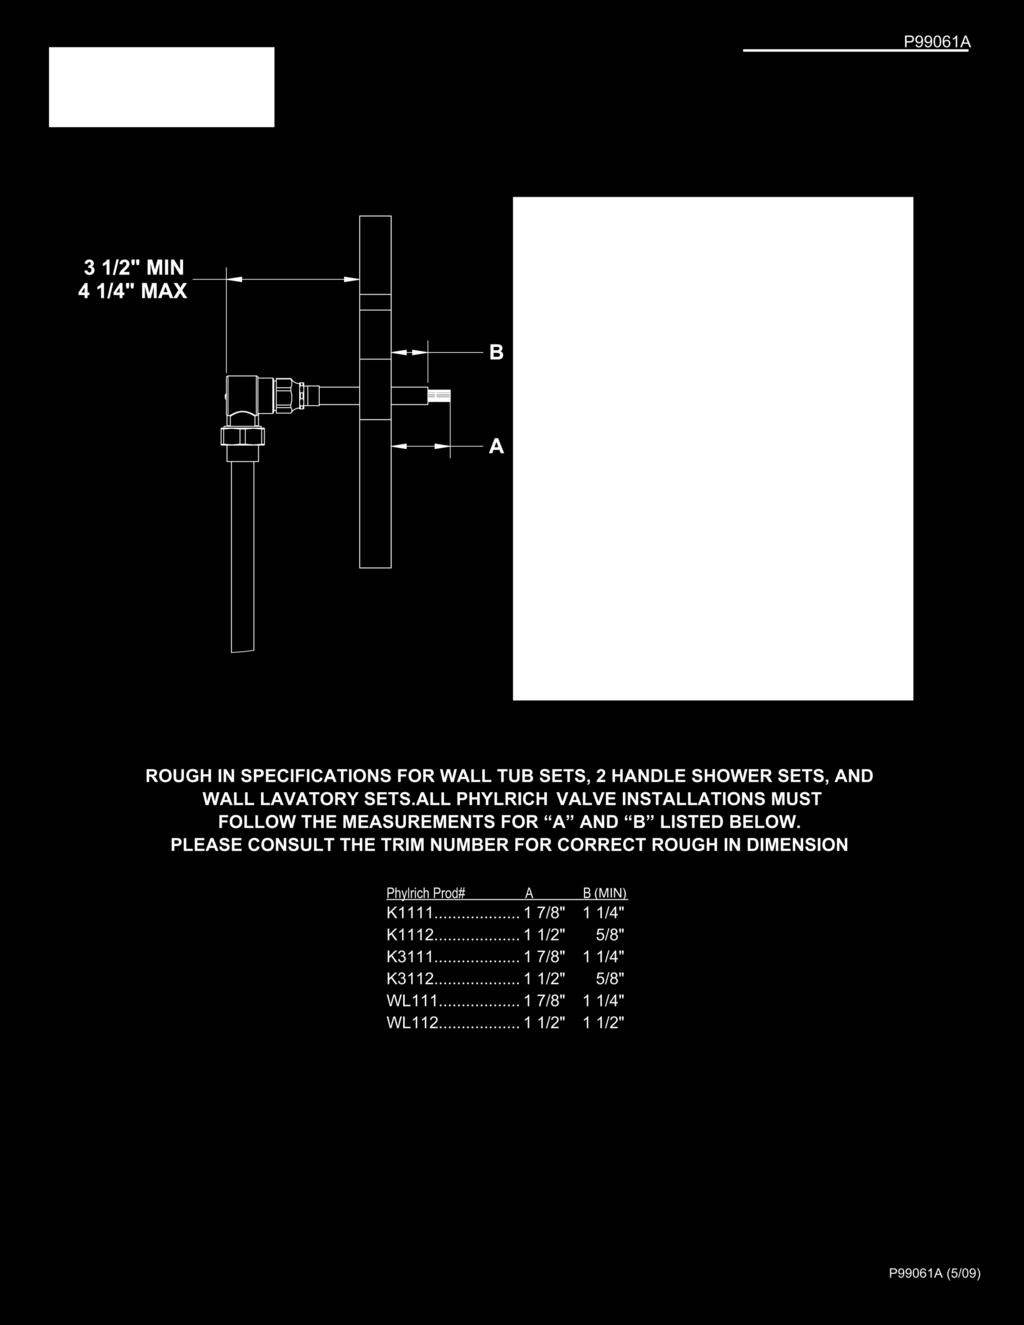
2 Step 1 Step 3 Connect hot and cold corner valves using 1/2" copper adaptors(a), copper lines (B) and copper tee (C). Note: DO NOT APPLY HEAT DIRECTLY TO VALVE BODIES. Center-to-center dimension to be specified by customer. Connect 12" adaptors and copper supply lines to 1/2 unions (part #7). Secure the assembled valve once the proper location has been determined. Connect the copper supply lines to the hot and cold supplies. For For shower installation head installation go to step go to 4. step 4. For tub wall installation lavatory and go to wall step tub 5. spout installation go to For step wall 5. lavatory installation go to step 6. Step2 Step 4 Shower Installation Please refer to rough-in specifications P99061A to determinminethe the A "A" and dimension B dimensions and theand proper proper location locations for for the Please refer to rough-in specifications P99005A to deter- the valve. valves. The The "A" dimension A dimension is from is from the tip the oftip theof stem the stem to the to finished the finished wall. wall. Installation The B of adimension crossbeamis between from the the tip of wall the studs threaded at thisvalve location shank is recommended. to the finished wall. Installation of a crossbeam between the wall studs at this location is recommended. Determine the proper locations for the showerhead. Install acrossbeamandsecurea1/2"brass90 elbow.connect elbow 3 to tee using copper lines and '/2" male adaptor. Check all connections for leaks and flush all lines. Wall is now ready to be closed. Proceed to step 4.1. Page 1
3 Step 4.1 Step 5.1 Once finished wall is installed, attach showerhead to the long end of the 8" shower arm and slide fiange onto the short end. attach shower arm to brass elbow. Check connections for leaks Slide fiange against wall. Proceed to step 6 Once finished wall is installed, cut the spout tube so that it extends ¼ from the finished wall. Be sure to remove any burrs around the cut surface. All burrs must be removed to prevent damage to spout o-rings. Take note that spout tube may need to be removed from wall in order to be cut. Step 5 Spout Installation Step 5.2 Wall Lavatory Installation B D E Determine the proper locations for the spout. (Note: the outlet of the spout must be a minimum of 2 above the floodplain of the tub.) Install a crossbeam and secure a 90 elbow. Connect elbow to tee using copper lines and ½ male adaptor. Connect adaptor nut (D) and spout tube (E) to elbow. Check all connections for leaks and flush lines. Wall is now ready to be closed. Proceed to step 5.1. Thread the spout mount base (F) onto the spout tube (E) and secure in place by tightening setscrews (G). Be careful to mount the spout mount base (F) as close to the wall as possible while maintaining horizontal alignment. Use the alignment screws (H) as reference and align them parallel to the floor. Page 2
4 Step 5.3 Step 6 Align alignment grooves on the spout with the alignment screws (H). Insert the spout adaptor (I) into the spout tube (E). Be sure not to damage o-rings. Refer to valve trim number and page P99061A to determine proper valve installation specifications. Proceed to step 7 Step 5.4 Step 7 Once spout is flush against the wall secure in place with setscrew (J). Proceed to step 6. Once the finished wall is in place, attach o-rings (K), escutcheons (L), wear washers (M), and handles (N), to the valve stems. Secure handle with setscrew (P) If the valve stem is too short to accept handle see step 7.1 If the valve stem is too long see step 7.2 and 7.3. Page 3
5 Step 7.1 Step 7.3 If the valve is installed too deep behind the wall, extension stems are available. Please contact your local distributor to order part number EXTWALL65_001 Remove handle, escutcheon and stern assembly (#6) Make appropriate cuts on sterm (#4) and nipple (#5). Reinstall stern assemblies, escutcheons and handles. Step 7.2 Step HANDLE CLEARANCE If the valve is installed too far out of the wall the stems and nipples may be trimmed. to determine amount to be cut measure the gap between the escutcheon and the wall and/or the gap between the handle and escutcheon, Attach handle (14) to handle escutcheon (13). Tighten spacer nut (15) into the handle (14) so that there is clearance (~1/13 ) between the handle (14) and the handle base (13). See clearance diagram above. Page 4
6 Step 7.5 Step Secure handle (14) to the handle escutcheon (13) by tightening the cap screw (16) into the valve stem. Complete the handle installation by placing the o-ring (17) and decorative cover plate (18) into the recess in the handle (14). Page 5 P99061 (5/09)
7
ONASSIS SHOWER SET INSTALLATION
 SKU(s): 925939 BEFORE YOU BEGIN We recommend consulting a professional if you are unfamiliar with installing plumbing fixtures. Signature Hardware accepts no liability for any damage to the plumbing, floor,
Wall-Mounted Basin Set
 P24702-LV 2014 1 of 6 KALLISTA THANK YOU FOR CHOOSING KALLISTA We appreciate your commitment to KALLISTA quality products. Please take a moment to review this manual before you install your KALLISTA product.
CALLAS THERMOSTATIC SHOWER SET
 SKU(s): 925945 CALLAS THERMOSTATIC SHOWER SET BEFORE YOU BEGIN We recommend consulting a professional if you are unfamiliar with installing plumbing fixtures. Signature Hardware accepts no liability for
LATTIMORE SHOWER SET INSTALLATION
 SKU(s): 931419 LATTIMORE SHOWER SET INSTALLATION BEFORE YOU BEGIN We recommend consulting a professional if you are unfamiliar with installing plumbing fixtures. Signature Hardware accepts no liability
EXIRA SHOWER SET INSTALLATION
 SKU(s): 925470 EXIRA SHOWER SET INSTALLATION BEFORE YOU BEGIN We recommend consulting a professional if you are unfamiliar with installing plumbing fixtures. Signature Hardware accepts no liability for
Installation Instructions 3/4 Thermostatic Valve Rough-in & Trim (PL8950)
") Tub & Shower PL950 Installation Instructions 3/ Thermostatic Valve Rough-in & Trim (PL950) CONTENT 0 - Valve & stop vlave specifications 03 - Face plate specifications 0 - Handle specifications 05 - Shower
Tub & Shower PL950 Installation Instructions 3/ Thermostatic Valve Rough-in & Trim (PL950) CONTENT 0 - Valve & stop vlave specifications 03 - Face plate specifications 0 - Handle specifications 05 - Shower
Pressure Balance Shower Only Dual Control (Volume & Temperature) Ceramic Disc Cartridge Platinum Shower Trim Kit
 Ceramic Disc Cartridge Platinum Shower Trim Kit") Shower Only PL8900-00 & TR-SH Pressure Balance Shower Only Dual Control (Volume & Temperature) Ceramic Disc Cartridge Platinum Shower Trim Kit - Installation Instructions Before Your Installation Read
Shower Only PL8900-00 & TR-SH Pressure Balance Shower Only Dual Control (Volume & Temperature) Ceramic Disc Cartridge Platinum Shower Trim Kit - Installation Instructions Before Your Installation Read
Installation Instructions
 MOUNT TUB SYSTEMS HAMPTON TRIM KIT T980.702 Installation Instructions T980.702 T980.712 T980.722 T980.732 Thank you for selecting American-Standard...the benchmark of fine quality for over 100 years. To
SHELTON THERMOSTATIC SHOWER PANEL
 SKU(s): 413241 BEFORE YOU BEGIN We recommend consulting a professional if you are unfamiliar with installing plumbing fixtures. Signature Hardware accepts no liability for any damage to the plumbing, floor,
CAELI THERMOSTATIC SHOWER PANEL
 SKU(s): 300280 CAELI THERMOSTATIC SHOWER PANEL BEFORE YOU BEGIN We recommend consulting a professional if you are unfamiliar with installing plumbing fixtures. Signature Hardware accepts no liability for
Acrylic Claw Foot Tub
 Acrylic Claw Foot Tub Wrench or socket Drill & Bits Parts Recommended 2-2 x12 boards 4 Lag Bolts 4 Flat Washers Be sure to re-inforce the floor before securing tub. We recommend 2-2 x12 s securely fastened
Installation/Care/Use Manual Soft Sides Freeze Resistant Fountain
 Installation/Care/Use Manual Soft Sides Freeze Resistant Fountain EDFP217FPC Installer To assure you install this model easily and correctly, PLEASE READ THESE SIMPLE INSTRUCTIONS BEFORE STARTING THE INSTALLATION.
INSTALLATION INSTRUCTIONS
 INSTALLATION INSTRUCTIONS NOT INCLUDED NOT INCLUDED MODEL: LUGARNO HAND SHOWER SET (RH-9) Restoration Hardware Hand Shower / Slide Bar Specification Diagram SHOWN WITH SHOWER SET RH-90 (NOT INCLUDED) All
INSTALLATION GUIDELINES
 STYLE No. DSXS20 with 8 Shower Head and Metal Cross Handles STYLE No. DSXS2C System with Metal Cross Handles STYLE No. DSXS30 with 8 Shower Head, Metal Lever and Cross Handle STYLE No. DSXS3C System with
SEBASTIAN TUB FAUCET INSTALLATION
 BEFORE YOU BEGIN We recommend consulting a professional if you are unfamiliar with installing plumbing fixtures. Signature Hardware accepts no liability for any damage to the faucet, plumbing, bathtub,
BALANTINE WALL-MOUNT FAUCET INSTALLATION
 SKU(s): 911574, 911575 BALANTINE WALL-MOUNT FAUCET INSTALLATION BEFORE YOU BEGIN We recommend consulting a professional if you are unfamiliar with installing bathroom fixtures and plumbing. Signature Hardware
Bodyspray INSTALLATION INSTRUCTIONS
 Bodyspray P22077 P22079 2014 KALLISTA 1 of 8 THANK YOU FOR CHOOSING KALLISTA Bodyspray We appreciate your commitment to KALLISTA quality products. Please take a moment to review this manual before you
MALEKO WALL-MOUNT FAUCET INSTALLATION
 SKU(s): 934146 BEFORE YOU BEGIN We recommend consulting a professional if you are unfamiliar with installing bathroom fixtures and plumbing. Signature Hardware accepts no liability for any damage to the
INSTALLATION INSTRUCTIONS
 Flash Shower Valve Rough With Screwdriver Stops Thank you for selecting American-Standard... the benchmark of fine quality for over 0 years. To ensure that your installation proceeds smoothly-please read
INSTALLATION GUIDELINES
 RW ATLAS Wall Mounted Lavatory Faucet Metal Wheel Handles Style No. RWLS60 IMPORTANT: INSTALLATION GUIDELINES To ensure this product is installed properly, you must read and follow these guidelines. The
Installation Instructions
 Contemporary Square Floor Mounted Tub Filler Thank you for selecting American-Standard... the benchmark of fine quality for over 00 years. To ensure that your installation proceeds smoothly-- please read
Installation Instructions
 Contemporary Round Floor Mounted Tub Filler Thank you for selecting American-Standard... the benchmark of fine quality for over 00 years. To ensure that your installation proceeds smoothly-- please read
WILLIS WIDESPREAD FAUCET
 SKU(s): 924621 WILLIS WIDESPREAD FAUCET BEFORE YOU BEGIN We recommend consulting a professional if you are unfamiliar with installing plumbing fixtures. Signature Hardware accepts no liability for any
VICTORIAN WIDESPREAD FAUCET
 VICTORIAN WIDESPREAD FAUCET SKU(s): 900889, 900890, 900907, 903778, 918910, 918911 BEFORE YOU BEGIN We recommend consulting a professional if you are unfamiliar with installing plumbing fixtures. Signature
ROTUNDA WALL-MOUNT FAUCET INSTALLATION
 SKU(s): 919045 BEFORE YOU BEGIN We recommend consulting a professional if you are unfamiliar with installing bathroom fixtures and plumbing. Signature Hardware accepts no liability for any damage to the
Preference Collection 5580 Treatment Console INSTALLATION GUIDE
 Preference Collection 5580 Treatment Console INSTALLATION GUIDE 0 WARNING Failure to install the 5580 as described in this installation guide may cause the unit to collapse, resulting in serious injury
CW-1401 (WL1212) CB-1401 (BL1212)
 CB-1401 (BL1212)") INSTALLATION INSTRUCTIONS C-00 (LB) CROSS HANDLE WALL-MOUNTED -HOLE BASIN MIXER TRIM ONLY, TO SUIT R-0 ROUGH CW-0 (WL) WHITE LEVER WALL-MOUNTED -HOLE BASIN MIXER TRIM ONLY, TO SUIT R-0 ROUGH CB-0 (BL)
INSTALLATION INSTRUCTIONS C-00 (LB) CROSS HANDLE WALL-MOUNTED -HOLE BASIN MIXER TRIM ONLY, TO SUIT R-0 ROUGH CW-0 (WL) WHITE LEVER WALL-MOUNTED -HOLE BASIN MIXER TRIM ONLY, TO SUIT R-0 ROUGH CB-0 (BL)
Preference Collection and Treatment Console INSTALLATION GUIDE
 Preference Collection 5580.69 and 5580.96 Treatment Console INSTALLATION GUIDE WARNING Failure to install the 5580 as described in this installation guide may cause the unit to collapse, resulting in serious
Installation Instructions
 LIFETIME UNIVERSAL DRAIN OVER THE RIM DRAIN AND STANDARD DRAIN BATH WASTE AND OVERFLOW WITH TOE TAPPER Installation Instructions 99.00.XXX Thank you for selecting American-Standard...the benchmark of fine
GLENBROOK/GLENGUARD VITREOUS CHINA DRINKING FOUNTAIN/CUSPIDOR
 GLENBROOK/GLENGUARD VITREOUS CHINA DRINKING FOUNTAIN/CUSPIDOR BEFORE YOU BEGIN HOW TO USE THESE INSTRUCTIONS Please read these instructions carefully to familiarize yourself with the required tools, materials,
Thermostatic Valve Trim
 Thermostatic Valve Trim P23052-CR, P23052-LV, P23122-LV, P23222-RK, P23222-LV, P24022-CL, P24022-CR, P24022-KL, P24022-RB, P24022-RL, P24122-CR, P24122-LV, P24129-CR, P24129-LV, P24421-CR, P24421-LV, P24422-CR,
Installation and Maintenance Instructions
 Installation and Maintenance Instructions Bradley Barrier-Free HN-300 In-Wall Shower Table of Contents Pre-Installation Information................2 Warranty...............................2 Components
3-way Transfer Valve Trim
 3-way Transfer Valve Trim P23083-CR, P23083-LV, P23183-LV, P23283-RK, P23283-LV, P24183-CR, P24183-LV, P24184-CR, P24184-LV, P24483-CR, P24483-LV, P24583-TT, P24683-CR, P24683-LV, P24724-LV 2014 1 of 6
WILLIS WALL-MOUNT FAUCET INSTALLATION
 SKU(s): 924620 BEFORE YOU BEGIN We recommend consulting a professional if you are unfamiliar with installing bathroom fixtures and plumbing. Signature Hardware accepts no liability for any damage to the
INSTALLATION INSTRUCTIONS
 INSTALLATION INSTRUCTIONS Square Free Standing Floor Mount Tub Filler Model D35900900 Thank you for selecting DXV. To ensure that your installation proceeds smoothly, please read these instructions carefully
HALSEY TAYLOR OWNERS MANUAL Contour TM Series Barrier-Free Water Coolers Refrigerated Fountains with Back Panel
 HALSEY TAYLOR OWNERS MANUAL Contour TM Series BarrierFree Water Coolers Refrigerated Fountains with Back Panel Figure HRFSERQ Figure HRFERQ Figure HRFSRQ Figure Not Shown Model HRFSERQ HRFERQ HRFSRQ HRFESRQ
x2 1/4 (6mm) Floor Anchor
 Floor Anchor") INSTALLATION GUIDE Main Components x1 Rail x5 Wall Spacer x2 Anti-jump Block x2 Straight Strap x1 Right Stopper x1 Left Stopper x5 5/16 (8mm x 60mm) Carriage Bolt x5 5/16 (8mm x25mm) Anchor x5 5/16 (8mm
INSTALLATION GUIDE Main Components x1 Rail x5 Wall Spacer x2 Anti-jump Block x2 Straight Strap x1 Right Stopper x1 Left Stopper x5 5/16 (8mm x 60mm) Carriage Bolt x5 5/16 (8mm x25mm) Anchor x5 5/16 (8mm
Halsey Taylor Owners Manual
 Halsey Taylor Owners Manual Wall Mount Steel Fountains ITALLER These series fountains are among the easiest to install Fountains on the market today. To assure you install these models easily and correctly,
VACUSEAL MODEL 200. HOT TUB PRODUCTS 233 Carrington Road Bethany CT
 VACUSEAL MODEL 200 J G F G H L HOT TUB PRODUCTS 233 Carrington Road Bethany CT 06524 860-469-2580 www.vacusealcoverlift.com www.hottubproducts.com Made in USA H K E D C I A P B 10 9 8 7 6 5 4 3 2 1 0 SPAS
WHITE ARCHIPELAGO PRESSURE BALANCE MIXING VALVE TRIM ONLY, TO SUIT M ROUGH
 INSTALLATION INSTRUCTIONS CW-00 WHITE ARCHIPELAGO PRESSURE BALANCE MIXING VALVE TRIM ONLY, TO SUIT M-0 ROUGH CB-00 BLACK ARCHIPELAGO PRESSURE BALANCE MIXING VALVE TRIM ONLY, TO SUIT M-0 ROUGH CW-0 WHITE
Fan, Eden/Northfield, GS Installation Instructions (SKU ) Packing List
 Packing List") Packing List Blower Assembly Wiring Harness Rheostat with Nut and Knob Snap Disc Mounting Hardware (4) rubber grommets with brass inserts, (4) nuts, (4) washers. Cover Assembly Installation Warning: Make
Packing List Blower Assembly Wiring Harness Rheostat with Nut and Knob Snap Disc Mounting Hardware (4) rubber grommets with brass inserts, (4) nuts, (4) washers. Cover Assembly Installation Warning: Make
Installation Instructions
 ROTARY DRAIN Rotary Bath Waste And Overflow with Pop-up Drain Installation Instructions 8.SERIES BATH-DRAIN SERIES Thank you for selecting American-Standard...the benchmark of fine quality for over 00
BARN DOOR HARDWARE KIT
 INSTALLATION GUIDE Main Components x1 Rail x5 Wall Spacer x2 Anti-jump Block x2 Bent Strap x1 Right Stopper x1 Left Stopper x5 5/16 (8mm x 60mm) Carriage Bolt x5 5/16 (8mm x25mm) Anchor x5 5/16 (8mm x
Dia H321-V, 3505-H321-V, 3506-H321-V Shower System Series Operation & Maintenance Manual. Options/Modifications. Compliance.
 ia 50--V, 505--V, 506--V Shower System Series peration & aintenance anual odel umbers 50--V and Shower System 505--V Shower/and Shower System 506--V Tub/Shower/and Shower System ptions/odifications -.5
INSTALLATION INSTRUCTIONS FREE STANDING TUB FILLERS
 INSTALLATION INSTRUCTIONS FREE STANDING TUB FILLERS Model # 2040-4261 Model # 2480-4261 Congratulations on the purchase of your Newport Brass product, an excellent choice, that will give you years of quality
Important Note: Why this guidebook is FREE?
 Easy DIY Murphy Bed Construction Guide 1 Important Note: This guide is a FREE SAMPLE of our Complete Construction Guidebook. With the help of this guide you will get familiar with the construction steps
Why are we giving this guidebook as a FREE download?
 Construction Guide Queen, Double & Twin Vertical 1 Note: This guide covers the construction steps for all 3 sizes of the vertical wall mount Easy DIY Murphy beds, Queen, Double and Twin. The construction
ED1300/1300F SERIES CONCEALED VERTICAL ROD DEVICE INSTALLATION INSTRUCTIONS
 ED1300/1300F SERIES CONCEALED VERTICAL ROD DEVICE INSTALLATION INSTRUCTIONS Ver.2 1300 SERIES CONCEALED VERTICAL ROD DEVICE Top Strike Latch Screws Strike Screws Release Plunger Top Latch Plunger Screws
x2 1/4 (6mm) Floor Anchor
 Floor Anchor") Main Components x1 Rail x5 Wall Spacer x2 Anti-jump Block x2 Bent Strap x1 Right Stopper x1 Left Stopper x5 5/16 (8mm x 60mm) Carriage Bolt x5 5/16 (8mm x25mm) Anchor x5 5/16 (8mm x 90mm) Wall Screw x2
Main Components x1 Rail x5 Wall Spacer x2 Anti-jump Block x2 Bent Strap x1 Right Stopper x1 Left Stopper x5 5/16 (8mm x 60mm) Carriage Bolt x5 5/16 (8mm x25mm) Anchor x5 5/16 (8mm x 90mm) Wall Screw x2
Floor-Mounted Tubfiller
 Floor-Mounted Tubfiller Installation Guide TSP510 TSU510 2012-04 Attention Before Installation 1. Inspect this product to ensure you have all parts as shown that are required for proper installation. 2.
INSTALLATION INSTRUCTIONS INS T A L L A TIO N INS T R U C TIO N S THE MAVERICK HANGER R H
 INS T A L L A TIO N INS T R U C TIO N S THE MAVERICK HANGER 10.6.2016 PARTS INSTALLATION SPECIFICATIONS AND TOOLS INSTRUCTIONS 2-1/4" 2-7/8 11-3/8" 1/4" 2-1/8 PARTS INSTALLATION AND INSTRUCTIONS TOOLS
Preference Collection 5531 Accessory Console I NSTALLATION GUIDE
 Preference Collection 5531 Accessory Console I NSTALLATION GUIDE WARNING Failure to install the 5531 as described in this installation guide may cause the unit to collapse, resulting in serious injury
INSTALLATION GUIDELINES
 IMPORTANT: To ensure this product is installed properly, you must read and follow these guidelines. The owner/user of this product must keep this information for future reference. This product must be
Volume Control Valve Trim
 Volume Control Valve Trim P23013-CR, P23013-LV, P23123-LV, P23223-RK, P23223-LV, P24113-CR, P24113-LV, P24118-CR, P24118-LV, P24423-CR, P24423-LV, P24523-TT, P24623-CR, P24623-LV, P24723-LV 2014 1 of 6
Cabinet Mount Lifter Instructions
 PART LIST 2 @ Side Pivot Arms 1 @ Coupler Tube 1 @ Left Hand Bracket 1 @ Right Hand Bracket 2 @ Cover Support Arms w/ Foam Grip 1 set of Cover Saver 4 @ 4 Wood Screw 8 @ 1 Wood Screw 12 @ 1 Black Tek Screw
Brass Compression Fittings
 15 Brass Compression Fittings Product Applications For use with potable water, instrumentation, hydraulic and pneumatic systems. Designed to be used with aluminum, copper and plastic tubing. Not recommended
caroma marc newson wall basin mixer
 caroma marc newson wall basin mixer water efficient tapware (nominal flow rate = 5 L/min) PLUMBERS INSTALLATION INSTRUCTIONS IS1213A(07/12) Important Information Brazed connections should NOT be made directly
Pressure Vessel Assembly Instructions
 Pressure Vessel Assembly Instructions 1) Measure aluminum tube outer diameter 2) Machine both end caps and only drill pilot holes for all hoes shown 3) Weld both end caps onto the aluminum tube and be
A. This Section includes plumbing fixtures and related components.
 SECTION 224200 PLUMBING FIXTURES PART 1 - GENERAL 1.1 RELATED DOCUMENTS A. Drawings and general provisions of the Contract, including General and Supplementary Conditions and Division 01 Specification
Desk/Wall-Mount Rack
 Desk/Wall-Mount Rack Patent(s) Pending Installation Instructions Post P/N: 119-1752 119-1781 119-1782 119-4014 Frame P/N: 119-1591 119-1754 119-1755 Kit Contents (2) Frames (4) Posts Assembly Hardware
Shetland Stalls Installation Instructions
 Shetland Stalls Installation Instructions RAMM Horse Fencing and Stalls 13150 Airport Hwy. Swanton, OH 43558-9615 1-800-434-8456 Rev. 1/9/18 Before you start Kit can accommodate up to 12 wide stall front
Custom. Options Guide. and. Installation Instructions. GE Monogram 36" Built-In Refrigerators. Models: ZIS36NY ZISW36DY ZISB36DY
 GE Monogram 36" Built-In Refrigerators Custom Options Guide and Installation Instructions With Custom Panel Dimensions and Trim Kit Installation Instructions Monogram refrigerators offer a range of custom
Installation Instruction
 Tools Needed for Assembly Stud finder (for wood stud wall) Pencil Mark Electric drill Wood Stud Wall Installation Step 1. Locate the Wood Studs Installation Instruction Drill bit (for wood stud wall) Masonry
1. Fasten press to bench or work surface using the mounting holes provided (Item 3).
.") INSTRUCTIONS AND PARTS LIST FOR Models 1-202, 1-204, 1-210, and 1-220 Air Arbor Presses WARNING LABELS To the left is the safety Alert symbol. When you see these safety alert symbols on your press, be
INSTRUCTIONS AND PARTS LIST FOR Models 1-202, 1-204, 1-210, and 1-220 Air Arbor Presses WARNING LABELS To the left is the safety Alert symbol. When you see these safety alert symbols on your press, be
The Virgo/Libra Steam Engine
 The Virgo/Libra Steam Engine Congratulations on becoming the owner of a Virgo or Libra Steam Engine. With careful use and maintenance it will give many years of satisfying performance. Contents 1) Notes
FAIRFAX ROUGHING-IN K-12151T=673. UNIT: mm K-12153T K-12156T K-12151T=610 K-12157T K-12161T T01-A -1- INSTALLATION INSTRUCTIONS
 FAIRFAX INSTALLATION INSTRUCTIONS BATHROOM ACCESSORIES K-12151T/K-12153T/K-12156T/ K-12157T/K-12158T/K-12161T/K-12162T BEFORE YOU BEGIN Congratulation on your purchase of this high quality Bathroom Accessory.
caroma marc newson shower mixer
 caroma marc newson shower mixer PLUMBERS INSTALLATION INSTRUCTIONS IS1215A(07/12) Important Information Brazed connections should NOT be made directly onto the mixer, as excessive heat will cause permanent
WAREHOUSE HANGER INSTALLATION INSTRUCTIONS R H INS T A L L A TIO N INS T R U C TIO N S
 INS T A L L A TIO N INS T R U C TIO N S WAREHOUSE HANGER NOTE: Due to the size and weight of the Warehouse Hanger it is recommended that this Hanger be installed on 3 4 or wider doors. 10.11.2016 2-3/16"
INSTALLATION INSTRUCTIONS INS T A L L A TIO N INS T R U C TIO N S ROD IRON SCROLL HANGER R H
 INS T A L L A TIO N INS T R U C TIO N S ROD IRON SCROLL HANGER 10.5.2016 2-1- 3/16" 11/16" 8" 8 O 2-7/8 Ø2-7/8" 3-1/2 3-1/2" 12-9/16 12-9/16" PLEASE NOTE: These instructions are specific to a particular
IMPORTANT: PLEASE RETAIN THIS INSTRUCTION MANUAL FOR FUTURE REFERENCE
 IMPORTANT: PLEASE RETAIN THIS INSTRUCTION MANUAL FOR FUTURE REFERENCE 005-07 Cadillac STS Classic 3D Z, Classic Dual Weave, Classic Mesh & Classic Black Mesh Grilles B 7 HR 3 STS Classic 3D Z Grille Part
HYDRAULIC CONTROL DETAILS PARTS LIST
 Always give model number, serial number and part number when ordering repair parts. HYDRAULIC CONTROL DETAILS PARTS LIST REF NO. PART NUMBER DESCRIPTION 1 101939 Hydraulic Tank 2 101940 Hydraulic Tank
Traditional Wall Mounted Potfiller
 TOOLS NEEDED FOR INSTALLATION 1/4 hex wrench (provided in installation kit) 3/32 hex wrench (provided in installation kit) Pencil or marker PTFE tape Small level, or carpenters square Power Drill with
VACUSEAL MODEL 300 & 400
 VACUSEAL MODEL 300 & 400 G L HOT TUB PRODUCTS 2 Toelles Road, Suite 13 Wallingford, CT 06492 860-469-2580 www.hottubproducts.com J G F H H K E D C I A P B 10 9 8 7 6 5 4 3 2 1 0 0 1 Figure 1 2 3 4 SPAS
 www.wildmanconstruction.com Changing your toilet is an easy project that should take half a day or less. The most common toilet has a separate tank that mounts on top of the bowl. These instructions apply
Low Base 3, 4 and 5-Piece Showers with SnapJoint 3/4/5 LBS SJ
 ARCHITECTURALS INC. Architectural Products for Barrier Free Living Barrier Free Architecturals 2788 Bathurst Street Toronto, On Canada M6B3A3 1(877) 717-7027 or visit: www.barrierfree.org EMAIL: info@barrierfree.org
B Range Faucet. T&S Brass and Bronze Works, Inc. Travelers Rest, South Carolina
 B-0575 Range Faucet 1 Piece, Swivel 001622-45 2 O-Ring, (.103 C/S x.206 I.D.) 009268-45 3 Dyanmic Bearing 001621-20 4 Spring, O-Ring Brg. 001625-45 5 Nut, Swivel 001623-40 6 O-Ring, Center Body 001069-45
Duro Shower/Hand Shower System Operations & Maintenance Manual. Warranty Duro Shower/Hand Shower System
 uro 605 hower/and hower ystem perations & aintenance anual odel umbers 605 uro hower/and hower ystem odifications -.5.5 gpm (5.7 L/min) flow restrictor pecifications hower/hand shower system powered by
Privacy Wall Glass Selections - Polished Edge Slider Door
 Privacy Wall Glass Selections - Polished Edge Slider Door 3/6" HEX BIT PUTTY KNIFE #2 ACR BIT SUCTION CUP HOLDERS DOOR LEAF: Satin Tempered Clear Tempered LOCTITE 425 SIDE LIGHT ETCHED GLASS STYLES: Satin
WADE 2-1. Universal Carrier. Exclusive Features of 400 Series Universal Carrier for Lavatories, Urinals, Drinking Fountains.
 Universal Carrier Exclusive Features of 400 Series Universal Carrier for Lavatories, Urinals, Drinking Fountains. The 400 series carrier accommodates most urinal, water-cooler or hanger plate lavatory
Assembly Instructions 10 X 10 Aluminum Frame Building
 Assembly Instructions 10 X 10 Aluminum Frame Building 27 97 9 8 47 36 74 52 10 10 X 10 Square Building W/ Dome Includes: The Steel Entry Door with a Dead Bolt Lock assembly and Aluminum Door Frame. Metal
WPS crew Doors Installation instructions
 WPS-132-133 crew Doors Installation instructions ORDER OF INSTALLATION FOR A COMPLETE ENCLOSURE OF A CREW WPS (Weather Protection System) IS AS FOLLOWS: 1. Heater 2. Rear Thresholds - Right Hand & Left
Installation Manual MODEL NE-42
 Installation Manual MODEL NE-42 GET TO KNOW YOUR UNIT 1 1. CROSS BRACES - Stud Finder - 12-14 Level - Tape Measure - Small Flathead Screwdriver Tools Needed: - Electric Drill (with 1/4 & 1/8 drill bit)
Flash Rough-In Valves
 Flash Rough-In Valves American Standard I Flash Rough-In Valves I 1 Take Your Time Back At American Standard, we are constantly thinking about how our products can improve the way you work every day. Every
Chiltern Model Steam Engines
 Chiltern Model Steam Engines Mill Twin Cylinder Model Steam Engine v2 Assembly Instructions v1.0 Notes: 1. In overview the engine should first be assembled "dry" with no oil/lubricants, thread lock or
A-dec 574L and 575L Dental Lights on a Cabinet or Wall INSTALLATION GUIDE
 A-dec 574L and 575L Dental Lights on a Cabinet or Wall INSTALLATION GUIDE A-dec 574L Dental Light Mounted on an A-dec Inspire TM 59 Central Console Before You Begin. Turn off the power to the system before
Installation Guide. Mounting Kit for Mounting Philips Avalon CTS Cordless Fetal Transducer System on Wall, 2'' Post, Rail, or Slide-on Mounting Plate
 Installation Guide Mounting Kit for Mounting Philips Avalon CTS Cordless Fetal Transducer System on Wall, 2'' Post, Rail, or Slide-on Mounting Plate The purpose of this guide is to: 1. Describe mounting
4703-TRM, 4705-TRM, 4706-TRM Allura Trim Series Operation & Maintenance Manual
 470-T, 4705-T, 4706-T llura Trim eries peration & aintenance anual odel umbers 470-T Valve Trim with and hower 4705-T hower Trim with and hower 4706-T Tub/hower Trim with and hower pecification Tub/shower
TRM Water Dance Two Wall Shower Trim Operation & Maintenance Manual
 -780- Water ance wo Wall hower rim peration & aintenance anual odel umbers pecifications -780- wo Wall hower rim wo wall shower trim with lever handle includes 0" slide bar with cradle for hand shower,
Installation Manual MODEL AE-46
 Installation Manual MODEL AE-46 GET TO KNOW YOUR UNIT (BOTTOM OF RACEWAY) 2 5 1 4 6 3 1. CROSS BRACES 2. ELECTRICAL RACEWAY 3. SIDE BRACKETS 4. ELECTRICAL CORD COVER 5. ELECTRICAL OUTLET 6. HOT IRON REST
Oxford Stalls Installation Instructions
 Oxford Stalls Installation Instructions RAMM Horse Fencing and Stalls 13150 Airport Hwy. Swanton, OH 43558-9615 1-800-434-8456 Rev. 8/15/17 Before You Start Typical stall sizes are 10 x 10, 12 x 12 or
Instructions for the installation of Ellison Bronze balanced door models #137 & 138
 1. A packing list will be found in crate No. 1 of each shipment. The parts in the crates should be checked with this list. If there is any discrepancy, notify Ellison Bronze at once. 2. All parts are numbered.
Line volt rail & fixtures. Low volt quick connect fixtures with transformers
 INSTRUCTIONS: Line Volt Flexrail2 Safety Instructions: A qualified electrician must install system only. System is intended for installation in accordance with National Electric Code, local and Federal
Big Block Installation Manual For Systems without A/C
 Big Block Installation Manual For Systems without A/C Billet Specialties, Inc. 500 Shawmut Ave. La Grange, IL 60526 Tech Line (708) 588-0505 Fax (708) 588-7181 Hardware List For Chevrolet Big Block Tru
NAIL GUNS & STAPLERS
 NAIL GUNS & STAPLERS MODEL G1847 / G1852 / G1861 / G3811 PARTS LIST COPYRIGHT 1990 BY GRIZZLY INDUSTRIAL, INC. TX 3 176 561 WARNING: NO PORTION OF THIS MANUAL MAY BE REPRODUCED IN ANY SHAPE OR FORM WITHOUT
New Product Release: October 2014 Boone Racks
 New Product Release: October 2014 Boone Racks Double Fido Fountain Mounting: Surface NOTE: THESE ROUGH-IN DIMENSIONS MAY VARY ½: (13 mm) PLUS OR MINUS NOTE: All dimensions subject to manufacturing variance
FITTINGS. Pneufit C composite and Pneufit M fittings Metric Ø 3 to 16 mm O/D tube
 Ø 3 to 16 mm Releasable stainless-steel grab-ring to grip nylon or polyurethane (8 or 9 durometer). Nickel plated brass components. Pre-applied thread sealant on all taper threads and recessed captive
Riser Extension INSTALLATION GUIDE 40100AX35 / 40100AX18. Manual 40100X35-8
 Riser Extension INSTALLATION GUIDE 40100AX35 / 40100AX18 Manual 40100X35-8 3 2 4 Access covers with bolts supplied with Interceptor 1 5 14 6 11 15 Sampling Port/Cleanout cap supplied with Interceptor 12
HP-4 Wall Wash Recessed Flush Diffuser Visible Flange Starter/Independent Installation Instructions
 HP-4 Wall Wash Recessed Flush Visible Flange /Independent Installation Instructions Scan QR code for helpful video(s) 0-10V Dimming Step 1 a ( Cutout Dimension Step 2 S Step 3 1/-20 Threaded Rod 1/-20
Installation Manual MODEL E-42
 Installation Manual MODEL E-42 GET TO KNOW YOUR UNIT 2 (BOTTOM OF RACEWAY) 1 3 1. CROSS BRACES 2. ELECTRICAL RACEWAY 3. ELECTRICAL OUTLET - Stud Finder - 12-14 Level - Tape Measure - Small Flathead Screwdriver
This product is designed for a water supply pressure range of 20 psi (137kPa) minimum to 80psi (550 kpa) maximum.
 minimum to 80psi (550 kpa) maximum.") We appreciate your commitment to Kohler quality. Please take a few minutes to review this manual before you start installation. If you encounter any installation or performance problems, please don t hesitate
We appreciate your commitment to Kohler quality. Please take a few minutes to review this manual before you start installation. If you encounter any installation or performance problems, please don t hesitate