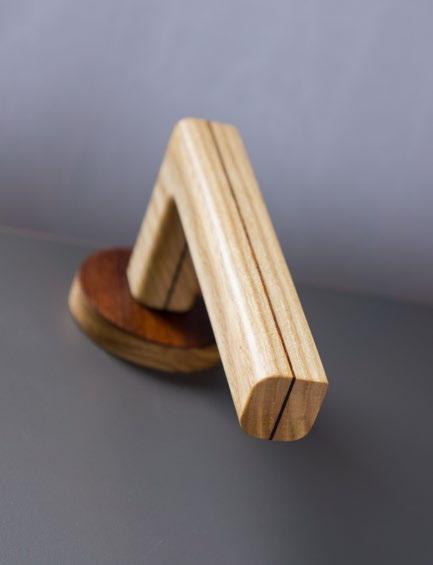
PRESERVING THE BEAUTY OF THE MATERIAL, EACH HANDLE SHOWS OFF THE GRAIN OF THE WOOD IT S MADE FROM IN A CONTEMPORARY SHAPE.
|
|
|
- Rosamund Lang
- 6 years ago
- Views:
Transcription

1
2 PRESERVING THE BEAUTY OF THE MATERIAL, EACH HANDLE SHOWS OFF THE GRAIN OF THE WOOD IT S MADE FROM IN A CONTEMPORARY SHAPE.

3 ABOUT US We are a small company located in Latvia, in the North of Europe. Our country s most valuable natural resource since ancient times has been the forest. At least half the country s territory is covered in forests. Nature and the woods are part of our everyday life. Here we know wood as very valuable, beautiful and durable material and have found that there are endless opportunities for its application. And we know just as well, how to bring this natural value into the interior of your home. We believe that design is not just a coincidence, but a careful and organized system, which, in our case, transforms natural materials into pleasant lines and functional objects.


4 THE NAME Everyone has their own story to tell. Ours starts with a young deer. In Latvian, this word is also used to denote beech tree. Also in several other languages it is the name for this tree. This is a very hard and durable species of wood. Some say that no-one was able to cut down the great American beech trees until the invention of the chain saw. This is the reason why almost ancient examples of this species still exist.


5 HISTORY OF WOODEN HANDLES Wooden handles are rare nowadays. If we look back at the past, then maybe in some hundred-year old house we would be lucky enough to find a quite dingy, but still functioning example - a historical value. In case of these handles, only the lever was made of wood. Even earlier, wooden handles were much more popular than metal products, because they were simple to make and the material was more accessible. Until today design and quality has significantly changed, but the function and the material remains.
6 UNIQUE QUALITIES WOODEN HANDLE PROVIDES A PLEASANT, WARM TOUCH AS OPPOSED TO A METAL HANDLE UNIQUE DESIGN AND CONSTRUCTION THE EXTERNAL APPEARANCE OF THE PRODUCT IS MADE ENTIRELY OF WOOD ECOLOGICAL AND ANTI-ALLERGENIC OIL AND WAX FINISH THAT DEEPLY PENETRATES THE WOOD WOOD IS A RENEWABLE RESOURCE
7 DURABILITY The durability of our wooden handles comes from bonding the wood in a special manner. As is well known, that glued structures are much more durable than homogeneous wood. Handles are generally manufactured from hardwood. The construction of the handle is reinforced with metal details that are invisible from the outside. The manufacturing process of our handles adheres to specific standards, so that our handles would be compatible with the locks and doors available in the market. This means that some of the metal elements is an industry standard, produced by familiar and tested manufacturers, who guarantees precision and durability of their parts. Our wooden handles are intended for low-intensity use, that is, for application in individual homes, not public buildings with high pedestrian intensity and high risk of incorrect usage.


8 DURABILITY GLUED WOODEN CONSTRUCTION. WOODEN BODY IS FORTIFIED WITH A METAL SPINDLE. GASKET PROTECTS FROM FRICTION AND FINGERPRINTS. THE WOOD IS IMPREGNATED WITH OIL AND THE SURFACE IS COVERED WITH A LAYER OF WAX THAT HARDENS. COVER CONSTRUCTION IS REINFORCED WITH A METAL PANEL. A SPRING, MOUNTED IN THE BASE, HOLDS THE HANDLE IN A HORIZONTAL POSITION. COVER HAS AN INVISIBLE FASTENING THE HANDLE IS LOCKED WITH A SCREW


9 MANUFACTURING PROCESS The manufacturing of one set of handles may take up to one week. The first job is to select appropriate boards with homogeneous texture. The two parts of the handle consists of boards and these boards had been next to each other within the body of a tree. Next we saw, plane, polish, glue, rout, drill and then glue and glue some more until we get the shape of the handle. And then we polish some more. The surface is treated with oil twice and then waxed. The oil penetrates deep into the wood while the wax forms a protective layer. Enough work is applied by hand in the manufacturing process, to call this a handmade design element. Of course, technology is a great help, ensuring speed, straight lines and precision; nevertheless, hand work is invaluable.
10 CUSTOM ORDERS We are able to meet almost any of our customers desires regarding the type or color of the wood that is used. It is also possible to manufacture other shapes and sizes of handles, handles for furniture and other compatible products. We address each order individually, looking at the availability of the materials and their technical characteristics, as well as the specification of the doors and locks. MATERIALS We use local hardwood, as well as precious wood from abroad. The metal parts are made from stainless steel and aluminum. Surfaces are finished with ecological, anti-allergenic and natural oils and waxes.
11 INFORMATION ABOUT USE Intended for installation on interior doors for low to medium intensity use, careful use and low risk of incorrect usage (pulling on locked doors climbing on the handles and other inconsiderate actions, as well as correctly installed door and lock. Not intended for installation in public buildings. Not recommended for exterior doors. Do not use for escape doors. Do not use in rooms with increased humidity levels such as cellars, saunas and baths. Do not use for doors that required increased level of security against braking. Note that wood is a softer material than metal, so over the years, the signs of wear may appear. Be aware of the fact that wood is a natural and living material, and can change the color due to exposure to ultraviolet radiation (exposure to sunlight) and natural wear and tear. Over the years, wood often becomes a little darker. CARE Clean dust with dry cloth Clean stains with slightly dampened cloth Do not clean with powerful and colorful cleaners Based on the level of wear, from time to time you can restore the oil and wax layer.
. Available in different lengths according to the thickness of the door. Instructions for installation and dismantling. Hex key. Packaging box (suitable for shipping).")
12 HANDLE KIT INCLUDES Two handles (suitable for right-hand and left-hand door). Two covers. Two bases. 8 screws, 20 mm and 8 screws, 15 mm. 2 tightening screws (please specify, if necessary). Spindle (8 x 8 mm). Available in different lengths according to the thickness of the door. Instructions for installation and dismantling. Hex key. Packaging box (suitable for shipping). Door hanger with logo.
13 INSTALLATION INSTRUCTION Insert the handle with the spindle in the intended opening of the door. Slide the lock through. Slide the base on the spindle from the other side. Tighten with appropriate length screws. It is also possible to use through screws (EU standard locks only). Repeat step 1 through 3 from the other side of the door. Remove the handle from the door CLACK! Find the crease on the cover, this should face down. Firmly push the cover on the base. Place the handle on the door. Slide the handle on the spindle from the other side and push both handles together. Tighten the screw with the hex key included.
14 Unscrew the screw on the underside of the handle using the hex key. Remove the handle from the lock. Remove the other handle from the lock. Find the crease on the bottom of the cover Insert a screwdriver or other tool and pull the cover from the base. To avoid damaging the door and the cover, replace the previous screwdriver with a wider Repeat the levering movements around the cover, if necessary. Unscrew the base.


15 PRODUCTS
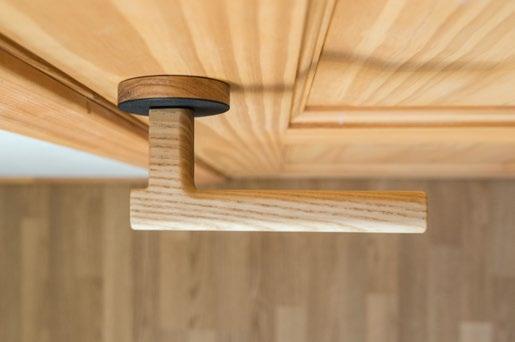
16 ASHWOOD + BLACK TANGANIKA L TYPE HANDLES ESCUTCHEONS MEASUREMENTS 140 8x
17 ASHWOOD + BLACK TANGANIKA T TYPE HANDLES ESCUTCHEONS MEASUREMENTS 145 8x

18 ASHWOOD + BLACK TANGANIKA + STAINLESS STEEL T TYPE HANDLES ESCUTCHEONS MEASUREMENTS 145 8x

19 ASHWOOD + BLACK TANGANIKA L TYPE HANDLES ESCUTCHEONS MEASUREMENTS 140 8x
20 ASHWOOD + BLACK TANGANIKA T TYPE HANDLES ESCUTCHEONS MEASUREMENTS 145 8x

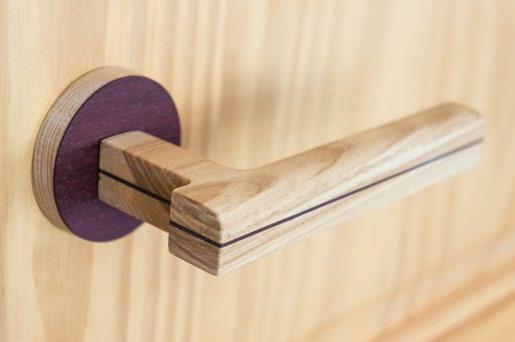
21 ASHWOOD + PURPLE AMARANTH T TYPE HANDLES ESCUTCHEONS MEASUREMENTS 145 8x

22 ASHWOOD + BROWN SAPELLI L TYPE HANDLES ESCUTCHEONS MEASUREMENTS 140 8x
23 ASHWOOD + BROWN SAPELLI T TYPE HANDLES ESCUTCHEONS MEASUREMENTS 145 8x


24 Recommended door latch for use with for apartment use Rotating latch bolt for universal handling Quick installation - fit in less than 5 minutes Unique design - round forend

25 OAK + PURPLE AMARANTH + STAINLESS STEEL WC ESCUTCHEON MEASUREMENTS
26 CONTACT TRAPEX HARDWARE LTD
Product Care & Cleaning Guide
 Product Care & Cleaning Guide /5 CABINETRY CARE, CLEANING & ADJUSTMENT GUIDE AFTER INSTALLATION CARE After your cabinets have been installed, wipe down exteriors with a clean damp cloth. Work on a small
Maintenance Guide 11/12
 Product Maintenance Guide 11/12 C abinetry Care, Cleaning & Adjustment Guide After installation care After your cabinets have been installed, wipe down exteriors with a clean damp cloth. Work on a small
Instructions for Catalina Round/Square Extension Tables
 Unpack the table onto a soft level surface and identify the listed items. Instructions for Catalina Round/Square Extension Tables Hardware included: ¼ - #20 x 35mm s (4) ¼ - #20 x 50mm s (8) Cross nuts
Hardware Fitting Accessories Bolts
 Lever action flush bolt With slide Width: 19 mm Stroke (a): 25 mm 1 Flush bolt 1 Set of fastening material With lever arm Width: 19 mm Stroke (a): 18 mm 1 Flush bolt 1 Set of fastening material Stainless
Passive Panel Replacement Guide
 Replacement Guide for Andersen 200 Series d Patio Doors - Inswing For questions call 1-888-888-7020. For more information and/or guides visit andersenwindows.com. Please leave this guide with building
Phone # La Jolla Doors. Block Frame Installation Manual Aluminum Frame with either Vinyl or Aluminum Panels
 Phone # 800-440-8785 www.lajolladoors.com La Jolla Doors Block Frame Installation Manual Aluminum Frame with either Vinyl or Aluminum Panels Thank you for choosing La Jolla Doors In this manual you will
Installation Manual Flat Track Series
 Manual Flat Track Series Contents Safety...1 Parts...2 Hardware.......................................... 2 Tools Required..................................... 4.............................................
The following instructions will guide you through the installation of your new vinyl railing stair kit.
 Installation Guide Vinyl Standard Stair Railing Tools Required Protective eye glasses Tape measure Variable speed drill/screwdriver Rotary hammer or hammer drill and masonry percussion bit recommended
Shepherd 210A Fingerprint Door Lock Installation Manual V1.1
 Shepherd 210A Fingerprint Door Lock Installation Manual V1.1 Hongda USA Inc. 2505 Technology Dr. #2-6A, Hayward, CA 94545, USA Phone: (510) 887-5682 Fax: (510) 372-0487 Email: info@hongdausa.com Website:
Product Care & Maintenance Guide
 Product Care & Maintenance Guide To prolong the life and beauty of your new cabinetry, please read and follow these product care and maintenance instructions. While 6 Square takes great care in building
Barn Door & Hardware Installation Guide
 Barn Door & Hardware Guide INTRODUCTION Thank you for purchasing our hardware. Our barn door and hardware will add a stunning accent to your living environment and maximize its space. This manual covers
1200 SIDE TO SIDE PORCH ROCKER ASSEMBLY INSTRUCTIONS
 1200 SIDE TO SIDE PORCH ROCKER ASSEMBLY INSTRUCTIONS Thank you for purchasing a quality select hardwood rocking chair. Your chair comes with a rich heritage and will become a treasured family heirloom.
MORTISE LOCKS LA1Tx7 //DATASHEET
 //DATASHEET SATO ocks AElement Access control requires a good, reliable door locking system. SATO offers a wide range of mortise locks in order to ensure that the door is correctly locked. Whether you
1. TOOLS + MATERIALS REQUIRED
 R INSTALLATION INSTRUCTIONS PRODUCT: BALDUR + ODEN CONFIGURATION: BI-PARTING DOOR MOUNT: TOP MOUNT Product is covered by U.S. patents. For more information visit www.krownlab.com. TOOLS + MATERIALS REQUIRED
Entry Mortise Lock Set Lever to Lever
 Entry Mortise Lock Set Lever to Lever 1 Lever 2 Escutcheon 3 Turn Piece 4 Mortise Lock 5 Scalp 6 Mortise Lock Strike 7 Mortise Lock Dust Box 8 Mortise Cylinder 9 Cylinder Swing Cover 10 Spindle 11 Spindle
Tubular Latches. 3 a. Heavy Duty Lever Latches Series HLL Features Ordering String Functions Dummy Mounts Trim Sets Specifications
 3 Tubular Latches 3 a 3 4 6 8 12 14 Heavy Duty Lever Latches Series HLL Features Ordering String Functions Dummy Mounts Specifications 2016 02 2 FSB North America Heavy Duty Lever Latch HLL Series Quality
Assembly Instructions ROUND ISLAND DISPLAY
 Assembly Instructions ROUND ISLAND DISPLAY Congratulations! You have purchased the finest wine racking available anywhere. Properly assembled, your Vigilant wine racks will outlast even your finest wines.
MH60/MH72 DESK HUTCH IMPORTANT!
 MH60/M2 DESK HUTCH IMPORTANT! Assembly may require the assistance of another person. Before you begin assembly: READ THE DIRECTIONS all the way through one time. This will speed up the process and help
DESIGNER EDITION L EXINGTON
 DESIGNER EDITION L EXINGTON U.S. GREEN BUILDING COUNCIL R COMMERCIAL GRADE FINISH High performance finish is ideally suited for high traffic commercial areas, thanks to the abrasion resistant and anti-microbial
104 PORCH SWING ASSEMBLY INSTRUCTIONS
 104 PORCH SWING ASSEMBLY INSTRUCTIONS Thank you for purchasing a quality porch swing. The product you have purchased requires some assembly. This item has been carefully inspected before packing to ensure
where ideas unfold brio.com.au Brio 6000 Mortice Lock Series Locking solutions for sliding & folding doors
 where ideas unfold brio.com.au Brio 6000 Mortice Lock Series Locking solutions for sliding & folding doors About us Brio, based in Australia, is focused on bringing adventurous architectural ideas to life,
Cabinet Care & Adjustments
 Cabinet Care & djustments Cabinet Warranty 1600 SERIES: Limited Lifetime Warranty t ellmont Cabinet Company, we are proud of the quality, design and construction of our 1600 Series cabinetry. We make every
Skew Block Plane. U.S. Pat. No. 7,603,783 and U.S. Des. Pat. No. D644,904
 Skew Block Plane U.S. Pat. No. 7,603,783 and U.S. Des. Pat. No. D644,904 The Veritas Skew Block Plane combines the best features of a low-angle block plane with those of a skew rabbet plane, making it
INSTALLATION MANUAL FORTRESS SERIES
 Guardian Security Structures TEL 1-406-212-2334 EMAIL rg@gssdoors.com WEB www.gssdoors.com FORTRESS SERIES GENERAL INSTALLATION GUIDELINES 1. The door frame is installed using 16 bolt screws 7,5 mm in
HURST COMP STICK KIT DODGE CHARGER, MAGNUM, AND CHRYSLER 300 (with AUTO-STICK) Catalog # & by Hurst Performance
 Catalog # & by Hurst Performance") HURST COMP STICK KIT 2005-2007 DODGE CHARGER, MAGNUM, AND CHRYSLER 300 (with AUTO-STICK) Catalog #538 0410 & 538 0411 2009 by Hurst Performance FORM 159 0410 03/09 Thank you for purchasing the Hurst Comp
HURST COMP STICK KIT 2005-2007 DODGE CHARGER, MAGNUM, AND CHRYSLER 300 (with AUTO-STICK) Catalog #538 0410 & 538 0411 2009 by Hurst Performance FORM 159 0410 03/09 Thank you for purchasing the Hurst Comp
Installing Your Electronic Deadbolt
 Ultra Security Plus Electronic Deadbolt Installation Instructions http://www.hberger.com/video-gallery/electronic-deadbolt New Installation Lock Location Preparation (Skip this section if you door has
#850 PORCH ROCKER ASSEMBLY INSTRUCTIONS
 #850 PORCH ROCKER ASSEMBLY INSTRUCTIONS Thank you for purchasing a quality select hardwood rocking chair. Your chair comes with a rich heritage and will become a treasured family heirloom. If you should
Tall Wide Extra Deep Bookcase
 Tall Wide xtra Deep Bookcase Assembly Instructions - Please keep for future reference 8/650 Dimensions Width - 78cm Depth - 9cm Height - 180cm Important Please read these instructions fully before starting
Router Plane 05P38.01
 Router Plane 05P38.01 Patent Pending The Veritas Router Plane is an invaluable tool for work on stop or through dadoes, grooves, or any work that requires an area cut to a precise depth. This is the perfect
INSTALLATION GUIDE DUOFUSE GARDEN GATE
 Installation guide nr.: Version Publication date MOVO- 0008 V2 1/04/2015 INSTALLATION GUIDE DUOFUSE GARDEN GATE The Duofuse wood composite garden gate is much more durable than a wooden gate, and correct
Installation Instructions ENGLISH
 Installation Instructions ENGLISH Interior Latchset PRIVACY (Bed & Bath) PASSAGE (Hall & Closet) PK.5400 Congratulations! With your purchase of this Interior Latchset, you re among a group of discerning
Passage Mortise Lock Set Lever to Lever
 Passage Mortise Lock Set Lever to Lever 1 Lever 2 Escutcheon 3 Mortise Lock 4 Scalp 5 Mortise Lock Strike 6 Mortise Lock Dust Box 7 Spindle 8 Spindle Spring 9 Spindle Retainer 2 1 9 8 7 9 7 8 3 1 2 4 5
O nament. Birdhouse. Birdhouse Christmas ornaments have become very
 Birdhouse O nament Photo by Al Parrish Dale Nish, one of the principal architects of the turning revival, shares some turning techniques. Birdhouse Christmas ornaments have become very popular the last
INSTALLATION AND CARE INSTRUCTIONS
 INSTALLATION AND CARE INSTRUCTIONS Skylight Manually Operated Honeycomb Shades 20 C8-10-1806 2/15 1 INTRODUCTION Thank you for purchasing our product. Your new shade has been custom built for you from
Spokeshaves. U.S. Des. Pat. D499,770
 Spokeshaves U.S. Des. Pat. D499,770 Introduction The Veritas spokeshaves have been designed for smooth, effective shaping of chair spindles, tool handles, panel edges, paddle shafts, etc. The large spokeshave
MUTO COMFORT DORMOTION XL 150/80 L 80
 MUTO COMFORT DORMOTION XL 150/80 L 80 Installation instructions - Wall mount with DORMOTION ( ) TABLE OF CONTENTS Closer overall Overview Intended use Wall requirements and fittings Safety instructions
Retractable Screen Installation Instructions For Vinyl and Aluminum Clad and Wood In-Swing Hinged Doors (See separate instructions for sliding doors)
") Retractable Screen Installation Instructions For Vinyl and Aluminum Clad and Wood In-Swing Hinged Doors (See separate instructions for sliding doors) IMPORTANT: Please read before you begin. Table of Contents
Retractable Screen Installation Instructions For Vinyl and Aluminum Clad and Wood In-Swing Hinged Doors (See separate instructions for sliding doors) IMPORTANT: Please read before you begin. Table of Contents
Bellavista lena collection
 Bellavista Lena Collection Strong. Stunning. Classic. The LENA Collection, Italian for strong, showcases the durability of American Hickorys and Maples crafted in the timeless fashion of European design.
INSTALLATION INSTRUCTIONS TOOLS YOU WILL NEED GETTING STARTED
 INSTALLATION INSTRUCTIONS HONEYCOMB SHADES TOP-DOWN, MOVABLE ARCH Thank you for your purchase. This shade has been custom built for you from the highest quality materials. To avoid errors and save valuable
MANCHESTER VANITY BASE
 MANCHESTER VANITY BASE INSTALLATION INSTRUCTIONS Questions? Call our customer service department at 1-855-995-5578, 8:30 a.m. - 5 p.m., EST, Monday - Friday or e-mail: contactus@magickwoods.com. Models:
INSTALLATION INSTRUCTIONS GRILLE GUARD 09-ON DODGE RAM PART #
 INSTALLATION INSTRUCTIONS GRILLE GUARD 09-ON DODGE RAM PART # PARTS LIST: Qty Description Qty Description 1 Grille Guard 8 12-1.75mm x 35mm Hex Bolts 2 Brackets (for trucks without 22 12mm x 30.1mm OD
JOHNSTON DRUM WORKS 20 QUICK-TYMP LUG KIT INSTRUCTIONS
 JOHNSTON DRUM WORKS 20 QUICK-TYMP LUG KIT INSTRUCTIONS THIS KIT WILL HELP YOU BUILD YOUR OWN TYMPANI STYLE GONG BASS DRUM THANK YOU FOR PURCHASING THE JOHNSTON DRUM WORKS QUICK-TYMP LUG KIT. THIS IS A
XL JOINERY LTD LA PORTE VISTA MODULAR 3 ASSEMBLY INSTRUCTIONS
 XL JOINERY LTD LA PORTE VISTA MODULAR 3 2090mm High x 4687mm Wide ASSEMBLY INSTRUCTIONS READ AND UNDERSTAND THESE INSTRUCTIONS FULLY PRIOR TO STARTING INSTALLATION. IT IS STRONGLY RECOMMENDED THAT A COMPETENT
Installation Instructions for Bifold Doors (JII103)
") Thank you for selecting JELD-WEN products. Attached are JELD-WEN s recommended installation instructions for premium composite, hollow and solid core molded Bifold Doors. Bifolds are designed for fast
Thank you for selecting JELD-WEN products. Attached are JELD-WEN s recommended installation instructions for premium composite, hollow and solid core molded Bifold Doors. Bifolds are designed for fast
Passive Panel Replacement
 Passive Panel Replacement Product Series: 200 Series Product Type: Hinged Inswing Patio Doors Read these instructions before starting procedure. For additional information visit www.andersenwindows.com.
RH-412 STEEL DOORS INSTALLATION INSTRUCTIONS
 RH-412 STEEL DOORS INSTALLATION INSTRUCTIONS By following the steps outlined below, the assembly, installation and adjustment of the steel doors, will be a simple process. Let s start with the Driver Side.
limited lifetime warranty
 PRODUCT CARE PACKET bellmont 1900 series limited lifetime warranty At Bellmont Cabinet Company, we are proud of the quality, design and construction of our Bellmont 1900 series. We make every effort to
DX60 Block Plane 05P70.01
 DX60 Block Plane 05P70.01 U.S. Des. Pat. D612,701 The body of this block plane by Veritas is ductile cast iron, a material much more durable as well as more stable than gray iron, having been fully stress
USER GUIDE 3060ZWC. 60 cm Wine Cellar Model. Modular 3000 Series RIGHT PRODUCT. RIGHT PLACE. RIGHT TEMPERATURE. SINCE 1962.
 RIGHT PRODUCT. RIGHT PLACE. RIGHT TEMPERATURE. SINCE 1962. Modular 3000 Series 3060ZWC 60 cm Wine Cellar Model Contents Intro Installation Dimensions Integrated Grille / Plinth Dimensions Installation
ASSEMBLY INSTRUCTIONS UltraHD Rolling Workbench (Model No ) 77 in. W X 20 in. D X 37.5 in. H (1.95m W x 50.8cm D x 95.2cm H)
 77 in. W X 20 in. D X 37.5 in. H (1.95m W x 50.8cm D x 95.2cm H)") ASSEMBLY INSTRUCTIONS UltraHD Rolling Workbench (Model No. 20262) 77 in. W X 20 in. D X 37.5 in. H (1.95m W x 50.8cm D x 95.2cm H) Reference page 14 for special care and maintenance of stainless steel
ASSEMBLY INSTRUCTIONS UltraHD Rolling Workbench (Model No. 20262) 77 in. W X 20 in. D X 37.5 in. H (1.95m W x 50.8cm D x 95.2cm H) Reference page 14 for special care and maintenance of stainless steel
INSTALLATION INSTRUCTIONS RH 412 STEEL DOORS
 By following the steps outlined below, the assembly, installation and adjustment of the steel doors, will be a simple process. Let s start with the Driver Side. Note: Having the hood open makes the job
Premium Light Filtering Sheer Shade
 Premium Light Filtering Sheer Shade Installation Instructions Email: customerservice@blindster.com Call us: (888) 256-8672 Mon - Fri 8am - 7pm (CT) Congratulations on purchasing a Premium Light Filtering
R-EVO MANUAL. English
 R-EVO MANUAL English 1 ENGLISH VERSION Adjusting the holster for your revolver With versatility, refined design, high quality, elegance and resistance - R-EVO, the new GR Holster for revolvers, supplies
HEAVY DUTY 11 STEEL CABINET
 HEAVY DUTY STEEL CABINET ASSEMBLY INSTRUCTIONS ONE DRAWER BASE CABINET 05-206 Parts List Part No Description Qty Image ONE DRAWER BASE CABINET Part No Description Qty Image SB- Cabinet Body EH-0 Euro Hinge
Installation Instructions For The 8850FL Series Mortise eboss
 Installation Instructions For The 8850FL Series Mortise eboss Electronic Battery Operated Security Solution FEATURES Battery Operated (Hardwire Capable) Motorized Grade 1 Mortise Lock 94 User Code Capacity
INSTALLING YOUR NEW SPRING LIFT ARM KIT
 INSTALLING YOUR NEW SPRING LIFT ARM KIT 1. Measure the distance that the roof is to be raised. [If your lift system is completely non-functional, you will need to calculate or estimate this distance as
REINFORCING THE CORNERS OF FLAT FRAMES
 REINFORCING THE CORNERS OF FLAT FRAMES There are a number of different methods that may be used to join flat frame sides together. As most Woodworkers know, end grain glue joints are not nearly as strong
TIRE RACK INSTALLATION INSTRUCTIONS Dodge Sprinter
 Aluminess Products Inc 9402 Wheatlands Ct. #A Santee, CA 92071 619-449-9930 TIRE RACK INSTALLATION INSTRUCTIONS 07-11 Dodge Sprinter Please read before beginning Stainless steel hardware may bind together
Royal System (1948) Designed by Poul Cadovius INSTALLATION GUIDE
 Designed by Poul Cadovius INSTALLATION GUIDE") Royal System (1948) Designed by Poul Cadovius INSTALLATION GUIDE ROYAL SYSTEM Congratulations on your new furniture from dk3. The Royal System bookcase was designed in 1948 by legendary Danish designer
Royal System (1948) Designed by Poul Cadovius INSTALLATION GUIDE ROYAL SYSTEM Congratulations on your new furniture from dk3. The Royal System bookcase was designed in 1948 by legendary Danish designer
SAN DIEGO - TV Unit. Assembly Instructions - Please keep for future reference 389/6620
 SN GO - TV Unit ssembly nstructions - Please keep for future reference 389/6620 imensions Width - 125cm epth - 40cm eight - 50cm mportant Please read these instructions fully before starting assembly f
Closet System Installation Manual
 Closet System Manual Thank you For choosing our Custom Closet Collection to fit all your needs Closets come fully assembled to make your project an enjoyable and satisfying experience. With quality Custom
Palladian/ Keystone Models 202/204 Maintenance Kit
 Palladian/ Keystone Models 202/204 Maintenance Kit Please read all of the instructions before you begin. Confirm that you have all the necessary tools and parts required. Allow about one hour to complete
SAN DIEGO - Coffee Table
 SN DIEO - offee Table ssembly Instructions - Please keep for future reference 408/835 Dimensions Width - 100cm Depth - 70cm Height - 45cm Important Please read these instructions fully before starting
3/16 x 5/8 Bolt. 2 Handle 7 Front Plinth 1 G. Connector. Shelf Support. 4 Hinge 10 Left Door 1 J. Bracket. L Stud
 ASSEMBLY INSTRUCTIONS 2 DOOR DISPLAY UNIT / BOOKCASE IMPORTANT: READ THESE INSTRUCTIONS CAREFULLY BEFORE ASSEMBLING OR USING YOUR 2 DORO DISPLAY UNIT / BOOKCASE. PLEASE KEEP THESE INSTRUCTIONS FOR FUTURE
ASSEMBLY INSTRUCTIONS CORONA ENTERTAINMENT UNIT
 ASSEMBLY INSTRUCTIONS CORONA ENTERTAINMENT UNIT IMPORTANT: READ THESE INSTRUCTIONS CAREFULLY BEFORE ATTEMPTING TO ASSEMBLE OR USE YOUR CORONA ENTERTAINMENT UNIT PLEASE KEEP THESE INSTRUCTIONS FOR FUTURE
PLEASE READ THIS NOTICE BEFORE BEGINNING ANY PHASE OF INSTALLATION!!!!
 PLEASE READ THIS NOTICE BEFORE BEGINNING ANY PHASE OF INSTALLATION!!!! This kit is designed to be installed by someone with a fair amount of mechanical aptitude. However, if you are not comfortable making
MANUFACTURING INC. Specifications
 Page 1 of 4 GENERAL 11 Aluminum security screen doors must be tested by a recognized testing laboratory to conform to SMA 6001-2002 Proposed American National Standard Specifications for Metal Protection
Kent Kings Cross Bench KKCB5500
 Kings Cross Bench Kent Kings Cross Bench Specify: Kent Kings Cross Bench ; 5500mm overall length; European Oak Timber (IFSE Certified) treated with Danish Oil; Grade 316L Stainless Steel; Bead Blasted
Agricultural Mechanics and Technology Power Tool Safety Rules
 Agricultural Mechanics and Technology Power Tool Safety Rules Name: BAND SAW Use: Cutting curves, circles and irregular shapes. 1. Use clean SHARP blades. 2. The teeth should always point DOWN. 3. Adjust
Congratulations! You are now on your way to enriching your life with!
 C) Using the base point as your reference, measure up 8-1/32 and mark a horizontal line. Measure in from the edge of the door the distance of your backset and mark where the two lines cross. This will
BABY WOLF LOOM. Assembly Instructions for Knocked-Down Looms
 BABY WOLF LOOM Assembly Instructions for Knocked-Down Looms BEFORE YOU BEGIN Please read through the directions before beginning to assemble your loom. Unpack the loom parts carefully. Do not throw away
Contract range of locks and latches
 Contract range of locks and latches E N 1 2 2 0 9-2 0 0 3 Tested The Gridlock Security Products contract range of locks and latches has all been successfully tested at Warrington Certification Ltd to meet
C. Side Panel 1 pc. B. Side Panel. 1 pc. J2. Shelf. 4 pcs. Adjustable Pin 24 pcs. (+1 extra) M3.5x16 Wood Screw 20 pcs. (+1 extra) 2 pcs.
 M3.5x16 Wood Screw 20 pcs. (+1 extra) 2 pcs.") IMPORTANT 20 05180 0307 Hutch Carefully remove all the parts from the carton and place them individually on a soft cloth to prevent scratches or other damage. Carefully and strictly follow these assembly
IMPORTANT 20 05180 0307 Hutch Carefully remove all the parts from the carton and place them individually on a soft cloth to prevent scratches or other damage. Carefully and strictly follow these assembly
Kawasaki Teryx 750 Cab Kit* Caution: Before using this product, read this manual and follow all Safety Instructions.
 Owner s Manual Model: Kawasaki Teryx 750 Kawasaki Teryx 750 Cab Kit* Caution: Before using this product, read this manual and follow all Safety Instructions. Safety Instructions Cab Kit Contents Hardware
JELD-WEN DesignGlide Barn Door Hardware System Installation (JII-90003)
") JELD-WEN DesignGlide Barn Door Hardware System Installation IMPORTANT INFORMATION CONTACT US For questions, feel free to contact us by phone or email: Phone: 1-(800)-JELD-WEN/1-(800)-535-3936 Email: customerserviceagents@jeldwen.com
JELD-WEN DesignGlide Barn Door Hardware System Installation IMPORTANT INFORMATION CONTACT US For questions, feel free to contact us by phone or email: Phone: 1-(800)-JELD-WEN/1-(800)-535-3936 Email: customerserviceagents@jeldwen.com
How to operate (folding)
") How to operate (folding) LEFT HAND STACKING OUTWARD OPENING How to operate (folding) RIGHT HAND STACKING OUTWARD OPENING LOCK BOTH LEVER HANDLE AND FLAT HANDLE UTILISING THE D-HANDLE LOCATED ABOVE THE
How to operate (folding) LEFT HAND STACKING OUTWARD OPENING How to operate (folding) RIGHT HAND STACKING OUTWARD OPENING LOCK BOTH LEVER HANDLE AND FLAT HANDLE UTILISING THE D-HANDLE LOCATED ABOVE THE
Astrid Bed -assembly instructions
 Astrid Bed -assembly instructions Headboard Assembly Bed Deck x2 Base Assembly x2 Your Astrid bed is delivered in either two or three boxes depending on whether you have ordered a bed with headboard or
8 Right Front Frame 1 H Handle. 1 Clip 11 Bottom Front Frame 1 L. 1 Plug 12 Vertical Front Frame 1 M Stud
 ASSEMBLY INSTRUCTIONS CORONA 1 DOOR 4 DRAWER SIDEBOARD IMPORTANT: READ THESE INSTRUCTIONS CAREFULLY BEFORE ASSEMBLING OR USING YOUR CORONA 1 DOOR 4 DRAWER SIDEBOARD. PLEASE KEEP THESE INSTRUCTIONS FOR
Beds may be put up or taken down quickly by use of a simple bolted connection at rails and uprights. MATERIALS LIST
 CANPLY This design has been made both functional and attractive by use of pattern cut-outs in head and foot uprights, which serve as ladders. Since most children love to climb, getting them to bed will
USER GUIDE 3060ZWC. 60 cm Wine Cellar Model. Modular 3000 Series RIGHT PRODUCT. RIGHT PLACE. RIGHT TEMPERATURE. SINCE 1962.
 RIGHT PRODUCT. RIGHT PLACE. RIGHT TEMPERATURE. SINCE 1962. Modular 3000 Series 3060ZWC 60 cm Wine Cellar Model Contents Intro Installation Integrated Panel Dimensions Integrated Grille / Plinth Dimensions
2300 BI-FOLD INSTALLATION GUIDE
 2300 BI-FOLD INSTALLATION GUIDE INSTALLATION INSTRUCTIONS OF MAIN FRAME Header #8 x 2½ zinc coated screws 2 1 2 Jamb Jamb 1 1 3 #8 x 2½ zinc coated screws 4 1 4 3 #8 x 2½ zinc coated screws 5 Threshold
pottery barn kids MADISON CABINET HUTCH
 pottery barn kids MADISON CABINET HUTCH IMPORTANT SAFETY INSTRUCTIONS: Please read all instructions carefully before assembling. For your safety, assembly by two adults is recommended. PRE-ASSEMBLY: Remove
Congratulations! You are now on your way to enriching your life with! Figure #5. Step 5 Install the Dummy Deadbolt. Step 3 Drill the Door
 C) Using the base point as your reference, measure up 8-1/32 and mark a horizontal line. Measure in from the edge of the door the distance of your backset and mark where the two lines cross. This will
WITH HEAT - NATURALLY
 WITH HEAT - NATURALLY Clock House, Station Approach, Shepperton, Middlesex TW17 8AN T +44 (0)1932 256590 F +44 (0)1932 229989 E info@mbmspeciality.co.uk W www.mbmspeciality.co.uk Continue About the company
Sliding Barn Door Hardware Installation Instructions Baldur and Oden
 Sliding Barn Door Hardware Installation Instructions Baldur and Oden INSTALLATION INSTUCTIONS Structural Information For standard systems and most custom single door opening systems. General Overview All
Puerto Rico - 2 Door Shoes Cupboard
 Puerto Rico - oor Shoes Cupboard ssembly Instructions - Please keep for future reference 04/478 imensions Width - 86cm epth - 38.5cm Height - 108cm Important Please read these instructions fully before
Safety glasses Measuring tape Level Pencil Power drill Center punch Phillips screw driver Saw horse
 EX76 Concealed Vertical Rod Exit Device Preparation Guide and Installation Instructions Box Contents EX76 Concealed Vertical Rod Exit Device Back Bar Active Push Bar Filler Plate Door Kit with Templates
SAN DIEGO - Corner TV Unit
 SN EGO - orner TV Unit ssembly nstructions - lease keep for future reference 385/8651 imensions Width - 100cm epth - 40cm eight - 50cm mportant lease read these instructions fully before starting assembly
Entry Mortise Handleset
 1. Pencil 2. No. 2 and No. 3 Phillips Head Screwdrivers 3. No. 1 and No. 2 Slotted Screw Drivers 4. 1/8" Allen Head Wrench 5. 3/4" Wood Chisel or Corner Chisel 6. Measuring Device 7. Lock Mortising Tool
Vista SCREEN. and Double Door Link Kit. Installation Manual for. For Double Doors (French Doors) Quick and Easy to Size and Install
 Quick and Easy to Size and Install") and Double Door Link Kit Installation Manual for Vista SCREEN TM Quick and Easy to Size and Install For Double Doors (French Doors) Durable. Reliable. Attractive. For door openings up to 72 13 /16 (1,849
and Double Door Link Kit Installation Manual for Vista SCREEN TM Quick and Easy to Size and Install For Double Doors (French Doors) Durable. Reliable. Attractive. For door openings up to 72 13 /16 (1,849
Adjusting 45 Compass Hardware Including 4-Point
 Adjusting 45 Compass Hardware Including 4-Point Compass Hardware - US Patent No. 7,104,610 & 7,891,739 Apparatus for Mounting a Wheelchair Back Quick Release Fixed 4-Point The information in this manual
Custom Bench Plane. Honing and Polishing the Blade. Blade Carrier
 Custom Bench Plane U.S. Pat. No. 7,603,783 Your Veritas bench plane has been assembled with the component options you selected when you placed your order. Caution: Be aware that the blade is sharp; careless
Hills Folding Frame Double and Single
 Hills Folding Frame Double and Single Product Manual 2 Introduction Congratulations Congratulations on the purchase of your Hills Folding Frame Clothesline, which will bring you many years of trouble free
DOOR SECURITY AND REPAIR KIT
 DOOR SECURITY AND REPAIR KIT MODEL #S SET-SLP-X0552 SET-STD-X0552 SET-UNI-X0002 SET-ULT-X0002 R Questions? Call customer service at -888-582-2294 or visit www.armorconcepts.com PACKAGE CONTENTS A B C E
COFFEE TABLE WITH RECESSED TRAY
 COFFEE TABLE WITH RECESSED TRAY Why not treat your guests to a tray laid with delicacies and then remove it from sight in your new coffee table. There's no easier way to show that you are a thoughtful
Surface Finishes. For woods metals and plastics
 Surface Finishes For woods metals and plastics Reasons for Surface Finishes Some kind of surface finish is always necessary for the following reasons Resistance to decay (Stopping the material from rotting
Installation Instructions for. Before You Begin TOOLS REQUIRED
 Composite Railing System STEP-BY-STEP Installation Instructions for Spectrum Composite Railing Virtually maintenance free 20-year warranty EverNew Spectrum Railing system is designed to work with a number
The following instructions will guide you through the installation of your new vinyl railing.
 Installation Guide St. James Vinyl T-Rail Tools Required Protective eye glasses 3/8 x 3 Concrete Anchors/Fasteners (for Tape measure concrete installations) Variable speed drill/screwdriver Philips Driver
HR175 Sash Replacement Kit Installation Instructions
 HR175 Sash Replacement Kit Installation Instructions IMPORTANT: Please read before you begin. Weather Shield HR175 Sash Replacement Kits Important: Thoroughly read and follow these instructions, failure
METAL BLINDS. Deluxe GETTING STARTED OPTIONAL HARDWARE. A few simple tools are required: STANDARD HARDWARE
 METAL BLINDS Deluxe GETTING STARTED OPTIONAL HARDWARE A few simple tools are required: Steel Tape Measure Pencil Level Hold Down Brackets with Screws Extension Bracket Power Drill and Drill Bits Flathead