Assembly & Installation Instructions
|
|
|
- Christopher Knight
- 6 years ago
- Views:
Transcription

1 1 OF 6
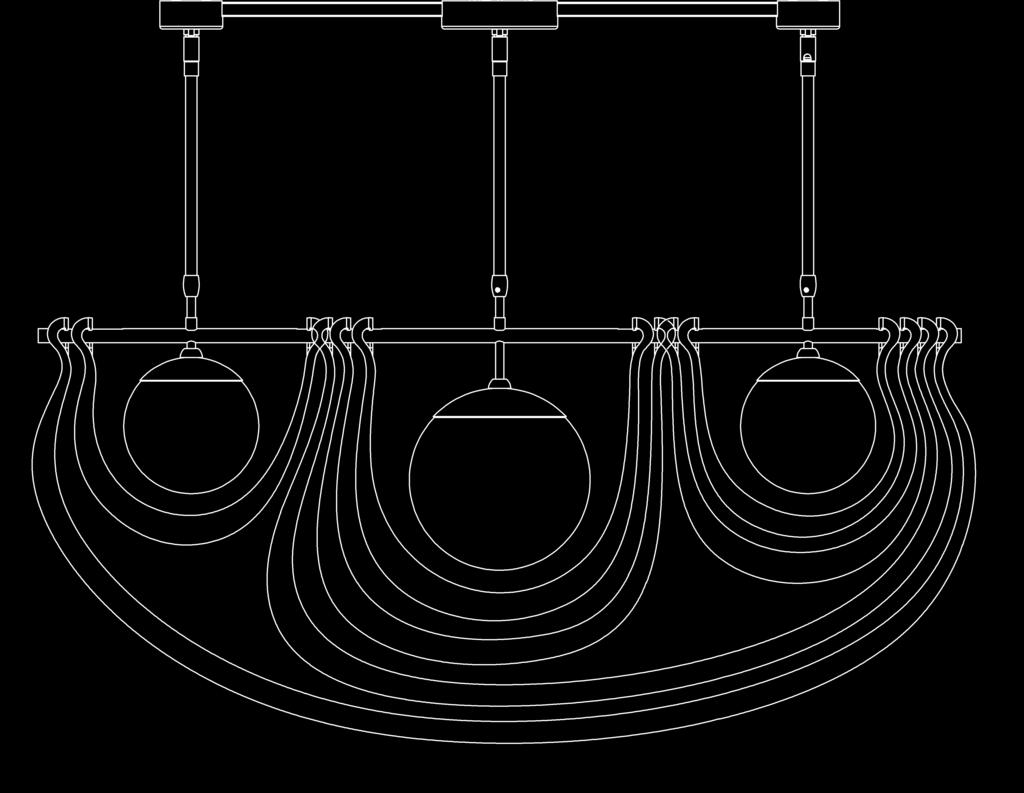
2 Component Parts A Fixture Pipe (3) B Coupling (3) C Canopy Pipe (3) D Middle Canopy Can E Clutch (3) F Plastic Sleeve (3) G Side Canopy Can (2) H Set Screw (3) I Middle Crossbar J #10 Screws (4) K Outer Mounting Plates (2) L Short Threaded Studs (4) M Long Threaded Studs (2) O P Fixture # 8 Screw Safety Cable Q Barrel Knobs (6) R Half Round Couplings (3) S Side Glass Cover (2) T U Middle Glass Cover Small Glass Globe V Side Plate (2) W Large Glass Globe X Accent Swoops (7) Y Hooks with otches (14) Z Anchors 2 OF 6
3 CAUTIO: FAILURE TO ISTALL THIS FIXTURE PROPERLY MAY RESULT I SERIOUS PERSOAL IJURY OR DEATH AD PROPERTY DAMAGE. We recommend installation by a licensed electrician. This product must be installed in accordance with applicable installation code(s), by a person familiar with the construction and operation of the product and the hazards involved.* Caution: Do not exceed maximum wattage noted on fixture. Use only recommended bulbs with fixture. Please ote: After installation extra hardware and accessories are possible due to our kits being used on multiple products and options. To Assemble Fixture (Figures 1, 2 & 3) CAUTIO: BE SURE POWER IS OFF AT THE MAI BREAKER BOX PRIOR TO ISTALLATIO. 1. Carefully unpack fixture from carton. 2. Slip fixture pipe (A) unpainted threads end first over any of the 3 sets of wires. 3. Apply a drop of the supplied thread locking compound to the threads of fixture pipe (A) and screw into coupling (B), being careful not to twist or pinch the wires. ote: Application of the thread locking compound is necessary to prevent the pipe from loosening during regular maintenance and cleaning of the fixture. Be certain to apply the compound. 4. Repeat steps 2 & 3 for the two remaining fixture pipes (A). 5. Run the wires from the center fixture pipe (A) through the canopy pipe (C) attached to the middle canopy can (D). 6. Unscrew the clutch (E) from the canopy pipe (C); slide it across the wires and onto the fixture pipe (A). Follow this with the plastic sleeve (F), oriented so the tapered end nests in the clutch (E) (Figure 2). 7. Repeat steps 5 & 6 for the side canopy cans (G) and the two remaining fixture pipes (A). 8. Slide the canopy pipe (C) as far as necessary to achieve the total height of fixture desired. Be careful not to scratch the pipe surfaces and to pull excess wire up through the canopy pipe (C). There must be a minimum 1-1/2" of inner pipe inside the outer pipe. Screw clutch (E) onto canopy pipe (C). Tighten the set screw (H) firmly with hex wrench provided. 9. Repeat this for the two remaining canopy pipes (C) being sure to keep the notches in the swivels facing the same direction (Figure 3). 10. Follow steps on following page to make wiring connections. Yeah, you got this! 3 OF 6
4 To Make Wiring Connections (Figures 1, 2 & 3) 1. Making sure to keep the two outside mounting plates (K) in the orientation desired and the middle crossbar (I) over the electric box, mark the location of all the anchors (Z) on the ceiling. Set the crossbar aside. 2. Drill 1/4 holes in the locations marked on the ceiling. Place the tapered ends of all anchors (Z) into the holes and gently tap flush with a hammer. 3. Using two machine screws (not provided), attach the middle crossbar (I) to the electric box. ote: A new electric box comes with screws. When replacing a fixture, retain the existing screws for use with the new fixture. 4. Thread the #10 screws through the outside mounting plates (K) and into the anchors (Z) to secure the outside mounting plates (K) to the ceiling. Be careful not to over tighten or strip the anchors. 5. Thread the short threaded studs (L) into the outer mounting plates (K). Thread the long threaded studs (M) into the middle crossbar (I). 6. Raise the fixture () to the ceiling and using one of the #8 screws (O) found in the kitbag attach the safety cable (P) to the middle crossbar (I) and suspend the fixture Caution: The cable is intended to temporarily suspend the fixture while wiring connections are made. ever depend on it to support weight with the fixture installed. 7. Run the black, white, and green ground wires from each side canopy can (G) through the square tube toward the middle crossbar (I). 8. Slide the side canopy can (G) over the short threaded studs (L) and secure to the outside mounting plate (K) with barrel knobs (Q). Be sure barrel knobs (Q) are fully seated onto the short threaded studs (L). 9. Repeat this for the second side canopy can (G) on the opposite outside mounting plate (K) making sure to keep the notches in the swivel facing the same direction as the other swivel. 10. Using suitable wire connectors (not provided), connect the fixture wires from all three cans to supply wires (white to white supply, black to black supply). Connect all ground wires (bare copper or green to bare copper or green). Push wires back into outlet box. Be sure to leave slack in the wires to allow for final height adjustments. Caution: Make sure wire connectors are twisted on securely, and no bare wire is exposed. 11. Slide middle canopy can (D) over long threaded studs (M) until flush against the ceiling and secure with barrel knobs (Q). Make sure no wires are pinched between the can and the ceiling. 12. Small adjustments in height may be made at this time by loosening the set screw (H) and clutch (E). Be sure to retighten after adjusting. 13. Install a bulb (not included) in each socket. ote: Using a slightly higher wattage bulb in the middle socket will make the fixture light more evenly 14. Follow instructions on page 6 to complete installation. 4 OF 6

 (Figure 3)")
5 MACHIE SCREWS Z I O P M D K J L G Q (Figure 1) C F H E A B (Figure 2) (Figure 3) 5 OF 6
6 To Complete Installation (Figure 4) 1. Loosen all 3 of the half round couplings (R) fully to allow the side glass covers (S) and middle glass cover (T) to be raised up. 2. While holding the side glass cover (S) up, slide the small globe glass (U) over the side plate (V) until the small globe glass is centered on the side plate (V). 3. When the small globe glass (U) is centered, allow side glass cover (S) to cover the opening in the top of glass. Retighten the half round coupling (R) to secure the small glass globe (U). ote: Tighten half round couplings (R) until snug. Overtightening can cause the glass to crack. 4. Repeat this step for the other small globe glass (U) and side glass cover (S) and the large glass globe (W) and the middle glass cover (T). 5. When all 3 glass globes have been secured follow the orientation in figure 4 to install all of the accent swoops (X). 6. Accent plates (X) all have hooks with notches (Y) that loop over and rest in the notch (AA) on fixture (). ote: The accent swoops (X) will only fit in the orientaion show in figure Restore electricity at main breaker. (Figure 4) R T Y W R S V U AA R S X (Figure 5) If you need further assistance, or find that you are missing any parts, please contact the dealer from which you purchased this product. We hope you enjoy your fixture! * Vermont Modern / Hubbardton Forge will not be liable for injury or damage caused by improper installation, lamping or use of this fixture. 6 OF 6
Caution: Do not exceed maximum wattage noted on fixture. Use only recommended bulbs with fixture.
 izz Kitchen Pendant With Brass Accent - 18700 Page 1 of 5 CAUTON: AUR TO NSTA THS XTUR PROPRY MAY RSUT N SROUS PRSONA NURY OR DATH AND PROPRTY DAMAG. We recommend installation by a licensed electrician.
Assembly & Installation Instructions
 1 OF 6 Component Parts A B C Fixture Mounting Bracket Canopy D Threaded Standoffs (2) E Cap (2) F Anchors (4) G #10 Screws (4) H I J K Safety Cable #8 Screw Ground Screw Cupped Washer Socket Assembly (6)
A524 ASSEMBLY & INSTALLATION INSTRUCTIONS BELLADONNA PENDANT CASTLETON, VERMONT USA SYNCHRONICITYLIGHTING.COM Rev A 1 OF 7
 1 OF 7 COMPONENT PARTS A B Canopy Mounting Bracket C Anchor (4) D #10 Wood Screw (4) E F G H Safety Cable Ground Screw Cupped Washer Safety Cable screw I Gripper (2) J Barrel Knob (4) K L Lightbar Fixture
A500 ASSEMBLY & INSTALLATION INSTRUCTIONS
 ASSEMBLY & INSTALLATION INSTRUCTIONS 1 CONTENTS 2 Component Parts A B Canopy Mounting Plate C Cap (3) D Threaded Nipple E Threaded Standoffs (2) F Anchors (8) G #10 Screws (8) H Safety Cable (2) I Safety
B235 Mobius Sconce Page 1 of 6
 Mobius Sconce 28-9450 Page 1 of 6 CAUTION: FAILURE TO INSTALL THIS PRODUCT PROPERLY MAY RESULT IN PERSONAL INJURY OR PROPERTY DAMAGE. We recommend installation by a qualified individual trained in the
GLASS GLOBE MOBILE LINEAR CHANDELIER
 PARTS ENCLOSED: (B) Top ceiling plate [1] (C) Bottom ceiling plate [1] (D) Glass globes [7] (E) Screws [6] (F) Nuts [5] (G) Extension rods [15] (H) Transformer [1] (I) Threaded inserts [5] (J) 1.6W LED
GLASS GLOBE MOBILE 6-ARM CHANDELIER
 PARTS ENCLOSED: (B) Top ceiling plate [1] (C) Bottom ceiling plate [1] (D) Glass globes [6] (E) Screws [4] (F) Nut [1] (G) Extension rods [3] (H) Transformer [1] (I) Arm counterweights [6] (J) 1.6W LED
Turn off electricity at circuit breaker or main fuse box before installation. Consult a licensed electrician if in doubt.
 Quoizel, Inc. 6 Corporate Parkway Goose Creek, SC Customer Service Phone 63.273.2700 Fax 63.23.702 www.quoizel. ToolsRequired:Flatheadscrewdriver,Phillipsscrewdriver,pliers,wirecutters,wire strippers,electricaltape,safetyglasses.
Nash Chandelier Assembly and Installation Instructions
 CAUTION: Nash Chandelier Assembly and Installation Instructions BEFORE INSTALLING FIXTURE, MAKE SURE THE POWER TO THE CIRCUIT IS TURNED OFF AT THE MAIN FUSE BOX / CIRCUIT BREAKER UTILITY BOX. Important
Custom Pendant- Hardwire Assembly and Installation Instructions
 Custom Pendant- Hardwire Assembly and Installation Instructions CAUTION: BEFORE INSTALLING FIXTURE, MAKE SURE THE POWER TO THE CIRCUIT IS TURNED OFF AT THE MAIN FUSE BOX / CIRCUIT BREAKER UTILITY BOX.
Turn off electricity at circuit breaker or main fuse box before installation. Consult a licensed electrician if in doubt.
 Quoizel, Inc. 6 Corporate Parkway Goose Creek, SC Customer Service Phone 631.273.2700 Fax 631.231.7102 www.quoizel. Pleasegotowww.quoizel.forproductcleaningtips.GototheCare+Maintenance selection. ToolsRequired:Flatheadscrewdriver,Phillipsscrewdriver,pliers,wirecutters,wire
Woven Leather Chandelier Large Assembly and Installation Instructions
 CAUTION: Woven Leather Chandelier Large Assembly and Installation Instructions BEFORE INSTALLING FIXTURE, MAKE SURE THE POWER TO THE CIRCUIT IS TURNED OFF AT THE MAIN FUSE BOX / CIRCUIT BREAKER UTILITY
MM540 Installation Instructions IMPORTANT SAFETY INSTRUCTIONS - SAVE THESE INSTRUCTIONS
 MM50 Installation Instructions IMPORTANT SAFETY INSTRUCTIONS - SAVE THESE INSTRUCTIONS Please read this entire manual before you begin. Do not unpack any contents until you verify all requirements on PAGE.
Arched Top Lantern Pendant Assembly and Installation Instructions. Country of Destination: US/CN UK/EU/AUS Middle East
 CAUTION: Arched Top Lantern Pendant Assembly and Installation Instructions Country of Destination: US/CN UK/EU/AUS Middle East BEFORE INSTALLING FIXTURE, MAKE SURE THE POWER TO THE CIRCUIT IS TURNED OFF
Installation and Assembly - Universal Articulating Swivel Double-Arm for 42" - 60" Plasma Screens
 Installation and Assembly - Universal Articulating Swivel Double-Arm for 42" - 60" Plasma Screens Models: PLAV 70-UNL, PLAV 70-UNL-S PLAV 70-UNLP, PLAV 70-UNLP-S R This product is UL Listed. It must be
F5513 APOGEE 30"DIA 3LTS PENDANT INSTALLATION INSTRUCTIONS WARNING
 F5513 APOGEE 30"DIA 3LTS PENDANT INSTALLATION INSTRUCTIONS TROY LIGHTING DISCONNECT POWER BEFORE RE-LAMPING OR WIRING THE FIXTURE READ ALL INSTRUCTIONS COMPLETELY BEFORE STARTING INSTALLATION. CAUTION
FIXTURE INSTALLATION GUIDE Model T21T (Low Voltage Pendant Set 120V)
") FIXTURE INSTALLATION GUIDE Model T21T (Low Voltage Pendant Set 120V) 21T, Rev.4 6-13 IMPORTANT: Before proceeding, retrieve the GLASS SHADE INSTALLATION GUIDE, which is included with the pendant cord set
FIXTURE INSTALLATION GUIDE Model T21T (Low Voltage Pendant Set 120V) 21T, Rev.4 6-13 IMPORTANT: Before proceeding, retrieve the GLASS SHADE INSTALLATION GUIDE, which is included with the pendant cord set
MantelMount. TM1A Installation Instructions IMPORTANT SAFETY INSTRUCTIONS - SAVE THESE INSTRUCTIONS
 MantelMount TMA Installation Instructions IMPORTANT SAFETY INSTRUCTIONS - SAVE THESE INSTRUCTIONS TM Thank you for choosing the MantelMount television wall mount. Please read this entire manual before
Installation and Assembly - Universal Articulating Swivel Double-Arm for 42" - 60" Plasma Screens
 Installation and Assembly - Universal Articulating Swivel Double-Arm for 42" - 60" Plasma Screens Models: PLAV 70-UNL, PLAV 70-UNL-S PLAV 70-UNLP, PLAV 70-UNLP-S R This product is UL Listed. It must be
MM340 Installation Instructions IMPORTANT SAFETY INSTRUCTIONS - SAVE THESE INSTRUCTIONS
 MM30 Installation Instructions IMPORTANT SAFETY INSTRUCTIONS - SAVE THESE INSTRUCTIONS Please read this entire manual before you begin. Do not unpack any contents until you verify all requirements on PAGE.
GroundControl. Follow instructions contained in this manual. Incorrect installation could result in serious injury or damage to property.
 GroundControl TM use supplied hardware Use only hardware supplied in your GroundControl kit or supplied by an authorized YAKIMA dealer. Use of unauthorized parts in the GroundControl system could result
TP4463. ASSeMBly INSTruCTIONS FLAT PANEL TV MOUNTING SYSTEM OPTION 1 OPTION 2 OPTION 3
 TP63 FLAT PANEL TV MOUNTING SYSTEM OPTION 1 OPTION 2 OPTION 3 Flat Panel TV Stand Stand with TV Mounting System Stand with Wall Mount ASSeMBly INSTruCTIONS for your safety, please follow these precautions:!
ROPE CHANDELIER - FRAME ASSEMBLY & INSTALLATION INSTRUCTIONS
 ROPE CHANDELIER - FRAME ASSEMBLY & INSTALLATION INSTRUCTIONS CAUTION: BEFORE INSTALLING FIXTURE, MAKE SURE THE POWER TO THE CIRCUIT IS TURNED OFF AT THE MAIN FUSE BOX / CIRCUIT BREAKER UTILITY BOX. IMPORTANT
PARTS & ASSEMBLY SHEET
 PARTS & ASSEMBLY SHEET Fixture Name: Echelon 8981-3P BRI / GRM This fixture assembled PO: Date: Notice: Please review the parts listing and check for all parts before assembling the fixture. If any parts
Assembly Instructions for Model: MF110
 Assembly Instructions for Model: MF110 Thank you for choosing a Sanus Systems VisionMount wall mount. The MF110 is designed to mount LCD flat panels with VESA (Video Electronics Standards Association)
CALLAS THERMOSTATIC SHOWER SET
 SKU(s): 925945 CALLAS THERMOSTATIC SHOWER SET BEFORE YOU BEGIN We recommend consulting a professional if you are unfamiliar with installing plumbing fixtures. Signature Hardware accepts no liability for
Side Mount INSTRUCTION BOOKLET #C122 BED STYLE: PARK CITY
 Side Mount BED STYLE: PARK CITY INSTRUCTION BOOKLET #C1 WARNING! ALL MURPHY/WALLBED SYSTEMS CONTAIN STORED ENERGY. FAILURE TO USE AND FOLLOW THESE INSTRUCTIONS DURING THE INSTALLATION PROCESS COULD RESULT
Hardware and Components:
 Hardware and Components: (A) 5/16 x 2 Hex Bolt (B) 5/16 x 2-1/4 Hex Bolt (C) 5/16 x 2-1/2 Hex Bolt (D) 4X 5/16 x 3/4 Hex Bolt (E) 4X 5/16 x 1-1/4 Hex Bolt (F) 11X 5/16 Flat Washer (G) 12X 5/16 Nylock Nut
Inigo Sconce INSTALLATION INSTRUCTIONS P _2_A 1 of 5
 P31321 1 of 5 Thank You For Choosing Kallista We appreciate your commitment to Kallista quality products. Please take a moment to review this manual before you install your Kallista product. If you encounter
PARTS & ASSEMBLY SHEET
 PARTS & ASSEMBLY SHEET Fixture Name: Echelon 8981-9 BRI / GRM This fixture assembled PO: Date: Notice: Please review the parts listing and check for all parts before assembling the fixture. If any parts
19 to 39 TV WALL MOUNT - FULL MOTION
 19 to 39 TV WALL MOUNT - FULL MOTION RF-HTVMMAB For wood-stud and concrete wall installations Safety information and specifications...2 Tools needed...2 Package contents...3 Installation instructions...5
MALEKO WALL-MOUNT FAUCET INSTALLATION
 SKU(s): 934146 BEFORE YOU BEGIN We recommend consulting a professional if you are unfamiliar with installing bathroom fixtures and plumbing. Signature Hardware accepts no liability for any damage to the
Assembly Instructions for Model: VMDD26
 Assembly Instructions for Model: VM26 Thank you for choosing a Sanus Systems Vision Mount wall mount. The VM26 is designed to mount up to 63 lat panel televisions weighing up to 175 lb. to a vertical wall.
Turn off electricity at circuit breaker or main fuse box before installation. Consult a licensed electrician if in doubt.
 Quoizel, Inc. 6 Corporate Parkway Goose Creek, SC Customer Service Phone 63.73.700 Fax 63.3.70 www.quoizel. Pleasegotowww.quoizel.forproductcleaningtips.GototheCare+Maintenance selection. ToolsRequired:
WARNING. Make sure that the supporting surface will safely support the combined load of the equipment and all attached hardware and components.
 All-in-one Projector Adapter Plate I5300 series, I5500 series, and SP8602 series Model: SP-CEIL-ISTALL Maximum Load Capacity: 50 lbs/22 kg Read all instructions before you start installation and assembly.
Projector Ceiling Mount
 INSTALLATION MANUAL Projector Ceiling Mount PID:3010 PID:5466 20kg (44lbs) RATED CAUTION: DO NOT EXCEED RATED LISTED WEIGHT. SERIOUS INJURY OR PROPERTY DAMAGE MAY OCCUR! ISSUED: FEB. 2013 NOTE: Read the
Fabric tiered drum pendant 30in Assembly and Installation Instructions
 CAUTION: Fabric tiered drum pendant 30in Assembly and Installation Instructions BEFORE INSTALLING FIXTURE, MAKE SURE THE POWER TO THE CIRCUIT IS TURNED OFF AT THE MAIN FUSE BOX / CIRCUIT BREAKER UTILITY
Riverside. Windward Bay EntertaInment Wall System Assembly Instructions. Made In Viet Nam. Right Pier. Bridge & Back Panel.
 EntertaInment Wall System Page 1 of 12 Product No. 42840 42848 42849 42843 Product Description Console Left Pier Right Pier Bridge & Back Panel Right Pier Bridge & Back Panel Left Pier 63" Inch Ent. Console
MADELINE METAL CHANDELIER
 MADELINE METAL CHANDELIER Assembly and Installation Instructions CAUTION: BEFORE INSTALLING FIXTURE, MAKE SURE THE POWER TO THE CIRCUIT IS TURNED OFF AT THE MAIN FUSE BOX / CIRCUIT BREAKER UTILITY BOX.
INSTALLATION INSTRUCTIONS HEAVY DUTY TILT WALL MOUNT Model: PPH-2000
 INSTALLATION INSTRUCTIONS HEAVY DUTY TILT WALL MOUNT Model: PPH-2000 Specifications: Accomodates Akira and Orion 84" displays without interface bracket; accomodates other large flat panel displays with
INSTALLATION INSTRUCTIONS Small Flat Panel Mounts Model: F-Series
 INSTALLATION INSTRUCTIONS Small Flat Panel Mounts Model: F-Series This Instruction Manual covers most of the F-Series wall and desk mounts, as well as selected F-Series pole mounts. NOTE: Some F-Series
THIS SHEET CONTAINS IMPORTANT SAFETY INSTRUCTIONS. SAVE THESE INSTRUCTIONS.
 LumeLEX 2026 SERIES INSTALLATION INSTRUCTIONS Important THIS SHEET CONTAINS IMPORTANT SAFETY INSTRUCTIONS. SAVE THESE INSTRUCTIONS. Warning This product must be installed in accordance with National Electrical
IMPORTANT SAFETY INSTRUCTIONS:
 Online: www.ballarddesigns.com PRODUCT NAME: MR Geometric Chandelier ITEM NUMBER: LC971 DIMENSIONS OF ITEM ASSEMBLED: FLUSH- 36 H x 42 W x 30 1/2 D HANGING- 96 H x 42 W x 30 1/2 D HANGING FIXTURE: FLUSH
MM750 Installation Instructions
 MM750 Installation Instructions IMPORTANT SAFETY INSTRUCTIONS - SAVE THESE INSTRUCTIONS Please read this entire manual before you begin. Do not unpack any contents until you verify all requirements on
YOUR LIFE. YOUR FIRE. Ortal Curved & Islands Fireplaces Installation Manual. Ortal USA - Version: 1.3 November, 2017 SKU: KPMANCIRISLUS17B
 YOUR LIFE. YOUR FIRE. Ortal Curved & Islands Fireplaces Installation Manual Ortal USA - Version: 1.3 November, 2017 SKU: KPMANCIRISLUS17B [THIS ISTALLATION MANUAL INCLUDES ASSEMBLY INSTRUCTIONS FOR THESE
Installation and Assembly: In-wall Mount for 32" to 71" Flat Panel Screens
 Installation and Assembly: In-wall Mount for 32" to 71" Flat Panel Screens Model# IM760P, IM760P-S IM760PU, IM760PU-S Screen size range 32" to 71" (81 to 180 cm) 32" to 60" (81 to 152 cm) IM760P IM760P-S
Maintenance Information
 16601023 Edition 2 January 2014 Air Impact Wrench 2705P1 Maintenance Information Save These Instructions Product Safety Information WARNING Failure to observe the following warnings, and to avoid these
Installation Instructions
 Installation Instructions Optima LED 8 Double-Sided StretchLite Perimeter Lit Graphic Display Line Voltage Connector Optima LED DS5 (Double-sided StretchLite Graphic Display) with Graphics Corner Bracket
Installation and Assembly: In-wall Mount for 32" to 71" Flat Panel Displays
 Installation and Assembly: In-wall Mount for 32" to 71" Flat Panel Displays Model# Display size range IM760P, IM760P-S 32" to 71" (81 to 180 cm) IM760PU, IM760PU-S 32" to 65" (81 to 165 cm) This product
Hardware and Components:
 Hardware and Components: (A) 4X 5/16 x 1 Carriage Bolt (B) 2X 5/16 x 2-1/4 Carriage Bolt (C) 2X 5/16 x 3-1/4 Hex Bolt (D) 2X 5/16 x 3/4 Hex Bolt (E) 2X 5/16 x 1-1/4 Hex Bolt (F) 5/16 x 2-1/4 Hex Bolt (G)
 INSTRUCTION BOOKLET #C10 Watch step by step installation instructions at: https://www.wallbedsbywilding.com/wallbed-installation-studio-series/ WARNING! ALL MURPHY/WALLBED SYSTEMS CONTAIN STORED ENERGY.
IMPORTANT SAFETY INSTRUCTIONS:
 PRODUCT NAME: Presley 4 Light Chandelier ITEM NUMBER: LC973 DIMENSIONS OF ITEM ASSEMBLED: 18 H x 18 W x 18 D IMPORTANT SAFETY INSTRUCTIONS: -We strongly recommend that a professional electrician install
INSTALLATION GUIDE. Model:B60 RECESSED IN WALL MOUNT
 INSTALLATION GUIDE Model:B60 RECESSED IN WALL MOUNT Features: Installs between 16 (406mm) wood stud centers Mounting Pattern Compliance: VESA 100*100mm up to 600 x 400mm Level 5 degree horizontal adjustment
Installation Instructions for Cirrus Suspension Downlight with Power - End Feed. Section One: 4" Flush Canopy Version
 Doc # 0-CSP-E_0 W. Fullerton Chicago, IL 606 Ph:.0. Fax:..6 www.pureedgelighting.com info@pureedgelighting.com 06 PureEdge Lighting. All Rights Reserved. Installation Instructions for Cirrus Suspension
Installation and Assembly: Flat Panel Pull-out Swivel Wall Mount
 Installation and ssembly: Flat Panel Pull-out Swivel Wall Mount Models: SP850-V2X2 2300 White Oak Circle urora, Il 60502 (800) 865-2112 Fax: (800) 359-6500 www.peerlessmounts.com ISSUED: 01-17-12 SHEET
https://www.wallbedsbywilding.com/wallbed-installation-studio-series/
 For Wallbed models: KING SIZE INSTRUCTION BOOKLET #C1 Watch step by step installation instructions at: https://www.wallbedsbywilding.com/wallbed-installation-studio-series/ WARNING! ALL MURPHY/WALLBED
INSTALLATION INSTRUCTIONS
 INSTALLATION INSTRUCTIONS Universal Low Profile Tilt Mount Model: U.S. Toll Free: 1-866-752-6271 Outside N. America: 1-503-748-5799 E-mail: ts@planar.com FRANCE Phone: +33 5 6378 3810 E-mail: emeats@planar.com
Frameless Inline Door With Return QCI5263
 INSTALLATION INSTRUCTIONS Frameless Inline Door With Return QCI5263 WALL MOUNT HINGES FRAMELESS DOOR / PANEL / RETURN PANEL QCI5263 REV. 0 Page 1 Certified 06/17/2016 Parts List with wall mount hinges
ONASSIS SHOWER SET INSTALLATION
 SKU(s): 925939 BEFORE YOU BEGIN We recommend consulting a professional if you are unfamiliar with installing plumbing fixtures. Signature Hardware accepts no liability for any damage to the plumbing, floor,
Universal Projector Ceiling Mount Model: DPM-45
 Universal Projector Ceiling Mount Model: DPM-45 Instruction Manual Images may different from actual product Disclaimer It is Dyconn s intention to have all the correct information represented within this
 INSTRUCTION BOOKLET #C0 Watch step by step installation instructions at: https://www.wallbedsbywilding.com/wallbed-installation-studio-series/ WARNING! ALL MURPHY/WALLBED SYSTEMS CONTAIN STORED ENERGY.
PAM-200 Universal Projector Mount
 INSTALLATION MANUAL PAM-200 Universal Projector Mount Sony Electronics 16540 West Bernardo Drive San Diego, CA 92127 www.sony.com IN-PAM200.R0 Table of Contents Parts List...- 3 - Installation Tools...-
Ready To Go SimpleSpec tm. Installation Manual. For more information, please visit 3-form.com or call
 Contents Overview ( 1) 3/8" Varia Panel = Cable Tensioner with Cover Plate KIT Stainless Steel: 3-15-1636-K Black Oxide: 3-15-2005-K Cable Tensioner with Cover Plate SS: 3-15-1636 BO: 3-15-2005 + M8 Thread
Midmark Care Exchange 6282 Standard Duty Wall Mounted Workstation
 INSTALLATION MANUAL Midmark Care Exchange 6282 Standard Duty Wall Mounted Workstation Weight Capacity 5-20 lbs 1210180MD Rev. C TABLE OF CONTENTS Tools Required / Installation Warnings / Disclaimer / Safety
GB-AVSTOR5 Ceiling Equipment Storage Box with Pipe Coupler
 Ceiling Equipment Storage Box with Pipe Coupler INSTALLATION INSTRUCTIONS CREATING POSITIVE CUSTOMER EXPERIENCES 9534-500-021-00 Contents Weight Limit... 2 Warning Statements... 2 Installation Tools...
Allegro Home Office Assembly Instructions. Tipping Restraint. Bun Foot W/ Leveler. 4 pcs.
 email: info@riverside-furniture.com Allegro Home Office Assembly Instructions Components and Hardware List Page 1 of 5 Made in China Shelf Pin Wood Shelf File Rod & Clips 1/2"Wood Screw A 16 pcs. B 4 pcs.
Dual Arm Tilt LCD Mount
 Installation Manual model # 51324 M o u n t i n g S y s t e m s Dual Arm Tilt LCD Mount Fits Displays 13 to 32 Supports Up to 50 lbs (23 kgs) Projection from Wall from 3 to 17 Meets VESA Standards 50/75/100,
General Installation Instructions
 General Installation Instructions WARNING To reduce the risk of death, injury or property damage from fire, electric shock, cuts, abrasions, falling parts and other hazards: Service of the equipment must
Wall Mount Assembly and Mounting Guide (55 /84 )
") Microsoft Surface Hub Wall Mount Assembly and Mounting Guide (55 /84 ) For mounting on a wall with wood studs These instructions assume wood-stud wall construction with 2-by-4 studs spaced 16 inches apart,
Microsoft Surface Hub Wall Mount Assembly and Mounting Guide (55 /84 ) For mounting on a wall with wood studs These instructions assume wood-stud wall construction with 2-by-4 studs spaced 16 inches apart,
PORTA~TRACE. GAGNE, INC. 41 Commercial Dr. Johnson City, New York Phone: Fax: ASSEMBLY INSTRUCTIONS
 PORTA~TRACE GAGNE, INC. 41 Commercial Dr. Johnson City, New York 13790 Phone: 1-607-729-3366 Fax: 1-607-729-7644 ASSEMBLY INSTRUCTIONS PORTA~TRACE MODEL 2436T LIGHT TABLE PORTA~TRACE MODEL 3648T LIGHT
LATTIMORE SHOWER SET INSTALLATION
 SKU(s): 931419 LATTIMORE SHOWER SET INSTALLATION BEFORE YOU BEGIN We recommend consulting a professional if you are unfamiliar with installing plumbing fixtures. Signature Hardware accepts no liability
INSTALLATION AND CARE INSTRUCTIONS
 INSTALLATION AND CARE INSTRUCTIONS Skylight Manually Operated Honeycomb Shades 20 C8-10-1806 2/15 1 INTRODUCTION Thank you for purchasing our product. Your new shade has been custom built for you from
QLF215 INSTRUCTION MANUAL
 QLF215 INSTRUCTION MANUAL We ll Make It Stress-Free If you have any questions along the way, just give us a call. 1-800-359-5520. We re ready to help! 1 2 3 IMPORTANT SAFETY INSTRUCTIONS SAVE THESE INSTRUCTIONS
EXIRA SHOWER SET INSTALLATION
 SKU(s): 925470 EXIRA SHOWER SET INSTALLATION BEFORE YOU BEGIN We recommend consulting a professional if you are unfamiliar with installing plumbing fixtures. Signature Hardware accepts no liability for
USE AND CARE GUIDE FIXED LED / LCD TV WALL MOUNT (UNIVERSAL MOUNTING PATTERN, FITS VESA
 Item #302-080 Model #50710 USE ND CRE GUIDE FIXED LED / LCD TV WLL MOUNT (UNIVERSL MOUNTING PTTERN, FITS VES 100/200/300/400/600) Questions, problems, missing parts? Before returning to the store, call
TV WALL MOUNT ASSEMBLY GUIDE RF-TVMLPT01V2
 TV WALL MOUNT RF-TVMLPT01V2 For wood-stud and concrete wall installations Safety information and specifications...2 Tools needed...2 Package contents...3 Installation instructions...4 ASSEMBLY GUIDE Before
Installation Instruction
 Tools Needed for Assembly Stud finder (for wood stud wall) Pencil Mark Electric drill Wood Stud Wall Installation Step 1. Locate the Wood Studs Installation Instruction Drill bit (for wood stud wall) Masonry
INSTALLATION RECOMMENDATIONS For The Con-Tech ODYSSEY Line Voltage Flexible Track System
 INSTALLATION RECOMMENDATIONS For The Con-Tech ODYSSEY Line Voltage Flexible Track System IMPORTANT SAFETY INSTRUCTIONS: Read all instructions before installation. Save these instructions for later use.
INSTALLATION INSTRUCTIONS Flat Panel Static Wall Mount Model: GSM-111
 INSTALLATION INSTRUCTIONS Flat Panel Static Wall Mount Model: GSM-111 The GSM-111 static wall mount fits most 23" to 30" displays. The GSM-111 is designed to adapt to VESA 200mm/ 100mm compliant displays.
INSTALLATION MANUAL PBC-UMS
 INSTALLATION MANUAL. PBC-UMS Premier Mounts 3130 E. Miraloma Avenue Anaheim, CA 92806 Phone: (800) 368-9700 Fax: (800) 832-4888 mounts@mounts.com www.mounts.com Rev. 01 PBL-110 Projector Mount Page 2 Installation
OB1U INSTALLATION INSTRUCTIONS. Interactive Flat Panel Over White Board Mount
 INSTALLATION INSTRUCTIONS Interactive Flat Panel Over White Board Mount Spanish Product Description German Product Description Portuguese Product Description Italian Product Description Dutch Product Description
Assembly Instructions
 Unite Panel System Hinge Door July 2016 #12 x / slotted hex washer head bolt Figure 1 threshold bracket frame Detail F threshold bracket threshold bracket (installed) #12 x / slotted hex washer head bolt
Installation and Assembly - Articulating Swivel Double-Arm for 42" - 71" Plasma Screens
 Installation and ssembly - rticulating Swivel Double-rm for 42" - 71" Plasma Screens Models: PLV 70, PLV 70-S R This product is UL Listed. It must be installed by a qualified professional installer. Maximum
C 0.05" ALLEN WRENCH. Installation Instructions for Cirrus Channel Suspension T1 with 4" Square or Round Canopy. Section One: Adjusting Cable Position
 Doc # 90-CST-SQ_0 W. Fullerton Chicago, IL 0 Ph:.0.9 Fax:.9. www.pureedgelighting.com info@pureedgelighting.com 0 PureEdge Lighting. All Rights Reserved. Installation Instructions for Cirrus Channel Suspension
Installing flat panels on the MPL15 wall mount
 Installing flat panels on the MPL15 wall mount The MPL15 (DS-VW775) is a full-service video wall mount that can accommodate tiled LCD panels with up to a 400 x 400 mm VESA pattern in portrait and landscape
WILLIS WALL-MOUNT FAUCET INSTALLATION
 SKU(s): 924620 BEFORE YOU BEGIN We recommend consulting a professional if you are unfamiliar with installing bathroom fixtures and plumbing. Signature Hardware accepts no liability for any damage to the
Line volt rail & fixtures. Low volt quick connect fixtures with transformers
 INSTRUCTIONS: Line Volt Flexrail2 Safety Instructions: A qualified electrician must install system only. System is intended for installation in accordance with National Electric Code, local and Federal
Modern Gatherings 60" TV Console Assembly Instructions
 Parts List Page 1 of 6 No. Description Sketch Quantity A Console 1 B Door 1 Thank you for purchasing this quality product. Be sure to check all packing material carefully for small parts that may have
 For Wallbed models: KING SIZE INSTRUCTION BOOKLET #C1 Watch step by step installation instructions at: https://www.wallbedsbywilding.com/wallbed-installation-studio-series/ WARNING! ALL MURPHY/WALLBED
FOR WALL MOUNT WORKSTATION
 INSTALLATION MANUAL FOR WALL MOUNT WORKSTATION Weight Capacity 5-20 lbs. 1210180 Rev. C TABLE OF CONTENTS Tools Required / Installation Warnings / Disclaimer / Safety Warning / Adjustment Notification...3
Installation Instructions
 For Medium (15-18.5K) + Heavy duty (22-28.5K) Air Conditioner READ BEFORE INSTALLING UNIT To avoid risk of personal injury, property damage, or product damage due to the weight of this device and sharp
EmagiKit. Privacy Pod Plus. Quiet. Easy. Affordable. INSTRUCTIONS ASSEMBLY
 EmagiKit Privacy Pod Plus Quiet. Easy. Affordable. INSTRUCTIONS ASSEMBLY DIMENSIONS AND COMPONENTS 47 47 Ceiling Unit 2-B 2-L 2-R Glass Door Corner Trim Door Handle 90 Adjustable Height Work Surface 1-B
INSTRUCTION BOOKLET #C21. For Wallbed models: KING SIZE
 For Wallbed models: KING SIZE INSTRUCTION BOOKLET #C1 WARNING! ALL MURPHY/WALLBED SYSTEMS CONTAIN STORED ENERGY. FAILURE TO USE AND FOLLOW THESE INSTRUCTIONS DURING THE INSTALLATION PROCESS COULD RESULT
YOUR LIFE. YOUR FIRE. Ortal Curved & Islands Fireplaces User s Manual
 YOUR LIFE. YOUR FIRE. Ortal Curved & Islands Fireplaces User s Manual [USA Fireplace Models [THIS ISTALLATION MANUAL INCLUDES ASSEMBLY INSTRUCTIONS FOR THESE MODELS: STAND ALONE 7565 CURVED TUNNEL DOUBLE
Installation and Assembly: Articulating Swivel Arm for 37" - 60" Flat Panel Displays
 Installation and Assembly: Articulating Swivel Arm for 37" - 60" Flat Panel Displays Models: PLA60, PLA60-S, PLAV60, PLAV60-S Max UL Load Capacity: 175 lb (79 kg) 2300 White Oak Circle Aurora, Il 60502
ATTACH WALL PLATE TO WALL
 DANGER! The Elite ar m contains high p r e s s u r e g a s s p r i n g s. T h e following cautions MUST be observed to avoid serious injury. 1. Do not attempt to adjust your Elite arm until everything
NEC Display Solutions of America, Inc.
 NEC Display Solutions of merica, Inc. Installation and ssembly Manual: Custom Ceiling Mount for NEC NP400, NP500, NP500W, and NP600 Projectors Model: NP600CM Maximum Load Capacity: 50 lb (22.7 kg) Features:
Under Seat Storage Drawer Installation Instructions
 Under Seat Storage Drawer Installation Instructions Parts List: 1) Drawer Assembly 8) Self Tapping Screws 1) Instructions 1) Template Tools Needed: Drill and/or Bit Driver Tape Measure Jigsaw or metal
Installation and Assembly: Wallmount for CPA100 and Whiteboard
 Installation and ssembly: Wallmount for CP100 and Whiteboard Model: 100IWBMOUNT Maximum Load Capacity for Screen: 53 lb (24 kg) Maximum Load Capacity for Projector : 13.5 lb (6 kg) 1 of 16 Visit 3215 the
QLF214 INSTRUCTION MANUAL
 QLF214 INSTRUCTION MANUAL We ll Make It Stress-Free If you have any questions along the way, just give us a call. 1-800-359-5520. (UK: 0800 056 2853) We re ready to help! CAUTION: IMPORTANT SAFETY INSTRUCTIONS