Installation Instructions
|
|
|
- Darren Virgil Harvey
- 6 years ago
- Views:
Transcription
1
2 Arizona Corporate Office 2801 W. Indian School Rd Phoenix, AZ PH FAX Florida Westside Industrial Dr Jacksonville, FL PH FAX Illinois 2601 Bond St #1 University Park, IL PH FAX Colorado 3871 Revere Street Denver, CO PH FAX Oregon 2057 Lars Way Medford. OR PH FAX Utah 2594 S 3600 Wet Suite A West Valley City, UT PH FAX Installation Instructions Tools you will need for this install Exploded View drawing of shower door 3/16 Masonry drill bit (use 9/64 drill bit for fiberglass) 1/8 drill bit Drill 4 Level Saw (Electric chop saw with a blade for cutting aluminum extrusion or Hacksaw) #2 Phillips drill bit #2 Phillips screwdriver Tape Measure Pencil or Pen Caulking Gun 1 Tube of 100% Clear Silicone (no latex!) Vacuum Cleaner or Brush for clean up Glass Cleaner and Paper Towels Rubber Mallet File
 Find the centerline of where the unit will be installed.")
. Place the wall jamb against the wall, on top of the ledge or curb, aligning centerline marks (A).")
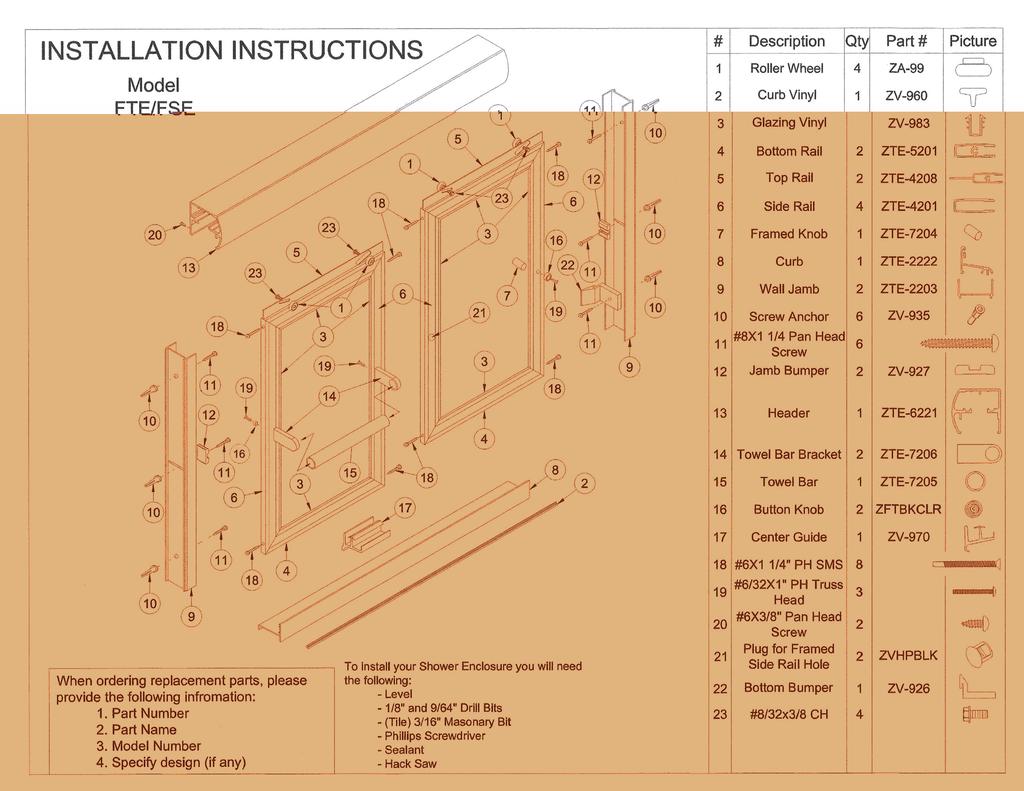
3 side Installation of the bumper Instructions for Model FTE & FSE Note: These instructions will refer to the item # s in the Exploded View drawing. For example, #1, #2, #3 etc Please read through all of the instructions to get an over view before you install the door. 1) Find the centerline of where the unit will be installed. This will usually be the center of the ledge of the bath tub or the curb of the shower pan. Place a centerline mark at each end of the tub ledge or curb where it meets the wall. This mark will also represent the center of the ZTE2203 wall jamb (item #9 in exploded view). Place the wall jamb against the wall, on top of the ledge or curb, aligning centerline marks (A). If your shower is fiberglass you might have to file the backside corner of the ZTE2203 to a radius so the jamb sits as flush as possible on the ledge or curb. Use a level to position the jamb plumb, then mark the installation holes with a pen or pencil (B). Repeat this procedure for the other jamb. Now drill the 6 holes with a 3/16 masonry bit (9/64 for fiberglass, & without anchors). Then insert the 6) ZV935 screw anchors (#10) in the holes. Fasten the ZTE2203 wall jambs in place using the #8X1 1/4 Phillips Pan Head screws provided (#11) (C). Install the two ZV927 bumpers (#12) with the center screws of the wall jambs (D). Important Note: The ZV926 Bottom Bumper needs to be installed with the bottom screw on the jamb, on the showerhead side of the unit, with the angled side of the bumper going to the inside of the shower. Refer
(E). Cut to size. Apply silicone where wall jambs meet tub or curb (F).")
4 to the exploded view drawing. 2) Measure the distance between the inside of the wall jambs (just above the tub ledge or curb). Measure tight and deduct 1/16 to 1/8 to get the cut size of the ZTE2222 Curb (#8)(E). Cut to size. Apply silicone where wall jambs meet tub or curb (F). Then run a bead underneath the ZTE2222 Curb (F2). Slide the curb down between the wall jambs and onto the tub/shower. Make sure the curb is solid and doesn t rock back and forth (G). If it is not solid, secure it with two of the #6X3/8 Pan Head Screws (#20) by drilling with a 1/8 drill bit through the outside leg of the wall jamb at the bottom, into the face of the curb and inserting the screws (G2). 3) Measure the distance from wall to wall across the top of the jambs. Cut the ZTE6221 Header (#13) to that dimension minus 1/16. Slide the header down over the top of the wall jambs. The header does not need to be secured with screws (H). 4) Install the panels. The inside panel will be set first. (The inside panel will have the knob). This will be done as you stand on the outside of the shower. Grip one of the panels on each side so that the rollers are facing away from you. Lift the panel so that the bottom edge clears the top of the ZTE2222 Curb as you lower it into the shower. Continue lowering the panel down
5 until the top rollers can be guided up into the inside roller track of the header. Lift up panel then slowly lower the rollers into the inside roller track and let the panel hang in its vertical position. The outside panel will be installed the same way. Make sure the rollers are facing toward you. A helper would be valuable at this point to hold the inside panel on an angle toward the inside so that the outside panel can be lowered and positioned to be installed into the outside roller track. The inside panel will be positioned at the showerhead side of the shower while the outside panel will be positioned opposite the showerhead. This is to ensure that no water escapes through the overlap (I). 5) Adjust Rollers (J). The roller wheels are mounted to angled slots in the top rail on the glass. Lowering the roller in the slot raises the glass. Raising the roller in the slot lowers the glass. Start out with the rollers mounted in the middle of the angled slot. If the panel needs to be adjusted you can remove the panel, adjust with a screwdriver, reset the panel. This might be done one or two times until you achieve proper alignment. The end result should be that the vertical edge of the panel is parallel to your wall jamb to achieve maximum coverage. 6) Attach the ZV970 Center Guide (#17). Position the guide in the center of the overlap of the glass. When the doors are in a closed position the center guide should be centered in the overlap of the panels. Attach the guide in place by running a bead of silicone under the base of the ZV970 Center Guide.
 into the other ZTE7206 Towel Bar Bracket then slip the other end of the towel bar into the previously mounted bracket.")
6 7) Attach one ZTE7206 (#14) (L) Towel Bar Bracket using one of the two #6/32x3/8 PH Truss Head Screw (#19). Place the ZTE7205 Towel Bar (#15) into the other ZTE7206 Towel Bar Bracket then slip the other end of the towel bar into the previously mounted bracket. Hold into place while you run the other screw through the frame and into the bracket. 8) Attach the ZTE7204 Framed Knob (#7) (M) by inserting the mounting screw (#19) through frame and into the knob and tighten. 9) Run a bead of silicone on the gap between the metal and the shower surface inside and out. Fill all joints and gaps where metal meets metal and fill with a fine bead (N). 10) Insert ZVHPBLK (#21) into hole on frame rail (O).
Tools you will need for this install
 Arizona Corporate Office 2801 W. Indian School Rd Phoenix, AZ 85017 800-255-1901 PH 602-447-8208 FAX Florida 8100-1 Westside Industrial Dr Jacksonville, FL 32219 855-695-8899 PH 904-786-9025 FAX Illinois
SLIDING TUB / SHOWER ENCLOSURE WITH STATIONARY 90º PANEL
 SLIDING TUB / SHOWER ENCLOSURE WITH STATIONARY 0º PANEL This instruction sheet applies to the following units. C, C7, C7, C77, C, C7 This instruction sheet also applies to the following units. VTE / VSE
TUB SHOWER Framed Sliding Enclosure
 INSTALLATION INSTRUCTIONS 8775-9775 - SHOWER Framed Sliding Enclosure Call Technical Dept @ 1-800-452-2726 QCI1000 Page 1 of 6 Certified 10/01/09 INSTALLATION NOTES: Unpack your unit carefully and inspect
SHOWERGLIDE 600B, 690B, 692B, SERIES
 Installation Instructions SHOWERGLIDE SERIES 600B, 60B, 6B, 6B, 65B, 67B IMPORTANT: You should check with your local plumbing or building code agency about this product for compliance before it is installed.
Deluxe Frameless ByPass Bath Enclosures. 340 & 350 Series
 202 Anderson Ave., Belvue, KS 66407 Phone: 800-669-9867 Fax: 800-393-6699 www.onyxcollection.com 800-643-1514 www.alumaxshowerdoor.com 340 & 350 Series Deluxe Frameless ByPass Bath Enclosures 350D-0517
Two Panel Frameless Bypass Door
 INSTALLATION INSTRUCTIONS Two Frameless Bypass Door Series 00 Please Record Model Number From Carton Label Here Please read these instructions carefully to familiarize yourself with the required tools,
GLASSCRAFTERS, INC 193 Veterans Blvd., Carlstadt, NJ Frameless Sliding Door with Fixed Panel Shower/Tub Enclosure Installation Instructions
 GLASSCRAFTERS, INC 193 Veterans Blvd., Carlstadt, NJ 07072 1+(888) 683-1362 -- (Fax) 201-525-1117 sales@glasscraftersinc.com MATRIX series Frameless Sliding Door with Fixed Panel Shower/Tub Enclosure Installation
Frameless Bypass Slider
 INSTALLATION INSTRUCTIONS Frameless Bypass Slider QCI-5301 Heavy Glass Bypass Slider with Exposed Rollers QCI5301 Rev 0 Page 1 Certified 11/1/2016 Tools: To install your New Shower Enclosure, you may need
Frameless Bypass Slider
 INSTALLATION INSTRUCTIONS Frameless Bypass Slider QCI-5301 3/8 or 1/4 Glass Bypass Slider with Exposed Rollers QCI5301 Rev 1 Page 1 Certified 6/5/2017 Tools: To install your New Shower Enclosure, you may
1/4 FRAMELESS SLIDING DOOR FOR TUB OR SHOWER 4400A-4500A
 1/4 FRAMELESS SLIDING DOOR FOR TUB OR SHOWER 4400A-4500A F AB GLASS AND MIRROR www.fabglassandmirror.com Call: +1 888-474-2221 Fax: (614)-334-4919 Office Timing: 8:30-18:00 EST info@fabglassandmirror.com
Unit No. 4400, 4500 Classic Frameless Sliding Tub/Shower Enclosure INSTALLATION INSTRUCTIONS
 Unit No. 4400, 4500 Classic Frameless Sliding Tub/Shower Enclosure INSTALLATION INSTRUCTIONS MAINTENANCE: Two primary materials are used to manufacture your new Basco enclosure: tempered glass and anodized
3/16 FRAMELESS SERIES BY-PASS TUB AND SHOWER ENCLOSURES #3344, 3345, 3037
 / FRAMELESS SERIES BY-PASS #, 5, 07 PLEASE READ THOROUGHLY BEFORE STARTING INSTALLATION Item 5 7 8 9 0 5 7 8 Part # 09/050 0 05 A05 8 0 0 0 70 0 09 5 5 0 0 7 0 Description Tub Header Stay Clean Sill Tub
MASON SHOWER DOOR INSTALLATION
 SKU(s): 939728, 939729 MASON SHOWER DOOR INSTALLATION BEFORE YOU BEGIN We recommend consulting a professional if you are unfamiliar with installing this type of product. Signature Hardware accepts no liability
Series----SP3600A SHOWER DOOR
 Series----SP3600A SHOWER DOOR INSTALLATION INSTRUCTIONS Please read these instructions carefully to familiarize yourself with the required tools, materials, and installation sequences. The Exploded Diagram
INSTALLATION INSTRUCTIONS
 INSTALLATION INSTRUCTIONS BUILDERS CHOICE FRAMED Bypass Door Model: L0516 (Tub Height), L0517 (Shower Height) Rev. 09.20.13 INSTALLATION NOTES: Unpack your unit carefully and inspect for freight damage.
tile redi redi DOOR Redi Redi Swing Slide g TM TM...Opening Doors to Stunning Showers! TM TM SERIES: CONFIGURATION: MOUNTING PACKAGE:
 redi DOOR INSTALLATION INSTRUCTIONS tile redi Redi Redi Swing Slide g TM TM...Opening Doors to Stunning Showers! TM TM SERIES: CONFIGURATION: MOUNTING PACKAGE: 3000 Door-Door Header, sliding doors RDQCI5301
FRAMED SLIDING DOOR FOR TUB OR SHOWER ENCLOSURE 6150A-7150A
 FRAMED SLIDING DOOR FOR TUB OR SHOWER ENCLOSURE 6150A-7150A F AB GLASS AND MIRROR www.fabglassandmirror.com Call: +1 888-474-2221 Fax: (614)-334-4919 Office Timing: 8:30-18:00 EST info@fabglassandmirror.com
1/4 FRAMELESS SLIDING DOOR FOR TUB OR SHOWER
 1/4 FRAMELESS SLIDING DOOR FOR OR SHOWER INSTALLATION INSTRUCTIONS NEED INSTALLATION HELP? Call 1-800-45-BASCO (452-2726) M onda y - Friday 8 :00 A.M. - 4:30 P.M. Eastern Time MAINTENANCE: Two primary
3/8 FRAMELESS BYPASS SLIDING SHOWER ENCLOSURE
 INSTALLATION INSTRUCTIONS 3/8 FRAMELESS BYPASS SLIDING SHOWER ENCLOSURE QCI-5017 QCI5017 Rev. 3 Page 1 of 9 Certified 12/6/17 INSTALLATION NOTES: Unpack your unit carefully and inspect for freight damage.
1/4 FRAMELESS SLIDING DOOR FOR TUB OR SHOWER
 1/4 FRAMELESS SLIDING DOOR FOR OR SHOWER INSTALLATION INSTRUCTIONS NEED INSTALLATION HELP? Call 1-800-45-BASCO (452-2726) M onda y - Friday 8 :00 A.M. - 4:30 P.M. Eastern Time MAINTENANCE: Two primary
SERIES: CONFIGURATION: MOUNTING PACKAGE: 1200 Door-Door Frameless, sliding door
 SERIES: CONFIGURATION: MOUNTING PACKAGE: 1200 Door-Door Frameless, sliding door RDQCI5022 Rev.0 Page 1 Certified 06/01/2016 Tools: To install your New Shower Enclosure, you may need the following: Pencil
Unit No. 6150, 7150 Deluxe Framed Sliding Tub/Shower Enclosure
 INSTALLATION INSTRUCTIONS Unit No. 6150, 7150 Deluxe Framed Sliding Tub/Shower Enclosure QCI0023 Rev. 1 Page 1 of 8 Certified 8/20/10 MAINTENANCE: Two primary materials are used to manufacture your new
FRAMED SLIDING DOOR FOR TUB OR SHOWER ENCLOSURE INSTALLATION INSTRUCTIONS
 FRAMED SLIDING DOOR FOR OR SHOWER ENCLOSURE INSTALLATION INSTRUCTIONS QCI5023 REV. 0 Page 1 Certified 06/22/2016 INSTALLATION NOTES: Unpack your unit carefully and inspect for freight damage. Lay out and
Page 1. FIG. #1 - Shower Door Assembly SHOWER & BATH ENCLOSURES BUILT TO LAST A LIFETIME HANDLE ASSEMBLIES REMOVED FOR CLARITY.
 FIG. #1 - Shower Door Assembly 29 1 2 1 6 9 9 5 HANDLE ASSEMBLIES REMOVED FOR CLARITY. 25 25 PLEASE REFER TO FIG. #2 FOR INSTALLATION 26 12 17 18 18 17 10 3 11 7 10 8 Page 1 FIG. #2 - Top View 5 21 10
Model 2400/4000 Illustrated Installation Instructions
 Model 2400/4000 Illustrated Installation Instructions Contractors Wardrobe DESIGNERS MNUFCTURERS 26121 venue Hall Valencia, C 955 (661) 257-77 Fax: (661) 257-4907 Toll Free: (800) CW-DOORS (800) 293-6677
Frameless Fixed Panel Slider QCI5279
 Frameless Fixed Panel Slider QCI5279 F AB GLASS AND MIRROR www.fabglassandmirror.com Call: +1 888-474-2221 Fax: (614)-334-4919 Office Timing: 8:30-18:00 EST info@fabglassandmirror.com Frameless Fixed Panel
INSTALLATION INSTRUCTIONS FRAMELESS CONTINUOUS HINGE SHOWER ENCLOSURE QCI5233
 INSTALLATION INSTRUCTIONS FRAMELESS CONTINUOUS HINGE SHOWER ENCLOSURE QCI5233 QCI5233 Rev 0 Page 1 Certified 06/20/2016 INSTALLATION NOTES: Unpack your unit carefully and inspect for freight damage. Lay
Frameless Fixed Panel Slider
 INSTALLATION INSTRUCTIONS Frameless Fixed Panel Slider QCI-5279 SINGLE ROLLER WITH ANTI-JUMP DOUBLE ROLLERS QCI5279 Rev Page Certified 08/09/6 Tools: To install your New Shower Enclosure, you may need
tile redi redi DOOR Redi Redi Swing Slide g TM TM...Opening Doors to Stunning Showers! TM TM SERIES: CONFIGURATION: MOUNTING PACKAGE:
 redi DOOR INSTALLATION INSTRUCTIONS tile redi Redi Redi Swing Slide g TM TM...Opening Doors to Stunning Showers! TM TM SERIES: CONFIGURATION: MOUNTING PACKAGE: 1100 Door-Door Framed sliding doors RDQCI5023
3-LITE PATIO DOOR INSTALLATION INSTRUCTIONS
 3-LITE PATIO DOOR INSTALLATION INSTRUCTIONS IMPORTANT: Read the instructions and familiarize yourself with the door parts and pieces before beginning assembly and installation. TOOLS NEEDED: Tape Measure
INSTALLATION INSTRUCTIONS VENETIAN 84" SLIDING SHOWER DOOR SYSTEM (180º INSTALLATION)
") INSTALLATION INSTRUCTIONS VENETIAN 84" SLIDING SHOWER DO SYSTEM (180º INSTALLATION) 28539 Industry Drive, Valencia, CA 91355 Toll Free Phone: (877) 728-3874 Toll Free Fax: (888) 440-9567 Phone: (661) 775-1675
INSTALLATION INSTRUCTIONS VENETIAN 84" SLIDING SHOWER DO SYSTEM (180º INSTALLATION) 28539 Industry Drive, Valencia, CA 91355 Toll Free Phone: (877) 728-3874 Toll Free Fax: (888) 440-9567 Phone: (661) 775-1675
Frameless Inline Door QCI5254
 INSTALLATION INSTRUCTIONS Frameless Inline Door QCI5254 FRAMELESS DOOR / PANEL QCI5254 REV. 0 Page 1 Cer fied 06/16/2016 Parts List with wall mount hinges *Quanes may vary QCI5254 REV. 0 Page 2 Cer fied
Frameless Inline Door With Return QCI5263
 INSTALLATION INSTRUCTIONS Frameless Inline Door With Return QCI5263 WALL MOUNT HINGES FRAMELESS DOOR / PANEL / RETURN PANEL QCI5263 REV. 0 Page 1 Certified 06/17/2016 Parts List with wall mount hinges
Frameless Inline Door QCI5248
 INSTALLATION INSTRUCTIONS Frameless Inline Door QCI5248 FRAMELESS PANEL / DOOR / PANEL QCI5248 REV. 0 Page 1 Certified 06/16/2016 Parts List with glass to glass hinges *Quantities may vary. **Support Bar
Frameless Inline Door QCI5250
 INSTALLATION INSTRUCTIONS Frameless Inline Door QCI5250 FRAMELESS PANEL / DOOR / PANEL QCI0249 REV. 3 Page 1 Certified 10/12/12 Parts List with pivot hinges *Quantities may vary. QCI0249 REV. 3 Page 2
4-lite Patio Door. Installation Instructions
 4-lite Patio Door Installation Instructions IMPORTANT: Read the instructions and familiarize yourself with the door parts and pieces before beginning assembly and installation. Note: Only the 5-0 x 6-8
Model 750 Illustrated Installation Instructions Contractors Wardrobe
 Model 750 Illustrated Installation Instructions Contractors Wardrobe DESIGNERS MANUFACTURERS 26121 Avenue Hall Valencia, CA 9155 (661) 257-77 Fax: (661) 257-4907 Toll Free: (800) CW-DOORS (800) 29-6677
FIXED PANEL SLIDER QCI5241
 INSTALLATION INSTRUCTIONS FIXED PANEL SLIDER QCI5241 FRAMELESS PANEL / DOOR / PANEL FRAMELESS DOOR / PANEL QCI5241 REV. 0 Page 1 Certified 06/16/2016 Parts List *Quantities may vary QCI5241 REV. 0 Page
340 & 350 SERIES DELUXE FRAMELESS BYPASS
 BATH ENCLOSURES An Alcoa Company Tel: 800-643-1514 Fax: 870-234-3181 www.alumaxbath.com INSTALLATION INSTRUCTIONS 340 & 350 SERIES DELUXE FRAMELESS BYPASS BATH ENCLOSURES Copyright Alumax Bath Enclosures
340 & 350 SERIES BATH ENCLOSURES
 INSTALLATION INSTRUCTIONS 340 & 350 SERIES BATH ENCLOSURES 800-643-1514 www.alumaxbath.com Copyright Alumax Bath Enclosures 2010. All rights reserved. LIMITED WARRANTY AND REMEDY ALUMAX BATH ENCLOSURES
Semi-Frameless Hinged Door With Panel And Return
 202 Anderson Ave., Belvue, KS 66407 Phone: 800-669-9867 Fax: 800-393-6699 www.onyxcollection.com 800-643-1514 www.alumaxbath.com Semi-Frameless Hinged Door With Panel And Return Full Showers with Return
Installation Instructions Models: TRTE180 / TRSE180 ECTE180 / ECSE180 3/8" Frameless Slider & 180 Panel
 Scan this Barcode for Parts Bag BP.5004.NTL Thank you for purchasing this outstanding product! This booklet will help you install your units safely and successfully. IMPORTANT: Warnings and General Shower
FIXED SHOWER SCREEN For Wall Mount Hinges QCI5283
 FIXED SHOWER SCREEN For Wall Mount Hinges QCI5283 QCI5283 Page 1 Date Certified: 06/16/2016 Parts List with wall mount clamp ITEM NO. DESCRIPTION QTY. 1 FIXED GLASS PANEL 1 2 WALL MOUNT CLAMP 1 3 U-CHANNEL
UNIT No. 8150/9150 SHOWER ENCLOSURE
 INSTALLATION INSTRUCTIONS NEE INSTALLATION HELP? Call 1-800-45-BASCO (452-2726) UNIT No. 8150/9150 SHOWER ENCLOSURE Monday - Friday 8:00 A.M. - 4:30 P.M. Eastern Time MAINTENANCE: Two primary materials
340D & 350D SERIES FRAMELESS BYPASS BATH ENCLOSURES
 INSTALLATION INSTRUCTIONS 340D & 350D SERIES FRAMELESS BYPASS BATH ENCLOSURES 800-643-1514 www.alumaxshowerdoor.com Copyright Alumax Bath Enclosures 2014. All rights reserved. !WARNINGS! INSTALLATION WARNINGS
ESSENCE. Shower / Tub Door Installaion Instructions
 ESSENCE Shower / Tub Door Installaion Instructions IMPORTANT DreamLine reserves the right to alter, modify or redesign products at any time without prior notice. For the latest up-to-date technical drawings,
INSTALLATION INSTRUCTIONS 960 RODA GLASS TO GLASS HINGES ANGLED FRAMELESS PANEL / DOOR / PANEL CELESTA DRESDEN TRESOR
 INSTALLATION INSTRUCTIONS 960 RODA GLASS TO GLASS HINGES NEED INSTALLATION HELP? Call 1-800-45-BASCO (452-2726) Monday - Friday 8:00 A.M. - 4:30 P.M. Eastern Time ANGLED FRAMELESS PANEL / DOOR / PANEL
INSTALLATION INSTRUCTIONS FRAMELESS CONTINUOUS HINGE SHOWER ENCLOSURE QCI5232
 INSTALLATION INSTRUCTIONS FRAMELESS CONTINUOUS HINGE SHOWER ENCLOSURE QCI5232 QCI5232 Rev 0 Page 1 Certified 06/20/2016 INSTALLATION NOTES: Unpack your unit carefully and inspect for freight damage. Lay
Double Swing Door With Header QCI5114
 Double Swing Door With Header QCI5114 QCI5114 REV. 0 Page 1 of 9 Certified 06/22/2016 MAINTENANCE: Two primary materials are used to manufacture your new shower enclosure: tempered glass and anodized aluminum.
463-GP. Swing Door. Technical Assistance is available Monday - Friday, 8:00 a.m. - 5:00 p.m. (Central Time) (Toll Free) 463-GP 5/06
 (Toll Free) 463-GP 5/06") 463-GP Swing Technical ssistance is available Monday - Friday, 8:00 a.m. - 5:00 p.m. (Central Time) 1-877-723-7190 (Toll Free) PRTS LIST FRME PCKGE KEY DESCRIPTION PRT QTY SILL 855 1 JM 942 2 E MGNETIC
463-GP Swing Technical ssistance is available Monday - Friday, 8:00 a.m. - 5:00 p.m. (Central Time) 1-877-723-7190 (Toll Free) PRTS LIST FRME PCKGE KEY DESCRIPTION PRT QTY SILL 855 1 JM 942 2 E MGNETIC
340D / 350D SERIES FRAMELESS BYPASS BATH ENCLOSURES
 INSTALLATION INSTRUCTIONS 340D / 350D SERIES FRAMELESS BYPASS BATH ENCLOSURES 800-643-1514 www.alumaxshowerdoor.com Copyright Alumax Bath Enclosures 2016. All rights reserved. !WARNINGS! INSTALLATION WARNINGS
TD10A INSTALLATION GUIDE TUB DOOR
 Thank you for choosing Valley Acrylic Products. This installation manual provides general information on the installation of our products. BEFORE YOU BEGIN Prior to installation, examine all boxes and
935 RODA VINESSE NEED INSTALLATION HELP? DOUBLE ROLLERS FRAMELESS DOOR INSTALLATION INSTRUCTIONS QCI XX/XX/XXXX. Call BASCO ( )
") INSTALLATION INSTRUCTIONS 935 RODA DOUBLE ROLLERS FRAMELESS DOOR NEED INSTALLATION HELP? Call 1-800-45-BASCO (452-2726) Monday - Friday VINESSE QCI0286 1 XX/XX/XXXX 935 Roda Parts List With double rollers
INSTALLATION INSTRUCTIONS 935 RODA DOUBLE ROLLERS FRAMELESS DOOR NEED INSTALLATION HELP? Call 1-800-45-BASCO (452-2726) Monday - Friday VINESSE QCI0286 1 XX/XX/XXXX 935 Roda Parts List With double rollers
FRAMELESS DOOR / PANEL WITH WALL MOUNT HINGES QCI5274
 FRAMELESS DOOR / PANEL WITH WALL MOUNT HINGES QCI5274 QCI0274 QCI5274 REV. Rev. 1 0 Page Page 1 1 Date Certified: Certified 06/16/2016 10/01/10 Parts List with wall mount hinges ITEM NO. Part # DESCRIPTION
Closet Doors Depot. Innovative Closet Doors Like Nothing Else INSTALLATION INSTRUCTIONS
 Closet Doors Depot Innovative Closet Doors Like Nothing Else CDD 00 COLONIAL INSTALLATION INSTRUCTIONS Closet Doors Depot 71 N. Valley Street, Suite F Anaheim, CA 92801 1.800.RE-CLOSETS 877.81.3 fax sales@closetdoorsdepot.net
L e g e n d Inline panel shower enclosure installation Instructions (400 Series)
") L e g e n d Inline panel shower enclosure installation Instructions (00 Series) PATENTS PENDING Legend Inline (hinged) 0-3 -0 (A) ALWAYS ON DOOR SIDE EXPLODED VIEW OF MODULAR INLINE PANEL (RIGHT HAND HINGED
L e g e n d Inline panel shower enclosure installation Instructions (00 Series) PATENTS PENDING Legend Inline (hinged) 0-3 -0 (A) ALWAYS ON DOOR SIDE EXPLODED VIEW OF MODULAR INLINE PANEL (RIGHT HAND HINGED
Installation Instructions with 90 Degree Return Panel -- Model E-DP9. Model Semi-Frameless Door & Panel
 6//5 Model Semi-Frameless Door & Panel Installation Instructions with 90 Degree Return Panel -- Model E-DP9 IF YOU NEED REPLACEMENT PARTS OR HAVE INSTALLATION QUESTIONS, PLEASE CALL OUR CUSTOMER SERVICE
Model 6100 Illustrated Installation Instructions Contractors Wardrobe
 Model 6100 Illustrated Installation Instructions Contractors Wardrobe DESIGNERS MANUFACTURERS 26121 Avenue Hall Valencia, CA 91355 (661) 257-17 Fax: (661) 257-4907 Toll Free: (800) CW-DOORS (800) 293-6677
INSTALLATION INSTRUCTIONS 935 RODA GLASS TO GLASS HINGES FRAMELESS DOOR / PANEL CELESTA DRESDEN GEOLUX TRESOR VONSE
 INSTALLATION INSTRUCTIONS 935 RODA GLASS TO GLASS HINGES NEED INSTALLATION HELP? Call 1-800-45-BASCO (452-2726) Monday - Friday 8:00 A.M. - 4:30 P.M. Eastern Time FRAMELESS DOOR / PANEL CELESTA DRESDEN
675 Quick N Stall Neo Angle Framed Hinge Shower Enclosure
 INSTALLATION INSTRUCTIONS 675 Quick N Stall Neo Angle Framed Hinge Shower Enclosure Call Technical Dept @ 1-800-452-2726 QCI1003 Page 1 of 9 Certified 10/01/09 INSTALLATION NOTES: Unpack your unit carefully
BASIC TOOLS AND MATERIALS NEEDED. Introduction HOW TO CARE FOR YOUR DOOR
 DO IT RIGHT! Use a Kohler Certified Installer, (KCI), for the installation of your Kohler Shower Door. Contact your Kohler Distributor/Showroom or call Kohler at 1-800-4-KOHLER for the KCI nearest you.
INSTALLATION INSTRUCTIONS. Deluxe Continuous Hinge Inline Door & Panel Shower Enclosure QCI5230
 INSTALLATION INSTRUCTIONS Deluxe Continuous Hinge Inline Door & Panel Shower Enclosure QCI5230 QCI5230 Rev 0 6 shower new QCI5230 Rev 0 Page 2 Certified 06/20/2016 Parts List A. Curb (w/ weep holes) (1)
Model 5400H / 7000H Illustrated Installation Instructions
 Model 5400H / 7000H Illustrated Installation Instructions Contractors Wardrobe DESIGNERS MANUFACTURERS 261 Avenue Hall Valencia, CA 91355 (661) 257-1177 (661) 257-4907 TOLL FREE: (800) CW-DOORS (800) 293-6677
OSBORNE SHOWER DOOR INSTALLATION
 SKU(s): 939719, 939720, 939721 OSBORNE SHOWER DOOR INSTALLATION BEFORE YOU BEGIN We recommend consulting a professional if you are unfamiliar with installing this type of product. Signature Hardware accepts
Deluxe Continuous Hinge Framed Door & Inline Panel with Return Panel Shower Enclosure
 INSTALLATION INSTRUCTIONS Deluxe Continuous Hinge Framed Door & Inline Panel with Return Panel Shower Enclosure QCI0235 Page 1 of 11 Certified 08/20/10 MAINTENANCE: Two primary materials are used to manufacture
392CV SERIES Stickstall
 202 Anderson Ave., Belvue, KS 66407 Phone: 800-669-9867 Fax: 800-393-6699 www.onyxcollection.com 800-643-1514 www.alumaxshowerdoor.com 392CV SERIES Stickstall TM Corner Shower Enclosure 392CV-1117 Yes!
846-GP. Neo-Angle Enclosure. Technical Assistance is available Monday - Friday 8:00 a.m. - 5:00 p.m. (Central Time) GP 12/05
 GP 12/05") 846-GP Neo-ngle Enclosure Technical ssistance is available Monday - Friday 8:00 a.m. - 5:00 p.m. (Central Time) 1-877-723-7190 PRTS LIST FRME PCKGE KEY ESCRIPTION PRT QTY SILL 855 3 M 942 2 C HEER 101
846-GP Neo-ngle Enclosure Technical ssistance is available Monday - Friday 8:00 a.m. - 5:00 p.m. (Central Time) 1-877-723-7190 PRTS LIST FRME PCKGE KEY ESCRIPTION PRT QTY SILL 855 3 M 942 2 C HEER 101
640S & 650S SERIES FRAMED BYPASS BATH ENCLOSURES
 INSTALLATION INSTRUCTIONS Tel: 800-643-1514 www.alumaxshowerdoor.com 640S & 650S SERIES FRAMED BYPASS BATH ENCLOSURES Page 1 of 8 G03915346 !WARNINGS! INSTALLATION WARNINGS a) Alumax Bath Enclosures by
620 Freestyle/Style Swing Door
 620 Freestyle/Style Swing Door (CUH or MG) Style Series Option M HK87 MGNETIC PULL HNDLE KIT 989 MGNETIC DOOR STOP C 083 JM Metal Slide with Magnet H900 PN HED SCREW N Connector Screw J HTG6 PUSH / PULL
FRAMED PANEL / DOOR / PANEL CONTINUOUS HINGE SHOWER ENCLOSURE INSTALLATION INSTRUCTIONS
 FRAMED / DOOR / CONTINUOUS HINGE SHOWER ENCLOSURE INSTALLATION INSTRUCTIONS QCI5229 Rev 0 6 INSTALLATION NOTES: Unpack your unit carefully and inspect for freight damage. Lay out and identify all parts
Installation Instructions Models: TRTE290 / TRSE290 ECTE290 / ECSE290 3/8" Frameless Slider with 180 & 90 Panels
 3/8" Frameless Slider with 180 & 90 Panels Scan this Barcode for Parts Bag BP.5005.NLT Thank you for purchasing this outstanding product! This booklet will help you install your units safely and successfully.
UNIT No FRAMELESS PIVOT SHOWER DOOR
 INSTALLATION INSTRUCTIONS UNIT No. 3600 FRAMELESS PIVOT SHOWER DOOR NEED INSTALLATION HELP? Call 1-800-45-BASCO (452-2726) Monday - Friday 8:00 A.M. - 4:30 P.M. Eastern Time QCI0020 Rev. 3 Page 1 of 8
INOVO 4-LITE SLIDING PATIO DOOR ASSEMBLY AND INSTALLATION INSTRUCTIONS
 INOVO 4-LITE SLIDING PATIO DOOR ASSEMBLY AND INSTALLATION INSTRUCTIONS IMPORTANT: READ THE INSTRUCTIONS AND FAMILIARIZE YOURSELF WITH THE DOOR PARTS AND PIECES BEFORE BEGINNING ASSEMBLY AND INSTALLATION.
INOVO 2-LITE SLIDING PATIO DOOR
 INOVO 2-LITE SLIDING PATIO DOOR ASSEMBLY AND INSTALLATION INSTRUCTIONS IMPORTANT: READ THE INSTRUCTIONS AND FAMILIARIZE YOURSELF WITH THE DOOR PARTS AND PIECES BEFORE BEGINNING ASSEMBLY AND INSTALLATION.
1/4 FRAMELESS DOOR WITH INLINE PANEL 1413A-1713A-1813A
 1/4 FRAMELESS DOOR WITH INLINE PANEL 1413A-1713A-1813A F AB GLASS AND MIRROR www.fabglassandmirror.com Call: +1 888-474-2221 Fax: (614)-334-4919 Office Timing: 8:30-18:00 EST info@fabglassandmirror.com
Frameless Heavy Glass Door with Header
 INSTALLATION INSTRUCTIONS Frameless Heavy Glass Door with Header QCI5243 QCI5243 REV. 0 Page 1 Certified 06/16/16 Frameless Heavy Glass Door with Pivot Hinges ITEM NUMBER DESCRIPTION QUANTITY 1 DOOR GLASS
Installation Instructions Models: TRTE290 / TRSE290 ECTE290 / ECSE290 3/8" Frameless Slider with 180 & 90 Panels
 3/8" Frameless Slider with 180 & 90 Panels Scan this Barcode for Parts Bag BP.5005.NLT Thank you for purchasing this outstanding product! This booklet will help you install your units safely and successfully.
Installation Instructions Models: SESD180, DESD180, MESD180 1/4" Semi-Frameless Door and 3/8" In-Line Panel
 Models: SESD180, DESD180, MESD180 Scan this Barcode for Parts Bag BP.3143.NLT Thank you for purchasing this outstanding product! This booklet will help you install your units safely and successfully. IMPORTANT:
INSTALLATION INSTRUCTIONS. UNIT No. 160/760 THIN-LINE SHOWER ENCLOSURE
 INSTALLATION INSTRUCTIONS UNIT No. 160/760 THIN-LINE SHOWER ENCLOSURE QCI0011 Rev. 0 Page 1of 10 Certified 10/18/2006 MAINTENANCE: Two primary materials are used to manufacture your new Basco enclosure;
640D & 650D SERIES FRAMED BYPASS BATH ENCLOSURES
 INSTALLATION INSTRUCTIONS 640D & 650D SERIES FRAMED BYPASS BATH ENCLOSURES 800-643-1514 www.alumaxshowerdoor.com Page 1 !WARNINGS! INSTALLATION WARNINGS a) Alumax Bath Enclosures by Sapa are intended to
Frameless Door QCI5284
 Frameless Door QCI5284 F AB GLASS AND MIRROR www.fabglassandmirror.com Call: +1 888-474-2221 Fax: (614)-334-4919 Office Timing: 8:30-18:00 EST info@fabglassandmirror.com INSTALLATION INSTRUCTIONS Frameless
IMPORTANT: One Corner Entry Shower Door requires two cartons.
 IMPORTANT: You should check with your local plumbing or building code agency about this product for compliance before it is installed. IMPORTANT: One Entry Shower Door requires two cartons. 95302-2-AB
UNIT No. 1415NP / 1715NP / 1815NP INFINITY FRAMELESS CONTINUOUS HINGE SHOWER ENCLOSURE WITH NO INLINE POST
 INSTALLATION INSTRUCTIONS UNIT No. 1415NP / 1715NP / 1815NP INFINITY FRAMELESS CONTINUOUS HINGE SHOWER ENCLOSURE WITH NO INLINE POST QCI0240 Page 1 of 13 Certified 8/2/10 INSTALLATION NOTES: Unpack your
Installation Instructions Models: TRBTE / TRBSE ECBTE / ECBSE 3/8" Frameless Slider
 Installation Instructions Scan this Barcode for Parts Bag BP.5003.NTL Thank you for purchasing this outstanding product! This booklet will help you install your units safely and successfully. IMPORTANT:
Thank you for your order
 Installation Guide Thank you for your order Ph: 09-9133110 Fax: 09-9133113 5 Smales Road. East Tamaki, Manukau PO Box 58031 Greenmount, Manukau 2013 AUCKLAND // WELLINGTON // CHRISTCHURCH www.bathroomdirect.co.nz
Figure #1 - ATE-ASE & UTE-USE Shower Door Assembly
 Figure #1 - ATE-ASE & UTE-USE Shower Door Assembly Refer to FIG #3A or 3B For detail and orientation of towel bar and pull assemblies. Page Figure # 2 - Shower Door Assembly - Side View Figure # 3a - Shower
INSTALLATION INSTRUCTIONS FIXED PANEL SLIDER FRAMELESS DOOR / PANEL. QCI0280 Page 1 Cer fied 6/27/14
 INSTALLATION INSTRUCTIONS FIXED PANEL SLIDER FRAMELESS DOOR / PANEL QCI0280 Page 1 Cer fied 6/27/14 VINA-935 Parts List ITEM NO. 1 2 NUMBER DESCRIPTION QTY. CLZ2278-13A (44"-47") CLZ2878-13A (56"-59")
STACKING MULTI-SLIDE DOOR SYSTEM INSTALLATION INSTRUCTIONS
 STACKING MULTI-SLIDE DOOR SYSTEM INSTALLATION INSTRUCTIONS 1290363 Revision 1 12/16 Page 1 Weather Shield Mfg., Inc. NOTICE CAUTION! Failure to install and maintain our product according to these instructions
1040 & 1050 SERIES HEAVY FRAMELESS BYPASS BATH ENCLOSURE
 INSTALLATION INSTRUCTIONS 1040 & 1050 SERIES HEAVY FRAMELESS BYPASS BATH ENCLOSURE www.alumaxshowerdoor.com Copyright Alumax Bath Enclosures 2014. All rights reserved. !WARNINGS! INSTALLATION WARNINGS
A-935 RODA WALL MOUNT HINGES
 INSTALLATION INSTRUCTIONS A-935 RODA WALL MOUNT HINGES NEED INSTALLATION HELP? Call 1-800-45-BASCO (452-2726) Monday - Friday 8:00 A.M. - 4:30 P.M. Eastern Time FRAMELESS DOOR / PANEL CELESTA QCI0274 REV.
INSTALLATION INSTRUCTIONS
 PARTS LIST ITEM PART DESCRIPTION QTY 73-A 503F 9MM 50G 5A 50E 505S 50H Connector Bracket Door Stops Support Bar Panel Glass Bracket Wall Mount Bracket Rollers Center Guide Recessed Finger Pull Fixed Panel
Frameless Heavy Glass Door with Wall Mount Hinges
 INSTALLATION INSTRUCTIONS Frameless Heavy Glass Door with Wall Mount Hinges QCI-5245 QCI5245 REV. 0 Page 1 Certified 06/16/16 Frameless Door with Wall Mount Hinges ITEM NUMBER DESCRIPTION QUANTITY 1 DOOR
300 CV Series. Semi-Frameless Hinged Door. 202 Anderson Ave., Belvue, KS Phone: Fax:
 202 Anderson Ave., Belvue, KS 66407 Phone: 800-669-9867 Fax: 800-393-6699 www.onyxcollection.com 800-643-1514 www.alumaxshowerdoor.com 300 CV Series Semi-Frameless Hinged Door 300CV-1117 300cv PARTS LIST
Models Royal Oak and Royal Maple
 Installation Instructions Models Royal Oak and Royal Maple DESIGNERS MANUFACTURERS 21 Avenue Hall Valencia, CA 9 (1) 27-77 FAX: (1) 27-4907 or visit our website at: www.cwdoor.com ILLUSTRATED PARTS BREAKDOWN
Steel Solutions USA 602 E. Walnut Street Watseka, IL p: (888) f: (815)
 f: (815)") Steel Solutions USA 602 E. Walnut Street Watseka, IL 60970 p: (888) 875-5004 f: (815) 432-3364 sales@steelsolutionsusa.com Published February 2011 2011 Steel Solutions USA. All rights reserved. version
Steel Solutions USA 602 E. Walnut Street Watseka, IL 60970 p: (888) 875-5004 f: (815) 432-3364 sales@steelsolutionsusa.com Published February 2011 2011 Steel Solutions USA. All rights reserved. version
1038 SERIES DELUXE FRAMELESS PIVOT SHOWER DOOR
 INSTALLATION INSTRUCTIONS 1038 SERIES DELUXE FRAMELESS SHOWER DOOR Page 1 of 11 This Page Intentionally Left Blank. Page 2 of 11 LIMITED WARRANTY AND REMEDY Alumax Bath Enclosures warrants to its dealers,
1/4 FRAMELESS CONTINUOUS HINGE SHOWER ENCLOSURE
 1/4 FRAMELESS CONTINUOUS HINGE SHOWER ENCLOSURE QCI5028 Rev 1 Page 1 Certified 09/19/2018 INSTALLATION NOTES: Unpack your unit carefully and inspect for freight damage. Lay out and identify all parts using
ESA-300 Full Breakout
 Interior View 0 Installation Instructions For use with ESA II Controler DORMA AUTOMATICS, Inc. 94 Sherwood Drive Toll-Free: 877-67-6 DL844-00 Lake Bluff, IL 60044 Fax: 877-4-7999 Rev. /07 Tools Required:
ICU TRACKLESS SLIDING DOOR
 Interior View 0 Installation Instructions Tools Required: Screwdrivers Small Straight (Flat Blade) - for Terminal Block wiring # Phillips (Crosspoint) - for various #8, #0, and #4 screws Wrenches / Sockets
IMPORTANT INSTALLATION GUIDE VALENCIA SQUARE CORNER SHOWER READ ALL INSTRUCTIONS CAREFULLY BEFORE STARTING THE
 INSTALLATION GUIDE VALENCIA SQUARE CORNER SHOWER NOTE: Acrylic wall, tray and tapware not included. Supplied handles may differ from image. SEALANT REQUIRED TO COMPLETE THIS INSTALLATION: (Not supplied)