Stairwell Tower. Product Information and Assembly Guide
|
|
|
- Samantha Magdalen Lane
- 5 years ago
- Views:
Transcription
1 Product Information and Assembly Guide
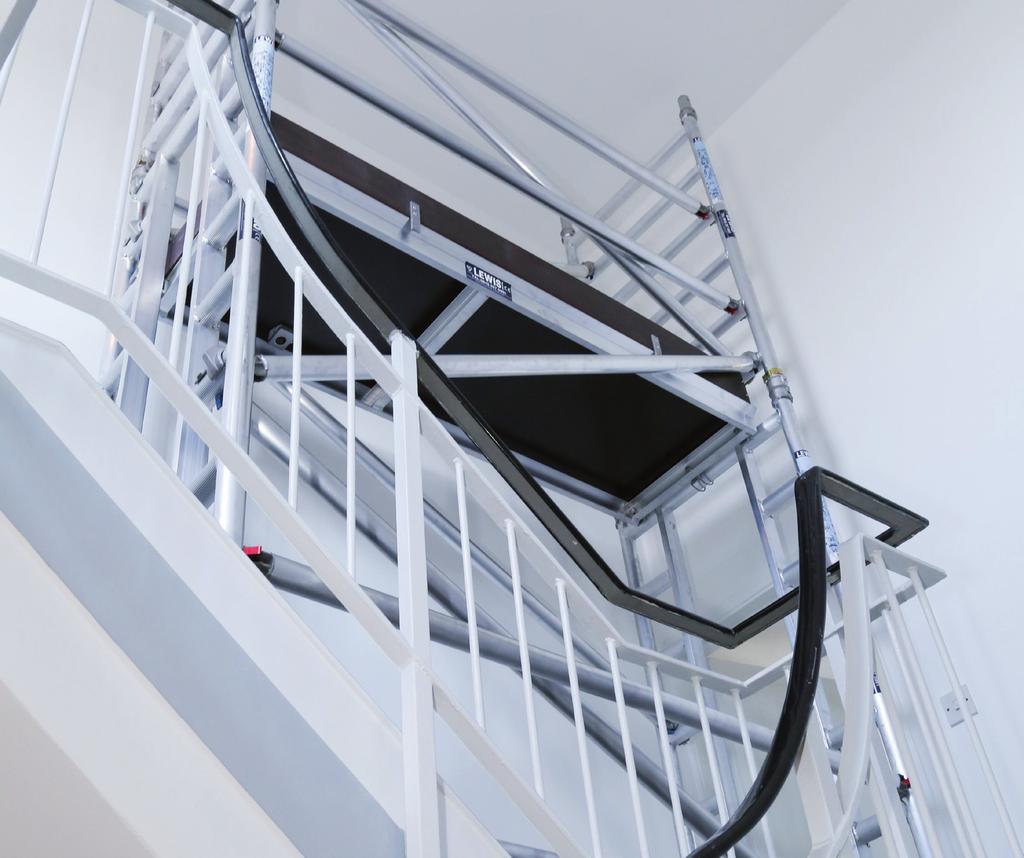
2 Product Information Assembly Guide Ensure you read all safety notes before erecting this tower There is a serious risk of personal injury if you do not follow all instructions laid down in this guide. z Carry out all necessary risk assessments prior to the use of this equipment. z This equipment should be used by an able bodied, competent adult who has read and understood these instructions. Anyone with either a temporary or permanent disability should seek expert advice before using it. z Keep children, animals and bystanders away from the work area. z Cordon off a NO GO area using cones and either barriers or tape. z Never use this equipment if you are ill, feeling tired, or under the influence of alcohol or drugs. z Wear sensible, protective clothing and footwear offering good grip, plus gloves and a hard hat. Tie back long hair and avoid loose garments and jewellery that could get in your way. z Never work on the tower if you suffer from vertigo. Never suspend the tower from another structure. z Always climb onto the tower from the upper end, entering through the gate in the handrail frame. Keep your feet in the middle of the rungs and grip frame sides firmly with both hands. z Never carry anything when climbing, unless you can do so leaving both hands free. z Always check the condition of components before use - and at regular intervals thereafter. If any show signs of damage or excessive wear, do not use them. Tower Safety z Never overload the tower. The tower s maximum working load is 150kg on the platform. Only one person is allowed on the platform, along with tools and materials. z Never lean anything against the tower. z Never use it for jobs that exert repetitive or excessive force. Lateral forces over 198N - equivalent to a 20kg weight - make it unstable even when fitted with stabilisers or ballast. This section includes a table (a) to indicate what level of lateral force is exerted by typical jobs. Those jobs likely to exert excessive sideways force should not be carried out on this tower, whilst those likely to exert moderate sideways force should be carried out with due care. z Never use boxes, steps etc to gain extra height. Never reach too far out to one side. z If the tower is to be repositioned on a higher step, DO NOT attempt to move it as a complete assembly. Always dismantle it and rebuild at the new location. z This tower is intended only for indoor use, and must not be positioned where it could be subjected to wind loads. Ensure that the site or stairwell where it is erected does not induce any funnelling or concentrating effect of the wind, or where opening of doors could introduce sudden wind loads. z Ensure that you are not contravening any health and safety law (blocking a fire exit for example) before proceeding to construct the tower on the stairwell. Table (A) Lateral Forces Typical jobs or tools likely to exert: Low sideways force include: Paintbrush, Paint Roller, Wallpapering Moderate sideways force include: Driving in Screws, Drilling, Hammering Nails, Chiselling Excessive sideways force include: Pneumatic Hand Tools, Demolition Work, Sledgehammer
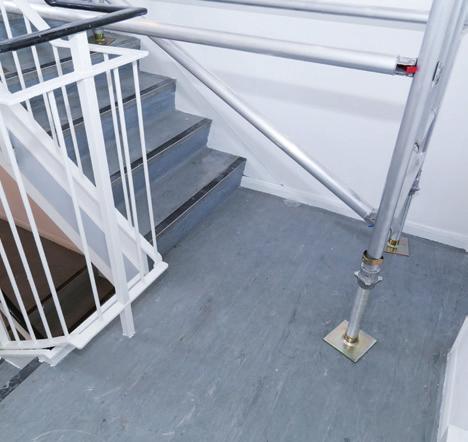
3 Assembly Procedure Assembly Procedure Make sure that you understand these instructions and are familiar with the tower s components before you begin. It is recommended that you have the help of a second person to assist with the erection process. Make sure too, that you have everything you need to hand and refer to the illustrations for construction. Check the stabilisation guide and table to ensure that you have the necessary stabiliser(s) or ballast for the site in which you intend to erect the tower. 1. Unlock the interlock clips on all frames (see section Clips and Claws) 2. Fit base plate legs securely to two standard frames. Ensure they are equally extended so that they stand level. These will now be referred to as the base frames. 3. Fit an additional frame to one of the base frames and engage the interlock clips. Place the base frame, fitted with an extra frame, on the lower stair and the singular base frame on the upper stair, allowing the correct distance between the frames for the platform to fit (1.3 metres). 4. Link these two frames with two horizontal and two diagonal braces as shown in the illustration, to form the tower base - start by clipping the horizontal braces to the frame uprights. 5. Fit the platform to the top rungs of the two end frames. Make sure all four platform end hooks are in contact with the top rungs, then secure in place by engaging the hook latches (see illustration). Fit a standard frame to the top end of the frame that is at the lower step, securing it in place with the interlock clips. Fit the gate frame to the top of the frame that is resting on the upper step. Make sure that the access bar is positioned so that it opens in towards the tower. 6. Now attach the four guard rails (see illustration) ensuring that the claws face outward. To complete the tower, the toe boards must be fitted on all four sides of the platform. 7. Now refer to the stabilisation guide and table to use the correct means of stabilising the tower. The manufacturer strongly recommends that ballast is used in all applications in addition to any method of stabilisation used. Please contact your supplier or hire shop for details. If stabiliser(s) are required, they must be fitted to the corner(s) of the end frame on the lower step, angled at 45 degrees. The clamps should be fitted to the clear sections of the frame uprights, away from the interlock clips and rungs. Once fitted they must have a minimum sideways extension of 650mm, and also reach down the stairs for a minimum distance of 650mm. Ensure that the rubber foot is firmly in contact with the ground, and that the stabiliser clamps are securely tightened.
4 Assembly Procedure Clips and Claws 1. Components are linked using two kinds of fittings Interlock Clips join frame uprights. Unlock those on the frame to be added. fit its sockets over the spigots of the lower frame and re-lock the clips. Locking Claws join brace to frame. Pull back the trigger to open the jaws, then snap the claw onto the rail or upright, ensuring the open side faces down or out. The jaws should lock automatically. Whichever fitting you are using, though, always double-check that it is locked and secure before continuing
5 Refer to the table below for the correct method(s) of stabilising the tower for the stairwell in which you intend to erect it: Position of tower in Stairwell Staircase Clear Width 0.8 to 1.4m 1.4 to 2.0m 2.0m or greater Free-Standing (No walls on either side of staircase) A A A or C Up against a wall on one side of the staircase A or D A or B or D A or B or D Mid-way between walls on each side of staircase A or D A or D A or C For additional stability more than one stabilisation method may be used. The manufacturer strongly recommends that ballast be used in all applications in addition to the alternative methods indicated by this guide. Methods of stabilisation A. Strongly recommended: The tower is fitted with 150kg of ballast uniformly spread along the bottom rung of each base frame (i.e. 75kg at each end). Please contact your supplier or hire shop for details. B. The tower is positioned up against a wall on one side, and a stabiliser is fitted on the other, to the end frame on the lower step. The stabiliser must have a minimum sideways extension of 650mm, and reach down the stairs for a minimum distance of 650mm. C. The tower is fitted with a stabiliser on both sides, each with a minimum sideways extension of 650mm, and reaching down the stairs for a minimum distance of 650mm. Additional stabiliser available from your supplier or hire shop. D. The tower is fixed solidly to a wall on one side with ties. They should be rigid, two-way ties fastened to both uprights of the frame with load bearing right-angled or swivel couplers. Only couplers suitable for the 50.8mm diameter tube of the tower should be used. Ideally ties should secure to either the face of a solid structure or by means of anchorages. Tying in with rope or non-rigid members is not acceptable. Equipment Care Never use the tower for anything other than its intended purpose as a work platform. Keep the tower clean, paying special attention to the deck You will find this easier if you clean up regularly. When not in use, store everything somewhere clean, dry and safe. Finishing Off To dismantle the tower, start at the top and work down, reversing the erection procedure. Work through the steps in strict sequence. Components can be damaged by the use of excessive force. Do not use hammers, etc. to force joints apart. Always lower components to the ground carefully when dismantling the tower. Never simply drop them as damage or serious personal injury may occur.


6 Further Information For further information and support please contact us on: Unit 1 Bellingham Trading Estate Franthorne Way London SE6 3BX
GARAGE DOOR WITH TORSION SPRING
 GARAGE DOOR WITH TORSION SPRING DIMENSIONS 9 WIDTH X 7 HEIGHT (2.74m x 2.13m) IMPORTANT SAFETY INSTRUCTIONS WARNING: Read all instructions and warnings before use. Failure to follow all instructions may
Section 1 Safety working at height
 Contents Section 1 Safety working at height. Section 2 Hi-Step package contents & parts identification. Section 3 Assembly. Section 4 Operation. Section 5 Maintenance. Section 6 Extender package contents
INSTALLATION GUIDE 8IWBM-EL. phone: (02) fax: (02)
 fax: (02)") INSTALLATION GUIDE 8IWBM-EL www.gilkon.com.au email: sales@gilkon.com.au phone: (02) 99140900 fax: (02) 99140901 CONTENTS 1. DISCLAIMER Page 2 2. WARNINGS & SAFETY INSTRUCTIONS Page 3 3. PACKAGE CONTENTS
INSTALLATION GUIDE 8IWBM-EL www.gilkon.com.au email: sales@gilkon.com.au phone: (02) 99140900 fax: (02) 99140901 CONTENTS 1. DISCLAIMER Page 2 2. WARNINGS & SAFETY INSTRUCTIONS Page 3 3. PACKAGE CONTENTS
Installation Instructions for the AlphaDeck Staging System
 Installation Instructions for the AlphaDeck Staging System Step 1 - Preparation A. Before setting up your system, determine the location where the stage will be installed and locate all the parts you will
ASSEMBLY AND CARE INSTRUCTIONS JUST FOR KIDS 355
 ASSEMBLY AND CARE INSTRUCTIONS VERSION: 8920100 (Revised 06/16) JUST FOR KIDS 355 SALES AND SERVICE spiethamerica.com Canada and International 135 Forestview Road, PO Box 40 Orillia, Ontario, Canada L3V
ASSEMBLY INSTRUCTIONS
 ASSEMBLY INSTRUCTIONS PRINTED IN USA Assembly Instructions Include: P/N: LL-04-5 Step : Site Preparation Step 0: Guard Rail Installation Step : Leg Assembly Step : Stairs Step 3-8: Setting the Stage Step
Spring Loaded All Season Roll-Up Doors
 Spring Loaded All Season Roll-Up Doors STAND-OFF MOUNTING METHOD INSTALLATION INSTRUCTIONS READ THIS FIRST Carefully examine the crate(s) for damage before opening. If the carton is damaged, immediately
Greenhouse Assembly Instructions
 Greenhouse Assembly Instructions Our Help Line provides support and advice to customers of Summer Garden Buildings after ordering. For advice before you buy you can phone us free 7 days a week on 0800
Sunrise Deck Assembly Instructions for Kingston Left
 Sunrise Deck Assembly Instructions for Kingston Left It s easiest to build the deck frame first like it will be lying on its back and then after all 4 legs and horizontals are in place, tip the deck toward
Gardman Lean-to Greenhouse Assembly Instructions
 Page 1 Gardman Lean-to Greenhouse Assembly Instructions Our Help Line provides support and advice to customers of Summer Garden Buildings after ordering. For advice before you buy you can phone us free
SAFE RAPID ACCESS. Board-Walk Assembly Instructions
 SAFE RAPID ACCESS Board-Walk Assembly Instructions Board-Walk Assembly Instructions IMPORTANT NOTE: Before assembling the Board-Walk for the first time, it is highly recommended that Installers familiarise
Impact Wrench. 19 mm (3/4 ) MODEL 6906
 MODEL 6906") Impact Wrench 9 mm (3/4 ) MODEL 6906 002290 DOUBLE INSULATION I N S T R U C T I O N M A N U A L WARNING: For your personal safety, READ and UNDERSTAND before using. SAVE THESE INSTRUCTIONS FOR FUTURE REFERENCE.
Impact Wrench 9 mm (3/4 ) MODEL 6906 002290 DOUBLE INSULATION I N S T R U C T I O N M A N U A L WARNING: For your personal safety, READ and UNDERSTAND before using. SAVE THESE INSTRUCTIONS FOR FUTURE REFERENCE.
GREENHOUSE EXTENSION 6 X4
 ASSEMBLY INSTRUCTIONS GREENHOUSE EXTENSION 6 X Overall Dimensions (Approx.) 0 L x 93 W x 00 H cms 9" L x 76" W x 8.7" H 0 IMPORTANT You must read these instructions carefully before you start to assemble
Sales & Service. JFK - Just For Kids. sasportonline.com. 135 Forestview Road 7879 Will Rogers Blvd.
 Sales & Service sasportonline.com SA Sport (Canada) SA Sport (U.S.A.) 135 Forestview Road 7879 Will Rogers Blvd. P.O. Box 40 Fort Worth, Texas Orillia, Ontario USA 76140 Canada L3V 6H9 Telephone: (705)
HOW TO HOME IMPROVEMENT INSTRUCTIONS (Steps to make changes and before and after photos) Entrance to Front and Back of House
 Entrance to Front and Back of House") HOW TO HOME IMPROVEMENT INSTRUCTIONS (Steps to make changes and before and after photos) Entrance to Front and Back of House 1. Outdoor Grab Bar To install a weatherproof grab bar into a brick wall: 1.
HOW TO HOME IMPROVEMENT INSTRUCTIONS (Steps to make changes and before and after photos) Entrance to Front and Back of House 1. Outdoor Grab Bar To install a weatherproof grab bar into a brick wall: 1.
ClearSpan PolyMax Windbreak Wall
 ClearSpan PolyMax Windbreak Wall Photo may show a different but similar model. 2007 ClearSpan All Rights Reserved. Reproduction is prohibited without permission. Revision date: February 2007ldg STK# DIMENSIONS
Assembly Instructions
 18' W x 10' H or 12' H Peak Style Frame Assembly Assembly Instructions Before you start: 2+ individuals recommended for assembly, approximate time 3 hours. Recommended tools: Power Drill, Safety Glasses,
User Guide. 10ft (3.05m) Jumpking Classic Premium. Got a Problem building your trampoline? Call us on and we can help
 Jumpking Classic Premium. Got a Problem building your trampoline? Call us on and we can help") User Guide 10ft (3.05m) Jumpking Classic Premium Got a Problem building your trampoline? Call us on 0344 800 4060 and we can help Patent no: DE602006006495D1, EP1721640B1 and US7628731 WARNING: Read these
User Guide 10ft (3.05m) Jumpking Classic Premium Got a Problem building your trampoline? Call us on 0344 800 4060 and we can help Patent no: DE602006006495D1, EP1721640B1 and US7628731 WARNING: Read these
LAWN AND GARDEN GREENHOUSE
 MODEL# OGAL-66 OGrow Walk-in 6' x ' LAWN AND GARDEN GREENHOUSE With Heavy Duty Aluminium Frame Let'sGrow Together! Thank you for purchasing the OGROW greenhouse Follow the assembly and safety instructions
400A 40113V, 401A 40120V, & 401AL 40120VL ALUMINUM VERTICAL 4000 LB LIFT INCLUDES SCREW LEG ASSEMBLY INSTRUCTIONS
 12/11/07 PAGE 1 OF 12 400A 40113V, 401A 40120V, & 401AL 40120VL ALUMINUM VERTICAL 4000 LB LIFT INCLUDES SCREW LEG ASSEMBLY INSTRUCTIONS Thank you for purchasing our product! *Please read these instructions
General Guidelines:
 ASSEMBLY INSTRUCTIONS Congratulations on your new Patriot Dock purchase. This manual contains instructions to assemble basic dock configurations for use at typical residential shoreline application. Please
LAWN AND GARDEN GREENHOUSE
 MODELS# OG0AL8-BKE OGAL-8 OGrow Walk-in ' x 8' LAWN AND GARDEN GREENHOUSE With Heavy Duty Aluminium Frame MANUAL VERSION # Grow r! e h t e g To Let's Thank you for purchasing the OGROW greenhouse Follow
USER GUIDE Crystal - Hardware Mount
 USER GUIDE Crystal - Hardware Mount Height 30.7" (78 cm) Minimum Opening 29.5" (75 cm) Maximum Opening 39.75" (101cm) IMPORTANT: Qdos wants to keep your children safe and for that we need you to do your
IMPORTANT!!! ASSEMBLY ASSEMBLY INSTRUCTIONS. (Internal Dimensions)
") ASSEMBLY ASSEMBLY INSTRUCTIONS (Internal Dimensions) Ent Spec Edition Ltr v-0- Overall dimensions including base: 7. L x 9 W x 0 H cms 97.5" L x 7" W x 8.7" H IMPORTANT!!! Please read these instructions
ASSEMBLY ASSEMBLY INSTRUCTIONS (Internal Dimensions) Ent Spec Edition Ltr v-0- Overall dimensions including base: 7. L x 9 W x 0 H cms 97.5" L x 7" W x 8.7" H IMPORTANT!!! Please read these instructions
Lumber Smith. Owners Manual. If you are having problems assembling the saw and need assistance, please contact us at:
 Lumber Smith Owners Manual If you are having problems assembling the saw and need assistance, please contact us at: 804-577-7398 info@lumbersmith.com 1 General Safety Instructions Failure to follow these
GREENHOUSE 6'x8' ASSEMBLY INSTRUCTIONS. (Internal Dimensions) Overall Dimensions (Approx.) L 193 W 200 H cms 97.5" L 76" W 78.
 Overall Dimensions (Approx.) L 193 W 200 H cms 97.5 L 76 W 78.") ASSEMBLY INSTRUCTIONS GREENHOUSE 'x8' (Internal Dimensions) Overall Dimensions (Approx.) 7. L 9 W 00 H cms 97." L 7" W 78.8" H 0 IMPORTANT You must read these instructions carefully before you start to
ASSEMBLY INSTRUCTIONS GREENHOUSE 'x8' (Internal Dimensions) Overall Dimensions (Approx.) 7. L 9 W 00 H cms 97." L 7" W 78.8" H 0 IMPORTANT You must read these instructions carefully before you start to
Drill INSTRUCTION MANUAL. WARNING: For your personal safety, READ and UNDERSTAND before using. SAVE THESE INSTRUCTIONS FOR FUTURE 1 REFERENCE.
 ENGLISH (Original instructions) INSTRUCTION MANUAL Drill 6411 6412 6413 007894 DOUBLE INSULATION WARNING: For your personal safety, READ and UNDERSTAND before using. SAVE THESE INSTRUCTIONS FOR FUTURE
ClearSpan End Frame Kit 26' Wide x 12' High
 ClearSpan End Frame Kit 26' Wide x 12' High Diagram shows the end frame kit for an end wall without a door. (Door and end panel are purchased separately.) Rafter and struts shown in the above diagram are
Sliding Door Kit
 YOU MUST READ THIS DOCUMENT BEFORE YOU BEGIN TO ASSEMBLE THE DOOR KIT. Thank you for purchasing this GrowSpan door kit. When properly assembled and maintained, this product will provide years of reliable
CONSTRUCTION GUIDE 27ft Wide and 30ft Wide SHEEP HOUSE
 The Outside, Inside CONSTRUCTION GUIDE 27ft Wide and 30ft Wide SHEEP HOUSE Thank you for purchasing a Premier Sheep House. Please take the time to carefully read through this Construction Guide before
Spiral Slide
 IMPORTANT Page 1 PLEASE READ THESE INSTRUCTIONS BEFORE COMMENCING ASSEMBLY. All equipment must be installed in accordance with these instructions. Check your shipment against Bill of Lading and Parts list.
Experience the Hi-Lite Advantage
 Experience the Hi-Lite Advantage 12K Aluminum Shoring System INTRODUCTION The 12K Shoring System is primarily a hand-set system. It can also be handled with a crane, and may also be used quite successfully
PATRIOT DOCKS ASSEMBLY INSTRUCTIONS
 6/1/2008 PATRIOT DOCKS ASSEMBLY INSTRUCTIONS Congratulations on your new Patriot Dock purchase. This manual contains instructions to assemble basic dock configurations for use at typical shoreline application.
Construction Instructions for Continental and Quickfit Clearspan Frame Marquees
 Construction Instructions for Continental and Quickfit Clearspan Frame Marquees ERECTION INSTRUCTIONS - CONTINENTAL & QUICKFIT FRAME TENTS CONTINENTAL & QUICKFIT FRAME TENTS A system of clearspan frame
MODEL# SLA001-3 "SLIDE & LOCK" A-FRAME POOL LADDER
 MODEL# SLA001-3 "SLIDE & LOCK" A-FRAME POOL LADDER IMPORTANT INSTRUCTIONS: : Read all instructions carefully & completely to become familiar with parts, assembly, safety and proper use of this product.
SAFETY AND OPERATING MANUAL. Portable versatile workstation
 SAFETY AND OPERATING MANUAL Original instructions Portable versatile workstation wu063 1 2 3 4 5 6 7 8 9 Safety instructions Warning! When using this product basic safety precautions should always be followed.
User Guide. 12ft (3.66m) Jumpking Classic Premium. Got a Problem building your trampoline? Call us on and we can help
 Jumpking Classic Premium. Got a Problem building your trampoline? Call us on and we can help") User Guide Made In China 12ft (3.66m) Jumpking Classic Premium Got a Problem building your trampoline? Call us on 0344 800 4060 and we can help Patent no: DE602006006495D1, EP1721640B1 and US7628731 WARNING:
User Guide Made In China 12ft (3.66m) Jumpking Classic Premium Got a Problem building your trampoline? Call us on 0344 800 4060 and we can help Patent no: DE602006006495D1, EP1721640B1 and US7628731 WARNING:
Impact Wrench MODEL TW1000. WARNING: For your personal safety, READ and UNDERSTAND before using. SAVE THESE INSTRUCTIONS FOR FUTURE REFERENCE.
 ENGLISH Impact Wrench MODEL TW000 00605 DOUBLE INSULATION I N S T R U C T I O N M A N U A L WARNING: For your personal safety, READ and UNDERSTAND before using. SAVE THESE INSTRUCTIONS FOR FUTURE REFERENCE.
CONSTRUCTION GUIDE 21ft Wide and 24ft Wide SHEEP HOUSE
 The Outside, Inside CONSTRUCTION GUIDE 21ft Wide and 24ft Wide SHEEP HOUSE Thank you for purchasing a Premier Sheep House. Please take the time to carefully read through this Construction Guide before
ENGLISH (Original instructions) INSTRUCTION MANUAL. Drill DOUBLE INSULATION. IMPORTANT: Read Before Using.
 INSTRUCTION MANUAL. Drill DOUBLE INSULATION. IMPORTANT: Read Before Using.") ENGLISH (Original instructions) INSTRUCTION MANUAL Drill 64 642 643 007894 DOUBLE INSULATION IMPORTANT: Read Before Using. ENGLISH (Original instructions) SPECIFICATIONS Model 64 642 643 Capacities Steel
ENGLISH (Original instructions) INSTRUCTION MANUAL Drill 64 642 643 007894 DOUBLE INSULATION IMPORTANT: Read Before Using. ENGLISH (Original instructions) SPECIFICATIONS Model 64 642 643 Capacities Steel
12 TON HYDRAULIC SHOP PRESS. Instruction Manual. Please read this instruction manual carefully before use.
 12 TON HYDRAULIC SHOP PRESS Instruction Manual Please read this instruction manual carefully before use. IMPORTANT PLEASE READ THESE INSTRUCTIONS CAREFULLY. NOTE THE SAFETY INSTRUCTIONS AND WARNINGS. USE
A WORD ABOUT BRACING PART A - BUILDING A STRAIGHT, PILE BENT, OPEN DECK TRESTLE. Built in Place, Straight
 BUILDING LARGE SCALE TRESTLES You have many options when building a large scale trestle. The choices you make may be based on the prototype you are modeling; the era or industry you are modeling; or, simply
Maintenance and other important non-personal injury and non-material damage instructions or statements that should be observed.
 VIGO INDUSTRIES INSTALLATION GUIDE FOR SHOWER ENCLOSURE ()! SAFETY PRECAUTIONS This Installation Guide uses the following symbols to indicate important information. Always observe the instructions indicated
ENGLISH (Original instructions) INSTRUCTION MANUAL. Drill DS4012 DOUBLE INSULATION. IMPORTANT: Read Before Using.
 INSTRUCTION MANUAL. Drill DS4012 DOUBLE INSULATION. IMPORTANT: Read Before Using.") ENGLISH (Original instructions) INSTRUCTION MANUAL Drill DS402 05402 DOUBLE INSULATION IMPORTANT: Read Before Using. ENGLISH (Original instructions) SPECIFICATIONS Model DS402 Capacities Steel 3 mm Wood
ENGLISH (Original instructions) INSTRUCTION MANUAL Drill DS402 05402 DOUBLE INSULATION IMPORTANT: Read Before Using. ENGLISH (Original instructions) SPECIFICATIONS Model DS402 Capacities Steel 3 mm Wood
COMPOSITE RAILING INSTALLATION
 COMPOSITE RAILING INSTALLATION Tools All you ll need is a hammer and screw gun, circular saw (carbidetipped blade with fewer than 20 teeth is recommended), level, tape measure, rasp and blue chalk line.
2 Section Slider Loft Ladder Instructions
 WARNING! - Safety information 2 Section Slider Loft Ladder Instructions All ladders have potential injury risks, before installing this loft ladder carefully read and follow all of the safety, installation
ENGLISH (Original instructions) INSTRUCTION MANUAL. Drill MT600 MT601 DOUBLE INSULATION. IMPORTANT: Read Before Using.
 INSTRUCTION MANUAL. Drill MT600 MT601 DOUBLE INSULATION. IMPORTANT: Read Before Using.") ENGLISH (Original instructions) INSTRUCTION MANUAL Drill MT600 MT60 003635 DOUBLE INSULATION IMPORTANT: Read Before Using. ENGLISH (Original instructions) SPECIFICATIONS Model MT600 MT60 Capacities Steel
ENGLISH (Original instructions) INSTRUCTION MANUAL Drill MT600 MT60 003635 DOUBLE INSULATION IMPORTANT: Read Before Using. ENGLISH (Original instructions) SPECIFICATIONS Model MT600 MT60 Capacities Steel
ClearSpan Front Roll-Up Kit Installation Guide
 ClearSpan Front Roll-Up Kit Installation Guide Roll-up panel opened. Roll-up panel closed. Actual building and panel may differ from what is shown. 2008 ClearSpan All Rights Reserved. Reproduction is prohibited
PROTECTA Door Barrier
 MODEL NO: 320 PROTECTA Door Barrier ASSEMBLY INSTRUCTIONS INFA SECURE PTY LTD P.O. Box 487, Emu Plains NSW 2750 SERVICE NUMBER: (02) 4728 8090 www.infa-secure.com.au INDEX I. Parts list for Door Barrier
16ft Polytunnel Assembly Instructions
 CONTENTS Section Page 1. FOUNDATION TUBES: Option A Ground Anchor Plates 3 2. FOUNDATION TUBES: Option B Concreted Foundation Tubes 5 3. STEEL FRAME ASSEMBLY & INSTALLATION 6 4. CROP BARS 8 5. TIMBER END
Media Storage Systems Fixed Media Cabinets
 Owner s Manual Media Storage Systems Fixed Media Cabinets Contents 1-Column Fixed Media Storage Cabinet Important User Information...........................2 Safety Precautions.................................3
Taurean Sectional Garage Door INSTALLATION INSTRUCTIONS
 BEFORE YOU BEGIN MAKE SURE THESE INSTRUCTIONS ARE READ AND UNDERSTOOD COMPLETELY. THESE INSTRUCTIONS ARE INTENDED FOR PROFESSIONAL GARAGE DOOR INSTALLERS. ALL REFERENCES ARE TAKEN FROM THE INSIDE LOOKING
Model ADJUSTABLE ROLLER STAND WITH THREE-LEG SUPPORT
 ADJUSTABLE ROLLER STAND WITH THREE-LEG SUPPORT Model 46086 ASSEMBLY and Operating Instructions Visit our website at: http://www.harborfreight.com Read this material before using this product. Failure to
Got a Problem building your trampoline? Call us on and we can help
 User Guide 10ft (3.05m) Trampoline Got a Problem building your trampoline? Call us on 0844 800 4060 and we can help WARNING: Read these assembly instructions carefully before attempting to assemble or
MODEL C-71-5 TWO-MAN EARTH DRILL
 DO NOT THROW AWAY IMPORTANT MANUAL MODEL TWO-MAN EARTH DRILL Operator s Manual P.O.BOX 290 San Bernardino, CA. 92402 Phone (909) 478-5700 Fax (909) 478-5710 (800) 922-4680 E-mail: sales@groundhoginc.com
Drill MODEL 6013B MODEL 6013BR. WARNING: For your personal safety, READ and UNDERSTAND before using. SAVE THESE INSTRUCTIONS FOR FUTURE REFERENCE.
 ENGLISH Drill MODEL 6013B MODEL 6013BR 004618 DOUBLE INSULATION I N S T R U C T I O N M A N U A L WARNING: For your personal safety, READ and UNDERSTAND before using. SAVE THESE INSTRUCTIONS FOR FUTURE
Spring Loaded SCREEN-PRO. All Season Roll-Up Doors IN-JAMB MOUNTING METHOD INSTALLATION INSTRUCTIONS READ THIS FIRST
 Spring Loaded SCREEN-PRO All Season Roll-Up Doors IN-JAMB MOUNTING METHOD INSTALLATION INSTRUCTIONS READ THIS FIRST Carefully examine the crate(s) for damage before opening. If the carton is damaged, immediately
Sliding Door Kit
 YOU MUST READ THIS DOCUMENT BEFORE YOU BEGIN TO ASSEMBLE THE DOOR KIT. Thank you for purchasing this GrowSpan door kit. When properly assembled and maintained, this product will provide years of reliable
Installation Instructions
 Contents Page General Information and Installer Tips.......... 2 Panels & Posts............................. 3 Enclosure Description..................... 4 Hinge Door Hardware................... 4-5 Step-by-Step
GrowSpan Round Premium High Tunnels
 GrowSpan Round Premium High Tunnels Photo may show a different but similar model. 2016 Growers Supply All Rights Reserved. Reproduction is prohibited without permission. STK# PB01680R4 PB01690R4 DIMENSIONS
Installation Manual. Fortress OSHA Stair System Adjustable Temporary Stair Rated Load: 100 psf, 300 lbs. concentrated. 3-Tread at 25.
 Installation Manual Fortress OSHA Stair System Adjustable Temporary Stair Rated Load: 100 psf, 300 lbs. concentrated 3-Tread at 25.5 3-Tread at 34 4-Tread at 34 4-Tread at 42.5 Manufactured in the USA
Fruit Cage Construction Guide Copyright First Tunnels Ltd 2012.
 www.firsttunnels.co.uk/quality Fruit Cage Construction Guide FC Copyright First Tunnels Ltd 2012. Introduction A standard size fruit cage can be easily constructed in day, and if you can put together a
fax
 310-324-7622 fax 310-324-7644 Founded in 1998, Commercial Scaffolding Sales, Inc. (CSSI) has quickly established itself as the premier source of scaffold products for North American markets. CSSI carries
Cottage Style Dock Instructions
 Cottage Style Dock Instructions Table of Contents 1. Dock Assembly and Set-Up 1.1 Quick Start 1.2 Positioning Quick Clips 1.3 Installing Dock Legs 1.4 Installing Foot Pads 1.5 Installing Cross Braces 1.6
SHBP10M HYDRAULIC PRESS WITH MANDRELS
 SHBP10M HYDRAULIC PRESS WITH MANDRELS OWNER S MANUAL FOR YOUR SAFETY PLEASE READ THESE INSTRUCTIONS CAREFULLY AND RETAIN THEM FOR FUTURE USE. SPECIFICATION MAX CAPACITY STROKE WORK RANGE WEIGHT 10 TONNE
Angle Drill DA4000LR INSTRUCTION MANUAL
 ENGLISH (Original instructions) INSTRUCTION MANUAL Angle Drill DA4000LR 003009 DOUBLE INSULATION WARNING: For your personal safety, READ and UNDERSTAND before using. SAVE THESE INSTRUCTIONS FOR FUTURE
Multi-Stage ASSEMBLY INSTRUCTIONS ST-8100 SERIES. 125 TAYLOR PARKWAY ARCHBOLD, OH PHONE: (419) FAX: (419)
 FAX: (419)") 125 TAYLOR PARKWAY ARCHBOLD, OH 43502 PHONE: (419) 445-8915 FAX: (419) 445-0367 www.biljax.com Multi-Stage ST-8100 SERIES ASSEMBLY INSTRUCTIONS ALL DRAWINGS ARE FOR ILLUSTRATION ONLY. PRINTED IN U.S.A.
125 TAYLOR PARKWAY ARCHBOLD, OH 43502 PHONE: (419) 445-8915 FAX: (419) 445-0367 www.biljax.com Multi-Stage ST-8100 SERIES ASSEMBLY INSTRUCTIONS ALL DRAWINGS ARE FOR ILLUSTRATION ONLY. PRINTED IN U.S.A.
METHOD STATEMENT FOR THE CONSTRUCTION OF LIGHTWEIGHT HALLS
 METHOD STATEMENT FOR THE CONSTRUCTION OF LIGHTWEIGHT HALLS General The exact position of the structure has to be established. Please note that the difference in height must not exceed 1.5% in longitudinal
WARNING. Read and become familiar with this manual BEFORE operating unit.
 Covered by one or more of the following patents: 3,828,942 5,368,429 5,586,619 5,984,605 7,556,464 7,726,901 Other patents pending. OPERATOR S MANUAL For Model 439 WARNING Read and become familiar with
CARPORT/SHELTER JIT-1333HZ. L10.0xW4.0xH4.5M Installation Manual MODEL:
 CARPORT/SHELTER MODEL: JIT-1333HZ L10.0xW4.0xH4.5M www.vikre.no Installation Manual Congratulations on your purchase of our instant shelter. This unit is a combination of excellent manufacturing and design.
Ledgewood Farm greenhouse. construction
 Ledgewood Farm greenhouse How do I Start? construction to I m Finished! Post layout The string will be 7 above the ground and the posts will be driven until the proper drill hole is at the string. Spacing
High Speed Drill MODEL WARNING: For your personal safety, READ and UNDERSTAND before using. SAVE THESE INSTRUCTIONS FOR FUTURE REFERENCE.
 ENGLISH High Speed Drill MODEL 6501 003002 DOUBLE INSULATION I N S T R U C T I O N M A N U A L WARNING: For your personal safety, READ and UNDERSTAND before using. SAVE THESE INSTRUCTIONS FOR FUTURE REFERENCE.
T R I - S TA N D C H A I N V I S E
 T R I - S TA N D C H A I N V I S E OWNER S MANUAL Item# 23235 WARNING: Read carefully and understand all ASSEMBLY AND OPERATION INSTRUCTIONS before operating. Failure to follow the safety rules and other
I n s t a l l a t i o n I n s t r u c t i o n s S E N T I N E L S E R I E S 1 50 SLIDING GLASS DOORS
 I n s t a l l a t i o n I n s t r u c t i o n s S E N T I N E L S E R I E S 1 50 SLIDING GLASS DOORS Page 2-9: Installation Instructions, Figures 1, 2, & 3 Page 10-12: Figures A-1, A-2, & A-3: Installation
RAPID-EPS SAFETY INSTRUCTIONS AND INSTALLATION GUIDE. American Standard OSHA
 RAPID-EPS QUICK REFERENCE GUIDE SAFETY INSTRUCTIONS AND INSTALLATION GUIDE Standards Tested and Certificated British Standard BS EN 13374:2013 CLASS A American Standard OSHA - 1926.502 Canadian/Ontario
Aluminum Lake Truss Dock Instructions
 Table of Contents Aluminum Lake Truss Dock Instructions 1. Dock Assembly and Set-Up 1.1 Quick Start 1.2 Positioning Quick Clips 1.3 Installing Dock Legs 1.4 Installing Foot Pads 1.5 Installing Cross Braces
GrowSpan Gothic Cold Frames
 GrowSpan Gothic Cold Frames Photo may show a different but similar model. 2016 Growers Supply All Rights Reserved. Reproduction is prohibited without permission. STK# DIMENSIONS 106342 30' W x 12' H x
Moo-Tel Small Animal Hut
 Moo-Tel Small Animal Hut Photo may show a different but similar model. 2010 ClearSpan All Rights Reserved. Reproduction is prohibited without permission. STK# DIMENSIONS 104602 4 6" W x 4' 10" H x 8 2"
EASY-IN POOL STEP SYSTEM NE132
 EASY-IN POOL STEP SYSTEM NE132 This instruction manual features multiple guides for the step unit components. 7939 EASY POOL STEP (NE113) FOR USE WITH: EASY-IN POOL STEP (NE126) 6492 PARTS & HARDWARE FOR
BEST PRACTICE GUIDE. Socket Bases. Working with Concrete Slabs
 Working with Concrete Slabs When working with concrete slabs the barrier protection can be erected in three ways - with socket bases, adjustable slab edge brackets and multi slab clamps. Socket Bases 1
StageTek Staging System
 Owner s Manual StageTek Staging System CONTENTS Safety Precautions.................................2 Important User Information...........................2 Introduction.......................................3
CONTENTS TOOL LIST U P S I D E I N N O V A T I O N S, L L C RAMP AND STEP SYSTEM ASSEMBLY INSTRUCTIONS. Revised: June 2013
 U P S I D E I N N O V A T I O N S, L L C RAMP AND STEP SYSTEM ASSEMBLY INSTRUCTIONS TOOL LIST Required Tools: - Reciprocating Saw with Metal Cutting Blade - Drill - 7/16 Drill Bit for Metal Drilling -
EllisSaw.com. EllisSaw.com P.O. Box Verona, WI
 P.O. Box 9019 Verona, WI 9-019 GENERAL OPERATING & SAFETY INSTRUCTIONS * READ INSTRUCTIONS BEFORE USE * CAUTION: Disconnect power supply cord from power source when doing repair work or changing belt.
Please read through and understand this manual before using the tightening tool. Original manual
 MANUAL GEARED TRACK Tightening TOOL Please read through and understand this manual before using the tightening tool. Original manual December 2008 ENG www.olofsfors.se Tel. +46 (0)930-311 40 Olofsfors
MM750 Installation Instructions
 MM750 Installation Instructions IMPORTANT SAFETY INSTRUCTIONS - SAVE THESE INSTRUCTIONS Please read this entire manual before you begin. Do not unpack any contents until you verify all requirements on
Installation Fence Guide Kodiak Iron. Exceptional Fencing Extraodinary Customer Service
 Installation Fence Guide Kodiak Iron Exceptional Fencing Extraodinary Customer Service Kodiak Fence System Installation Guide Thank you for the purchasing the Kodiak Fence System. Fence installation is
ASSEMBLY INSTRUCTIONS TF Tent Flooring System. 125 Taylor Parkway Archbold, Ohio Phone: (419) Fax: (419)
 Fax: (419)") 125 Taylor Parkway Archbold, Ohio 43502 Phone: (419) 445-8915 Fax: (419) 445-0367 www.biljax.com TF-2100 Tent Flooring System ASSEMBLY INSTRUCTIONS ALL DRAWINGS ARE FOR ILLUSTRATION ONLY Revision: 1 1/21/16
125 Taylor Parkway Archbold, Ohio 43502 Phone: (419) 445-8915 Fax: (419) 445-0367 www.biljax.com TF-2100 Tent Flooring System ASSEMBLY INSTRUCTIONS ALL DRAWINGS ARE FOR ILLUSTRATION ONLY Revision: 1 1/21/16
TELESCOPIC GATE MANUFACTURING AND INSTALLATION MANUAL.
 TELESCOPIC GATE MANUFACTURING AND INSTALLATION MANUAL. Telescopic gates have been manufactured for many years essentially in the same way they are largely today. In recent years hardware suppliers have
GrowSpan Round Cold Frames
 GrowSpan Round Cold Frames Photo may show a different but similar model. 2016 Growers Supply All Rights Reserved. Reproduction is prohibited without permission. STK# DIMENSIONS 103099 12' W x 8' H x 24'
ClearSpan Grab Bag Canopy
 ClearSpan Grab Bag Canopy Photo may show a different but similar model. 2008 ClearSpan All Rights Reserved. Reproduction is prohibited without permission. STK# DIMENSIONS 104385 10 W x 20 L 1 YOU MUST
STAGE DEX STAGE DEX. Birch plywood, special water resistant quality, anti skidding top layer
 The Stage DEX staging system consists of an aluminium frame made from a special extruded profile. The plywood top is bolted and glued to this frame to reduce noise and vibration. Several leg types and
Linear Hook- on Worksurfaces
 Linear Hook- on Worksurfaces Linear Hook-On Worksurfaces come in three depths and seven lengths. Different worksurfaces have different reqirements for installation that are outlined below. 27 inch deep
Impact Wrench MODEL 6905B MODEL 6906
 ENGLISH Impact Wrench MODEL 6905B MODEL 6906 005305 DOUBLE INSULATION I N S T R U C T I O N M A N U A L WARNING: For your personal safety, READ and UNDERSTAND before using. SAVE THESE INSTRUCTIONS FOR
Familiarize yourself with the individual elements and components.
 1. Preface Dear Albert Customer, Buying an Albert Flat Roof Protection System, you acquire a high profiled quality system, robust and versatile Protection system. Safe working is only guaranteed, when
Premium Solar Star Greenhouse
 Premium Solar Star Greenhouse Assembly Instructions SKU# 104901 2006 ClearSpan All rights reserved. Reproduction without permission is prohibited. Revision date: March 2006g Contact your sales representative
Important Safety Information
 HM-30 NC 30B HOME GYM Important Safety Information Please keep this manual in a safe place for reference.. It is important to read this entire manual before assembling and using the equipment. Safe and
How to Build a Wire and Timber Deer Fence. Contents
 How to Build a Wire and Timber Deer Fence. Contents 1. Determining The Line of The Fence 2. Deciding on The Specification of the Fence 3. Basic Principle of Fence Erection 4. Safety Notes 5. Putting In
PAT installation of a Sun Dome over a in-ground
 PAT. 3766573 Installation of Sun Domes for in-ground pool GENERAL INSTRUCTIONS: STEP 1. Read thru the entire instructional materials before beginning any installation. You will find that the installation
WeatherShield Covered Walkway and Connect-A-Building
 WeatherShield Covered Walkway and Connect-A-Building Photo may show a different but similar model. 2014 ClearSpan All Rights Reserved. Reproduction is prohibited without permission. STK# DIMENSIONS 104303
INSTALLATION INSTRUCTIONS
 INSTALLATION INSTRUCTIONS INSTALLATION INSTRUCTIONS THESE INSTRUCTIONS COVER THE INSTALLATION OF THE FOLLOWING REAR DOORS WITH OUTSIDE CABLES AND MAXIMUM SECURITY LOCK: 3/4" DryFreight 1-1/8" PolarGuard