Familiarize yourself with the individual elements and components.
|
|
|
- Anna Ramsey
- 6 years ago
- Views:
Transcription
1
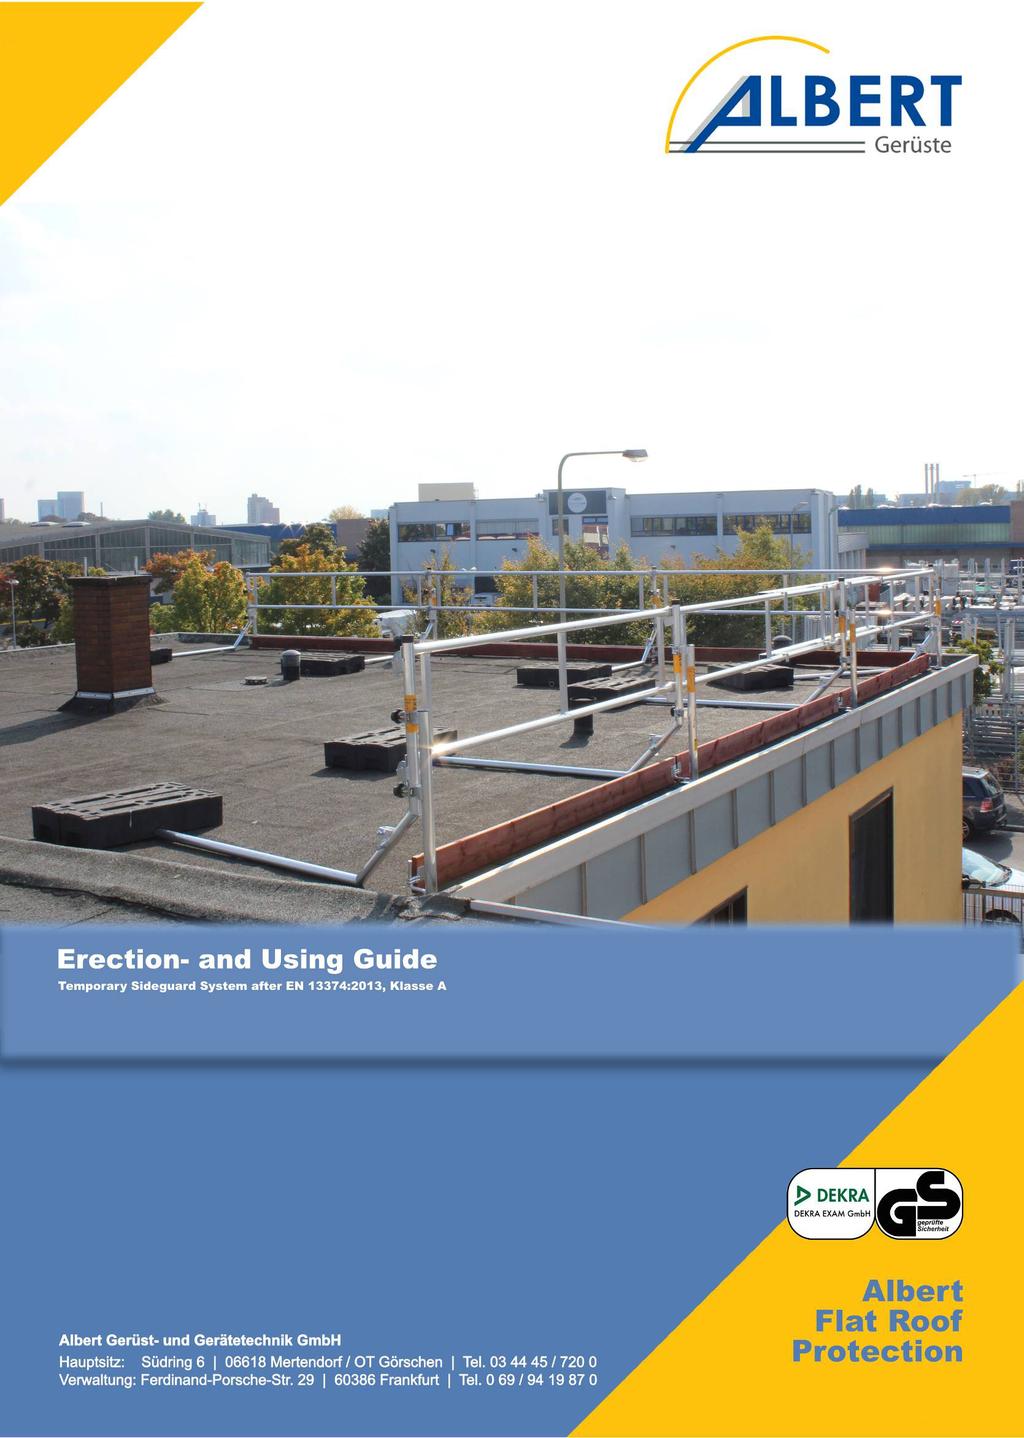
2 1. Preface Dear Albert Customer, Buying an Albert Flat Roof Protection System, you acquire a high profiled quality system, robust and versatile Protection system. Safe working is only guaranteed, when assembly and disassembly as well as the use of the Flat Roof Protection System is conformed to this erection guide. Read the instruction carefully before using the Protection System. The necessary hand grips and safety precautions are explained to you in the right order. Familiarize yourself with the individual elements and components. If you have any questions or suggestions to our Flat Roof Protection System or if you want to deviate from the official Instructions, then give us a call please. We are gladly available for any further information. Phone No / Fax No / Sincerely Yours, Albert Gerüst- und Gerätetechnik GmbH Current edition: 01. September
 Weight: 5,8 kg Limit Post with Toe Board Pin Article-No. 68010-AP (EN 13374-A) Weight: 3,1 kg Bracing frame 2,60 m Article-No.")
 Weight: 7,0 kg Alu-Double-Guard rail 2,57 m Article-No. 241555-A (EN 13374-A) Weight: 6,0 kg Toe Board 3,07 m Article-No.")
3 1. Components Guard rail post with wedge housing 2,05 m Article-No K (EN A) Weight: 5,6 kg Corner-Guard rail post with wedge housings 2,05 m Article-No KE (EN A) Weight: 5,8 kg Limit Post with Toe Board Pin Article-No AP (EN A) Weight: 3,1 kg Bracing frame 2,60 m Article-No AK (EN A) Weight: 15,3 kg ECO Concrete Weight Article-No BR (EN A) Weight: 22,0 kg Alu-Double-Guard rail 3,07 m Article-No A (EN A) Weight: 7,0 kg Alu-Double-Guard rail 2,57 m Article-No A (EN A) Weight: 6,0 kg Toe Board 3,07 m Article-No (EN A) Weight: 7,0 kg Toe Board 2,57 m Article-No (EN A) Weight: 4,8 kg Safety tube 0,50 m Article-No SR (EN A) Weight: 0,4 kg - 3 -
4 2. General instructions The Flat Roof Protection System can be used for flat roofs with or without Attica. Therefore please notice the erectionand ballast versions. We point out that the structure are to be built up, rebuilt or dismantled exclusively under the supervision of a competent person and by professionally qualified staff, who have received specific training. Make sure, that it is possible to mount the weight of the Protection System on the roof. The Albert Flat Roof Protection System can be assemble at dry and wet ground until a height of 40 Meter. Please remove ice and snow from the Albert Flat Roof Protection System and from the roof before you assemble the Protection System. The permitted service life is 6 months. The following instructions must be considered particularly in terms of your personal safety. 3. Maintenance, cleaning and storage of the components (Without instructions on how to repair the damaged parts) Clean every part after using and check if it is complete, control the welding seam, control and examine components for deformation. Please check if the labels of the parts are still readable. Clean the hinges, bolts, cotter pins and safety clatch regularly, free them of mortar, plaster and paint residue. They should be oiled, so that their function is ensured. Without written permission of the Albert Gerüst- und Gerätetechnik GmbH it is not allowed to make changes at the single parts of the Protection System. Store the scaffolding parts lying flat and in dry areas for protection against bad weather. Do not use violence to assemble or disassemble parts, do not let pieces fall from great heights on the ground. Scaffolding parts must be secured against shock and slipping during transport. If there are any doubts regarding to the safety of the single parts or of the whole flat roof protection system, it is not allowed to use it again. Damaged parts have to send to the manufacturer. If a reparation is not possible, exchange the single part to an original new one. After a fall of a person or a fall of a thing in or to the side guard system, and its accessories, it is only allowed to use the Albert Flat Roof Protection System again, if a supervised person have checked it
5 4. General Safety Instructions 4.1 The assembly and disassembly must be done strictly according to the instructions of use. The special sequence must be followed. The availability of the assembly and use instruction at point of use must be ensured at all times. By passing the Protection System to a third party for use, the instructions manual must absolutely be given, too. Every instruction have to be available in the language of the place the System is used. Please make sure, that the workings are take place in areas, where you are protected against falling. 4.2 Before assembly, check that all parts, tooling equipment and security devices for the construction of the Flat Roof Protection System are available. 4.3 At least two persons are required for assembly and disassembly of rolling towers. 4.4 Before building, the single parts are to be checked for their proper condition. Damaged parts must be scrapped. Only original parts are to be used according to manufacturer s instructions. 4.5 All single components must be checked to ensure that they are firmly fixed before using. 4.6 Before use, the proper and correct assembly of the Flat Roof Protection System must be checked. 4.7 The using and connecting of lifting devices at the Flat Roof Protection Systems is not allowed. It is also not allowed to secure persons at the Protection System. 4.8 During the assembly and disassembly you have to make sure to prevent that persons are under the roof edge
 During the assembly on the roof you should be secured by your personally fall protection.")
 Get ready all the single parts, to make the assembly easier (Picture 1).")
 Start with a Guard rail post (68010-K).")
6 5. Construction 1) Before assembly of the Albert Flat Roof Protection System, make sure, that the assembly area is flat and undamaged. 2) During the assembly on the roof you should be secured by your personally fall protection. It is to make sure that there is open space under the roof edge. Please notice the instructions of the personal fall protections. 3) Get ready all the single parts, to make the assembly easier (Picture 1). Picture 1 Guard rail posts with wedge housings 2,05 m Corner-Guard rail posts with wedge housings 2,05 m Limit Post with Toe Board Pin Bracing frame 2,60 m ECO Concrete weights Alu-Double-Guard rails Toe boards Safety tube 0,50 m 4) Start with a Guard rail post (68010-K). Flap the upper part of the Guard rail post (68010-K) on the front and secure it with the safety clatch (Picture 2). Make sure, that the safety clatch is locked in place (Picture 3). Picture 2 Picture 3-6 -
 a lot easier. Please make sure, that you are secured against falling.")
.")
 (Picture 15). Tipp!")
!")
7 5) Set the Guard rail post (68010-K) in a distance of ca. 15 until 20 cm in front of the Attica. This makes the assembly of the Limit Post (68010-AP) a lot easier. Please make sure, that you are secured against falling. Now set for fixing two ECO Concrete weights (68010-BR) at the two round bars, which are at the roof end of the Guard rail posts (68010-K) (Picture 4, 5). If there is no Attica or the Attica is not higher than 150 mm five Ballast weights (68010-BR) are necessary, which have to be secured against sliding with help of the Safety Tube (68010-SR) (Picture 15). Tipp!!! It is a lot easier, if you start your assembly in a corner with a Corner-Guard rail post (68010-KE). Picture 4 Picture 5!!! You can find the necessary ballast of your assembly version in the ballast table (Point 12)!!! 6) Go on with the second Guard rail post (68010-K), with help of the same scheme, like the first Guard rail post (68010-K). Get ready the Alu-Double-Guard rail ( A), so you have the distance between the guard rail posts and you can hang in it very fast (Picture 6,7). Picture 6 Picture 7-7 -
 in the wedge house of the post (Picture 8) and fix the")
. Picture 8 Picture 9 7) For secure the Guard rail post")
.")


8 Now hang in the Alu-Double-Guard rail ( A) in the wedge house of the post (Picture 8) and fix the Guard rails with help of a hammer blow on the wedges (Picture 9). Picture 8 Picture 9 7) For secure the Guard rail post (68010-K) against sliding to the front, it is necessary to build up a Limit post (68010-AP). The Limit post (68010-AP) will be mounted with help of star grip nuts at the outside and the upper part of the Guard rail post (68010-K) (Picture 10,11). Adjust the System, so the post is limited at the Attica (Picture 12). The assembly should be happen from the inside, which is already safe. Picture 10 Picture 11 Picture 12 8) Go on with this proceed until the area you want to secure is safe (Picture 13). Picture
, which is laying on")
 of the flapped Guard rail")
 with help of the Safety tube (68010-SR) against")
 Now it is necessary to stable the guard rail in the area of the flapped Guard rail post")
, which you hang in at the inside of the")
 (Picture 16), so it is at the middle of the flapped Guard rail post (68010-K) (Picture 17).")
9 9) For working without any material on the roof, for example if you want to lay down roofing paper at the whole area, it is possible to flap the Guard rail post (68010-K), which is laying on the roof normally. Therefore you have to distribute the ECO Concrete Weight (68010-BR) of the flapped Guard rail post (68010-K) to the other Guard rail posts (68010-K) right next to it (Picture 14). Now secure the ECO Concrete Weights (68010-BR) with help of the Safety tube (68010-SR) against not wanted sliding (Picture 15). Picture 14 Picture ) Now it is necessary to stable the guard rail in the area of the flapped Guard rail post (68010-K). This happens with help of the Bracing Frame (68010-AK), which you hang in at the inside of the Alu-Double-Guard rail ( A) (Picture 16), so it is at the middle of the flapped Guard rail post (68010-K) (Picture 17). Picture 16 Picture ) Unsecure the guard rail post with help of the safety clatch (Picture 18). Now flap the under part of the Guard rail post (68010-K) up (Picture 19). Picture 18 Picture 19 Please notice: It is only allowed to flap a Corner-Guard-rail Post, if the Attica is minimum 150 mm high
.")
 on the whole Flat Roof Protection System.")
, so you have a three parted side guard.")
 Ballast table without flapped Guard rail post Ballast of the Guard rail posts Flapped Guard rail")
10 9.3) It is also necessary to secure the flapped Guard rail post against falling on the ground, so it is to fixed with help of a belt quick fastener (Picture 20,21). Picture 20 Picture 21 10) If it is needed, contractual needed or if the Attica is under 150 mm high it is necessary to establish Toe Boards ( ) on the whole Flat Roof Protection System. This happens with help of the at the Limit post with Toe Board Pin (68010-AP) integrated Toe board pin (Picture 22,23), so you have a three parted side guard. Picture 22 Picture 23 11) The disassembly happens in reversed order. 12) Ballast table without flapped Guard rail post Ballast of the Guard rail posts Flapped Guard rail post Ballast of the posts right next to to the flapped one With Attica 2 3 Without Attica or Attica under 150 mm high
CHAINSAW SHARPENER MODEL: ECSS-1
 CHAINSAW SHARPENER MODEL: ECSS-1 Part No: 3402075 ASSEMBLY & INSTRUCTION MANUAL LS0409 INTRODUCTION Thank you for purchasing this CLARKE product Before attempting to use the product, it is essential that
Bending Roll Machine 4126
 Bending Roll Machine 4126 Operating Instructions Table of contents Main components...4 Operation...5 Safety...7 Service and maintenance... 12 Machine plates and stickers... 13 Dismantling the bending
TROLLA LEAVY 97 CM Lawn sweeper
 TROLLA LEAVY 97 CM Lawn sweeper Artikel nr.: 1008 EN Operating manual 014/1 Dear Customer, Congratulations on your new Trolla product. We hope you will enjoy it. Checkout with your new Trolla product may
SUMMERHOUSE PERGOLA ASSEMBLY INSTRUCTIONS. Toll-free: MODEL NO
 SUMMERHOUSE PERGOLA MODEL NO. 088-1759-2 INSTRUCTIONS Toll-free: 1-888-670-6684 IMPORTANT: Please read this manual carefully before beginning assembly of this product. Keep this manual for future reference.
H20 Beam for Elevated Slabs Application Guide
 H20 Beam for Elevated Slabs Application Guide A WORD ABOUT SAFETY High productivity depends on safety; even a minor accident causes job delays and inefficiency, which run up costs. That s why Symons, in
Schutzeinrichtungen. Safety fence system HIGH RESISTANT
 Schutzeinrichtungen Safety fence system HIGH RESISTANT Safer than safe Brühl Safety guards Our promise Reliably safeguarding people and machinery: This is the principle that we have always remained committed
Assembly Instructions. Item# L-GZ704PST
 Assembly Instructions Item# L-GZ704PST GAZEBO ASSEMBLY INSTRUCTIONS Our clear, easy-to-follow, step-by-step instructions will guide you through the project from start to finish. The final product will
Essex Gazebo. Assembly Instructions. Model No
 Essex Gazebo Model No. 088-1336-8 Instructions Toll-free: 1-877-483-6759 IMPORTANT: Please read this manual carefully before beginning assembly of this product. Keep this manual for future reference. Made
DASHLEY COLLECTION GAZEBO
 DASHLEY COLLECTION GAZEBO MODEL NO. 088-1760-6 INSTRUCTIONS Toll-free: 1-888-670-6684 IMPORTANT: Please read this manual carefully before beginning assembly of this product. Keep this manual for future
INSTALLATION MANUAL GIOTTO SCREEN
 INSTALLATION MANUAL GIOTTO SCREEN Before installing the Giotto screen, please read the following instructions carefully: The Giotto screen must be used INDOORS ONLY. It is forbidden to stay under the Giotto
8' x 22' Cash Hut INSTALLATION INSTRUCTIONS
 PARTS IST J I G A A J I C F D E B B K H A A K H G A Posts w/ Feet (4pcs) J eft End Panels (Front & Back) [4'3"x7'8"] (2pcs) B 22' Peak Trusses (2pcs) K Right End Panels (Front & Back) C 8' Centre Truss
Stairwell Tower. Product Information and Assembly Guide
 Product Information and Assembly Guide Product Information Assembly Guide Ensure you read all safety notes before erecting this tower There is a serious risk of personal injury if you do not follow all
Horse Shelter 12 x
 Horse Shelter 12 x 15 76110678 Hardware Kit 76900228 THANK YOU FOR PURCHASING THIS PRODUCT Behlen Country has been in the business of providing quality products for more than 75 years. Our products will
Hardware Pkg
 ASSEMBLY INSTRUCTIONS Horse Shelter 12 x 15 76110678 Hardware Pkg. 76900228 THANK YOU FOR PURCHASING THIS PRODUCT For questions about this product, or parts inquiries, please contact our Customer Service
25 TONNE HYDRAULIC PRESS MODEL NO: AHP 26
 WARNING: Read these instructions before using the machine 25 TONNE HYDRAULIC PRESS MODEL NO: AHP 26 PART NO: 7615115 OPERATION & MAINTENANCE INSTRUCTIONS LS1211 INTRODUCTION Thank you for purchasing this
Sport-Thieme. Full-Size Goal. Assembly instructions. 7,32x2,44 m, Portable
 Assembly instructions Sport-Thieme 7,32x2,44 m, Portable Art.-Nr.: 115 0793 257 7207 Full-Size Goal 0218214 2018 Sport-Thieme GmbH D-38367 Grasleben Germany sport-thieme.com info @sport-thieme.com Phone:
Owner s Manual AE PLUG AERATOR MANUFACTURING QUALITY LAWN CARE EQUIPMENT SINCE Made In CHINA REV
 MANUFACTURING QUALITY LAWN CARE EQUIPMENT SINCE 1945 Owner s Manual AE-48 48 PLUG AERATOR IMPORTANT Read and follow all Safety Precautions and Instructions Before Operating this Equipment. Made In CHINA
ClearSpan End Frame Kit 26' Wide x 12' High
 ClearSpan End Frame Kit 26' Wide x 12' High Diagram shows the end frame kit for an end wall without a door. (Door and end panel are purchased separately.) Rafter and struts shown in the above diagram are
KEEP FOR FUTURE REFERENCE STOWAWAY TILT TABLE READ ALL INSTRUCTIONS AND WARNINGS BEFORE USING THIS TABLE
 KEEP FOR FUTURE REFERENCE INSTRUCTIONS International Version P.O. Box 368 908 West Main Laurel, MT USA 59044 phone 800-548-7341 phone 406-628-8231 fax 406-628-8354 MODEL NUMBER: STT1 SERIAL NUMBER: (please
Assembly instruction Shelving System Hi280 Silverline
 A Member of the Constructor Group Assembly instruction Shelving System Hi280 Silverline. Read these instructions carefully before putting your shelving system into operation. Use them regularly during
UNIVERSAL WORKSTATION
 ASSEMBLY AND OPERATING INSTRUCTIONS UNIVERSAL WORKSTATION FOX Model F50-179 1 Universal Workstation FOX MODEL F50-179 TABLE OF CONTENTS Safety instructions Page 3 Specific safety instructions for workbenches..
12, 14 & 16 Wide Enclosure Assembly Guide
 www.rmfiberglass.com 12, 14 & 16 Wide Enclosure Assembly Guide RM Products Ltd 1-800-363-0867 www.rmfiberglass.com Table of Contents 1. Handling and Storage page 3 to 5 2. Parts and Tools List page 7 3.
The object of these Operating Instructions is to assist you in the correct safe and economical use of the TORSIOMAX torque screwdriver.
 Preface The object of these Operating Instructions is to assist you in the correct safe and economical use of the TORSIOMAX torque screwdriver. Target group for these Operating Instructions These Operating
ASSEMBLY AND CARE INSTRUCTIONS JUST FOR KIDS 355
 ASSEMBLY AND CARE INSTRUCTIONS VERSION: 8920100 (Revised 06/16) JUST FOR KIDS 355 SALES AND SERVICE spiethamerica.com Canada and International 135 Forestview Road, PO Box 40 Orillia, Ontario, Canada L3V
Assembly Instructions. Funbrella Palm
 Assembly Instructions Funbrella Palm Please read all assembly/installation instructions before the installation or removal of this product. EVANSVILLE, IN Sold by Aquatic Technology, Inc. Phone: 800-446-646
TITGEMEYER Tf1673GB(0517)1. GETO City Body Kit with a self-supporting base and without a base Assembly Instructions
1. GETO City Body Kit with a self-supporting base and without a base Assembly Instructions") TITGEMEYER Tf1673GB(0517)1 with a self-supporting base and without a base All rights reserved. The technical data quoted in this catalogue, performance descrip - tions, recommendations and instructions
TITGEMEYER Tf1673GB(0517)1 with a self-supporting base and without a base All rights reserved. The technical data quoted in this catalogue, performance descrip - tions, recommendations and instructions
MANUAL PLASTIC STRAPPING TOOL MODEL P404
 OPERATION MANUAL / SPARE PARTS LIST MANUAL PLASTIC STRAPPING TOOL MODEL P404 43.0404.02 43040402.en/MAS/ 12.05 INDEX PAGE 1 SAFETY INSTRUCTIONS 2 2 TECHNICAL DATA 3 3 OPERATION ELEMENTS 4 4 ADJUSTMENT
Lakeside Gazebo. Assembly Instructions. Product No
 Lakeside azebo Product No. 088-1610-4 Instructions Toll-free: 1-877-483-6759 IMPORTANT: Please read this manual carefully before beginning assembly of this product. Keep this manual for future reference.
Closet System Installation Manual
 Closet System Manual Thank you For choosing our Custom Closet Collection to fit all your needs Closets come fully assembled to make your project an enjoyable and satisfying experience. With quality Custom
UNIVERSAL STAND. Owner s Manual. Visit us on the web at QUESTION Model No. UT1002
 Owner s Manual Model No. UT1002 UNIVERSAL STAND QUESTION... 1 877 393 7121 Visit us on the web at www.southerntechllc.com You will need this manual for safety instructions, operating procedures, and warranty.
SHELTER ASSEMBLY MANUAL Model # 3085GL-17P
 SHELTER ASSEMBLY MANUAL Model # 3085GL-17P Strongly ask to remove snow from the roof immediately. Do not leave any snow load on the roof. Keep both sides and two ends on the ground clear all the times.
ClearSpan Grab Bag Canopy
 ClearSpan Grab Bag Canopy Photo may show a different but similar model. 2008 ClearSpan All Rights Reserved. Reproduction is prohibited without permission. STK# DIMENSIONS 104385 10 W x 20 L 1 YOU MUST
IRM 2500 Rotation plate for oval rings (operating manual)
") IRM 2500 Rotation plate for oval rings (operating manual) Laban-Produkttechnik Table of contents Table of contents 1 Introduction / information for the user... 3 1.1 Purpose of this operating manual...
IRM 2500 Rotation plate for oval rings (operating manual) Laban-Produkttechnik Table of contents Table of contents 1 Introduction / information for the user... 3 1.1 Purpose of this operating manual...
Spiral Slide
 IMPORTANT Page 1 PLEASE READ THESE INSTRUCTIONS BEFORE COMMENCING ASSEMBLY. All equipment must be installed in accordance with these instructions. Check your shipment against Bill of Lading and Parts list.
Tensile Traditional Marque Installation Manual
 Tensile Traditional Marque Installation Manual Tensile Traditional Marquee Installation Instructions Tools Needed: Sledgehammers/Mechanical Wackers Gloves Ladder and Stepladder Safety helmets Method: 1.
INSTALLATION INSTRUCTIONS
 INSTALLATION INSTRUCTIONS A CSW Industrials Company FGLP with Cast-In Frames FGLP-A, FGLP-C, FGLP-D IMPORTANT The following instructions are very important. Read them carefully, and be sure you understand
ClearSpan Attached-Style Awning
 ClearSpan Attached-Style Awning Photo may show a different but similar model. 2007 ClearSpan All Rights Reserved. Reproduction is prohibited without permission. Revision date: July 2007ldg STK# DIMENSIONS
8 Ft Wide Enclosure Assembly Guide
 www.rmfiberglass.com 8 Ft Wide Enclosure Assembly Guide RM Products Ltd 1-800-363-0867 www.rmfiberglass.com Table of Contents 1. Parts and Tools List page 3 2. Hardware page 4 3. Maintenance page 5 4.
Read all instructions before using the log splitter, especially safety instructions.
 Operation manual for log splitter ELH500, ELH700, ELH1100, TRH700 och TRH1100 Read all instructions before using the log splitter, especially safety instructions. Faxes Fabriks AB Hestravägen 7 330 26
26 GARDEN CART ASSEMBLY & OPERATING INSTRUCTIONS. Rev 07/03
 GARDEN CART 304 ASSEMBLY & OPERATING INSTRUCTIONS 3 Rev 07/03 THANK YOU for choosing a HARBOR FREIGHT TOOLS product. For future reference, please complete the owner s record below: Model Serial No. Purchase
" PLUG AERATOR. Model No. Safety Assembly Operation Maintenance Parts. CAUTION: Read Rules for Safe Operation and Instructions Carefully
 owner s manual Model No. 45-0383 48" PLUG AERATOR CAUTION: Read Rules for Safe Operation and Instructions Carefully Safety Assembly Operation Maintenance Parts the fastest way to purchase parts www.speedepart.com
Contents. Technical Metal Industrial Co. L.L.C.
 We, at Technical Metal Industrial Co. L.L.C. take pride in declaring the company s commitment to satisfy our customers by providing high quality products and promptly delivering them as per the agreed
Meva Guided Screens MGS Technical Instruction Manual
 Meva Guided Screens MGS Technical Instruction Manual Product Characteristics: The MEVA Guided Screens (MGS) system encloses complete floors especially in high-rise construction independent of the height
Section 1 Safety working at height
 Contents Section 1 Safety working at height. Section 2 Hi-Step package contents & parts identification. Section 3 Assembly. Section 4 Operation. Section 5 Maintenance. Section 6 Extender package contents
HOME GYM Owner s Manual
 HOME GYM Owner s Manual Content Content-------------------------------------------------------------1 Safety precautions----------------------------------------------------2 Assembly instruction-------------------------------------------------3-12
SHELTER ASSEMBLY MANUAL CONTAINER COVER
 QuickTime and a decompressor are needed to see this picture. SHELTER ASSEMBLY MANUAL CONTAINER COVER L12.0xW10.0XH5.0m SPECIFICATION Length: 12.0m Width: 10.0m Height: 5.0m IMPORTANT-----READ MANUAL FIRST
MERRY GO ROUND ITEM NO: 8030
 MERRY GO ROUND ITEM NO: 8030 OWNER S MANUAL CAUTION: This unit is designed to be used safely by up to 4 children between the ages of 3 years to 8 years old with a maximum weight of 00 pounds (45.4 kgs)
Double Truss Shelter Model# SST W9.14xL14.2xH4.88m Assembly Instructions
 Double Truss Shelter Model# SST304716 W9.14xL14.2xH4.88m Assembly Instructions Page 1 RECOMMENDED TOOLS Equipment List Speed Wrench 22#.23#.24# Hammer (30lb) Rope (12#) Long Tape (50m) Hammer Drill*1 Lifter*2
Dropped Objects Who s Responsible. Presented by Bob Thompson, Chevron Indonesia
 Dropped Objects Who s Responsible Presented by Bob Thompson, Chevron Indonesia Design - Bolt fell from URA to Drillfloor - 1.6kg x 25m A bolt attaching the gripper head to the upper racking arm came loose
Sales and Service
 OPERATION MANUAL / SPARE PARTS LIST MANUAL SEALLESS STEEL STRAPPING TOOL MODEL A333 13.2370.01 INDEX PAGE 1 SAFETY INSTRUCTIONS 2 2 WARRANTY CONDITIONS AND LIABILITY 3 3 APPROPRIATE USE 3 4 TECNICAL DATA
Sales & Service. JFK - Just For Kids. sasportonline.com. 135 Forestview Road 7879 Will Rogers Blvd.
 Sales & Service sasportonline.com SA Sport (Canada) SA Sport (U.S.A.) 135 Forestview Road 7879 Will Rogers Blvd. P.O. Box 40 Fort Worth, Texas Orillia, Ontario USA 76140 Canada L3V 6H9 Telephone: (705)
S E L E C T I O N. Arm Curl. User manual
 S E L E C T I O N T H E S T R E N G T H E V O L U T I O N User manual The identification plate of the and manufacturer, affixed behind the seat, gives the following details: A Name and address of the manufacturer
GREENHOUSE 6'x8' ASSEMBLY INSTRUCTIONS. (Internal Dimensions) Overall Dimensions (Approx.) L 193 W 200 H cms 97.5" L 76" W 78.
 Overall Dimensions (Approx.) L 193 W 200 H cms 97.5 L 76 W 78.") ASSEMBLY INSTRUCTIONS GREENHOUSE 'x8' (Internal Dimensions) Overall Dimensions (Approx.) 7. L 9 W 00 H cms 97." L 7" W 78.8" H 0 IMPORTANT You must read these instructions carefully before you start to
ASSEMBLY INSTRUCTIONS GREENHOUSE 'x8' (Internal Dimensions) Overall Dimensions (Approx.) 7. L 9 W 00 H cms 97." L 7" W 78.8" H 0 IMPORTANT You must read these instructions carefully before you start to
Supplement. Assembly and Maintenance Guide Titan Series Commercial Step System. Manufactured in the USA
 Supplement Assembly and Maintenance Guide Titan Series Commercial Step System Manufactured in the USA IMPORTANT! Read and follow all labels and assembly instructions including warnings and cautions prior
Core EZ. Operating Manual. Toll Free B East Broadway Avenue Tampa, FL 33619
 Operating Manual 3702 West Central Avenue Santa Ana, CA 92704 Toll Free 1-866-987-7297 11 High Street Suffield, CT 06078 www.ussaws.com 8004B East Broadway Avenue Tampa, FL 33619 Introduction This manual
Pvcu Bi Folding Doors Fitting Instructions.
 Pvcu Bi Folding Doors Fitting Instructions. THE FOLLOWING INSTRUCTIONS ARE GIVEN IN GOOD FAITH AND ARE FOR GUIDANCE ONLY. NO RESPONSIBILITY WILL BE ACCEPTED FOR ANY MIS- INTERPRETATION. WHEN INSTALLING
English/French 06/04
 E000 PLEASE READ ASSEMBLY INSTRUCTIONS COMPLETELY BEFORE ASSEMBLING YOUR BUILDING CAUTION: Some parts have sharp edges. Care must be taken when handling the various pieces to avoid a mishap. For safety
Sonoma Hardtop Gazebo 10 X 12. Owner s Manual
 Sonoma Hardtop Gazebo 10 X 12 Owner s Manual Congratulations on your purchase of our Sonoma Hardtop Gazebo. Our clear, easy to follow, step-by-step instructions will guide you through the assembly process
50 W ide. Future Trac G able E nd. Installation Instructions AIGE
 G able E nd W ide TopTec Products, LLC 7601 Highway 221 Moore, SC 29369 Phone: (800) 845-2830 Fax: (800) 921-77 e-mail: sales@toptecproducts.com www.toptecproducts.com AIGE 2003915 General Information
I E D DIN EN ISO 9001 I T Y S Y S T E M. Reg. Nr
 HZR HZR - Projecting Part III Start-up, Maintenance and Repairs 2. Editon We automate motion Q U A L C E R T DIN EN ISO 9001 I T Y I F I E D S Y S T E M Reg. Nr. 36 38-01 Parker Hannifin GmbH & Co. KG
Wallgard 1,3 product
 INSTALLATION INSTRUCTIONS Wallgard 1,3 product October 2015 GENERAL Application can be done to smooth, dry, clean, sound walls of concrete, plaster, hardboard, plywood and fibreboard. Board material must
MANUAL SEALLESS STEEL STRAPPING TOOL MODEL A332
 OPERATION MANUAL / SPARE PARTS LIST MANUAL SEALLESS STEEL STRAPPING TOOL MODEL A332 13.2250.01 INDEX PAGE 1 SAFETY INSTRUCTIONS 2 2 WARRANTY CONDITIONS AND LIABILITY 3 3 APPROPRIATE USE 3 4 TECNICAL DATA
Octagon Gazebo. Assembly Instructions. Product No
 Octagon Gazebo Product No. 088-1613-8 nstructions Toll-free: 1-877-483-6759 MPORTANT: Please read this manual carefully before beginning assembly of this product. Keep this manual for future reference.
Radio System Strobe Wizard Plus Freemask
 Radio System Strobe Wizard Plus Freemask User manual Translation of the original German user manual Doc. No.: 900.0509.00 Version: 09/2017 Contents Information about this manual and about the manufacturer...
Instruction Manual. Manual Furniture Mover. Note: Owner/Operator must read and understand this instruction manual before using the furniture mover.
 Instruction Manual Manual Furniture Mover Note: Owner/Operator must read and understand this instruction manual before using the furniture mover. I - Contents 1. Application 2 Specifications 3.Assembly
Walk-in Greenhouse. Assembly instructions A B. MODEL A (mm) B (mm) C (mm) / / 2. Hobby / / 16
 B (mm) C (mm) / / 2. Hobby / / 16") ssembly instructions C MODEL (mm) (mm) C (mm) Hobby Passion 689 8 9 7 / 8 3666 5 / 6 438 4 4 / 4 7 0 5 / 6 Walk-in Greenhouse Climapod ssembly Tips and Tricks Prior to the assembly of the greenhouse, you
ssembly instructions C MODEL (mm) (mm) C (mm) Hobby Passion 689 8 9 7 / 8 3666 5 / 6 438 4 4 / 4 7 0 5 / 6 Walk-in Greenhouse Climapod ssembly Tips and Tricks Prior to the assembly of the greenhouse, you
10 Ton LOG SPLITTER MODEL NO: Log Buster 4 PART No:
 10 Ton LOG SPLITTER MODEL NO: Log Buster 4 PART No: 3402025 OPERATION & MAINTENANCE INSTRUCTIONS 1603 ISS 4 Thank you for purchasing this CLARKE 10 ton manually operated Log Splitter. Before attempting
MANUAL SEALLESS STEEL STRAPPING TOOL MODEL A335
 OPERATION MANUAL / SPARE PARTS LIST MANUAL SEALLESS STEEL STRAPPING TOOL MODEL A335 13.2810.01 INDEX PAGE 1 SAFETY INSTRUCTIONS 2 2 WARRANTY CONDITIONS AND LIABILITY 3 3 APPROPRIATE USE 3 4 TECNICAL DATA
FACTORY STRETCH INSTALLATION INSTRUCTIONS
 !! Important!! Make sure all power is disconnected prior to installation. Wiring to be done according to Local and National Electric Codes by a qualified electrician. Make sure the building and/or structure
Clopay Models 835/837 Sliding Door System Installation Guide
 Clopay Models 835/837 Sliding Door System Installation Guide The aim of this instruction is to guide you through the process of construction and fitting of Sliding Doors. Due to the number of sizes available
OPERATING INSTRUCTIONS MODULGRAV. Tel. +49 (0) Fax +49 (0) homepage:
 Fax +49 (0) homepage:") OPERATING INSTRUCTIONS MODULGRAV Kolpingstraße -7 D-784 Singen / Htwl. Postfach 80 D-784 Singen / Htwl. Tel. +49 (0) 77 88-0 Fax +49 (0) 77 88 66 e-mail: info@elma-ultrasonic.com homepage: www.elma-ultrasonic.com
OPERATING INSTRUCTIONS MODULGRAV Kolpingstraße -7 D-784 Singen / Htwl. Postfach 80 D-784 Singen / Htwl. Tel. +49 (0) 77 88-0 Fax +49 (0) 77 88 66 e-mail: info@elma-ultrasonic.com homepage: www.elma-ultrasonic.com
Re-Grab Safety Gate. These industrial safety gates come pre-assembled and are easily installed.
 Manufactured from durable and corrosive resistant polyurethane, the RE-GRAB Safety Gate will not corrode or degrade even in aggressive chemical environments. They are self-extinguishing to UL94 and are
CRYSTEEL S. this manual must be included with the vehicle after completing the installation.
 Website: www.tbei.com E-mail: sales@tbei.com CRYSTEEL S Grain Tipper mounting and operating instructions this manual must be included with the vehicle after completing the installation. Web Site E-Mail
W6 series greenhouse
 W series greenhouse ssembly instructions Model W0 Model W07 Model W0 Model W Model W Walk-in Greenhouse Statement Dear Customer! May we congratulate you on your new Greenhouse. We feel sure that by following
Instructions for Fitting, Operating and Maintenance
 EN Instructions for Fitting, Operating and Maintenance Side hinged door / GDP Personnel Door 1 327 010 RE / 05.2011 ENGLISH Contents 1 Safety Instructions... 3 1.1 Qualified persons... 3 1.2 Symbols and
OWNERS MANUAL. Model No " PLUG AERATOR. CAUTION: Read Rules for Safe Operation and Instructions Carefully
 OWNERS MANUAL Model No. 45-0299 48" PLUG AERATOR CAUTION: Read Rules for Safe Operation and Instructions Carefully Assembly Operation Maintenance Repair Parts the fastest way to purchase parts www.speedepart.com
Operation manual for log conveyor 100, 200 mm Read all instructions before using the log conveyor, especially safety instructions.
 Operation manual for log conveyor 100, 200 mm. Read all instructions before using the log conveyor, especially safety instructions. Faxes Fabriks AB Hestravägen 7 330 26 Burseryd Tel +46 (0)371-500 08
LM600 Landmark Permanent Blind
 LM600 Landmark Permanent Blind Get parts online at www.huntriversedge.com P/N: 23033 REV1: 02/23/16 2016 RETI All Rights Reserved INTRODUCTION Landmark Permanent Blinds are engineered with you the hunter
OPEN PICKET PANEL AND GATE INSTALLATION INSTRUCTIONS
 For All Your Vinyl Fencing Needs OPEN PICKET PANEL AND GATE INSTALLATION INSTRUCTIONS 1 BEFORE YOU START, IT S IMPORTANT TO CHECK: That fence or the fence post footings do not exceed your lot lines of
OPERATING INSTRUCTIONS 5-AXIS CLAMPING SYSTEM + ACCESSORIES
 OPERATING INSTRUCTIONS 5-AXIS CLAMPING SYSTEM + ACCESSORIES 1 Contents 1. Introduction 2. Safety instructions and precautions 3 Operating the clamp 3.1 Clamp set up 3.2 Sequence for clamp set up 3.3 Adjusting
MANUAL MOUNTING SYSTEM FOR CORRUGATED ROOF
 MANUAL MOUNTING SYSTEM FOR CORRUGATED ROOF EN mounting system for corrugated roof for solar panels in portait setup (cross-system) ESDEC BV 2015 TABLE OF CONTENT 1. Introduction 1 2. General installation
ASSEMBLY INSTRUCTIONS FOR STORETTE STA42
 ASSEMBLY INSTRUCTIONS FOR STORETTE STA42 A01 CAUTION: Some parts have sharp edges. Care must be taken when handling the various pieces to avoid a mishap. For safety sake, please read the safety information
Sliding Door Kit
 YOU MUST READ THIS DOCUMENT BEFORE YOU BEGIN TO ASSEMBLE THE DOOR KIT. Thank you for purchasing this GrowSpan door kit. When properly assembled and maintained, this product will provide years of reliable
Spring Loaded All Season Roll-Up Doors
 Spring Loaded All Season Roll-Up Doors STAND-OFF MOUNTING METHOD INSTALLATION INSTRUCTIONS READ THIS FIRST Carefully examine the crate(s) for damage before opening. If the carton is damaged, immediately
Installation of HORIZONT and HORIZONT HIGH pool enclosures
 Installation of HORIZONT and HORIZONT HIGH pool enclosures Rev. 19.10.2017 PARTS LIST Parts for rail installation: Rail screw 6 x 60 Plastic anchor 10 x 50 Rail connector Arrest wedge [R-L] Pop rivet 4
STAGE DEX STAGE DEX. Birch plywood, special water resistant quality, anti skidding top layer
 The Stage DEX staging system consists of an aluminium frame made from a special extruded profile. The plywood top is bolted and glued to this frame to reduce noise and vibration. Several leg types and
Assembly instructions Pantograph shutters
 Assembly instructions Pantograph shutters Read these instructions, observe the contents and the warning notes prior to assembly. The information is very important for installation and correct use of the
OWNERS MANUAL. Model No LB. POLY PRO SPIKER/SPREADER. CAUTION: Read Rules for Safe Operation and Instructions Carefully
 OWNERS MANUAL Model No. -0301 CAUTION: Read Rules for Safe Operation and Instructions Carefully 17 LB. POLY PRO SPIKER/SPREADER Safety Assembly Operation Maintenance Parts PRINTED IN U.S.A. FORM NO. 78
Adjustable Shelving. Shelf Depths. Lundia Adjustable shelving is fully adjustable, ready to use, and easy to install and disassemble.
 Adjustable Shelving Upright Heights Shelf Lengths 410 455 600 800 900 1000 1200 2745mmH 2400mmH 2100mmH 1829mmH 1524mmH 1220mmH 915mmH 762mmH 714mmH 512mmH Shelf Depths 235mm 292mm 381mm 457mm 610mm 762mm
HEIGHT ADJUSTABLE WORKBENCH
 HEIGHT ADJUSTABLE WORKBENCH Model 91 ASSEMBLY and Operating Instructions Visit our website at: http://www.harborfreight.com Read this material before using this product. Failure to do so can result in
FitSpine R.E.D. 5YEAR. Inversion Table Assembly Instructions WA R R A N T Y
 R FitSpine R.E.D. Inversion Table Assembly Instructions TEETER HANG UPS 5YEAR WA R R A N T Y BEFORE YOU BEGIN: Review all steps before beginning assembly and read all precautions before using the inversion
Multi-Stand MSA 200. tritontools.com. Key Specifications. Selling Points
 Multi-Stand MSA 200 Multi-purpose, adjustable support stand with extra-wide tripod base for excellent stability on level or uneven ground. Folds down in seconds for convenient transportation and storage.
Greenhouse Assembly Instructions
 Greenhouse Assembly Instructions Our Help Line provides support and advice to customers of Summer Garden Buildings after ordering. For advice before you buy you can phone us free 7 days a week on 0800
ClearSpan Twin-Wall Polycarbonate End Panel Kit
 ClearSpan Twin-Wall Polycarbonate End Kit 30' Wide & 35' Wide Diagram shows a sample end panel kit for a frame. Actual panel positions and sizes for your end panel package may differ from what is shown.
Model No. EP84-A, EP84AR-A, P84L
 E000 Model No. EP84-A, EP84AR-A, P84L PLEASE READ ASSEMBLY INSTRUCTIONS COMPLETELY BEFORE ASSEMBLING YOUR BUILDING CAUTION: Some parts have sharp edges. Care must be taken when handling the various pieces
ClearSpan End Frame Kit 30' Wide x 11' High
 ClearSpan End Frame Kit 30' Wide x 11' High Diagram shows the end frame kit for an end wall without a door. (Door and end panel are purchased separately.) Rafter and mounting feet shown in the above diagram
1-CYLINDER TORNADO LIFT INSTALLATION MANUAL
 1-CYLINDER TORNADO LIFT INSTALLATION MANUAL Model: TORNADO LIFT 2K 2018 Edition PROVIDED FOR ASSEMBLY Foot Pads 12 sq. Square Tube Legs (optional) Cross Beams Side Beams 2.5 Dia. Cylinders (with hoses
Vertical Offset Base and Safety Rail System Installation Instructions
 Section 5 Vertical Offset Base and Safety Rail System Installation Instructions The vertical offset base and safety rail assembly are designed to be used in residential construction for sloped or flat
12mm (Max) 6mm (Max) 82mm (Max) 12mm (Max) 6mm (Max)
 6mm (Max) 82mm (Max) 12mm (Max) 6mm (Max)") 1 1 2 2 3 3 82mm (Max) 12mm (Max) 12mm (Max) 6mm (Max) 4 4 5 6 8 6mm (Max) 0.5 0mm 1 5 6 7 7 8 9 9 A = B 10 11 12 D B 1 13 14 15 0 C A D E 16 17 18 F G D B N H J G I K 19 A 20 G L 21 C K 1mm L M 1mm 22
1 1 2 2 3 3 82mm (Max) 12mm (Max) 12mm (Max) 6mm (Max) 4 4 5 6 8 6mm (Max) 0.5 0mm 1 5 6 7 7 8 9 9 A = B 10 11 12 D B 1 13 14 15 0 C A D E 16 17 18 F G D B N H J G I K 19 A 20 G L 21 C K 1mm L M 1mm 22
C L A S S I C. Deluxe. Snow Thrower Cab. Assembly and Care Instructions
 C L A S S I C Deluxe Snow Thrower Cab Assembly and Care Instructions Deluxe Snow Thrower Cab Assembly and Care Instructions Before you begin please unpack the carton and check that you have all your parts.