Installation Instruction
|
|
|
- Sherman Cox
- 5 years ago
- Views:
Transcription
1 Installation Step 1 Cut Upper Guide and Lower Tracks to opening size Step 2 Mount Upper Track to soffit or ceiling. Use appropriate mounting hardware for your field conditions. NOTE: The Lower Track is not the same size as the Upper Track. Refer to specifications. Step 3 Locate Bottom Track in proper position. (do not attach to floor until door position is confirmed) Step 4 Position Door Panel into opening by sliding top of panel into upper track. Step 5 Rest bottom of door panel on lower track. Step 6 Insert lower wheels tabs into slot in lower track to the side of the door slightly lift the door, and slide the wheel behind the door, positioning against mounting holes. Attach with screws. Test slide the panel to both ends of the opening. Step 7 Mark position of the lower track. Remove door panel. Step 8 Install all panels on appropriate tracks as described in Step 5. Level door panels by slightly loosening the wheel screws, raising or lowering door, and re-tightening wheel screws and adjusting leveling screw. Parts - Door Panels (Size and Quantity per your order) - Upper Guide and Lower Track (Single, Double, or Triple) Style and length per your order - Wheel Kit Each kit contains (upper rollers and lower wheels for (1) Door Panel

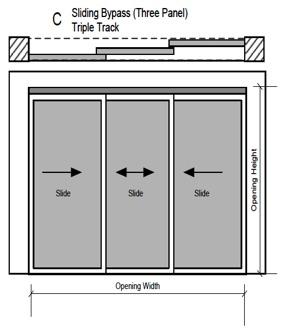
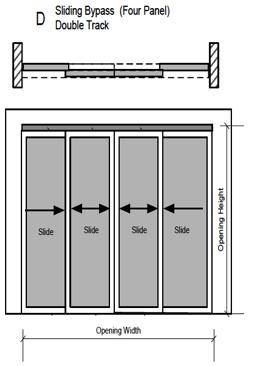
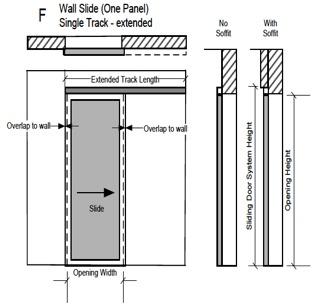
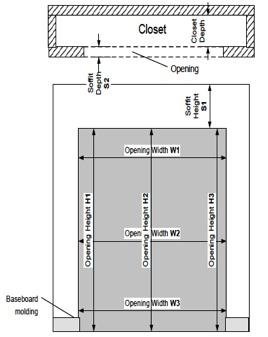
2 Opening Type
3


4 Cut the tracks Carefully measure the width of the opening at top and bottom, and reduce the lengths measured by about 2-3 mm. Measure off the required track length, marking the future cut line on the tracks. Use a fine-toothed metal cutting saw to cut off the redundant part of the tracks. In order to facilitate upper track cutting, insert 38 mm thick wood blocks or a reversed piece of track into the track. This will prevent track deflection during the cutting process Install the upper track Fix the upper track with screws, offsetting its flat surface by 2 mm from the door face. Install the upper track with the shadow line facing forward in order to mask ceiling irregularities. If a multiple-track system is installed, fix the other tracks so that they fit tightly against each other along the entire length. mm Avoid applying excessive force when tightening screws to prevent track deformation. Use flathead screws for best results. The surface to which the track is fixed must not be curved.

5 Fix stoppers and positioners in the bottom track Before fixing the bottom track down, slide the bottom positioners and stoppers into the track as shown in the drawing. Set the exact location of positioners and stoppers after the door has been put in place and adjusted. Set the door in place Lay the bottom track on the floor, offsetting it from the door face by about: x = 11 mm for profiles, x = 18 mm for profiles. (dependent on the type of profile) If the track is to be fitted with positioners and stoppers, slip them into the respective tracks before fixing. Fully insert the door leaf in the top track, taking care not to damage the bottom rollers, then align the bottom end of the door leaf with the bottom track and slowly lower the leaf, letting the rollers snap into the tracks. NOTE: The Lower Track is not the same size as the Upper Track. Refer to specifications Before you set the door in place, put a cardboard sheet on the bottom track to prevent damage to track surface. When the door is already in position, remove the protective cardboard.

6 Install the bottom track Use a level to make sure the door is exactly plumb; move the bottom track as necessary. Check if the door travels smoothly along the entire width of the opening. Having precisely aligned the bottom track, fix it to the base. With the track installed, set the other door leaves in their respective tracks. Before you fix the bottom track, make sure that it is positioned exactly parallel to the upper track. With soft floor covering, before you fix the bottom track, cut out a strip of about 55 mm in width and replace it with a 55 mm timber batten. Alternatively, put a 100 mm floor batten between the floor covering and the bottom track. Avoid applying excessive force when tightening screws to prevent track deformation. Use flat-head screws for best results. Adjust door position Adjust door position by means of the adjusting bolts in the bottom rollers so that the door fits tightly against the wall along its entire side. Door-to-floor clearance is adjustable between 11 and 20 mm (3 to 12 mm from the bottom track).
7 Fix the recessed bottom tracks Recessed track for wood floor The recessed bottom track can be fixed to ceramic or parquet flooring or to furniture board. Leave or make a groove of mm in width and min. 7 mm in depth. Fix the track using silicon adhesive. Prior to fixing the track, apply an appropriate quantity of the adhesive along the bottom groove. Where two or more tracks are installed, provide for 40.2 mm spacing on centers (distance between track centre lines). Track recessed into ceramic flooring: A recessed bottom track can be mounted in ceramic flooring. Leave a groove of mm in width and at least 9 mm in depth, in which to install the installation profile SU or embed it in mortar before it sets. Prior to door installation, fix the track using silicone adhesive. Wide recessed track for carpet: The wide recessed track can be installed under carpeting. Fix the track using screws, double-sided self-adhesive tape or silicon adhesive. Where two tracks are installed, correct spacing of tracks will be obtained by laying them next to each other so that the wider sides of their bases abut. For an uneven base, fix the tracks with silicon adhesive.
Installation Instruction
 Installation Step 1 Cut Upper Guide and Lower Tracks to opening size Step 2 Mount Upper Track to soffit or ceiling. Use appropriate mounting hardware for your field conditions. NOTE: The Lower Track is
INSTALLATION GUIDE. 1. Overview. 2. Measuring. 3. Tools & fixings you will need B C. Opening Width. Opening Height
 INSTALLATION GUIDE Please take a few minutes to read through this guide before getting started. 1. Overview A Typical Sliding Wardrobe Door Layout A Frame - Top Liner (optional) B Top Track C Frame - Strike
Sliding Glass Door Assembly and Installation Guide
 Sliding Glass Door Assembly and Installation Guide Index Door System Components and Hardware The following components are needed to complete the installation of your Sliding Patio Door unit. Check all
INS T A L L A TIO N INS T R U C TIO N S. Ceiling Mount Track System
 Ceiling Mount Track System 10.26.2016 Specifications Ceiling Post: Unassembled 2-7/8 Assembled 1-11/16 7/8 7-9/16 5-7/8 3/8 2 Tubes 1/2 2-3/8 5 Parts and Tools Tools Needed Tape Measure Pencil Drill with
SHOWERGLIDE 600B, 690B, 692B, SERIES
 Installation Instructions SHOWERGLIDE SERIES 600B, 60B, 6B, 6B, 65B, 67B IMPORTANT: You should check with your local plumbing or building code agency about this product for compliance before it is installed.
LOFT DOOR HANGER BARN DOORS & HARDWARE. Hardware Installation Instructions. Page
 LOFT DOOR HANGER Page 1 Specifications 2 7/16" 3/8" 1-1/2 1-3/4 Ø3 3 7/8" 11-1/16 Page 2 Parts and Tools Tools Needed Tape Measure Pencil Drill with 1/8, 1/4 and 3/8 bits, 1 spade bit and Phillips bit
1200 SERIES 2 PANEL DOOR rev.1 DETAILED INSTALLATION INTRUCTIONS
 1200 SERIES 2 PANEL DOOR 10.2013 rev.1 DETAILED INSTALLATION INTRUCTIONS GENERAL: Door elevations shown in these instructions are as viewed from the outside. X denotes the active or moving panel(s). O
Two Panel Frameless Bypass Door
 INSTALLATION INSTRUCTIONS Two Frameless Bypass Door Series 00 Please Record Model Number From Carton Label Here Please read these instructions carefully to familiarize yourself with the required tools,
TP4463. ASSeMBly INSTruCTIONS FLAT PANEL TV MOUNTING SYSTEM OPTION 1 OPTION 2 OPTION 3
 TP63 FLAT PANEL TV MOUNTING SYSTEM OPTION 1 OPTION 2 OPTION 3 Flat Panel TV Stand Stand with TV Mounting System Stand with Wall Mount ASSeMBly INSTruCTIONS for your safety, please follow these precautions:!
PORTA-FAB Cleanroom Wall Systems
 PORTA-FAB Cleanroom Wall Systems FABLINE BATTEN 2000 INSTALLATION INSTRUCTIONS IMPORTANT Porta-Fab Advises A Thorough Reading of These Instructions Before Beginning Installation. INTRODUCTION Porta-Fab
MIRAGE-X / BELLA. Shower Door Installation Instructions
 MIRAGE-X / BELLA Shower Door Installation Instructions IMPORTANT DreamLine reserves the right to alter, modify or redesign products at any time without prior notice. For the latest up-to-date technical
Installation And Care Instructions. Vertical Honeycomb Shades
 Installation And Care Instructions Vertical Honeycomb Shades Rev 5/2013 Table Of Contents Getting Started... 3 Parts Overview... 4 Materials Required... 5 Tools Required... 6 Outside Mount Installation...
INDECO TECHNICAL CATALOGUE 2014
 INDECO TECHNICAL CATALOGUE 0 as at October 0 PN-EN 7:000 ITB AT--790/009 Contents S00 - SERIES SLIDING DOORS (steel system))... S00 - SERIES SLIDING DOORS (steel system)... S00 - SERIES PIVOTED DOORS
Frameless Fixed Panel Slider
 INSTALLATION INSTRUCTIONS Frameless Fixed Panel Slider QCI-5279 SINGLE ROLLER WITH ANTI-JUMP DOUBLE ROLLERS QCI5279 Rev Page Certified 08/09/6 Tools: To install your New Shower Enclosure, you may need
TAMBOUR DOOR SYSTEMS. Construction Automotive Industry
 TAMBOUR DOOR SYSTEMS C3 Installation instructions www.rehau.com Construction Automotive Industry C3 Parts Overview 8 1 Slats 2 Handle 6 7 3 Handle gliders 4 Track cover 5 1 9 5 Track base 6 End caps 4
ESSENCE. Shower / Tub Door Installaion Instructions
 ESSENCE Shower / Tub Door Installaion Instructions IMPORTANT DreamLine reserves the right to alter, modify or redesign products at any time without prior notice. For the latest up-to-date technical drawings,
INOVO 4-LITE SLIDING PATIO DOOR ASSEMBLY AND INSTALLATION INSTRUCTIONS
 INOVO 4-LITE SLIDING PATIO DOOR ASSEMBLY AND INSTALLATION INSTRUCTIONS IMPORTANT: READ THE INSTRUCTIONS AND FAMILIARIZE YOURSELF WITH THE DOOR PARTS AND PIECES BEFORE BEGINNING ASSEMBLY AND INSTALLATION.
ESSENCE - H SHOWER / TUB DOOR INSTALLATION INSTRUCTIONS
 ESSENCE - H SHOWER / TUB DOOR INSTALLATION INSTRUCTIONS IMPORTANT DreamLine reserves the right to alter, modify or redesign products at any time without prior notice. For the latest up-to-date technical
INSTALLATION INSTRUCTIONS. Deluxe Continuous Hinge Inline Door & Panel Shower Enclosure QCI5230
 INSTALLATION INSTRUCTIONS Deluxe Continuous Hinge Inline Door & Panel Shower Enclosure QCI5230 QCI5230 Rev 0 6 shower new QCI5230 Rev 0 Page 2 Certified 06/20/2016 Parts List A. Curb (w/ weep holes) (1)
TREX ENHANCE RAILING (Also Applies to Trex Select Railing) Installation Instructions
 Installation Instructions") TREX ENHANCE RAILING (Also Applies to Trex Select Railing) NOTE: All Enhance Railing lengths are manufactured at CLEAR SPAN dimensions (spanning between space of posts): 7" for 6' clear span. Note that
TREX ENHANCE RAILING (Also Applies to Trex Select Railing) NOTE: All Enhance Railing lengths are manufactured at CLEAR SPAN dimensions (spanning between space of posts): 7" for 6' clear span. Note that
Thank you for your order
 Installation Guide Thank you for your order Ph: 09-9133110 Fax: 09-9133113 5 Smales Road. East Tamaki, Manukau PO Box 58031 Greenmount, Manukau 2013 AUCKLAND // WELLINGTON // CHRISTCHURCH www.bathroomdirect.co.nz
WAREHOUSE HANGER INSTALLATION INSTRUCTIONS R H INS T A L L A TIO N INS T R U C TIO N S
 INS T A L L A TIO N INS T R U C TIO N S WAREHOUSE HANGER NOTE: Due to the size and weight of the Warehouse Hanger it is recommended that this Hanger be installed on 3 4 or wider doors. 10.11.2016 2-3/16"
INOVO 2-LITE SLIDING PATIO DOOR
 INOVO 2-LITE SLIDING PATIO DOOR ASSEMBLY AND INSTALLATION INSTRUCTIONS IMPORTANT: READ THE INSTRUCTIONS AND FAMILIARIZE YOURSELF WITH THE DOOR PARTS AND PIECES BEFORE BEGINNING ASSEMBLY AND INSTALLATION.
Deauville Installation Guide
 vjul16 (for 17 or 24 mm Surface Wall Profiles) DO NOT ASSEMBLE WITHOUT FULLY READING THESE INSTRUCTIONS Page 2 Thank you for purchasing this Deauville shower enclosure. Please study these instructions
Portofino Installation Guide
 vjul16 (for 17 or 24 mm Surface Wall Profiles) DO NOT ASSEMBLE WITHOUT FULLY READING THESE INSTRUCTIONS Page 2 Thank you for purchasing this Portofino shower enclosure. Please study these instructions
INSTALLATION INSTRUCTIONS INS T A L L A TIO N INS T R U C TIO N S THE MAVERICK HANGER R H
 INS T A L L A TIO N INS T R U C TIO N S THE MAVERICK HANGER 10.6.2016 PARTS INSTALLATION SPECIFICATIONS AND TOOLS INSTRUCTIONS 2-1/4" 2-7/8 11-3/8" 1/4" 2-1/8 PARTS INSTALLATION AND INSTRUCTIONS TOOLS
Box Track INSTALLATION INSTRUCTIONS
 Box Track INSTALLATION INSTRUCTIONS BOX TRACK Recommended Tools Level Tape Measure Pencil Drill with 1/8, and 1/4, Drill Bits, Phillips Bit and Slotted Bit Socket Wrench with 9/16 Socket 9/16 and 5/8 Wrench
Heavy Duty I-Beam Trolley
 Heavy Duty I-Beam Trolley ASSEMBLY INSTRUCTIONS I-BEAM TROLLEY Recommended Tools Level Tape Measure Pencil Drill with 1/8, 1/4, and 3/8, Drill Bits and Phillips Bit Socket Wrench with 9/16 Socket I-BEAM
Deauville Installation Guide
 vjul16 (for Recessed Wall Profiles) DO NOT ASSEMBLE WITHOUT FULLY READING THESE INSTRUCTIONS Page 2 Thank you for purchasing this Deauville shower enclosure. Please study these instructions carefully before
INSTALLATION INSTRUCTIONS
 INSTALLATION INSTRUCTIONS SOLID PHENOLIC TOILET PARTITIONS 1080 DuraLine Series 1180 DuraLine Series Class-A Fire Rated IMPORTANT: Review these instructions thoroughly prior to installation. FLOOR ANCHORED
INSTALLATION AND CARE INSTRUCTIONS
 INSTALLATION AND CARE INSTRUCTIONS Vertical Applications Honeycomb Shades 52 C8-10-3401 Rev 2/14 CONTENTS Introduction...2 Before You Begin...3 Vertical Application Parts Overview...4 Materials Required...5
How to Install Custom Real Wood and Faux Wood Blinds
 Before you begin your installation: READ ALL INSTALLATION INSTRUCTIONS! Make sure that you have all tools and hardware needed for installation. Check the installation surface (wall, ceiling, or window
Version 1.0 BLAISE UTILITY 4 CUBE 2 DOOR.
 Version 1.0 BLAISE UTILITY 4 CUBE 2 DOOR Enjoy Your purchase from Australia s Best Value Furniture Store PAGE 2 Assembly Checklist Read through the instructions carefully before you begin. Identify and
C70 Window Roller Repair Taken from: Heres the problem:
 C70 Window Roller Repair Taken from: http://www.volvospeed.com/vs_forum/topic/115086-how-to-c70-window-rollers-permanent-fix/ Heres the problem: This happened to two separate window assemblys on my c70
ENIGMA AIR ENCLOSURE
 ENIGMA AIR ENCLOSURE SHOWER ENCLOSURE INSTALLATION INSTRUCTION IMPORTANT DreamLine reserves the right to alter, modify or redesign products at any time without prior notice. For the latest up-to-date technical
BASIC TOOLS AND MATERIALS NEEDED. Introduction HOW TO CARE FOR YOUR DOOR
 DO IT RIGHT! Use a Kohler Certified Installer, (KCI), for the installation of your Kohler Shower Door. Contact your Kohler Distributor/Showroom or call Kohler at 1-800-4-KOHLER for the KCI nearest you.
BARN DOOR HARDWARE KIT
 INSTALLATION GUIDE Main Components x1 Rail x5 Wall Spacer x2 Anti-jump Block x2 Bent Strap x1 Right Stopper x1 Left Stopper x5 5/16 (8mm x 60mm) Carriage Bolt x5 5/16 (8mm x25mm) Anchor x5 5/16 (8mm x
SURFACE CLIP MOUNT. 1 Insert lens into channel, measure, and cut to length. Remove lens cover from channel. surface. Attach lens cover and end caps
 SURFACE CLIP MOUNT 1 Insert lens into channel, measure, and cut to length Remove lens cover from channel Screw mounting clips into mounting Snap channel into mounting clips Attach lens cover and end caps
Sectional Door Installation Instructions
 Sectional Door Installation Instructions 1. Check opening height and door size. a. 25-30mm overlap on each side and >10mm at top. b. At least 150mm side room required 2. Check headroom clearance, standard
x2 1/4 (6mm) Floor Anchor
 Floor Anchor") Main Components x1 Rail x5 Wall Spacer x2 Anti-jump Block x2 Bent Strap x1 Right Stopper x1 Left Stopper x5 5/16 (8mm x 60mm) Carriage Bolt x5 5/16 (8mm x25mm) Anchor x5 5/16 (8mm x 90mm) Wall Screw x2
Main Components x1 Rail x5 Wall Spacer x2 Anti-jump Block x2 Bent Strap x1 Right Stopper x1 Left Stopper x5 5/16 (8mm x 60mm) Carriage Bolt x5 5/16 (8mm x25mm) Anchor x5 5/16 (8mm x 90mm) Wall Screw x2
Installation Instructions
 Supafold Slide Aside System Three Fold Room Divider Installation Instructions Distinctive Doors Ltd Supafold Slide Aside Internal Folding System IMPORTANT: Before proceeding with the installation, and
Pet Door Panel Installation Manual
 Pet Door Panel Installation Manual 400-558-1 1 4/3/03, 3:26 PM Components: Pet Door Panel Panel Latch Assembly Foam Weather-stripping Glass Sweep (4) Binding Posts (6) #6 x 1/2 Sheet Metal Screws (4) 8-32
Monaco Installation Guide - Surface Profiles
 v1 Page 1 Thank you for purchasing this Monaco shower screen. Please study these instructions carefully before assembly and installation and check all supplied parts immediately upon receipt. These instructions
Installation Manual MODEL NE-42
 Installation Manual MODEL NE-42 GET TO KNOW YOUR UNIT 1 1. CROSS BRACES - Stud Finder - 12-14 Level - Tape Measure - Small Flathead Screwdriver Tools Needed: - Electric Drill (with 1/4 & 1/8 drill bit)
MH60/MH72 DESK HUTCH IMPORTANT!
 MH60/M2 DESK HUTCH IMPORTANT! Assembly may require the assistance of another person. Before you begin assembly: READ THE DIRECTIONS all the way through one time. This will speed up the process and help
Installation Operation Care
 Installation Operation Care Palm Beach Polysatin Shutters CONTENTS Getting Started Installation Overview...1 Unpacking...1 Tools and Materials Needed...1 Fasteners...2 Frame Assembly Assemble the Frame
INSTALLATION INSTRUCTIONS INS T A L L A TIO N INS T R U C TIO N S ROD IRON SCROLL HANGER R H
 INS T A L L A TIO N INS T R U C TIO N S ROD IRON SCROLL HANGER 10.5.2016 2-1- 3/16" 11/16" 8" 8 O 2-7/8 Ø2-7/8" 3-1/2 3-1/2" 12-9/16 12-9/16" PLEASE NOTE: These instructions are specific to a particular
E N G L I S H GARDEN SHED. Assembly Instructions. Suitable for Models WITH VARYING DEPTHS
 GARDEN SHED Assembly Instructions Suitable for Models 6' Wide 8' Wide 0' Wide WITH VARYING DEPTHS GI0003 November 0 INSTALLATION ADVICE It's Not That Difficult! The construction of your shed isn't as complicated
FD50-H SLIDING DOOR SYSTEM Installation Manual (Ceiling Mount Type for Pocket Door, with Dual Soft Close) Part No.FD50DHCP-PD
 Part No.FD50DHCP-PD") FD50-H SLIDING DOOR SYSTEM Installation Manual (Ceiling Mount Type for Pocket Door, with Dual Soft Close) Part No.FD50DHCP-PD Thank you for purchasing Sugatsune products. Read the instructions carefully
FD50-H SLIDING DOOR SYSTEM Installation Manual (Ceiling Mount Type for Pocket Door, with Dual Soft Close) Part No.FD50DHCP-PD Thank you for purchasing Sugatsune products. Read the instructions carefully
FRAMED PANEL / DOOR / PANEL CONTINUOUS HINGE SHOWER ENCLOSURE INSTALLATION INSTRUCTIONS
 FRAMED / DOOR / CONTINUOUS HINGE SHOWER ENCLOSURE INSTALLATION INSTRUCTIONS QCI5229 Rev 0 6 INSTALLATION NOTES: Unpack your unit carefully and inspect for freight damage. Lay out and identify all parts
INS T A L L A TIO N INS T R U C TIO N S HORSESHOE W/ BAR HANGER
 INS T A L L A TIO N INS T R U C TIO N S HORSESHOE W/ BAR HANGER 6-1/2" 5" 2-7/16" 3-7/16" Ø2-7/8" 4-7/8" 11" 2" 3/16" 1/2" HORSESHOE W/ BAR S P ECIFICATIONS PARTS AND TOOLS Tools Needed Tape Measure Pencil
SHOWER DOORS INSTALLATION INSTRUCTIONS SHOWER DOORS: LBSDD Version 4.0
 D SHOWER DOORS INSTALLATION INSTRUCTIONS SHOWER DOORS: LBSDD7279 Version 4.0 PREPARATION FOR INSTALLATION SHOWER DOORS PREPARATION FOR INSTALLATION READ ALL INSTRUCTIONS BEFORE UNPACKING THE PRODUCT 2
INSTALLATION INSTRUCTIONS
 INSTALLATION INSTRUCTIONS BUILDERS CHOICE FRAMED Bypass Door Model: L0516 (Tub Height), L0517 (Shower Height) Rev. 09.20.13 INSTALLATION NOTES: Unpack your unit carefully and inspect for freight damage.
Required Tools: Suggested Additional Tools: 1 Cordless Drill with Robertson Bits 1 Ratchet Wrench 1 7/16 or 11mm socket 1 7/16 or 11mm Gear Wrench
 Thank you for your recent purchase of a Cabinets by Hayley garage cabinet system. You are about to experience the best made cabinets that you can purchase. Cabinets by Hayley are designed for beauty and
ASS 70 FD folding / sliding door. Installation Guide
 ASS 70 FD folding / sliding door Installation Guide IMPORTANT! These doors should be fitted by competent and trained installers. Please read these instructions thoroughly before beginning the installation.
Spring Loaded All Season Roll-Up Doors
 Spring Loaded All Season Roll-Up Doors STAND-OFF MOUNTING METHOD INSTALLATION INSTRUCTIONS READ THIS FIRST Carefully examine the crate(s) for damage before opening. If the carton is damaged, immediately
IMPORTANT: installation. FLOOR ANCHORED CEILING HUNG OVERHEAD BRACED FLOOR-TO- CEILING ANCHORED
 INSTALLATION INSTRUCTIONS MAXIMUM PRIVACY COMPACT LAMINATE TOILET PARTITIONS 2080 DuraLineSeries 2180 DuraLineSeries Class-A Fire Rated Includes Institutional Hardware Option.67 IMPORTANT: Storage and
IMPORTANT - GLASS IS FRAGILE AND CAN SHATTER.
 STEP BY STEP SHOWER SCREEN INSTALLATION GUIDE IMPORTANT - GLASS IS FRAGILE AND CAN SHATTER. 2 PEOPLE ARE IMPORTANT REQUIRED - GLASS FOR GLASS IS FRAGILE PANEL AND INSTALLATION CAN SHATTER. TO AVOID GLASS
Item # Thanks for shopping with Improvements!
 Thanks for shopping with Improvements! Hampshire -Door Cabinet Item #5505 To order, call -800-64- West Chester, OH 45069 Made in China PR-6 If you have questions regarding this product, call -800-64- Mon.-Fri.
tile redi redi DOOR Redi Redi Swing Slide g TM TM...Opening Doors to Stunning Showers! TM TM SERIES: CONFIGURATION: MOUNTING PACKAGE:
 redi DOOR INSTALLATION INSTRUCTIONS tile redi Redi Redi Swing Slide g TM TM...Opening Doors to Stunning Showers! TM TM SERIES: CONFIGURATION: MOUNTING PACKAGE: 1100 Door-Door Framed sliding doors RDQCI5023
Frameless Bypass Slider
 INSTALLATION INSTRUCTIONS Frameless Bypass Slider QCI-5301 Heavy Glass Bypass Slider with Exposed Rollers QCI5301 Rev 0 Page 1 Certified 11/1/2016 Tools: To install your New Shower Enclosure, you may need
Installation Manual Flat Track Series
 Manual Flat Track Series Contents Safety...1 Parts...2 Hardware.......................................... 2 Tools Required..................................... 4.............................................
INFINITY-Z SHOWER DOOR / TUB DOOR INSTALLATION INSTRUCTION. MODEL #s 01-Chrome
 INFINITY-Z SHOWER DOOR / TUB DOOR INSTALLATION INSTRUCTION IMPORTANT DreamLine reserves the right to alter, modify or redesign products at any time without prior notice. For the latest up-to-date technical
Monaco Installation Guide - Surface Profiles - vjun16
 1 Thank you for purchasing this Monaco shower screen. Please study these instructions carefully before assembly and installation. Checking of Parts Parts are listed at the beginning of this guide. Please
Frameless Bypass Slider
 INSTALLATION INSTRUCTIONS Frameless Bypass Slider QCI-5301 3/8 or 1/4 Glass Bypass Slider with Exposed Rollers QCI5301 Rev 1 Page 1 Certified 6/5/2017 Tools: To install your New Shower Enclosure, you may
Series----SP3600A SHOWER DOOR
 Series----SP3600A SHOWER DOOR INSTALLATION INSTRUCTIONS Please read these instructions carefully to familiarize yourself with the required tools, materials, and installation sequences. The Exploded Diagram
ROCKWELL. Two Panel Door. Half X Door. Double X Door. Z Combination Door
 ROCKWELL 4 in 1 DOOR Choose between four door styles with this Door Kit. Our versatile Rockwell Door Kit is very easy to assemble. All materials and hardware needed to assemble any of the four styles are
1/4 FRAMELESS DOOR WITH INLINE PANEL 1413A-1713A-1813A
 1/4 FRAMELESS DOOR WITH INLINE PANEL 1413A-1713A-1813A F AB GLASS AND MIRROR www.fabglassandmirror.com Call: +1 888-474-2221 Fax: (614)-334-4919 Office Timing: 8:30-18:00 EST info@fabglassandmirror.com
ELEGANCE SHOWER DOOR/ENCLOSURE INSTALLATION INSTRUCTIONS. Style A Style B Style C Style D
 ELEGANCE SHOWER DOOR/ENCLOSURE INSTALLATION INSTRUCTIONS IMPORTANT DreamLine reserves the right to alter, modify or redesign products at any time without prior notice. For the latest up-to-date technical
INSTALLATION INSTRUCTIONS
 INSTALLATION INSTRUCTIONS SOLID PHENOLIC TOILET PARTITIONS 1080 DuraLineSeries Class-A Fire Rated Includes Institutional Hardware Option.67 IMPORTANT: Storage and Handling Information on last page. Review
TREX TRANSCEND RAILING
 RAILING NOTES:» RAILINGS ARE DESIGNED TO BE INSTALLED OVER THE DECKING FRAME OR ON INSIDE OF RIM JOIST. NOTCHING OF PRESSURE-TREATED POSTS OR POSTS INSTALLED ON OUTSIDE OF RIM JOIST IS NOT ALLOWED.» All
INSTRUCTION SHEET U19
 U19 All Refrigerator and All Freezer Trim Kit Installation Product Line: U19 All Refrigerator and All Freezer Models Parts Included in Kit TRIMKITEZ1 (Part# 297333500): Single Trim Kit Components Single
Stage 2: Preparing the door (read in conjunction with Hole Drilling Options on back of Template).
.") There are three stages to fitting the CL100 mortise case: Stage 1: Marking out the position of the lock. Stage 2: Preparing the door by mortising and drilling holes. Stage 3: Fitting lock, door furniture,
There are three stages to fitting the CL100 mortise case: Stage 1: Marking out the position of the lock. Stage 2: Preparing the door by mortising and drilling holes. Stage 3: Fitting lock, door furniture,
Fig. 2 DORMA-Glas Stand/Issue 02/03 Seite/Page 1/7
 FSW Installation instructions Track rail 75 x 72 mm 1. Ceiling substructure and installation of the track rail (Fig. 1): The track rail must be bolted over its entire length (including the stacking track
Installation Instructions. Oakmont Folding Doors
 Before You Start For quick and easy installation of your Oakmont folding door, read these instructions thoroughly. A few minutes of prior planning will make the job easier and ensure years of trouble-free
x2 1/4 (6mm) Floor Anchor
 Floor Anchor") INSTALLATION GUIDE Main Components x1 Rail x5 Wall Spacer x2 Anti-jump Block x2 Straight Strap x1 Right Stopper x1 Left Stopper x5 5/16 (8mm x 60mm) Carriage Bolt x5 5/16 (8mm x25mm) Anchor x5 5/16 (8mm
INSTALLATION GUIDE Main Components x1 Rail x5 Wall Spacer x2 Anti-jump Block x2 Straight Strap x1 Right Stopper x1 Left Stopper x5 5/16 (8mm x 60mm) Carriage Bolt x5 5/16 (8mm x25mm) Anchor x5 5/16 (8mm
Pathways Privacy Wall Glass Selections - Sliding Door
 Pathways Privacy Wall Glass Selections - Sliding Door #2 ACR BIT 3/16" HEX BIT RAYBO ETCHED GLASS STYLES: Satin Mist PATTERN GLASS STYLES: Waterfall Bamboo Harp Mirage If you have a problem, question,
6MM ALLEN KEY FOR ROOF CLIPS PHILLIPS HEAD BIT FOR SCREWS FOR DOOR FRAME SPIRIT/LASER LEVEL TO LEVEL THE UNIT
 1 TOOLS REQUIRED: MOVING CART/DOLLY FOR TRANSPORTING PANELS, ROOF, AND POSTS TWO 9 FT. STEP LADDERS FOR INSTALLING ROOF & PANELS MINI REVERSIBLE RATCHET 1/4 DRIVE FOR CORNER SCREWS ON TOP TRAVERSE BEAMS
INSTALLATION INSTRUCTIONS FRAMELESS CONTINUOUS HINGE SHOWER ENCLOSURE QCI5233
 INSTALLATION INSTRUCTIONS FRAMELESS CONTINUOUS HINGE SHOWER ENCLOSURE QCI5233 QCI5233 Rev 0 Page 1 Certified 06/20/2016 INSTALLATION NOTES: Unpack your unit carefully and inspect for freight damage. Lay
Installation Manual MODEL ANE-42
 Installation Manual MODEL ANE-42 GET TO KNOW YOUR UNIT 1 2 1. CROSS BRACES 2. SIDE BRACKETS - Stud Finder - 12-14 Level - Tape Measure - Small Flathead Screwdriver Tools Needed: - Electric Drill (with
Colonial Classic Bar
 88 5528 991 Colonial Classic Bar IMPORTANT NOTE Carefully remove all the parts from the carton and put them individually on a soft cloth to prevent scratches or other damages occuring to the wood parts.
Mach Wall Installation Instructions
 Mach Wall Installation Instructions Planning the Job Since Mach Wall is an innovative product that accomplishes 3 tasks at the same time (frame, insulate and drywall) and it replaces traditional framing,
SHOWER ENCLOSURES INSTALLATION INSTRUCTIONS SHOWER ENCLOSURES:
 D SHOWER ENCLOSURES INSTALLATION INSTRUCTIONS SHOWER ENCLOSURES: LBSDD4879-C+LBSED3679-CB LBSDD4879-B+LBSED3679-CB LBSDD6079-C+LBSED3679-CB LBSDD6079-B+LBSED3679-CB LBSDD7279-C+LBSED3679-CB LBSDD7279-B+LBSED3679-CB
FOLDING HARDWARE STARTEC T-SNAP G2/G4
 FOLDING HARDWARE STARTEC T-SNAP G2/G4 T-SNAP G2 T-SNAP G4 Technical data: 40 kg for package throughout Height according 36+7 mm Fix bracket every 400 mm T-SNAP G2: 1x door leaf package T-SNAP G4: 2x door
Parts List. U-DS92ST Ashley Creative Center With Padded Stool Assembly Instructions. [15] - Plastic Thick Washer (2 - pieces) [22] - Wrench (1 piece)
![Parts List. U-DS92ST Ashley Creative Center With Padded Stool Assembly Instructions. [15] - Plastic Thick Washer (2 - pieces) [22] - Wrench (1 piece)](/thumbs/82/86598067.jpg "Parts List. U-DS92ST Ashley Creative Center With Padded Stool Assembly Instructions. [15] - Plastic Thick Washer (2 - pieces) [22] - Wrench (1 piece)") [1] - 23.5 x 35.5 Top [8] - Drawer Support Rods Parts List [15] - Plastic Thick Washer (2 - pieces) [22] - Wrench [2] - Upper Base left End (1 pieces) [9] - Media Supports (1 pieces) [16] - loor Guides
[1] - 23.5 x 35.5 Top [8] - Drawer Support Rods Parts List [15] - Plastic Thick Washer (2 - pieces) [22] - Wrench [2] - Upper Base left End (1 pieces) [9] - Media Supports (1 pieces) [16] - loor Guides
INSTALLATION INSTRUCTIONS. UNIT No. 160/760 THIN-LINE SHOWER ENCLOSURE
 INSTALLATION INSTRUCTIONS UNIT No. 160/760 THIN-LINE SHOWER ENCLOSURE QCI0011 Rev. 0 Page 1of 10 Certified 10/18/2006 MAINTENANCE: Two primary materials are used to manufacture your new Basco enclosure;
Canterbury 4 DRW CHEST
 Canterbury 4 DRW CHEST Assembly Instructions - Please save for future reference 553/4801 565/2178 572/6080 25 kg 55 lbs 9 kg 20 lbs max. Dimensions Width - 84.3cm Depth - 41.9cm Height - 99.7cm Important
INSTALLATION INSTRUCTIONS FRAMELESS CONTINUOUS HINGE SHOWER ENCLOSURE QCI5232
 INSTALLATION INSTRUCTIONS FRAMELESS CONTINUOUS HINGE SHOWER ENCLOSURE QCI5232 QCI5232 Rev 0 Page 1 Certified 06/20/2016 INSTALLATION NOTES: Unpack your unit carefully and inspect for freight damage. Lay
INSTALLATION INSTRUCTIONS FOR HAND OPERATED SILENT STEEL ADC HEAVY DUTY CURTAIN TRACK MODELS: 280, 281, 282, 280-A, 283-N, 283-R
 INSTALLATION INSTRUCTIONS FOR HAND OPERATED SILENT STEEL ADC HEAVY DUTY CURTAIN TRACK MODELS: 280, 281, 282, 280-A, 283-N, 283-R I. SUSPENDED INSTALLATIONS 1. Lay the two track halves on the floor with
Assembly InstructIons
 tp50 FLAT PANEL TV MOUNTING SYSTEM OPTION OPTION 2 OPTION 3 Flat Panel TV Stand Stand with TV Mounting System Stand with Wall Mount Assembly InstructIons for your safety, please follow these precautions:!
Tech Sheet. T4 Interior conversion kit how to - fitting instructions. 1. Rear seat belts. 2.
 Page 1 of 8 T4 Interior conversion kit how to - fitting instructions Thank you for purchasing our T4 interior conversion kit. This kit will enable you to convert any SWB left hand loading door T4 into
Unit No. 135, 735 Deluxe Pivot Inline Door & Panel Shower Enclosure
 INSTALLATION INSTRUCTIONS Unit No. 135, 735 Deluxe Pivot Inline Door & Panel Shower Enclosure NEED INSTALLATION HELP? Call 1-800-45-BASCO (452-2726) Monday - Friday 8:00 A.M. - 4:30 P.M. Eastern Time QCI0004
Barn Door & Hardware Installation Guide
 Barn Door & Hardware Guide INTRODUCTION Thank you for purchasing our hardware. Our barn door and hardware will add a stunning accent to your living environment and maximize its space. This manual covers
NISSAN NV200 CHEVY CITY EXPRESS WALL LINER KIT INSTALLATION INSTRUCTIONS
 NISSAN NV200 CHEVY CITY EXPRESS WALL LINER KIT INSTALLATION INSTRUCTIONS NOTES: 1. Before commencing, remove all wall liners and D Rings already installed in the vehicle. 2. Consult layout PDF and compare
TOOL LIST FOR TAILGATE HIDDEN LATCH & LINK ASSY FOR FORD FLARESIDE TRUCKS
 TOOL LIST FOR TAILGATE HIDDEN LATCH & LINK ASSY FOR 53-87 FORD FLARESIDE TRUCKS Vise Grip Clamps C-clamps Sharpie Marker Ball Peen Hammer Center Punch 3/8 or 1/2 Drill 5/32, 7/32, 9/32, and 3/8 Drill Bits
PRODUCT: LOKI INSTALLATION INSTRUCTIONS. Product is covered by U.S. patents. For more information visit
 R INSTALLATION INSTRUCTIONS PRODUCT: LOKI CONFIGURATION: SINGLE DOOR MOUNT: GLASS MOUNT Product is covered by U.S. patents. For more information visit www.krownlab.com . TOOLS + MATERIALS REQUIRED TOOLS
Quick Fit Installation Guide Retractable Screen - Double Door
 Quick Fit Installation Guide Retractable Screen - Double Door 1 REMOVE KIT PARTS FROM SHIPPING TUBE 2 Slide bolts 2 Rail receiver Clips 15 Mounting screws 1 Housing end cap screw 2 Handles 1 Housing end
INSTALLATION AND CARE INSTRUCTIONS
 INSTALLATION AND CARE INSTRUCTIONS Vertical Applications Honeycomb Shades CONTENTS Introduction...2 Before You Begin...3 Vertical Application Parts Overview...4 Materials Required...5 Tools Required...6
STEP 1 : DESTROYER FRONT BUMPER INSTALL GATHER YOUR TOOLS AND LAY OUT YOUR PARTS... *shorty bumper to show hardware* Tools Required:
 DESTROYER FRONT BUMPER INSTALL JL STEP 1 : GATHER YOUR TOOLS AND LAY OUT YOUR PARTS... Tools Required: - Utility knife - 11/16 Deep socket - Ratchet - 11/16 Crescent wrench - Ratchet Extension - 1/4 socket
FRAMED SLIDING DOOR FOR TUB OR SHOWER ENCLOSURE 6150A-7150A
 FRAMED SLIDING DOOR FOR TUB OR SHOWER ENCLOSURE 6150A-7150A F AB GLASS AND MIRROR www.fabglassandmirror.com Call: +1 888-474-2221 Fax: (614)-334-4919 Office Timing: 8:30-18:00 EST info@fabglassandmirror.com