IMPORTANT - GLASS IS FRAGILE AND CAN SHATTER.
|
|
|
- Alexis McDowell
- 6 years ago
- Views:
Transcription
1
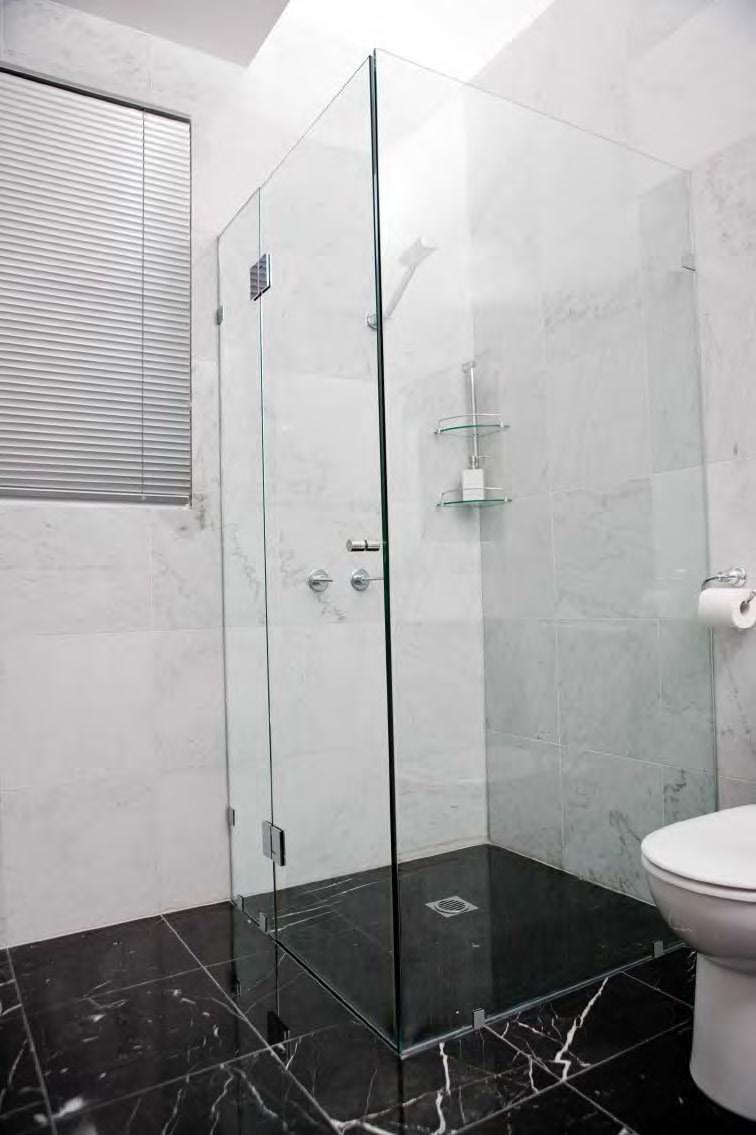
2 STEP BY STEP SHOWER SCREEN INSTALLATION GUIDE IMPORTANT - GLASS IS FRAGILE AND CAN SHATTER. 2 PEOPLE ARE IMPORTANT REQUIRED - GLASS FOR GLASS IS FRAGILE PANEL AND INSTALLATION CAN SHATTER. TO AVOID GLASS DAMAGE 2 PEOPLE AND ARE SERIOUS REQUIRED INJURY. FOR GLASS PANEL INSTALLATION TO AVOID GLASS DAMAGE AND SERIOUS INJURY. Ensure you read all instruc ons completely before commencing. Ensure you read all instructions completely before commencing. 2
3 FIXED PANEL (A) 1175 x 2000mm or 875 x 2000mm or 600 x 2000mm HINGE PANEL (B) 254 x 2000mm DOOR PANEL (C) 600 x 1995mm (to allow for door swing) BEFORE COMMENCING INSTALLATION, ENSURE YOU HAVE THE FOLLOWING COMPONENTS: D) 8 x Hinge Caps E) 2 x Allen Keys F) 2 x Glass to Glass Hinges G) H) 1 x Door Handle I) 4 x Clear Rubber Blocks J) 8 x Clear Gaskets K) 8 x 25mm Green Masonry/Ceramic Plugs L) 8 x 25mm Phillips Head Screws D x 8 E x 2 F x 2 G x 8 H x 1 I x 4 J x 8 K x 8 L x 8 3
4 YOU WILL ALSO NEED THE FOLLOWING TOOLS: A) B) Drill C) 6mm ceramic drill bit D) E) Spirit level F) Phillips head screw driver G) A suitable bathroom silicone with mould inhibitor H) I), safety glasses of gloves and silicone spatula) A) B) C) D) E) F) G) H) I) 4
5 STEP 1 On the base of the shower mark two HORIZONTAL centre lines (A) that will guide the installation and placement of your panels For a 1175mm fixed panel, this will be = 1175 mm For a 875mm fixed panel, this will be = 875 mm For a 600mm fixed panel, this will be = 600 mm Position a spirit level on the centre lines next to BOTH fixed shower walls and make a VERTICAL mark at 2000mm (B). This will be the top of your shower screen. NOTE: A spirit level must be used to ensure vertical straightness. 5
6 STEP 2 To mark the position of the two WALL mounted brackets for both Panel A and Panel B, make a mark at 200mm and 1800mm from the floor on each of your VERTICAL marks (B) from Step 1 as indicated by the triangles ( ). To mark the position of the two FLOOR mounted brackets for Panel A, make a mark, on your HORIZONTAL marks (A) from Step 1, 50mm from the desired wall AND 100mm from the end of where Panel A will finish when installed as indicated by the stars ( ). To mark the position of the two FLOOR mounted brackets for Panel B, make a mark, on your HORIZONTAL marks (A) from Step 1, 50mm and 200mm from the adjacent wall as indicated by the diamonds ( ). 1800mm 200mm 50mm 200mm 50mm 100mm STEP 3 Using a 6mm ceramic drill bit, drill the marked holes (eight holes) from Step 2 to a depth of approximately 30mm. Insert green plugs into each hole and ensure you cut off any excess protruding from the wall or floor. Fix each mounting bracket to the walls and floor, ensuring the grub screw side of each bracket faces the inside of the shower. Loosen the grub screws so the glass panels can slide inside the brackets. 6
7 STEP 4 Remove any marks you have made with your marker or pencil. Cut the supplied clear rubber blocks to approximately 5-6mm and place in front of each bracket to protect Panel A and Panel B edges from damage. STEP 5 IMPORTANT - GLASS IS FRAGILE AND CAN SHATTER. 2 PEOPLE ARE REQUIRED FOR GLASS PANEL INSTALLATION TO AVOID GLASS DAMAGE AND SERIOUS INJURY. Ensure you read all instructions completely before commencing. Ensuring you have Panel A up the correct way, carefully lower the panel into the FLOOR brackets of the desired side. Once inserted into the floor brackets, you can now slide Panel A into the WALL brackets. Once Panel A is level, HAND tighten using Allen Key provided. Insert into floor brackets FIRST Do not exceed a 12mm gap between Panel A and the wall Insert into wall brackets SECOND 7
8 STEP 6 IMPORTANT - GLASS IS FRAGILE AND CAN SHATTER. 2 PEOPLE ARE REQUIRED FOR GLASS PANEL INSTALLATION TO AVOID GLASS DAMAGE AND SERIOUS INJURY. Ensure you read all instructions completely before commencing. Ensuring you have Panel B up the correct way, carefully lower the panel into the FLOOR brackets of the desired side. Once inserted into the floor brackets, you can now slide Panel B into the WALL brackets. Insert into floor brackets FIRST Insert into wall brackets SECOND 8
9 Ensure Panel B is level. If not, adjust the size of the clear rubber blocks. Do not exceed a 12mm gap between Panel B and the wall. Do not exceed a 12mm gap between Panel B and the wall. Before tightening all grub screws for Panel B, ensure the door opening is 606mm from the end of Panel A. Once Panel B is level and 606mm from the end of Panel A, HAND tighten all bracket grub screws very tightly. You cannot overtighten these, so do not worry about breaking the glass. PANEL B PANEL A 606mm 9
10 STEP 7 Using a suitable bathroom silicone with mould inhibitor, fill the gap between Panels A and B and the wall. Spray water over the sealed area before using a Highgrove silicone spatula to scrape off the excess. Repeat this action until the excess silicone is cleared. Repeat the step on both sides of the glass and allow the silicone to cure before hanging the door as per silicone instructions. STEP 8 Attach the hinges to the recesses in Panel B ensuring the Allen head screws are facing the inside of the shower. STEP 9 Place two rubber blocks in the door opening to prevent damage and allow for proper door clearance. IMPORTANT - GLASS IS FRAGILE AND CAN SHATTER. 2 PEOPLE ARE REQUIRED FOR GLASS PANEL INSTALLATION TO AVOID GLASS DAMAGE AND SERIOUS INJURY. Ensure you read all instructions completely before commencing. SLOWLY lift Panel C into position on the rubber blocks, ensuring the door is facing the right way up. Fix the Panel B hinges to Panel C, ensuring gaskets are fitted to EACH side of the glass when installing hinges. Before tightening hinge screws, ensure there are even gaps between Panel B and Panel C, and Panel C and the edge of Panel A. 10
11 Ensure tops of panels are aligned Ensure even spacing - 3mm STEP 10 Tighten the hinges and carefully remove the rubber blocks. and Panel A for support. 11
12 IMPORTANT NOTICE (Highgrove Glass Solutions Frameless Shower Screen) IMPORTANT: The glass panels used for Highgrove Glass solutions frameless shower screen are made from NATA tested Toughened Safety Glass. Although it is very tough, it can still be damaged if not handled correctly. Please read all instructions, prior to installation. 1) DO NOT rest or place the glass panels on hard surfaces like tiles, concrete, other glass panels & metal surfaces. 2) DO NOT attempt to cut, drill or grind the glass panel. Toughened Safety Glass is not like ordinary glass. Any such actions would cause the entire panel to shatter into thousands of tiny pieces. **(This is not because of inferior quality but it is part of the design criteria specified by Australian Standard AS2208 to avoid large shards of glass in case of accidental breakage) 3) DO NOT use abrasive cleaners or powders to clean the glass panels. 4) DO NOT use any acidic or caustic Silicone or chemicals on any part of the shower screen assembly. 5) DO NOT impact or scratch the glass panels with any sharp metallic objects or tools. 6) DO NOT knock one glass panel against another piece of glass panel. Take special care to avoid any impact during the installation. 7) DO NOT install the glass panels with just one person. The glass panels are heavy and you should have another person assist you to avoid injury. 8) DO NOT rest the edge of the panel directly on any hard surfaces during installation. Always cushion the edges with cardboard, soft timber or rubber mat. If you are unclear about any part of the instruction, please contact Highgrove Glass Solutions Phone: Web:
Shower Screen and Door Kit Instructions
 Shower Screen and Door Kit Instructions Step by step guide everton.com.au IMPORTANT NOTICE IMPORTANT: The glass panels used for Highrove frameless shower screens are made from Grade A Toughened Safety
Gallium 03 Installation Instructions & Parts List
 Gallium 03 Installation Instructions & Parts List Illustration Gallium 03, H1 Handle Left Hand: Open Out 04/05/2016 Revision 1.1 Page 1 of 19 IMPORTANT This shower screen / enclosure must be installed
Xenon 05 Installation Instructions & Parts List
 Xenon 05 Installation Instructions & Parts List Illustration Xenon 05, H1 Handle Left Hand: Open Out 26/05/2016 Revision 2.1 Page 1 of 19 IMPORTANT This shower screen / enclosure must be installed by suitably
INFINITE RANGE - HINGE DOOR
 INFINITE RANGE - HINGE DOOR HINGE DOOR + 1 SIDE RETURN PANEL (CORNER) Please read these instructions before installing, as incorrect fitting will invalidate the guarantee-carry out each stage before moving
Installation Site Preparation - Site Preparation
 S c u l p t u r e s Bespoke Single Door / Bespoke Frameless Hinged Door + Inline Panel Instruction Manual Truelife Consumer Guarantee Please make sure the purchaser/end user completes and returns the Guarantee
Centre-fold Door. Installation Instructions. Please note: Images shown are for illustration purposes only
 Centre-fold Door Installation Instructions Please note: Images shown are for illustration purposes only Please read these instructions in full before installing. The enclosure can be installed to give
Dubnium 11 Installation Instructions & Parts List
 Dubnium 11 Installation Instructions & Parts List Illustration Dubnium, H1 Handle Right Hand: Open Out Page 1 of 25 IMPORTANT This shower screen / enclosure must be installed by suitably qualified individuals.
Curium 19.4H Installation Instructions & Parts List
 Curium 19.4H Installation Instructions & Parts List Illustration Curium 19.4H Right Hand Page 1 of 21 30/06/2016 Revision 1.0 IMPORTANT This shower screen / enclosure must be installed by suitably qualified
Radon 07 Installation Instructions & Parts List
 Radon 07 Installation Instructions & Parts List Illustration Radon 07, H1 Handle Right Hand: Open Out 14/06/2016 Revision 1.1 Page 1 of 21 IMPORTANT This shower screen / enclosure must be installed by
Curium 19H Installation Instructions & Parts List
 Curium 19H Installation Instructions & Parts List Illustration Curium 19H Right Hand Page 1 of 15 01/07/2016 Revision 2.1 IMPORTANT This shower screen / enclosure must be installed by suitably qualified
INFINITE RANGE - CENTRE FOLDING DOOR
 INFINITE RANGE - CENTRE FOLDING DOOR CENTRE FOLDING DOOR ONLY ( RECESS) Please read these instructions before installing, as incorrect fitting will invalidate the guarantee-carry out each stage before
Hinge Door + Inline Panel + Return Panel
 Hinge Door + Inline Panel + Return Panel Instruction Manual DXL2HDR + DXL2HR + DXR Important Information Toughened glass is completely safe for use in our shower enclosures and bath screens; providing
B A T H R O O M G L A S S
 mistley B A T H R O O M G L A S S vaug16 Page 2 Thank you for purchasing this Trinity shower screen. Please study these instructions carefully before assembly and installation and check all supplied parts
Hinge Door + Side Panel
 Hinge Door + Side Panel Instruction Manual KL+ KR Important Information Toughened glass is completely safe for use in our shower enclosures and bath screens; providing our products are installed according
FRAMELESS DOOR / PANEL WITH WALL MOUNT HINGES QCI5274
 FRAMELESS DOOR / PANEL WITH WALL MOUNT HINGES QCI5274 QCI0274 QCI5274 REV. Rev. 1 0 Page Page 1 1 Date Certified: Certified 06/16/2016 10/01/10 Parts List with wall mount hinges ITEM NO. Part # DESCRIPTION
Frameless Inline Door QCI5254
 INSTALLATION INSTRUCTIONS Frameless Inline Door QCI5254 FRAMELESS DOOR / PANEL QCI5254 REV. 0 Page 1 Cer fied 06/16/2016 Parts List with wall mount hinges *Quanes may vary QCI5254 REV. 0 Page 2 Cer fied
Hinge Door + One Inline Panel
 inge Door + One Inline Panel Instruction Manual KLD + KL Important Information Toughened glass is completely safe for use in our shower enclosures and bath screens; providing our products are installed
Wall Profiles 2 Pozi Screwdriver. Wall Profile Covers 4 Sealant. Large Panel and Thin Panel Assemblies Sealant Gun
 Decem Sliding Door (Corner Fitting) Instruction Manual DXT Important Information Toughened glass is completely safe for use in our shower enclosures and bath screens; providing our products are installed
Frameless Inline Door QCI5250
 INSTALLATION INSTRUCTIONS Frameless Inline Door QCI5250 FRAMELESS PANEL / DOOR / PANEL QCI0249 REV. 3 Page 1 Certified 10/12/12 Parts List with pivot hinges *Quantities may vary. QCI0249 REV. 3 Page 2
Argon 02 Installation Instructions & Parts List
 Argon 02 Installation Instructions & Parts List Illustration Argon, H1 Handle Right Hand: Open Out 16/06/2016 Revision 1.1 Page 1 of 10 IMPORTANT This shower screen / enclosure must be installed by suitably
Frameless Inline Door With Return QCI5263
 INSTALLATION INSTRUCTIONS Frameless Inline Door With Return QCI5263 WALL MOUNT HINGES FRAMELESS DOOR / PANEL / RETURN PANEL QCI5263 REV. 0 Page 1 Certified 06/17/2016 Parts List with wall mount hinges
Frameless Heavy Glass Door with Wall Mount Hinges
 INSTALLATION INSTRUCTIONS Frameless Heavy Glass Door with Wall Mount Hinges QCI-5245 QCI5245 REV. 0 Page 1 Certified 06/16/16 Frameless Door with Wall Mount Hinges ITEM NUMBER DESCRIPTION QUANTITY 1 DOOR
Double Frameless Swing Door QCI5247
 INSTALLATION INSTRUCTIONS Double Frameless Swing Door QCI5247 WALL MOUNT HINGES QCI5247 REV. 0 Page 1 Certified 06/16/2016 Parts List with wall mount hinges *Quantities may vary **Quantities double where
INFINITE RANGE - CENTRE FOLDING DOOR
 INFINITE RANGE - CENTRE FOLDING DOOR CENTRE FOLDING DOOR + 2 SIDE RETURN PANELS (PENINSULA) Please read these instructions before installing, as incorrect fitting will invalidate the guarantee-carry out
Frameless Door QCI5284
 Frameless Door QCI5284 F AB GLASS AND MIRROR www.fabglassandmirror.com Call: +1 888-474-2221 Fax: (614)-334-4919 Office Timing: 8:30-18:00 EST info@fabglassandmirror.com INSTALLATION INSTRUCTIONS Frameless
FIXED PANEL SLIDER QCI5241
 INSTALLATION INSTRUCTIONS FIXED PANEL SLIDER QCI5241 FRAMELESS PANEL / DOOR / PANEL FRAMELESS DOOR / PANEL QCI5241 REV. 0 Page 1 Certified 06/16/2016 Parts List *Quantities may vary QCI5241 REV. 0 Page
Platinum Swing Panel Installation Instructions
 Platinum Swing Panel Installation Instructions The Standard Platinum Swing Panel is designed to fit baths with a perimeter lip no taller than 20mm. If installing onto baths without a perimeter lip an optional
Frameless Heavy Glass Door with Header
 INSTALLATION INSTRUCTIONS Frameless Heavy Glass Door with Header QCI5243 QCI5243 REV. 0 Page 1 Certified 06/16/16 Frameless Heavy Glass Door with Pivot Hinges ITEM NUMBER DESCRIPTION QUANTITY 1 DOOR GLASS
Thank you for your order
 Installation Guide Thank you for your order Ph: 09-9133110 Fax: 09-9133113 5 Smales Road. East Tamaki, Manukau PO Box 58031 Greenmount, Manukau 2013 AUCKLAND // WELLINGTON // CHRISTCHURCH www.bathroomdirect.co.nz
ALLORA SWING PANEL INSTALLATION INSTRUCTIONS
 ALLORA SWING PANEL INSTALLATION INSTRUCTIONS Before Installation Please check that your Allora Swing Panel is undamaged SEQUENCE OF INSTALLATION These instructions are also available from the Athena website:
Frameless Inline Door QCI5248
 INSTALLATION INSTRUCTIONS Frameless Inline Door QCI5248 FRAMELESS PANEL / DOOR / PANEL QCI5248 REV. 0 Page 1 Certified 06/16/2016 Parts List with glass to glass hinges *Quantities may vary. **Support Bar
Half framed 2-Panel Bath Screen
 IN00573 (Iss 2) Half framed 2-Panel Bath Screen Instruction suitable for both Right and Left Hand Fixing. Before You Start Check that the bath has been installed correctly and that it is level. Please
ProLine PL60 HEAVY FRAMELESS BYPASS BATH ENCLOSURE
 INSTALLATION INSTRUCTIONS ProLine PL60 HEAVY FRAMELESS BYPASS BATH ENCLOSURE Copyright Alumax Bath Enclosures 2013. All rights reserved. G03980847 5-1-13 !WARNINGS! INSTALLATION WARNINGS a) Alumax Bath
IMPORTANT: If installing a Glide Bifold Door only; ie. a recess installation, please refer to alternative fixing details on the document reverse.
 IN00422 (rev A) Aqua 6 / Aqua 8 Glide Bifold Door & Side Panel Instruction suitable for both Right and Left Hand fixing variations. IMPORTANT: If installing a Glide Bifold Door only; ie. a recess installation,
Frameless Hinged Door Enclosure. These instructions must be left with the user. Installation Guide W2-B
 Frameless Hinged Door Enclosure These instructions must be left with the user Installation Guide 1 1290643-W2-B 1290643-W2-B 2 Introduction Thank you for purchasing a quality product. To enjoy the full
Frameless Fixed Panel Slider
 INSTALLATION INSTRUCTIONS Frameless Fixed Panel Slider QCI-5279 SINGLE ROLLER WITH ANTI-JUMP DOUBLE ROLLERS QCI5279 Rev Page Certified 08/09/6 Tools: To install your New Shower Enclosure, you may need
SHOWER DOOR INSTALLATION & CARE GUIDE
 SHOWER DOOR INSTALLATION & CARE GUIDE For models: SD-AZ-0 Please Note: This is a two person job. The glass doors are extremely heavy and it is highly recommended to use professional installers. For any
Portofino Installation Guide
 vjul16 (for 17 or 24 mm Surface Wall Profiles) DO NOT ASSEMBLE WITHOUT FULLY READING THESE INSTRUCTIONS Page 2 Thank you for purchasing this Portofino shower enclosure. Please study these instructions
Installation Instructions
 Installation Instructions Curved Glass Screen Installation Instructions Important Information Please read these instructions carefully before starting installation and keep for future reference. Remove
A-935 RODA WALL MOUNT HINGES
 INSTALLATION INSTRUCTIONS A-935 RODA WALL MOUNT HINGES NEED INSTALLATION HELP? Call 1-800-45-BASCO (452-2726) Monday - Friday 8:00 A.M. - 4:30 P.M. Eastern Time FRAMELESS DOOR / PANEL CELESTA QCI0274 REV.
Portofino Case2 Installation Guide
 Portofino Case2 Installation Guide vjun16 (for 17 or 24 mm Surface Wall Profile) DO NOT ASSEMBLE WITHOUT FULLY READING THESE INSTRUCTIONS Page 2 Thank you for purchasing this Portofino Case 2 shower enclosure.
Deauville Installation Guide
 vjul16 (for 17 or 24 mm Surface Wall Profiles) DO NOT ASSEMBLE WITHOUT FULLY READING THESE INSTRUCTIONS Page 2 Thank you for purchasing this Deauville shower enclosure. Please study these instructions
Frameless Fixed Panel Slider QCI5279
 Frameless Fixed Panel Slider QCI5279 F AB GLASS AND MIRROR www.fabglassandmirror.com Call: +1 888-474-2221 Fax: (614)-334-4919 Office Timing: 8:30-18:00 EST info@fabglassandmirror.com Frameless Fixed Panel
mistley PELE Installation Guide vapr16 Mistley Bathroom Glass Limited No 4 One Mistley Quayside, High Street, Mistley, Essex CO11 1AL England
 mistley BAT HRO O M G LASS vapr16 Page 2 Thank you for purchasing this Pele shower screen. Please study these instructions carefully before assembly and installation and check all supplied parts immediately
ENIGMA AIR ENCLOSURE
 ENIGMA AIR ENCLOSURE SHOWER ENCLOSURE INSTALLATION INSTRUCTION IMPORTANT DreamLine reserves the right to alter, modify or redesign products at any time without prior notice. For the latest up-to-date technical
Allora ALCOVE ENCLOSURE INSTALLATION BEFORE INSTALLATION CHECK THAT YOUR ALLORA SHOWER ENCLOSURE SYSTEM IS UNDAMAGED
 Allora ALCOVE ENCLOSURE INSTALLATION BEFORE INSTALLATION CHECK THAT YOUR ALLORA SHOWER ENCLOSURE SYSTEM IS UNDAMAGED ALCOVE SHOWER Your shower can be installed to open Left hand or Right hand by rotating
Maintenance and other important non-personal injury and non-material damage instructions or statements that should be observed.
 VIGO INDUSTRIES INSTALLATION GUIDE FOR SHOWER ENCLOSURE ()! SAFETY PRECAUTIONS This Installation Guide uses the following symbols to indicate important information. Always observe the instructions indicated
Frameless Inline Door With Return QCI5128
 INSTALLATION INSTRUCTIONS Frameless Inline Door With Return QCI5128 WALL MOUNT HINGES FRAMELESS DOOR QCI5128 REV. 0 Page 1 Certified 06/20/2016 3 panel - Parts List KEY DESCRIPTION PART NUMBER QTY KEY
Monaco Installation Guide - Surface Profiles
 v1 Page 1 Thank you for purchasing this Monaco shower screen. Please study these instructions carefully before assembly and installation and check all supplied parts immediately upon receipt. These instructions
Installation Manual Using StairFurb Handraail Version 5.1 OCT 2017
 Installation Manual Using StairFurb Handraail Version 5.1 OCT 2017 ORDER OF ASSEMBLY TOOLS YOU WILL NEED - Fine Saw - Sander - Wood Filler - Allen keys - Screw Driver - Drill - Suitable Screws PROTECTING
SHOWER DOORS INSTALLATION INSTRUCTIONS SHOWER DOORS: LBSDD Version 4.0
 D SHOWER DOORS INSTALLATION INSTRUCTIONS SHOWER DOORS: LBSDD7279 Version 4.0 PREPARATION FOR INSTALLATION SHOWER DOORS PREPARATION FOR INSTALLATION READ ALL INSTRUCTIONS BEFORE UNPACKING THE PRODUCT 2
ESSENCE - H SHOWER / TUB DOOR INSTALLATION INSTRUCTIONS
 ESSENCE - H SHOWER / TUB DOOR INSTALLATION INSTRUCTIONS IMPORTANT DreamLine reserves the right to alter, modify or redesign products at any time without prior notice. For the latest up-to-date technical
Assembly Instructions Pivot Door
 ssembly Instructions Product Reference (Barcode) : 79823 ( 01062762) 83324 ( 01062779) 48826 ( 01062786) 38683 ( 01062793) Watersmith UK Ltd.,B22 8RT. ssembly Instructions Parts Supplied Ref Description
Cardo DOOR & RETURN SHOWER ENCLOSURE INSTALLATION PLEASE READ THESE INSTRUCTIONS CAREFULLY.
 Cardo DOOR & RETURN SHOWER ENCLOSURE INSTALLATION PLEASE READ THESE INSTRUCTIONS CAREFULLY. IT IS RECOMMENDED TO USE A TRAINED SHOWER INSTALLER FOR THIS SHOWER TO OBTAIN THE BEST INSTALLATION. D Square
Modular Shower Panel. IN00580 (Iss 1)
") IN00580 (Iss 1) Modular Shower Panel Instruction suitable for both Right and Left Hand fixing variations. Instruction suitable for both Tray and Wetfloor fixing variations. Before You Start - Tray Fix
IN00580 (Iss 1) Modular Shower Panel Instruction suitable for both Right and Left Hand fixing variations. Instruction suitable for both Tray and Wetfloor fixing variations. Before You Start - Tray Fix
Deauville Installation Guide
 vjul16 (for Recessed Wall Profiles) DO NOT ASSEMBLE WITHOUT FULLY READING THESE INSTRUCTIONS Page 2 Thank you for purchasing this Deauville shower enclosure. Please study these instructions carefully before
SLIDING DOOR for CORNER installation ONLY - this door closes to side panel -
 by KUDOS INSTALLATION INSTRUCTIONS SLIDING DOOR for CORNER installation ONLY - this door closes to side panel - Please read these instructions throughout before installing as incorrect fitting will invalidate
ESSENCE. Shower / Tub Door Installaion Instructions
 ESSENCE Shower / Tub Door Installaion Instructions IMPORTANT DreamLine reserves the right to alter, modify or redesign products at any time without prior notice. For the latest up-to-date technical drawings,
VITREO X SHOWER / TUB DOOR INSTALLATION INSTRUCTIONS
 VITREO X SHOWER / TUB DOOR INSTALLATION INSTRUCTIONS IMPORTANT DreamLine reserves the right to alter, modify or redesign products at any time without prior notice. For the latest up-to-date technical drawings,
PREMIER PENTAGON SHOWER ENCLOSURE
 PREMIER PENTAGON SHOWER ENCLOSURE 71677 00 / Issue 1 / 13 SAFETY Please read these instructions carefully and keep for future reference. Incorrect fitting will invalidate the guarantee. Handle glass with
ProLine PL80 HEAVY FRAMELESS BYPASS BATH ENCLOSURE
 INSTALLATION INSTRUCTIONS ProLine PL80 HEAVY FRAMELESS BYPASS BATH ENCLOSURE Copyright Alumax Bath Enclosures 2013. All rights reserved. G03980849 5-1-13 Three-Year Limited Residential Warranty Alumax
PRISM LUX / PYRAMID SHOWER ENCLOSURE INSTALLATION INSTRUCTIONS
 PRISM LUX / PYRAMID SHOWER ENCLOSURE INSTALLATION INSTRUCTIONS IMPORTANT DreamLine reserves the right to alter, modify or redesign products at any time without prior notice. For the latest up-to-date technical
FIXED SHOWER SCREEN For Wall Mount Hinges QCI5283
 FIXED SHOWER SCREEN For Wall Mount Hinges QCI5283 QCI5283 Page 1 Date Certified: 06/16/2016 Parts List with wall mount clamp ITEM NO. DESCRIPTION QTY. 1 FIXED GLASS PANEL 1 2 WALL MOUNT CLAMP 1 3 U-CHANNEL
tile redi redi DOOR Redi Swing SERIES: CONFIGURATION: MOUNTING PACKAGE:
 redi DOOR INSTALLATION INSTRUCTIONS tile redi Redi Swing g TM TM...Opening Doors to Stunning Showers! TM TM SERIES: CONFIGURATION: MOUNTING PACKAGE: 2900V Door-Panel No header, offset pivot hinges, u-channel
NEPAL Installation procedure
 PART DESCRIPTION 1.- Door handle (1pc) 2.- Long tight bar (1pc) 3.- Short tight bar (1pc) 4.- Support block-lower (2pcs) 5.- Wall jamb cap (2pcs) 6.- Tight bar support (2 pcs) 7.- Acrilic base (1pc) 8.-
1/4 FRAMELESS DOOR WITH INLINE PANEL 1413A-1713A-1813A
 1/4 FRAMELESS DOOR WITH INLINE PANEL 1413A-1713A-1813A F AB GLASS AND MIRROR www.fabglassandmirror.com Call: +1 888-474-2221 Fax: (614)-334-4919 Office Timing: 8:30-18:00 EST info@fabglassandmirror.com
1/4 FRAMELESS CONTINUOUS HINGE SHOWER ENCLOSURE 1400A-1700A-1800A
 1/4 FRAMELESS CONTINUOUS HINGE SHOWER ENCLOSURE 1400A-1700A-1800A F AB GLASS AND MIRROR www.fabglassandmirror.com Call: +1 888-474-2221 Fax: (614)-334-4919 Office Timing: 8:30-18:00 EST info@fabglassandmirror.com
UNIDOOR LUX (STYLE E)
") UNIDOOR LUX (STYLE E) SHOWER DOOR & GLASS PANEL INSTALLATION INSTRUCTIONS IMPORTANT DreamLine reserves the right to alter, modify or redesign products at any time without prior notice. For the latest up-to-date
UNIDOOR LUX (STYLE E) SHOWER DOOR & GLASS PANEL INSTALLATION INSTRUCTIONS IMPORTANT DreamLine reserves the right to alter, modify or redesign products at any time without prior notice. For the latest up-to-date
K-KR4Z - Kona INSTRUCTION MANUAL KK002
 K-KR4Z - Kona INSTRUCTION MANUAL 07.10 KK002 Please keep this manual and product code number for future reference and replacement parts ordering if necessary. CURVED GLASS SLIDING SHOWER DOOR CURVED GLASS
INSTALLATION INSTRUCTIONS DANUBE ACRYLIC NEO ANGLE
 INSTALLATION INSTRUCTIONS DANUBE ACRYLIC NEO ANGLE March 2013 DOOR 2 Page 1 of 5 INSTALLATION INSTRUCTIONS NEO ANGLE 6MM FRAMELESS AND 4MM FRAMED SHOWER DOOR DANUBE, DELTA, SIGNATURE, OCEANIA, CASCADE
GRAMERCY POWDER WASHSTAND ASSEMBLY INSTRUCTIONS. 1. Storage. 1. Keep marble top in its crate until installation.
 1. Storage 1. Keep marble top in its crate until installation. 2. Store crate vertically in a place safe from being hit or knocked over. 3. Do not stack anything on top of the crate. 2. Opening crate 1.
tile redi redi DOOR Redi Redi Swing Slide g TM TM...Opening Doors to Stunning Showers! TM TM SERIES: CONFIGURATION: MOUNTING PACKAGE:
 redi DOOR INSTALLATION INSTRUCTIONS tile redi Redi Redi Swing Slide g TM TM...Opening Doors to Stunning Showers! TM TM SERIES: CONFIGURATION: MOUNTING PACKAGE: 3000 Door-Door Header, sliding doors RDQCI5301
Slider Door Installation Instructions
 Slider Door Installation Instructions IMPORTANT: If installing a Slider Door and Side Panel only; ie. a corner installation, please refer to alternative fixing details on the document reverse. 2 YEAR GUARANTEE
OSBORNE SHOWER DOOR INSTALLATION
 SKU(s): 939719, 939720, 939721 OSBORNE SHOWER DOOR INSTALLATION BEFORE YOU BEGIN We recommend consulting a professional if you are unfamiliar with installing this type of product. Signature Hardware accepts
Installation Instructions
 Installation Instructions Bespoke Glass Design In A Box Typical Installation Guidance Installation Instructions Important Information Please read these instructions carefully before starting installation
950 RODA WALL MOUNT HINGES PRECERIA INSTALLATION INSTRUCTIONS. NEED INSTALLATION HELP? Call BASCO ( ) FRAMELESS DOOR
 FRAMELESS DOOR") INSTALLATION INSTRUCTIONS 950 RODA WALL MOUNT HINGES NEED INSTALLATION HELP? Call 1-800-45-BASCO (452-2726) Monday - Friday 8:00 A.M. - 4:30 P.M. Eastern Time FRAMELESS DOOR PRECERIA QCI0128 REV. 0 Page
INSTALLATION INSTRUCTIONS 950 RODA WALL MOUNT HINGES NEED INSTALLATION HELP? Call 1-800-45-BASCO (452-2726) Monday - Friday 8:00 A.M. - 4:30 P.M. Eastern Time FRAMELESS DOOR PRECERIA QCI0128 REV. 0 Page
Frameless Inline Door QCI5288
 Frameless Inline Door QCI5288 QCI5288 Rev. 0 Page 1 Date Certified: 06/21/2016 Tools: To install your New Shower Enclosure, you may need the following: Pencil Drill Hack Saw Low Tack Tape 1/8 & 3/16 Drill
SHELTON THERMOSTATIC SHOWER PANEL
 SKU(s): 413241 BEFORE YOU BEGIN We recommend consulting a professional if you are unfamiliar with installing plumbing fixtures. Signature Hardware accepts no liability for any damage to the plumbing, floor,
QUATRA LUX SHOWER ENCLOSURE INSTALLATION INSTRUCTIONS
 QUATRA LUX SHOWER ENCLOSURE INSTALLATION INSTRUCTIONS IMPORTANT DreamLine reserves the right to alter, modify or redesign products at any time without prior notice. For the latest up-to-date technical
TD10A INSTALLATION GUIDE TUB DOOR
 Thank you for choosing Valley Acrylic Products. This installation manual provides general information on the installation of our products. BEFORE YOU BEGIN Prior to installation, examine all boxes and
Installation Instructions
 Installation Instructions Walk-in Shower Screen with 180 o Return Panel (700 + 350mm & 900 + 350mm) Installation Instructions Parts supplied A B C D Wall Channel (x1) Wall fixing screw (x6) Return Straight
ELEGANCE SHOWER DOOR/ENCLOSURE INSTALLATION INSTRUCTIONS. Style A Style B Style C Style D
 ELEGANCE SHOWER DOOR/ENCLOSURE INSTALLATION INSTRUCTIONS IMPORTANT DreamLine reserves the right to alter, modify or redesign products at any time without prior notice. For the latest up-to-date technical
*** All chrome surfaces should be cleaned using a clean damp cloth. *** No abrasive cleaning agents or materials should be used.
 Cleaning *** All chrome surfaces should be cleaned using a clean damp cloth. *** No abrasive cleaning agents or materials should be used. *** No chemical cleaners can be used on the glass use only mild
Frameless Bypass Slider
 INSTALLATION INSTRUCTIONS Frameless Bypass Slider QCI-5301 Heavy Glass Bypass Slider with Exposed Rollers QCI5301 Rev 0 Page 1 Certified 11/1/2016 Tools: To install your New Shower Enclosure, you may need
Step-by-Step Installation Instructions for
 Step-by-Step Installation Instructions for Version 5-06/11 Before Starting: Please read and understand these instructions. Not following these instructions will invalidate your warranty (although this
M-PD93X INSTRUCTION MANUAL M
 M-PD93X INSTRUCTION MANUAL 06.10 M003 Dimensions from wall to center of threshold MODEL FRONT (DIM A) SIDE (DIM B) MIN MAX MIN MAX 4836 45 7/8 46 3/8 33 7/8 34 3/8 6036 57 7/8 58 3/8 33 7/8 34 3/8 4832
MIRAGE-X / BELLA. Shower Door Installation Instructions
 MIRAGE-X / BELLA Shower Door Installation Instructions IMPORTANT DreamLine reserves the right to alter, modify or redesign products at any time without prior notice. For the latest up-to-date technical
Bi-fold Door Installation Instructions
 Bi-fold Door Installation Instructions IMPORTANT: If installing a Pivot Door and Side Panel, ie. a corner installation, please refer to alternative fixing details on the document reverse. 2 YEAR GUARANTEE
Model 5400H / 7000H Illustrated Installation Instructions
 Model 5400H / 7000H Illustrated Installation Instructions Contractors Wardrobe DESIGNERS MANUFACTURERS 261 Avenue Hall Valencia, CA 91355 (661) 257-1177 (661) 257-4907 TOLL FREE: (800) CW-DOORS (800) 293-6677
INSTALLATION INSTRUCTIONS 960 RODA GLASS TO GLASS HINGES ANGLED FRAMELESS PANEL / DOOR / PANEL CELESTA DRESDEN TRESOR
 INSTALLATION INSTRUCTIONS 960 RODA GLASS TO GLASS HINGES NEED INSTALLATION HELP? Call 1-800-45-BASCO (452-2726) Monday - Friday 8:00 A.M. - 4:30 P.M. Eastern Time ANGLED FRAMELESS PANEL / DOOR / PANEL
Frameless Bypass Slider
 INSTALLATION INSTRUCTIONS Frameless Bypass Slider QCI-5301 3/8 or 1/4 Glass Bypass Slider with Exposed Rollers QCI5301 Rev 1 Page 1 Certified 6/5/2017 Tools: To install your New Shower Enclosure, you may
1/4 FRAMELESS CONTINUOUS HINGE SHOWER ENCLOSURE
 1/4 FRAMELESS CONTINUOUS HINGE SHOWER ENCLOSURE QCI5028 Rev 1 Page 1 Certified 09/19/2018 INSTALLATION NOTES: Unpack your unit carefully and inspect for freight damage. Lay out and identify all parts using
UNIDOOR (STYLES B&C)
") UNIDOOR (STYLES B&C) SHOWER DOOR & GLASS PANEL INSTALLATION INSTRUCTIONS IMPORTANT DreamLine reserves the right to alter, modify or redesign products at any time without prior notice. For the latest up-to-date
UNIDOOR (STYLES B&C) SHOWER DOOR & GLASS PANEL INSTALLATION INSTRUCTIONS IMPORTANT DreamLine reserves the right to alter, modify or redesign products at any time without prior notice. For the latest up-to-date
WC INSTRUCTION MANUAL 2 PEOPLE REQUIRED SHOWER DOOR KW002
 WC-66-75 INSTRUCTION MANUAL SHOWER DOOR 05.11 2 PEOPLE REQUIRED KW002 IT IS MANDATORY TO HAVE A WALL STUD ON EACH SIDE OF THE SHOWER UNIT TO SECURELY FASTEN THE RAIL TO THE WALLS. GENERAL INSTRUCTIONS
300C6 CONTINUOUS HINGE SEMI-FRAMELESS DOOR KIT
 300C6 CONTINUOUS HINGE SEMI-FRAMELESS DOOR KIT LIMITED WARRANTY AND REMEDY Alumax Bath Enclosures warrants to its dealers, customers, and all subsequent purchasers and users, that the products supplied
UNIDOOR/UNIDOORLUX/UNIDOOR PLUS
 UNIDOOR/UNIDOORLUX/UNIDOOR PLUS SINGLE SHOWER DOOR INSTALLATION INSTRUCTIONS IMPORTANT DreamLine reserves the right to alter, modify or redesign products at any time without prior notice. For the latest
935 RODA VINESSE NEED INSTALLATION HELP? DOUBLE ROLLERS FRAMELESS DOOR INSTALLATION INSTRUCTIONS QCI XX/XX/XXXX. Call BASCO ( )
") INSTALLATION INSTRUCTIONS 935 RODA DOUBLE ROLLERS FRAMELESS DOOR NEED INSTALLATION HELP? Call 1-800-45-BASCO (452-2726) Monday - Friday VINESSE QCI0286 1 XX/XX/XXXX 935 Roda Parts List With double rollers
INSTALLATION INSTRUCTIONS 935 RODA DOUBLE ROLLERS FRAMELESS DOOR NEED INSTALLATION HELP? Call 1-800-45-BASCO (452-2726) Monday - Friday VINESSE QCI0286 1 XX/XX/XXXX 935 Roda Parts List With double rollers
SHOWER ENCLOSURE INSTALLATION
 T F e34 x 46 s a QUATRA LUX 32 x 46 / ele A R r r fo SHOWER ENCLOSURE INSTALLATION I NSTRUCTIONS d e D v o r p IMPORTANT DreamLine reserves the right to alter, modify or redesign products at any time without
Step-by-Step Installation Instructions for
 Step-by-Step Installation Instructions for Customer helpline number: 01604 633607 8892_Step_By_Step_900_Quad_V5.indd 1 1/9/10 18:01:22 Before Starting: Please read and understand these instructions. Not
Unit No. 1400, 1700, 1800 Infinity Continuous Hinge Frameless Swing Door Shower Enclosure
 INSTALLATION INSTRUCTIONS Unit No. 1400, 1700, 1800 Infinity Continuous Hinge Frameless Swing Door Shower Enclosure QCI0028 Rev. 2 Page 1 of 10 Certified 06/05/09 MAINTENANCE: Two primary materials are