C-57D Starcruiser Paint Scheme
|
|
|
- Caroline Francis
- 5 years ago
- Views:
Transcription
1 Introduction The interior set of the C-57D appears to have been painted in neutral gray tones. Some interior colors were produced by side lighting with colored filters. These paints were chosen to recapture the look and feel of Forbidden Planet. Each deck in this model kit has been molded together with the walls and bulkheads. The decks are bowl shaped, with partitions. This makes spray painting a difficult task, so it is recommended to hand paint the interior cabin with Model Master Acrylic paints. Use a flat, square brush. [Floquil 3/8 inch Silver Fox works well] Thin the paint to airbrush density, or a little thinner, using an eyedropper. [Ethyl rubbing alcohol will do]. It takes about 4 light coats. For a smoother finish, Clear Flat Acryl can be airbrushed as a final coat. A paint list is included. 02Feb04 1

 Rot RLM 23 Acryl (Red) + Clear Flat Acryl 12015 8 o clock circular wall")
 Radome Tan Jagged Walls Radome")
2 #1 Upper Deck Underside Camouflage Gray Acryl Ceiling Stasis Units outside shell Silver Acryl 4678 inner coil Gold Acryl 4671 with Copper 1151 center hubs Silver Chrome Trim 2734 Floor Leather Acryl 4674 (Brown) Walls: Outside (Circular) Radome Tan Acryl FS33613 (End) Camouflage Gray Acryl Inside Circular wall behind console (12 o clock) Rot RLM 23 Acryl (Red) + Clear Flat Acryl o clock circular wall Rot + Clear Flat 4 o clock circular wall (by symmetry) Rot + Clear Flat End walls adjacent to 4 o clock and 8 o clock Camouflage Gray Acryl 6 o clock circular wall (by symmetry) Radome Tan Jagged Walls Radome Tan 2
 Flat Gunship Gray Circular Screens (4) Light Gray Acryl 36495 #5 Chairs Silver Acryl finish with Clear Flat")

3 #2, 3 Ceiling Upper surface Camouflage Gray Underside Radome Tan #4 Instrument Station Flat Neutral Gray Lower Panels (3) Silver Acryl + Clear Flat Upper Boxes (4) Flat Gunship Gray Circular Screens (4) Light Gray Acryl #5 Chairs Silver Acryl finish with Clear Flat Acryl Trim Astrogator chairs (2) and upper level console chairs (4) Red stripe (1/16 inch) on back of chairs #6, 7, 8 Rails Dark Tan Acryl FS30219 #9, 10 Instrument Station Dark Gray Acryl Panel Silver Acryl + Clear Flat #11 Dome Supports Silver Acryl Shaded areas-- Flat Neutral Gray 3
4 #12 Upper Deck Dome Camouflage Gray Struts Silver Acryl #13 Lower Deck Outside Circular Walls Radome Tan Inside Circular Walls Radome Tan End Walls and Radial Walls Camouflage Gray Galley Cushion Rot + Clear Flat Steel Floor Hatch Dark Gray Acryl Bunk Floor Fittings Light Sea Gray Acryl Floor Stasis Units outside shell Silver Acryl 4678 inner shell Copper 1151 centers Marker Red 2127 [red lights in base with unit on] or Silver Acryl 4678 [unit off] Floor Leather Acryl 4674 (Brown) Floor Circles around Astrogator Sand (17060) (see Stencil & Note 4) Underside Camouflage Gray #14, 16 Bunk Bulkhead Camouflage Gray Brackets Light Sea Gray 4
5 #15 Bunk Rack Light Sea Gray #17 Bunks Flat Gull Gray Trim Dark Gull Gray #18, 19 Hatch Crane Dark Gray Acryl Extension arm Silver Acryl #20 Bulkhead Radome Tan #21,22,23 Stasis Screens Dark Gray Acryl #24 Galley Table Dark Tan Acryl #25 Crew Stations (4) Flat Neutral Gray Acryl 5
 Duck")
 Flat Black + Hellgrun RLM 25")
6 #26 Chart Monitor Round Screen Light Gray Acryl Circular Rim, Arrows, Crosshairs Flat Gunship Gray Square background Dark Tan Acryl Poles Leather Acryl #27 Bulkhead Radome Tan Door Panel Sand 1 Concave Panels (4) Duck Egg Blue Lights (3) Silver Chrome Trim 2734 #28 Instrument Panel Panels Silver Acryl Red Trim Rot + Clear Flat Poles Dark Gray Acryl Small Round Screen Fluorescent Red Oscilloscope CRT (3) Flat Black + Hellgrun RLM 25 (Green) 6


7 #29 Log Station Dark Tan Acryl Top box front panel Flat Neutral Gray, with Flat Gunship Gray inset Horizontal Instrument consoles Flat Gunship Gray & Silver Chrome trim Lights Red #30 Chart Table Table Dark Tan Acryl Charts Light Gray Acryl Instruments Flat Neutral Gray #31 Arm Chairs Silver Acryl finish with Clear Flat Acryl #32 View Screen Station Left Panel Silver Acryl Red Trim Rot + Clear Flat Poles Dark Gray Acryl View Screen Light Gray Acryl Inside Border Flat Gunship Gray Outer Shade Flat Neutral Gray Lights & Buttons Black, White, Hellgrun RLM 25 7


8 #33 Power Station Camouflage Gray Tesla Coil Light Sea Gray Concentric Ovals Copper #34 Astrogator Table top Rot + Clear Flat Acryl Top Center under bubble Flat White Charts Light Gray Acryl, with outer trim Flat Gunship Gray Consoles Flat Gunship Gray & Silver Chrome trim Lower Surface Camouflage Gray Inside Bubble small ship Use a 7/32 inch diameter washer for the ship Fluorescent Red (white primer) Bolt 70/1000 inch X 9/16 inch Flat Black shaft + Flat Neutral Gray head Contained in package: [Hob-Bits Fill 1-72 ½ QTY 5 H832] #35 Viewer Flat Neutral Gray 8
9 #36 Navigation Plotter Flat NeutralGray, with Silver on middle extension #39 Lift Poles (4) Dark Tan Acryl #40, Robby Graphite Metallic 2712 Top wash of Artic Blue Metallic #43, 44 Ship Hull Sections See Hull Assembly for assembly of hull sections warps caused by packing can be straightened out. Outer Hull Primer + Testors 1246 Metallic Silver [see Note 2] Outside Hull Trim Outer Rim 1 3/8 inches (35 mm) Steel B1420 Non buff Metalizer Interior Hull Flat Gull Gray [see Note 3] Landing Gear Wells Open Landing Gear Wells (3) Sand (17060) Closed Landing Gear Wells(3) Flat Gull Gray #45 Landing Gear Assembly (6) Open Landing Gear (3) Exterior & Interior Metallic Silver 1246 Closed Landing Gear Panels (3) Exterior Metallic Silver
![Interior Flat Gull Gray (to match interior hull) [See Hull Assembly Instructions for installation] #46 Landing Gear Assembly (2) Metallic Silver 1246 #47 Stairs Metallic Silver 1246 #48 Hand Rails](/docs-images/93/114388672/images/10-0.jpg "Rails Marker Red Base Metallic Silver #49 Landing Support Column Primer + Testors 1246 Metallic Silver [see Note 2] #50 Bottom Dome Optional Transparent Silver Mix Future Acrylic Floor Finish with a")
10 Interior Flat Gull Gray (to match interior hull) [See Hull Assembly Instructions for installation] #46 Landing Gear Assembly (2) Metallic Silver 1246 #47 Stairs Metallic Silver 1246 #48 Hand Rails Rails Marker Red Base Metallic Silver #49 Landing Support Column Primer + Testors 1246 Metallic Silver [see Note 2] #50 Bottom Dome Optional Transparent Silver Mix Future Acrylic Floor Finish with a few drops of Silver Acrylic, and Airbrush on Reinforce inside bubble with 6 ½ inch diameter fiberglass cloth #51 Top Dome Outside Metallic Silver 1246 [See Note 2] Inside Camouflage Gray Optional Transparent Silver Mix Future Acrylic Floor Finish with a few drops of Silver Acrylic, and Airbrush on 10
11 Paint List Acrylic Paints Clear Flat Acryl Flat White Acryl Flat Black Acryl Radome Tan Acryl FS33613 Dark Tan Acryl FS30219 Leather Acryl 4674 (Brown) Light Gray Acryl Camouflage Gray Acryl Flat Gull Gray Acryl Light Sea Gray Acryl Dark Gull Gray Acryl Flat Neutral Gray Acryl Dark Gray Acryl Flat Gunship Gray Acryl Rot RLM 23 Acryl (German Luftwaffe Red) Fluorescent Red Acryl Silver Acryl 4678 Gold Acryl 4671 Hellgrun RLM 25 (German Luftwaffe Green) Primer Tamiya Surface Primer Rustoleum V2182 gray primer Enamel Paints Sand (17060) Duck Egg Blue Marker Red 2127 (Russian) Silver Chrome Trim 2734 Copper 1151 Spray Paints Testors 1246 Metallic Silver Flat Gull Gray 1930 Lacquer Paints Steel B-1420 Non Buff Metalizer Robby Base Graphite Metallic 2712 Top wash of Artic Blue Metallic Glues 1. Model Master Precision Cement # Clear Parts Cement (Testors #3515 or Model Master #8876) 3. Ambroid Tac N Place (floor stencil tack down) Note: These glues are highly recommended. Model Master Precision Cement #8872 Remove paint from one surface, and apply glue to one surface only. Do not wipe spilled glue! It dries clear, thin, and shiny, and will not warp paint. Seal visible glue with Clear Flat Acryl 11
12 Notes 1. Color is approximately correct hue. This shade was chosen to give good contrast with other colors, and look right to the eye, for this scale of model. 2. It is recommended to use primer on the outer hull If you choose to use V2182 primer for the outside hull, use light spray coats [see Note 3], and wet sand the primed finish with 400 grit wet sandpaper before spray painting. When spraying Metallic Silver paint, use very light spray coats (5 or 6). This will leave pigment spots, but smooth paint. When dry, buff with a small rag with a few drops of thinner. No sealer is required for this enamel paint 3. Due to the large size of model, the interior hull can be primed with Rustoleum V2182 gray primer. Use light spray coats. Let the primer cure about 2 weeks before applying model paints. According to the manufacturer: The V2182 is intended for use under spray enamels. It may not work well under some auto paints or over some spray enamels. Plastics come in so many varieties I can't give a definitive answer to that. Usually it's OK, but the only way to tell for sure would be to do a small test application. The two most common problems it can have: 1) It might melt the surface a little. 2) It might dissolve some chemicals out of the plastic and take a lot longer to dry. Problem 1 would be obvious immediately; 2 would take overnight to determine. If the primer is still tacky the next morning, you may not want to apply it unless you can leave the piece alone for a week or so to let the primer dry. 12


13 4. Astrogator Floor Circles. The floor around the Astrogator should be puttied, and sanded with a small block before applying the circles. Print the floor circle stencil by checking the Print as Image setting. This will correctly size the stencil at double size. Photocopy the stencil at 50% reduction onto coated card stock.. Make at least 6 copies. Cut out the center hub, and the inside edge of the first shaded ring. Tack stencil onto deck. [Use Ambroid Tac N Place cement, let it dry clear, then tack down] On a second sheet, cut the outside edge of the first shaded ring, and tack the outer stencil on to the deck, centered about the inner stencil. Paint the ring Repeat the procedure for the other two shaded rings. 13
14

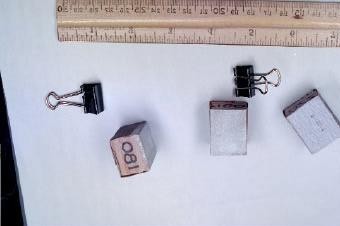
15 C-57D Hull Assembly Instructions Hull Assembly Glue Use Model Master Precision Cement #8872 This glue welds the styrene together, and forms a flexible bond. It has a precision applicator, and is just the right viscosity. Note: Cyanoacrylate glue does not weld styrene, and is not suitable for this model. Glue the Hull Sections The Hull is composed of 12 sections, 6 sections for each upper and lower half. 1. Glue 2 sections together. Feel the outside joint to make sure it is flush, then add office binder clamps to the inside flange. (quarter inch and half inch clamps). 2. Repeat the procedure for the remaining joints. Do the same for the other half of the hull. 3. Place each hull half on a flat surface and check the joints. If the joints bow upward, then they need to be straightened out. Straighten out Joints 1. Place the half hull on a table or refrigerator top, with the joint sticking out about 6 inches. 2. Place a boxed cake mix on the joint (edgewise), and also place a box on the 2 adjacent joints to keep the hull flat. 3. Leave it sit a week or two, then check it. It should be straight. 4. Check all the joints and straighten them. 14
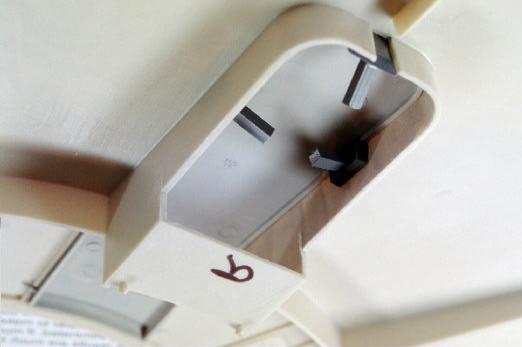
16 Mate the Hull Halves C-57D Hull Assembly Instructions 1. The upper and lower hull halves will mate in 6 different positions. Try all 6 and find the one that mates best. 2. Mate the hull, then place quarter inch office binder clamps on all 12 joints on the outer rim, and let the hull sit for about 2 months. This will reform the plastic into a precision fit, and make the hull straight. 3. Place a mark on the upper and lower hull so you will always mate the hull in this same position. While the hull is being reformed, you can work on the interior cabin. Important: These hull halves will NOT be glued together, to allow the interior cabin to be removed for display After the hull has been reformed and forms a precision fit, custom work will be necessary. There are some structural limitations with this kit that require us to do some custom work The lower hull has 6 landing wells, with panels to close the alternating 3. The closed panels do not connect well to the hull, so we have to do some custom work to get a flush mount, and add strength. The bottom hull center is flat by design, and supports the entire weight of the model on the lower bubble ring. By itself, the stock hull may sag due to insufficient structural strength. This is not bad engineering on the part of Polar Lights. Styrene plastic is flexible, which is good for models because it does not break easily. The hull is huge, and the bottom section if flat, so it is hard to attain structural strength using styrene alone without a convex surface. To add strength, we will need to use cross members and composite materials. (Plastic beams and fiberglass cloth.) The alternative would be a 2 piece fiberglass casting considerably more expensive. 15


17
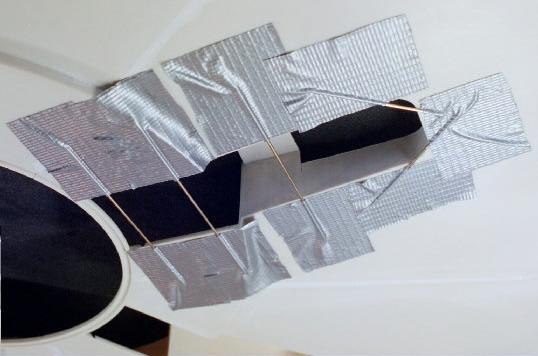
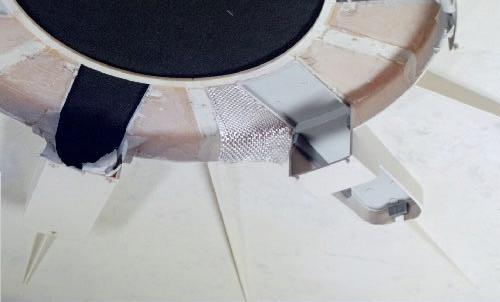
18 C-57D Hull Assembly Instructions Closed Landing Wells 1. Remove part of the top of the closed landing wells. Leave 1 inch near the center, where the mating pins are. 2. Build hard points to connect inside the landing wells, so we can mount the panel flush. 3. Attach brass rods to the outside hull across the closed landing wells using silver duct tape. 4. Flip the hull over, and insert Panel 45 from inside. The brass rods will hold the panel flush against the hull. 5. Place the hard points against the side of the landing well, and rest them on top of Panel Glue the hard points to the inside landing well, but NOT to the lower Panel 45. These hard points will later allow us to glue Panel 45 in position with a flush mount. 7. Remove the brass rods. 8. Glue Panel 45 in position. 9. Glue more plastic beams in position against the side well and Panel 45 for extra strength. 10. Use 2 part epoxy putty to fill the gap between the lower bubble ring and Panel 45. Use masking tape to cover the lower bubble ring! 16
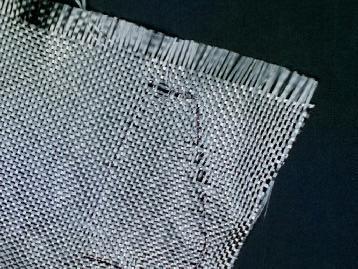
19 C-57D Hull Assembly Instructions Bottom Hull Center Fiberglass Sections Bondo Fiberglass Repair Kit No. 420 There are 12 sections to be fiberglass reinforced, 6 sections adjacent to the closed wells, and 6 sections adjacent to the open landing wells. The two sets are treated differently, so it is recommended to do this with two applications. Six Open Landing Wells Cloth Sections These 6 sections have landing gear glued to them, so we must not cover the notches with resin. 1. Mask off about 5/16 inch square over the landing gear notch, and leave the end of the masking tape sticking out in the landing well. 2. Place the fiberglass cloth in position, and mark the cloth corresponding to the masking tape. Cut out the notch in the cloth with sprue cutters. 3. Do this to all 6 sections, and lay them in place. 4. Mix about 1 ½ ounces of resin with hardener. 5. Soak 1 cloth section in the resin, and let the excess drip off. Do not use a blotter! The cloth should be sloppy looking. 6. Lay the cloth into position, and tuck it down. The resin should not quite overflow the landing section. Excess can be ground off later. 7. Do the remaining 5 sections. 8. After about minutes, the resin should form a hard gel. Take a razor knife and cut the resin along the borders of the masking tape, then pull up the masking tape. The resin piece will be removed. After the landing gear are glued in, the notches can be filled with epoxy putty 17


20
21 C-57D Hull Assembly Instructions Six Closed Well Cloth Sections Same as before, except we do not mask and cut the cloth for the landing gear notches. Note: If the fiberglass sections will not hold in place, then rough sand both surfaces, and glue them back in with epoxy glue. This may happen if you do not use enough resin on the cloth. Lower Bubble Reinforcement Reinforce inside bubble with 6 ½ inch diameter fiberglass cloth 18
 Let it cure overnight. This will keep the joints from splitting. 2.")
22 C-57D Hull Assembly Instructions Hull Body Work The hull seams need to be ground and filled. Follow the procedure: 1. Apply glue to all the inside hull seams (beyond the flanges) Let it cure overnight. This will keep the joints from splitting. 2. Outside hull seams use a Dremel grinding wheel, and grind down the outside hull seams, about ¾ inch wide. Grind it so the two sides are even, and a little below flush. It should feel like a flat strip against the curvature of the hull. 3. Use masking tape, and mask the area about ¾ inch to 1 inch wide, along the length of each seam. 4. Apply Squadron White Putty to the seam, using an artist paint knife. Use thin layers, maybe 2 or 3 light coats, or use Epoxy putty for the first coat for extra strength Prevents bubbles and cracks. 5. Sand the seams to match the curvature of the hull, using small sanding blocks [180 grit, 220, 320, 400] 19

23 C-57D Hull Assembly Instructions 6. The outside hull will have a number of defects that may need some putty and sanding. Squadron Green Putty works well for the smaller defects. It sands harder and smoother. 7. Base Primer The outside hull will need several coats of primer to cover the surface defects. Rustoleum V2182 Primer works well for the base coats (Light Gray Enamel) Spray light coats, and let it dry about 10 days between coats 8. Wait 2 weeks after the last coat for the Enamel to cure completely. Otherwise, it clogs the sandpaper, and is difficult to work with 9. Wet sand the primer with 400 grit wet sandpaper. This will produce a beautiful smooth finish. 10. Examine the surface for small defects. Use Green putty to fill and sand. 11. Use Tamiya Surface Primer to spot prime the finish This lacquer sands easily, unlike the V2182. You can also use Tamiya as a finishing primer when the surface is ready. 12. Inside Hull The inside hull can be primed with V2182, and later painted Flat Gull Gray 20
24
Background: For the Modeler:
 Right On Replicas, LLC Step-by-Step Review 20141020* Space Shuttle with Fuel Tank and Boosters 1:72 Scale Monogram Model Kit #85-5089 Review (Part 1 of 2) Background: The United States Space Transportation
Nanton Grain Mill Assembly
 ( 1 ) Nanton Grain Mill Assembly Locate package for assembling storage building. These are cut from 1/8 masonite. Inspect and lightly sand edges where it will be bonded. Use white glue or CA glue to bond.
Tools and Tips: ( 1 )
") Tools and Tips: As you build instructions will show in my many picture manual how to assemble. You can use your own methods as you desire, my results are very good. A smooth, flat work surface is very
Tools and Tips: As you build instructions will show in my many picture manual how to assemble. You can use your own methods as you desire, my results are very good. A smooth, flat work surface is very
Swift assembly guide
 Swift assembly guide Download the assembly guide at www.scihighmodels.com/swift.pdf Sample kit shown with aluminium bells (available with the Deluxe kit) Shown here without main tanks Version 10/12/2010
CONCEPT MODELS INSTRUCTIONS FOR UP DC-10 WING CAR El Toro Way Stockton, CA Web Address:
 CONCEPT MODELS Web Address: http://www.con-sys.com 8810 El Toro Way Stockton, CA 95210 INSTRUCTIONS FOR UP DC-10 WING CAR 2 CONCEPT MODELS PARTS DC-10 WING CAR Item No. Part No. DESCRIPTION QTY. 1 2003-1
The Rubley Building Instructions for Assembly of the N scale kit. v1.1
 The Rubley Building Instructions for Assembly of the N scale kit. v1.1 Kit Contents: 197 ea. laser cut 1/16" acrylic parts. 1ea. adhesive backed.020 styrene part. 10 ea..060 x 1" styrene alignment pins.
Tools and Tips: ( 1 )
") Tools and Tips: As you build instructions will show in my many picture manual how to assemble. You can use your own methods as you desire, my results are very good. A smooth, flat work surface is very
Tools and Tips: As you build instructions will show in my many picture manual how to assemble. You can use your own methods as you desire, my results are very good. A smooth, flat work surface is very
The Hamlin Assembly Instruction By Laser Dollhouse Designs
 The Hamlin Assembly Instruction By Laser Dollhouse Designs NOTE 1: Please do a dry assembly using only tape to hold house together. This will get you familiar with parts, location, and fit. This also gives
CONCEPT MODELS SP DOUBLE STACK CONTAINER CARS INSTRUCTIONS Sheep Ranch Rd. Mountain Ranch, CA Web Address:
 CONCEPT MODELS Web Address: http://www.con-sys.com 8331 Sheep Ranch Rd. Mountain Ranch, CA 95246 SP DOUBLE STACK CONTAINER CARS INSTRUCTIONS 2 CONCEPT MODELS PARTS Item No. PART NO. DESCRIPTION QTY. 1
BUZZ S SAWMILL PF5195 WOODLAND SCENICS BUILDING KIT
 1:87 BUILDING KIT BUZZ S SAWMILL PF5195 Buzz s Sawmill is a detailed work of art with all workings of a vintage steam-fired, belt-driven sawmill. Details include interior rafters and shake roof, attached
CORNER PORCH HOUSE PF5196
 1:87 BUILDING KIT CORNER PORCH HOUSE PF5196 Two-story home with cedar-shake roof and a corner wrap-around porch. Clapboard siding, paned windows, and loaded with accessories, such as a bicycle built for
CONCEPT MODELS INSTRUCTIONS FOR PRODUCT 60,000 GALLON TANK CAR El Toro Way Stockton, CA 95210
 CONCEPT MODELS Web Address: http://www.con-sys.com Email: concept_models@con-sys.com 8810 El Toro Way Stockton, CA 95210 INSTRUCTIONS FOR PRODUCT 60,000 GALLON TANK CAR 2 CONCEPT MODELS PARTS GATX/UTLX
Hotel Belvedere Instructions for Assembly of the HO scale kit. v1.1
 Hotel Belvedere Instructions for Assembly of the HO scale kit. v1.1 Kit Contents: 319 ea. laser cut.090" acrylic parts. 132 ea. laser cut.060" acrylic parts. 8 ea. window glass templates 8 ea. window glazing
Additional Parts List:
 THE TIME MACHINE Additional Parts List: In addition to the cast resin parts enclosed in this kit, there should also be a plastic bag containing the following items needed to complete your time machine
DAVENPORT DEPARTMENT STORE PF5214
 1:160 BUILDING KIT DAVENPORT DEPARTMENT STORE PF5214 Dress up your downtown scene with the classic Victorian architecture and large first-floor picture windows of the Davenport Department Store. Details
N Scale Concrete Coal Dock Instruction Manual
 N Scale Concrete Coal Dock Instruction Manual 1. General Overview This kit combines precision laser cut acrylic, photo etched brass and wood parts to make a highly detailed model of the Roberts and Schaefer
Peter Krause ABN
 Peter Krause ABN 25 736 637 163 T/as O-Aust Kits PO Box 743 ALBANY CREEK QLD 4035 AUSTRALIA Phone +61 (0)7 3298 6283 (7.00pm to 9.30pm ONLY) Facsimile +61 (0)7 3298 6287 (24 hours) Mobile 0419 680 584
RoR Step-by-Step Review Consolidated B-24J Liberator 1:48 Monogram # Review Click Here to Buy This Kit
 RoR Step-by-Step Review 201207011 Consolidated B-24J Liberator 1:48 Monogram #85-5629 Review Click Here to Buy This Kit The Consolidated B-24 Liberator was an American heavy bomber, designed by Consolidated
CONCEPT MODELS INSTRUCTIONS FOR THE KASGRO KRL SPECIAL DEPRESSED CENTER FLAT CARS El Toro Way Stockton, CA 95210
 CONCEPT MODELS Web Address: http://www.con-sys.com Email: concept_models@con-sys.com 8810 El Toro Way Stockton, CA 95210 INSTRUCTIONS FOR THE KASGRO KRL 204000-2 SPECIAL DEPRESSED CENTER FLAT CARS 2 CONCEPT
B. Painting: Boat by Frankie Novak. Western Reserve Model Yacht Club Finishing Your Soling One Meter. From simplest to most complex. A.
 Western Reserve Model Yacht Club Finishing Your Soling One Meter From simplest to most complex A. Simplest: 1. Of course, leaving the hull and deck as is (white styrene) is the easiest route to take. The
Tools and Tips: ( 1 )
") Tools and Tips: As you build the book will show in my many picture manual how to assemble. You can use your own methods as you desire, but these worked best for me. A smooth, flat work surface is very
Tools and Tips: As you build the book will show in my many picture manual how to assemble. You can use your own methods as you desire, but these worked best for me. A smooth, flat work surface is very
Seascape Bungalow Assembly instructions. Laser Dollhouse Designs
 Seascape Bungalow Assembly instructions Laser Dollhouse Designs NOTE: Please do a dry assembly using only tape to hold house together. This will get you familiar with parts, location, and fit. This also
Instructions for Assembly of the HO Scale The Charles
 The Charles Instructions for Assembly of the HO Scale The Charles HO Kit Contents: 337 ea. white 1/16" laser cut acrylic part 19 ea. Clear 1/16" laser cut acrylic part 69 ea. white 1/8" laser cut acrylic
The Fyfe Building Instructions for Assembly of the N scale kit.
 The Fyfe Building Instructions for Assembly of the N scale kit. Kit Contents: 150 each laser cut 1/16" acrylic parts. 6 each 020 adhesive backed part 6 each column caps 2 each decorative canopy 1 each.125"
CONCEPT MODELS UTLX 80006,80020 CRYOGENIC TANK CAR KIT INSTRUCTIONS Sheep Ranch Rd. Mountain Ranch, CA 95246
 CONCEPT MODELS Web Address: http://www.con-sys.com Email: concept_models@con-sys.com 8331 Sheep Ranch Rd. Mountain Ranch, CA 95246 UTLX 80006,80020 CRYOGENIC TANK CAR KIT INSTRUCTIONS 2 CONCEPT MODELS
Rosalina Accessories Tutorial Version March 2011 Martyn
 Rosalina Accessories Tutorial Version 1.0 - March 2011 Martyn Star Brooch Feel free to experiment with these dimensions, you should make a template you are happy with, the method still works. 1) Creating
HAPPY HUNTER BUILD LOG
 HAPPY HUNTER BUILD LOG After finishing a Billings model of the Calypso in January, 2012, I decided to build a model of the Happy Hunter, a Robbe kit I had stashed 3036 3037 3038 3039 from an earlier purchase.
#70 grit sand Putty knives, sized as needed #1 fine gray sand Corner tools Milestone acrylic liquid
 Countertops Supplies Tools White and/or gray Milestone cement 12 inch steel trowel #70 grit sand Putty knives, sized as needed #1 fine gray sand Corner tools Milestone acrylic liquid Hock Universal tints
Right On Replicas, LLC Step-by-Step Review * Panzer IV Tank 1:32 Scale Monogram Model Kit # Review
 Right On Replicas, LLC Step-by-Step Review 20150108* Panzer IV Tank 1:32 Scale Monogram Model Kit #85-7861 Review The Panzer tank was used throughout World War II and had several modifications during that
The Park Hotel Instructions for Assembly of N Scale Kit
 The Park Hotel Instructions for Assembly of N Scale Kit Kit Contents: 198 ea. Laser Cut Acrylic Parts, 2 ea. Chimney Parts Sheets, 1 ea.2".040 styrene rod, 5 ea. Sidewalk Parts, 14 ea. Cast Resin Dormers,
Building Instructions Diva cabin boat
 Building Instructions Diva cabin boat Order no. 3093/00 aero-naut Modellbau Stuttgarterstr. 18-22 D-72766 Reutlingen / Germany http://www.aero-naut.com 1 For pictured building instructions please see the
Donaldson s Department Store
 Donaldson s Department Store Instructions for Assembly of Donaldson s Department Store Kit Contents: 80 each laser cut acrylic parts. 1 each sheet of canopy parts. 1 each sheet of AC roof unit parts. 1
GENERAL INSTRUCTIONS. Woodland Scenics PO BOX 98, LINN CREEK, MO woodlandscenics.com PREPARE PLASTIC PARTS PREPARE METAL CASTINGS
 #40700 Popa Weelie's Saloon INSTRUCTIONS CAUTION: Cutting tools recommended. Use with care. This item is not a Children s Product and is not intended for use by Children. Conforms to Health Requirements
HARRISON S HARDWARE PF5891
 1:48 BUILDING KIT HARRISON S HARDWARE PF5891 Model the local hardware store where layout residents can find all they need to keep their homes in tip-top shape and workshops running smooth. The positive
Blakes 7 DSV-1 Liberator
 Blakes 7 DSV-1 Liberator Model kit by Masterpiece Models: www.masterpiecemodels.com Pattern Maker: Alfred Wong Casting: J&S Technologies LLC Parts List Main body 3 Main body nose vanes 4 Main body detail
PITTS S2S CONSTRUCTION
 PITTS S2S CONSTRUCTION FUSELAGE CONSTRUCTION 1) Place the right fuselage side over the plan and mark the former positions. Place the left side over the right side and mark the former positions. Glue F1
After printing these plans, several pages will need to be taped together to form a larger plan. Below is a diagram of which pages need assembled.
 Watermill Building Plans For complete building instructions and instructional videos, please visit the main web site at www.hirstarts.com/watermill/watermill.html. Using these plans alone will not give
Shell Gas Station & Convenience Store kit in HO scale
 Shell Gas Station & Convenience Store kit in HO scale Parking lot base and cars not included This kit includes all building parts and signs milled in white and black styrene plastic, clear window glazing,
Drawings of all parts have been included for ease of part identification.
 Acme Corporation Instructions for Assembly of the HO Scale Acme Corporation HO Kit Contents: 156 ea. white 1/16" laser cut acrylic part 10 ea. white 1/8" laser cut acrylic part 37 ea. adhesive-backed brick
Season One Phaser Kit PRP1745
 Season One Phaser Kit PRP1745 RODDENBERRY ENTERTAINMENT STAR TREK: THE NEXT GENERATION SEASON ONE PHASER KIT Thank you for your purchase of the Roddenberry Entertainment Star Trek: The Next Generation
San Felipe: Step by Step Pack 6
 Pack 6 Your parts Framing Tools and equipment Glue Knife Sandpaper Superglue Tweezers Clear varnish a Retrieve the grating that you assembled on Page 100. Cut two pieces of 2 x 3 mm wooden strip to fit
PS 5077 cu. ft. Boxcar with EOC device. 1:29 scale resin craftsman kit. by Burl Rice
 PS 5077 cu. ft. Boxcar with EOC device 1:29 scale resin craftsman kit by Burl Rice www.burlrice.com Bill of materials (not included): Thick/medium viscosity CA PL adhesive, or Gorilla Glue Heavy Duty Construction
REVISION LIST CHAPTER 25: AFT WINDOWS. The following list of revisions will allow you to update the Legacy construction manual chapter listed above.
 REVISION LIST CHAPTER 25: The following list of revisions will allow you to update the Legacy construction manual chapter listed above. Under the Action column, R&R directs you to remove and replace the
EZYSTONE WORKSURFACES
 EZYSTONE WORKSURFACES Installation & Maintenance Instructions 1. Tools Required Worktop Edge Finishing Kit Pack 1-100mm Velcro Backing Pad Pack 2-100mm Diamond Dry Cut Velcro Discs (100 Grit Yellow) (200
Introduction: The model should be assembled following the sequence of the stages of construction described in these instructions.
 Victoria Bestell-Nr. 3082/00 Introduction: The model should be assembled following the sequence of the stages of construction described in these instructions. The laser-cut components are individually
EXTREME LOAD no. TWO
 1602 - EXTREME LOAD no. TWO Kit Features: 22' 4 " x 14' x 3'-6 Oversize Load 49mm (1.9") actual height Bolt Head Details Welded Load Mounting Fins Painting Handles Tools Required: Hobby Knife Tweezers
Installation Instructions
 Please read all instructions before installing products. STORAGE: Keep crates in the upright position. When unpacking, store panels flat in a clean dry place. BEFORE INSTALLATION: Check for damage that
Tape Measure Metal Clippers Screw Bit Set With Extensions
 IMPORTANT: Read through instructions thoroughly before beginning to replace any damaged material. Minor damage can be fixed with a fiberglass repair kit and color matched paint. Tools Required Tape Measure
The Park Hotel Instructions for Assembly
 The Park Hotel Instructions for Assembly Kit Contents: 280 ea. Laser Cut Acrylic Parts. 1 ea. 6" Plastic Coated Wire. 5 ea. Sidewalk Parts. 14 ea. Cast Resin Dormers. 12 ea. Window Glass Templates, 12
Hardee s Restaurant kit in HO scale
 Hardee s Restaurant kit in HO scale Parking lot base and cars not included This kit includes all building parts milled in white styrene plastic and laser cut white acrylic, clear acrylic window glazing,
Paint Spraying: Spray gun parts Student A:
 Paint Spraying: Spray gun parts Student A: You need to replace some parts for your spray gun. However, you don t know the name of the part, or the part number. Telephone a paint gun supplier and order
Aerospace Speciality Products
 Specifications:! Length: 18.75"/47.6 cm! Diameter: 0.98"/24.9 mm! Weight: 1.5 oz/44 gm! Streamer Recovery! Recommended Engines:!! A8-3; B4-4; B6-4; C6-5! Skill Level: Beginner This is a model rocket kit
BLADE REPAIR INSTRUCTION BOOKLET
 BLADE REPAIR INSTRUCTION BOOKLET Contents Section I: Section II: Section III: Section IV: Section V: Section VI: Removing a Blade Refer to this section if you need to remove the blade from an oar shaft.
CVS Pharmacy kit in HO scale
 CVS Pharmacy kit in HO scale Parking lot base and cars not included This kit includes all building parts and wall-mounted signs milled in white styrene plastic, clear window glazing and pre-cut Plastruct
Cobra X Q Construction Tips Construction: Bel y pan
 Cobra X Q Construction Tips : The white plastic in this kit is high impact styrene. It can be painted with most types of coatings if light coats are applied this is necessary due to the thickness of the
50 FineScale Modeler January Finding (Captain) Nemo
 Nemo") 50 FineScale Modeler January 2005 Finding (Captain) Nemo 1/70 Scale Sci-Fi How-to In 1954, Walt Disney Pictures launched its big-screen adaptation of Jules Verne s classic adventure novel, 20,000 Leagues
50 FineScale Modeler January 2005 Finding (Captain) Nemo 1/70 Scale Sci-Fi How-to In 1954, Walt Disney Pictures launched its big-screen adaptation of Jules Verne s classic adventure novel, 20,000 Leagues
CIRRUS AIRPLANE MAINTENANCE MANUAL MODELS SR22 AND SR22T CHAPTER 56-30: DOOR GENERAL. Door 56-30: DOOR. 1. General
 CIRRUS AIRPLANE MAINTENANCE MANUAL Door CHAPTER 56-30: DOOR GENERAL 56-30: DOOR 1. General The cabin door windows are manufactured of acrylic and adhesive bonded to the door structure. Replacement is accomplished
CUT OUT FLARES INSTALLATION INSTRUCTIONS FOR 20017, 20018, F100-F150 F250-F350 P.U. & BRONCO CUT OUTS
 20017 04/22/03 REV-A CUT OUT FLARES INSTALLATION INSTRUCTIONS FOR 20017, 20018, F100-F150 F250-F350 P.U. & BRONCO CUT OUTS Tools Required for Installation: (A) 3/16 Drill Bit (B) Pop-Rivet Gun (C) Air
Contents. pages 20-24: Installing Edge sinks into. custom laminate countertops page 8: Installing Edge sinks into postform laminate countertops
 Contents pages 2-8: Installing Edge sinks into custom laminate countertops page 8: Installing Edge sinks into postform laminate countertops pages 9-14: Installing Acrylic sinks into custom laminate countertops
Lots of paints Several brushes from 000 to? Exacto knife. 200 grit sandpaper Bel-Decal Sheets Spray Primer
 Tools Lots of paints Several brushes from 000 to? Exacto knife 200 grit sandpaper Bel-Decal Sheets Spray Primer Brass Rod and a Drill bit that matches Super Glue Sculpy Putty the same size 3/16 suggested
Cockpit Kit. Full Depth - Builds Quickly - Light Weight READ THROUGH THIS INSTRUCTION MANUAL FIRST. IT CONTAINS IM- laser cut wood kit
 The Savage Light Sukhoi Su- 27 Cockpit Kit contains everything you need to build a full depth semi scale Su-27 cockpit, yet adds less than an ounce to your finished model s weight (not including pilot).
Above are the offsets for the plywood panels.
 DinkyDink Plans Bottom Panel Half Station X Y X2 Y2 1 1/4 3/4 0 11 5/16 2 4 9/16 4 12 9/16 3 11 11/16 1/4 11 7/16 14 1/2 4 18 5/8 1/16 18 5/8 15 11/16 5 25 3/4 0 25 3/4 16 5/16 6 32 13/16 0 32 13/16 16
1Use the metal file to smooth
 Yamato: Step-by-step 85 Parts of the bridge and the hull a b c d e f a Part of the bridge b Part of the bridge c Part of the bridge d Radar x 2 e Part of the bridge x 2 f Wire Recommended tools and materials
1Take the keel (3) and
 and") 1 The hull and the bridge 1Take the keel (3) and apply PVA wood glue in the second slot from the left: a toothpick may make it easier. Take care: the left end is the one that has a projection. THE HULL
1 The hull and the bridge 1Take the keel (3) and apply PVA wood glue in the second slot from the left: a toothpick may make it easier. Take care: the left end is the one that has a projection. THE HULL
HRMLaserModels.com T.W. SNOW 25 TON COALING TOWER S SCALE AS USED ON THE MILWAUKEE ROAD
 HRMLaserModels.com T.W. SNOW 25 TON COALING TOWER S SCALE AS USED ON THE MILWAUKEE ROAD HRM-61 S SCALE COAL TOWER T.W.Snow 25 Ton Coaling Tower General Instructions Check out HRMLaserModels.com for construction
Continued on next page
 Please read these instructions completely through to be sure you are familiar with all the steps. Then following along again as you build your structure. Download a.zip file of all the pictures including
RFS Class II Rocket Assembly Instructions
 RFS Class II Rocket Assembly Instructions Instructions by: Loc Precision Photos by: Great Lakes Space Port Sheboygan Education Foundation, Inc. Welcome and thank you for joining the Rockets for Schools
Cowper From Steve Wolverton on the T&TTT forum, Feb 2005 For Reference Only Do not use to build a trailer. Check on Teardrop and Tiny Travel Trailers
 Cowper From Steve Wolverton on the T&TTT forum, Feb 2005 For Reference Only Do not use to build a trailer. Check on Teardrop and Tiny Travel Trailers for up to date building information; http://www.mikenchell.com/forums
Model the hub of your layout s rural setting. Planters Feed and Seed Supply Instructions N Scale 1:160 WOODLAND SCENICS
 PF5201 Planters Feed and Seed Supply Instructions N Scale 1:10 Model the hub of your layout s rural setting. Planters Feed and Seed Supply presents a vintage agricultural center where farmers and rural
Model Grandma and Grandpa s cozy cottage, a. Country Cottage Instructions HO Scale 1:87 WOODLAND SCENICS PF5186
 PF586 Country Cottage Instructions HO Scale :87 Model Grandma and Grandpa s cozy cottage, a young family s first home or give this vintage Victorian cottage the run-down look of an abandoned shack. This
Scratchbuilding. (or why don t they make a kit?)
") Scratchbuilding (or why don t they make a kit?) By Mike Belcher Retired Mechanical Engineer Modelling since 1975; First kit was a scratchbuilt 1/35 tank Resin casting since 1994; scratchbuild my own masters
Scratchbuilding (or why don t they make a kit?) By Mike Belcher Retired Mechanical Engineer Modelling since 1975; First kit was a scratchbuilt 1/35 tank Resin casting since 1994; scratchbuild my own masters
Learn to. Brush Paint Model Airplanes
 Learn to Brush Paint Model Airplanes Table of Contents Model Paints... 4 Brushes... 6 Workspace Setup... 7 Surface Preparation... 9 Painting Procedure... 10 Paintbrush Cleanup... 14 Masking... 15 Dry-brushing...
Do-it-yourself plastic repair kit by Jaeger Aviation
 Do-it-yourself plastic repair kit by Jaeger Aviation If your aircraft is adorned by yellowed, cracked and broken window trim, side panels or headliner there is something you can do about it! In the past,
WRIGHT FLYER 1 INSTRUCTIONS FOR THE D10LC KIT
 WRIGHT FLYER 1 INSTRUCTIONS FOR THE D10LC KIT Manufactured in the USA by Easy Built Models PO Box 681744, Prattville, AL 36068-1744 Visit us at www.easybuiltmodels.com Easy Built Models GLUE METHODS Always
3Position the hull of the ship as
 Yamato: Step-by-step 25 The hull and stern deck c b d a b d c e e f a Rear frame b Stern deck x 2 c Stern deck x 2 d Side wall x 2 Wood glue Sandpaper (no. 400 grain) Craft knife Pliers d Side wall x 2
Central New York Rocket Team Challenge 2018 Rocket Assembly Instructions
 Central New York Rocket Team Challenge 2018 Rocket Assembly Instructions Note: These instructions vary from those provided by the manufacturer of the rocket kits. There is also considerable varying discussion
The Lansdowne One Car Garage Assembly Instruction by Laser Dollhouse Designs
 The Lansdowne One Car Garage Assembly Instruction by Laser Dollhouse Designs NOTE 1: Please do a dry assembly using only tape to hold house together. This will get you familiar with parts, location, and
Building the Circular Tower
 Building the Circular Tower You will need to fill this mold 18 times to have enough blocks to build the circular tower. Be sure the blocks are completely dry before gluing them together. For detailed instructions
If by chance a part is missing or broken please contact us indicating the kit name and part description and we will send you a replacement.
 Six Stall Roundhouse Instructions for Assembly of the HO Scale Six Stall Roundhouse Roundhouse Kit Contents: 18ea. Roof Pieces 12 ea. 1/16" Parts Sheets 9ea. 1/8" Parts Sheets 12ea. Floor Pieces 1ea. 1/4"
The Severn Instructions for Assembly of the N scale kit.
 The Severn Instructions for Assembly of the N scale kit. Kit ontents: 172 each laser cut 1/16" acrylic parts 102 each adhesive backed styrene parts 1 each cast entryway 3 each cast balcony 4 each cast
3Insert the second rod no. 4
 Yamato: Step-by-step 37 The stern block and searchlight control towers a b c d e f Recommended tools and materials Wood glue Sandpaper (no. 800 grain) Metal file Putty Craft knife For metal: Super Glue
Bedtime for Bondo MERA Training
 Bedtime for Bondo 2002 MERA Training Section 1: Making the Plug/Model This section will show the process of building a plug/model for a plaster mold.this will represent what the final fiberglass part
NSWGR Class SRC Refrigerated Wagon Kitset in 7mm Scale
 O-Aust Kits PO Box 743 ALBANY CREEK QLD 4035 AUSTRALIA Phone +61 (0)7 3298 6283 (7.00pm to 9.30pm ONLY) Facsimile +61 (0)7 3298 6287 (24 hours) Mobile 0419 680 584 Email pa_rl_krause@bigpond.com Web www.oaustkits.com.au
Bates 1/8 scale B-26. Parts List. Instructions
 Bates 1/8 scale B-26 Vacuform Pieces Swivel Ball 1 Cockpit Floor 1 Ball 2 Cockpit Back Wall 2 Two Flanges 3 Dash 3 Seven 0-64 x 1/4 Bolts 4 Dash Hood 4 Seven 0-64 Nuts 5 Center Console 6 Pilot Seat Fire
PROVIDED BY WINDY URTINOWSKI AND REPRESENT HIS PROCEDURE FOR OBTAINING A SUPERIOR FINISH USING BRODAK DOPE
 PROVIDED BY WINDY URTINOWSKI AND REPRESENT HIS PROCEDURE FOR OBTAINING A SUPERIOR FINISH USING BRODAK DOPE The TARGET is for a GREAT FINISH with 6-7 OUNCES of weight FROM BARE WOOD TO READY FOR SILVER
SE5a Instrument Board part 2 - rev 1.1
 SE5a Instrument Board part 2 - rev 1.1 Fuel (Petrol) Valve This valve uses two circular name plates, eight brass screws, one black plastic base, copper wire and two black plastic risers. You can pick any
Repairing Sheet-Molded Compound (SMC) With Epoxy
 With Epoxy") Repairing Sheet-Molded Compound (SMC) With Epoxy 1. Properties: A. It does not dent. B. It does not rust C. Panels are formed using a flat sheet or compound that is heat molded in a press. 2. Preparation
Repairing Sheet-Molded Compound (SMC) With Epoxy 1. Properties: A. It does not dent. B. It does not rust C. Panels are formed using a flat sheet or compound that is heat molded in a press. 2. Preparation
The Midtown Apartment Building
 The Midtown Apartment Building Instructions for Assembly of The Midtown Apartment Building. Kit Contents: 70 each laser cut acrylic parts. 3 each sidewalk parts. 3each Window Glass Templates, 3 each Window
Building the Cathedral
 Building the Cathedral Please note that the cathedral is a fairly difficult and time consuming project. I strongly suggest building one or two easier models before tackling this one! Four molds are needed
SAN FELIPE: Step by Step Pack 2
 Pack 2 Your parts Stern reinforcement Bulkheads The poop deck Bulkhead planks Planks Tools and equipment Knife Pencil Wood glue Sandpaper File a Using leftover 5 x 5-mm wooden strips, measure and cut beams
Continue gluing the remaining top parts ensuring the angled piece is glued well. Set aside and let dry. See photo below
 Radiator rev 1.1 The SE5a s radiator is one of the most recognized radiators in WW1. It is one of the components that defines the SE5a. The original SE5a has seen multiple radiator designs used during
12. Wings, Flaps, Ailerons and Struts
 12. Wings, Flaps, Ailerons and Struts Fit Aileron Hinges Reference: Drawing 20270K2 Photo 12.1 Parts Required: 2007092 Aileron LS 200809N Aileron RS 2001394 Hinge 3/16 A1 (4) 2001694 Hinge Pin (4) PH0059N
Right On Replicas, LLC Step-by-Step Review * How to Build a Vacuform (vacuum-formed) Scale Model
 Scale Model") Right On Replicas, LLC Step-by-Step Review 20140730* How to Build a Vacuform (vacuum-formed) Scale Model Review and Photos by Doug Cole If you ve been building models for a while you ve probably heard
Right On Replicas, LLC Step-by-Step Review 20140730* How to Build a Vacuform (vacuum-formed) Scale Model Review and Photos by Doug Cole If you ve been building models for a while you ve probably heard
Hasegawa 1/72 Scale Focke-Wulf Fw190D-9 Yellow Tail
 Hasegawa 1/72 Scale Focke-Wulf Fw190D-9 Yellow Tail It goes without saying that the Focke-Wulf Fw190 will always remain a hallmark aircraft in aviation history. With that said I wish to delve into the
SGTalon s Enterprise-A Foamie Build Guide. SGTalon s. Enterprise. Enterprise--A. Assembly Instructions
 SGTalon s Enterprise SGTalon s Enterprise--A Enterprise Assembly Instructions Page 1 4-13-2013 SGTalon s Enterprise *******Recommended Hardware******** 2.6oz 250w Motor and Speed Control with 8x6 prop
Super 2.5-EZ. Sheetrock Wall. Sheetrock Wall 10'-10" 2.5V-EZ 2.5V-EZ 2.5A-EZ
 Super 2.5-EZ Company: 30 Vertical Radius Phone: 36 Horizontal Radius w/12 Wide Flat Expansion in Corner Non-Parabolic Corner Easy Installation Built-In System Date: 24'-1/2" 20'-1/2" 16'-1/2" 12'-1/2"
A Precision 2000 Mixed Media Project
 Día de los Muertos (Day of the Dead) Panel A Precision 2000 Mixed Media Project PROJECT TITLE: Día de los Muertos (Day of the Dead) Panel DESIGNED BY: Andy Spencer SKILL LEVEL: (Adult 1-5: 1 being the
There are several things to consider before or when painting your new Soling One Meter.
 Western Reserve Model Yacht Club Finishing Your Soling One Meter Introduction: The Soling One Meter (and other polystyrene boats) can be a real challenge to paint. If this is your first Soling, you should
Building Tips This model can be built using the following types of adhesives:
 Page 1 Building Tips This model can be built using the following types of adhesives: Epoxy (with or without microballons) Odorless cyanoacrylate (CA) with accelerator UHU Creativ for Styrofoam (or UHU
Assembly Instructions for Summit Motel Kits # SMFS and SMBD
 Assembly Instructions for Summit Motel Kits # SMFS and SMBD Introduction Thank you for your purchase of the Summit Motel. This modern motel can be converted to almost any chain motel of your choice, depending