ANATOMY OF A BIT TM how you can tell top from bottom. four on the floor!
|
|
|
- Jane Logan
- 5 years ago
- Views:
Transcription


1 CRAWLY CREATURE
2 BASICS 1 Learn BITSNAP ANATOMY OF A BIT TM how you can tell top from bottom. TOP BOTTOM BIT FEET 2 which COLOR-CODED BY FUNCTION Bits TM are grouped into four different categories, are color-coded. POWER (BLUE) Power Bits, plus a power supply, run power through your circuit. WIRE (ORANGE) Wire Bits connect to other systems and let you build circuits in new directions. four on the floor! INPUT (PINK) Input Bits accept input from you or the environment and send signals that affect the Bits that follow. OUTPUT (GREEN) Output Bits do something light up, buzz, move 3 MAGNET MAGIC! Bits snap together with magnets. The magnets are always right you can t snap them together the wrong way. 4 only ORDER IS IMPORTANT POWER BITS always come first and INPUT BITS affect the OUTPUT BITS that come after them. 5 you SOME BITS ARE ADJUSTABLE Switches, buttons, and dials on the Bit allow to change how the Bit functions. ARROWS SHOULD POINT IN THE SAME DIRECTION WITH NO OUTPUT BIT AFTER IT, THE INPUT BIT HAS NOWHERE TO SEND ITS SIGNAL FLIP THE SWITCH TO CHANGE MODES ADJUST SENSITIVITY WITH SLIDE POT IF THE BITS WON T SNAP TOGETHER, TRY SPINNING ONE AROUND AND MAKE SURE THE ARROWS POINT IN THE SAME DIRECTION THE INPUT BIT AFFECTS THE OUTPUT BITS THAT FOLLOW

3 p4 POWER SAMPLE CIRCUIT o2 LONG LED HOW IT WORKS The p4 power Bit converts the 9 volts of electricity in the battery to the 5 volts that littlebits circuits run on. The power Bit also sends a signal through your circuit. Controlling this signal with inputs is how you control your circuit. MEET THE BIT p4 POWER Every circuit starts with power. It provides the electricity that makes your Bits spin, buzz, blink, and shine. MODE: on/off on light low battery light REAL WORLD ANALOGIES PHONE CHARGER


4 i6 DIMMER SAMPLE CIRCUIT o9 BARGRAPH TWIST p4 POWER i6 DIMMER HOW IT WORKS The dimmer is like the knob on a water faucet. The more you turn the knob, the more the water flows from the faucet. The dimmer is similar the more you twist it clockwise, the more signal it lets through. When the dimmer is all the way to the left, it s sending an off or 0 volt signal. When the dimmer is all the way to the right, it s sending an on or 5 volt signal. The dimmer can be positioned to send any signal between 0 and 5 volts. MEET THE BIT Twist this dimmer back and forth to control your circuit. As you twist the dimmer clockwise, more signal goes to the Bits that follow, brightening lights, speeding up motors, or raising the volume on buzzers. MINI-CHALLENGE REAL WORLD ANALOGIES Can you invent a light that changes color? HOUSEHOLD DIMMER SWITCH STEREO VOLUME CONTROL FAUCET STOVE KNOB


5 i16 PULSE SAMPLE CIRCUIT o2 LONG LED p4 POWER HOW IT WORKS The pulse is a switch that opens and closes over and over again. When it's open, the signal from the previous Bit passes through to the next Bit. When the switch closes, the signal is blocked. Use the slider to adjust the speed of the pulse. Moving the slider to the right will increase the speed of the pulse. MEET THE BIT i16 PULSE The pulse is like a heartbeat that makes the Bits after it turn on and off in a steady rhythm. SPEED: " " decrease, "+" increase MINI-CHALLENGE REAL WORLD ANALOGIES Can you invent a warning signal with the pulse? How can you make the signal pulse faster or slower? POLICE SIREN FIREFLY TURN SIGNAL CLOCK SECONDHAND


. You can find out how to use those on pages 26 and 27.")
6 o11 SERVO SAMPLE CIRCUIT i5 SLIDE DIMMER p4 POWER HOW IT WORKS The servo has two modes. In TURN mode, the input from other Bits determines the position of the hub try using a dimmer to set the angle you want. In SWING mode, the servo will move back and forth on its own like a pair of windshield wipers the input signal controls the speed of the swing. The servo's range of motion is about 110 degrees. MEET THE BIT The servo is a motor that can swing back and forth or be turned to a specific position. There are a few accessories you can use with the servo (like the mechanical arm). You can find out how to use those on pages 26 and 27. o11 SERVO MODE: turn or swing MINI-CHALLENGE Can you invent something that uses the servo to clean up your desk? REAL WORLD ANALOGIES bleep blorp TRUCK CRANE WINDSHIELD WIPERS ROBOT
7 a7 ADHESIVE SHOES a19 SERVO HUB MEET THE ACCESSORY MEET THE ACCESSORY Shoes slip onto your Bit feet and hold your circuit together. On the bottom of your shoes you'll find adhesive, which is great for securing your circuits to different surfaces. The servo hub lets you easily attach materials to your servo motor and add more complex movements to your littlebits inventions. Bit feet go in the shoes HOW IT WORKS First, snap together your littlebits circuit. Then press the feet of your Bits into the holes of the shoes and place it on your chosen surface. Adhesive shoes can be secured onto any surface paper, cardboard, plastic you name it! Just peel the adhesive backing off, and stick it on. BE SURE TO ALIGN THE TEETH ON THE SHAFT WITH THE TEETH IN THE HUB HOLE HOW IT WORKS The servo hub can be attached and removed by gently pushing or pulling it on or off the servo motor. This is helpful if you need to reorient how the holes are positioned for a project. The servo hub can be permanently attached by using a small screw in the center hole. NOTE: The shoe adhesive is for one-time use only. Use the included #6 screws with any of these eight outer holes. USE A PHILLIPS-HEAD SCREWDRIVER
8 a23 MECHANICAL ARM a24 SERVO MOUNT MEET THE ACCESSORY MEET THE ACCESSORY The mechanical arm attaches to both the servo hub and the DC motor shaft, and offers lots of leverage for pushing, pulling, and throwing. The servo mount lets you attach your servo to a mounting board or a pair of littlebits shoes. It's a great way to keep the servo steady so the arm can go wild. Connect to servo hub with included #6 screws USE A PHILLIPS-HEAD SCREWDRIVER HOW IT WORKS HOW IT WORKS Connect to DC motor shaft To attach the mechanical arm to the servo hub, use two of the #6 screws (included) and a Phillipshead screwdriver (not the purple screwdriver). Be sure to screw through the holes on the servo hub. Connect to servo hub with included #6 screws Push the servo in from the side until it clicks into place. To keep the servo from sliding up and down, use the included screws and a Phillips-head screwdriver. Fits a Sharpie TM -sized marker Fits a pen To attach the mechanical arm to the DC motor, line up the flat edge of the DC motor shaft with the flat edge of either of the flat-edged holes on the mechanical arm. The two large holes on the end are perfect for holding pens and markers in place. USE A PHILLIPS-HEAD SCREWDRIVER Feet for mounting boards and shoes
9 1 BUILD YOUR CIRCUIT. i16 BUTTON p4 POWER o11 BARGRAPH
10 2 3 PRESS THE SERVO HUB ONTO THE SERVO. You can secure the hub with the included small screw found with the servo accessories. ATTACH YOUR CIRCUIT TO THE INCHWORM TEMPLATE.
11 4 ATTACH THE BATTERY TO THE TEMPLATE. Use Glue Dots. 5 Use ATTACH THE SERVO TO THE TEMPLATE WHERE INDICATED. Glue Dots.
12 6 7 GIVE YOUR INCHWORM SOME MUSCLES. Use a twist tie. FEED THE TWIST TIE THROUGH THE SERVO HUB.
13 8 9 THREAD THE FREE ENDS OF THE TWIST TIE THROUGH THE TWO SMALL HOLES ON THE INCHWORM TEMPLATE. FOLD THE TEMPLATE, AND TWIST THE TWIST TIE.
14 10 11 TWIST THE TIES 2 OR 3 TIMES. This will keep the template in an A shape. POWER ON YOUR CIRCUIT. POWER: ON
15 12 START INCHING. Adjust the slider on the pulse Bit to change your Inchworm s speed.
16 HOW IT WORKS p4 POWER sends a signal through the circuit. The i16 PULSE Bit is conitnuosly switching on and off. When it gets a signal from the light sensor, it only lets it through in short bursts. When the o11 SERVO gets the signal, it rotates the hub, pulling and pushing the twist tie to inch the creature along.

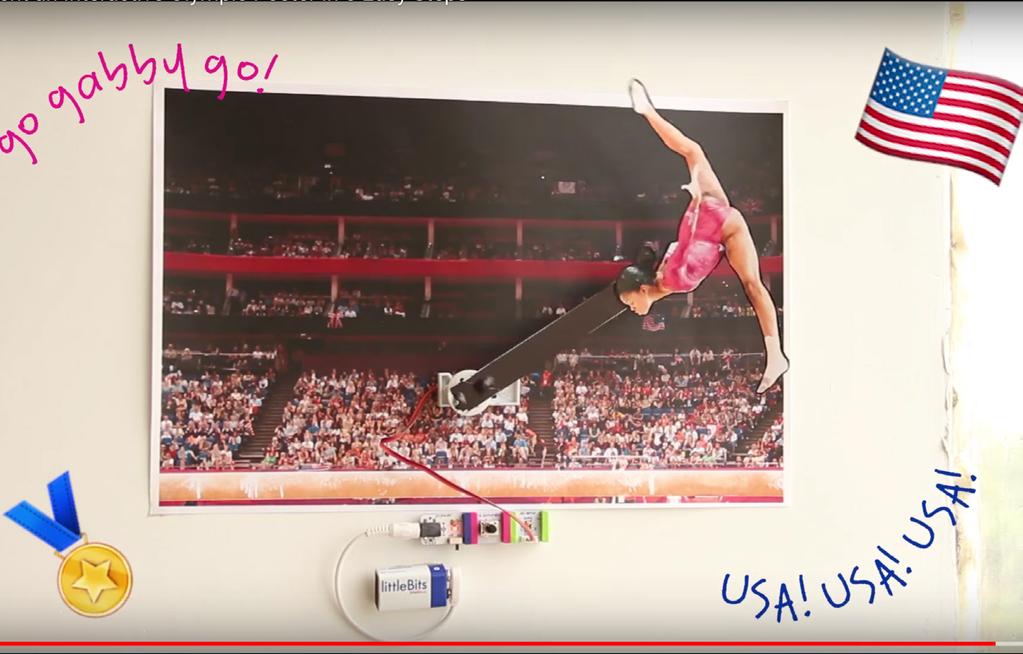
17 MOVING POSTER INVENTION #2
18 1 BUILD YOUR CIRCUIT. i6 DIMMER p1 POWER o11 SERVO
19 2 PRESS THE SERVO HUB ONTO THE SERVO. 3 SCREW PRESS THE SERVO INTO THE SERVO MOUNT FROM THE SIDE AND IN. USE PHILLIPS-HEAD SCREWDRIVER JUST ONE SCREW NEEDED
20 4 CONNECT THE MECHANICAL ARM TO THE SERVO HUB. USE PHILLIPS-HEAD SCREWDRIVER
21 5 6 PRESS ADHESIVE SHOES ONTO YOUR CIRCUIT. SET SERVO TO SWING MODE. MODE: SWING
22 7 TEST YOUR CIRCUIT. Turn the power on and twist the dimmer knob. The servo arm should swing back and forth. 8 images. MAKE THE STORY OF YOUR MOVING COLLAGE. You will need two Cut out a background image and a moving image. USE SCISSORS TWIST POWER: ON
23 9 10 TAPE ATTACH THE MOVING IMAGE TO THE MECHANICAL ARM. MOUNT YOUR BACKGROUND IMAGE TO THE WALL AND ALL FOUR CORNERS DOWN WELL. USE TAPE USE TAPE
24 11 12 move PEEL THE BACK OFF THE ADHESIVE SHOES AND STICK YOUR CIRCUIT TO THE COLLAGE. SET IT IN MOTION! Twist the dimmer to make the animated element faster or slower across the background. ADJUST THE POSITION OF THE MECHANICAL ARM SO THAT IT SWINGS WHERE YOU WANT IT TO. USE TAPE SECURE YOUR BATTERY TO THE WALL POWER: ON
25 HOW IT WORKS p4 POWER sends a signal through the circuit. The i5 SLIDE DIMMER controls how much signal moves through to the servo. The speed of the o11 SERVO depends on the amount of signal it recieves from the dimmer. The more signal it recieves, the faster it swings. ADJUST THE POSITION OF THE MECHANICAL ARM SO THAT IT SWINGS WHERE YOU WANT IT TO. USE TAPE SECURE YOUR BATTERY TO THE WALL POWER: ON


26 VIDEO LINKS click to explore!
ANATOMY OF A BIT TM how you can tell top from bottom. four on the floor!
 ARCADE GAME BASICS 1 Learn BITSNAP ANATOMY OF A BIT TM how you can tell top from bottom. TOP BOTTOM BIT FEET 2 which COLOR-CODED BY FUNCTION Bits TM are grouped into four different categories, are color-coded.
INVENTION GUIDE. littlebits Basics. Invent a night light Invent an alarm Invent a spinning sign Invent interactive art. The littlebits Invention Cycle
 INVENTION GUIDE INVENTION GUIDE 01 11 01 02 04 BIT INDEX POWER p4 power INPUT i8 proximity sensor i13 light sensor i16 pulse 13 15 17 19 21 23 littlebits Basics Invent a night light Invent an alarm Invent
STEAM STUDENT SET INVENTION GUIDE. DOWNLOAD THE TEACHER'S GUIDE and other classroom resources at littlebits.cc/student-set
 STEAM STUDENT SET INVENTION GUIDE DOWNLOAD THE TEACHER'S GUIDE and other classroom resources at littlebits.cc/student-set STEAM STUDENT SET PG INVENTION GUIDE 32 PG 39 PG 46 PG 53 04 06 27 07 09 14 17
Cardboard Circuit Playground Express Inchworm Robot
 Cardboard Circuit Playground Express Inchworm Robot Created by Kathy Ceceri Last updated on 2018-10-25 05:41:17 PM UTC Guide Contents Guide Contents Overview Parts List -- Electronics Materials List --
Ohbot. Eyes turn. servo. Eyelids open. servo. Head tilt. servo Eyes tilt. servo. Mouth open servo. Head turn servo
 Making Instructions Ohbot Ohbot has six servo motors. The servos allow each part of the face to be positioned precisely. Eyelids open servo Eyes tilt servo Eyes turn servo Head tilt servo Mouth open servo
UNLEASH YOUR INNER INVENTOR.
 UNLEASH YOUR INNER INVENTOR. GIZMOS & GADGETS INVENTIONS littlebits Basics 4 5 6 8 9 0 4 6 8 Breezy Buddy Spinmate Megablaster Wireless Doorbell Mischief Machine Bubblebot Bumperball Bitbot Rotolamp Spy
Electric Skein Winder
 Electric Skein Winder Assembly and Use Package Contents 1 - Triangular Body (w/ motor) 1 - Cross Arm 1 - Left Foot (w/ yarn guide) 1 - Right Foot 1 - Adjustable Finger (w/ yarn clip) 3 - Adjustable Fingers
The Useless Machine. Parts Only - Build Guide v0001
 TM The Useless Machine Parts Only - Build Guide v0001 For the best outcome, follow each step in order. We recommend reading this guide entirely before you get started. Tools required: One phillips screwdriver,
WARNING: Prior to installation, turn the power off to the vending machine and unplug it from its power source. Also, make sure to level the machine.
 Installation of Gum and Mint Tray for National 147, 157, 167 Important Note: Please read all instructions thoroughly before continuing with installation of kit. If you are having problems installing the
Replacing the Reciprocator on the SWF Compact Series Machine (601C and 1201C)
") Follow the instructions below to replace the reciprocator in the SWF Compact series machines. The tools required can be found in the tool kit that came with the machine. Preparation 1. First, place the
Follow the instructions below to replace the reciprocator in the SWF Compact series machines. The tools required can be found in the tool kit that came with the machine. Preparation 1. First, place the
Pivot Frame Mounting Instructions
 A D E I J What Is In The Box B C F * Some Pivot Frames include Extra Spring Clips for Mat if spring clips are lost or to flatten mat in frame. G H Description QTY A. Pivot Frame 1 B. Upper Catch Bracket
AUC Cell Assembly Torque Stand. User Manual
 AUC Cell Assembly Torque Stand User Manual WARRANTY Spin Analytical Inc., warrants this product to be defect free in both material and workmanship for 90 days from the date of shipment. Labor services
FACTORY CAT TOMCAT CORPORATION
 FACTORY CAT RPS TOMCAT CORPORATION Artificial Turf and Carpet Sweeping Install Kit #349-641 & #349-642 1. Detach batteries so that there is no power running through the machine before starting. 2. Start
The Useless Machine. DIY Soldering Edition. Instruction Guide v0004
 The Useless Machine DIY Soldering Edition Instruction Guide v0004 TM For the best outcome, follow each step in order. We recommend reading this guide entirely before you get started. Tools required: Soldering
1. ASSEMBLING THE PCB 2. FLASH THE ZIP LEDs 3. BUILDING THE WHEELS
 V1.0 :MOVE The Kitronik :MOVE mini for the BBC micro:bit provides an introduction to robotics. The :MOVE mini is a 2 wheeled robot, suitable for both remote control and autonomous operation. A range of
Under Seat Storage Drawer Installation Instructions
 Under Seat Storage Drawer Installation Instructions Parts List: 1) Drawer Assembly 8) Self Tapping Screws 1) Instructions 1) Template Tools Needed: Drill and/or Bit Driver Tape Measure Jigsaw or metal
DC Motor. Controller. User Guide V0210
 DC Motor Controller User Guide 59757 V0210 This kit provides a great exercise of intermediate soldering skills and creates a device that enables you to control various Pitsco motors, Tamiya gearboxes,
Energate Foundation Meter Data Collector Installation Guide
 Energate Foundation Meter Data Collector Installation Guide The Meter Data Collector works with Foundation s built-in Meter Data Receiver. The collector attaches to the meter provided by your electricity
3D PRINTER. Pack 11. Anything you can imagine, you can make! 3D technology is now available for you at home! BUILD YOUR OWN
 BUILD YOUR OWN Pack 11 Anything you can imagine, you can make! 3D PRINTER Compatible with Windows 7 & 8 Mac OS X 3D technology is now available for you at home! BUILD YOUR OWN 3D PRINTER CONTENTS PACK
Activity Instructions - Classroom Wind Farm
 Wind Power - Classroom Wind Farm Activity Instructions - Classroom Wind Farm The purpose of this activity is for students to build their own windmill generator, which will then be one unit of the classroom
ActivAting OrigAmi SEt guidebook
 Activating Origami SET GUIDEBOOK Welcome to the TEKNIKIO Activating Origami SET CONTENTS 4 YOUR MATERIALS 8 ORIGAMI PATTERNS 14 EXAMPLE ACTIVITIEs This is one in a series of sets. In this set you will
Thanks for shopping with Improvements! Mandarin Tansu Step Cabinet Item #512735
 Thanks for shopping with Improvements! Mandarin Tansu Step Cabinet Item #512735 This unit can be assembled so the top and middle cabinets are on the left or on the right. Use these instructions for a right-sided
EPPA2-KIT DUAL MONITOR ARM CONVERSION
 EPPA2-KIT DUAL MONITOR ARM CONVERSION EPPA2-KIT Rev A 10/17 Model EPPA2-KIT-XXX ASSEMBLY AND ADJUSTMENT EPPA2-KIT PARTS AND TOOLS PLEASE REVIEW these instructions before beginning the assembly and adjustment
Start by building the example racer, then turn it into your own unique design.
 Start by building the example racer, then turn it into your own unique design. For use with TeacherGeek Air Racer Activity Pack, or Maker Cart. To find documents and activity materials, click here. Page
DesignWorks Sampler 2 #12448DW / 12 Designs / 24 Files
 #12448DW / 12 Designs / 24 Files Note: Use DesignWorks Software to edit PaintWork and designs, including rescaling, rotating, and mirror imaging. 12448-01_CW Applique Bluebird 3.70 X 4.46 in. 93.98 X 113.28
E-FLIGHT BLADE CX COMPLETE DISASSEMBLY JANUARY 2006
 E-FLIGHT BLADE CX COMPLETE DISASSEMBLY JANUARY 2006 AERONUTS THIS IS NOT AN OFFICIAL E-FLIGHT MANUAL OR INSTRUCTION. IT IS BEING PROVIDED FOR INFORMATIONAL PURPOSES ONLY. AUTHOR ASSUMES NO LIABILITY FOR
LANDING GEAR. 1. Fit landing gear into slots on bottom of fuselage.
 LANDING GEAR 1. Fit landing gear into slots on bottom of fuselage. 4. Use channel-lock pliers to press blind nuts into position (note: drilled hole should be slightly smaller than shaft of blind nut for
A. Preparing the fabric (not shown):
:") INSERTING ZIPPERS - CENTER INSERTION The zipper can be snapped on to the right or to the left side of the needle so that you can sew close to the zipper. When sewing on the right side of the zipper, attach
INSERTING ZIPPERS - CENTER INSERTION The zipper can be snapped on to the right or to the left side of the needle so that you can sew close to the zipper. When sewing on the right side of the zipper, attach
1.9 KIT # Fits Aerotech 1.9 diameter rockets. Uses coupler and payload tube included with select Aerotech Kits. Ebay Parts List Description.
 KIT #0545.9 Fits Aerotech.9 diameter rockets. Uses coupler and payload tube included with select Aerotech Kits. Ebay Parts List P/N Description Qty 5405.9 Ebay Laser Cut Sheet Thin 5406.9 Ebay Laser Cut
Budget Robotics Octabot Assembly Instructions
 Budget Robotics Octabot Assembly Instructions The Budget Robotics Octabot kit is a low-cost 7" diameter servo-driven robot base, ready for expansion. Assembly is simple, and takes less than 15 minutes.
AUTOMATIC ADVANCE MANUAL
 AUTOMATIC ADVANCE MANUAL AVL Looms, Inc. 3851 Morrow Lane, Suite #9 Chico, CA 95928-8305 530 893-4915 530 893-1372 fax # info@avlusa.com www.avlusa.com Copyright 2009 TABLE OF CONTENTS Page # I. Parts.........................
EDGE2 DUAL MONITOR ARM
 EDGE2 DUAL MONITOR ARM EDGE2 Rev A 2/17 Model EDGE2-SLV Model EDGE2-BLK Model EDGE2-WHT ASSEMBLY AND ADJUSTMENT EDGE2 DUAL MONITOR ARM PARTS AND TOOLS PLEASE REVIEW these instructions before beginning
Hardware Installation. Do this first:
 1 Do this first: Hardware Installation Need some help? Here s what you ll need: 4 AA Batteries Phillips screwdriver Visit us online. support.remotelock.com We re here to help. 1 (877) 254 5625 support@remotelock.com
IMPORTANT! Recommended Tools. 7/16 Deep socket Phillips screwdriver
 IMPORTANT! Read all instructions carefully before commencing any work. Always wear proper safety equipment. Some installation steps will require two or more installers. Recommended Tools Ratchet 10-mm
Volvo 240/260 New Face Overlay Installation Models By Dave Barton
 Volvo 240/260 New Face Overlay Installation 1975-80 Models By Dave Barton These custom faces are the product of years of research and experimentation. They are printed with a special printer using waterproof
Installing Brackets to Minimize Distortion in Your SMART Board 685ix Interactive Whiteboard System s Projected Image
 UX60-RFK-685 Installing Brackets to Minimize Distortion in Your SMART Board 685ix Interactive Whiteboard System s Projected Image Follow these instructions to install brackets on your SMART Board 685ix
Panel List models listed below Note: Separate and stack panels by like types before beginning assembly process.
 DFI Double Workstations FIip-it Double Series Page 1 Panel List models listed below Note: Separate and stack panels by like types before beginning assembly process. 1 Desktop Panel 1 Back Panel 1 Left
STOP! READ THIS FIRST
 STOP! READ THIS FIRST Page 1 of 37 Getting Started With Your Pantograms GS1501 Embroidery Machine (the quick guide) Thank you for choosing Pantograms for your embroidery system provider. We encourage you
Harmony Remote Repair
 Harmony Remote Repair harmonyremoterepair.com How to install your new Harmony One Front Cover/Touch Screen Important! Before you begin working on your Harmony One, you must discharge any static electricity
HOW TO HOME IMPROVEMENT INSTRUCTIONS (Steps to make changes and before and after photos) Entrance to Front and Back of House
 Entrance to Front and Back of House") HOW TO HOME IMPROVEMENT INSTRUCTIONS (Steps to make changes and before and after photos) Entrance to Front and Back of House 1. Outdoor Grab Bar To install a weatherproof grab bar into a brick wall: 1.
HOW TO HOME IMPROVEMENT INSTRUCTIONS (Steps to make changes and before and after photos) Entrance to Front and Back of House 1. Outdoor Grab Bar To install a weatherproof grab bar into a brick wall: 1.
ASSEMBLY AND ADJUSTMENT
 EDGE MONITOR ARM EDGE Rev A 2/17 Model EDGE-SLV Model EDGE-BLK Model EDGE-WHT ASSEMBLY AND ADJUSTMENT EDGE MONITOR ARM PARTS AND TOOLS PLEASE REVIEW these instructions before beginning the assembly and
Fryer's Trebuchet Paper Kits
 Fryer's Trebuchet Paper Kits Things you will need 7 sheets of card approx. 0.3 mm or 0.01 inches thick 1 sheet of paper to print out to download. 2 x 6-7 mm dowel or pencils 1 paper clip String 6 cms (2.5
WOLF PUP LOOM TM & WOLF PUP LT LOOM TM
 WOLF PUP LOOM TM & WOLF PUP LT LOOM TM Assembly Instructions FL3000 FL3006 FL3009 WOLF PUP WOLF PUP LT Find out more at schachtspindle.com Schacht Spindle Company 6101 Ben Place Boulder, CO 80301 p. 303.442.3212
ORTOP Modular Robot v3.0 Arm Assembly
 Base Plate Assembly Parts Needed: Arm Assembly BAG 1 2 Socket Head Cap Screw, 1-1/4" 2 Socket Head Cap Screw, 1/2" 2 Button Head Cap Screw, 3/8" 6 Nuts 1 Gear Hub Spacer 1 Flat Building Plate 1 Single
Please read BOTH these Installation Instructions and the General Instructions prior to installing or operating this equipment.
 Attachment Tab Height: 16-1/4 Attachment Tab Width: 21-3/4 Please read BOTH these and the General Instructions prior to installing or operating this equipment. Serial Number 1. Blue Ox towing products
Partnership Teacher Night February 2017 littlebits and Electronic Circuits
 Partnership Teacher Night February 2017 littlebits and Electronic Circuits What are littlebits? littlebits are easy-to-use, color-coded, magnetic, electronic snap-and-lock circuits that can be linked together
Wanderlust Suitcase Vanity
 Wanderlust Suitcase Vanity If you re like me, you re always up for an adventure. When I saw some examples of DIY reclaimed suitcases, paired with the exciting new Wanderlust embroidery design collection,
Removing and Replacing the Y-truck
 Service Documentation Removing and Replacing the Y-truck To remove and replace the Y-truck you will need the following tools: 4mm Allen wrench 12mm stamped flat wrench #2 Phillips screwdriver (magnetic
Super Sky Surfer 2000 Assembly Instructions
 Super Sky Surfer 2000 Assembly Instructions Note: Plug and Play version of the Sky Surfer comes with fuselage pre-glued and motor/servos installed. If you wish to route antennas or wires through the tail,
Flexshaft Assembly. Flexshaft Support Tube. Clear Front Cover FIGURE 1: EXTERIOR VIEW OF THE FLEXSHAFT AND HEAD COVERS
 Adjusting the Head Pressure Checking the head pressure and adjusting the vertical guide rods is part of the machine set-up process. The head pressure should also be checked periodically during routine
HP Envy M6-1205DX Screen Replacement
 HP Envy M6-1205DX Screen Replacement This guide will show you how to replace your computer's screen. Written By: Alex Wasilewski ifixit CC BY-NC-SA www.ifixit.com Page 1 of 16 INTRODUCTION We will be showing
Step 1: The larger tower box contains the tower machine, a set of Silver 100 Lid Keys, and a set of Black 002 Coin Box Keys
 2 3 Step 1: Each tower is shipped as two boxes the large tower box and the smaller stand box. Open each of the boxes and inventory each of the parts before starting assembly to ensure all parts have arrived.
STACKED BOOKS PROJECT 2013
 STACKED BOOKS PROJECT 2013 Taught by Laura A. DeVincentis Inspired by Robin Messenheimer, Big Island, Hawaii (Robinscraftroom.com) Supplies and Measurements needed for this project: (6) Six pieces 6-1/2
Clip & Save Coupon Organizer
 Clip & Save Coupon Organizer Keep coupons and clippers easy-to-access in this unique organizer! Made with durable canvas and lightweight cotton, this clip and save coupon organizer keeps scissors, pens,
BITCRAFT: GETTING STARTED
 BITCRAFT: GETTING STARTED 1 SETTING UP THE MOD 2 IN ORDER TO SIMPLIFY THE SET-UP PROCESS, we ve made the bitcraft mod available on a platform designed to make modding Minecraft simple, called Technic Launcher.
TIP FOR GETTING STARTED
 Tip for getting started TIP FOR GETTING STARTED Be careful not to drill into any electrical wires, ductwork, plumbing or other damagable components. If you have any questions on the locations of these
How to Mount a Moto Accessories MV Agusta F4 Hugger in Less than 30 Minutes.
 How to Mount a Moto Accessories MV Agusta F4 Hugger in Less than 30 Minutes http://idealcycle.com/mv_agusta Materials and Tools: 13 10 4 1 3 2 5 11 6 15 17 14 12 9 8 16 7 1. Electric drill 2. Tap drill
ASSEMBLY AND ADJUSTMENT
 EPPA MONITOR ARM EPPA Rev A 10/17 Model EPPA-XXX ASSEMBLY AND ADJUSTMENT EPPA MONITOR ARM PARTS AND TOOLS PLEASE REVIEW these instructions before beginning the assembly and adjustment procedures. Check
CAUTION- SAVE THESE INSTRUCTIONS This product is for household use, or equivalent.
 Never operate this sewing machine if it has a damaged cord or plug, if it is not working properly, if it has been dropped or damaged, dropped into water. Return this sewing machine to the nearest authorized
Equilibrium. Conference Table. Installation Instruction. Revision B 11/07/16
 Equilibrium Conference Table Installation Instruction Revision B 11/07/16 Equilibrium End User Agreement Enwork Equilibrium table bases must be installed directly onto a four inch minimum thickness concrete
Modular ottoman. assembly instructions
 Modular ottoman assembly instructions Smooth & Wrinkle-Free Fabric Covers: In addition to these printed instructions, you may want to watch our beauty tips videos on the customer service page of our website.
Standard Operating Procedure
 RIT MULTIDISCIPLINARY SENIOR DESIGN 2010 Standard Operating Procedure Baja Water Propulsion Test Stand This SOP specifies how to assemble, use, troubleshoot, and disassemble the water propulsion system
DIY Eliza: Instructions
 Make sure you first download from Redlightsonthebrain the list of things required for a DIY Eliza. 1. Take your bucket, ruler and marking pen. We will put on all the markings before we start cutting the
T R U E. Start by building the example boat, then turn it into your own unique design.
 T R U E Start by building the example boat, then turn it into your own unique design. For use with TeacherGeek Build-a-Boat Activity, or Maker Cart. To find documents and activity materials, click here.
Star Trek TOS communicator upgrade kit Install instructions Hyperdyne Labs 2002
 Star Trek TOS communicator upgrade kit Install instructions Hyperdyne Labs 2002 Package Your package should include: Assembled TOS sound/motor/light board with LEDs and sound chip Moiré motor 9V snap connector
Tools needed: Phillips screwdriver, flat blade screwdriver, rubber cement, clean hands.
 Installing the New Face for the Volvo 740 Turbo Vacuum/Boost Gauge INTRODUCTION: These instructions will guide you through the installation of this new face for your existing vacuum/boost gauge. It is
POWER PET. Low-E Automatic Patio Pet Door Installation and Operating Instructions
 POWER PET Low-E Automatic Patio Pet Door Installation and Operating Instructions Power Pet, Regular Height, Patio Door Assembly Steps Estimated assembly time: Under 1 hour STEP 1: Assemble the tools you
The Mind Project s Iris 1 Robotic Arm. Assembly instructions Step 1
 The Mind Project s Iris 1 Robotic Arm Assembly instructions Step 1 Packing list Below you will find pictures and descriptions of each part. It may be helpful to take each piece out of the bag and place
Mac mini (PowerPC) Hard Drive Replacement
 Hard Drive Replacement") Mac mini (PowerPC) Hard Drive Replacement Written By: irobot INTRODUCTION Upgrade your storage with a new hard drive. TOOLS: 1.5" Thin Putty Knife (1) Phillips #00 Screwdriver (1) Phillips #1 Screwdriver
Mac mini (PowerPC) Hard Drive Replacement Written By: irobot INTRODUCTION Upgrade your storage with a new hard drive. TOOLS: 1.5" Thin Putty Knife (1) Phillips #00 Screwdriver (1) Phillips #1 Screwdriver
INSTALL/REMOVAL INSTRUCTIONS: WINDOW REGULATOR
 REMOVAL/INSTALL OF WINDOW REGULATOR (741-584) Ford Focus 2000-2007 General Tech Tips: Use painter s tape rather than duct tape to secure window. It will not damage paint or leave sticky residue. A plastic
STRUCTURE SENSOR & DEMO APPS TUTORIAL
 STRUCTURE SENSOR & DEMO APPS TUTORIAL 1 WELCOME TO YOUR NEW STRUCTURE SENSOR Congrats on your new Structure Sensor! We re sure you re eager to start exploring your Structure Sensor s capabilities. And
Mac mini Model A1283 Speaker Replacement
 Mac mini Model A1283 Speaker Replacement Written By: Walter Galan ifixit CC BY-NC-SA www.ifixit.com Page 1 of 14 INTRODUCTION Restore sound to your mini by replacing the speaker. TOOLS: Jimmy (1) Phillips
MAIN PARTS
 MAIN PARTS 7 8 9 10 11 12 13 1 2 3 17 4 5 6 01 02 03 04 05 12 23 34 45 56 13 24 35 46 57 14 25 36 47 58 15 16 26 27 37 38 48 49 59 60 06 07 08 09 10 17 18 28 29 39 40 50 51 61 62 19 30 41 52 63 20 21 31
DIY KITS FRAME KIT. Thank you for purchasing a 3DR Y6 DIY Kit!
 DIY KITS Y6 FRAME KIT Thank you for purchasing a 3DR Y6 DIY Kit! These instructions will guide you through assembling and wiring your new autonomous multicopter. CONTENTS Your 3DR Y6 Kit contains: 35 mm
Written By: Brook Drumm
 Simple 1401 Assembly For kits produced between 1/15/14-6/1/14. This guide is for kits with the Fan Shroud. Instructions for metal and wood extruder (and bed) included below. Written By: Brook Drumm TOOLS:
Never power this piano with anything other than a standard 9V battery!
 Welcome to the exciting world of Digital Electronics! Who is this kit intended for? This kit is intended for anyone from ages 13 and above and assumes no previous knowledge in the field of hobby electronics.
100mm (3in) Slide Stop Cut to 6mm (1/4in) Sections. Quantity: mm (10in) Skewers Quanity: 10. Material to Lift. Material for Blades.
 Slide Stop Cut to 6mm (1/4in) Sections. Quantity: mm (10in) Skewers Quanity: 10. Material to Lift. Material for Blades.") Wind Lift Page 1 The Activity This guide will take you through the process of creating a wind powered lift. You ll start by creating the stand. The lift mechanism, hub and blades are then added. Before
Wind Lift Page 1 The Activity This guide will take you through the process of creating a wind powered lift. You ll start by creating the stand. The lift mechanism, hub and blades are then added. Before
BABY WOLF LOOM. Assembly Instructions for Knocked-Down Looms
 BABY WOLF LOOM Assembly Instructions for Knocked-Down Looms BEFORE YOU BEGIN Please read through the directions before beginning to assemble your loom. Unpack the loom parts carefully. Do not throw away
Instructions for Lighting an S Scale Caboose
 Instructions for Lighting an S Scale Caboose The S Scale Caboose lighting kit is adaptable for most caboose models of rolling stock including American Flyer (TM) and contains the same components as found
Beautiful Bouquet. Designed by Heidi Pridemore. Page All Rights Reserved The Whimsical Workshop
 O - 3/5/12 Designed by Heidi Pridemore #FR-032 Fabric Requirements: 1/3 yard of Green- for all 1/3 yard of Yellow- Daisy 1/3 yard of Orange- Daisy 1/4 yard of Pink- Poppy 1/4 yard of Yellow Print- Poppy
Obtained from Omarshauntedtrail.com
 http://www.scary-terry.com/dancskele/dancskele.htm This is a how-to for making a set of dancing skeletons for your Halloween window display. It uses a pair of cheap, glow-in-the-dark plastic skeletons
TOTT Hair Bow Instructions Ribbon Covered Snap Clips These instructions may not be reproduced or copied. Hair Bows made using these instructions MAY
 Supplies & Tools Ribbon and supplies may be purchased from: http://www.theribbonretreat.com Hair Bow Making Tip Hair Bow Maker Ribbon Barrettes & Clips Cutting Mat Scissors Hi-Temp Glue Gun Glue Sticks
ESRA III. Expressive System for Robotic Animation
 ESRA III Expressive System for Robotic Animation 1 ESRA III Kit Contents 1 Hitec Servos 8 Upper Eye Support 2 Dagu (New as of 7/12) 9 Lower Eye Support 3 Eye Balls 10 Main Support 4 Flat Servo Plate 11
Motorized Balancing Toy
 Motorized Balancing Toy Category: Physics: Force and Motion, Electricity Type: Make & Take Rough Parts List: 1 Coat hanger 1 Motor 2 Electrical Wire 1 AA battery 1 Wide rubber band 1 Block of wood 1 Plastic
Patton Robotics ESRA II Expressive System for Robotic Animation
 Patton Robotics ESRA II Expressive System for Robotic Animation Assembly and Operation Instructions Version 1.0 Patton Robotics, LLC. 61 Hagan Drive New Hope, PA 18938 Copyright 2015 Patton Robotics, LLC.
SuperTrack Parts List
 SuperTrack Parts List [indicates number for 6 lane tracks] SuperTrack Installation Instructions www.supertimer.com 1-800-654-2088 1 Track Instruction Manual (this booklet) 2 Start sections [3] Start Gate
Z-Truck Up-and-Down Motion. Y-Truck Side-to-Side Motion. Head. Squaring Plate. Sliding Plate FIGURE 1: THE CARVEWRIGHT MACHINE
 Setup and use of CarveWright CO2 Powered Dragster Jig The CO 2 powered Dragster Jig will arrive from the factory fully assembled, calibrated, and squared. In order to get the best results, your CarveWright
Volkswagen Window Regulator Repair
 The tools you will need to complete the repair will be a T20 Torx screwdriver and a Flat Screwdriver additionally, you could also use a pair of pliers to remove the plastic plug holding the wire nearest
Sentinel Series Cigar Humidor End Tables
 Sentinel Series Cigar Humidor End Tables Assembly Instructions Models: Sentinel 500, 1000 and 1500 Style: Traditional SENTINEL ASSEMBLY INSTRUCTIONS Congratulations! You have purchased a superior cigar
Efflorescence by Amanda Greene / #82010 / 45 Designs
 Note: Some designs in this collection may have been created using unique special stitches and/or techniques. To preserve design integrity when rescaling or rotating designs in your software, always rescale
EmagiKit. Privacy Pod Plus. Quiet. Easy. Affordable. INSTRUCTIONS ASSEMBLY
 EmagiKit Privacy Pod Plus Quiet. Easy. Affordable. INSTRUCTIONS ASSEMBLY DIMENSIONS AND COMPONENTS 47 47 Ceiling Unit 2-B 2-L 2-R Glass Door Corner Trim Door Handle 90 Adjustable Height Work Surface 1-B
TOYOTA COROLLA EC REARVIEW MIRROR Section I Installation Preparation
 Section I Installation Preparation Part Number: PT374-02030 Section I Installation Preparation Kit Contents Item # Quantity Reqd. Description 1 1 AD Mirror Assembly w/compass & Maplights 2 1 Hardware Bag
How To Measure Your Finished Opening
 3000 Series Bifold Doors How To Measure Your Finished Opening MEASURE FROM RIGHT TO LEFT 2 PLACES (WIDTH) MEASURE FROM TOP TO BOTTOM 2 PLACES (HEIGHT) Tools Required for Assembly: Tools Needed: Phillips
MOTOR & BULK HEAD. A Manual for Repair and Maintenance Technicians
 MOTOR & BULK HEAD A Manual for Repair and Maintenance Technicians CAUTION This manual is designed to help technicians who are already experienced in workshop procedures and know how to handle tools. Only
iphone 6 Chargeport REPAIR GUIDE Version Edition
 iphone 6 Chargeport REPAIR GUIDE Version 1 2016 Edition IPHONE 6 CHARGEPORT REPAIR GUIDE LCD AND DIGITIZER REPLACEMENT RiAna Soto Repair Training Specialist rsoto@cellairis.com FOR EVERY REPAIR MAKE SURE
Open Air. Kit includes: Drawer Full Indicator board assembly, (2) retainers, and (4) screws. PREPARATION
 retainers, and (4) screws. PREPARATION") Open Air Installation Video You will need: 8-inch #2 Phillips screwdriver Needle-nose pliers DFI INSTALLATION GUIDE For installation videos, visit the Customer Service playlist at www.youtube.com/user/thelitterrobot
Open Air Installation Video You will need: 8-inch #2 Phillips screwdriver Needle-nose pliers DFI INSTALLATION GUIDE For installation videos, visit the Customer Service playlist at www.youtube.com/user/thelitterrobot
RADIO ANTI TWO-BLOCK SYSTEM
 BB-550 TM RADIO ANTI TWO-BLOCK SYSTEM INSTALLATION MANUAL GREER Company 1918 East Glenwood Place, Santa Ana, CA 92705 Tel: (714) 259-9702 FAX (714) 259-7626 BB-550 TM Radio Anti Two-Block System PN W250000
#11179 Wellington ARBOR
 #11179 Wellington ARBOR Assembly INSTRUCTIONS TOOLS NEEDED Tape Measure Variable Speed Drill with #2 Phillips Bit (recommended) or Phillips Screwdriver Hammer or Mallet ARBOR SIDE PANEL ASSEMBLY (Refer
Art Robot Module STEMinistas (Sixth, Seventh, and Eighth Grade)
") Art Robot Module STEMinistas (Sixth, Seventh, and Eighth Grade) Module Rationale: Students become electrical engineering artists through the challenge of constructing an artcreating robot from simple circuits.
Art Robot Module STEMinistas (Sixth, Seventh, and Eighth Grade) Module Rationale: Students become electrical engineering artists through the challenge of constructing an artcreating robot from simple circuits.
Chatelaine. Read on for project instructions to create a beautiful and useful chatelaine! Chatelaine
 Chatelaine Chatelaines have a long history, dating back to the 18th century. A chatelaine is a decorative belt hook or clasp worn at the waist with a series of chains (or cords, in this project) suspended